-
- 3.1. Syntax
-
- 7.1. The modulo operation
-
- 11.1. The classic "off by one" error
- 11.2. Using indexOf
-
- 14.1. Logical NOT
- 14.2. Logical AND
- 14.3. Logical OR
- 14.4. Logical order of operations
-
- 20.1. Declaring a variable
- 20.2. Assigning a variable
-
- 21.1. Assignment Shorthand
-
- 24.1. Function Declaration
-
- 25.1. Order of code
- 25.2. An average example
-
- 29.1. Extra arguments
- 29.2. Not enough arguments
-
- 36.1. While Loops
- 36.2. Important Loop Knowledge
- 36.3. For Loops
-
- 41.1. Containing data in arrays
- 41.2. Using indexOf with arrays
-
- 44.1. A peek under the hood
-
- 55.1. Using splice to remove
- 55.2. Using splice to insert
- 55.3. Using splice like a pro
-
- 80.1. Essential terminology
-
- 81.1. Navigation commands
- 81.2. Directory Shortcuts
-
- 92.1. Chrome
- 92.2. Xcode
- 92.3. Homebrew
- 92.4. Node.js & NPM
- 92.5. VS Code
- 92.6. Mocha testing framework
- 92.6.1. Installing Mocha
- 92.7. Installing Python3
-
- 95.1. Using the Node REPL
- 95.2. Using JavaScript Files
-
- 101.1. Keys without values
- 101.2. Using variables as keys
-
- 102.1. Bracket notation vs Dot notation
- 102.2. Putting it all together
- 102.3. Operator precedence revisited
-
- 109.1. Mutability
-
- 113.1. Spreading elements
- 113.2. Spreading arguments
-
- 119.1. The Driver
- 119.2. The Navigator
- 119.3. Both roles
-
- 123.1. Partner up
- 123.2. Check-in
- 123.3. Get coding!
- 123.4. Hand off
- 123.5. Follow-up
-
- 126.1. Applying empathy to pair programming
- 126.2. When empathy goes awry
- 126.3. Applying empathy to your code
-
- 134.1. Global scope
- 134.2. Local scope
- 134.3. Block scope
- 134.4. Scope chaining: variables and scope
- 134.5. Lexical scope
-
- 137.1. Function-scoped variables
- 137.2. Block-scoped variables
- 137.2.1. Using the keyword
let - 137.2.2. Using the keyword
const - 137.2.3. Hoisting with block-scoped variables
- 137.2.1. Using the keyword
- 137.3. Function scope vs. block scope
-
- 138.1. What you learned
-
- 140.1. Private State
- 140.2. Passing Arguments Implicitly
-
- 146.1. Anatomy of an arrow function
- 146.1.1. Single expression arrow functions
- 146.1.2. Syntactic ambiguity with arrow functions
- 146.1.3. Arrow functions are anonymous
- 146.1. Anatomy of an arrow function
-
- 153.1. Synchronous
- 153.2. Asynchronous
- 153.2.1. Can't believe it's async?
-
- 160.1. Single-threaded
- 160.2. Multi-threaded
-
- 166.1. The message queue
-
- 172.1. checkGuess
- 172.2. askGuess
-
- 173.1. randomInRange
- 173.2. askRange
-
- 174.1. Limiting turns to 5
- 174.2. Limiting turns dynamically
-
- 176.1. Global vs Window
- 176.2. Document
- 176.3. Location
- 176.4. Require and module.exports
-
- 178.1. Creating a new file
- 178.2. Reading existing files
-
- 181.1. Git?
-
- 182.1. See the world through Git's eyes
- 182.2. Tracking changes in a repository
- 182.3. Branches and workflow
- 182.4. Bringing it back together
-
- 183.1. Collaboration via Git and GitHub
- 183.2. Merging your code on GitHub
-
- 185.1. Diff options
-
- 186.1. Why checkout?
-
- 193.1.
master - 193.2.
working-on-the-header(our feature branch)
- 193.1.
-
- 203.1. The product owner
- 203.2. The Scrum master
- 203.3. The development team
-
- 204.1. The product backlog
- 204.2. Sprints
- 204.3. Sprint planning
-
- 205.1. Daily scrum
- 205.2. Done
- 205.3. Show and tell
- 205.4. Sprint retrospective
-
- 209.1. The metronome effect
-
- 211.1. The evolution of done
- 211.2. Done and "done done"
-
- 215.1. The card
- 215.2. The conversation
- 215.3. The confirmation
-
- 217.1. Celebrate your independence
- 217.2. Negotiate for profit
- 217.3. Valuable for everyone
- 217.4. Estimations are the lifeblood of prediction
- 217.5. Small enough to accomplish
- 217.6. Test makes the world go 'round
-
- 220.1. Creating a dictionary
- 220.2. Censoring Sentences
-
- 236.1. Parts of the terminal
- 236.2. A few quick tricks
- 236.3. Understanding directories
-
- 237.1. Where am I?
- 237.2. A closer look at our contents
- 237.3. Navigating directories
- 237.4. A caveat
-
- 238.1. Creating new files & directories
- 238.2. Manipulating existing files
- 238.3. Clean up: aisle
~!
-
- 240.1. Common
grepoptions
- 240.1. Common
-
- 243.1. Why a terminal editor?
-
- 246.1. Selling C shells by the seashore
- 246.2. Shells vs Terminals
- 246.3. Shell Prompts
- 246.4. Two purposes
- 246.5. From the command line to the screen
-
- 247.1. Startup files
- 247.2. Bash startup files
- 247.3. Zsh startup files
-
- 248.1. macOS
- 248.2. Windows using WSL
- 248.3. Ubuntu Linux
- 248.4. Visual Studio Code
- 248.5. Whew this seems complicated, can
you just tell me which file to use?
- 248.5.1. macOS Catalina with Zsh
- 248.5.2. macOS pre-Catalina with Bash
- 248.5.3. Ubuntu Linux
- 248.5.4. Windows with WSL
- 248.6. Customization options
-
- 250.1. Selling C shells by the seashore
- 250.2. Shells vs Terminals
- 250.3. Shell Prompts
- 250.4. Two purposes
- 250.5. From the command line to the screen
-
- 251.1. Startup files
- 251.2. Bash startup files
- 251.3. Zsh startup files
-
- 252.1. macOS
- 252.2. Windows using WSL
- 252.3. Ubuntu Linux
- 252.4. Visual Studio Code
- 252.5. Whew this seems complicated,
can you just tell me which file to use?
- 252.5.1. macOS Catalina with Zsh
- 252.5.2. macOS pre-Catalina with Bash
- 252.5.3. Ubuntu Linux
- 252.5.4. Windows with WSL
- 252.6. Customization options
-
- 254.1. Numeric permission notation
- 254.2. Modifying permissions
- 254.3. Ignoring permissions entirely with sudo
-
- 255.1. Script requirements
- 255.2. A sample script
- 255.3. Updating & running a script
-
- 257.1. A note on language
-
- 261.1. London Stack is falling down!
- 261.2. Step by step
- 261.3. Types of recursion
-
- 373.1. Special delivery!
- 373.2. Package managers
-
- 375.1. Just the basics
-
- 377.1. Get the right package every time
- 377.2. Ask...
- 377.3. ...and you shall receive!
-
- 379.1. Creating version ranges
-
- 408.1. Defining an instance method
- 408.2. Instance methods and prototypes
- 408.3. Defining a static method
- 408.4. Static methods and constructor functions
-
- 417.1. Core and third-party modules
- 417.2. The CommonJS module system
-
- 420.1. The
require()function - 420.2. Using destructuring when importing
- 420.1. The
-
- 422.1. Module loading logic
- 422.2. Module loading process
-
- 439.1. Main menu
- 439.2. Category management
- 439.3. Editing a category
- 439.4. To-do item search screen
- 439.5. To-do item search results
- 439.6. To-do items list
- 439.7. To-do item detail screen
- 439.8. To-do item create screen
- 439.8.1. Create a note
- 439.8.2. Create a task - step 1
- 439.8.3. Create a task - step 2
- 439.8.4. Create a task - step 3
-
- 443.1. HT-: HyperText
- 443.2. -TP: Transfer Protocol
-
- 445.1. Reliable connections
- 445.2. Stateless transfer
- 445.3. Intermediaries
-
- 449.1. Request-line & HTTP verbs
- 449.2. Headers
- 449.3. Body
-
- 453.1. Status
- 453.1.1. Status codes 100 - 199: Informational
- 453.1.2. Status codes 200 - 299: Successful
- 453.1.3. Status codes 300 - 399: Redirection
- 453.1.4. Status codes 400 - 499: Client Error
- 453.1.5. Status codes 500 - 599: Server Error
- 453.2. Headers
- 453.3. Body
- 453.1. Status
-
- 457.1. Phase 2a: Start small
- 457.2. Phase 2b: Rinse, repeat
-
- 479.1. A word about fetch
- 479.2. As you go along
-
- 480.1. Just failing to get a URL
-
- 481.1. Predefined options
- 481.2. Url from command-line
- 481.3. Help message
-
- 484.1. Setting special headers
-
- 497.1. These things called "tags"
- 497.2. These things called "elements"
- 497.3. These things called "attributes"
-
- 502.1. The unordered list
- 502.2. The ordered list
-
- 511.1. Using Callbacks and XMLHttpRequest
- 511.2. Back to the code
-
- 518.1. Using a callback
- 518.2. Using a Promise
- 518.3. Using async/await
-
- 520.1. Testing frameworks vs Assertion libraries
- 520.2. Mocha
-
- 521.1. Test the public interface
- 521.2. The testing pyramid
-
- 527.1. Creating your own errors
- 527.2. Throwing your own errors
-
- 528.1. SyntaxError
- 528.2. ReferenceError
- 528.3. TypeError
- 528.4. Catching known errors
-
- 532.1. Organizing tests
- 532.2. Testing errors
-
- 534.1. Introducing Mocha Hooks
- 534.2. Using the
beforeEachMocha Hook - 534.3. Using Chai Spies
- 534.4. Testing static methods on classes
-
- 543.1. The first body request test
- 543.2. The second body request test
-
- 544.1. The first test
- 544.2. The second test
- 544.3. The third test
- 544.4. The fourth test
- 544.5. The fifth test
-
- 545.1. The first test
- 545.2. The second test
- 545.3. The third test
-
- 550.1. The first test
- 550.2. The second test
- 550.3. The third test
- 550.4. The fourth test
-
- 567.1. Simplifying Math Terms
- 567.2. Simplifying a Product
- 567.3. Simplifying a Sum
- 567.4. Putting it all together
-
- 569.1. O(1) - Constant
- 569.1.1. Constant growth
- 569.1.2. Example Constant code
- 569.2. O(log(n)) - Logarithmic
- 569.2.1. Logarithmic growth
- 569.2.2. Example logarithmic code
- 569.3. O(n) - Linear
- 569.3.1. Linear growth
- 569.3.2. Example linear code
- 569.4. O(n * log(n)) - Loglinear
- 569.4.1. Loglinear growth
- 569.4.2. Example loglinear code
- 569.5. O(nc) - Polynomial
- 569.5.1. Polynomial growth
- 569.5.2. Example polynomial code
- 569.6. O(cn) - Exponential
- 569.6.1. Exponential growth
- 569.6.2. Exponential code example
- 569.7. O(n!) - Factorial
- 569.7.1. Factorial growth
- 569.7.2. Factorial code example
- 569.1. O(1) - Constant
-
- 576.1. The Tabulation Formula
-
- 590.1. Partition
-
- 601.1. Space Complexity: O(1)
-
- 606.1. Time Complexity: O(n log(n))
- 606.2. Space Complexity: O(n)
- 606.3. When should you use Merge Sort?
- 606.4. Quicksort Sort JS Implementation
-
- 607.1. Time Complexity
- 607.2. Space Complexity
- 607.3. When should you use Quick Sort?
- 607.4. Binary Search JS Implementation
-
- 608.1. Time Complexity: O(log(n))
- 608.2. Space Complexity: O(n)
- 608.3. When should we use Binary Search?
-
- 619.1. Scenarios:
- 619.2. Discussion:
-
- 620.1. Scenarios:
- 620.2. Discussion:
- 620.3. NOTE:
-
- 621.1. Scenarios:
- 621.2. Discussion:
- 621.3. NOTE:
-
- 631.1. Complete Trees
- 631.2. When to Use Heaps?
-
- 632.1. Insert
- 632.2. DeleteMax
- 632.3. Time Complexity Analysis
- 632.3.1. Array Heapify Analysis
- 632.4. Space Complexity Analysis
- 632.5. Insert
- 632.6. DeleteMax
- 632.7. Time Complexity Analysis
- 632.7.1. Array Heapify Analysis
- 632.8. Space Complexity Analysis
-
- 634.1. Heapify
- 634.2. Construct the Sorted Array
- 634.3. In-Place Heap Sort JavaScript Implementation
-
- 640.1. Simplifying Math Terms
- 640.2. Simplifying a Product
- 640.3. Simplifying a Sum
- 640.4. Putting it all together
-
- 642.1. O(1) - Constant
- 642.1.1. Constant growth
- 642.1.2. Example Constant code
- 642.2. O(log(n)) - Logarithmic
- 642.2.1. Logarithmic growth
- 642.2.2. Example logarithmic code
- 642.3. O(n) - Linear
- 642.3.1. Linear growth
- 642.3.2. Example linear code
- 642.4. O(n * log(n)) - Loglinear
- 642.4.1. Loglinear growth
- 642.4.2. Example loglinear code
- 642.5. O(nc) - Polynomial
- 642.5.1. Polynomial growth
- 642.5.2. Example polynomial code
- 642.6. O(cn) - Exponential
- 642.6.1. Exponential growth
- 642.6.2. Exponential code example
- 642.7. O(n!) - Factorial
- 642.7.1. Factorial growth
- 642.7.2. Factorial code example
- 642.1. O(1) - Constant
-
- 649.1. The Tabulation Formula
-
- 663.1. Partition
-
- 674.1. Space Complexity: O(1)
-
- 679.1. Time Complexity: O(n log(n))
- 679.2. Space Complexity: O(n)
- 679.3. When should you use Merge Sort?
- 679.4. Quicksort Sort JS Implementation
-
- 680.1. Time Complexity
- 680.2. Space Complexity
- 680.3. When should you use Quick Sort?
- 680.4. Binary Search JS Implementation
-
- 681.1. Time Complexity: O(log(n))
- 681.2. Space Complexity: O(n)
- 681.3. When should we use Binary Search?
-
- 692.1. Scenarios:
- 692.2. Discussion:
-
- 693.1. Scenarios:
- 693.2. Discussion:
- 693.3. NOTE:
-
- 694.1. Scenarios:
- 694.2. Discussion:
- 694.3. NOTE:
-
- 704.1. Complete Trees
- 704.2. When to Use Heaps?
-
- 705.1. Insert
- 705.2. DeleteMax
- 705.3. Time Complexity Analysis
- 705.3.1. Array Heapify Analysis
- 705.4. Space Complexity Analysis
- 705.5. Insert
- 705.6. DeleteMax
- 705.7. Time Complexity Analysis
- 705.7.1. Array Heapify Analysis
- 705.8. Space Complexity Analysis
-
- 707.1. Heapify
- 707.2. Construct the Sorted Array
- 707.3. In-Place Heap Sort JavaScript Implementation
-
- 714.1. Simplifying Math Terms
- 714.2. Simplifying a Product
- 714.3. Simplifying a Sum
- 714.4. Putting it all together
-
- 716.1. O(1) - Constant
- 716.1.1. Constant growth
- 716.1.2. Example Constant code
- 716.2. O(log(n)) - Logarithmic
- 716.2.1. Logarithmic growth
- 716.2.2. Example logarithmic code
- 716.3. O(n) - Linear
- 716.3.1. Linear growth
- 716.3.2. Example linear code
- 716.4. O(n * log(n)) - Loglinear
- 716.4.1. Loglinear growth
- 716.4.2. Example loglinear code
- 716.5. O(nc) - Polynomial
- 716.5.1. Polynomial growth
- 716.5.2. Example polynomial code
- 716.6. O(cn) - Exponential
- 716.6.1. Exponential growth
- 716.6.2. Exponential code example
- 716.7. O(n!) - Factorial
- 716.7.1. Factorial growth
- 716.7.2. Factorial code example
- 716.1. O(1) - Constant
-
- 723.1. The Tabulation Formula
-
- 737.1. Partition
-
- 748.1. Space Complexity: O(1)
-
- 753.1. Time Complexity: O(n log(n))
- 753.2. Space Complexity: O(n)
- 753.3. When should you use Merge Sort?
- 753.4. Quicksort Sort JS Implementation
-
- 754.1. Time Complexity
- 754.2. Space Complexity
- 754.3. When should you use Quick Sort?
- 754.4. Binary Search JS Implementation
-
- 755.1. Time Complexity: O(log(n))
- 755.2. Space Complexity: O(n)
- 755.3. When should we use Binary Search?
-
- 766.1. Scenarios:
- 766.2. Discussion:
-
- 767.1. Scenarios:
- 767.2. Discussion:
- 767.3. NOTE:
-
- 768.1. Scenarios:
- 768.2. Discussion:
- 768.3. NOTE:
-
- 778.1. Complete Trees
- 778.2. When to Use Heaps?
-
- 779.1. Insert
- 779.2. DeleteMax
- 779.3. Time Complexity Analysis
- 779.3.1. Array Heapify Analysis
- 779.4. Space Complexity Analysis
- 779.5. Insert
- 779.6. DeleteMax
- 779.7. Time Complexity Analysis
- 779.7.1. Array Heapify Analysis
- 779.8. Space Complexity Analysis
-
- 781.1. Heapify
- 781.2. Construct the Sorted Array
- 781.3. In-Place Heap Sort JavaScript Implementation
-
- 788.1. Simplifying Math Terms
- 788.2. Simplifying a Product
- 788.3. Simplifying a Sum
- 788.4. Putting it all together
-
- 790.1. O(1) - Constant
- 790.1.1. Constant growth
- 790.1.2. Example Constant code
- 790.2. O(log(n)) - Logarithmic
- 790.2.1. Logarithmic growth
- 790.2.2. Example logarithmic code
- 790.3. O(n) - Linear
- 790.3.1. Linear growth
- 790.3.2. Example linear code
- 790.4. O(n * log(n)) - Loglinear
- 790.4.1. Loglinear growth
- 790.4.2. Example loglinear code
- 790.5. O(nc) - Polynomial
- 790.5.1. Polynomial growth
- 790.5.2. Example polynomial code
- 790.6. O(cn) - Exponential
- 790.6.1. Exponential growth
- 790.6.2. Exponential code example
- 790.7. O(n!) - Factorial
- 790.7.1. Factorial growth
- 790.7.2. Factorial code example
- 790.1. O(1) - Constant
-
- 797.1. The Tabulation Formula
-
- 811.1. Partition
-
- 822.1. Space Complexity: O(1)
-
- 827.1. Time Complexity: O(n log(n))
- 827.2. Space Complexity: O(n)
- 827.3. When should you use Merge Sort?
- 827.4. Quicksort Sort JS Implementation
-
- 828.1. Time Complexity
- 828.2. Space Complexity
- 828.3. When should you use Quick Sort?
- 828.4. Binary Search JS Implementation
-
- 829.1. Time Complexity: O(log(n))
- 829.2. Space Complexity: O(n)
- 829.3. When should we use Binary Search?
-
- 840.1. Scenarios:
- 840.2. Discussion:
-
- 841.1. Scenarios:
- 841.2. Discussion:
- 841.3. NOTE:
-
- 842.1. Scenarios:
- 842.2. Discussion:
- 842.3. NOTE:
-
- 852.1. Complete Trees
- 852.2. When to Use Heaps?
-
- 853.1. Insert
- 853.2. DeleteMax
- 853.3. Time Complexity Analysis
- 853.3.1. Array Heapify Analysis
- 853.4. Space Complexity Analysis
- 853.5. Insert
- 853.6. DeleteMax
- 853.7. Time Complexity Analysis
- 853.7.1. Array Heapify Analysis
- 853.8. Space Complexity Analysis
-
- 855.1. Heapify
- 855.2. Construct the Sorted Array
- 855.3. In-Place Heap Sort JavaScript Implementation
Web Dev Basics
1. TOC
2. Intro To JS
WEEK 1
Introduction to JavaScript (Part 1)
Expression Learning Objectives
Intro to Functions Learning Objectives
- Hello World
- The Number Type
- The String Type
- The Boolean Type
- Comparison Operators
- Basic Variables
- Introduction to Functions
- Parameters and Arguments
- Control Flow - Conditional Statements
- Mutually Exclusive Conditions
- Control Flow - Looping
- The Array Type
- Function Expressions
- Two-Dimensional Arrays (2D Arrays)
- Mutability in JavaScript
- Array Splice
- String#split and Array#join
- Determining Types
- The Null Type (And Undefined)
- Catch Me If You Can
WEEK-01 DAY-1
Function Introduction
Expression Learning Objectives
Below is a complete list of the terminal learning objectives for this lesson.
When you complete this lesson, you should be able to perform each of the
following objectives. These objectives capture how you may be evaluated on the
assessment for this lesson.
- Given a working REPL interface, write and execute a statement that will print
“hello world” using console.log - Identify that strings are a list of characters defined by using double or
single quotes - Given an arithmetic expression using +, -, *, /, %, compute its value
- Given an expression, predict if its value is NaN
- Construct the truth tables for &&, ||, !
- Given an expression consisting of >, >=, ===, <, <=, compute it’s value
- Apply De Morgan’s law to a boolean expression
- Given an expression that utilizes operator precedence, compute its value
- Given an expression, use the grouping operator to change it’s evaluation
- Given expressions using == and ===, compute their values
- Given a code snippet using postfix ++, postfix --, +=, -=, /=, *=, predict
the value of labeled lines - Create and assign a variable using
letto a string, integer, and a
boolean. Read its value and print to the console.l learning objectives for this lesson.
When you complete this lesson, you should be able to perform each of the
following objectives. These objectives capture how you may be evaluated on the
assessment for this lesson. - Given a working REPL interface, write and execute a statement that will print
“hello world” using console.log - Identify that strings are a list of characters defined by using double or
single quotes - Given an arithmetic expression using +, -, *, /, %, compute its value
- Given an expression, predict if its value is NaN
- Construct the truth tables for &&, ||, !
- Given an expression consisting of >, >=, ===, <, <=, compute it’s value
- Apply De Morgan’s law to a boolean expression
- Given an expression that utilizes operator precedence, compute its value
- Given an expression, use the grouping operator to change it’s evaluation
- Given expressions using == and ===, compute their values
- Given a code snippet using postfix ++, postfix --, +=, -=, /=, *=, predict
the value of labeled lines - Create and assign a variable using
letto a string, integer, and a
boolean. Read its value and print to the console.
Intro to Functions Learning Objectives
Below is a complete list of the terminal learning objectives for this lesson.
When you complete this lesson, you should be able to perform each of the
following objectives. These objectives capture how you may be evaluated on the
assessment for this lesson.
- Define a function using function declaration
- Define a function that calculates the average of two numbers, call it,
pass in arguments, and print it’s return value - Identify the difference between parameters vs argument terminal learning objectives for this lesson.
When you complete this lesson, you should be able to perform each of the
following objectives. These objectives capture how you may be evaluated on the
assessment for this lesson. - Define a function using function declaration
- Define a function that calculates the average of two numbers, call it,
pass in arguments, and print it’s return value - Identify the difference between parameters vs arguments
Hello World
Hey Programmer! Welcome to the JavaScript module. In the next few sections,
we'll be learning the fundamentals of the JavaScript programming language. If
it's your first time programming, don't worry; we designed this course
especially for you. We'll have you executing your first lines of code in no
time!
When you finish this article, you should be able to:
- use the
console.logcommand to print out messages - use double slashes (
//) to write code comments
3. Getting visual feedback in your programs
The first command we'll learn in JavaScript is console.log. This command is
used to print something onto the screen. As we write our first lines of code,
we'll be using console.log frequently as a way to visually see the output of
our programs. Let's write our first program:
console.log("hello world");
console.log("how are you?");
Executing the program above would print out the following:
hello world
how are you?
Nothing too ground breaking here, but pay close attention to the exact way we
wrote the program. In particular, notice how we lay out the periods,
parentheses, and quotation marks. We'll also terminate lines with semicolons
(😉.
Depending on how you structure your code, sometimes you'll be able to omit
semicolons at the end of lines. For now, you'll want to include them
just as we do.
3.1. Syntax
We refer to the exact arrangement of the symbols, characters, and keywords as
syntax. These details matter - your computer will only be able to
"understand" proper JavaScript syntax. A programming language is similar to a
spoken language. A spoken language like English has grammar rules that we should
follow in order to be understood by fellow speakers. In the same way, a
programming language like JavaScript has syntax rules that we ought to follow!
As you write your first lines of code in this new language, you may make many
syntax errors. Don't get frustrated! This is normal - all new programmers go
through this phase. Every time we recognize an error in our code, we have an
opportunity to reinforce your understanding of correct syntax. Adopt a growth
mindset and learn from your mistakes.
Additionally, one of the best things about programming is that we can get such
immediate feedback from our creations. There is no penalty for making a mistake
when programming. Write some code, run the code, read the errors, fix the
errors, rinse and repeat!
4. Code comments
Occasionally we'll want to leave comments or notes in our code. Commented
lines will be ignored by our computer. This means that we can use comments to
write plain english or temporarily avoid execution of some JavaScript lines. The
proper syntax for writing a comment is to begin the line with double forward
slashes (//):
// let's write another program!!!
console.log("hello world");
// console.log("how are you?");
console.log("goodbye moon");
The program above would only print:
hello world
goodbye moon
Comments are useful when annotating pieces of code to offer an explanation of
how the code works. We'll want to strive to write straightforward code that is
self-explanatory when possible, but we can also use comments to add additional
clarity. The real art of programming is to write code so elegantly that it is
easy to follow.
"Simplicity is prerequisite for reliability." — Edsger W. Dijkstra
5. What you've learned
console.logcan be used to print to the screen- using
//at the front of a line will turn it into a comment; comments are
ignored by JavaScript
The Number Type
The Number data type in JavaScript does exactly what you expect! It is used
to represent any numerical values, this includes integers and decimal numbers.
As one of our first data types, we'll be interested in what operations we can
use with numbers.
When you finish this article, you should be able to:
- predict the evaluation of arithmetic expressions
- explain the order of operations for JavaScript's arithmetic operators
- use the grouping operator,
(), to manipulate the order of operations in an
expression
6. All the numbers
JavaScript's Number encompasses numerical values. All of the following values are of number type:
42;
-5;
3.14159;
7.0;
7. The basic arithmetic operators
For any given data type, we're interested in what operations we can perform with
that type. We use the word operator to refer to the symbol that performs a
particular operation. For example, the + operator performs the addition
operation. Here are the common arithmetic operators in JS:
+(addition)-(subtraction)*(multiplication)/(division)%(modulo)
With number values and arithmetic operators in hand, we can evaluate our first
expressions:
console.log(2 + 3); // => 5
console.log(42 - 42); // => 0
console.log(-4 * 1.5); // => -6
console.log(25 / 8); // => 3.125
Nothing too groundbreaking about the results above. An expression consists of
values and operators. JavaScript will evaluate an expression into a single
value.
We can write more complex expressions using multiple operators. However, we'll
want to be aware of the general math order of operations. That is, we perform
multiplication-division operations first and then addition-subtraction
operations. To force a specific order of operation, we can use the grouping
operator, ( ), around a part of the expression:
console.log(5 * 3 + 2); // => 17
console.log(2 + 3 * 5); // => 17
console.log((2 + 3) * 5); // => 25
7.1. The modulo operation
All of the math operators listed above are the simple operations you use
everyday, except for maybe modulo %. Modulo gives us the remainder that
results from a division. For example, 10 % 3 is 1 because when we divide 10
by 3, we are left with a remainder of 1. We can read 10 % 3 as "ten modulo
three" or "ten mod three."
console.log(10 % 3); // => 1
console.log(14 % 5); // => 4
console.log(20 % 17); // => 3
console.log(18 % 6); // => 0
console.log(7 % 9); // => 7
Modulo is a very useful operation in the realm of computers. We can use it to
check the divisibility of numbers, whether numbers are even, whether they are
prime, and much, much more. Don't take this seemingly simple operation from
granted! We'll provide a ton of practice using these modulo patterns as we move through the course.
In the order of operations, modulo has the the same precedence as
multiplication-division. So our complete order of math operations in JS is
parentheses, multiplication-division-modulo, addition-subtraction.
// modulo has precedence over addition
console.log(4 + 12 % 5); // => 6
console.log((4 + 12) % 5); // => 1
8. What you've learned
- The Number type is used to represent integer and decimal values
- The operators
+,-,/,*perform the normal math operations of
addition, subtraction, division, multiplication respectively a % breturns the remainder when we divideabyb; we call this
operation modulo- JavaScript follows the usual mathematical order of operations and we can use
the()to force precedence
The String Type
This article is about one of JavaScript's primitive data types, String.
Strings are what we'll use to represent textual data. This means that strings
are useful in representing things like messages, names, poems, and so on. A
string is a sequence of characters.
When you finish this article, you should be able to:
- Write strings using correct syntax
- Use
.lengthto obtain a count of the numbers of characters that comprise a
string - Index a string to refer to a single character
- Concatenate strings together
9. Writing a valid string
Strings are always wrapped by a pair of single quotation marks (') or by a
pair of double quotation marks ("). Between the enclosing quotation marks, we
can put any characters! Here are a six examples of strings:
"potato";
"New York";
"azablan@appacademy.io";
"Follow the yellow brick road, please!";
"365 days a year";
"";
Above, notice that we are free to mix in any characters into a string. This
includes spaces, numerics, punctuation, and other symbols. The sixth string
above is the empty string; it contains zero characters!
You are probably wondering why we are allowed to use either single or double
quotes when denoting a string - why is this useful? Maybe we want a string that
contains quotation marks:
// valid strings
'Shakespeare wrote, "To be or not to be"';
"That's a great string";
// invalid string
'That's a bad string'
If we want to use a single quote as a character of a string, we simply need to
enclose the string in double quotes, and vice versa.
10. Calculating length
Since a single string can contain any number of characters, we may find it
useful to count the number of characters in a string using .length:
console.log("ramen".length); // => 5
console.log("go home!".length); // => 8
console.log("".length); // => 0
11. Indexing a string
Strings consist of multiple characters. These characters are numbered by
indices starting at 0. So in the string 'bootcamp',
'b' is at index 0,
'o' is at index 1, 'o' is at index 2, 't' is
at index 3, and so on. We can
look at particular characters of a string by using [] and specifying an index:
console.log("bootcamp"[0]); // => 'b'
console.log("bootcamp"[1]); // => 'o'
console.log("bootcamp"[2]); // => 'o'
console.log("bootcamp"[3]); // => 't'
console.log("bootcamp"[7]); // => 'p'
console.log("bootcamp"[10]); // => undefined
console.log("bootcamp"[-3]); // => undefined
In general, when we index a string using the expression string[i], we get back
the single character at position i. Looking at the last two examples
above, if we use an invalid index with a string, the value returned is
undefined. This makes since because there is no character at the given
position! It's also worth mentioning that an index should always be a number.
11.1. The classic "off by one" error
Bear in mind that indices begin at 0 and not 1! Forgetting this nuance can lead
to incorrect code for both new and experienced programmers alike. Let's hone in
on an important distinction: the index of the last character of a string is
always one less than it's length.
console.log("cat".length); // => 3
console.log("cat"[3]); // => undefined
console.log("cat"[2]); // => 't'
In other words, although the length of 'cat' is 3, the index of the last
character ('t') is 2.
11.2. Using indexOf
We can also calculate the index of a given character within a string by using
indexOf:
console.log("bagel".indexOf("b")); // => 0
console.log("bagel".indexOf("a")); // => 1
console.log("bagel".indexOf("l")); // => 4
console.log("bagel".indexOf("z")); // => -1
If we attempt to search for a character that is not present in a string,
indexOf will return -1. This makes sense because we know that -1 is not a
valid string index. The smallest index possible is 0!
If we search for a character that appears more than once in a string,
indexOf will return the index of the first occurance of that character.
We can also use indexOf to search for a substring of characters. Under this
circumstance, indexOf will return the index where the substring begins in the
main string:
console.log("door hinge".indexOf("oor")); // => 1
console.log("door hinge".indexOf("hi")); // => 5
console.log("door hinge".indexOf("hint")); // => -1
12. Concatenation
Concatenation is just a fancy word for joining strings together into a single
string. To concatenate strings, we use the + operator:
console.log("hello" + "world"); // => 'helloworld'
console.log("goodbye" + " " + "moon"); // => 'goodbye moon'
13. What you've learned
- a String is a data type that contains multiple characters enclosed in
quotation marks string.lengthreturns the number of characters in thestring- each character of a string is associated with a number index; the first
character of a string is at index 0 - we can use
string.indexOf(char)to obtain the index ofcharwithin
string; ifcharis not found, then -1 is returned - we can use
+to concatenate multiple strings, combining them into a single
string
The Boolean Type
The Boolean data type is perhaps the simplest type since there are only two
possible values, true and false. However, we'll find booleans very useful
because they will act as components of later concepts. As programmers, we'll use
booleans to describe the validity of statements. In an abstract sense, "Today
is Monday" and "one plus one equals ten" are examples of statements with
boolean values. That is, they are either true or false.
When you finish this article, you should be able to:
- predict the evaluation of expressions that use the boolean operations of
!,
||, and&& - explain DeMorgan's law
14. Logical Operators
In the long run, we'll be using booleans to establish logic in our code. For
this reason, the boolean operators can also be referred to as the logical
operators. There are only three such operators:
!(not)&&(and)||(or)
14.1. Logical NOT
The not (!) operator will reverse a boolean value:
console.log(!true); // => false
console.log(!false); // => true
console.log(!!false); // => false
It's worth mentioning that ! is a unary operator. This means that the not
operation is applied to a single value. This is in contrast to a binary operator
such as multiplication, which is applied between two values. It does not make
sense to ! two values together.
14.2. Logical AND
The and (&&) operator will take two boolean values and will only evaluate to
true when both input values are true. Otherwise, it will return false:
console.log(false && false); // => false
console.log(false && true); // => false
console.log(true && false); // => false
console.log(true && true); // => true
14.3. Logical OR
The or (||) operator will take two boolean values and will only evaluate to
false when both input values are false. Otherwise, it will return true:
console.log(false || false); // => false
console.log(false || true); // => true
console.log(true || false); // => true
console.log(true || true); // => true
14.4. Logical order of operations
We can write boolean expressions that consist of multiple logical operations, but we should be aware of the order
of operations. JavaScript will evaluate ! then && then ||.
console.log(true || true && false);    // => true
console.log(false && !(false || true)); // => false
In general, A || B && C is equivalent to A || (B && C) where
A, B, C are booleans.
15. De Morgan's Law
A common mistake in boolean logic is to incorrectly distribute ! across parentheses. Say we had
boolean values of A, B. Here is something to remember:
!(A || B)is equivalent to!A && !B!(A && B)is equivalent to!A || !B
In other words, to correctly distribute!across parentheses, we must also flip the operation within parentheses. Beware that:!(A || B)is not equivalent to!A || !B!(A && B)is not equivalent to!A && !B
We call this property De Morgan's Law. Shout out to Augustus De Morgan of Great Britain.
16. What you've learned
!,&&,||are the boolean operators that we can use to establish logic in our code- De Morgan's Law should be used to distribute
!against parentheses
These are just the basics of the type. We'll be seeing more booleans in the upcoming section, so stay tuned for that!
Comparison Operators
In our previous introduction to the boolean data type, we described booleans as
way to represent the validity of an expression. We'll continue this conversation
by exploring comparison operators. As you learn about these operators, bear
in mind that all comparisons will result in a boolean, true or false.
When you finish this article, you should be able to:
- Predict the result of expressions that utilize the operators
>,<,>=
<=,===, and!== - Explain the difference between the equality operators
==and===
17. The relative comparators
>(greater than)<(less than)>=(greater than or equal to)<=(less than or equal to)===(equal to)!==(not equal to)
Using these operators is pretty straightforward. Here are a few examples:
console.log(10 > 5); // => true
console.log(10 < 5); // => false
console.log(1 < 7); // => true
console.log(7 <= 7); // => true
console.log(5 === 6); // => false
console.log(5 !== 6); // => true
console.log("a" !== "A"); // => true
console.log(false === false); // => true
Notice that a comparison expression always evaluate to a boolean value (true
or false). Comparison operators like === are a useful to compare strings,
booleans, etc. not just numbers.
Did you know? 'a' < 'b' is valid JS code? When you relatively
compare
strings using > or < you will be comparing them lexicographically.
Lexicographically is fancy shmancy talk for "dictionary" order! A "lesser"
string is one that would appear earlier in the dictionary:
console.log("a" < "b"); // => true
console.log("apple" < "abacus"); // => false
console.log("app" < "apple"); // => true
console.log("zoo" > "mississippi"); // => true
Gotcha capitilized letters are considered lexicographically less than
lower case letters. i.e "A" < "z" // => true.
18. === vs ==
In JavaScript there are two equality operators triple-equals (===) and
double-equals (==). The operators differ in how they compare across differing
types. Triple-equals performs the strict equality, meaning it will only return
true if the types are the same. Double-equals performs the loose equality,
meaning it can return true even if the values are of different type.
Double-equals may coerce a value into another type for the comparison, and
this behavior is hard to predict:
console.log(5 === "5"); // false
console.log(5 == "5"); // true
console.log(0 === false); // false
console.log(0 == false); //true
Whoa! Surprised by these results? It can be hard to predict how == behaves, so
we will avoid using it in this course and as a best practice. Stick to using
=== because it respects data types.
19. What you've learned
>,<,>=,<=,===, and!==can be used to compare values- we prefer to use
===to check for equality because it takes the type into
account.
Basic Variables
Variables are used to store information to be referenced and manipulated in a
computer program. They also provide a way of labeling data with a descriptive
name, so our programs can be understood more clearly by programmers. It is
helpful to think of variables as containers that hold information. Their sole
purpose is to label and store data in computer memory. This data can then be
used and even changed throughout the lifetime of your program.
When you finish this reading, you should be able to:
- declare variables using the
letkeyword - assign values to variables using the assignment operator (
=) - use the shortcuts
+=,-=,++,--to reassign variables - identify
undefinedas the default value for unassigned variables
20. Initializing a variable
To initialize a variable in JavaScript we'll need two new pieces of syntax:
let and =. We can give the variable any name that we wish and assign it a
value. Once we initialize a variable, the variable will evaluate to the value
assigned:
let bootcamp = "App Academy";
console.log(bootcamp); // 'App Academy'
let birthYear = 2012;
console.log(birthYear); // 2012
Did you know? JavaScript variables names can contain any alphanumeric
characters, underscore (_), or dollar sign ($). However, they cannot begin
with a number.
Above are examples of how you'll create variables most of the time, so we'll
grow very familiar with the syntax. As a best practice, we should name our
variables in a way that is descriptive and concise.
The variable initializations above really consist of two steps: declaration
with let and assignment with =. Let's break these two steps down.
20.1. Declaring a variable
In JavaScript, in order to use a variable, we must declare it. Variable
declaration is the act of introducing the variable to the environment.
To declare a variable, use the let keyword, followed by a space and then the
name of the variable.
let bootcamp;
console.log(bootcamp); // undefined
Once a variable is declared, it will contain undefined as it's value.
undefined is a common default value in JavaScript, we'll see it come up in a
few different places. You can think of undefined as showing that the variable
is empty.
20.2. Assigning a variable
Once a variable has been declared, we can assign it a value using single-equals
= :
let bootcamp;
console.log(bootcamp); // undefined
bootcamp = "App Academy";
console.log(bootcamp); // 'App Academy'
21. Manipulating variables
To change the value of a variable, we need to reassign it to a new value with
= :
let num = 42;
console.log(num + 8); // => 50
console.log(num); // => 42
num = num + 10;
console.log(num); // => 52
In the code above, num + 8 will evaluate to 50, but it will not change the
num
variable to 50. If we want to change the num variable, we must reassign to
it.
21.1. Assignment Shorthand
Changing the value of a number variable is something fairly common in the
programming world. Luckily there is some shorthand operators we can use:
let number = 0;
number += 10; // equivalent to number = number + 10
number -= 2; // equivalent to number = number - 2
number /= 4; // equivalent to number = number / 4
number *= 7; // equivalent to number = number * 7
console.log(number); // 14
We also have other shorthand to add or subtract exactly 1 from a variable, the
increment (++) and decrement (--) operators:
let year = 3004;
year++;
console.log(year); // 3005
year--;
console.log(year); // 3004
22. NaN
Now that we have the ability to perform arithmetic with variables, let's take a
look at a common programming mistake, getting a result of NaN (not a number):
let num;
console.log(num + 3); // NaN
The above code gives NaN because the unassigned num variable contains
undefined; adding 3 to undefined results in NaN. In general,
any
nonsensical arithmetic will result in NaN. Math operations involving
undefined is perhaps the most common mistake:
console.log(undefined + 3); // NaN
console.log("fish" * 2); // NaN
23. What you've learned
- variables are declared with
letand will contain the valueundefinedby
default - we can use single-equals
=to assign variables - changing a variable requires a reassignment, for which there are many
shortcuts for (+=,-=, etc.)
Introduction to Functions
We hope you are ready - because you are on the brink of one of the most fun
parts of writing JavaScript: writing functions. A function is a procedure of
code that will run when called. We only "write" a function once (function
declaration), but we can "use" it as many times as we please (function
calls). Functions are the fundamental building blocks of JavaScript and
mastering them is a big step on the road to JavaScript mastery.
When you finish this reading, you should be able to:
- Describe what a function in JavaScript is.
- Demonstrate how to invoke a function.
- Write a function using function declaration.
- Use the
returnkeyword to return a value from a function.
24. Writing Functions
A function is a set procedure of code that will run when called. Functions
really start to make sense when put in the perspective of solving problems. So
for example say you want to find the average of two given numbers. Meaning we
want to take two numbers, add them together then divide by 2:
> (5 + 5) / 2
5
> (15 + 3) / 2
9
> (7 + 2) / 2
4.5
Writing out the same code again and again gets tedious fast. What you can do
instead is write a new function.
24.1. Function Declaration
A function definition consists of the function keyword, followed by three
things:
- The name of the function.
- A list of parameters to the function, enclosed in parentheses,
(). - The code to be run when this function is run, enclosed in curly
brackets,{ }.
So for our above example of averaging two numbers we could write a function that
would do that for us! We would write something like the following:
// 1. average is the name of the function
// 2. number1 & number2 are the parameters being passed in
function average(number1, number2) {
  // 3. this is the code run every time this function is used
  return (number1 + number2) / 2;
}
First thing to notice for the above average function is that we didn't use any
real numbers. You always want to write functions to accept as wide a range of
data as possible. Utilizing the incoming parameters to a function is one of
the keys to making functions flexible.
In the case of the average function, we want to use it to calculate the
average of any two numbers. number1 and number2 are the parameters for the
average function. In other words, the average function expects to be given
two numbers, number1 and number2. We'll be talking a lot more about
parameters later - but for now know that when you define a function with
parameters you are declaring those parameters as usable variables within that
function.
The beauty of a function is that if we define it in a clever way, it will work
on a whole slew of data! For example, we want average to work on any two
numbers, whether or not they are whole numbers, decimal, negative, etc.
25. Invoking or "calling" a function
Now that we've written a function how do we actually use it? Once defined a
function can be invoked or "called" as many times as we please.
25.1. Order of code
Let's step away from average for a bit to see how a simple function call
works. Say we run JavaScript code that looks like this:
console.log("First!");
console.log("Second!");
Running this code will return exactly as we expect. We will see First! printed
out, followed by Second!. In other words, JavaScript will evaluate your code
left-to-right and top-to-bottom. Very intuitive! It's exactly how you are
reading these notes right now.
However, when JavaScript sees a function definition, JavaScript will not
evaluate the code inside of the definition. It will only "remember" the code so
we can execute it later. The code below only prints First! followed by
Fourth!:
console.log("First!");
function callMe() {
  console.log("Second!");
  console.log("Third!");
}
console.log("Fourth");
// when run this code is ran it will print out:
// "First!"
// "Fourth"
To actually get the code within callMe to evaluate, we must call it by using
callMe(). The code below will now print out in order:
function callMe() {
  console.log("Second!");
  console.log("Third!");
}
console.log("First!");
// we call the function by adding ending parenthesis
callMe();
console.log("Fourth!");
// when run this code is ran it will print out:
// "First!"
// "Second!"
// "Third!"
// "Fourth"
Let's say JavaScript is running the file above. Here are the steps it would
take, starting from the tippy top of the code:
- JS sees a definition for
callMe. It will remember this definition in case
we call the function later. It will not evaluate the code inside the
function yet. - JS prints out
First! - JS sees that we are calling
callMe(). At this point it will look at the
priorcallMedefinition and run the code inside. It is as if we are
"jumping" to inside the function definition. This means it will print
Second!followed byThird! - JS sees there is no more code to be run inside of
callMe, so it "jumps"
back to where we originally calledcallMe() - JS will continue evaluating in order and print
Fourth!
25.2. An average example
So a declared function is "saved for later use", and will be executed later,
when it is called, also known as being invoked. So thinking back to our
average function we can declare the function and then invoke it.
When we specify what data to use for a function call, we refer to that process
passing arguments to the function.
// this is a function definition
function average(number1, number2) {
  return (number1 + number2) / 2;
}
// this is a function call with the arguments being 15 & 3
> average(15, 3)
9
// this is a function call with the arguments being 5 & 5
> average(10, 5)
7.5
When we call the function average(15, 3), we run the code inside the
definition for average. That is, we plug in the parameters with real numbers
(number1 becomes 10 and number2 becomes 16). Think of number1
and
number2 as variables that contain the values we pass in when we called the
function. Then we proceed by running the code inside the function. The parameter
names number1 and number2 used through the body of the function and behave
like variables.
26. Returning a value
Now that we know how functions are declared and invoked let's talk about the
inside of the function. We'll start with a statement: Every function in
JavaScript returns undefined unless otherwise specified.
Now what does that mean? We'll start with a simple example:
function sayNumber(number) {
  console.log(number);
}
> sayNumber(1); // prints 1
1
undefined
So what happened there? Let's do a quick step by step:
- We declared the
sayNumberfunction sayNumberwas called handing in the argument of 1- The
numberparameter is printed to the console - Then the function ends without encountering a
returnstatement. Since
nothing was specifically returned then the function returned the default
value for a function which isundefined.
Now let's change our above example to use the keywordreturnto return a
value:
function sayNumber(number) {
  console.log(number);
  return true;
}
> sayNumber(1);
1 // sayNumber still prints 1
true // but now sayNumber returns as true
Let's go back to our previous average function and talk about the return we
used there:
function average(number1, number2) {
  return (number1 + number2) / 2;
}
// the function call for average(10, 16) will return 13
// so the result variable will be set to 13
let result = average(10, 16);
// if we want to check what a function returns we can do this:
console.log(result); // prints `13`
// we could alternatively do this:
console.log(average(10, 16));
When we call a function, we jump to the function definition and run the code
inside. When we hit a return statement, we immediately exit the function,
jump back to where we called the function, and evaluate the function call to
the value it returned.
Every function call evaluates to it's return value! In other words, the
expression average(10, 16) evaluates to 13 just like how the expression
1 + 1 evaluates to 2.
Another important rule of the return statement is that it stops function
execution immediately. This means that any code after a return will not be
executed!
function average(number1, number2) {
  let sum = number1 + number2;
  return sum;
  // anything under the first return will not be executed
  console.log("this will not run")
  return false;
}
 // when the first return is encountered the entire function will return a value
> average(2, 7);
9
So the three things to remember about return statements is:
- Every function call evaluates to it's return value.
- Every function in JavaScript returns
undefinedunless areturnis
specified - Once a
returnstatement is encountered the function will immediately stop
and return the value, ignoring any code below thereturnstatement.
27. The importance of naming
A quick but very important side note about good naming. Take this to heart right
now: Good names are important. Do yourself, and every other programmer
reading your code, a favor by always using significant function and variable
names.
For example, x is a very non-descriptive name for a variable or function. As
we tackle more complicated problems and our code grows to be more complex, we
are likely to forget what badly named variables originally stood for and what
their purpose was. Non-descriptive names make our code error-prone. Great code
reads like English and almost explains itself. As programmers, our goal is to
write code that is not only "correct", but also elegant, readable, and
maintainable! Hold yourself to this high standard.
As far as syntax goes in JavaScript we always name our functions and variables
camelCase for multiple words. (Ex: tipCalculator, currentNumber,
puppyPartyFinder). Other languages use other conventions so it's best to pick
up the standard for your chosen language and stick with it.
28. What you learned
By writing a function we can reuse code over and over again to solve similar
problems with different input data (arguments). This will make your life easier
and allow you to start working on more complex problems.
This reading covered:
- How to define and invoke a function in JavaScript.
- How to use the
returnkeyword to return a value from a function. - Writing readable JavaScript code by using significant names and following
camelCaseconventions for multiple word variables and functions
Parameters and Arguments
When talking about functions one of the first things we mentioned was the word
parameters. In this reading we will be covering what exactly a parameter is -
as well as the differentiation between parameters and arguments.
When you finish this reading, you should be able to:
- Identify the difference between parameters and arguments.
- Write a function that utilizes declared parameters.
- Invoking a function with passed in arguments.
29. The difference between Parameters and Arguments
Let's start off by talking about the difference between arguments and
parameters and how to identify which is which.
- Parameters are comma separated variables specified as part of a
function's declaration. - Arguments are values passed to the function when it is invoked.
So by defining parameters when we declare our function we are effectively
setting accessible variables within the function:
function add(firstParameter, secondParameter) {
  console.log(firstParameter + secondParameter);
}
// the add function declares two parameters
> add(1, 2); //=> 3
In the above example we declared our parameters when we declared our function.
Now arguments work slightly differently - when the function is invoked we are
passing in arguments. So in the above example when we invoked add(1, 2) the
(1,2) were the arguments being passed in. So when a function is invoked the
value of the declared parameters is assigned to the passed in arguments.
You can think of it parameters and arguments like a recipe. A recipe is a
list of ingredients (parameters) and list of steps (the code to be run). When
someone cooks the recipe (invokes the function) they add the ingredients they
actually have(arguments). The result of cooking the recipe is the delicious
return value!
29.1. Extra arguments
In JavaScript a function will not throw an error if the number of arguments
passed during a function invocation is different than the number of parameters
listed during function declaration. This is very important to know!
Let's use the above function to demonstrate:
function add(firstParameter, secondParameter) {
  console.log(firstParameter + secondParameter);
}
// this will ignore the 17 & 14
// the first two arguments passed in will be assigned to the first two parameters
> add(1, 2, 17, 14); //=> 3
Notice in the above example we passed in 4 arguments (1, 2, 17, 14) to add.
Since the function was only looking for two parameters that is all it uses.
29.2. Not enough arguments
Now what happens if we pass in less arguments then needed?
function add(firstParameter, secondParameter) {
  console.log(firstParameter + secondParameter);
}
> add(5); //=> NaN
Whoa what happened there? Let's do a play-by-play:
firstParameterwas set to equal the first passed in argument which in the
above case is 5.- Since there is no second argument then
secondParameteris declared as a
variable but is set to the default value ofundefined. - The function then tries to add 5 to
undefinedwhich is definitely not a
number! So we getNaN(which meansNot A Number) printed to the console.
As you write more functions you'll grow very comfortable using both arguments
and parameters to accomplish your function's goal.
30. What you learned
- Parameters are variables defined as a part of a function's declaration.
- Arguments are values passed to the function when it is invoked.
- JavaScript functions can intake a different number of arguments than the
number of parameters listed during function declaration.
WEEK-01 DAY-2
Control Flow
Control Flow and Array Learning Objectives
Below is a complete list of the terminal learning objectives for this lesson.
When you complete this lesson, you should be able to perform each of the
following objectives. These objectives capture how you may be evaluated on the
assessment for this lesson.
- Define a function that accepts a sentence string and two words as args. The
function should return a boolean indicating if the sentence includes either
word. - Identify a pair of mutually exclusive conditions
- Given a for loop, translate it into a while loop, and vice-versa
- Write a function that iterates through a provided string argument
- Given a description of pig latin, write a function that takes in a string
argument and utilizes String#slice to translate the string into pig latin. - Write a function that takes in an array of words and a string as arguments
and returns a boolean indicating whether the string is located inside of the
array. The function must use Array#indexOf. - Define that an array literal is an ordered list of values defined by using
bracket and individual values are read by indexing. - Prevent code that can throw an exception from causing the program to crash. the terminal learning objectives
for this lesson.
When you complete this lesson, you should be able to perform each of the
following objectives. These objectives capture how you may be evaluated on the
assessment for this lesson. - Define a function that accepts a sentence string and two words as args. The
function should return a boolean indicating if the sentence includes either
word. - Identify a pair of mutually exclusive conditions
- Given a for loop, translate it into a while loop, and vice-versa
- Write a function that iterates through a provided string argument
- Given a description of pig latin, write a function that takes in a string
argument and utilizes String#slice to translate the string into pig latin. - Write a function that takes in an array of words and a string as arguments
and returns a boolean indicating whether the string is located inside of the
array. The function must use Array#indexOf. - Define that an array literal is an ordered list of values defined by using
bracket and individual values are read by indexing. - Prevent code that can throw an exception from causing the program to crash.
Control Flow - Conditional Statements
So far the code you've written has been pretty direct in it's intent. You can
define functions and variables but, so far the functions you've created haven't
been able to do that much for you yet. It's time to start writing functions
that can do things conditionally by utilizing control flow.
In simple terms - control flow is the order in which instructions are
executed within a program. One modifies control flow using control structures,
expressions that alter the control flow based on given parameters. The control
structures within JavaScript allow the program flow to change within a unit of
code or a function.
This reading will be covering one of the two main control structures you
will use time and time again - Conditional statements. Conditional
statements are used to perform different actions based on different conditions.
When you finish this reading, you should be able to:
- Write
if,else if,if...elseconditional statements. - Know that conditional statements can have only one
ifand oneelse
statement. - Identify that conditional statements can be nested.
31. A Quick Word on Syntax
Before we get started we'll quickly go over the terms we'll be using to
represent syntax.
[ ]are square brackets{ }are curly braces( )are parentheses
32. Writing Conditional Statements
Conditional Statements are the second fundamental control structure for
writing JavaScript and are pretty straight forward. The simplest conditional
statement is the if statement. An if statement has two parts, the test
expression (the code that immediately follows the if which goes in
parentheses), and the then expression (this code belongs in braces after the
if expression). The then expression will only run when the if expression
is truthy.
Here is an example of a simple if statement:
// this is the test expression
if (3 === 3) {
  // this is the then expression
  // this code will run if the above statement is true
  console.log("this is a three!");
}
The if statement above allows you to specify what should happen if your
particular expression evaluates to true. You can chain additional test
expressions onto this if statement by using a else if statement.
The syntax for else if is very similar as an if statement:
function mathFun() {
  let x = 2 + 3;
  if (x === 3) {
    console.log("we have a 3");
  } else if (x === 4) {
    // this code will run if the above statement is true
    console.log("we have a 4");
  } else if (x === 5) {
    // this code will run if the above statement is true
    console.log("we have a 5");
  }
};
mathFun(); // => "we have a 5"
The else if and if statements do not, however, provide the option to specify
something else that should happen in the event that all of the above expressions
evaluate to be falsey. The if...else statement reads just like English. The
JS interpreter will execute the else statement if all the above conditions
given are falsey. See below for an example:
function mathFun() {
  let x = 19;
  if (x === 3) {
    console.log("we have a 3");
  } else if (x === 4) {
    console.log("we have a 4");
  } else {
    console.log("I will return if everything above me is falsey!");
  }
};
mathFun(); // => "I will return if everything above me is falsey!"
You can chain an arbitrary number of else if statements but there can only be
one if statement and one optional else statement. The if introduces the
control
structure and the else acts as a fail safe to catch everything that didn't
meet the above conditions.
Only one then expression is ever executed in an if, if...else, or
if...else statement. If one of the test expressions is truthy, then the
result of its then expression is the result of the entire conditional
statement:
let x = 3;
if (x === 3) {
  console.log("this will run");
} else {
  console.log("this will not run");
}
Additionally, you can nest conditional statements within each other but it will
get hard to read pretty quickly and is discouraged:
function mathFun(x) {
  if (x === "math") {
    if (x === "math" && x[0] === "m") {
      if (x[1] === "a") {
        console.log("this got confusing fast");
      } else {
        console.log("that is not math!");
      }
    } else {
      console.log("that is for sure not math!");
    }
  } else {
    console.log("I will return if everything above me is false!");
  }
};
mathFun("math"); // => "this got confusing fast"
33. What You Learned
- Conditional statements allow us to control what actions should be taken based
on a boolean (truthy or falsey) expression - In a chain of then expressions (
if...else if...else), only one of the
then expressions will be executed. - Conditional statements can have only one
ifand oneelsestatement. - Conditional statements can be nested.
Mutually Exclusive Conditions
You have now learned how to write conditional statements. Now we'll talk a
little bit more about how to write them using best practices.
When you finish this reading, you should be able to:
- Identify a pair of mutually exclusive conditions.
34. When to use if statements
Say you are given the challenge to write a function that that will call another
function named bigNumber if the given argument is greater than 100 or call
a function named smallNumber if it the given argument is smaller. You could
write a function to do that which would look like this:
function numberSeparator(number) {
  if (number < 100) {
    // number is smaller than 100 so we invoke smallNumber
    smallNumber();
  }
  if (number === 100) {
    // number is equal to 100 so we invoke smallNumber
    smallNumber();
  }
  if (number > 100) {
    // number is larger than 100 so we invoke bigNumber
    bigNumber();
  }
}
As you can probably tell the above function uses a lot of code to do a simple
task. To be clear the function above would work for our aim - but it repeats
itself. There is an age old principal for writing good code named DRY or
Don't repeat yourself. As good programmers we always want our code to be
clear, concise, and efficient.
A general rule of thumb is that if you are working with a condition that is
mutually exclusive, meaning if one condition is true the other condition
must be false, then you should use an if/else statement. You can also think of
mutually exclusivity like a coin flip - it can be either heads or tails but
not both.
Going back to the original problem at hand we can see it makes intuitive sense
with the way the challenge is phrased: If the number is larger than 100 then
we'll call bigNumber, otherwise we invoke is smallNumber.
So let's rewrite the above function to read a little more clearly:
function numberSeparator(number) {
  if (number > 100) {
    bigNumber();
  } else {
    smallNumber();
  }
}
// this also works
function numberSeparator(number) {
  if (number <= 100) {
    smallNumber();
  } else {
    bigNumber();
  }
}
Look at how much clearer that is! Writing good code is an art - devote yourself
to becoming an artist!
35. What you Learned
- How to identify a pair of mutually exclusive conditions.
- DRY - don't repeat yourself!
Control Flow - Looping
A quick reminder before we start - control flow is the order in which
instructions are executed within a program. One modifies control flow using
control structures, expressions that alter the control flow based on given
parameters. This reading will be covering the second of the main control
structures you will use time and time again - loops.
When you finish this reading, you should be able to:
- Know how to write a
whileloop and aforloop.- Know how to convert a
forloop into awhileloop
- Know how to convert a
- Know that index variables conventionally start at zero.
- Explain what an iteration is.
36. Looping
Imagine you are at a friend's house and your friend has six dogs. Someone left
the back gate open and all the dogs go out in the yard and get super muddy. Now
your friend wants to clean their dogs but they only have one bathtub! You can't
wash all the dogs at once. So the only option is to give the dogs a bath one at
a time until they are all clean. When you start 0 dogs are clean and 6 dogs are
dirty.
While there are still dirty dogs you still have a job to do. That is your
condition - you will stop giving baths once all 6 dogs are clean. So after
one bath you you have 1 clean dog and 5 dirty dogs. You've
incremented(increased by one) your number of clean dogs. After each bath you
check your condition again until you have 6 clean dogs so you know you can
stop!
What we've described above is the idea of looping - setting a condition,
executing an action, doing something to make sure our condition will be met
eventually, and rechecking our condition before executing our next action.
Loops are a fundamental control structure for writing JavaScript.
Loops will repeatedly execute a section of code while a condition is true. Loops
are simple to write and incredibly powerful! There are many variations of loop
but we will be covering the two most fundamental loops now - while loops and
for loops.
36.1. While Loops
One of the simplest loops in JavaScript is the while loop. As with all
loops, the while loop will execute a block of code as long as a specified
condition is true. The while loop starts with the keyword while then states a
condition in parentheses. The code in the following braces will be run until the
above condition is met.
while (condition) {
  // code block to be executed
}
In the following example, the code in the loop will run, over and over again, as
long as a variable (index) is less than 10:
let index = 0;
// this is the condition that will be checked every time this loop is run
while (index < 10) {
  console.log("The number is " + index);
  // this is common shorthand for index = index + 1
  index++;
}
The most important thing to remember when writing any loop is to always be
working towards your condition. In the example above if we did not increment the
index variable by 1 each time the loop ran then we would be stuck with what we
call an infinite loop:
let index = 0;
// this is an infinite loop because our condition will never be met
while (index < 10) {
  console.log("The number is " + index);
  // if we do not increase the index then our condition is never met
  // Meaning this will run forever!
}
The above code will run until whatever interpreter you are using crashes.
36.2. Important Loop Knowledge
A quick word before we learn about the next loop.
The index is the traditional word for the variable that keeps track of how
many times the loop has been run. Don't write loops with indices starting at
one; you'll confuse other programmers and yourself. Indices have started at zero
for a long time, and for good reason. It's much easier to use loops that start
with an index of zero because Array and String indices also start at zero.
let array = [0, 1, 2];
let index = 0;
while (index < array.length) {
  console.log(
    "Both the index and the current array position are " + array[index]
  );
  index++;
}
In the above code we will do one loop for each digit in the Array above. We call
each of those loops an "iteration". An iteration is the act of repeating a
procedure, hence looping is an iterative technique. Each repetition itself
is also called an "iteration." So you can use loops to iterate through Arrays
and Strings.
36.3. For Loops
A for loop can be broken down into three sections:
- The initial expression which will be run once at the beginning of the loop.
- The condition which is checked every time the loop is run. If this
condition is true the loop will run again. If this condition is false the
loop will end. - The loopEnd expression which will be run at the end of the loop before
checking the condition again.
for (<initial expression>;<condition>;<loopEnd expression>)
The for loop is usually used with an integer counter:
for (let index = 0; index < 10; index += 1) {
  // the code inside this block will run 10 times
}
While the loopEnd expression is normally used to increase a variable by one
per loop iteration, it can contain any statement, such as one that decreasing
the counter, or increasing it by 2.
You can use the for loop to iterate through all kinds of things. Check out the
example below for how to iterate through a String:
let testString = "testing";
// we can use the testString's length as our condition!
// Since we know the testString's index starts at 0
// and our index starts at 0 we can access each letter:
for (let index = 0; index < testString.length; index += 1) {
  let letter = testString[index];
  console.log(letter);
}
These are the most basic types of loops. If all else fails, you can always fall
back on these two loops. All the other loop forms are just more convenient forms
of these basic loop styles.
37. Translating From One Loop to Another
So far we have covered both while and for loops. Once you understand the
concept of looping it's easy to translate one loop to another:
// these two do the exact same thing!
function forLoopDoubler (array) {
  // it is convention to shorten index to just i in most cases
  for (let i = 0; i < array.length; i++) {
    array[i] = array[i] * 2;
  }
  return array;
};
function forLoopDoubler (array) {
  let i = 0;
  while (i < array.length) {
    array[i] = array[i] * 2;
    i++;
  }
  return array;
};
forLoopDoubler([1, 2, 3]); // => [2,4,6]
whileLoopDoubler([1, 2, 3]); //=> [2,4,6]
38. What You Learned
- We can use a
fororwhileloop to repeat a block of code repeatedly. - While the loop condition is true, we will execute another iteration of the
loop. - When the loop condition is false, we will exit the loop.
The Array Type
This reading will be about one of JavaScript's global objects, the Array
type. JavaScript arrays are used to store multiple values all within a single
structure, much like a creating a list. Arrays can hold strings, integers and
even other arrays! Arrays are incredibly useful for holding a bunch of different
information all in one place.
When you finish this reading, you should be able to:
- Write arrays using correct syntax
- Identify that an array is an ordered list of values defined by using brackets
- Use
.lengthto obtain a count of the numbers of elements that comprise an
array - Index an array to refer to a single value
- Concatenate multiple arrays together
39. Using arrays
While coding you will find that you often find yourself needing to refer to a
bunch of data at once. For instance, what if you wanted to refer to the entire
English alphabet. Sure, you could create a bunch variables for each letter in
the alphabet:
let a = "a";
let b = "b";
let c = "c";
let d = "d";
// and so on for way too long...
However this becomes cumbersome and unmanageable quickly. An Array is a data
structure that solves this problem. Arrays are always wrapped in square
brackets, [], and store their comma separated values in sequential order.
Arrays in JavaScript are also very flexible: we can put elements into an array,
replace elements in an array, and remove elements from the array.
So going back to our first example of containing the alphabet:
let alphabet = [
  "a", "b", "c", "d", "e", "f",
  "g", "h", "i", "j", "k", "l",
  "m", "n", "o", "p", "q", "r",
  "s", "t", "u", "v", "w", "x",
  "y", "z"
];
40. Indexing arrays
40.1. Calculating the length of an array
Since an array can container any number of values you will find it useful to
count the number of values available to you using .length:
console.log([4, 7, 9].length); // => 3
console.log([1, 2].length); // => 2
console.log([].length); // => 0
40.2. Properly indexing an array
Arrays consist of multiple values all stored in sequential order. These value
are numbered by indices starting at 0 (just like indexing a string!). So
given the below example:
let numbersAndLetters = ["b", "z", 17, "cat"];
In the above numbersAndLetters array if we access numbersAndLetters at the
index of 0 we get back the value of "b". If we access numbersAndLetters at the
index of 1 we get "z", at the index of 3 we get 17, etc. We can specify which
value we'd like to access in an array by using square brackets,[], and
specifying an index:
console.log(numbersAndLetters[0]); // => "b"
console.log(numbersAndLetters[1]); // => "z"
console.log(numbersAndLetters[2]); // => 17
console.log(numbersAndLetters[3]); // => "cat"
Notice that even though the index at numbersAndLetters[3] has the value of a
string with multiple characters ("cat") we return the entire value listed at
that index.
Reminder: Arrays always start at the index of 0, not 1. This is the
convention in programming. Additionally, indices should always be a number.
We can access a value in an array directly by providing an index for the value
we'd like to access in that array (array[index]). See below for an example:
console.log(["a", "b", "c"][0]); // => "a"
console.log(["a", "b", "c"][1]); // => "b"
console.log(["a", "b", "c"][2]); // => "c"
console.log(["a", "b", "c"][3]); // => `undefined`
As we see in the code above, if we try to access an element at an index that is
not inside the array, we get back undefined. This makes sense because there is
no value at that given position!
40.3. The classic "off by one" error
Arrays are similar to strings in that both of their indices start at 0 instead
of 1. Forgetting this fact can lead to some pretty confusing situations. Let's
focus on an important distinction: the index of the last value of an array is
always one less than its length.
console.log([4, 7, 9].length); // => 3
console.log([4, 7, 9][3]); // => undefined
console.log([4, 7, 9][2]); // => 9
In other words, although the length of [4, 7, 9] is 3, the index of the last
value (9) is 2. A good rule of thumb of accessing the last index of an array
is to find the length and then subtract one:
let testArray = [4, 7, 9];
let finalIndex = testArray.length - 1; // => (3 - 1) = 2
console.log(testArray[finalIndex]); // => 9
41. Working with arrays
41.1. Containing data in arrays
By packaging groups of related data into a single array, we gain the added
benefit of being able to refer to that data as a single collection. Arrays don't
have to just hold single characters- they are capable of holding entire strings,
numbers, and even other arrays!
let wackyArray = [2, 17, "apple", "cat", ["apple"]];
console.log(wackyArray[0]); // => 2
console.log(wackyArray[1]); // => 17
console.log(wackyArray[3]); // => "cat"
console.log(wackyArray[4]); // => ["apple"]
Just think of all the possibilities of what you can store in a single array!
However, just because you can doesn't mean you should. In practice we will
almost always be storing similar kinds of data, that are coming from a common
source (i.e. items in a shopping list, ID numbers, tasks on a todo list).
41.2. Using indexOf with arrays
We can also calculate the index of a given value within an array by using
indexOf:
console.log([1, 3, 5, "apple", "jet"].indexOf(3)); // => 1
console.log([1, 3, 5, "apple", "jet"].indexOf(5)); // => 2
console.log([1, 3, 5, "apple", "jet"].indexOf("jet")); // => 4
// this won't be found in the array
console.log([1, 3, 5, "apple", "jet"].indexOf("potato")); // => -1
If we attempt to search for a value that is not present in an array,
indexOf will return -1. This makes sense because we know that -1 is not a
valid array index. The smallest index possible is 0!
42. Concatenation with arrays
As a reminder, concatenation is just a fancy word for joining things together
into a single collection. Now, this is where arrays will differ from strings.
The + operator only exists for numbers and strings. If you try to use the +
on an array it will try to help you out by converting your arrays into
strings.
console.log([1, 2, 3] + [4, 5, 6]); // => 1,2,34,5,6
JavaScript was just trying to help! However that is probably not what you meant
to do. Good thing JavaScript has a seperate method for putting two array
together. To concatenate arrays, we can use the aptly named .concat method:
console.log([1, 2, 3].concat([4, 5, 6])); // => [1, 2, 3, 4, 5, 6]
43. What you've learned
- An Array is a data type that contains a list of in order values surrounded
in square brackets[]. array.lengthreturns the number of values in thearray.- Each value of an array is associated with a number index; the first value of
an array is at the index of 0. - We can use
array.indexOf(value)to obtain the index ofvaluewithin
array; ifvalueis not found, then -1 is returned. - We can use
.concatto concatenate multiple arrays, combining them into a
single array.
WEEK-01 DAY-3
Intermediate Functions
Intermediate Functions Learning Objectives
Below is a complete list of the terminal learning objectives across all
"Intermediate Function" lessons. When you complete these lessons, you should be
able to perform each of the following objectives. These objectives capture how
you may be evaluated on the assessment for these lessons.
- Identify that strings are immutable and arrays are mutable
- Define a function using both function declaration and function expression
syntax - Utilize Array#push, #pop, #shift, #unshift to mutate an array
- List the arguments that can be used with Array#splice
- Write a function that sums up elements of an array, given an array of numbers
as an argument - Utilize Array#forEach, #map, #filter, #reduce in a function
- Define a function that takes in an array of numbers and returns a new array
containing only the primes - Define a function that takes in a 2D array of numbers and returns the total
sum of all elements in the array - Define a function that takes in an array of elements and returns a 2d array
where the subarrays represent unique pairs of elements - Define a function that takes in an array of numbers as an argument and
returns the smallest value in the array; if the array is empty return null the terminal learning objectives across all
"Intermediate Function" lessons. When you complete these lessons, you should be
able to perform each of the following objectives. These objectives capture how
you may be evaluated on the assessment for these lessons. - Identify that strings are immutable and arrays are mutable
- Define a function using both function declaration and function expression
syntax - Utilize Array#push, #pop, #shift, #unshift to mutate an array
- List the arguments that can be used with Array#splice
- Write a function that sums up elements of an array, given an array of numbers
as an argument - Utilize Array#forEach, #map, #filter, #reduce in a function
- Define a function that takes in an array of numbers and returns a new array
containing only the primes - Define a function that takes in a 2D array of numbers and returns the total
sum of all elements in the array - Define a function that takes in an array of elements and returns a 2d array
where the subarrays represent unique pairs of elements - Define a function that takes in an array of numbers as an argument and
returns the smallest value in the array; if the array is empty return null
Function Expressions
You may have noticed that we've been writing many functions so far in the
course! We will continue to do so since functions are the building blocks of the
eventual applications that we will build. That being said, let's begin to
broaden the way we think about functions. In particular, we'll want think of
functions as expressions that we can store in variables - just like our classic
data types of number, string, boolean, array, and object!
When you finish this article, you should be able to:
- identify functions as first-class objects in JavaScript
- define a function using function expression syntax
44. Functions as first-class objects
JavaScript is well known for being a programming language that treats functions
as "first-class objects". This fancy talk means that you can treat a function as
a "normal" value by storing it in a variable. We'll leverage this key concept in
very clever ways later in the course. For now, let's begin with a simple example
that shows the "first-class object" nature of functions:
let calculateAverage = function(a, b) {
  return (a + b) / 2;
};
console.log(calculateAverage(10, 20)); // 15
In the code snippet above, we define the calculateAverage by assigning a
variable to contain the function's definition. By doing this, the variable's
name is effectively the function's name. So to call the function, we simply
refer to the variable name. Note that we do not write the function's name after
the function keyword, where we normally would. We will refer to this new way
of defining functions as function expression syntax and the classic way of
defining functions as function declaration syntax. In general, we can define
functions using either syntax:
// function declaration syntax
function myFunctionName(arg1, arg2) {}
// function expression syntax
let myFunctionName = function(arg1, arg2) {};
In the coming sections, we'll highlight moments when we'll prefer one syntax
over the other. For now, get acquainted with the new syntax as it is something
you'll be seeing a lot of as a programmer!
44.1. A peek under the hood
Perhaps you're finding it tough to understand what it means for a variable to
contain a function - it is indeed a very abstract idea for new programmers.
Let's draw a comparison. We know that when we assign an expression to variable,
the expression first evaluates to a single value, which we then store in the
variable name:
let myNum = 4 + 4;
console.log(myNum); // prints 8
console.log(myNum * 3); // prints 24
In the same way we can treat a function definition as an expression that
evaluates!
let myFunc = function() {
  console.log("I'm a function");
};
console.log(myFunc); // prints [Function: myFunc]
myFunc(); // prints "I'm a function"
Looking at the snippet immediately above, you'll notice that when we print the
myFunc variable directly, without calling the function with parentheses,
JavaScript simply says the variable contains a function named myFunc
([Function: myFunc]). You can truly imagine a function as a value that we can
store and use as we please.
The term anonymous function may also be used to describe a function
expression before it is assigned to any variable. Following the example above,
we'll use the word anonymous function to describe the function expression
before the assignment to themyFuncvariable is complete. Once the
assignment is complete, it would be silly to refer tomyFuncas an
anonymous functionbecause an anonymous function has no name.
45. What you've learned
- functions can be stored in variables; just like any other values in
JavaScript!
Two-Dimensional Arrays (2D Arrays)
Time to broaden our understanding of arrays! We've already explore the
fundamentals of arrays. Mainly, we can store any type of data we please as
elements of an array and even mix types together. However, what happens if we
store an array as an element of an array?
When you finish this article, you should be able to:
- index into the inner elements of a 2D array
- use nested loops to iterate through a 2D array
46. Multidimensional Arrays
When we store arrays as elements of other arrays, we refer to those structures
as multidimensional arrays. If the "depth" of the nested arrays is at exactly 2 (an
outer array containing inner arrays), then we'll refer to it as a
two-dimensional array:
let twoDimensional = [["a", "b", "c"], ["d", "e"], ["f", "g", "h"]];
console.log(twoDimensional[1]); // [ 'd', 'e' ]
console.log(twoDimensional[1][0]); // 'd'
let subArr = twoDimensional[1];
console.log(subArr[0]); // 'd'
Note that indexing the outer twoDimensional array will return an element like
usual, it's just that element happens to be another array. To gain access to the
innermost elements, we simply need to apply another set of indexing brackets!
If we style our 2D arrays nicely so that each subarray is on a new line, we can
interpret the double indices as [row][column]:
let twoDimensional = [
	["a", "b", "c"],
	["d", "e"],
	["f", "g", "h"]];
// get the element in the 0th row, 2nd col:
console.log(twoDimensional[0][2]); // 'c'
47. Iterating through 2D Arrays
Since a 2D array is just an array of arrays. We'll need to use a loop within a
loop to iterate through a 2D array:
let array = [["a", "b", "c"], ["d", "e"], ["f", "g", "h"]];
for (let i = 0; i < array.length; i++) {
  let subArray = array[i];
  console.log(subArray);
  for (let j = 0; j < subArray.length; j++) {
    console.log(subArray[j]);
  }
}
In the nested loops above, the i index refers to the current "row" and the
j
index refers to the current "column". It's worth noting that since the inner
subArrays have different length, we'll want to specifically reference the length
of that subarray in our inner loop condition j < subArray.length. The code
above will print:
[ 'a', 'b', 'c' ]
a
b
c
[ 'd', 'e' ]
d
e
[ 'f', 'g', 'h' ]
f
g
h
48. When is a 2D array practical?
As a preview of things to come let's briefly mention when you'll find a 2D array
useful in your future projects. Imagine how'd you represent a "grid":
- tic-tac-toe (3x3 grid)
- chess (8x8 grid)
- sudoku (9x9 grid)
- excel (a sheet is an arbitrarily sized 2D array)
49. What you've learned
- an array can contain arrays as elements, we call this a 2D arrays
- to iterate through a 2D array, used nested loops
Mutability in JavaScript
So far in the course we've explored a handful of methods that manipulate data.
We'll be growing our arsenal of methods further overtime, so we'll want to gain
awareness for exactly how we should expect these methods to manipulate the
data we give them. To this end, let's analyze which methods will modify existing
data and which methods do not. We refer to this concept as mutability.
When you finish this article, you should be able to:
- Explain what "mutability" is
- Correctly label JavaScript data types as immutable or mutable
50. What is mutability?
At its face value, mutability is a simple concept. You may be familiar with
the word mutation, which refers to a alteration (usually in DNA). Something
that is mutable can be changed, while something that is immutable is
unchanging and permanent. To illustrate this concept, we'll begin with strings
and arrays. We've spent some time with these two data types and by now we
recognize that the two types share many similarities. Both have indices,
length, and even share common methods like slice. However, they differ
greatly in their mutability:
let myArr = ["b", "e", "a", "m"];
myArr[0] = "s";
console.log(myArr); // 'seam'
let myStr = "beam";
myStr[0] = "s";
console.log(myStr); // 'beam'
Above we have shown that we can assign a new element to an index of an array,
but we cannot assign a new character to an index of a string. In other words,
arrays are mutable, but strings are immutable.
An implication of this discovery is that there are some array methods that
will modify an existing array but zero methods that will modify an existing
string. Methods that manipulate string data typically return a new string and
never modify an existing one. A prime example is toUpperCase:
let word = "piñata";
let newWord = word.toUpperCase();
console.log(word); // 'piñata'
console.log(newWord); // 'PIÑATA'
Above, notice that the toUpperCase method returns a capitalized version of the
string, but does not change the original string. It's also worth noting that not
every array method will mutate. For example, the slice method does not mutate
for both strings and arrays. As we learn about methods in the future, we'll be
certain to note what mutates and what does not.
51. Mutable or immutable, that is the question
Now that we have a grasp of mutability, let's take inventory and identify
JavaScript's data types as mutable or immutable.
Mutable
- array
- object (we'll learn these soon)
Immutable - number
- string
- boolean
A quick way to remember the above list is to identify that the composite types
(the types that can contain multiple values) of array and object are mutable.
The remaining "simpler" types of number, string, and boolean are immutable.
52. The mutability misconception
Maybe you are having a tough time believing what we have just claimed. We don't
blame you, you've probably heard the saying that change is the only constant in
the universe. Let's debunk a common argument to turn you into a believer. The
skeptical programmer may use this as an argument to show that numbers are
mutable:
let myNum = 42;
myNum += 8;
console.log(myNum); // 50
Because the myNum variable now contains 50 where it once contained 42,
it
may seem we have mutated the number, but this is not truly the case. Recall that
myNum += 8 is shorthand for myNum = myNum + 8. Since the right hand side of
the assignment evaluates first, we are simply taking the new number of 50 and
reassigning it to the myNum variable. This reassignment of a variable name is
not a mutation of the original number.
53. What you've learned
- data types that can be changed are mutable, those that cannot be changed are
immutable - arrays and objects are mutable
- numbers, strings, and booleans are immutable
Array Splice
Time to a learn yet another array method! The [Array#splice][mdn-splice] method
deserves its own reading because of how versatile it is. Feel free to use this
article as a quick reference; let's jump right in.
When you finish reading this article, you should be able to:
- list all possible arguments that can be used with the
Array#splicemethod
54. Notation
For clarity in this article and moving forward in the course, we'll be notating
methods with # to clarify how they should be called. For example,
Array#splice refers to the method that should be called on an array,
arr.splice() where arr is some array variable. Likewise
String#toUpperCase
refers to the method that should be called on a string, str.toUpperCase()
where str is some string variable. We'll opt to refer to methods using this
notation because some methods can be called on multiple data types, such as
Array#slice and String#slice.
55. What can Array#splice do?
Before we explore the nitty-gritty details of the Array#splice method, the
first thing to be aware of is that the method will mutate the array that it
is called on. That is, Array#splice will modify the existing array and not
return a new array.
55.1. Using splice to remove
The usage of the Array#splice method is easy to mix up because it can be used
to remove or insert elements into an array. That's right - it can perform
"opposite" operations, even at the same time! For now, we'll begin by only
removing elements from an array:
let colors = ["red", "yellow", "blue", "green", "orange", "brown", "gray"];
let returnVal = colors.splice(2, 3);
console.log(colors); // [ 'red', 'yellow', 'brown', 'gray' ]
console.log(returnVal); // [ 'blue', 'green', 'orange' ]
The first two arguments for splice correspond to 1) the target index and 2) how
many elements to remove. The call colors.splice(2, 3), will remove the next
three elements beginning at index 2. This means that the elements at indices 2,
3, and 4 are removed.
Note that splice returns an array containing the elements that were removed and
also has the effect of removing the elements from the original array, mutating
it in-place.
55.2. Using splice to insert
To use the splice method to insert new elements into an array, we can pass in
any number of additional arguments representing the values to insert:
let colors = ["red", "yellow", "blue"];
let returnVal = colors.splice(1, 0, "RebeccaPurple", "CornflowerBlue");
console.log(colors); // [ 'red', 'RebeccaPurple', 'CornflowerBlue', 'yellow', 'blue' ]
console.log(returnVal); // []
The method call colors.splice(1, 0, 'RebeccaPurple', 'CornflowerBlue')
translates to "target index 1, remove the next 0 elements, then insert
'RebeccaPurple' and 'CornflowerBlue'."
55.3. Using splice like a pro
Naturally, we can combine these two functionalities! Say we wanted to target
index 2, remove the next 3 elements, then insert 'Gainsboro',
'Ivory', and
'Khaki':
let colors = ["red", "yellow", "blue", "green", "black", "beige"];
let removed = colors.splice(2, 3, "Gainsboro", "Ivory", "Khaki");
console.log(colors); // [ 'red', 'yellow', 'Gainsboro', 'Ivory', 'Khaki', 'beige' ]
console.log(removed); // [ 'blue', 'green', 'black' ]
Bam. What a versatile method! Always feel free to reference the
[documentation][mdn-splice] for the method when you are struggling to remember
its usage:
56. What you've learned
- Array#splice has two required arguments
- the target index
- the number of elements to remove beginning at that target index
- Array#splice can also take in any number of values to be inserted at the
target index
[mdn-splice]:
https://developer.mozilla.org/en-US/docs/Web/JavaScript/Reference/Global_Objects/Array/splice
String#split and Array#join
We've seen previously that strings and arrays share many similar properties. For
example, strings and arrays both have a length and can have multiple indices.
Because of this, you may find it useful to "convert" between the two types.
When you finish this article, you should be able to:
- use the
String#splitmethod to turn a string into an array - use the
Array#joinmethod to turn an array into a string
57. String#split
The [String#split][string-split-mdn] method is called on a string and accepts a
"separator" string as an argument. The method will return an array where the
elements are the resulting substrings when we cut at the "separators":
let sentence = "follow the yellow brick road";
let words = sentence.split(" ");
console.log(words); // [ 'follow', 'the', 'yellow', 'brick', 'road' ]
console.log(sentence); // 'follow the yellow brick road'
Note that the original string is not mutated, rather a new array is returned.
A common pattern is to split a sentence string on a space (' '), but you can
split on any separator as you see fit:
let sentence = "follow the yellow brick road";
console.log(sentence.split(" ")); // [ 'follow', 'the', 'yellow', 'brick', 'road' ]
console.log(sentence.split("the")); // [ 'follow ', ' yellow brick road' ]
console.log(sentence.split("o")); // [ 'f', 'll', 'w the yell', 'w brick r', 'ad' ]
A pattern you may find useful is that when you split on a separator string, it
is guaranteed that that separator will not be in the resulting array,
effectively removing it. See the example of sentence.split('the') above. This
may come in handy, so keep it in mind!
58. Array#join
The [Array#join][array-join-mdn] method is called on an array and accepts a
"separator" string as an argument. The method will return a string where
elements of the array are concatenated together with the "separator" between
each element:
let words = ["run", "around", "the", "block"];
let sentence = words.join(" ");
console.log(sentence); // 'run around the block'
console.log(words); // [ 'run', 'around', 'the', 'block' ]
console.log(words.join("_")); // 'run_around_the_block'
console.log(words.join("HI")); // 'runHIaroundHItheHIblock'
Array#join does not mutate the original array, instead it will return a new
string.
59. A clever combination
It's pretty evident that String#split and Array#join are "opposite"
methods.
That is:
- we use split to turn a string into a array
- we use join to turn an array into a string
By combining these two methods we can accomplish some cool behavior:
let str = "I don't know what I want to eat";
let newStr = str.split("I").join("we");
console.log(newStr); // 'we don't know what we want to eat'
Whoa! We were able to replace every substring "I" with the substring "we". We
know that the line str.split('I').join('we') evaluates from left to right.
This means that the split will cut the string wherever there is an 'I',
leaving a gap where the 'I's were. Then, the join will fill those gaps with
'we's.
60. What you've learned
- we can use
String#splitandArray#jointo convert between strings and
arrays - both methods do not mutate their input
[string-split-mdn]:
https://developer.mozilla.org/en-US/docs/Web/JavaScript/Reference/Global_Objects/String/split
[array-join-mdn]:
https://developer.mozilla.org/en-US/docs/Web/JavaScript/Reference/Global_Objects/Array/join
WEEK-01 DAY-5
Control Flow
Determining Types
Sometimes you want to know the type of value store in a variable so that you can
safely do things with it. If your function expects an array in its parameter but
gets a number, you can't call the map method on that!
In this article you will learn how to figure out if a value in a variable is
- A string
- A number
- A function
- An array
61. The typeof operator
Not all operators in JavaScript require two arguments like the + operator for
addition, the = for assignment, and the % operator for modulo division.
Those are all called binary operators because they take two (bi-) operands,
or things that are operated on.
JavaScript kindly gives you the operator typeof which acts on a single value.
Operators that take only one operand are called unary operators because "u
only give them one value!" (That's a joke. "uni-" or "una-" is one.)
Here are some examples of what you'd expect to see with the typeof operator.
let s = 'This is a string';
console.log(typeof s);    // 'string'
let n = 6.28;
console.log(typeof n);    // 'number'
let sum = function (a, b) {
  return a + b;
}
console.log(typeof sum);  // 'function'
Note that the value returned from the typeof operator is a String data type.
So, if you want to check if a value is a number, you could do this.
if (typeof n === 'number') {
  // It is a number. Do some maths!
} else {
  console.log('I really wanted a number. :-(');
}
62. How to tell if a value is an array
Unfortunately, due to a really old bug in the way that JavaScript works, a bug
that no one can fix because people wrote code that relies on the bug for
decades, you cannot use the typeof operator to figure out if something is an
array.
let a = [1, 2, 3];
console.log(typeof a);  // 'object'
Gee, JavaScript. That's not helpful. Thanks.
Luckily, it only took 12 years for JavaScript to include a way to test if a
value is an array. To do so, you use the Array.isArray method like this.
let a = [1, 2, 3];
Array.isArray(a);  // true
let n = 6.28;
Array.isArray(n);  // false
let f = function () {}
Array.isArray(f);  // false
63. Practical use in "real" code
Oddly enough, you won't see a lot of code in real-world applications testing if
a value is one type or another. A lot of JavaScript functions just assume that
they will get arguments of the right kind because the parameter names imply what
kind of value to pass in. For example, the following function has a parameter
named sentence.
function reverseTheSentence(sentence) {
  // ... code here ...
}
Most developers will know that the function probably wants sentence to be a
string value. They just won't pass in an array or number or ... well, anything
other than a string. Because that's just not polite. They'd expect any other
kind of value to cause the reverseTheSentence to malfunction. Only when you
know that people that don't respect your code will use it should you add in some
kind of check like this.
function reverseTheSentence(sentence) {
  if (typeof sentence !== 'string') {
    // Tell the developer they are using
    // the function wrong.
  }
  // ... code here ...
}
64. What you've seen
This article has shown you two ways to determine if a value is a kind of type:
- the
typeofoperator to use to test if a value is a number, a string, or
a function; and, - the
Array.isArraymethod to check if a value is an array.
Use them as much (or as little) as you need!
The Null Type (And Undefined)
You've met numbers and string, Booleans and arrays. There's another type often
used in JavaScript: the Null type. And, it's a special type.
In this article, you will learn about the Null type, its value, and how to work
with it in JavaScript.
65. A type with only one value
You have seen that the String type can have an "infinite" number of values
(within the limits of your computer memory). For example, the String type
represents any of the following values.
// Examples of values with the String type
'hello, world'
"this is a string"
`Where is my pudding?`
''
'A really long string.........................................................'
The Number type also has this aspect. Any number that you can reasonable express
in JavaScript has the Number type.
// Examples of values with the Number type
-100
99
6.28
Infinity
You also know about the Boolean type. It can have only two values.
// The only two values of Boolean type
true
false
There are not more Boolean values. You can't dream up more. There are only
two, those two.
The Null type has one and exactly one value.
// The only value that has the Null type
null
It's just that word: null. No quotation marks. No other fancy things. Just
null.
66. The meaning of null
This is a harder subject to tackle because it's a philosophical subject. Many
people ask, "What does the value of null mean in a program?" There are a
couple of answers that programmers give to this. None of them are wrong. None of
them are right. They just are. In the presence of null, the code you write
determines which of the following meanings null has.
- The value
nullmeans the absence of a value or no value - The value
nullmeans an unknown value - The value
nullis a nuisance and I hate it and wish it were never invented
During your software programming career, you will likely have all three of those
opinions, sometimes at the same time. Let's take a look at some examples to try
to figure this out.
67. The absence of a value
Let's say you wrote a function that splits a string into words, reverses them,
and puts them back together in reverse order. You can do that with the methods
String#split[link][split];Array#reverse[link][reverse]; and,Array#join[link][join].
That function could look like this.
function reverseTheSentence(sentence) {
  let parts = sentence.split(' ');
  parts.reverse();
  return parts.join(' ');
}
That's great! It works! But, what happens if someone doesn't care about what
your function and just decides to pass in something that's not a string? It
would make sense that reversing something that is not a string should lead to no
value, the absence of a value, because the input to the function doesn't make
sense. In that case, you can just return a null because there is no value
that the function can return that would make sense.
function reverseTheSentence(sentence) {
  if (typeof sentence !== 'string') {
    return null;
  }
  let parts = sentence.split(' ');
  parts.reverse();
  return parts.join(' ');
}
68. An unknown value
There are a lot of programmers that will argue that null cannot be an unknown
value. "The value is known!" they'll exclaim. "The value is 'null'! It's
known!
It's 'null'! Stop saying it's not known!"
There are programmers that vehemently disagree with that.

69. Checking if a value is null
If you had hoped that you could use the typeof operator to check if a value is
null, then you're out of luck.
// Useless code.
console.log(typeof null);  // 'object'
Silly JavaScript. Instead of using the typeof operator, you can just compare
the value to null because there is only one value of the Null data type and
it's always null. Take a look at the following code and figure out what you
think it will produce.
let a = [];
let x = null;
if (a === null) {
  console.log('a is null');
} else if (x === null) {
  console.log('x is null');
}
70. Oh, and there's that undefined value, too
Just like the null value that is the only value of the Null data type, there
is undefined which is the only value of the Undefined data type.
If you're asking yourself, "Wait, if 'null' is no value or the absence of a
value, then what the heck does 'undefined' mean?", well you're not the only one.
Have a look at this code.
let value;
value = 6.28;
console.log(value);
You probably will not be surprised to see that it will print out "6.28" because
that's the value of value. But, what if you did this? What does that new
console.log print?
let value;
console.log(value); // <- what does this print?
value = 6.28;
console.log(value);
If you guessed that it prints "undefined", you're right! When you declare a
variable, it's very first value is undefined. Most of the time, though, you'll
just immediately set it to a value.
let value = 6.28;
So, an uninitialized variable has the value undefined which is the only value
of the Undefined data type. To test for it, you can use the typeof operator
or the strict equality operator. Using the strict equality operator is the
more common way to do that, now.
// Test if a value is undefined
if (value === undefined) {
  // do a thing
}
// You can also do it this way, but
// it is considered passé.
if (typeof value === 'undefined') {
  // do a thing
}
71. What happens when...
Interestingly enough, all functions actually do return values. Have a look at
this function. What value does it return? (Not a trick question.)
function returnsTrue() {
  return true;
}
Yes, it returns the value true. But, what about this function?
function returnsWhat() {
  return;
}
There's a return statement there but it does not specify a value. If there is
not value specified, what do you think this function returns? Try putting the
function definition above and the code below into a code runner and seeing what
happens.
console.log(returnsWhat());
One you figure that out, try the same experiment but with this function. What
do you think it returns. It doesn't even have a return statement in it!
function whatIsThis() {
}
72. What you've learned
There is a special value in JavaScript represented as null which means "no
value" or "unknown value". It is the only value of the Null data type. You can
check that a value is null by using the strict equality operator x === null.
The value undefined is used by JavaScript for variables that have not been
assigned a value. Also, functions that do not return an explicit value return
the value undefined. You can test if a value is undefined by using the
strict equality operator x === undefined.
[reverse]: https://developer.mozilla.org/en-US/docs/Web/JavaScript/Reference/Global_Objects/Array/reverse
[split]: https://developer.mozilla.org/en-US/docs/Web/JavaScript/Reference/Global_Objects/Array/split
[join]: https://developer.mozilla.org/en-US/docs/Web/JavaScript/Reference/Global_Objects/Array/join
Catch Me If You Can
Sometimes bad things happen to good programs. Some person may enter some badly
formatted information. Another computer may try to attack your program by
sending it wonky data. A network could go down. A file can become corrupt. When
this happens, your running software will have some errors. This article is about
how you can recover from those errors with "structured exception handling".
In this article you'll learn the answers to:
- What is structured exception handling?
- How can I do that in JavaScript?
- How can I make my own errors?
- What else can I do with it?
- Shouldn't I just always do this?
73. Structured exception handling
Oddly enough, there are very few error-handling mechanisms in use, today, in all
programming languages. There are really only three ways that programming
language provide structured exception handling.
- Error or error code reporting as found in languages like C and Go
- Continuable exceptions as found in Common Lisp
- Stack unwinding which is found in almost every modern programming
language including JavaScript and Python
In the stack-unwinding paradigm, which is the one you'll use in JavaScript, when
an error occurs, the JavaScript interpreter (the thing running your JavaScript
code) looks for some kind of handler for that error. It has a very specific way
of searching for those handlers. The way JavaScript searches for the handlers is
very similar to the way it happens in Python, C++, Java, C#, and a lot of other
languages. Once you learn it, here, you will be able to handle errors when
writing code in all of those languages.
74. Try and catch
Say you have some code that may have an error. For example:
function sumArray(array) {
  let sum = 0;
  for (let i = 0; i < array.length; i += 1) {
    sum += array[i];
  }
  return sum;
}
If someone calls the above function with the code sumArray(null), then they
will get the error because the for loop is trying to get the length property
of the array parameter which is null.
TypeError: Cannot read property 'length' of null
To prevent this from ruining your program, you wrap code that may have an error
in a try block. Now, you've seen other blocks already: if blocks,
for
blocks, function blocks. Basically, if there are curly braces around some
lines of code, that's a code block of some kind. A try block is just some
curly braces with the try keyword.
// THIS IS AN INCOMPLETE BLOCK OF CODE
function sumArray(array) {
  let sum = 0;
  // The try block wraps the for loop. If some
  // error occurs, the try block will give you
  // a chance to react to it so that the program
  // doesn't terminate.
  try {
    for (let i = 0; i < array.length; i += 1) {
      sum += array[i];
    }
  } // needs something more here
  return sum;
}
The try block tells JavaScript that it needs to watch the code inside the
curly braces for an error. Now, you have to tell JavaScript what to do when
there is an error. You do that in the catch block that should immediately
follow the try block. The catch block accepts a single parameter that
(usually) contains an object that describes the error that occurred. In the
case of the sumArray method, if an error occurs, you could return the value
undefined rather than letting an error terminate your program. You could also
log the error to the "error" output.
function sumArray(array) {
  let sum = 0;
  try {
    for (let i = 0; i < array.length; i += 1) {
      sum += array[i];
    }
  } catch (e) {
    console.log(e);
    return null;
  }
  return sum;
}
sumArray(null);
Just to state it, again: the catch block runs when an error occurs in the try
block. If no error occurs in the try block, the catch block does not
run.
That (e) after the word catch is a variable that contains any error that was
thrown and caught by this try-catch block. It doesn't have to be named e.
function sumArray(array) {
  let sum = 0;
  try {
    for (let i = 0; i < array.length; i += 1) {
      sum += array[i];
    }
  } catch (pancakes) {
    console.log(pancakes);
    return null;
  }
  return sum;
}
sumArray(null);
Here is the same code but, instead of a variable named "e", there is a variable
named "pancakes". Now, if an error is thrown, the variable "pancakes" will
contain it. By long-standing tradition, the variables used with the catch block
are normally "e", "err", or "error".
// CODE SNIPPET, WILL NOT RUN
} catch (e) {
// CODE SNIPPET, WILL NOT RUN
} catch (err) {
// CODE SNIPPET, WILL NOT RUN
} catch (error) {
Now, when you run the code sumArray(null), you should see something like the
following, if you run it in the online code editor.
TypeError: Cannot read property 'length' of null
  at sumArray (/tmp/file.js:5:31)
  at Object.<anonymous> (/tmp/file.js:16:1)
  at Module._compile (internal/modules/cjs/loader.js:1158:30)
  at Object.Module._extensions..js (internal/modules/cjs/loader.js:1178:10)
  at Module.load (internal/modules/cjs/loader.js:1002:32)
  at Function.Module._load (internal/modules/cjs/loader.js:901:14)
  at Function.executeUserEntryPoint [as runMain] (internal/modules/run_main.js:74:12)
  at internal/main/run_main_module.js:18:47
In that code sample, after the sumArray(null) call, the lines that begins
TypeError is the error that occurred. The next 10 lines are what is known as a
stack trace. You'll end up seeing these a lot, most likely, as you continue
your career in software programming. This is the first line in understanding
errors in your code. The stack trace shows on the first line where the error
occurred: sumArray (/tmp/file.js:5:31) means that it occurred in the
sumArray method on line 5 of the content, at character 31. If you open up one
of the coding problems, paste that code block in, and run it, you'll see similar
output in the output block.
The last line undefined is the return value of the sumArray(null) invocation
that now happens when an error occurs.
That is how the so-called try-catch block works.
75. How can I make my own errors?
To create your own errors with structured exception handling, you first need to
create an error object with the message that describes the error. Then, you need
to "throw" the error. That code would look like either of these two lines, the
only difference being the new keyword. They both work exactly the same.
throw Error('this happened because I wanted it to');
throw new Error('this happened because I wanted it to');
76. What else is there?
Turns out that you can have one more block on the try-catch block. It is the
finally block. The finally block runs whether or not an error occurs. It
always runs.
function sumArray(array) {
  let sum = 0;
  try {
    for (let i = 0; i < array.length; i += 1) {
      sum += array[i];
    }
  } catch (e) {
    console.log(e);
    return null;
  } finally {
    console.log('you will always see this.');
  }
  return sum;
}
77. How do I best use this?
At this point, you may be asking yourself, "Self, since errors can occur
everywhere, shouldn't I just wrap all of my code in these try-catch blocks?"
No. No, you shouldn't.
Every try-catch block introduces another slow-down in your code. If you're
writing code that you want to run as fast as possible, then you write as few
try-catch blocks as possible. Also, it makes the code pretty cluttered with
all of the indentation and curly braces. When at all possible, you should write
defensive code which checks for bad values before errors get thrown in your
code. Rather than using a try-catch block in the sumArray function, you
could defend against bad values of the array parameter like so.
function sumArray(array) {
  if (array === null) {
    return null;
  }
  let sum = 0;
  for (let i = 0; i < array.length; i += 1) {
    sum += array[i];
  }
  return sum;
}
78. What you learned
The try-catch-finally block is a mechanism to handle errors in your code. You
should not wrap all of your code in these blocks because it can seriously
degrade the performance of your application. Instead, only wrap those portions
of the code that you want to guard against throwing exceptions.
A better choice, in JavaScript and all programming languages, is to be
defensive about your programming and choose to check that the value that you
have has the functionality that you desire by adding code like
if (value !== undefined) {}
if (value !== null) {}
WEEK 2
Introduction to JavaScript (Part 2)
Running JS Locally Learning Objectives
- Terminal Basics
- File tree
- Basic terminal navigation
- Setup & Installations on Windows 10
- Setup & Installations on macOS Catalina or Mojave
- Running JavaScript Locally
- The Object Type
- Iterating Through Objects
- Reference vs. Primitive Types
- Using the Spread Operator and Rest Parameter Syntax
- Destructuring
- We're Better Together: Pair Programming
- The App Academy Pair Programming Approach
- You Are Not Your Code: Empathetic Communication In Engineering
- Object Problems
Callbacks Learning Objectives - Callbacks: Using a Function as an Argument
- Callback Problems
Scope Learning Objectives - All About Scope
- Different Kinds of Variables
- Calculating Closures
- Context in JavaScript
- Arrow Functions
- WhiteBoarding Problem
WEEK-02 DAY-1
Nodejs
Running JS Locally Learning Objectives
Below is a complete list of the terminal learning objectives for this lesson.
When you complete this lesson, you should be able to perform each of the
following objectives. These objectives capture how you may be evaluated on the
assessment for this lesson.
- Match the commands ls, cd, pwd to their descriptions
- Given a folder structure diagram, a list of 'cd (path)' commands and target
files, match the paths to the target files. - Use VSCode to create a folder. Within the folder create a .js file containing
console.log('hello new world');and save it. - Use node to execute a JavaScript file in the termina terminal learning objectives for this lesson.
When you complete this lesson, you should be able to perform each of the
following objectives. These objectives capture how you may be evaluated on the
assessment for this lesson. - Match the commands ls, cd, pwd to their descriptions
- Given a folder structure diagram, a list of 'cd (path)' commands and target
files, match the paths to the target files. - Use VSCode to create a folder. Within the folder create a .js file containing
console.log('hello new world');and save it. - Use node to execute a JavaScript file in the terminal
79. Terminal Basics
Part of the journey of growing into a skilled programmer is about becoming
proficient with the tools we have at our disposal. The terminal is a text-based
system that allows you, as a user, to control your computer and do everything
from creating new files and folders to starting up entire applications.
Interacting with the terminal is something you will most likely do everyday in
your coding career. You may find the terminal initially intimidating to use -
all commands must be entered as text and the terminal has its own language.
However, once we get over this initial learning curve, you'll discover the
terminal is your most powerful tool!
Let's start with the basics. There are a few differences between this tool on
Mac and Windows environments; we'll be sure to highlight these differences as we
go. On Mac and Linux we use the Terminal, while on Windows we use the
Command Prompt. Both applications are analogous and you can launch them
normally by searching your apps.
When you finish this reading, you should be able to:
- Start a terminal session on your local computer
- Utilize the commands
ls,cd, andpwdto navigate a computer's file
systems. - Navigate through a file tree to access specific directories
80. File tree
As you start writing code on your local computer you'll find it soon becomes
essential to have the ability to navigate around your file system. Before we
start exploring the syntax of how to navigate your file system - we'll introduce
you to the basics of how your files are structured.
Below is a basic visualization of what a file tree might look like
[1][1] :

[1]: https://info474-s17.github.io/book/introduction-to-the-command-line.html
80.1. Essential terminology
To explain the above picture properly we first need to go over some important
terminology that we'll be using for the rest of the course.
- directory - same as a folder on your computer; a directory can contain
many files or subdirectories (folders within themselves) - root - the outer most main directory of our computer represented by
/ - path - location on your computer specified by directories.
/Desktop/photos/cats.pdfis an example of a path.
Now take a look again at the visualization above and things will make a little
more sense. The root directory sits at the top of the chart as the outer
main directory. All other directories can be accessed from root by following
a path (the dotted lines in the chart above). All directories can contain
both files and subdirectories.
Two more important words to know are: - CLI - (short for Command Line Interface) is the text-based user interface
used to view and manage computer files. (Terminal for Mac & Linux vs.
Command Prompt for Windows). - GUI - (Graphic User Interface) is the visual alternative of the CLI. The
GUI is probably what you've been using to navigate your computer so far (with
icons representing folders and files).
The CLI, Command Line Interface, predates the graphic interface you are familiar
with. Many coding specific programs can only be run from the command line
(likeNode!). Working with your own computer will really help these ideas sink
in, and once your have fluency with commands in the CLI you'll find it much
faster to do essential tasks. Plus, matrix ninja w00t.
Basic terminal navigation
NOTE: Unix is a term we will be using a lot in the future. It refers to
the parent operating system upon which Mac is built upon and Linux is inspired
by. They have (nearly) identical commands and features and both use the
Terminal. Windows is not Unix based and the commands are slightly different. For
the rest of the course we will only support Unix/Linux and we will not give any
additional Windows specific commands.
81. Navigation of the Unix file system
Let's get started! Search your computer for an Application named "Terminal".
Upon opening the application a new Terminal window will greet you with:
~ $
81.1. Navigation commands
We'll start by covering some basic commands that you will find yourself using
all the time:
ls- lists all the files and subdirectories in the current directorycd [path]- changes the current directory to the directory specified by the
pathargument. (i.e.cd /catswould enter a directory named "cats").pwd- short for "Print Working Directory". Thepwdcommand lists the path
to your current location in your file system starting from the root.
When opening a fresh terminal window the default directory opened will be the
home directory. Your home directory will be represented by a~. So for
example, if your computer user's name wasjanedoethen a fresh terminal
would open to~and using thepwdcommand would print out your current
location as/Users/janedoe/.
To navigate through directories in the command line, we need to specify which
directories to go through. Let's say we are in the home directory for our user,
(~), and want to navigate into a directory we have on our Desktop (for example
photos). We need to first go into theDesktopdirectory, and then go into
photos.
~ $ ls
Applications    Desktop
Documents       Downloads
Library         Movies
Music           Pictures
~ $ cd Desktop
~ Desktop $ ls
photos          lectures
memes           projects
~ Desktop $ cd photos
~ photos $ ls
cats.jpeg       hey_programmers.gif
Notice, after we navigate to a new folder using cd, the current path before
the $ changed to reflect where we currently are in our file system. Test
changing directories in your Terminal.
You can also navigate into and through multiple directories at once by
specifying a path of a directory and its subdirectory:
~ $ ls
Applications    Desktop
Documents       Downloads
Library         Movies
Music           Pictures
~ $ cd Desktop/photos
~ photos $ ls
cats.jpeg       hey_programmers.gif
If you ever need a reminder on where you are in your file system you can use the
pwd command. Let's take a look at at how to use pwd continuing from our
above example:
~ photos $ ls
cats.jpeg       hey_programmers.gif
~ photos $ pwd
/Users/rose/Desktop/photos
81.2. Directory Shortcuts
Use the command cd .. to go back to the previous directory. If we are in the
photos directory on our Desktop, and want to go back to the Desktop:
~ photos $ cd ..
~ Desktop $
Use the command cd (by itself) to go back to your home directory instantly:
~ photos $ cd
~ $
Those are the basics of navigating around the terminal! We'll trickle in more
commands as we move forward, but you'll use ls, pwd and cd the most.
82. What you learned
- How to start a new terminal session
- How to navigate your file system using
cd,ls, andpwd - How to navigate through a file tree to access specific directories
Setup & Installations on Windows 10
This reading is only applicable to Windows users. If you're on macOS, please use
the instructions in Setup & Installations (macOS).
83. Windows Subsytem for Linux (WSL) and Ubuntu
Test if you have Ubuntu installed by typing "Ubuntu" in the search box in the
bottom app bar that reads "Type here to search". If you see a search result that
reads "Ubuntu" with "App" under it, then you have it installed. Otherwise,
follow these instructions to install the WSL and Ubuntu.
- In the application search box in the bottom bar, type "PowerShell" to find
the application named "Windows PowerShell" - Right-click on "Windows PowerShell" and choose "Run as administrator" from
the popup menu - In the blue PowerShell window, type the following:
Enable-WindowsOptionalFeature -Online -FeatureName Microsoft-Windows-Subsystem-Linux - Restart your computer
- In the application search box in the bottom bar, type "Store" to find the
application named "Microsoft Store" - Click "Microsoft Store"
- Click the "Search" button in the upper-right corner of the window
- Type in "Ubuntu"
- Click "Run Linux on Windows (Get the apps)"
- Click the orange tile labeled "Ubuntu"
- Click "Install"
- After it downloads, click "Launch"
- If you get the option, pin the application to the task bar. Otherwise,
right-click on the orange Ubuntu icon in the task bar and choose "Pin to
taskbar" - Wait for it to install the local files
- When prompted to "Enter new UNIX username", type your first name with no
spaces - When prompted, enter and retype a password for this UNIX user (it can be the
same as your Windows password) - Confirm your installation by typing the command
whoamifollowed by Enter at
the prompt (it should print your first name) - You need to update your packages, so type
sudo apt update(if prompted for
your password, enter it) - You need to upgrade your packages, so type
sudo apt upgrade(if prompted
for your password, enter it)
84. Git
Git comes with Ubuntu, so there's nothing to install. However, you should
configure it using the following instructions.
- Open an Ubuntu terminal if you don't have one open already.
- You need to configure Git, so type
git config --global user.name "Your Name"with replacing "Your Name" with your real name. - You need to configure Git, so type
git config --global user.email your@email.comwith replacing "your@email.com" with your real email.
85. Google Chrome
Test if you have Chrome installed by typing "Chrome" in the search box in the
bottom app bar that reads "Type here to search". If you see a search result that
reads "Chrome" with "App" under it, then you have it installed. Otherwise,
follow these instructions to install Google Chrome.
- Open Microsoft Edge, the blue "e" in the task bar, and type in
http://chrome.google.com. Click the "Download Chrome" button. Click the
"Accept and Install" button after reading the terms of service. Click "Save"
in the "What do you want to do with ChromeSetup.exe" dialog at the bottom of
the window. When you have the option to "Run" it, do so. Answer the questions
as you'd like. Set it as the default browser. - Right-click on the Chrome icon in the task bar and choose "Pin to taskbar"
86. Node.js
Test if you have Node.js installed by opening an Ubuntu terminal and typing
node --version. If it reports "Command 'node' not found", then you need to
follow these directions.
- In the Ubuntu terminal, type
sudo apt updateand press Enter - In the Ubuntu terminal, type
sudo apt install build-essentialand
press Enter - In the Ubuntu terminal, type
curl -o- https://raw.githubusercontent.com/nvm-sh/nvm/v0.35.2/install.sh | bashand
press Enter - In the Ubuntu terminal, type
. ./.bashrcand press Enter - In the Ubuntu terminal, type
nvm install --ltsand press Enter - Confirm that node is installed by typing
node --versionand seeing it
print something that is not "Command not found"!
87. Unzip
For your projects you will often have to download a zip file and unzip it. It is easier to do this from the
command line. So we need to install a linux unzip utility.
In the Ubuntu terminal type: sudo apt install unzip and press Enter
88. Mocha.js
Test if you have Mocha.js installed by opening an Ubuntu terminal and typing
which mocha. If it prints a path, then you're good. Otherwise, if it prints
nothing, install Mocha.js by typing npm install -g mocha.
89. Python 3
Ubuntu does not come with Python 3. Install it using the command sudo apt install python3. Test it
by typing python3 --version and seeing it print a
number.
90. Note about WSL
As of the time of writing of this document, WSL has an issue renaming or deleting files if Visual Studio Code is open. So before doing any linux commands which manipulate files, make sure you close Visual Studio Code before running those commands in the Ubuntu terminal.
91. Now, you have everything installed!
Setup & Installations on macOS Catalina or Mojave
Being a developer isn't just about hacking away into the wee hours of the
morning or debugging a new feature. All craftspeople must have mastery of their
tools to be successful in their trade, and programmers are no different. For a
developer the most important tools are our CLI, text editor, web browser,
compiler, package manager, and Node environment for running JavaScript. Mastery
of these tools will be invaluable for the entire duration of our careers.
This reading will cover the installation of the basic tools you'll need to run
code on your computer.
When you finish this reading, you should have:
- Installed Visual Studio Code (VS Code)
- Installed Node & NPM (Node Package Manager)
- Installed Google Chrome
- Installed Xcode & Homebrew (Mac)
- Installed Python 3
92. Preparing your machine
The commands you need to enter are listed below. Here we will install basic
developer tools, such as [homebrew][homebrew] (a 3rd party package manager for
MacOS), [Xcode][xcode] (a library of developer tools provided by Apple), VS Code
(a full-featured text-editor), and Node (a JavaScript runtime environment).
92.1. Chrome
Here at App Academy, our browser of choice is Google Chrome. This isn't super
important at the beginning of the course, but once we get into frontend
development (writing code that runs in a web browser) the Chrome Devtools will
be crucial for debugging every manner of issue.
To install Google Chrome, download the necessary files and follow the
instructions on the [Google Chrome website][chrome-dl].
[chrome-dl]: https://www.google.com/chrome/browser/desktop/index.html
92.2. Xcode
Let's start with Xcode. The Xcode command line tools are a requirement for
installing the homebrew package manager in the next step.
NOTE: If you are using a Linux machine you will not be able to install Xcode
or homebrew.
Install the Xcode command line tools by running the following from the console.
$ xcode-select --install
To conclude the installation you will need to agree to the Xcode license. Start
the Xcode app, click "Agree", and allow the installation to finish. Then you can
go ahead and quit the Xcode app.
92.3. Homebrew
Homebrew is kind of like a low-tech App Store. It allows us access to and the
ability to install a wide variety of software and command line tools from the
console. These are distinct from those hosted on the App Store and will need to
be managed by Homebrew.
Enter the following in your terminal to download and install Homebrew:
/usr/bin/ruby -e "$(curl -fsSL https://raw.githubusercontent.com/Homebrew/install/master/install)"
You will be given a list of dependencies that will be installed and prompted to
continue or abort. Press RETURN to continue.
Let's break this command down a bit. curl, a command-line tool commonly used
for downloading files from the internet, is used to download the Homebrew
installation file. The "$(...)" transforms the file content into a string.
Finally, the string is passed to a Ruby language executable (/usr/bin/ruby is
where the system Ruby executable file is stored on our machine) with the -e
flag to tell Ruby to run the argument as code.
Check out the [Homebrew website][homebrew] to learn the basic commands.
[xcode]: https://itunes.apple.com/us/app/xcode/id497799835
[homebrew]: https://brew.sh/
92.4. Node.js & NPM
[Node.js][node] is a very powerful runtime environment built on Google Chrome's
JavaScript V8 Engine. It is used to develop I/O intensive applications like
video streaming sites, robots, and other general purpose applications. For our
purposes Node provides a way for us to run JavaScript outside of the browser.
We want to use a version manager with Node to help us manage potential conflicts
between versions and dependencies. In this case we will be using [NVM][nvm]
(Node Version Manager) to install/manage Node.js.
Open up your console (the Terminal application on Mac) and run the following:
# download and run the official install script
curl -o- https://raw.githubusercontent.com/creationix/nvm/v0.33.6/install.sh | bash
# update your terminal config (you will now have access to the nvm command)
source ~/.bashrc
# install a stable version of node
nvm install 10.16
# set version 10.16.0 as default version
nvm use 10.16
# verify install/config
which node # => /Users/username/.nvm/versions/node/v10.16.0/bin/node
Node comes with a package manager called [NPM][npm], which provides access to a
whole ecosystem of libraries and tools we can use. NPM comes pre-bundled with
Node, so there is no additional work for us to do. By default we don't need any
additional libraries, and any additional packages we do need to use will be
installed on a project-by-project basis.
92.5. VS Code
This one is pretty easy. Go to website for [Visual Studio Code][vs-code], then
download and install VS Code.
To verify that the shell commands were installed correctly, run which code in
your terminal. If code is not a recognized command, open the VS Code editor,
open the Command Palette (Cmd+Shift+P on macOS ,Ctrl+Shift+P on Linux) and
type shell command to find the
Shell Command: Install 'code' command in PATH
command. Then restart the terminal. This will now allow you to easily open files
in VS Code from the terminal using the code command followed by a file or
directory.
Next, we'll want to install a few useful VS Code extensions and configure VS
Code to play nice with these extensions. Download [this zip
file][vscode-script], which contains a script that will do the work for you.
Unzip the file and open the setup_vscode directory. Navigate into that
directory in the terminal (drag and drop the folder over to the terminal icon on
macOS or right click in the directory and select Open in Terminal on most
Linux distributions).
To run the script, run the command:
~ ./setup-vs-code.sh
The script will do the rest. Now restart VS Code and you'll be good to go.
[node]: https://nodejs.org/en/
[nvm]: https://github.com/creationix/nvm
[npm]: https://docs.npmjs.com/
[vs-code]: https://code.visualstudio.com/
[vscode-script]:
https://appacademy-open-assets.s3-us-west-1.amazonaws.com/Module-JavaScript/js-local/setup-vs-code.zip
92.6. Mocha testing framework
The last thing we'll be installing will be Mocha. Mocha is a JavaScript testing
framework that we will be using to test our work in the future. Here are the
instructions of how to install mocha!
92.6.1. Installing Mocha
- Open Terminal
- Enter this command:
npm install -g mocha - To test your installation, run the command:
mocha --version. If it returns
a version number, you've successfully installed mocha! Otherwise, let your
instructor know and they'll help you fix things.
92.7. Installing Python3
You can just use homebrew for this install, too.
brew install python
93. What you learned
How to install the various tools you'll need to create a development
environment.
After you finished this reading you should have the following installed:
- Virtual Studio Code (VS Code)
- Node & NPM (Node Package Manager)
- Mocha the JavaScript testing framework
- Google Chrome
- Xcode & Homebrew (Mac)
- Python 3
94. Running JavaScript Code
JavaScript is the language of the Internet! Whenever you browse your
favorite website (google, facebook, twitter, appacademy.io), your web browser
is
executing JavaScript code. There are two main environments we use to run
JavaScript: the first is the browser (Chrome, Firefox, etc.) and the second is
Node. Writing code for the browser, (aka front end engineering), requires a lot
more than just understanding JavaScript, so we'll come back to that topic later
in the course. For now, we will concentrate on running JavaScript on our
computers using Node.
So what is [Node][node] exactly? [Node.js][node] is a very powerful runtime
environment built on Google Chrome's JavaScript V8 Engine. It is used to develop
I/O intensive applications like video streaming sites, robots, and other general
purpose applications. For our purposes the most advantageous feature of Node is
that it provides a way for us to run JavaScript outside of the browser.
Now that you have Node installed on your local computer it's time to run some
JavaScript! Running your own code on your own computer is a rite of passage for all
developers. We know you are up to the challenge!
By the end of this reading you should be able to:
- Use the Node REPL to test out simple expressions and functions
- Use VSCode to create a folder and a
.jsfile within that folder - Use Node to run a
.jsfile
[node]: https://nodejs.org/en/
95. Node REPL vs. JavaScript File
Before we begin running code we wanted to make a clear distinction. Using Node
there are two ways that we can run JavaScript code:
- using the Node REPL
- using Node to run a .js file
Both the Node REPL and using a JavaScript file are common ways to execute
JavaScript code, but they are useful in different scenarios:
Node REPL (Read, Evaluate, Print, Loop) is used for testing quick ideas. The
Node REPL is useful when playing around with any curiosities you have because
you can see how an expression is evaluated quickly. Any code that you type into
the Node REPL will be lost when you exit the REPL. If you've ever used a program
that let you write a line of code and execute it immediately, without a separate
command, then you've used a REPL.
JS Files are used for saving code for the long term. If you create a.js
file and save it then all the code within can be referenced and used later. When
you work on problem sets, projects, and anything else you want to save, you
should always save your code to a.jsfile!
95.1. Using the Node REPL
To use the Node REPL, simply open up your command line (Terminal) and enter
the command node. In the examples below we use the $ to show that we are in
the command line (in our case Terminal).
~ $ node
Welcome to Node.js
Type ".help" for more information.
>
Notice that as soon as we enter the node command, we get a welcome message and
we see our Terminal icon change to look like this: >. This > icon means that
we are inside the Node REPL, so we can type any valid JavaScript lines and see
what they evaluate to:
~ $ node
Welcome to Node.js
Type ".help" for more information.
> 1 + 1
2
> let message = "Hello" + "world"
undefined
> message
'Helloworld'
We can also define functions in the Node REPL though you'll find writing them in
that environment is not super fun due to the Node REPL not being optimized for
that kind of coding.
Here is an example of defining and invoking a function using node:
~ $ node
Welcome to Node.js
Type ".help" for more information.
> function sayHello () {
... console.log("hello!");
... }
undefined
> sayHello();
hello!
If you want to exit the Node REPL, and head back to our plain old command line
enter the command .exit in the REPL. Doing this will get rid of the > icon,
which means we are no longer in the REPL. When we are back inside our command
line we can enter the normal commands (i.e cd, ls, pwd):
$ node
> 1 + 1
2
> "How do I get out of here" + "!?!?"
'How do I get out of here!?!?'
> .exit
~ $
95.2. Using JavaScript Files
The first thing you'll need in order to run a JavaScript file is to create a
file that will contain the code you will be running. A new file is like a blank
canvas - just awaiting the chance to be made into art.
If you don't currently have a dedicated coding folder start off by creating a
new folder somewhere accessible, like your Desktop folder. Then you can open
that folder using VS Code. From there you can simply create a "New File". In
order to create a JavaScript file, make sure that you change the file name to
one that ends in .js, for example myFile.js.
Now take a moment to enter some code into your new .js file like the
following:
// AppAcademyWork/myFile.js
console.log("hello world!");
Don't forget to save the file with your new code!
Now to run a JS file you need to first go into the folder that contains that
file by using cd in your command line. Feel free to use ls to list your
folders and see where you have to go. Once you are inside of the correct folder,
run node <fileName>, for example node myFile.js. When you enter these
commands, be aware of the capitalization. File names are case sensitive!
~ $ ls
Downloads
Desktop
Music
Videos
~ $ cd Desktop
~ Desktop $ ls
AppAcademyWork
~ Desktop $ cd AppAcademyWork
~ AppAcademyWork $ ls
myFile.js
~ AppAcademyWork $ node myFile.js
Hello world
That is how you run JavaScript on your local computer! You create and save a
file, navigate to that file in your terminal, then run the file using the node
command followed by the filename (node <fileName>).
96. What you learned
- How to use the Node REPL to test out simple expressions and functions
- How to use VSCode to create a folder and a
.jsfile within that folder - How to use Node to run a
.jsfile
Running JavaScript Locally
Now it's time to become a leet Hacker and put your new found Terminal skills to
the test! In the past you have been writing JavaScript within the confines of
the App Academy Online platform but it's time to break free and start writing
code on your local computer.
In this project we'll be working VS Code to create new folders and files, Node
to run JavaScript, and mocha to help us run tests.
97. Phase 1: Creating files and folders
We'll kick off this project by creating a folder for to contain the code you
write. This would be a good time to create a folder for your work here at App
Academy. Feel free to name the folder whatever you like - just make sure you
remember where you put it (the Desktop is the ideal place)! Once you've created
a folder for your work create a new folder within that folder. This folder will
be representative of some of the work you do for this project, so name it
firstProject.
The first thing you'll want to do with this firstProject folder is open it up
in VS Code. Once you've entered VS Code you can go to "File" then "New File" to
create a new file. Name this file phaseOne.js.
Now we'll teach you a fun trick - in the Sidebar of VS Code you should see the
folder named firstProject and if you click the arrow beside it you should see
the file named phaseOne.js. Let's create a second file in the firstProject
directory but this time we'll use a nifty VS code shortcut. If you click within
the firstProject folder and type a then a new file will be automatically
created and you will be able to quickly name this file. Here is a gif of us
doing the same thing:

So you can use both the "New File" option or the above shortcut to create new
files. Additionally, you create subdirectories within a directory by typing
Shift + a. For now create new files and folders using whatever method is most
comfortable.
Name the second file you created above phaseTwo.js and let's go run some
JavaScript.
98. Phase 2: Using Node to run JavaScript files
98.1. Phase 2A: Using the Node REPL
The first way we'll run JavaScript today is by using the Node REPL. Open a
window of the Terminal application and type in the command:
~ $ node
>
You should see your icon change to look like this: >. Now do the following to
get comfortable with using the Node REPL:
- Write a
console.logstatement that will print "Hello Node!" - Write four mathematical expressions:
- each using one of the following symbols:
+,-,*and%
- each using one of the following symbols:
- Write a function named
addTwothat will accept a number as an argument and
then willreturnthe number with2added to it. Next, invokeaddTwo
passing in a number as an argument.
The Node REPL is an interactive code environment which allows you to test how
JavaScript will react to simple expressions. Learning to use a REPL to test
ideas and to ask your coding environment questions (as shown in the above
simple and quick problems) is a great way to teach yourself, and become more
self-sufficient as a programmer.
98.2. Phase 2B: Using Node to run JavaScript files
In the phaseOne.js file we previously created write a simple console.log
statement that will print "Look at me go!" to the console. Next, open a window
of the Terminal application on your computer and navigate to the firstProject
directory. Once inside the directory run the code within the phaseOne.js file
by using the following command:
~ firstProject $ node phaseOne.js
You should see "Look at me go!" printed to the console.
Congratulations, you've just run JavaScript on your computer using both the Node
REPL and by running a .js file!
Celebrate your victory by writing a new function in the phaseTwo.js file.
Write a function named helloNode that when invoked will return the string
"Hello Node". Try invoking your function below where you defined it and use
node to run the file:
~ firstProject $ node phaseTwo.js
~ firstProject $
Notice how you don't see anything printed to the console! That is because we
returned the value but didn't print it to the console. Now try wrapping your
function call for helloNode in a console.log statement. Then run the
phaseTwo.js file again using node. You should see "Hello Node" printed to
the console.
Nice! You've now written and run a function using a .js file. For the rest of
this course you will be utilizing VS Code and Node to write and run code.
99. Phase 3: Running tests using Mocha
At work, you will often be writing tests for your own code to ensure it works.
Here at App Academy you will primarily be running tests we have written for you
to guide your development. Now that you know how to write and run code in this
environment let's practice using mocha to test the output of functions.
We'll do a deep dive into testing practices soon - but for now know that
testing is how we can ensure that functions work the way we expect them to.
While you had previously used console.log to see if your functions gave the
expected output when given a certain input, Mocha automates this process for
you.
We will now go over an important testing workflow you'll be using a lot in the
future of this course. The workflow we are talking about breaks down into
several steps:
- Download problems & tests
- Start working on an individual problem
- Run tests (also known as
specs) to see if you have solved the problem
successfully - Move onto to the next problem and repeat steps 2 & 3
We'll now walk through what each of these steps entails.
99.1. Step One: Download problems & tests
- Click [here][skeleton] to download a
.zipfile containing the problems
you'll be working on.
Note: If you use Windows you might find it easier to use
curlto download the zip file into your WSL. Here's how to do that:
- right click on the link to the zip file and copy the link to your clipboard
- In the Ubuntu Terminal type the following:
curl -o skeleton.zipand then paste in the link you copied and press Enter. This will download the zip file into your current directory. It should look something like this:curl -o skeleton.zip https://appacademy-open-assets.s3-us-west-1.amazonaws.com/Module-JavaScript/js-local/skeleton.zip- Use
unzipto unzip the file like this:unzip skeleton.zipYou can use this method anytime you need to download zip files for your projects.
- Unzip/Uncompress the file somewhere you can access easily, like your
Desktop
folder. Unzipping the file will leave you with a folder namedskeleton. - Within the
skeletonfolder there will be folder namedproblems. You'll now
be working on completing each of these problem in order.
99.2. Step Two: Start working on an individual problem
- Open up the
problemsfolder in VS Code, you'll see the problems are numbered
in sequential order.
Only write your code to the.jsfiles in theproblemsfolder. Do not move
or edit any of the files in thetestfolder. Also, do not change the names of
the files in theproblemsfolder. The reason for this is because the tests
are expecting to find the files in a certain place and with the names we
provided for each function. Moving or editing files could cause the tests to
break.
99.3. Step Three: Run tests to see if you have solved the problem successfully
- In your Terminal, use the
cdcommand to navigate into theskeletonfolder.- Note: If you unzipped the
skeletononto yourDesktop, you need tocd
into yourDesktopfirst, thencdintoskeleton.
- Note: If you unzipped the
- From here you can now use the
mochacommand to run the problem set against
the mocha test cases we provided:
~ skeleton $ mocha
- If you scroll up toward the top of the
mochaoutput, you will see a quick
breakdown of what specs were passed. You can test withmochaas many times
as you want to!
Here is an example of setting up a problem set in the command line:
~ $ cd Desktop/
~ Desktop $ ls
 skeleton
~ Desktop $ cd skeleton/
~ skeleton $ ls
 problems test
~ skeleton $ mocha
  diffArrayLen()
    1) should return a boolean indicating the lengths of the arrays are the same
  avgValue()
    2) should return the average of an array of numbers
  ... etc.
  0 passing
  9 failing
If you have any trouble with this don't hesitate to ask a TA for help!
You can feel free at any point to move your skeleton folder into the
firstProject folder you created in the previous phase. Just make you you
navigate to it correctly!
99.4. A note about testing manually
- If you'd like to test a problem manually (without Mocha), you can still do
that. You can wrap function invocations inconsole.logstatements below
where each function is defined in the file.- Then you can
cdinto theskeletonfolder and run the individual.js
files usingnode. (for example:node 01-diff-array-lens.js)
- Then you can
- Before moving on from a problem, be sure to verify your function works as
expected usingmocha.
Now go forth and solve the problems you've been given! Once you've passed all
the tests give yourself a pat on the back for passing your first series of
specs. May you have many more passed specs in your future! 🙌
[skeleton]:
https://appacademy-open-assets.s3-us-west-1.amazonaws.com/Module-JavaScript/js-local/skeleton.zip
WEEK-02 DAY-2
Pojo
Plain Old JS Object Learning Objectives
Below is a complete list of the terminal learning objectives for this lesson.
When you complete this lesson, you should be able to perform each of the
following objectives. These objectives capture how you may be evaluated on the
assessment for this lesson.
- Label variables as either Primitive vs. Reference
- Identify when to use . vs [] when accessing values of an object
- Use the
obj[key] !== undefinedpattern to check if a given variable that
contains a key exists in an object - Utilize Object.keys and Object.values in a function
- Iterate through an object using a
for inloop - Define a function that utilizes ...rest syntax to accept an arbitrary number
of arguments - Use ...spread syntax for Object literals and Array literals
- Destructure an array to reference specific elements
- Destructure an object to reference specific values
- Write a function that accepts a array as an argument and returns an object
representing the count of each character in the arraye terminal learning objectives for this lesson.
When you complete this lesson, you should be able to perform each of the
following objectives. These objectives capture how you may be evaluated on the
assessment for this lesson. - Label variables as either Primitive vs. Reference
- Identify when to use . vs [] when accessing values of an object
- Use the
obj[key] !== undefinedpattern to check if a given variable that
contains a key exists in an object - Utilize Object.keys and Object.values in a function
- Iterate through an object using a
for inloop - Define a function that utilizes ...rest syntax to accept an arbitrary number
of arguments - Use ...spread syntax for Object literals and Array literals
- Destructure an array to reference specific elements
- Destructure an object to reference specific values
- Write a function that accepts a array as an argument and returns an object
representing the count of each character in the array
Pair Programming Learning Objectives
The Object Type
Up to this point you've interacted with a lot of different data types in
JavaScript. Now it's time to introduce one of the most diverse and widely used
data types of all: Objects.
An object is a data structure that stores other data, similar to how an array
stores elements. An object differs in that each value stored in an object is
associated with a key. Keys are almost always strings while values can
be
any data type: numbers, strings, functions, arrays, other objects, anything at
all!
When you finish this reading, you should be able to:
- Create objects using correct syntax with a variety of values.
- Identify that an object is an unordered collection of values.
- Key into an object to receive a single value using both Bracket and Dot
notation - Use Bracket notation to set a variable as a key in a Object.
- Implement a check to see if a key already exists within an Object.
- Understand how object precedence fits in with dot notation for objects.
100. The object of my affections
To reiterate, an object is a data structure that stores other data. In other
programming languages similar data structures to the Object type are referred to
as 'dictionaries', 'maps', or 'associative arrays'. Objects are different from
the previous data structures we've talked about (i.e. arrays) in two important
ways:
- Instead of accessing values within an object through an index with numbers,
objects are indexed usingkeys.- This allows us to access values quickly and efficiently. We'll be talking
a more more about this point later on in the course.
- This allows us to access values quickly and efficiently. We'll be talking
- Order is not guaranteed within an Object. When you iterate through the
values in an object, they may not be in the same order as when they were
entered.
Objects are defined by using curly braces:{}. See below for an example:
> let car = {};
undefined
// here is our new empty object!
> car
{}
Fun Fact: Objects are known by the affectionate industry jargon: Plain Old
JavaScript Objects (or POJO for short). Expect to see that short-hand often!
101. Setting keys and values
When learning about objects it can be helpful to think about real life objects.
For instance think about a car. A real life car can have a color, a number of
wheels, a number of seats, a weight, etc. So a real life car has a number of
different properties that you wouldn't list in any particular order, though all
those properties define the characteristics of that car.
Thinking of a car - let's create a car object to represent that collection of
properties. We can create new key-value pairs using bracket notation []
and assignment =. Notice that the key inside the brackets is represented with
a string:
// here "color" is the key!
> car["color"] = "Blue";
"Blue"
> car["seats"] = 2;
2
// accessing our object at the key of color
> car["color"]
"Blue"
> car["seats"]
2
> car
{color: "Blue", seats: 2}
When we enter car["color"], we are using "color" as our
key. You can think
of keys and values in an object just like a lock and key in real life. The
"color" key "unlocks" the corresponding value to give us our
car's color,
"Blue"!
101.1. Keys without values
What happens if we try to access a key that we have not yet assigned within an
object?
> car
{color: "Blue", seats: 2}
> car["weight"]
undefined
If we try to access a key that is not inside an object we get undefined.
This falls right into place with our understanding of where undefined shows up
in JavaScript. It's the common default value of a lot of things. The undefined
type is the default for unassigned variables, functions without a return,
out-of-array elements, and non-existent object values.
Using this knowledge, we can check if a key exists in an object:
> car
{color: "Blue", seats: 2}
> car["color"]
"Blue"
> car["color"] === undefined;
false
> car["weight"] === undefined;
true
While this is a common pattern, in modern JS the preferred method to check if an
object exists in a key is to use the in operator:
> car
{color: "Blue", seats: 2}
> "color" in car;
true
> "model" in car;
false
101.2. Using variables as keys
So we've talked about assigning string keys within Objects. Additionally, we
know how to create variables that have strings as values. Sooo... you might be
thinking: what happens if we assign a variable with a string value as a key
within an Object? Glad you asked! Let's look at an example below for setting
keys within Objects using variables.
Let's keep playing with the car we made previously:
> car
{color: "Blue", seats: 2}
> let newVariable = "color";
undefined
> newVariable
"color"
> car[newVariable]
"Blue"
> car["color"]
"Blue"
Aha! Of course we can use a variable as our key! A variable always evaluates
to the value we assigned it. So car[newVariable] and car["color"] are
equivalent! Why is this useful? We know that variables can change; so now the
keys we use for objects can change!
Let's take a look at what happens when we change the variable above:
> car
{color: "Blue", seats: 2}
> newVariable
"color"
> newVariable = "weight";
undefined
> car[newVariable]
undefined
// car doesn't change because we didn't *assign* the new variable key in our object
> car
{color: "Blue", seats: 2}
We can now use our newly assigned variable to set a new key in our object:
> car
{color: "Blue", seats: 2}
> newVariable
"weight"
// assigning a key value pair using a variable!
> car[newVariable] = 1000;
1000
> car
{color: "Blue", seats: 2, weight: 1000}
102. Using different notations
So far we've shown how to access and set values in objects using object[key] -
also known as Bracket Notation. However, this is only one of two ways to
access values within an object. The second way we can access values within an
object is called Dot Notation. We can use . to assign and access our
key-value pairs. The easiest to notice difference is when we use dot notation,
we don't need to use string quotes as the key:
> let dog = {};
undefined
> dog.bark = "Bowowowo";
"Bowowowowo"
> dog.bark
"Bowowowo"
> dog
{ bark: "Bowowowowo" }
102.1. Bracket notation vs Dot notation
Now that we know two ways to access values of an object, you are probably asking
yourself: which one should you use? Here is a quick list of pros for each.
Dot notation:
- easier to read
- easier to write because we don't have to deal with using quotation marks
- cannot use variables as keys
- keys can't contain numbers as their first character (
object.1keydoesn't
work!)
Bracket notation Pros: - you can use variables (assigned to string values) as keys!
- It is okay to use variables and Strings that start with numbers as keys
(useobject['1key']does work, whileobject.1keydoes not)
There are tradeoffs and advantages for either notation, so practice using both!
You will learn quickly that there are a ton of different ways to write the
same thing in JavaScript. Having both of these options available to you will
allow you to use different tools to solve different problems.
One of the most fun parts of being a programmer is the ability to come up with
different solutions to the same problem. So you should have both types of
notation in your tool-belt to be a versatile programmer!
Let's look at the difference:
let myDog = {};
myDog.name = "Fido";
// let's use a variable as our key and some bracket notation:
let myKey = "name";
console.log(myDog); // prints `{name: "Fido"}`
console.log(myDog[myKey]); // prints `Fido`
// what if we try to use the variable in dot notation:
// the below is interpreted as myDog['myKey']
console.log(myDog.myKey); // prints: undefined
When we use dot notation to write myDog.myKey, myKey will not be
interpreted by JavaScript as a variable. The text we write after the . will
be used as the literal key. Remember that if we try to use a key that does
not exist in an object, we get back the default value of undefined.
// continued from above
console.log(myDog.myKey); // prints `undefined`
myDog.myKey = "???";
console.log(myDog); // prints `{name: "Fido", myKey: "???"}`
console.log(myDog.myKey); // prints `???`
// mind === "blown"
102.2. Putting it all together
We can also create an entire object in a single statement:
let myDog = {
  name: "Fido",
  type: "Doge",
  age: 2,
  favoriteToys: ["bone", "ball"]
};
console.log(myDog.age); // prints 2
console.log(myDog["favoriteToys"]); // prints ["bone", "ball"]
102.3. Operator precedence revisited
Just like with math and logical operators, the concepts of [operator precedence]
also pertain to objects. Associativity determines the order of operation, along
with precedence. There are two types of associativity: right-associativity and
left-associativity.
Right-associativity is when code is evaluated right-to-left. Let's take a
closer look at what is happening in the line of code below:
a = b = 1;
- Variable
bis assigned as1. - Variable
ais assigned asb = 1. b = 1returns the value1, so variableais now assigned as1.
The assignment of variables takes lowest precedence, which is why we evaluate
the return value ofb = 1before completing the assignment of variablea.
The example below is left-associativity is when code is evaluated
left-to-right. It evaluates thedocument.getElementByIdmethod before
accessingvalue.
let id = "header";
let element = document.getElementById(id).value;
- We resolve the
documentvariable to be the document object. - We use dot notation to retrieve the
getElementByIdfunction. (The function
is a property of the document object). - We attempt to call it, but before the call can proceed we must first evaluate
the function's arguments. - We resolve the
idvariable to be the string"header". - The
getELementByIdfunction returns an HTMLElement object and then uses
dot notation to accessvalue. - Finally we do assignment which is the LOWEST precedence (that's why
assignment happens last). Its associativity is right to left, so we take the
value on the right and assign it to the left.
Now let's dive into the example below. Resolving the variables to their values
happens before the operators.
add(number1, number2) + number3;
number3is resolved to its value.- The function is invoked, but its variables need to be resolved.
number1andnumber2are resolved to their values.- The function is invoked so
number1,number2, andnumber3are finally
added together!
103. What you learned
In this reading we covered:
- Objects are un-ordered data structures consisting of key and value pairs.
- Object
keysare strings, but theirvaluescan be anything (arrays,
numbers, strings, functions, etc.) - Setting key and value pairs using both Bracket and Dot notation
- Using Bracket notation to set variables as
keysin Objects
- Using Bracket notation to set variables as
- The default value when accessing a key not in an object is
undefined- How to check if a key is already within an object using the
object[key] === undefinedpattern
[operator precedence]:
https://developer.mozilla.org/en-US/docs/Web/JavaScript/Reference/Operators/Operator_Precedence
- How to check if a key is already within an object using the
Iterating Through Objects
In the previous reading we mentioned that Objects store unordered
key-value pairs. With Objects we can not rely on indices to access values.
Meaning - we'll have to iterate through objects in new ways to access the keys
and values within.
When you finish this reading, you should be able to:
- Iterate through Object
keysandvaluesusing afor...inloop - Use the
Object.keysand theObject.valuesmethods to iterate through an
Object
104. A new Kind of
for Loop
We can use special syntax to iterate through each key of an object (in
arbitrary order). This is super useful for looping through both the keys and
values of an object.
The general syntax looks like this:
// The current key is assigned to *variable* on each iteration.
for (let variable in object) {
  statement;
}
This syntax is best shown by example:
let obj = { name: "Rose", cats: 2 };
// The key we are accessing is assigned to the `currentKey`
// *variable* on each iteration.
for (let currentKey in obj) {
  console.log(currentKey);
}
// prints out:
// name
// cats
The example above prints all the keys found in obj to the screen. On each
iteration of the loop, the key we are currently accessing is assigned to the
currentKey variable. Now, keys are nice but what about values?
If we want to access values in an object, we would throw some bracket notation
into the mix:
let obj = { name: "Rose", cats: 2 };
for (let key in obj) {
  let value = obj[key];
  console.log(value);
}
// prints out:
// Rose
// 2
Here's some food for thought: Why can't we use dot notation to iterate through
an object's values? For example, what if we replaced obj[key] with obj.key in
the above code snippet? Try it for yourself. As we previously covered - you can
only use variable keys when using bracket notation (obj[key])!
Like all variables, you can name the current key variable whatever you like -
just be descriptive! Here is an example of using a descriptive name for a key
variable:
let employees = {
  manager: "Angela",
  sales: "Gracie",
  service: "Paul"
};
for (let title in employees) {
  let person = employees[title];
  console.log(person);
}
// prints out:
// Angela
// Gracie
// Paul
105. Methods vs Functions
Before we dive further into iterating with Objects we'll take a moment to talk
about methods. A method is essentially a function that belongs to an
object. That means that every method is a function, but not every function
is a method.
myFuncis a functionmyObject.myFuncis a method of the objectmyObjectmyObject["myFunc"]is a method of the objectmyObject
A method is just a key-value pair where the key is the function name and the
value is the function definition! Let's use what we learned earlier to teach
our dog some new tricks:
let dog = {
  name: "Fido"
};
// defining a new key-value pair where the *function name* is the key
// the function itself is the value!
dog.bark = function() {
  console.log("bark bark!");
};
// this is the same thing as above just using Bracket Notation
dog["speak"] = function(string) {
  console.log("WOOF " + string + " WOOF!!!");
};
dog.bark(); // prints `bark bark!`
dog.speak("pizza"); // prints `WOOF pizza WOOF!!!`
Additionally, we can give objects methods when we initialize them:
let dog2 = {
  name: "Rover",
  bark: function() {
    console.log("bork bork!");
  },
  speak: function(string) {
    console.log("BORK " + string + " BORK!!!");
  }
};
// Notice that in the object above, we still separate the key-value pairs with commas.
// `bark` and `speak` are just keys with functions as values.
dog2.bark(); // prints `bork bork!`
dog2.speak("burrito"); // prints `BORK burrito BORK!!!`
Methods are just plain old functions at heart. They act like the functions we
know and love - define parameters, accept arguments, return data, etc. A method
is just a function that belongs to an object. To invoke, or call, a method we
need to specify which object is calling that method. In the code snippet
above the dog2 object had the bark method so to invoke bark we had to
specify it was dog2's method: dog2.bark(). More generally the pattern goes:
myObject.methodName().
106. Useful Object Methods
106.1. Iterating through keys using
Object.keys
The Object.keys method accepts an object as the argument and returns an array
of the keys within that Object.
> let dog = {name: "Fido", age: "2"}
undefined
> Object.keys(dog)
['name', 'age']
> let cup = {color: "Red", contents: "coffee", weight: 5}
undefined
> Object.keys(cup)
['color', 'contents', 'weight']
The return value of Object.keys method is an array of keys - which is useful
for iterating!
106.2. Iterating through keys using
Object.values
The Object.values method accepts an object as the argument and returns an
array of the values within that Object.
> let dog = {name: "Fido", age: "2"}
undefined
> Object.values(dog)
['Fido', '2']
> let cup = {color: "Red", contents: "coffee", weight: 5}
undefined
> Object.keys(cup)
['Red', 'coffee', 5]
The return value of Object.values method is an array of values - which is
useful for iterating!
106.2.1. Iterating through an Object's keys & values
So we have gone over how Object.keys gives you the keys on an object and
Object.values gives you the values, but what if you want both the keys and
the values corresponding to each other in an array?
The Object.entries method accepts an object as the argument and returns an
array of the [key, value] pairs within that Object.
Let's look at a quick demo:
> let cat = {name: "Freyja", color: "orange"}
undefined
> Object.entries(cat)
[ [ 'name', 'Freyja' ], [ 'color', 'orange' ] ]
107. What you learned
Objects may be an unordered collection of key-value pairs but that doesn't
mean you can't iterate through them!
In his reading we covered:
- How to define and invoke methods on Objects
- The
Object.keysandObject.valuesfunctions - How to iterate through a Object using a
for...inloop
Reference vs. Primitive Types
At this point you've worked with many different data types - booleans, numbers,
strings, arrays, objects, etc. It's now time to to go a little more in depth
into the differences between these data types.
When you finish this reading, you should be able to:
- Identify whether a data type is a Primitive type or a Reference type.
108. Primitives vs. Objects
JavaScript has many data types, six of which you've encountered so far:
Five Primitive Types:
Boolean-trueandfalseNull- represents the intentional absence of value.Undefined- default return value for many things in JavaScript.Number- like the numbers we usually use (15,4,42)String- ordered collection of characters ('apple')
One Reference Type:Object- (an array is also a kind of object)!
You might be wondering about why we separated these data types into two
categories - Reference & Primitive. Let's talk about the one of the main ways
Reference Types and Primitive Types differ:
- Primitive types are immutable. Meaning they cannot change.
109. Immutability
When we talk about primitive types the first thing we mentioned was
mutability. Primitives are immutable meaning they can not be directly
changed. Let's look at an example:
let num1 = 5;
// here we assign num2 to point at the value of the number variable
let num2 = num1;
// here we *reassign* the num1 variable
num1 = num1 + 3;
console.log(num1); // 8
console.log(num2); // 5
Whoa wait whaaaat? Let's break this down was just happened with some visuals. We
start by assigning num1. JavaScript already knows that the number 5 is a
primitive number value. So when we are assigning num1 to the value of 5 we are
actually telling the num1 variable to point to the place the number 5 takes up
in our computer's memory:

Next we assign num2 to the value of num1. What effectively happens
when
we do this is we are copying the value of num1 and then pointing num2 at
that copy:

Now here is where it gets really interesting. We cannot change the 5 our
computer has in memory - because it is a primitive data type. Meaning if we
want num1 to equal 8 we need to reassign the value of the num1
variable.
When we are talking about primitives reassignment breaks down into simply
having your variable point somewhere else in memory:

All this comes together in num1 now pointing at a new value in our computer's
memory. Where does this leave num2? Well because we never reassigned num2 it
is still pointing at the value it originally copied from num1 and pointing to
5 in memory.
So that in essence is immutability, you can not change the values in memory
only reassign where your variables are pointing.
Let's do another quick example using booleans:
let first = true;
let second = first;
first = false;
// first and second point to different places in memory
console.log(first); // false
console.log(second); // true
109.1. Mutability
Let's now talk about the inverse of immutability: mutability.
Let's take a look at what we call reference values which are mutable.
When you assign a reference value from one variable to a second variable, the
value stored in the first variable is also copied into the location of the
second variable.
Let's look at an example using objects:
let cat1 = { name: "apples", breed: "tabby" };
let cat2 = cat1;
cat1.name = "Lucy";
console.log(cat1); // => {name: "Lucy", breed: "tabby"}
console.log(cat2); // => {name: "Lucy", breed: "tabby"}
Here is a visualization of what happened above. First we create cat1 then
assign cat2 to the value of cat1. This means that both cat1 and
cat2 are
pointing to the same object in our computer's memory:

Now looking at the code above we can see what when we change either cat1
or cat2, since they are both pointing to the same place in memory, both
will change:

This holds true of arrays as well. Arrays are a kind of object - though
obviously different. We'll go a lot deeper into this when we start talking about
classes - but for now concentrate on the fact that arrays are also a Reference
Type.
See below for an example:
let array1 = [14, "potato"];
let array2 = array1;
array1[0] = "banana";
console.log(array1); // => ["banana", "potato"]
console.log(array2); // => ["banana", "potato"]
If we change array1 we also change array2 because both are pointing to the
same reference in the computer's memory.
110. What you learned
- How to work with variables that are both Primitive types and Reference types.
Using the Spread Operator and Rest Parameter Syntax
When writing functions in JavaScript you gain a certain flexibility that other
programming languages don't allow. As we have previously covered, JavaScript
functions will happily take fewer arguments than specified, or more arguments
than specified. This flexibility can be taken advantage of by using the spread
operator and rest parameter syntax.
When you finish this reading, you should be able to:
- Use rest parameter syntax to accept an arbitrary number of arguments inside a
function. - Use spread operator syntax with both Objects and Arrays.
111. Accepting arguments
Before we jump into talking about using new syntax let's quickly recap on what
we already know about functions.
111.1. Functions with fewer arguments than specified
As we've previously covered, JavaScript functions can take fewer arguments than
expected. If a parameter has been declared when the function itself was defined,
then the default value of that parameter is undefined.
Below is an example of a function with a defined parameter both with and without
an argument being passed in:
function tester(arg) {
  return arg;
}
console.log(tester(5)); // => prints: 5
console.log(tester()); // => prints: undefined
Always keep in mind that a function will still run even if it has been passed no
arguments at all.
111.2. More arguments than specified
JavaScript functions will also accept more arguments than were previously
defined by parameters.
Below is an example of a function with extra arguments being passed in:
function adder(num1, num2) {
  let sum = num1 + num2;
  return sum;
}
// adder will assign the first two parameters to the passed in arguments
// and ignore the rest
console.log(adder(2, 3, 4)); // => 5
console.log(adder(1, 5, 19, 100, 13)); // => 6
112. Utilizing Rest Parameters
We know that JavaScript functions can take in extra arguments - but how do we
access those extra arguments? For the above example of the adder function: how
could we add all incoming arguments - even the ones we didn't define as
parameters?
Rest parameter syntax allows us to capture all of a function's incoming
arguments into an array. Let's take a look at the syntax:
// to use the rest parameter you use ... then the name of the array
// the arguments will be contained within
function tester(...restOfArgs) {
  // ...
}
In order to use rest parameter syntax a function's last parameter can be
prefixed with ... which will then cause all remaining arguments to be placed
within an array. Only the last parameter can be a rest parameter.
Here is a simple example using rest parameter syntax to capture all incoming
arguments into an array:
function logArguments(...allArguments) {
  console.log(allArguments);
}
logArguments("apple", 15, 3); // prints: ["apple", 15, 3]
For a more practical example let's expand on our adder function from before
using rest parameter syntax:
function adder(num1, ...otherNums) {
  console.log("The first number is: " + num1);
  let sum = num1;
  // captures all other arguments into an array and adds them to our sum
  otherNums.forEach(function(num) {
    sum += num;
  });
  console.log("The sum is: " + sum);
}
adder(2, 3, 4);
// prints out:
// The first number is: 2
// The sum is: 9
To recap - we can use the rest parameter to capture a function's incoming
arguments into an array.
113. Utilizing Spread Syntax
Let's now talk about a very interesting and useful operator in JavaScript. In
essence, the spread operator allows you to break down a data type into the
elements that make it up.
The spread operator has two basic behaviors:
- Take a data type (i.e. an array, an object) and spread the values of that
type where elements are expected - Take an iterable data type (an array or a string) and spread the elements
of that type where arguments are expected.
113.1. Spreading elements
The spread operator is very useful for spreading the values of an array or
object where comma-separated elements are expected.
Spread operator syntax is very similar to rest parameter syntax but they do
very different things:
let numArray = [1, 2, 3];
// here we are taking `numArray` and *spreading* it into a new array where
// comma separated elements are expected to be
let moreNums = [...numArray, 4, 5, 6];
> moreNums
// => [1, 2, 3, 4, 5, 6]
In the above example you can see we used the spread operator to spread the
values of numArray into a new array. Previously we used the concat method
for this purpose, but we can now accomplish the same behavior using the spread
operator.
We can also spread Objects! Using the spread operator you can spread the
key-value pairs from one object and into another new object.
Here is an example:
let colors = { red: "scarlet", blue: "aquamarine" };
let newColors = { ...colors };
> newColors
// { red: "scarlet", blue: "aquamarine" };
Just like we previously showed with arrays, we can use this spread behavior to
merge objects together:
let colors = { red: "scarlet", blue: "aquamarine" };
let colors2 = { green: "forest", yellow: "sunflower" };
let moreColors = { ...colors, ...colors2 };
> moreColors
// {red: "scarlet", blue: "aquamarine", green: "forest", yellow: "sunflower"}
113.2. Spreading arguments
The other scenario in which spread proves useful is spreading an iterable
data type into the passed in arguments of a function. To clarify, when we say
iterable data types we mean arrays and string, not Objects.
Here is a common example of spreading an array into a function's arguments:
function speak(verb, noun) {
  return "I like to go " + verb + " with " + noun + ".";
}
const words = ["running", "Jet"];
console.log(speak("running", "Jet")); // => I like to go running with Jet.
console.log(speak(...words)); // => I like to go running with Jet.
Using spread allowed us to pass in the words array, which was then broken
down into the separate parameters of the speak function. The spread operator
allows you to pass an array as an argument to a function and the values of that
array be will be spread to fill in the separate parameters.
114. What you learned
Rest parameter syntax may look like spread operator syntax but they are
pretty much opposites[1]:
- Spread 'expands' a data type into its elements
- Rest collects multiple elements and 'condenses' them into a single data type.
[1]:
https://developer.mozilla.org/en-US/docs/Web/JavaScript/Reference/Operators/Spread_syntax#Rest_syntax_(parameters)
What this reading covered:
- JavaScript functions can accept any number of arguments
- Using rest parameter syntax we can capture the arguments of a JavaScript
function in an array - Using spread operator syntax to spread iterable data types where arguments
or values are expected- Using the spread operator to spread an array and object into their separate
elements
- Using the spread operator to spread an array and object into their separate
Destructuring
Up to this point we've learned how to collect related values and elements and
store them in lovely data structures. Now it's time to tear those data
structures down to the ground! Just kidding. In this reading we will be talking
about the concept of destructuring an array or object in order to more
easily access their individual elements.
When you finish this reading, you should be able to:
- Destructure an array to reference specific elements
- Destructure an object to reference specific values
- Destructure incoming parameters into a function
115. Destructuring data into variables
The destructuring assignment syntax allows you to extract parts of an array or
object into distinct variables.
Let's see an example:
let numArray = [10, 20];
// here we are "unpacking" the array values into two separate variables
let [firstEl, secondEl] = numArray;
console.log(firstEl); //=> 10
console.log(secondEl); //=> 20
As with normal variable assignment you put the name of the variable you are
assigning on the left, and the values you are assigning on the right. The above
code assigns firstEl to the value in the first position in numArray, and
secondEl to the second position in numArray.
We can alternatively declare our variables before destructuring as well:
let animalArray = ["tiger", "hippo"];
let animal1, animal2;
// here we are "unpacking" the array values into two separate variables
[animal1, animal2] = animalArray;
console.log(animal1); //=> "tiger"
console.log(animal2); //=> "hippo"
115.1. Swapping variables using destructuring
One of the really cool things you can do with destructuring is swapping the
values of two variables:
let num1 = 17;
let num2 = 3;
// this syntax will swap the values of the two variables
[num1, num2] = [num2, num1];
console.log(num1); // 3
console.log(num2); // 17
Neat, right? This little syntactic trick can save you a few lines of code.
115.2. Destructuring objects into variables
As you've previously read - objects can contain a lot of varied information
including arrays, functions, and other objects. One of the most useful
applications for destructuring is the ability to take apart and assign little
slices of large objects to variables.
Let's take a look at the basic syntax for destructuring objects when the
extracted variables have the same name as their associated keys:
let obj = { name: "Apples", breed: ["tabby", "short hair"] };
let { name, breed } = obj;
console.log(name); // "Apples"
console.log(breed); // ["tabby", "short hair"]
Now this syntax works by matching object properties, so we can choose exactly
which keys we want. If we only wanted to save certain properties, we could do
something like this:
let { a, c } = { a: 1, b: 2, c: 3 };
a; //=> 1
c; //=> 3
Now in all the previous examples we previously examined our variable names
shared the same name as our object's keys. Let's take a quick look at the syntax
we would need to use if the variable we are creating does not have the same
name as our object's keys. This is referred to as aliased object
destructuring:
let obj = { apple: "red", banana: "yellow" };
let { apple: newApple, banana: newBanana } = obj;
console.log(newApple); // "red"
console.log(newBanana); // "yellow"
Object deconstructing really becomes useful as you start working with larger and
nested objects. Let's take a look at destructuring with nested objects. In the
below example our goal is to capture the value of the species key into a
variable named species:
let object = { animal: { name: "Fiona", species: "Hippo" } };
// here we are specifying that within the animal object we want to assign the
// *species* variable to the value held by the *species* key
let {
  animal: { species }
} = object;
console.log(species); // => 'Hippo'
Take a look at the example below to see how object destructuring can make your
code more readable in more complex situations. For this example we are trying to
get the fname value into a variable:
let user = {
  userId: 1,
  favoriteAnimal: "hippo",
  fullName: {
    fname: "Rose",
    lname: "K"
  }
};
// accessing values *with* destructuring
let {
  userId,
  fullName: { fname, lname }
} = user;
console.log(userId, fname, lname); // prints out:
// 1 "Rose" "K"
Destructuring allowed us to assign multiple variables to multiple values in our
user object all in one line of code!
The whole point of destructuring is to make writing code easier to write and
read. However, destructuring can become harder to read with super nested
objects. A good rule of thumb to keep clarity in your code is to only
destructure values from objects that are two levels deep.
Let's look at a quick example:
// the fname key is nested more than two levels deep
// (within bootcamp.instructor.fullName)
let bootcamp = {
  name: "App Academy",
  color: "red",
  instructor: {
    fullName: {
      fname: "Rose",
      lname: "K"
    }
  }
};
// this is hard to follow:
let {
  instructor: {
    fullName: { fname, lname }
  }
} = bootcamp;
console.log(fname, lname);
// this is much easier to read:
let { fname, lname } = bootcamp.instructor.fullName;
console.log(fname, lname);
115.3. Destructuring and the rest pattern
Earlier you saw how the rest parameter syntax allows us to prefix a function's
last parameter with ... to capture all remaining arguments into an array:
function logArguments(firstArgument, ...restOfArguments) {
  console.log(firstArgument);
  console.log(restOfArguments);
}
logArguments("apple", 15, 3);
// prints out:
// "apple"
// [15, 3]
This coding pattern of saying "give me the rest of" can also be used when
destructuring an array by prefixing the last variable with .... In this
example, the otherFoods variable is prefixed with ... to initialize the
variable to an array containing the remaining array elements that weren't
explicitly destructured:
let foods = ["pizza", "ramen", "sushi", "kale", "tacos"];
let [firstFood, secondFood, ...otherFoods] = foods;
console.log(firstFood); // => "pizza"
console.log(secondFood); // => "ramen"
console.log(otherFoods); // => ["sushi", "kale", "tacos"]
At the time of this writing, the rest pattern is only officially supported by
JavaScript when destructuring arrays, though an [ECMAScript proposal][1] adds
support when destructuring objects. Recent versions of Chrome and Firefox
support this proposed addition to the JavaScript language.
Similar to when using the rest pattern with array destructuring, the last
variable obj is prefixed with ... to initialize it to an object containing
the remaining own enumerable property keys (and their values) that weren't
explicitly destructured:
let { a, c, ...obj } = { a: 1, b: 2, c: 3, d: 4 };
console.log(a); // => 1
console.log(c); // => 3
console.log(obj); // => { b: 2, d: 4 }
116. Destructuring parameters
So far we've talked about destructuring things into variables - but the other
main use for destructuring is destructuring incoming parameters into a
function. This gets to be really useful when we're passing objects around to
different functions. Each function can the be responsible for pulling the
parameters it needs from an incoming object - making it that much easier to work
with.
Let's look at a simple example of destructuring an object in a function's
parameters:
let cat = { name: "Rupert", owner: "Curtis", weight: 10 };
// This unpacks the *owner* key out of any incoming object argument and
// assigns it to a owner parameter(variable)
function ownerName({ owner }) {
  console.log("This cat is owned by " + owner);
}
ownerName(cat);
In the above example we destructured any incoming arguments to the ownerName
function to assign the value at the key owner to the parameter name of
owner. This syntax might seem a little much just for getting one parameter but
this syntax can become invaluable with nested objects.
Let's look at one more slightly more complex example to see the power of
destructuring parameters. In the below example we want to find and return an
array of the toys that belong to all cats:
let bigCat = {
  name: "Jet",
  owner: { name: "Rose" },
  toys: ["ribbon"],
  siblings: { name: "Freyja", color: "orange", toys: ["mouse", "string"] }
};
// here we use *aliased* object destructuring to create a siblingToys variable
function toyFinder({ toys, siblings: { toys: siblingToys } }) {
  let allToys = toys.concat(siblingToys);
  return allToys;
}
console.log(toyFinder(bigCat)); // => ["ribbon", "mouse", "string"]
One thing we'd like to draw your attention to is the parameters of the
toyFinder function. As you are all aware, we can't declare the same variable
twice - so in the above toyFinder we ran into a situation where two objects
had the same key name: toy. We solved this using aliased object
destructuring - we alias the toys key within the siblings object as
siblingToys.
Thanks to object destructuring in parameters, all we had to do when we invoked
toyFinder was pass in the whole object! Making our code easier to write and
our object easier to work with.
117. What you learned
What this reading covered:
- How to destructure an array to reference specific elements
- How to destructure an object to reference specific elements
- How to destructure incoming parameters into a function
[1]: https://github.com/tc39/proposal-object-rest-spread
Object Problems
It's time to get some practice using Objects! Below we've included a link to
download a zip file for a number of problems.
Complete the problems in the order specified. You should have mocha installed
and will need to pass all the tests in order to move on.
To run the tests for the above problems you will need to unzip the file you
downloaded and then navigate into the directory for that file. Once there you
can run the command:
~ mocha
The mocha command will run all the tests. If you have any trouble with this
don't hesitate to ask a TA for help!
WEEK-02 DAY-3
Callbacks
Callbacks Learning Objectives
Below is a complete list of the terminal learning objectives for this lesson.
When you complete this lesson, you should be able to perform each of the
following objectives. These objectives capture how you may be evaluated on the
assessment for this lesson.
- Given multiple plausible reasons, identify why functions are called “First
Class Objects” in JavaScript. - Given a code snippet containing an anonymous callback, a named callback, and
multipleconsole.logs, predict what will be printed - Write a function that takes in a value and two callbacks. The function should
return the result of the callback that is greater. - Write a function, myMap, that takes in an array and a callback as arguments.
The function should mimic the behavior ofArray#map. - Write a function, myFilter, that takes in an array and a callback as
arguments. The function should mimic the behavior ofArray#filter. - Write a function, myEvery, that takes in an array and a callback as
arguments. The function should mimic the behavior ofArray#everylearning objectives for this lesson.
When you complete this lesson, you should be able to perform each of the
following objectives. These objectives capture how you may be evaluated on the
assessment for this lesson. - Given multiple plausible reasons, identify why functions are called “First
Class Objects” in JavaScript. - Given a code snippet containing an anonymous callback, a named callback, and
multipleconsole.logs, predict what will be printed - Write a function that takes in a value and two callbacks. The function should
return the result of the callback that is greater. - Write a function, myMap, that takes in an array and a callback as arguments.
The function should mimic the behavior ofArray#map. - Write a function, myFilter, that takes in an array and a callback as
arguments. The function should mimic the behavior ofArray#filter. - Write a function, myEvery, that takes in an array and a callback as
arguments. The function should mimic the behavior ofArray#every.
Callbacks: Using a Function as an Argument
Previously we explored how functions are first class objects, meaning they can
be stored in variables just like any other value. In particular, we've been
using built-in methods like Array#forEach and Array#map which accept
(anonymous) functions as arguments. Now it's time to take a look under the hood
and define our own functions that accept other functions as arguments.
When you finish reading this article, you should be able to define functions
that accept callbacks.
129. What is a callback?
Defining a function that accepts another function as an argument is as simple as
specifying a regular parameter. We'll name our parameter callback but you could
very well name it whatever you please:
let foobar = function(callback) {
  console.log("foo");
  callback();
  console.log("bar");
};
let sayHello = function() {
  console.log("hello");
};
foobar(sayHello); // prints
// foo
// hello
// bar
A callback is always a function. In general, the callback is the function that
is being passed into the other function. In the example above, sayHello is a
callback, but foobar is not a callback. Notice that when we call
foobar(sayHello), we are not yet calling the sayHello function, instead we
are passing the sayHello function itself into foobar. When execution enters
the foobar function, the callback arg will refer to sayHello. This
means
that callback() will really evaluate to sayHello().
n the example above we used a named callback, but we can also use a function
expression directly. This is called an anonymous callback:
let foobar = function(callback) {
  console.log("foo");
  callback();
  console.log("bar");
};
foobar(function() {
  console.log("hello");
}); // prints
// foo
// hello
// bar
The advantage of using a named callback is that you can reuse the function many
times, by referring to its name. Opt for an anonymous callback if you need a
single-use.
130. A more interesting example
A callback behaves just like any other function, meaning it can accept it's own
arguments and return a value. Let's define an add function that also accepts a
callback:
let add = function(num1, num2, cb) {
  let sum = num1 + num2;
  let result = cb(sum);
  return result;
};
let double = function(num) {
  return num * 2;
};
let negate = function(num) {
  return num * -1;
};
console.log(add(2, 3, double)); // 10
console.log(add(4, 5, negate)); // -9
In the add function above, we pass the sum of num1 and num2 into the
callback (cb) and return the result of the callback. Depending on the callback
function we pass in, we can accomplish a wide range of behavior! This will come
in handy when reusing code. A callback is just like a helper function, except
now we can dynamically pass in any helper function.
To wrap things up, let's pass in some built-in functions and use them as
callbacks. Math.sqrt is a function that takes in a number and returns its
square root:
console.log(Math.sqrt(9)); // 3
console.log(Math.sqrt(25)); // 5
console.log(Math.sqrt(64)); // 8
let add = function(num1, num2, cb) {
  let sum = num1 + num2;
  let result = cb(sum);
  return result;
};
console.log(add(60, 4, Math.sqrt)); // 8
131. Refactoring for an optional callback
We have been claiming that we can leverage callbacks to write more versatile
functions. However, a skeptic may argue that our previous add function is
not so versatile because it can't return the normal sum without a trivial
callback:
let add = function(num1, num2, cb) {
  let sum = num1 + num2;
  let result = cb(sum);
  return result;
};
// we just want the normal sum of 2 and 3
add(2, 3, function(n) {
  return n;
});
// this correctly returns the normal sum of 5, but the code is pretty gross
Have no fear! We can remedy this to have the best of both worlds, we just need a
quick detour. JavaScript is not strict when it comes to passing too few
arguments to a function. Here is an isolated example of this behavior:
let greet = function(firstName, lastName) {
  console.log("Hey " + firstName + "! Your last name is " + lastName + ".");
};
greet("Ada", "Lovelace"); // prints 'Hey Ada! Your last name is Lovelace.'
greet("Grace"); // prints 'Hey Grace! Your last name is undefined.'
If we pass too few arguments when calling a function, the parameters that do not
have arguments will contain the value undefined. With that in mind, let's
refactor our add function to optionally accept a callback:
let add = function(num1, num2, cb) {
  if (cb === undefined) {
    return num1 + num2;
  } else {
    return cb(num1 + num2);
  }
};
console.log(add(9, 40)); // 49
console.log(add(9, 40, Math.sqrt)); // 7
Amazing! As its name implies, our add function will return the plain old sum
of the two numbers it is given. However, if it also passed a callback function,
then it will utilize the callback too. A function that optionally accepts a
callback is a fairly common pattern in JavaScript, so we'll be seeing this crop
up on occasion.
132. What you've learned
- a callback is a function that is passed as an arg into another function
- we can pass named functions, anonymous functions, and even built-in functions
as callbacks
Callback Problems
It's time to get some practice using callbacks! Below we've included a link to
download a zip file for a number of problems.
Complete the problems in the order specified. You should have mocha installed
and will need to pass all the tests in order to move on.
To run the tests for the above problems you will need to unzip the file you
downloaded.
To get started, use the following commands:
cdinto the project directorynpm installto install any dependenciesmochato run the test cases
Themochacommand will run all the tests. If you have any trouble with this
don't hesitate to ask a TA for help!
P.S. You may notice thepackage.json/package-lock.jsonfiles and
node_modulesdirectory. You do not need to edit any of those contents. Those
files are what we use the package the project and create the test cases.
WEEK-02 DAY-4
Scope
Scope Learning Objectives
Below is a complete list of the terminal learning objectives for this lesson.
When you complete this lesson, you should be able to perform each of the
following objectives. These objectives capture how you may be evaluated on the
assessment for this lesson.
- Identify the difference between const, let, and var declarations
- Explain the difference between const, let, and var declarations
- Predict the evaluation of code that utilizes function scope, block scope,
lexical scope, and scope chaining - Define an arrow function
- Given an arrow function, deduce the value of
thiswithout executing the
code - Implement a closure and explain how the closure effects scope
- Define a method that references
thison an object literal - Utilize the built in
Function#bindon a callback to maintain the context of
this - Given a code snippet, identify what
thisrefers trning objectives for this lesson.
When you complete this lesson, you should be able to perform each of the
following objectives. These objectives capture how you may be evaluated on the
assessment for this lesson. - Identify the difference between const, let, and var declarations
- Explain the difference between const, let, and var declarations
- Predict the evaluation of code that utilizes function scope, block scope,
lexical scope, and scope chaining - Define an arrow function
- Given an arrow function, deduce the value of
thiswithout executing the
code - Implement a closure and explain how the closure effects scope
- Define a method that references
thison an object literal - Utilize the built in
Function#bindon a callback to maintain the context of
this - Given a code snippet, identify what
thisrefers to
All About Scope
The scope of a program in JavaScript is the set of variables that are
available for use within the program. If a variable or other expression is not
in the current scope, then it is unavailable for use. If we declare a variable,
this variable will only be valid in the scope where we declared it. We can have
nested scopes, but we'll see that in a little bit.
When we declare a variable in a certain scope, it will evaluate to a specific
value in that scope. We have been using the concept of scope in our code all
along! Now we are just giving this concept a name.
By the end of this reading you should be able to predict the evaluation of code
that utilizes local scope, block scope, lexical scope, and scope chaining
133. Advantages of utilizing scope
Before we start talking about different types of scope we'll be talking about
the two main advantages that scope gives us:
- Security - Scope adds security to our code by ensuring that variables can
only be accessed by pre-defined parts of our programs. - Reduced Variable Name Collisions - Scope reduces variable name
collisions, also known as namespace collisions, by ensuring you can use the
same variable name multiple times in different scopes without accidentally
overwriting those variable's values.
134. Different kinds of scope
There are three types of scope in JavaScript: global scope, local scope, and
block scope.
134.1. Global scope
Let's start by talking about the widest scope there is: global scope. The
global scope is represented by the window object in the browser and the
global object in Node.js. Adding attributes to these objects makes them
available throughout the entire program. We can show this with a quick example:
let myName = "Apples";
console.log(myName);
// this myName references the myName variable from this scope,
// so myName will evaluate to "Apples"
The variable myName above is not inside a function, it is just lying out in
the open in our code. The myName variable is part of global scope. The
Global scope is the largest scope that exists, it is the outermost scope that
exists.
While useful on occasion, global variables are best avoided. Every time a
variable is declared on the global scope, the chance of a name collision
increases. If we are unaware of the global variables in our code, we may
accidentally overwrite variables.
134.2. Local scope
The scope of a function is the set of variables that are available for use
within that function. We call the scope within a function: local scope. The
local scope of a function includes:
- the function's arguments
- any local variables declared inside the function
- any variables that were already declared when the function was defined
In JavaScript when we enter a new function we enter a new scope:
// global scope
let myName = "global";
function function1() {
  // function1's scope
  let myName = "func1";
  console.log("function1 myName: " + myName);
}
function function2() {
  // function2's scope
  let myName = "func2";
  console.log("function2 myName: " + myName);
}
function1(); // function1 myName: func1
function2(); // function2 myName: func2
console.log("global myName: " + myName); // global myName: global
In the code above we are dealing with three different scopes: the global scope,
function1, and function2. Since each of the myName variables were
declared
in separate scopes, we are allowed to reuse variable names without any issues.
This is because each of the myName variables is bound to their respective
functions.
134.3. Block scope
A block in JavaScript is denoted by a pair of curly braces ({}). Examples of
block statements in JavaScript are if conditionals or for and while
loops.
When using the keywords let or const the variables defined within the curly
braces will be block scoped. Let's look at an example:
// global scope
let dog = "woof";
// block scope
if (true) {
  let dog = "bowwow";
  console.log(dog); // will print "bowwow"
}
console.log(dog); // will print "woof"
134.4. Scope chaining: variables and scope
A key scoping rule in JavaScript is the fact that an inner scope does have
access to variables in the outer scope.
Let's look at a simple example:
let name = "Fiona";
// we aren't passing in or defining and variables
function hungryHippo() {
  console.log(name + " is hungry!");
}
hungryHippo(); // => "Fiona is hungry"
So when the hungryHippo function is declared a new local scope will be created
for that function. Continuing on that line of thought what happens when we refer
to name inside of hungryHippo? If the name variable is not found in the
immediate scope, JavaScript will search all of the accessible outer scopes until
it finds a variable name that matches the one we are referencing. Once it finds
the first matching variable, it will stop searching. In JavaScript this is
called scope chaining.
Now let's look at an example of scope chaining with nested scope. Just like
functions in JavaScript, a scope can be nested within another scope. Take a look
at the example below:
// global scope
let person = "Rae";
// sayHello function's local scope
function sayHello() {
  let person = "Jeff";
  // greet function's local scope
  function greet() {
    console.log("Hi, " + person + "!");
  }
  greet();
}
sayHello(); // logs 'Hi, Jeff!'
In the example above, the variable person is referenced by greet, even
though it was never declared within greet! When this code is executed
JavaScript will attempt to run the greet function - notice there is no
person variable within the scope of the greet function and move on to seeing
if that variable is defined in an outer scope.
Notice that the greet function prints out Hi, Jeff! instead of
Hi, Rae!.
This is because JavaScript will start at the inner most scope looking for a
variable named person. Then JavaScript will work it's way outward looking for
a variable with a matching name of person. Since the person variable within
sayHello is in the next level of scope above greet JavaScript then stops
it's scope chaining search and assigns the value of the person variable.
Functions such as greet that use (ie. capture) variables like the person
variable are called closures. We'll be talking a lot more about closures
very soon!
Important An inner scope can reference outer variables, but an outer scope
cannot reference inner variables:
function potatoMaker() {
  let name = "potato";
  console.log(name);
}
potatoMaker(); // => "potato"
console.log(name); // => ReferenceError: name is not defined
134.5. Lexical scope
There is one last important concept to talk about when we refer to scope - and
that is lexical scope. Whenever you run a piece of JavaScript that code is
first parsed before it is actually run. This is known as the lexing time. In
the lexing time your parser resolves variable names to their values when
functions are nested.
The main take away is that lexical scope is determined at lexing time so we
can determine the values of variables without having to run any code. JavaScript
is a language without dynamic scoping. This means that by looking at a piece
of code we can determine the values of variables just by looking at the
different scopes involved.
Let's look at a quick example:
function outer() {
  let x = 5;
  function inner() {
    // here we know the value of x because scope chaining will
    // go into the scope above this one looking for variable named x.
    // We do not need to run this code in order to determine the value of x!
    console.log(x);
  }
  inner();
}
In the inner function above we don't need to run the outer function to know
what the value of x will be because of lexical scoping.
135. What you learned
The scope of a program in JavaScript is the set of variables that are
available for use within the program. Due to lexical scoping we can determine
the value of a variable by looking at various scopes without having to run our
code. Scope Chaining allows code within an inner scope to access variables
declared in an outer scope.
There are three different scopes:
- global scope - the global space is JavaScript
- local scope - created when a function is defined
- block scope - created by entering a pair of curly braces
Different Kinds of Variables
Variables are used to store information to be referenced and manipulated in
a computer program. A variable's sole purpose is to label and store data in
computer memory. Up to this point we've been using the let keyword as our only
way of declaring a JavaScript variable. It's now time to expand your tool set to
learn about the different kinds of JavaScript variables you can use!
When you finish this reading, you should be able to:
- Identify the three keywords used to declare a variable in JavaScript
- Explain the differences between
const,letandvar - Identify the difference between function and block-scoped variables
- Paraphrase the concept of hoisting in regards to function and block-scoped
variables
136. Declaring variables
All the code you write in JavaScript is evaluated. A variable always
evaluates to the value it contains no matter how you declare it.
136.1. The different ways to declare variables
In the beginning there was var. The var keyword used to be the only way to
declare a JavaScript variable. However, in ECMAScript 2015 JavaScript introduced
two new ways of declaring JavaScript variables: let and const. Meaning, in
JavaScript there are three different ways to declare a variable. Each of
these keywords has advantages and disadvantages and we will now talk about each
keyword at length.
let: any variables declared with the keywordletallows you to reassign
that variable. Variable declared usingletis scoped within a block.const: any variables declared with the keywordconstwill not allow you
to reassign that variable. Variable declared usingconstis scoped within
a block.var: Avardeclared variable may or may not be reassigned, and the
variable is scoped to a function.
For this course and for your programming career moving forward we recommend you
always uselet&const. These two words allow us to be the most clear
with our intentions for the variable we are creating.
137. Hoisting and scoping with variables
A wonderful definition of hoisting by Mabishi Wakio, "Hoisting is a JavaScript
mechanism where variables and function declarations are moved to the top of
their scope before code execution."
What this means is that when you run JavaScript code the variables and function
declarations will be hoisted to the top of their particular scope. This is
important because const and let are block-scoped while var
is
function-scoped.
Let's start by talking more about all const, let, and var before we
dive
into why the difference of scopes and hoisting is important.
137.1. Function-scoped variables
When JavaScript was young the only available variable was var. The var
keyword creates function-scoped variables. That means when you use the var
keyword to declare a variable that variable will be confined to the scope of the
current function.
Here is a simple example of declaring a var variable within a function:
function test() {
  var a = 10;
  console.log(a); // => 10
}
One of the drawbacks of using var is that it is a less indicative way of
defining a variable.
137.1.1. Hoisting with function-scoped variables
Let's take a look at what hoisting does to a function-scoped variable:
function test() {
  console.log(hoistedVar); // => undefined
  var hoistedVar = 10;
}
test();
Huh - that's weird. You'd expect an error from referring to a variable like
hoistedVar before it's defined, something like:
ReferenceError: hoistedVar is not defined. However this is not the case
because of hoisting in JavaScript!
So essentially hoisting will isolate and, in the computer's memory, will declare
a variable as the top of it's scope. With a function-scoped variable, var, the
name of the variable will be hoisted to the top of the function. In the above
snippet, since hoistedVar is declared using the var keyword the
hoistedVar's scope is the test function. To be clear what is being hoisted
is the declaration, not the assignment itself.
In JavaScript, all variables defined with the var keyword have an initial
value of undefined. Here is a translation of how JavaScript would deal with
hoisting in the above test function:
function test() {
  // JavaScript will declare the variable *in computer memory* at the top of it's scope
  var hoistedVar;
  // since hoisting declared the variable above we now get
  // the value of 'undefined'
  console.log(hoistedVar); // =>  undefined
  var hoistedVar = 10;
}
137.2. Block-scoped variables
When you are declaring a variable with the keyword let or const you are
declaring a variable that exists within block scope. Blocks in JavaScript are
denoted by curly braces({}). The following examples create a block scope: if
statements, while loops, switch statements, and for loops.
137.2.1. Using
the keyword let
We can use let to declare re-assignable block-scoped variables. You are,
of course, very familiar with let so let's take a look at how let works
within a block scope:
function blockScope() { let test = "upper scope"; if (true) { let test = "lower scope"; console.log(test); // "lower scope" } console.log(test); // "upper scope" }
In the example above we can see that the test variable was declared twice
using the keyword let but since they were declared within different scopes
they have different values.
JavaScript will raise a SyntaxError if you try to declare the same let
variable twice in one block.
if (true) { let test = "this works!"; let test = "nope!"; // Identifier 'test' has already been declared }
Whereas if you try the same example with var:
var test = "this works!"; var test = "nope!"; console.log(test); // prints "nope!"
We can see above that var will allow you to redeclare a variable twice which
can lead to some very confusing and frustrating debugging.
Feel free to peruse the [documentation][mdn-let] for the keyword let for more
examples.
[mdn-let]:
https://developer.mozilla.org/en-US/docs/Web/JavaScript/Reference/Statements/let
137.2.2. Using the keyword const
We use const to declare block-scoped variables that can not be
reassigned. In JavaScript variables that cannot be reassigned are called
constants. Constants should be used for values that will not be re-declared
or re-assigned.
Properties of constants:
- They are block-scoped like
let. - JavaScript enforces constants by raising an error if you try to reassign them.
- Trying to redeclare a constant with a
varorletby the same name will
also raise an error.
Let's look at a quick example of what happens when trying to reassign a
constant:
> const favFood = "cheeseboard pizza"; // Initializes a constant undefined > const favFood = "inferior food"; // Re-initialization raises an error TypeError: Identifier 'favFood' has already been declared > let favFood = "other inferior food"; // Re-initialization raises an error TypeError: Identifier 'favFood' has already been declared > favFood = "deep-dish pizza"; // Re-assignment raises an error TypeError: Assignment to constant variable.
We cannot reassign a constant, but constants that are assigned to Reference types
are mutable. The name binding of a constant is immutable. For example, if we
set a constant equal to an Reference type like an object, we can still modify
that object:
const animals = {}; animals.big = "beluga whale"; // This works! animals.small = "capybara"; // This works! animals = { big: "beluga whale" }; // Will error because of the reassignment
Constants cannot be reassigned but, just like with let, new constants of the
same names can be declared within nested scopes.
Take a look at the following for an example:
const favFood = "cheeseboard pizza"; console.log(favFood); if (true) { // This works! Declaration is scoped to the `if` block const favFood = "noodles"; console.log(favFood); // Prints "noodles" } console.log(favFood); // Prints 'cheeseboard pizza'
Just like with let when you use const twice in the same block JavaScript
will raise a SyntaxError.
if (true) { const test = "this works!"; const test = "nope!"; // SyntaxError: Identifier 'test' has already been declared }
137.2.3. Hoisting with block-scoped variables
When JavaScript ES6 introduced new ways of declaring a variable using let and
const the idea of block-level hoisting was also introduced. Block scope
hoisting allows developers to avoid previous debugging debacles that naturally
happened from using var.
Let's take a look at what hoisting does to a block-scoped variable:
if (true) { console.log(str); // => Uncaught ReferenceError: Cannot access 'str' before initialization const str = "apple"; }
Looking at the above we can see that an explicit error is thrown if you attempt
to use a block-scoped variable before it was declared. This is the typical
behavior in a lot of programming languages - that a variable cannot be referred
to until initialized to a value.
However, JavaScript is still performing hoisting with block-scoped declared
variables. The difference lies is how it initializes them. Meaning that let
and const variables are not initialized to the value of undefined.
The time before a let or const variable is declared, but not used is called
the Temporal Dead Zone. A very cool name for a simple idea. Variables declared
using let and const are not initialized until their definitions are
evaluated. Meaning, you will get an error if you try to reference a let or
const declared variable before it is evaluated.
Let's look at one more example that should illuminate the presence of the
Temporal Dead Zone:
var str = "not apple"; if (true) { console.log(str); //Uncaught ReferenceError: Cannot access 'str' before initialization let str = "apple"; }
In the above example we can see that inside the if block the let declared
variable, str, throws an error. Showing that the error thrown by a let
variable in the temporal dead zone takes precedence over any scope chaining that
would attempt to go to the outer scope to find a value for the str variable.
137.3. Function scope vs. block scope
Let's now take a deeper look at the comparison of using function vs. block
scoped variables.
Let's start with a simple example:
function partyMachine() { var string = "party"; console.log("this is a " + string); }
Looks good so far but let's take that example a step farther and see some of the
less fun parts of the var keyword in terms of scope:
function partyMachine() { var string = "party"; if (true) { // since var is not block-scoped and not constant // this assignment sticks! var string = "bummer"; } console.log("this is a " + string); } partyMachine(); // => "this is a bummer"
We can see in the above example how the flexibility of var can ultimately be a
bad thing. Since var is function-scoped and can be reassigned and
re-declared without error it is very easy to overwrite variable values by
accident.
This is the problem that ES6 introduced let and const to solve. Since
let
and const are block-scoped it's a lot easier to avoid accidentally overwriting
variable values.
Let's take a look at the example function above rewritten using let and
const:
function partyMachine() { const string = "party"; if (true) { // this variable is restricted to the scope of this block const string = "bummer"; } console.log("this is a " + string); } partyMachine(); // => "this is a party"
138. Global variables
If you leave off a declaration when initializing a variable, it will become a
global. Do not do this. We declare variables using the keywords var,
let, and const to ensure that our variables are declared within a proper
scope. Any variables declared without these keywords will be declared on the
global scope.
JavaScript has a single global scope, which means all of the files from your
projects and any libraries you use will all be sharing the same scope. Every
time a variable is declared on the global scope, the chance of a name collision
increases. If we are unaware of the global variables in our code, we may
accidentally overwrite variables.
Let's look at a quick example showing why this is a bad idea:
function good() { let x = 5; let y = "yay"; } function bad() { y = "Expect the unexpected (eg. globals)"; } function why() { console.log(y); // "Expect the unexpected (eg. globals)"" console.log(x); // Raises an error } why();
Limiting global variables will help you create code that is much more easily
maintainable. Strive to write your functions so that they are self-contained and
not reliant on outside variables. This will also be a huge help in allowing us
test each function by itself.
One of our jobs as programmers is to write code that can be integrated easily
within a team. In order to do that, we need to limit the number of globally
declared variables in our code as much as possible, to avoid accidental name
collisions.
Sloppy programmers use global variables, and you are not working so hard in
order to be a sloppy programmer!
138.1. What you learned
- Identify the different ways to declare a variable in JavaScript
- Explain the differences between
const,letandvar - Identify the difference between function and block-scoped variables
- Paraphrase the concept of hoisting in regards to variables
Calculating Closures
What is a closure? This question is one of the most frequent interview
questions where JavaScript is involved. If you answer this question quickly and
knowledgeably you'll look like a great candidate. We know you want to know it
all so let's dive right in!
The official definition of a closure from MDN is, "A closure is the combination
of a function and the lexical environment within which that function was
declared." The practicality of how a closure is used it simple: a closure is
when an inner function uses, or changes, variables in an outer function.
Closures in JavaScript are incredibly important in terms of the creativity,
flexibility and security of your code.
When you finish this reading you should be able to implement a closure and
explain how that closure effects scope.
139. Closures and scope
Let's look at an example of a simple closure below:
function climbTree(treeType) { let treeString = "You climbed a "; function sayClimbTree() { // this inner function has access to the variables in the outer scope // in which is was defined - including any defined parameters return treeString + treeType; } return sayClimbTree(); } // We assign the result to a variable const sayFunction = climbTree("Pine"); // So we can call it, and indeed the variables have been saved in the closure // and the sayFunction prints out their values. console.log(sayFunction); // You climbed a Pine
In the above snippet the sayClimbTree function captures and uses the
treeString and treeType variables within its own inner scope.
Let's go over some basic closure rules:
- Closures have access to any variables within its own, as well as any outer
function's, scope when they are declared. This is where the lexical
environment comes in - the lexical environment consists of any variables
available within the scope in which the closure was declared (which are the
local inner scope, outer function's scope, and global scope). - A closure will keep reference to all the variables when it was defined even
if the outer function has returned.
Notice above that even though the aboveclimbTreehad run itsreturn
statement the inner function ofsayClimbTreestill has access to the
variables(treeStringandtreeType) from the outer scope where it was
declared. So, even after an outer function has returned, an inner function will
still have access to the outer function’s variables.
Let's look at another example of a closure:
function makeAdder(x) { return function(y) { return x + y; }; } const add5 = makeAdder(5); console.log(add5(2)); // prints 7
In the above example the function the anonymous function within the makeAdder
function closes over the x variable and utilizes it within the inner
anonymous function. This allows us to do some pretty cool stuff like creating
the add5 function above. Closures are your friend ❤️.
140. Applications of closures
Let's take a look at some of the common and practical applications of closures
in JavaScript.
140.1. Private State
Information hiding is incredibly important in the world of software engineering.
JavaScript as a language does not have a way of declaring a function as
exclusively private, as can be done in other programming languages. We can
however, use closures to create private state within a function.
The following code illustrates how to use closures to define functions that
can emulate private functions and variables:
function createCounter() { let count = 0; return function() { count++; return count; }; } let counter = createCounter(); console.log(counter()); // => 1 console.log(counter()); // => 2 //we cannot reach the count variable! counter.count; // undefined let counter2 = createCounter(); console.log(counter2()); // => 1
In the above code we are storing the anonymous inner function inside the
createCounter function onto the variable counter. The counter variable
is
now a closure. The counter variable closes over the inner
count value
inside createCounter even after createCounter has returned.
By closing over (or capturing) the count variable, each function
that
is return from createCounter has a private, mutable state that cannot be
accessed externally. There is no way any outside function beside the closure
itself can access the count state.
[pre-crement]:
https://stackoverflow.com/questions/3469885/somevariable-vs-somevariable-in-javascript
140.2. Passing Arguments Implicitly
We can use closures to pass down arguments to helper functions without
explicitly passing them into that helper function.
function isPalindrome(string) { function reverse() { return string .split("") .reverse() .join(""); } return string === reverse(); }
141. What you learned
How to implement a closure and explain how that closure effects scope.
Context in JavaScript
It's now time to dive into one of the most interesting concepts in JavaScript:
the idea of context.
Programmers from the junior to senior level often confuse scope and context
as the same thing - but that is not the case! Every function that is invoked has
both a scope and a context associated with that function. Scope refers to
the visibility and availability of variables, whereas context refers to the
value of the this keyword when code is executed.
When you finish this reading you should be able to:
- Define a method that references
thison an object - Identify what
thisrefers to in a code snippet - Utilize the built in
Function#bindto maintain the context ofthis
142. What about this?
When learning about objects we previously came across the idea of a method. A
method is a function that is a value within an object and belongs to an
object.
There will be times when you will have to know which object a method belongs to.
The keyword this exists in every function and it evaluates to the object that
is currently invoking that function. So the value of this relies entirely on
where a function is invoked.
That may sound pretty abstract, so let's jump into an example:
let dog = { name: "Bowser", isSitting: true, stand: function () { this.isSitting = false; return this.isSitting; }, }; // Bowser starts out sitting console.log(dog.isSitting); // prints `true` // Let's make him stand console.log(dog.stand()); // prints `false` // He's actually standing now! console.log(dog.isSitting); // prints `false`
Inside of a method, we can use the keyword this to refer to the object that is
calling that method! So when calling dog.stand() and we invoke the code of the
stand method, this will refer to the dog object.
Still skeptical? Don't take our word for it, check this (heh) out:
let dog = { name: "Bowser", test: function () { return this === dog; }, }; console.log(dog.test()); // prints `true`
In short, by using the this keyword inside a method, we can refer to values
within that object.
Let's look at another example of this:
let cat = { purr: function () { console.log("meow"); }, purrMore: function () { this.purr(); }, }; cat.purrMore();
Through the this variable, the purrMore method can access the object it was
called on. In purrMore, we use this to access the cat object that has a
purr method. In other words, inside of the purrMore function if we had tried
to use purr() instead of this.purr() it would not work.
When we invoked the purrMore function using cat.purrMore we used a
method-style invocation.
Method style invocations follow the format: object.method(args). You've
already been doing this using built in data type methods! (i.e. Array#push,
String#toUpperCase, etc.)
Using method-style invocation (note the dot notation) ensures the method
will be invoked and that the this within the method will be the object that
method was called upon.
Now that we have gone over what this refers to - you can have a full
understanding of the definition of context. Context refers to the value of
this within a function and this refers to where a function is invoked.
143. Issues with scope and context
In the case of context the value of this is determined by how a function is
invoked. In the above section we talked briefly about method-style invocation,
where this is set to the object the method was called upon.
Let's now talk about what this is when using normal function style
invocation.
If you run the following in Node:
function testMe() { console.log(this); // } testMe(); // Object [global] {global: [Circular], etc.}
When you run the above testMe function in Node you'll see that this is set
to the global object. To reiterate: each function you invoke will have both
a context and a scope. So even running functions in Node that are not defined
explicitly on declared objects are run using the global object as their this
and therefore their context.
143.1. When methods have an unexpected context
So let's now look at what happens when we try to invoke a method using an
unintended context.
Say we have a function that will change the name of a dog object:
let dog = { name: "Bowser", changeName: function () { this.name = "Layla"; }, };
Now say we wanted to take the changeName function above and call it somewhere
else. Maybe we have a callback we'd like to pass it to or another object or
something like that.
Let's take a look at what happens when we try to isolate and invoke just the
changeName function:
let dog = { name: "Bowser", changeName: function () { this.name = "Layla"; }, }; // note this is **not invoked** - we are assigning the function itself let change = dog.changeName; console.log(change()); // undefined // our dog still has the same name console.log(dog); // { name: 'Bowser', changeName: [Function: changeName] } // instead of changing the dog we changed the global name!!! console.log(this); // Object [global] {etc, etc, etc, name: 'Layla'}
So in the above code notice how we stored the dog.changeName function without
invoking it to the variable change. On the next line when we did invoke the
change function we can see that we did not actually change the dog object
like we intended to. We created a new key value pair for name on the
global object! This is because we invoked change without the context of a
specific object (like dog), so JavaScript used the only object available to
it, the global object!
The above example might seem like an annoying inconvenience but let's take a
look at what happens when calling something in the wrong context can be a big
problem.
Using our cat object from before:
let cat = { purr: function () { console.log("meow"); }, purrMore: function () { this.purr(); }, }; let notACat = cat.purrMore; console.log(notACat()); // TypeError: this.purr is not a function
So in the above code snippet we attempted to call the purrMore function
without the correct Object for context. Meaning we attempted to call the
purrMore function on the global object! Since the global object does not have
a purr method upon its this it raised an error. This is a common problem
when invoking methods: invoking methods without their proper context.
Let's look at one more example of confusing this when using a callback.
Incorrectly passing context is an inherent problem with callbacks. The
global.setTimeout() method on the global object is a popular way of setting a
function to run on a timer. The global.setTimeout() method accepts a callback
and a number of milliseconds to wait before invoking the callback.
Let's look at a simple example:
let hello = function () { console.log("hello!"); }; // global. is a method of the global object! global.setTimeout(hello, 5000); // waits 5 seconds then prints "hello!"
Expanding on the global.setTimeout method now using our cat from before
let's say we wanted our cat to "meow" in 5 seconds instead of right now:
let cat = { purr: function () { console.log("meow"); }, purrMore: function () { this.purr(); }, }; global.setTimeout(cat.purrMore, 5000); // 5 seconds later: TypeError: this.purr is not a function
So what happened there? We called cat.purrMore so it should have the right
context right? Noooooope. This is because cat.purrMore is a callback in the
above code! Meaning that when the global.setTimeout function attempts to call
the purrMore function all it has reference to is the function itself. Since
setTimeout is on the global object that means that the global object will be
the context for attempting to invoke the cat.purrMore function.
143.1.1. Strictly protecting the global object
The accidental mutation of the global object when invoking functions in
unintended contexts is one of the reasons JavaScript released "strict" mode in
ECMAScript version 5. We won't dive too much into JavaScript's strict mode here,
but it's important to know how strict mode can be used to protect the global
object.
Writing and running code in strict mode is easy and much like writing code in
"sloppy mode" (jargon for the normal JavaScript environment). We can run
JavaScript in strict mode simply by adding the string "use strict" at the top of
our file:
"use strict"; function hello() { return "Hello!"; } console.log(hello); // prints "Hello!"
One of the differences of strict mode becomes apparent when trying to access the
global object. As we mentioned previously, the global object is the context of
invoked functions in Node that are not defined explicitly on declared objects.
So referencing this within a function using the global object as its context
will give us access to the global object:
function hello() { console.log(this); } hello(); // Object [global] {etc, etc, etc }
However, strict mode will no longer allow you access to the global object in
functions via the this keyword and will instead return undefined:
"use strict"; function hello() { console.log(this); } hello(); // undefined
Using strict mode can help us avoid scenarios where we accidentally would have
mutated the global object. Let's take our example from earlier and try it in
strict mode:
"use strict"; let dog = { name: "Bowser", changeName: function () { this.name = "Layla"; }, }; // // note this is **not invoked** - we are assigning the function itself let changeNameFunc = dog.changeName; console.log(changeNameFunc()); // TypeError: Cannot set property 'name' of undefined
As you can see above, when we attempt to invoke the changeNameFunc an error is
thrown because referencing this in strict mode will give us undefined
instead of the global object. The above behavior is helpful for catching
otherwise tricky bugs.
If you'd like to learn more about strict mode we recommend checking out the
[documentation][strict-mode].
[strict-mode]:
https://developer.mozilla.org/en-US/docs/Web/JavaScript/Reference/Strict_mode
144. Changing context using bind
Good thing JavaScript has something that can solve this problem for us: what is
known as the binding of a context to a function.
From the Function.prototype.bind(),
"The simplest use of bind()
is to make a function that, no matter how it is called, is called with a
particular this value".
Here is a preview of the syntax we use to bind:
let aboundFunc = func.bind(context);
So when we call bind we are returned what is called an exotic function. Which
essentially means a function with it's this bound no matter where that
function is invoked.
Let's take a look at example at bind in action:
let cat = { purr: function () { console.log("meow"); }, purrMore: function () { this.purr(); }, }; let sayMeow = cat.purrMore; console.log(sayMeow()); // TypeError: this.purr is not a function // we can now use the built in Function.bind to ensure our context, our `this`, // is the cat object let boundCat = sayMeow.bind(cat); // we still *need* to invoke the function boundCat(); // prints "meow"
That is the magic of Function#bind! It allows you choose the context for your
function. You don't need to restrict the context you'd like to bind to either -
you can bind functions to any context.
Let's look at another example:
let cat = { name: "Meowser", sayName: function () { console.log(this.name); }, }; let dog = { name: "Fido", }; let sayNameFunc = cat.sayName; let sayHelloCat = sayNameFunc.bind(cat); sayHelloCat(); // prints Meowser let sayHelloDog = sayNameFunc.bind(dog); sayHelloDog(); // prints Fido
Let's now revisit our above example of losing context in a callback and fix our
context! Using the global.setTimeout function we want to call the
cat.purrMore function with the context bound to the cat object.
Here we go:
let cat = { purr: function () { console.log("meow"); }, purrMore: function () { this.purr(); }, }; // here we will bind the cat.purrMore function to the context of the cat object const boundPurr = cat.purrMore.bind(cat); global.setTimeout(boundPurr, 5000); // prints 5 seconds later: meow
144.1. Binding with arguments
So far we've talking of one of the the common uses of the bind function -
binding a context to a function. However, bind will not only allow you to bind
the context of a function but also to bind arguments to a function.
Here is the syntax for binding arguments to a function:
let aboundFunc = func.bind(context, arg1, arg2, etc...);
Following that train of logic let's look at example of binding arguments to a
function, regardless of the context:
const sum = function (a, b) { return a + b; }; // here we are creating a new function named add3 // this function will bind the value 3 for the first argument const add3 = sum.bind(null, 3); // now when we invoke our new add3 function it will add 3 to // one incoming argument console.log(add3(10));
Note that in the above snippet where we bind with null we don’t actually use
this in the sum function. However, since bind requires a first argument
we
can put in null as a place holder.
Above when we created the add3 function we were creating a new bound function
where the context was null, since the context won't matter, and the first
argument will always be 3 for that function. Whenever we invoke the add3
function all other arguments will be passed in normally.
Using bind like this gives you a lot of flexibility with your code. Allowing
you to create independent functions that essentially do the same thing while
keeping your code very DRY.
Here is another example:
const multiply = function (a, b) { return a * b; }; const double = multiply.bind(null, 2); const triple = multiply.bind(null, 3); console.log(double(3)); // 6 console.log(triple(3)); // 9
145. What you learned
- How to define a method that references
thison an object - Identify what
thisrefers to in a code snippet - How to utilize the built in
Function#bindto maintain the context ofthis
Arrow Functions
Arrow functions, a.k.a. Fat Arrows (=>), are a more concise way of declaring
functions. Arrow functions were introduced in ES2015 as a way of solving many of
the inconveniences of the normal callback function syntax.
Two major factors influenced the reason behind the desire for arrow functions:
the need for shorter functions and behavior of this and context.
When you finish this reading you should be able to:
- Define an arrow function
- Given an arrow function, deduce the value of
thiswithout executing the code
146. Arrow functions solving problems
Let's start by looking at the arrow function in action!
// function declaration let average = function(num1, num2) { let avg = (num1 + num2) / 2; return avg; }; // fat arrow function style! let averageArrow = (num1, num2) => { let avg = (num1 + num2) / 2; return avg; };
Both functions in the example above accomplish the same thing. However, the
arrow syntax is a little shorter and easier to follow.
146.1. Anatomy of an arrow function
The syntax for a multiple statement arrow function is as follows:
(parameters, go, here) => {
statement1;
statement2;
return <a value>;
}
So let's look at a quick translation between a function declared with a function
expression syntax and a fat arrow function. Take notice of the removal of the
function keyword, and the addition of the fat arrow (=>).
function fullName(fname, lname) { let str = "Hello " + fname + " " + lname; return str; } // vs. let fullNameArrow = (fname, lname) => { let str = "Hello " + fname + " " + lname; return str; };
If there is only a single parameter you may omit the ( ) around the parameter
declaration:
param1 => { statement1; return value; };
If you have no parameters with an arrow function you must still use the ( ):
// no parameters will use parenthesis () => { statements; return value; };
Let's see an example of an arrow function with a single parameter with no
parenthesis:
const sayName = name => { return "Hello " + name; }; sayName("Jared"); // => "Hello Jared"
146.1.1. Single expression arrow functions
Reminder: In JavaScript, an expression is a line of code that returns a
value. Statements are, more generally, any line of code.
One of the most fun things about single expression arrow functions is they allow
for something previously unavailable in JavaScript: implicit returns.
Meaning, in an arrow function with a single-expression block, the curly braces
({ }) and the return are keyword are implied.
argument => expression; // equal to (argument) => { return expression };
Look at the below example you can see how we use this snazzy implicit returns
syntax:
const multiply = function(num1, num2) { return num1 * num2; }; // do not need to explicitly state return! const arrowMultiply = (num1, num2) => num1 * num2;
However this doesn't work if the fat arrow uses multiple statements:
const halfMyAge = myAge => { const age = myAge; age / 2; }; console.log(halfMyAge(30)); // "undefined"
To return a value from a fat arrow with multiple statements, you must
explicitly return:
const halfMyAge = myAge => { const age = myAge; return age / 2; }; console.log(halfMyAge(30)); // 15
146.1.2. Syntactic ambiguity with arrow functions
In Javascript, {} can signify either an empty object or an empty block.
const ambiguousFunction = () => {};
Is ambiguousFunction supposed to return an empty object or an empty code
block? Confusing right? JavaScript standards state that the curly braces after a
fat arrow evaluate to an empty block (which has the default value of
undefined):
ambiguousFunction(); // undefined
To make a single-expression fat arrow return an empty object, wrap that object
within parentheses:
// this will implicitly return an empty object const clearFunction = () => ({}); clearFunction(); // returns an object: {}
146.1.3. Arrow functions are anonymous
Fat arrows are anonymous, like their lambda counterparts in other
languages.
sayHello(name) => console.log("Hi, " + name); // SyntaxError (name) => console.log("Hi, " + name); // this works!
If you want to name your function you must assign it to a variable:
const sayHello = name => console.log("Hi, " + name); sayHello("Curtis"); // => Hi, Curtis
That's about all you need to know for arrow functions syntax-wise. Arrow
functions aren't just a different way of writing functions, though. They
behave differently too - especially when it comes to context!
147. Arrow functions with context
Arrow functions, unlike normal functions, carry over context, binding this
lexically. In other words, this means the same thing inside an arrow
function that it does outside of it. Unlike all other functions, the value of
this inside an arrow function is not dependent on how it is invoked.
Let's do a little compare and contrast to illustrate this point:
const testObj = { name: "The original object!", createFunc: function() { return function() { return this.name; }; }, createArrowFunc: function() { // the context within this function is the testObj return () => { return this.name; }; } }; const noName = testObj.createFunc(); const arrowName = testObj.createArrowFunc(); noName(); // undefined arrowName(); // The original object!
Let's walk through what just happened - we created a testObj with two methods
that each returned an anonymous function. The difference between these two
methods is that the createArrowFunc function contained an arrow function
inside it. When we invoked both methods we created two function - the noName
function creating it's own scope and context while the arrowName kept the
context of the function that created it (createArrowFunc's context of
testObj).
An arrow function will always have the same context as the function that created
it - giving it access to variables available in that context (like this.name
in this case!)
147.1. No binding in arrow functions
One thing to know about arrow functions is since they already have a bound
context, unlike normal functions, you can't reassign this. The this in
arrow functions is always what it was at the time that the arrow function was
declared.
const returnName = () => this.name; returnName(); // undefined // arrow functions can't be bound let tryToBind = returnName.bind({ name: "Party Wolf" }); // undefined tryToBind(); // will still be undefined
148. What you learned
- How to define an arrow function
- how to deduce the value of
thisin an arrow function
149. Scope Problems
It's time to get some practice using scope in the wild! This task includes a
link to download a zip file with a number of problems.
Complete the problems in the order specified. In addition to the prompts
available at the top of each file, Mocha specs are provided to test your work.
To get started, use the following commands:
cdinto the project directorynpm installto install any dependenciesmochato run the test cases
WhiteBoarding Problem
150. The Question
Write a function named hiddenCounter(). The hiddenCounter function will
start by declaring a variable that will keep track of a count and will be
initially set to 0. Upon first invocation hiddenCounter will return a
function. Every subsequent invocation will increment the previously described
count variable.
Explain how the closure you have created affects the scope of both functions.
Examples:
let hidden1 = hiddenCounter(); //returns a function hidden1(); // returns 1 hidden1(); // returns 2 let hidden2 = hiddenCounter(); // returns a function hidden2(); // returns 1
152. Intermediate JS
WEEK 3
Intermediate JavaScript (Part 1)
Asynchronous JS Learning Objectives
- Better Late Than Never: An Intro to Asynchronous JavaScript
- All in Good Time: Setting Timeouts and Intervals
- Hanging by a Single Thread: A Yarn on JavaScript's Execution
- Stacking the Odds in our Favor: the Call Stack
- An Unexpected Turn of Events: the event loop and Message Queue
- Reading Between the Lines: Getting User Input and Callback Chaining
- Timeout Project
- Guessing Game Project
- A Tale of Two Runtimes: Node.js vs Browser
- The Ins and Outs of File I/O in Node
- "Gitting" Started With Git!
- Browsing Your Git Repository
- Git Do-Overs: Reset & Rebase
- Git Merge Conflicts & You
- "Scrum" Stands For ... Nothing!
- Let's Talk About Sprints
- Requirements and User Stories
- Censor Project
- Global Replace Project
- Repo Madness Project: Managing Your Code With Git
- Navigating Your Filesystem
- Common Tasks On The Command Line
- Understanding The Shell
- Bash Permissions & Scripting
- Re-learning Functions With Recursion
- When To Hold & When To Fold(Fold(Fold())): Recursion vs. Iteration
- Recursion Problems
- Debugging A Stack Overflow
JS Trivia Learning Objectives - Stop Feeling Iffy about IIFEs!
- Interpolation in JavaScript
- Object Keys in JavaScript
- Unassigned Variables in JavaScript
- WhiteBoarding Problem
WEEK-03 DAY-1
Asynchronous Functions
Asynchronous JS Learning Objectives
Below is a complete list of the terminal learning objectives for this lesson.
When you complete this lesson, you should be able to perform each of the
following objectives. These objectives capture how you may be evaluated on the
assessment for this lesson.
- Identify JavaScript as a language that utilizes an event loop model
- Identify JavaScript as a single threaded language
- Describe the difference between asynchronous and synchronous code
- Execute the asynchronous function setTimeout with a callback.
- Given the function "function asyncy(cb) { setTimeout(cb, 1000);
console.log("async") }" and the function "function callback() {
console.log("callback"); }", predict the output of "asyncy(callback);" - Use setInterval to have a function execute 10 times with a 1 second period.
After the 10th cycle, clear the interval. - Write a program that accepts user input using Node’s readline modulrminal learning objectives for this
lesson.
When you complete this lesson, you should be able to perform each of the
following objectives. These objectives capture how you may be evaluated on the
assessment for this lesson. - Identify JavaScript as a language that utilizes an event loop model
- Identify JavaScript as a single threaded language
- Describe the difference between asynchronous and synchronous code
- Execute the asynchronous function setTimeout with a callback.
- Given the function "function asyncy(cb) { setTimeout(cb, 1000);
console.log("async") }" and the function "function callback() {
console.log("callback"); }", predict the output of "asyncy(callback);" - Use setInterval to have a function execute 10 times with a 1 second period.
After the 10th cycle, clear the interval. - Write a program that accepts user input using Node’s readline module
Better Late Than Never: An Intro to Asynchronous JavaScript
Every programming language has features that distinguish it from the rest of the
pack. The heavy usage of callbacks is one such pattern that characterizes
JavaScript. We pass callbacks as arguments as a way to execute a series of
commands at a later time. However, what happens if there is no guarantee exactly
when that callback is executed? We've explored callbacks extensively thus far
in the course, but it's time to add another wrinkle - how can we utilize
callbacks asynchronously?
When you finish this article, you should be able to:
- Describe the difference between synchronous and asynchronous code
- Give one example illustrating why we would need to deal with asynchronous code
153. Synchronous vs asynchronous code
Let's begin by exploring the difference between synchronous and
asynchronous code. Luckily, you are already familiar with the former. In
fact, all of the code you have written thus far in the course has been
synchronous.
153.1. Synchronous
If code is synchronous, that means that there is an inherent order among the
commands and this order of execution is guaranteed.
Here is a simple example of synchronous code:
console.log("one"); console.log("two"); console.log("three");
This seems trivial, but it is important to recognize. It is guaranteed that
'one' will be printed before 'two' and 'two' will be printed before
'three'.
Taking this a step further, you also know that the order of execution may not
always simply be the positional order of the lines in the code:
let foo = function() { console.log("two"); }; console.log("one"); foo(); console.log("three");
Although the command console.log("two") appears before
console.log("one") in
terms of the line numbers of the script, we know that this code will still print
'one', 'two', 'three' because we understand the rules of JavaScript evaluation.
Although the execution may jump around to different line numbers as we call and
return from functions, the above code is still synchronous. The above code is
synchronous because we can predict with total certainty the relative order of
the print statements.
153.2. Asynchronous
If code is asynchronous, that means that there is no guarantee in the total
order that commands are executed. Asynchronous is the opposite of synchronous.
Since this is our first encounter with asynchronicity, we'll need to introduce a
new function to illustrate this behavior. The [setTimeout][set-timeout] method
will execute a callback after a given amount of time. We can pass a callback and
an amount of time in milliseconds as arguments to the method:
setTimeout(function() { console.log("time is up!"); }, 1500);
If we execute the above code, 'time is up!' will be print after about one and a
half seconds. Paste the above code to a .js file and execute it to see this
behavior for yourself!
Let's add some other print statements into the mix:
console.log("start"); setTimeout(function() { console.log("time is up!"); }, 1500); console.log("end");
If we execute the above snippet, we will see the output in this order inside of
our terminal:
start
end
time is up!
Surprised? Although we call the function setTimeout, it does not block
execution of the lines after it (like console.log("end")). That is, while the
timer ticks down for the setTimeout we will continue to execute other code.
This is because setTimeout is asynchronous!
153.2.1. Can't believe it's async?
The healthy skeptic may notice that we defined the term asynchronous code as
code where there is no guaranteed order among its commands - but, couldn't we
just specify timeout periods such that we could orchestrate some order to the
code? The skeptic may write the following code arguing that we can predict a
print order of 'first' then 'last':
setTimeout(function() { console.log("last"); }, 3000); setTimeout(function() { console.log("first"); }, 1000);
Surely if we wait 3 seconds for 'last' and only 1 second for 'first', then we'll
see 'first' then 'last', right? By providing sufficiently large timeout periods,
hasn't the skeptic proven setTimeout to be synchronous?
The answer is a resounding no; we cannot treat setTimeout as synchronous
under any circumstance. The reason is that the time period specified to
setTimeout is not exact, rather it is the minimum amount of time that will
elapse before executing the callback (cue the title of this article). If we set
a timeout with 3 seconds, then we could wait 3 seconds, or 3.5 seconds, or even
10 seconds before the callback is invoked. If there is no guaranteed timing,
then it is asynchronous. The following snippet illustrates this concept
succinctly:
console.log("first"); setTimeout(function() { console.log("second"); }, 0); console.log("third");
This would print the following order:
first
third
second
Although we specify a delay of 0 milliseconds, the callback is not invoked
immediately, because the actual delay may be more than 0. This unintuitive
behavior is well known, in fact there is a [full section in the docs for
setTimeout][longer-timeouts-than-specified] devoted to this nuance. The reasons
for this discrepancy are not important for now. However, do take away the fact
that setTimeout is indeed asynchronous, no matter how hard we try to fight it.
[setTimeout][set-timeout] is just one example of asynchronous behavior.
Another asynchronous function is [setInterval][set-interval], which will
continually execute a callback after a number of milliseconds, repeatedly.
154. Why do we need asynchronous code?
We know how you are feeling. Asynchronous code seems intimidating. Before this
article, you've written exclusively synchronous code and have gotten quite far
using just that - so why do we need asynchronous code? The truth of the matter
is that the environment in which we run our applications is full of uncertainty;
there is seldom a guarantee of when actions occur, how long they will take, or
even if they will happen at all. A software engineer can write the code, but
they can't write the circumstances in which their code will run (we can dream).
Here are a few practical scenarios where asynchronous code is a necessity:
- When we request data from an external server over a network, we cannot predict
when we will get receive a response back. The timing is susceptible to latency
due to the amount of traffic on the network, the server being busy handling
other requests, and much more. - When we expect a user to interact with our programs by hitting a key, clicking
a button, or scrolling down the page, we can never be certain when they will
perform those actions.
These are a few problems that we will encounter in upcoming lessons and we'll
turn to asynchronous JavaScript for the solution!
155. What you've learned
In this reading, we've introduced asynchronous code. In particular we have:
- explored the difference between synchronous and asynchronous with
setTimeout
as our asynchronous candidate - identified asynchronous code as a solution to handle timing circumstances
during our programs' runtime that we cannot predict with total certainty
[set-timeout]:
https://developer.mozilla.org/en-US/docs/Web/API/WindowOrWorkerGlobalScope/setTimeout
[set-interval]:
https://developer.mozilla.org/en-US/docs/Web/API/WindowOrWorkerGlobalScope/setInterval
[longer-timeouts-than-specified]:
https://developer.mozilla.org/en-US/docs/Web/API/WindowOrWorkerGlobalScope/setTimeout#Reasons_for_delays_longer_than_specified
All in Good Time: Setting Timeouts and Intervals
During our introduction to asynchronicity, we used setTimeout as a prime
example of a function that exhibits asynchronous behavior. We'll turn time and
time again to setTimeout in order to illustrate asynchronous concepts. Because
of this, let's familiarize ourselves with all the ways we can use the function!
When you finish this article, you should be able to:
- name the arguments that can be passed to
setTimeoutandsetInterval - predict the asynchronous nature of code snippets that utilize
setTimeoutand
setInterval
156. Time-out! What are the arguments?
In it's most basic usage, the [setTimeout][set-timeout-mdn] function accepts a
callback and an amount of time in milliseconds. Open a new .js file and
execute the following code:
function foo() { console.log("food"); } setTimeout(foo, 2000);
The code above will print out 'food' after waiting about two seconds. We
previously explored this behavior, but it's worth reemphasizing. setTimeout is
asynchronous, so any commands that come after the setTimeout may be executed
before the callback is called:
function foo() { console.log("food"); } setTimeout(foo, 2000); console.log("drink");
The code above will print out 'drink' first and then 'food'. You may hear
asynchronous functions like setTimeout referred to as "non-blocking" because
they don't prevent the code that follows their invocation from running. It's
also worth mentioning that the time amount argument for setTimeout is
optional. If no amount is specified, then the amount will default to zero
(setTimeout(foo) is equivalent to setTimeout(foo, 0). Embellishing on this
thought for a moment, a common JavaScript developer interview question asks
candidates to predict the print order of the following code:
function foo() { console.log("food"); } setTimeout(foo, 0); console.log("drink");
The code above will will print out 'drink' first and then 'food'. This is
because setTimeout is asynchronous so it will not block execution of further
lines. We have also previously mentioned that the amount specified is the
minimum amount of time that will be waited, [sometimes the delay will be
longer][mdn-delays-longer].
In addition to the callback and delay amount, an unlimited number of additional
arguments may be provided. After the delay, the callback will be called with
those provided arguments:
function foo(food1, food2) { console.log(food1 + " for breakfast"); console.log(food2 + " for lunch"); } setTimeout(foo, 2000, "pancakes", "couscous");
The code above will print the following after about two seconds:
pancakes for breakfast
couscous for lunch
157. Cancelling timeouts
You now have complete knowledge of all possible arguments we can use for
setTimeout, but what does it return? If we executing the following snippet in
node:
function foo() { console.log("food"); } const val = setTimeout(foo, 2000); console.log(val);
We'll see that the return value of setTimeout is some special Timeout
object:
Timeout { _called: false, _idleTimeout: 2000, _idlePrev: [TimersList], _idleNext: [TimersList], _idleStart: 75, _onTimeout: [Function: foo], _timerArgs: undefined, _repeat: null, _destroyed: false, [Symbol(unrefed)]: false, [Symbol(asyncId)]: 5, [Symbol(triggerId)]: 1 }
You won't be finding this object too useful except for one thing, cancelling an
timeout that has yet to expire! We can pass this object into the
[clearTimeout][clear-timeout-mdn] function:
function foo() { console.log("food"); } const val = setTimeout(foo, 2000); clearTimeout(val);
The code above will not print out anything because the setTimeout is cleared
before the timer expires.
You may notice that the MDN documentation for
setTimeoutandclearTimeout
show thatsetTimeoutreturns a simple id number that can be used to cancel a
pending timeout and not a fancy Timeout object as we have described. This
variation is due to the fact that we are executing our code with NodeJS and
not in the browser (MDN is specific to the browser environment). Rest assured,
in either environment, if you pass the data that is returned fromsetTimeout
toclearTimeout, the timeout will be cancelled!
158. Running Intervals
Similar to setTimeout, there also exists a [setInterval][set-interval-mdn]
that function that executes a callback repeatedly at the specified delay.
setInterval accepts the same arguments as setTimeout:
function foo(food1, food2) { console.log(food1 + " and " + food2 + "!"); } setInterval(foo, 1000, "pancakes", "couscous");
The code above will print out 'pancakes and couscous!' every second. Someone's
hungry! Like you would expect, there is also a [clearInterval][clear-interval-mdn] that
we can use to cancel an interval!
159. What you've learned
In this reading we covered:
- what arguments
setTimeoutandsetIntervalcan accept: callback, delay in
ms, and any number of arguments to be passed to the callback - how to cancel a timeout or interval with
clearTimeoutandclearInterval
[set-timeout-mdn]:
https://developer.mozilla.org/en-US/docs/Web/API/WindowOrWorkerGlobalScope/setTimeout
[set-interval-mdn]:
https://developer.mozilla.org/en-US/docs/Web/API/WindowOrWorkerGlobalScope/setInterval
[clear-timeout-mdn]:
https://developer.mozilla.org/en-US/docs/Web/API/WindowOrWorkerGlobalScope/clearTimeout
[clear-interval-mdn]:
https://developer.mozilla.org/en-US/docs/Web/API/WindowOrWorkerGlobalScope/clearInterval
[mdn-delays-longer]:
https://developer.mozilla.org/en-US/docs/Web/API/WindowOrWorkerGlobalScope/setTimeout#Reasons_for_delays_longer_than_specified
Hanging by a Single Thread: A Yarn on JavaScript's Execution
The primary job of the programmer is to write code and to that end you have
written hundreds, possibly thousands of lines so far. However, it is important
for a programmer to understand the bigger picture. After we finish writing the
code, what should we do with it? Publish it in a book? Print it to frame on
wall? None of these. After we write the code, we run it! If writing code is the
birth of a program, then its execution is the lifetime that takes place after. A
lifetime full of highs and lows; some expected events and some unexpected.
Instead of "lifetime", programmers use the word "runtime" to refer to the
execution of a program.
Let's take a peek under the hood of the JavaScript runtime environment to get a
glimpse at how the code we write is processed.
When you finish reading this article, you should be able to:
- explain the difference between single-threaded and multi-threaded
execution - identify JavaScript as a single-threaded language
160. Single-threaded vs multi-threaded execution
In programming, we use the term thread of execution (thread for short) to
describe a sequence of commands. A thread consists of well-ordered commands in
the same way that a task may consist of multiple steps. For example, the task
(thread) of doing laundry may consist of the following steps (commands):
- open the washing machine door
- load the washing machine with clothes
- add some detergent
- close the washing machine door
- turn the washing machine on
For the most part, the relative order of these steps is critical to the task.
For example, we can only load the clothes after opening the door and should
only turn the machine on after closing the door.
Now that we have an understanding of what a thread is, let's use a similar
analogy to explore two different models of threading. Enter Appetite Academy,
the restaurant where patrons only have to pay the bill once they are full.
We'll be exploring these two models:
![single-vs-multi-threading][threading-image]
160.1. Single-threaded
In single-threaded execution, only one command can be processed at a time.
Say that a patron at Appetite Academy ordered a three course meal including a
salad (appetizer), a burger (main entree), and a pie (dessert). Each dish has
its own steps to be made. If the restaurant had a single-threaded kitchen, we
might see one chef in the kitchen preparing each dish one after the other. To
ensure that the customer receives the dishes in order, the lone chef would
likely plate a dish fully before beginning preparation of the next dish. A
shortcoming of this single chef kitchen is that the customer may have to wait
some time between dishes. On the flip side, only employing one chef is cheap for
the restaurant. Having one chef also keeps the kitchen relatively simple;
multiple chefs may complicate things. With one chef the restaurant avoids any
confusion that can result from "too many cooks in the kitchen."
Similar to having a single chef in the kitchen, JavaScript is a
single-threaded language. This means at any instance in time during a program,
only one command is being executed.
160.2. Multi-threaded
In multi-threaded execution, multiple commands can be processed at the same
time.
If Appetite Academy had a multi-threaded kitchen, it would be quite a different
scene. We might find three different chefs, each working on a different dish.
This would likely cut down on the amount of time the customer spends waiting for
dishes. This seems like a big enough reason to prefer multi-threading, but it's
not without tradeoffs. Employing more chefs would increase costs. Furthermore,
the amount of time that is saved may not be as large as we think. If the chefs
have to share resources like a single sink or single stove, then they would have
to wait for those resources to be freed up before continuing preparation of
their respective dishes. Finally, having multiple chefs can increase the
complexity inside of the kitchen; the chefs will have to painstakingly
communicate and coordinate their actions. If we don't orchestrate our chefs,then
they might fight over the stove or mistakenly serve the dishes in the wrong
order!
A thread (chef) can still only perform one command at a time, but with many
threads we could save some time by performing some steps in parallel across many
threads.
161. Keeping the thread from unraveling
Now that we've identified JavaScript as a single-threaded language, let's
introduce a problem that all single-threaded runtimes must face. If we can only
execute a single command at a time, what happens if we are in the process of
carrying out a command and an "important" event occurs that we want to handle
immediately? For example, if the user of our program presses a key, we would
want to handle their input as quickly as possible in order to provide a smooth,
snappy experience. The JavaScript runtime's solution to this is quite simple:
the user will have to wait. If a command is in progress and some event occurs,
the current command will run to full completion before the event is handled. If
the current command takes a long time, too bad; you'll have to wait longer. Cue
the very frustrating "We're sorry, the page has become unresponsive" message you
may be familiar with.
Execute the following snippet to illustrate this behavior:
setTimeout(function() { console.log("times up!"); }, 1000); let i = 0; while (true) { i++; }
The above program will hang indefinitely, never printing 'times up!' (press
ctrl/cmd + c in your terminal to kill the program). Let's break this down.
When the program begins, we set a timeout for one second, then enter an infinite
loop. While the loop is running, the timer expires, triggering a timeout event.
However, JavaScript's policy for handling new events is to only handle the next
event after the current command is complete. Since the current command is an
infinite loop, the current command will never complete, so the timeout event
will never be handled.
Although this example seems contrived, it highlights one of the primary causes
of slow, unresponsive pages. Up next, we'll take a closer look at this issue and
how we can mitigate it.
162. What you've learned
In this reading we were able to:
- compare and contrast single-threaded and multi-threaded execution through
the analogy of a single-chef and multi-chef kitchen - identify JavaScript as a single-threaded language and;
- bring awareness to how its single-threaded nature can cause unresponsive
programs if left unchecked
[threading-image]:
https://appacademy-open-assets.s3-us-west-1.amazonaws.com/Module-JavaScript/asynchronous-functions/assets/threading.png
Stacking the Odds in our Favor: the Call Stack
We've written a lot of programs so far in this course and sometimes they are
quite complex. They may be complex in their execution since function calls and
returns cause control flow to jump around to different lines, instead of just
sequentially by increasing line number. Ever wonder how the JavaScript runtime
is able to track all of those function calls? You're in luck! It's time to
explore an important component of the JavaScript runtime: the call stack.
When you finish reading this article, you should be able to:
- identify the two operations that characterize a stack data structure
- sketch how the call stack is manipulated during the runtime of a simple
program like the one provided in this reading
163. The call stack
The call stack is a structure that JavaScript uses to keep track of the
evaluation of function calls. It uses the stack data structure. In Computer
Science, a "stack" is a general pattern of organizing a collection of items. For
our current use of a stack, the items being organized are the function calls
that occur during the execution of our program. We'll be exploring stacks in
great detail further in the course. For now, we can imagine a stack as a
vertical pile that obeys the following pattern:
- new items must be placed on top of the pile - we refer to this as pushing
a new item to the stack - at any point, the only item that can be removed is the top of the pile - we
refer to this as popping the top item from the stack
In JavaScript's call stack, we use the term "stack frames" to describe the items
that are being pushed and popped. With this new understanding, we can now
identify two ways that JavaScript leverages these stack mechanics during
runtime: - when a function is called, a new frame is pushed onto the stack.
- when a function returns, the frame on the top of the stack is popped off the
stack.
To illustrate how frames are pushed and popped to the call stack, we'll explore
the following program:
function foo() { console.log("a"); bar(); console.log("e"); } function bar() { console.log("b"); baz(); console.log("d"); } function baz() { console.log("c"); } foo();
Create a file for yourself and execute this code. It will print out the letters
in order. This code is a great example of how a program's execution may not
simply be top down. Instead of executing sequentially, line by line, we know
that function calls and returns will cause execution to hop back and forth to
different line numbers. Let's trace through this program, visualizing the stack.
We'll use a commented arrow to denote where we pause execution to visualize the
stack at that moment.
We begin by executing a function call, foo(). This will add a frame to the
stack:
![stack-trace-image-1][stack-trace-01]
Now that foo() is the topmost (and only) frame on the stack, we must execute
the code inside of that function definition. This means that we print 'a' and
call bar(). This causes a new frame to be pushed to the stack:
![stack-trace-image-2][stack-trace-02]
Note that the stack frame for foo() is still on the stack, but not on top
anymore. The only time a frame may entirely leave that stack is when it is
popped due to a function return. Bear in mind that a function can return due to
a explicit return with a literal line like return someValue; or it can
implicitly return after the last line of the function's definition is executed.
Since bar() is now on top of the stack, execution jumps into the definition of
bar. You may notice the trick now: the frame that is at the top of the stack
represents the function being executed currently. Back to the execution, we
print 'b' and call baz():
![stack-trace-image-3][stack-trace-03]
Again, notice that bar() remains on the stack because that function has not
yet returned. Executing baz, we print out 'c' and return because there is no
other code in the definition of baz. This return means that baz() is popped
from the stack:
![stack-trace-image-4][stack-trace-04]
Now bar() is back on top of the stack; this makes sense because we must
continue to execute the remaining code within bar on line 10:
![stack-trace-image-5][stack-trace-05]
'd' is printed out and bar returns because there is no further code within its
definition. The top of stack is popped. foo() is now on top, which means
execution resumes inside of foo, line 4:
![stack-trace-image-6][stack-trace-06]
Finally, 'e' is printed and foo returns. This means the top frame is popped,
leaving the stack empty. Once the stack is empty, our program can exit:
![stack-trace-image-7][stack-trace-07]
That completes our stack trace! Here are three key points to take away from
these illustrations:
- the frame on the top of the stack corresponds to the function currently being
executed - calling a function will push a new frame to the top of the stack
- returning from a function will pop the top frame from the stack
This was a high level overview of the call stack. There is some detail that
we've omitted to bring attention to the most important mechanics. In
particular, we've glazed over what information is actually stored inside of a
single stack frame. For example, a stack frame will contain data about a
specific function call such as local variables, arguments, and which line to
return to after the frame is popped!
164. The practical consequences of the call stack
Now that we have an understanding of the call stack, let's discuss its practical
implications. We've previously identified JavaScript as a single-threaded
language and now you know why that's the case. The use of a single call stack
leads to a single thread of execution! The JavaScript runtime can only perform
one "command" at a time and the one "command" currently being executed is
whatever is at the top of the stack.
In the example program we just traced through, we mentioned that the program
will exit once the call stack is empty. This is not true of all programs. If a
program is asynchronously listening for an event to occur, such as waiting for a
setTimeout to expire, then the program will not exit. In this scenario, once
the setTimeout timer expires, a stack frame corresponding to the setTimeout
callback will be added to the stack. From here, the call stack would be
processed in the way we previously explored. Imagine that we had the same
functions as before, but we called foo asynchronously:
function foo() { console.log("a"); bar(); console.log("e"); } function bar() { console.log("b"); baz(); console.log("d"); } function baz() { console.log("c"); } setTimeout(foo, 2500);
The critical behavior to be aware of in the JavaScript runtime is this: an
event can only be handled once the call stack is empty. Recall that events can
be things other than timeouts, such as the user clicking a button or hitting a
key. Because we don't want to delay the handling of such important events, we
want minimize the amount of time that the call stack is non-empty. Take this
extreme scenario:
function somethingTerrible() { let i = 0; while (true) { i++; } } setTimeout(function() { console.log("time to do something really important!"); }, 1000); somethingTerrible();
somethingTerrible() will be pushed to the call stack and loop infinitely,
causing the function to never return. We expect the setTimeout timer to expire
while somethingTerrible() is still on the stack. Since somethingTerrible()
never returns, it will never be popped from the stack, so our setTimeout
callback will never have its own turn to be executed on the stack.
165. What you've learned
In this reading, we have:
- explored how the call stack is manipulated over the runtime of a program
- identified that events can only be handled once the call stack is empty
[stack-trace-01]:
https://appacademy-open-assets.s3-us-west-1.amazonaws.com/Module-JavaScript/asynchronous-functions/assets/stack-trace/01.png
[stack-trace-02]:
https://appacademy-open-assets.s3-us-west-1.amazonaws.com/Module-JavaScript/asynchronous-functions/assets/stack-trace/02.png
[stack-trace-03]:
https://appacademy-open-assets.s3-us-west-1.amazonaws.com/Module-JavaScript/asynchronous-functions/assets/stack-trace/03.png
[stack-trace-04]:
https://appacademy-open-assets.s3-us-west-1.amazonaws.com/Module-JavaScript/asynchronous-functions/assets/stack-trace/04.png
[stack-trace-05]:
https://appacademy-open-assets.s3-us-west-1.amazonaws.com/Module-JavaScript/asynchronous-functions/assets/stack-trace/05.png
[stack-trace-06]:
https://appacademy-open-assets.s3-us-west-1.amazonaws.com/Module-JavaScript/asynchronous-functions/assets/stack-trace/06.png
[stack-trace-07]:
https://appacademy-open-assets.s3-us-west-1.amazonaws.com/Module-JavaScript/asynchronous-functions/assets/stack-trace/07.png
An Unexpected Turn of Events: the event loop and Message Queue
As of late, we've begun to uncover the asynchronous potential of JavaScript and
how we can harness that potential to handle unpredictable events that occur
during our application's runtime. JavaScript is the tool that enables web pages
to be interactive and dynamic. For example, if we head to a site like
[appacademy.io][aa-homepage] and click a button in the header, the page
changes
due to that click event. We can click on that button whenever we want and
somehow JavaScript is able to handle it asynchronously. How exactly does
JavaScript handle these events?
When you finish reading this article, you should be able to:
- explain how the JavaScript runtime uses the call stack and message queue
in its event loop - identify the two operations that characterize a queue data structure
166. The event loop
JavaScript uses an event loop model of execution. We've previously been
introduced to one component of the event loop, the call stack. We identified
the call stack as the structure used to keep track of the execution of function
calls. Think of the call stack as keeping track of the current "task" in
progress. To clarify, a single task may consist of multiple function calls. For
example if a function foo calls function bar and bar calls function
baz,
then we consider all three functions as making progress toward the same task.
Along with the call stack, the event loop also consists of a message queue.
While the call stack tracks the task that is currently in progress, the message
queue keeps track of tasks that cannot be executed at this moment, but will be
executed once the current task is finished (recall that tasks can only be
performed one at a time because JavaScript is single-threaded). Because of this,
you may hear JavaScript's execution pattern referred to as "run to completion".
That is, the execution of an ongoing task will never be interrupted by another
task.
In some other programming languages, it is possible for an ongoing task to be
preempted or interrupted by another task, but this is not the case in
JavaScript
166.1. The message queue
The message queue is a structure used to track the handling of events. It uses
the queue data structure. A "queue" is a general pattern of organizing a
collection of things. A real world example of a queue is the line that you wait
on for checkout at a grocery store. A queue has a front and back, and obeys the
following pattern:
- new items are added to the back of queue - we refer to this as enqueueing
an item - items can only leave through the front of the queue - we refer to this as
dequeueing an item
Events in JavaScript are handled asynchronously with callbacks. Like always, the
events can be things such as asetTimeoutexpiring or the user clicking a
button. The items stored on the message queue correspond to events that have
occurred but have not yet been processed. The items stored on the queue are
referred to as "messages".
To illustrate how the message queue and call stack interact, we'll trace the
runtime of the following program:
function somethingSlow() { // some terribly slow implementation // assume that this function takes 4000 milliseconds to return } function foo() { console.log("food"); } function bar() { console.log("bark"); baz(); } function baz() { console.log("bazaar"); } setTimeout(foo, 1500); setTimeout(bar, 1000); somethingSlow();
The message queue only grows substantially when the current task takes a
nontrivial amount of time to complete. If the runtime isn't already busy tending
to a task, then new messages can be processed immediately because they wait
little to no time on the queue. For our illustration, we'll take creative
liberty and assume that some messages do have to wait on the queue because the
somethingSlow function takes 4000 milliseconds to complete! We'll use absolute
time in milliseconds to tell our story in the following diagrams, but the
reality is that we can't be certain of the actual timing. The absolute time in
milliseconds is not important, instead focus your attention to the relative
order of the stack and queue manipulations that take place.
We begin by setting a timeout for both foo and bar with 1500 and 1000 ms
respectively. Apart from the stack frames for the calls to the setTimeout
function itself (which we'll ignore for simplicity), no items are added to the
stack or queue. We don't manipulate the queue because a new message is only
enqueued when an event occurs and our timeout events have not yet triggered. We
don't add foo() or bar() to the stack because they are only called after
their timeout events have triggered. However, we do add somethingSlow() to the
stack because it is called synchronously. Imagine we are at about the 500 ms
mark, somethingSlow() is being processed on the stack, while our two timeout
events have not yet triggered:
![event-loop-image-01][event-loop-01]
At the 1000 ms mark, somethingSlow() is still being processed on the stack
because it needs a total of 4000 ms to return. However, at this moment, the
timeout event for bar will trigger. Because there is something still on the
stack, bar cannot be executed yet. Instead, it must wait on the queue:
![event-loop-image-02][event-loop-02]
At the 1500 ms mark, a similar timeout event will occur for foo. Since new
messages are enqueued at the back of the queue, the message for the foo event
will wait behind our existing bar message. This is great because once the call
stack becomes available to execute the next message, we ought to execute the
message for the event that happened first! It's first come, first serve:
![event-loop-image-03][event-loop-03]
Jumping to the 4000 ms mark, somethingSlow() finally returns and is popped
from the call stack. The stack is now available to process the next message. The
message at the front of the queue, bar, is placed on the stack for evaluation:
![event-loop-image-04][event-loop-04]
At the 4100 ms mark, bar() execution is in full swing. We have just printed
"bark" to the console and baz() is called. This new call for baz() is
pushed
to the stack.
![event-loop-image-05][event-loop-05]
You may have noticed that baz never had to wait on the queue; it went directly
to the stack. This is because baz is called synchronously during the execution
of bar.
At the 4200 ms mark, baz() has printed "bazaar" to the console and returns.
This means that the baz() stack frame is popped:
![event-loop-image-06][event-loop-06]
At the 4250 ms mark, execution resumes inside of bar() but there is no other
code to evaluate inside. The function returns and bar() is popped. Now that
the stack is free, the next message is taken from the queue to evaluate:
![event-loop-image-07][event-loop-07]
Finally, "food" is printed and the stack is popped. Leaving us with an empty
call stack and message queue:
![event-loop-image-08][event-loop-08]
That's all there is to it! Tracing the call stack and message queue for more
complex programs is very tedious, but the underlying mechanics are the same. To
summarize, synchronous tasks are performed on the stack. While the current task
is being processed on the stack, incoming asynchronous events wait on the queue.
The queue ensures that events which occurred first will be handled before those
that occurred later. Once the stack is empty, that means the current task is
complete, so the next task can be moved from the queue to the stack for
execution. This cycle repeats again and again, hence the loop!
If you are interested in reading more about the event loop check out the MDN
[documentation][mdn-event-loop]
167. What you've learned
In this article we:
- introduced the queue data structure
- explored how the call stack and message queue interact to form JavaScript's
event loop
[aa-homepage]: https://www.appacademy.io/
[mdn-event-loop]:
https://developer.mozilla.org/en-US/docs/Web/JavaScript/EventLoop
[event-loop-01]:
https://appacademy-open-assets.s3-us-west-1.amazonaws.com/Module-JavaScript/asynchronous-functions/assets/event-loop/01.png
[event-loop-02]:
https://appacademy-open-assets.s3-us-west-1.amazonaws.com/Module-JavaScript/asynchronous-functions/assets/event-loop/02.png
[event-loop-03]:
https://appacademy-open-assets.s3-us-west-1.amazonaws.com/Module-JavaScript/asynchronous-functions/assets/event-loop/03.png
[event-loop-04]:
https://appacademy-open-assets.s3-us-west-1.amazonaws.com/Module-JavaScript/asynchronous-functions/assets/event-loop/04.png
[event-loop-05]:
https://appacademy-open-assets.s3-us-west-1.amazonaws.com/Module-JavaScript/asynchronous-functions/assets/event-loop/05.png
[event-loop-06]:
https://appacademy-open-assets.s3-us-west-1.amazonaws.com/Module-JavaScript/asynchronous-functions/assets/event-loop/06.png
[event-loop-07]:
https://appacademy-open-assets.s3-us-west-1.amazonaws.com/Module-JavaScript/asynchronous-functions/assets/event-loop/07.png
[event-loop-08]:
https://appacademy-open-assets.s3-us-west-1.amazonaws.com/Module-JavaScript/asynchronous-functions/assets/event-loop/08.png
Reading Between the Lines: Getting User Input and Callback Chaining
Up until this point, our programs have been deterministic in that they exhibit
the same behavior whenever we execute them. In order to change the behavior, we
have had to change the code. The human element has been missing! It would be
great if a user of our program could interact with it during runtime, possibly
influencing the thread of execution. Gathering input from the user during
runtime is an operation that is typically handled asynchronously with
events. Why asynchronously? Well, we can't be certain when the user will
decide to interact and we don't want our program to wait around idly for their
input. Don't forget that JavaScript is single-threaded; waiting for user input
synchronously would block the thread!
When you finish reading this article, you should be able to:
- write a program that accepts user input using Node's
readlinemodule - utilize callback chaining to guarantee relative order of execution among
multiple asynchronous functions
168. Node's readline module
To take user input, we'll need to get acquainted with the
[readline][readline-doc] module. Recall that a module is just a package of
JavaScript code that provides some useful functionality (for example, mocha is
a module that we have been using frequently to test our code). Luckily, the
readline module already comes bundled with Node. No additional installations
are needed, we just need to "import" the module into our program. Let's begin
with a fresh .js file:
// import the readline module into our file const readline = require("readline");
The readline variable is an object that contains all of the methods we can use
from the module. Following the quick-start instructions in the
[docs][readline-doc], we'll also need to do some initial setup:
const readline = require("readline"); // create an interface where we can talk to the user const rl = readline.createInterface({ input: process.stdin, output: process.stdout });
The details of what createInterface does aren't super-duper important, but
here is the short story: it allows us to read and print information from the
terminal.
A large part of using modules like
readlineis sifting through the
documentation for what you need. You'll have to become comfortable with
utilizing methods without understanding exactly how they work. Abstraction
is the name of the game here! We don't know exactly how thecreateInterface
method works under the hood, but we can still use it effectively because the
docs offer examples and guidance!
Now that we have the setup out of the way, let's ask the user something!
Referencing the docs, we can use thequestionmethod on our interface:
const readline = require("readline"); const rl = readline.createInterface({ input: process.stdin, output: process.stdout }); // ask the user a question rl.question("What's up, doc? ", answer => { // print their response console.log("you responded: " + answer); // close the interface rl.close(); });
Execute the code above and enter something when prompted! If we respond 'nothing
much', the total output would be:
What's up, doc? nothing much
you responded: nothing much
Pretty cool, huh? Notice that the question method accepts two arguments: a
question message to display and a callback. When the user types a response and
hits enter, the callback will be executed with their response as the argument.
rl.close() is invoked after the question is answered to close the interface.
If we don't close the interface, then the program will hang and not exit. In
general, you'll want to close the interface after you are done asking all of
your questions. Like usual, all of this info is provided in the
[docs][readline-close-doc].
Let's emphasize a critical point: thequestionmethod is asynchronous! Similar
to how we illustrated the asynchronous nature ofsetTimeout, let's add a print
statement after we callrl.question:
const readline = require("readline"); const rl = readline.createInterface({ input: process.stdin, output: process.stdout }); rl.question("What's up, doc? ", answer => { console.log("you responded: " + answer); rl.close(); }); // try to print 'DONE!' after the question console.log("DONE!");
If we respond 'nothing much', the total output would be:
What's up, doc? DONE!
nothing much
you responded: nothing much
Oops. It looks like the 'DONE!' message was printed out before the user finished
entering their response because the question method is asynchronous. We'll
introduce a pattern for overcoming this issue next.
169. Callback chaining
In our last example, we saw how the asynchronous behavior of the question
method can lead to issues if we want to perform a command directly after the
user enters their response. The fix for this is trivial (some would even say
"low-tech"). Simply put the command you want to follow at the end of the
callback. In other words, the following code guarantees that we print 'DONE!'
after the user enters their response:
// this code is a partial snippet from previous examples rl.question("What's up, doc? ", answer => { console.log("you responded: " + answer); rl.close(); console.log("DONE!"); });
The change above would yield a total output of:
What's up, doc? nothing much
you responded: nothing much
DONE!
In general, when we want to a command to occur directly "after" a callback is
invoked asynchronously, we'll really have to place that command inside of the
callback. This is a simple pattern, but one that we'll turn to often.
Imagine that we want to ask the user two questions in succession. That is, we
want to ask question one, get their response to question one, then ask question
two, and finally get their response to question two. The following code will
not meet this requirement:
const readline = require("readline"); const rl = readline.createInterface({ input: process.stdin, output: process.stdout }); // ask question one rl.question("What's up, doc? ", firstAnswer => { console.log(firstAnswer + " is up."); }); // ask question two rl.question("What's down, clown? ", secondAnswer => { console.log(secondAnswer + " is down."); rl.close(); });
The code above is broken and will never ask the second question. Like you can
probably guess, this is because the question method is asynchronous.
Specifically, the first call to question will occur and before the user can
enter their response, the second call to question also occurs. This is bad
because our program is still trying to finish the first question. Since we want to
ask question two only after the user responds to question one, we'll have to use
the pattern from before. That is, we should ask question two within the response
callback for question one:
const readline = require("readline"); const rl = readline.createInterface({ input: process.stdin, output: process.stdout }); // ask question one rl.question("What's up, doc? ", firstAnswer => { console.log(firstAnswer + " is up."); // only after the user responds to question one, then ask question two rl.question("What's down, clown? ", secondAnswer => { console.log(secondAnswer + " is down."); rl.close(); }); });
If we respond to the questions with 'the sky' and 'the ground', the total output
is:
What's up, doc? the sky
the sky is up.
What's down, clown? the ground
the ground is down.
Nice! The program works as intended. The pattern we utilized is known as
callback chaining. While callback chaining allows us to perform a series of
asynchronous functions one after the other, if we don't manage our code neatly,
we can end up with a mess. Extending this pattern to three questions, we can
begin to see the awkward, nested structure:
// this code is a partial snippet from previous examples rl.question("What's up, doc? ", firstAnswer => { console.log(firstAnswer + " is up."); rl.question("What's down, clown? ", secondAnswer => { console.log(secondAnswer + " is down."); rl.question("What's left, Jeff? ", thirdAnswer => { console.log(thirdAnswer + " is left."); rl.close(); }); }); });
This overly nested structure is known colloquially in the JavaScript community
as ["callback hell"][callback-hell]. Don't worry! A way to refactor this type of
code for more readability is to use named functions instead of passing anonymous
functions. Here is an example of such a refactor:
const readline = require("readline"); const rl = readline.createInterface({ input: process.stdin, output: process.stdout }); rl.question("What's up, doc? ", handleResponseOne); function handleResponseOne(firstAnswer) { console.log(firstAnswer + " is up."); rl.question("What's down, clown? ", handleResponseTwo); } function handleResponseTwo(secondAnswer) { console.log(secondAnswer + " is down."); rl.question("What's left, Jeff? ", handleResponseThree); } function handleResponseThree(thirdAnswer) { console.log(thirdAnswer + " is left."); rl.close(); }
Run the code above to check out our final product! Ah, much better. By using
named functions to handle the responses, our code structure appears flatter and
easier to read.
Callback chaining is a very common pattern in JavaScript, so get used to it! As
a rule of thumb, prefer to use named functions when creating a callback chain
longer than two. Later in the course, we'll learn about recent additions to
JavaScript that help reduce "callback hell" even further, so stay tuned!
170. What you've learned
In this reading, we:
- learned how to use the
readlinemodule to gather user input asynchronously - utilized callback chaining to serialize multiple asynchronous functions
- refactored a callback chain to keep our code readable and avoid "callback
hell"
[readline-doc]: https://nodejs.org/api/readline.html#readline_readline
[readline-close-doc]: https://nodejs.org/api/readline.html#readline_rl_close
[callback-hell]: http://callbackhell.com/
Timeout Project
Time to practice dealing with asynchronous functions like setTimeout and
setInterval. Your objective is to implement the functions in each file
of the /problems directory. In addition to the prompts available at the
top of each file, Mocha specs are provided to test your work.
To get started, use the following commands:
cdinto the project directorynpm installto install any dependenciesmochato run the test cases
Guessing Game Project
It's time for our first non-spec guided project! There are many projects in the
course, some of which will not have test cases for you to run. These types of
projects will hold your hand less and force you to make design decisions.
Instead of specs, you will be provided with text instructions and example
snippets to guide you. In order to end up with a working project, you should
analyze these instructions closely. If you are stuck or don't understand an
instruction, ask a TA for clarification!
The solution for this project is available at the end of these instructions. Be
sure to give it an honest shot before you take a peek!
171. The Objective
Our objective for this project is to build a simple game where the user has to
guess a secret number that is chosen at random. Upon making a guess, the user
will receive a hint indicating if their guess is too small or too large. Below
is an example of how the final product will play. We've denoted the user's input
with *asterisks*. All other text is produced by the computer:
Enter a max number: *20*
Enter a min number: *11*
I'm thinking of a number between 11 and 20...
Enter a guess: *15*
Too high.
Enter a guess: *11*
Too low.
Enter a guess: *13*
Too high.
Enter a guess: *12*
Correct!
YOU WON.
We'll be building this project in phases, with each phase bringing us closer to
the final product shown above. It's important that you follow the phases closely
and don't jump the gun by ignoring the instructions and attempting to create
your own game quickly. For these guided projects, the journey is more important
than the final destination. Without further ado, let's jump in!
172. Phase I: Too High? Too Low? Who knows.
Begin by creating a folder called guessing-game-project. Open the folder in
VSCode. Inside of that folder create a guessing-game.js file. This is the file
where we will do all of the coding.
Begin by initializing a variable in the global scope named secretNumber to any
positive integer. Later we will program this variable to be assigned at random,
but for now we'll hard-code a value that we can test for quickly.
172.1. checkGuess
Define a function named checkGuess that accepts a number as an argument. It
should compare that argument against the global secretNumber. It should have
the following behavior:
- when the argument is larger than
secretNumber, it should print 'Too high.'
and returnfalse - when the argument is smaller than
secretNumber, it should print 'Too low.'
and returnfalse - when the argument is equal to
secretNumber, it should print 'Correct!' and
returntrue
Let's take a moment to verify that our code is working as intended. Make a few
test calls tocheckGuessin the global scope. Be sure to use a range of
numbers so we can verify that it behaves properly in all three scenarios. You'll
want toconsole.logthe return values ofcheckGuesssince it should return
booleans. Run your code withnode guessing-game.js. When you are positive that
your function is working, remove the test calls from your file.
172.2. askGuess
Since we will be taking user input during gameplay, we'll need to do some
standard setup for Node's readline module. Reference the [readline
docs][readline-doc] to create an interface for input and output that we will
use. To stay organized, we recommend that you import the module and create the
interface at the tippy top of your file.
Define a function named askGuess. The method should use the readline
module's question method to ask the user to 'Enter a guess: '. If you need a
refresher on how to use this method, check out the [question
docs][question-doc]. Once the user enters their number, the checkGuess
function should be called with their number as an argument and the interface
should be [closed][close-doc].
When accepting user input, there is a very important nuance to take into
account. When the user enters their guess it will be interpreted as a string of
numeric characters and not an actual number type! Depending on how you wrote
your checkGuess function, this could be disastrous because:
console.log(42 === "42"); // false
To overcome this issue, we should explicitly turn their guess into a number
before we pass it into checkGuess. You can do this by calling the Number
function. Here's an example of Number in action:
let str = "42"; console.log(42 === Number(str)); // true
Test your askGuess by calling it once in the global scope. Then run your
program a few times, entering different numbers. After trying a single guess,
you will have to run the program again. Be sure to include an attempt with a
correct guess by entering the secretNumber value that you hard-coded.
Once you have verified that the user's guess is being properly checked, let's
work on having the function ask the user for another guess if they are
incorrect. Refactor the askGuess method with some conditional logic. Recall
that the checkGuess function returns a boolean - very convenient! Here is how
the askGuess function should flow:
- check the user's guess
- if it is correct, print out 'You win!' and close the interface
- if it is incorrect, call
askGuessagain
You may find it a bit startling that you can reference the
askGuessfunction
from within theaskGuessfunction. That is, you can a reference a function
from within itself! This self-referential mechanism is leveraged quite
frequently in programming. We will return to this concept in later lessons.
Run your program and test it out, being sure that you have a single call to
askGuessin the global scope so the game can begin. Woohoo! We now have our
minimal viable product (MVP) version of the game.
Before moving onto the next phase, ask a TA for a code review.
173. Phase II: Making it Random
Now that we have the core gameplay down, we'll want to implement logic to allow
the secretNumber to be chosen at random. To do this, we'll utilize the
Math#random method. Take a look at the [docs][random-doc]. The method returns
a decimal number between 0 and 1 (excluding 1). For example:
console.log(Math.random()); // 0.5719957072947224 console.log(Math.random()); // 0.08590173924968769 console.log(Math.random()); // 0.0965770175443883
By itself, this method won't be too useful because our game should only use
whole numbers. Luckily, the docs provide some insight into how we can design a
function that returns a random whole number that lies within a certain range.
Scroll through the docs and locate examples about "Getting a random integer
between two values." You'll use these examples to inspire your code. You may
notice that the examples provided rely on other methods like Math.floor.
Research those methods so that you understand how the code works. Googling
around and researching the docs is an important aspect of being a developer, so
take your time!
173.1. randomInRange
Define a function called randomInRange that accepts a minimum and maximum
number as arguments. The function should return a random whole number between
the provided minimum and maximum (inclusive). Be sure to test your function,
here is an example of how it might behave:
console.log(randomInRange(15, 20)); // 16 console.log(randomInRange(15, 20)); // 17 console.log(randomInRange(15, 20)); // 20
Once you have confirmed that your randomInRange function is returning numbers
properly, edit your initialization of secretNumber. Instead of setting it to a
hard-coded value, use your function's return value to set it to a random number
between 0 and 100. Play a few games! Remember that you'll have to call
askGuess() once in the global scope to begin the game. Next up, we'll allow
the user to choose the min and max for the game.
173.2. askRange
Delete or comment out your global call to askGuess for now. Define a function
called askRange. This method should ask the user to enter a minimum number and
then ask them to enter a maximum number. We want to ask them for the maximum
only after they have responded to the first question. This means you will have
to use the question method twice! Recall what you learned from the readings.
The question method is asynchronous, so how can we ask two questions one after
the other? We'll leave the implementation to you. After the user enters their
min and max, you should print a message confirming the range. Here is an example
of how our askRange method behaves. We've put asterisks around the user's
input:
Enter a max number: *20*
Enter a min number: *11*
I'm thinking of a number between 11 and 20...
As always, test your function thoroughly by adding a call to askRange in
global scope. Your program may hang because the interface is not closed after
the user enters their max. That's okay, since we are debugging; press ctrl + c
in your terminal to kill the program.
Once your function is able to properly take the min and max from your user, it's
time to put it all together! When the user enters both the min and the max, call
your randomInRange function with that min and max as arguments. Recall that
the user's input is automatically interpreted as strings and not numbers. You
should explicitly turn the min and max to actual numbers before passing them in.
Take the random number returned from your function and set that as the
secretNumber. Then call your old askGuess method so that gameplay can begin.
All of this should happen within the askRange function. We design it this way
because we only want to ask for a guess after the random number has been chosen.
The askRange function is the "main" function that will begin our game, so
you'll need call it once in the global scope. Run your program and play a few
games!
Before moving onto the bonus ask a TA for a code review.
174. Bonus: Limiting the number of turns
With our main features complete, let's work on increasing the difficulty of the
game by limiting the number of guesses a user can make. If the player uses all
of their attempts without guessing the correct number, they will lose the game.
174.1. Limiting turns to 5
Start by limiting the player to 5 attempts. You can accomplish this by
initializing a numAttempts variable in the global scope. Refactor your
askGuess method to decrement the number of remaining attempts whenever it is
called. If the numAttempts reaches 0 before the correct guess is made, end the
game by printing 'You Lose'. We'll leave the details of the implementation up to
you.
174.2. Limiting turns dynamically
Make the limit dynamic by allowing the user to specify the number of attempts.
We recommend creating an askLimit function that behaves similarly to
askRange. Be sure to chain the callbacks in the right order to ensure the game
is configured properly. For example, one valid callback chain order would be
askLimit -> askRange -> askGuess. If you follow this order,
you'll need to
call askLimit in the global scope to begin the game.
[readline-doc]: https://nodejs.org/api/readline.html#readline_readline
[question-doc]:
https://nodejs.org/api/readline.html#readline_rl_question_query_callback
[close-doc]: https://nodejs.org/api/readline.html#readline_rl_close
[random-doc]:
https://developer.mozilla.org/en-US/docs/Web/JavaScript/Reference/Global_Objects/Math/random
WEEK-03 DAY-2
Git
Node.js Learning Objectives
Below is a complete list of the terminal learning objectives for this lesson.
When you complete this lesson, you should be able to perform each of the
following objectives. These objectives capture how you may be evaluated on the
assessment for this lesson.
- Define NodeJS as distinct from browser based JavaScript runtimes.
- Write a program that reads in a dictionary file using node's FS API and reads
a line of text from the terminal input. The program should 'spell check' by
putting asterisks around every word that is NOT found in the dictionaryearning objectives for this lesson.
When you complete this lesson, you should be able to perform each of the
following objectives. These objectives capture how you may be evaluated on the
assessment for this lesson. - Define NodeJS as distinct from browser based JavaScript runtimes.
- Write a program that reads in a dictionary file using node's FS API and reads
a line of text from the terminal input. The program should 'spell check' by
putting asterisks around every word that is NOT found in the dictionary.
Git Learning Objectives
Below is a complete list of the terminal learning objectives for this lesson.
When you complete this lesson, you should be able to perform each of the
following objectives. These objectives capture how you may be evaluated on the
assessment for this lesson.
- Use Git to initialize a repo
- Explain the difference between Git and GitHub
- Given 'adding to staging', 'committing', and 'pushing to remote', match attributes that apply to each.
- Use Git to clone an existing repo from GitHub
- Use Git to push a local commit to a remote branch
- Use git to make a branch, push it to github, and make a pull request on GitHub to merge it to master
- Given a git merge conflict, resolve it
- Match the three types of git reset with appropriate descriptions of the operation.
- Use Git reset to rollback local-only commits.
- Identify what the git rebase command does
- Use git diff to compare a local 'staging' branch and 'master' branch.
- Use git checkout to check out a specific commit by commit iing objectives for this lesson.
When you complete this lesson, you should be able to perform each of the
following objectives. These objectives capture how you may be evaluated on the
assessment for this lesson. - Use Git to initialize a repo
- Explain the difference between Git and GitHub
- Given 'adding to staging', 'committing', and 'pushing to remote', match attributes that apply to each.
- Use Git to clone an existing repo from GitHub
- Use Git to push a local commit to a remote branch
- Use git to make a branch, push it to github, and make a pull request on GitHub to merge it to master
- Given a git merge conflict, resolve it
- Match the three types of git reset with appropriate descriptions of the operation.
- Use Git reset to rollback local-only commits.
- Identify what the git rebase command does
- Use git diff to compare a local 'staging' branch and 'master' branch.
- Use git checkout to check out a specific commit by commit id
A Tale of Two Runtimes: Node.js vs Browser
Lately, we've been alluding to JavaScript running in the web browser. While we
are not quite ready to make that transition yet, the authors of JavaScript
really only intended their creation to be used in a browser environment when
they originally conceived of the language at Netscape in 1995. To prepare for
the coming transition to the browser, let's explore some of the differences
between Node.js and browser environments.
When you finish this article, you should be able to:
- identify Node.js as an environment that is distinct from web browsers
- list several differences between the Node.JS and browser runtimes
175. Same specification, different implementation
Since JavaScript is a single programming language, you may be wondering why
there are any differences between Node.js and browsers in the first place. If
they are in fact different, why wouldn't we classify them as different
programming languages? The answer is complicated, but the key idea is this: even
if we just consider browser environments, different browsers themselves can
differ wildly because JavaScript is a specification. During the rise of the
World Wide Web in the 90s, companies competed for dominance (see [The First
Browser War][browser-wars]). As Netscape's "original" JavaScript language rose
to prominence along with their browser, other browser companies needed to also
support JavaScript to keep their users happy. Imagine if you could only visit
pages as they were intended if you used a certain browser. What a horrible
experience it would be (we're looking at you Internet Explorer)! As companies
"copied" Netscape's original implementation of JavaScript, they sometimes took
creative liberty in adding their own features.
In order to ensure a certain level of compatibility across browsers, the
European Computer Manufacturers Association (ECMA) defined specifications to
standardize the JavaScript language. This specification is known as ECMAScript
or ES for short. This allows competing browsers like Google Chrome, Mozilla
Firefox, and Apple Safari to have a healthy level of competition that doesn't
compromise the customer experience. So now you know that when people use the
term "JavaScript" they are really referring to the core standards set by
ECMAScript, although exact implementation details may differ from browser to
browser.
The Node.js runtime was released in 2009 when there was a growing need to
execute JavaScript in a portable environment, without any browser.
Did you know? Node.js is built on top of the same JavaScript engine as
Google Chrome (V8). Neat.
176. Differences between Node.js and browsers
There are many differences between Node.js and browser environments, but many of
them are small and inconsequential in practice. For example, in our
Asynchronous lesson, we noted how [Node's setTimeout][node-set-timeout] has a
slightly different return value from [a browser's setTimeout][mdn-set-timeout].
Let's go over a few notable differences between the two environments.
176.1. Global vs Window
In the Node.js runtime, the [global object][global-object] is the object where
global variables are stored. In browsers, the [window object][window] is where
global variables are stored. The window also includes properties and methods
that deal with drawing things on the screen like images, links, and buttons.
Node doesn't need to draw anything, and so it does not come with such
properties. This means that you can't reference window in Node.
Most browsers allow you to reference
globalbut it is really the same object
aswindow.
176.2. Document
Browsers have access to a document object that contains the HTML of a page
that will be rendered to the browser window. There is no document in Node.
176.3. Location
Browsers have access to a location that contains information about the web
address being visited in the browser. There is no location in Node, since it
is not on the web.
176.4. Require and module.exports
Node has a predefined require function that we can use to import installed
modules like readline. We can also import and export across our own files
using require and module.exports. For example, say we had two different
files, animals.js and cat.js, that existed in the same directory:
// cat.js const someCat = { name: "Sennacy", color: "orange", age: 3 }; module.exports = someCat;
// animals.js const myCat = require("./cat.js"); console.log(myCat.name + " is a great pet!");
If we execute animals.js in Node, the program would print
'Sennacy is a great pet!'.
Browsers don't have a notion of a file system so we cannot use require or
module.exports in the same way.
177. What you've learned
In this reading, we covered a few differences between Node and browser environments, including:
- Node's
globaland browser'swindow - the browser specific
documentandlocationobjects - the Node specific
requireandmodule.exports
[node-set-timeout]:
https://nodejs.org/api/timers.html#timers_settimeout_callback_delay_args
[mdn-set-timeout]:
https://developer.mozilla.org/en-US/docs/Web/API/WindowOrWorkerGlobalScope/setTimeout
[global-object]: https://developer.mozilla.org/en-US/docs/Glossary/Global_object
[window]: https://developer.mozilla.org/en-US/docs/Web/API/Window
[browser-wars]: https://en.wikipedia.org/wiki/Browser_wars
The Ins and Outs of File I/O in Node
We have previously identified some differences between Node.js and browser
environments. One difference was the use of require to import different node
modules. It is often the case that these modules provide functionality that is
totally absent in the browser environment. While browsers support deliberate
file download or upload to the web, they typically don't support arbitrary file
access due to security concerns. Let's explore a node module that allows us to
read, write, and otherwise manipulate files on our computer.
When you finish this article, you should be able to use the fs module to
perform basic read and write operations on local files.
178. The fs module
Node ships with an [fs module][fs-doc] that contains methods that allow us to
interact with our computer's File System through JavaScript. No
additional installations are required; to access this module we can simply
require it. We recommend that you code along with this reading. Let's begin
with a change-some-files.js script that imports the module:
// change-some-files.js const fs = require("fs");
Similar to what we saw in the readline lesson, require will return to us a
object with many properties that will enable us to do file I/O.
Did you know? I/O is short for input/output. It's usage is widespread and all
the hip tech companies are using it, like appacademy.io.
Thefsmodule contains tons of functionality! Chances are that if there is
some operation you need to perform regarding files, thefsmodule supports it. The
module also offers both synchronous and asynchronous implementations of these
methods. We prefer to not block the thread and so we'll opt for the
asynchronous flavors of these methods.
178.1. Creating a new file
To create a file, we can use the [writeFile][fs-write-file] method. According
to the documentation, there are a few ways to use it. The most straight forward
way is:
// change-some-file.js const fs = require("fs"); fs.writeFile("foo.txt", "Hello world!", "utf8", err => { if (err) { console.log(err); } console.log("write is complete"); });
The code above will create a new file called foo.txt in the same directory as
our change-some-file.js script. It will write the string 'Hello world!'
into
that newly created file. The third argument specifies the encoding of the
characters. There are different ways to encode characters; [UTF-8][utf-8] is the
most common and you'll use this in most scenarios. The fourth argument to
writeFile is a callback that will be invoked when the write operation is
complete. The docs indicate that if there is an error during the operation (such
as an invalid encoding argument), an error object will be passed into the
callback. This type of error handling is quite common for asynchronous
functions. Like we are used to, since writeFile is asynchronous, we need to
utilize callback chaining if we want to guarantee that commands occur after
the write is complete or fails.
Beware! If the file name specified to
writeFilealready exists, it will
completely overwrite the contents of that file.
We won't be using thefoo.txtfile in the rest of this reading.
178.2. Reading existing files
To explore how to read a file, we'll use VSCode to manually create a
poetry.txt file within the same directory as our change-some-file.js script.
Be sure to create this if you are following along.
Our poetry.txt file will contain the following lines:
My code fails
I do not know why
My code works
I do not know why
We can use the [readFile][fs-read-file] method to read the contents of this
file. The method accepts very similar arguments to writeFile, except that the
callback may be passed an error object and string containing the file contents.
In the snippet below, we have replaced our previous writeFile code with
readFile:
// change-some-file.js const fs = require("fs"); fs.readFile("poetry.txt", "utf8", (err, data) => { if (err) { console.log(err); } console.log("THE CONTENTS ARE:"); console.log(data); });
Running the code above would print the following in the terminal:
THE CONTENTS ARE:
My code fails
I do not know why
My code works
I do not know why
Success! From here, you can do anything you please with the data read from the
file. For example, since data is a string, we could split the string on the
newline character \n to obtain an array of the file's lines:
// change-some-file.js const fs = require("fs"); fs.readFile("poetry.txt", "utf8", (err, data) => { if (err) { console.log(err); } let lines = data.split("\n"); console.log("THE CONTENTS ARE:"); console.log(lines); console.log("The third line is " + lines[2]); });
Running this latest version would yield:
THE CONTENTS ARE:
[ 'My code fails',
'I do not know why',
'My code works',
'I do not know why' ]
The third line is My code works
179. Fancy File I/O
Now that we have an understanding of both readFile and writeFile, let's use
both to accomplish a task. Using the same poetry.txt file from before:
My code fails
I do not know why
My code works
I do not know why
Our goal is to design a program to replace occurrences of the phrase 'do not'
with the word 'should'. This is straightforward enough. We can read the contents
of the file as a string, manipulate this string, then write this new string back
into the file. We'll need to utilize callback chaining in order for this to work
since our file I/O is asynchronous:
const fs = require("fs"); fs.readFile("poetry.txt", "utf8", (err, data) => { if (err) { console.log(err); } let newData = data.split("do not").join("should"); fs.writeFile("poetry.txt", newData, "utf8", err => { if (err) { console.log(err); } console.log("done!"); }); });
Executing the script above will edit the poetry.txt file to contain:
My code fails
I should know why
My code works
I should know why
As a bonus, we might also refactor this code to use named functions for better
readability and generality:
const fs = require("fs"); function replaceContents(file, oldStr, newStr) { fs.readFile(file, "utf8", (err, data) => { if (err) { console.log(err); } let newData = data.split(oldStr).join(newStr); writeContents(file, newData); }); } function writeContents(file, data) { fs.writeFile(file, data, "utf8", err => { if (err) { console.log(err); } console.log("done!"); }); } replaceContents("poetry.txt", "do not", "should");
180. What you've learned
In this reading we explored the fs module. In particular, we:
- learned about basic file I/O via
readFileandwriteFile - utilized callback chaining to edit a file based on its existing content
[fs-doc]: https://nodejs.org/api/fs.html
[fs-write-file]:
https://nodejs.org/api/fs.html#fs_fs_writefile_file_data_options_callback
[fs-read-file]:
https://nodejs.org/api/fs.html#fs_fs_readfile_path_options_callback
[utf-8]: https://en.wikipedia.org/wiki/UTF-8
"Gitting" Started With Git!
Good software is never limited to "right now"! Your code grows and changes over
time, and the people who work with it may come and go. How can you be certain
you're preserving your code's legacy? Version control lets us keep track of
your changes over time. You'll discuss version control with Git, the tool of
choice for modern development teams.
After reading, you'll be able to:
- Explain the role of version control in the programmer's toolkit
- Create and manage a Git repository
- Share and collaborate on Git repositories via Github
181. A little history
Think back to the dark ages of web development: a world of beeping modems and
marquee text. If you were going to build a web application in 1995, how might
you have done it? You'd start with an empty directory and add some JavaScript
and HTML files. As you made changes, you'd save them directly to your directory.
There's no history of the changes you've made, so you'd have to keep excellent
notes or have an incredible memory to revert your application to a previous
state.
What if you have teammates working with you on this project, or a client who
wants to review your work? Now each teammate needs a copy of the project
directory, and you need a way to share your work with clients. This results in
numerous copies of the same files and a lot of extra work keeping those files in
sync. If one file gets out of line, it could spell disaster for the whole
project. Yikes!
Instead of suffering from these problems, programmers designed a solution:
Version Control Systems (VCS). VCS tools abstract the work of keeping projects
and programmers in sync with one another. They provide a shared language with
which you can discuss changes to source code. They also allow you to step back
in time and review your work. VCS tools save you hours of work each day, so
learning to use them is a great investment in your productivity.
181.1. Git?
You'll be using Git (pronounced similarly to 'get' in English) as your VCS. Git
is the most popular VCS today and provides a good balance of power and ease of
use. It was created in 2005 by Linus Torvalds (who you may also recognize as the
creator of Linux) to address a number of shortcomings VCS tools of that time
had, including speed of code management and the ability to maintain workflow
when cut off from a remote server. Git is well-known for being reliable and
fast, and it brings with it an important online community you can leverage for
sharing your code with a wider audience.
182. Git basics
Like many disciplines, learning Git is just a matter of learning a new language.
You'll cover a lot of new vocabulary in this lesson! Remember that the
vocabulary you'll learn will allow you to communicate clearly with other
developers worldwide, so it's important to understand the meaning of each term.
It's also important to note that Git is a complex and powerful tool. As such,
its documentation and advanced examples may be tough to understand. As your
knowledge grows, you may choose to dive deeper into Git. Today, you'll focus on
the commands you'll use every day - possibly for the rest of your programming
career! Get comfortable with these commands and resist the urge to copy/paste or
create keyboard shortcuts as you're getting started.
182.1. See the world through Git's eyes
Before you look at any practical examples, let's talk about how Git works behind
the scenes.
Here is your first new word in Git-speak: repository, often shortened to
repo. A Git repo comprises all the source code for a particular project. In
the "dark ages" example above, the repo is the first directory you created,
where work is saved to, and which acts as the source for code shared to others.
Without a repo, Git has nothing to act on.
Git manages your project as a series of commits. A commit is a collection of
changes grouped towards a shared purpose. By tracking these commits, you can see
your project on a timeline instead of only as a finished project:
![image-git-timeline][image-git-timeline]
Notice the notes and seemingly random numbers by each commit? These are referred
to as commit messages and commit hashes, respectively. Git identifies your
commits by their hash, a specially-generated series of letters and numbers. You
add commit messages to convey meaning and to help humans track your commits, as
those hashes aren't very friendly to read!
A Git hash is 40 characters long, but you only need the first few characters to
identify which hash you're referring to. By default, Git abbreviates hashes to 7
characters. You'll follow this convention, too.
Git provides a helpful way for us to "alias" a commit in plain English as well.
These aliases are called refs, short for "references". A special one that Git
creates for all repositories is HEAD, which references the most recent commit.
You'll learn more about creating your own refs when you learn about "branching".
Git maintains three separate lists of changes: the working directory, the
staging area, and the commit history. The working directory includes all of
your in-progress changes, the staging area is reserved for changes you're ready
to commit, and the commit history is made up of changes you've already
committed. You'll look more at these three lists soon.
Git only cares about changes that are "tracked". To track a file, you must add
it to the commit history. The working directory will always show the changes,
even if they aren't tracked. In the commit history, you'll only have a history
of files that have been formally tracked by your repository.
182.2. Tracking changes in a repository
Now, let's get practical!
You can create a repository with git init. Running this command will
initialize a new Git repo in your current directory. It's important to remember
that you only want a repository for your project and not your whole hard drive,
so always run this command inside a project folder and not your home folder or
desktop. You can create a new repo in an empty folder or within a project
directory you've already created.
What good is an empty repo? Not much! To add content to your repository, use
git add. You can pass this command a specific filename, a directory, a
"wildcard" to select a series of similarly-named files, or a . to add every
untracked file in the current directory:
# This will add only my_app.js to the repo: > git add my_app.js # This will add all the files within ./objects: > git add objects/ # This will add all the files in the current directory ending in `.js`: > git add *.js # This will add everything in your current directory: > git add .
Adding a file (or files) moves them from Git's working directory to the staging
area. You can see what's been "staged" and what hasn't by using git status:
![image-git-status-output][image-git-status-output]
In this example, "Changes to be committed" is your staging area and "Changes not
staged for commit" is your working directory. Notice that you also have
"Untracked files", Git's way of reminding us that you may have forgotten to git add a
file to your repo. Most Git commands will include a bit of help text in
the output, so always read the messages carefully before moving forward. Thanks,
Git!
Once you're happy with your files and have staged them, you'll use git commit
to push them into the commit history. It's significantly more work to make
changes after a commit, so be sure your files are staged and exactly as you'd
like them before running this command. Your default text editor will pop up, and
you'll be asked to enter a commit message for this group of changes.
Heads Up: You may find yourself in an unfamiliar place! The default text
editor for MacOS (and many variants of Linux) is called Vim. Vim is a
terminal-based text editor you'll discuss in the near future. It's visually bare
and may just look like terminal text to you! If this happens, don't worry - just
type :q and press your "return" key to exit.
You'll want to ensure that future commit messages open in a more familiar
editor. You can run the following commands in your terminal to ensure that
Visual Studio Code is your git commit editor from now on:
> git config --global core.editor "code --wait" > git config --global -e
If you experience any issues, you may be missing Visual Studio Code's command
line tools. You can find more details and some troubleshooting tips on
Microsoft's official [VS Code and macOS documentation].
Once you close your editor, the commit will be added to your repository's commit
history. Use git log to see this history at any time. This command will show
all the commits in your repository's history, beginning with the most recent:
![image-git-log-output][image-git-log-output]
Like many Git commands, git commit includes some helpful shorthand. If you
need a rather short commit message, you can use the -m flag to include the
message inline. Here's an example:
> git commit -m "Fix typo"
This will commit your changes with the message "Fix typo" and avoid opening your
default text editor. Remember the commit messages are how you make your
project's history friendly to humans, so don't use the -m flag as an excuse to
write lame commit messages! A commit message should always explain why changes
were made in clear, concise language. It is also best practice to use imperative
voice in commit messages (i.e. use "Fix typo" instead of "Fixing the typo" or
"Typo was fixed").
182.3. Branches and workflow
You've seen what a project looks like with a linear commit history, but that's
just scratching the surface of Git's utility. Let's explore a new realm with
branches. A branch is a separate timeline in Git, reserved for its own
changes. You'll use branches to make your own changes independently of others.
These branches can then be merged back into the main branch at a later time.
Let's consider a common scenario: a school project. It's a lot of extra hassle
to schedule time together and argue over exactly what should be done next!
Instead, group members will often assign tasks amongst themselves, work
independently on their tasks, and reunite to bring it all together as a final
report. Git branches let us emulate this workflow for code: you can make a copy
of what's been done so far, complete a task on your new branch, and merge that
branch back into the shared repository for others to use.
By default, Git repos begin on the master branch. To create a new branch, use
git branch <name-of-your-branch>. This will create a named reference to your
current commit and let you add commits without affecting the master branch.
Here's what a branch looks like:
![image-git-branch][image-git-branch]
Notice how your refs help to identify branches here: master stays to itself
and can have changes added to it independently of your new branch (footer).
HEAD, Git's special ref, follows us around, so you know that in the above
diagram you're working on the footer branch.
You can create a new branch or visit an existing branch in your repository. This
is especially helpful for returning the master branch or for projects you've
received from teammates. To open an existing branch, use git checkout <name-of-branch>.
182.4. Bringing it back together
Once you're happy with the code in the branch you've been working on, you'll
likely want to integrate the code into the master branch. You can do this via
git merge. Merging will bring the changes in from another branch and integrate
them into yours. Here's an example workflow:
> git branch my-changes > git add new-file.js > git commit -m "Add new file" > git checkout master > git merge my-changes
Following these steps will integrate the commit from my-changes over to
master. Boom! Now you have your new-file.js on your default branch.
As you can imagine, branching can get very complicated. Your repository's
history may look more like a shrub than a beautiful tree! You'll discuss
advanced merging and other options in an upcoming lesson.
183. Connecting with the world via GitHub
Git can act as a great history tool and source code backup for your local
projects, but it can also help you work with a team! Git is classified as a
"DVCS", or "Distributed Version Control System". This means it has built-in
support for managing code both locally and from a distant source.
You can refer to a repository source that's not local as a remote. Your Git
repository can have any number of remotes, but you'll usually only have one. By
default you'll refer to the primary remote of a repo as the origin.
You can add a remote to an existing repository on your computer, or you can
retrieve a repository from a remote source. You can refer to this as cloning
the repo. Once you have a repository with a remote, you can update your local
code from the remote by pulling code down, and you can push up your own code
so others have access to it.
183.1. Collaboration via Git and GitHub
While a remote Git server can be run anywhere, there are a few places online
that have become industry standards for hosting remote Git repositories. The
best-known and most widely-used Git source is a website called [GitHub]. As the
name suggests, GitHub is a global hub for Git repositories. It's free to make a
Github account, and you'll find literally millions of public repositories you
can browse.
GitHub takes a lot of work out of managing remote Git repositories. Instead of
having to manage your own server, GitHub provides managed hosting and even
includes some helpful graphical tools for complicated tasks like deployment,
branch merging, and code review.
Let's look at a typical workflow using Git and GitHub. Imagine it's your first
day on the job. How do you get access to your team's codebase? By cloning the
repository!
> git clone https://github.com/your-team/your-codebase.git
Using the git clone command will create a new folder in your current directory
named after the repo you're cloning (in this case, your-codebase). Inside that
folder will be a git repository of your very own, containing the repo's entire
commit history. Now you're ready to get started.
You'll likely start on the master branch, but remember that this is the
default branch and it's unlikely you want to make changes to it. Since you're
working on a team now, it's important to think of how your changes to the
repository might affect others. The safest way to make changes is to create a
new branch, make your changes there, and then push your branch up to the remote
repository for review. You'll use the git push command to do this. Let's look
at an example:
> git branch add-my-new-file > git add my-new-file.js > git commit -m "Add new file" > git push -u origin add-my-new-file
Notice how you used the -u flag with git push. This flag, shorthand for
--set-upstream, lets Git know that you want your local branch to follow a
remote branch. You've passed the same name in, so you'll now have two branches
in your local repository: add-my-new-file, which is where your changes live
after being committed, and origin/add-my-new-file, which keeps up with your
remote branch and updates it after you use git push. You only need to use the
-u flag the first time you push each new branch - Git will know what to do
with a simple git push from then on.
You now know how to push your changes up, but what about getting the changes
your teammates have made? For this, you'll use git pull. Pulling from the
remote repo will update all of your local branches with the code from each
branch's remote counterpart. Behind the scenes, Git is running two separate
commands: git fetch and git merge. Fetching retrieves the repository code
and updates any remote tracking branches in your local repo, and merge does just
you've already explored: integrates changes into the local branches. Here's a
graphic to explain this a little better:
![image-git-pull-parts][image-git-pull-parts]
It's important to remember to use git pull often. A dynamic team may commit
and push code many times during the day, and it's easy to fall behind. The more
often you pull, the more certain you can be that your own code is based on the
"latest and greatest".
183.2. Merging your code on GitHub
If you're paying close attention, you may have noticed that there's a missing
step in your workflows so far: how do you get your code merged into your default
branch? This is done by a process called a Pull Request.
A pull request (or "PR") is a feature specific to GitHub, not a feature of Git.
It's a safety net to prevent bugs, and it's a critical part of the collaboration
workflow. Here's a high-level of overview of how it works:
- You push your code up to GitHub in its own branch.
- You open a pull request against a base branch.
- GitHub creates a comparison page just for your code, detailing the changes
you've made. - Other members of the team can review your code for errors.
- You make changes to your branch based on feedback and push the new commits up.
- The PR automatically updates with your changes.
- Once everyone is satisfied, a repo maintainer on GitHub can merge your branch.
- Huzzah! Your code is in the main branch and ready for everyone else to
git pull.
You'll create and manage your pull requests via GitHub's web portal, instead of
the command line. You'll walk through the process of creating, reviewing, and
merging a pull request in an upcoming project.
184. What you've learned
This lesson included lots of new lingo and two new tools you can take advantage
of immediately: Git and GitHub.
- You should feel comfortable exploring both of these more on your own.
- You should understand that a VCS is a critical part of your development
workflow. - You able to get started tracking your own projects and sharing code across a
team.
If it's still a little hazy, never fear! Git will be a core part of your
projects going forward. You'll get lots of practicepulling,pushing, and
clone-ing in the coming months.
[GitHub]: https://github.com
[VS Code and macOS documentation]:
https://code.visualstudio.com/docs/setup/mac#_launching-from-the-command-line
[image-git-timeline]:
https://appacademy-open-assets.s3-us-west-1.amazonaws.com/Module-JavaScript/git/assets/image-git-timeline.svg
[image-git-status-output]:
https://appacademy-open-assets.s3-us-west-1.amazonaws.com/Module-JavaScript/git/assets/image-git-status-output.svg
[image-git-log-output]:
https://appacademy-open-assets.s3-us-west-1.amazonaws.com/Module-JavaScript/git/assets/image-git-log-output.svg
[image-git-branch]:
https://appacademy-open-assets.s3-us-west-1.amazonaws.com/Module-JavaScript/git/assets/image-git-branch.svg
[image-git-pull-parts]:
https://appacademy-open-assets.s3-us-west-1.amazonaws.com/Module-JavaScript/git/assets/image-git-pull-parts.svg
Browsing Your Git Repository
Repositories can feel intimidating at first, but it won't take you long to
navigate code like you own the place - because you do! Let's discuss a few tools
native to Git that help us browse our changes over time.
We'll be covering:
- Comparing changes with
git diff - Browsing through our code "checkpoints" with
git checkout
185. Seeing changes in real time
Git is all about change tracking, so it makes sense that it would include a
utility for visualizing a set of changes. We refer to a list of differences
between two files (or the same file over time) as a diff, and we can use
git diff to visualize diffs in our repo!
When run with no extra options, git diff will return any tracked changes in
our working directory since the last commit. Tracked is a key word here;
git diff won't show us changes to files that haven't been included in our repo
via git add. This is helpful for seeing what you've changed before committing!
Here's an example of a small change:
![git-diff][git-diff]
Let's break down some of the new syntax in this output.
- The diff opens with some Git-specific data, including the branch/files we're
checking, and some unique hashes that Git uses to track each diff. You can
skip past this to get to the important bits. ---&+++let us know that there are both additions and subtractions in
the file "App.js". A diff doesn't have a concept of inline changes - it treats
a single change as removing something old and replacing it with something new.@@lets us know that we're starting a single "chunk" of the diff. A diff
could have multiple chunks for a single file (for example: if you made changes
far apart, like the header & footer). The numbers in between tell us how many
lines we're seeing and where they start. For example:@@ +1,3 -1,3 @@means
we'll see three lines of significant content, including both addition &
removal, beginning at line one.- In the code itself, lines that were removed are prefixed with a
-and lines
that were added are prefixed with a+. Remember that you won't see these on
the same lines. Even if you only changed a few words, Git will still treat it
like the whole line was replaced.
[git-diff]:
https://appacademy-open-assets.s3-us-west-1.amazonaws.com/Module-JavaScript/git/assets/image-git-diff-output.svg
185.1. Diff options
Remember that, by default, git diff compares the current working directory to
the last commit. You can compare the staging area instead of the working
directory with git diff --staged. This is another great way to double-check
your work before pushing up to a remote branch.
You're also not limited to your current branch - or even your current commit!
You can pass a base & target branch to compare, and you can use some special
characters to help you browse faster! Here are a few examples:
# See differences between the 'feature' # branch and the 'master' branch. > git diff master feature # Compare two different commits > git diff 1fc345a 2e3dff # Compare a specific file across separate commits > git diff 1fc345a 2e3dff my-file.js
186. Time travel
git diff gives us the opportunity to explore our code's current state, but
what if we wanted to see its state at a different point in time? We can use
checkout! git checkout lets us take control of our HEAD to bounce around
our timeline as we please.
Remember that HEAD is a special Git reference that usually follows the latest
commit on our current branch. We can use git checkout to point our HEAD
reference at a different commit, letting us travel to any commit in our
repository's history. By reading the commit message and exploring the code at
the time of the commit, we can see not only what changed but also why it
changed! This can be great for debugging a problem or understanding how an app
evolved.
Let's look at a diagram to understand what checkout does a little better:
![checkout][img-checkout]
Notice that we haven't lost any commits, commit messages, or code changes. Using
git checkout is entirely non-destructive.
To browse to a different commit, simply pass in a reference or hash for the
commit you'd like to explore. git checkout also supports a few special
characters & reserved references:
# You can checkout a branch name. # You'll be using this particular branch a lot! > git checkout master # You can also use commit hashes directly > git checkout 7d3e2f1 # Using a hyphen instead of a hash will take # you to the last branch you checked out > git checkout - # You can use "HEAD~N" to move N commits prior # to the current HEAD > git checkout HEAD~3
Once you're done browsing the repo's history, you can use
git checkout <your-branch-name> to move HEAD back to the front of the line
(your most recent commit). For example, in our diagram above, we could use
git checkout master to take our HEAD reference back to commit 42ffa1.
[img-checkout]:
https://appacademy-open-assets.s3-us-west-1.amazonaws.com/Module-JavaScript/git/assets/image-git-checkout.svg
186.1. Why checkout?
Most of Git's power comes from a simple ability: viewing commits in the past and
understanding how they connect. This is why mastering the git checkout command
is so important: it lets you think more like Git and gives you full freedom of
navigation without risking damage to the repo's contents.
That said, you'll likely use shortcuts like git checkout - far more often than
specifically checking out commit hashes. Especially with the advent of
user-friendly tools like GitHub, it's much easier to visualize changes outside
the command line. We'll demonstrate browsing commit histories on GitHub in a
future lesson.
187. What we've learned
We're building our skill set for navigating code efficiently, and we're starting
to got more accustomed to seeing our projects as a series of checkpoints we can
review instead of a single point in time.
- You should be able to compare code changes between commits or files.
- You should have confidence when switching between branches or commits.
- You should understand the role of
git checkoutas fundamental to how Git
organizes our projects.
Git Do-Overs: Reset & Rebase
Git is designed to protect you - not only from others, but also from yourself!
Of course, there are times where you'd like to exercise your own judgement, even
if it may not be the best thing to do. For this, Git provides some helpful tools
to change commits and "time travel".
Before we talk about these, a warning: The commands in this lesson are
destructive! If used improperly, you could lose work, damage a teammate's
branch, or even rewrite the history of your entire project. You should exercise
caution when using these on production code, and don't hesitate to ask for help
if you're unsure what a command might do.
After this lesson, you should:
- Be able to roll back changes to particular commit.
- Have an understanding of how rebasing affects your commit history.
- Know when to rebase/reset and when not to.
188. Resetting the past
Remember how our commits form a timeline? We can see the state of our project at
any point using git checkout. What if we want to travel back in time to a
point before we caused a new bug or chose a terrible font? git reset is the
answer!
Resetting involves moving our HEAD ref back to a different commit. No matter
how we reset, HEAD will move with us. Unlike git checkout, this will also
destroy intermediate commits. We can use some additional flags to determine how
our code changes are handled.
189. Starting small: Soft resets
The least-dangerous reset of all is git reset --soft. A soft reset will move
our HEAD ref to the commit we've specified, and will leave any intermediate
changes in the staging area. This means you won't lose any code, though you will
lose commit messages.
A practical example of when a soft reset would be handy is joining some small
commits into a larger one. We'll pretend we've been struggling with "their",
"there", and "they're" in our app. Here's our commit history:
![reset-soft-history-before][reset-soft-history-before]
Those commit messages aren't great: they're not very explanatory, and they don't
provide a lot of value in our commit history. We'll fix them with a soft reset:
git reset --soft 9c5e2fc
This moves our HEAD ref back to our first commit. Looking at our commit log
now, we might be worried we've lost our changes:
![image-git-reset-soft-history-during][image-git-reset-soft-history-during]
However, check out git status:
![image-git-reset-status-after-soft][image-git-reset-status-after-soft]
You'll see that our changes are still present in the staging area, ready to be
re-committed when we're ready! We can use git commit to re-apply those changes
to our commit history with a new, more helpful message instead:
![image-git-reset-soft-history-after][image-git-reset-soft-history-after]
Notice that the new commit has a totally new hash. The old commit messages (and
their associated hashes) have been lost, but our code changes are safe and
sound!
[reset-soft-history-before]:
https://appacademy-open-assets.s3-us-west-1.amazonaws.com/Module-JavaScript/git/assets/image-git-reset-soft-history-before.svg
[image-git-reset-soft-history-during]:
https://appacademy-open-assets.s3-us-west-1.amazonaws.com/Module-JavaScript/git/assets/image-git-reset-soft-history-during.svg
[image-git-reset-status-after-soft]:
https://appacademy-open-assets.s3-us-west-1.amazonaws.com/Module-JavaScript/git/assets/image-git-reset-status-after-soft.svg
[image-git-reset-soft-history-after]:
https://appacademy-open-assets.s3-us-west-1.amazonaws.com/Module-JavaScript/git/assets/image-git-reset-soft-history-after.svg
190. Getting riskier: Mixed resets
If soft resets are the safest form of git reset, mixed resets are the most
average! This is exactly why they're the default: running git reset without
adding a flag is the same as running git reset --mixed.
In a mixed reset, your changes are preserved, but they're moved from the commit
history directly to the working directory. This means you'll have to use
git add to choose everything you want in future commits.
Mixed resets are a good option when you want to alter a change in a previous
commit. Let's use a mixed reset with our "their", "there", "they're"
example
again.
We'll start with "they're":
![image-git-reset-mixed-history-before][image-git-reset-mixed-history-before]
Instead of pushing ahead, we'd like to revoke that change and try it again.
Let's use a mixed reset:
git reset 9c5e2fc
Now you'll see that your changes are in the working directory instead of the
staging area:
![image-git-reset-status-after-mixed][image-git-reset-status-after-mixed]
You can edit your files, make the changes you'd like, and use git add and
git commit to add a new commit to your repo:
![image-git-reset-mixed-history-after][image-git-reset-mixed-history-after]
Notice again that you don't lose your code with a mixed reset, but you do lose
your commit messages & hashes. The difference between --soft and --mixed
comes down to whether you'll be keeping the code exactly the same before
re-committing it or making changes.
[image-git-reset-mixed-history-before]:
https://appacademy-open-assets.s3-us-west-1.amazonaws.com/Module-JavaScript/git/assets/image-git-reset-mixed-history-before.svg
[image-git-reset-status-after-mixed]:
https://appacademy-open-assets.s3-us-west-1.amazonaws.com/Module-JavaScript/git/assets/image-git-reset-status-after-mixed.svg
[image-git-reset-mixed-history-after]:
https://appacademy-open-assets.s3-us-west-1.amazonaws.com/Module-JavaScript/git/assets/image-git-reset-mixed-history-after.svg
191. Red alert! Hard resets
Hard resets are the most dangerous type of reset in Git. Hard resets adjust your
HEAD ref and totally destroy any interim code changes. Poof. Gone forever.
There are very few good uses for a hard reset, but one is to get yourself out of
a tight spot. Let's say you've made a few changes to your repository but you now
realize those changes were unnecessary. You'd like to move back in time so that
your code looks exactly as it did before any changes were made.
git reset --hard can take you there.
It's our last round with "their", "there", and "they're". We've tried
it all
three ways and decided we don't need to use that word at all! Let's walk through
a hard reset to get rid of our changes.
We'll start in the same place we began for our soft reset:
![image-git-reset-soft-history-before][image-git-reset-soft-history-before]
It turns out that we'll be using a video on our homepage and don't need text at
all! Let's step back in time:
git reset --hard 9c5e2fc
Our Git log output is much simpler now:
![image-git-reset-soft-history-during][image-git-reset-soft-history-during]
Take a look at git status:
![image-git-reset-status-before-after][image-git-reset-status-before-after]
It's empty - no changes in your working directory and no changes in your staging
area. This is major difference between a hard reset and a soft/mixed reset: you
will lose all your changes back to the commit you've reset to.
If your teammate came rushing in to tell you that the boss has changed their
mind and wants that homepage text after all, you're going to be re-doing all
that work! Be very confident that the changes you're losing are unimportant
before embarking on a hard reset.
[image-git-reset-soft-history-before]:
https://appacademy-open-assets.s3-us-west-1.amazonaws.com/Module-JavaScript/git/assets/image-git-reset-soft-history-before.svg
[image-git-reset-soft-history-during]:
https://appacademy-open-assets.s3-us-west-1.amazonaws.com/Module-JavaScript/git/assets/image-git-reset-soft-history-during.svg
[image-git-reset-status-before-after]:
https://appacademy-open-assets.s3-us-west-1.amazonaws.com/Module-JavaScript/git/assets/image-git-reset-status-before-after.svg
192. Rebase: An alternative form of time travel
Sometimes we want to change more than a few commits on a linear timeline. What
if we want to move multiple commits across branches? git rebase is the tool
for us!
Rebasing involves changing your current branch's base branch. We might do this
if we accidentally started our branch from the wrong commit or if we'd like to
incorporate changes from another branch into our own.
You're probably thinking "Gee, this sounds familiar! Can't we accomplish those
tasks with git merge?" In almost all cases, you'd be right. Rebasing is a
dangerous process that effectively rewrites history. There's a whole slew of
movies, books, and TV shows that explain why rewriting history is a bad idea!
193. Okay, rebasing is risky! Show me anyway.
Let's look at a situation where we might be tempted to rebase. We've added a
couple commits to a feature branch while other team members have been merging
their code into the master branch. Once we're ready to merge our own branch,
we probably want to follow a tried-and-true procedure:
> git pull origin master
This will fetch our remote master branch and merge its changes into our own
feature branch, so it's safe to pull request or git push. However, every time
we do that, a merge commit will be created! This can make a big mess of our Git
commit history, especially if lots of people are making small changes.
We can use git rebase to move our changes silently onto the latest version of
master. Here's what the git log history of our two example branches looks
like:
193.1. master
![image-git-rebase-master-before][image-git-rebase-master-before]
[image-git-rebase-master-before]:
https://appacademy-open-assets.s3-us-west-1.amazonaws.com/Module-JavaScript/git/assets/image-git-rebase-master-before.svg
193.2. working-on-the-header (our feature branch)
![image-git-rebase-feature-before][image-git-rebase-feature-before]
Notice that both branches start at 9c5e2fc. That's our common ancestor commit,
and is where git merge would start stitching these branches together! We're
going to avoid that entirely with a rebase. We'll run this command while we have
working-on-the-header checked out:
git rebase master
Here's our new commit history:
![image-git-rebase-after][image-git-rebase-after]
And a diagram of what just happened:
![image-git-rebase-before-and-after][image-git-rebase-before-and-after]
See how we changed the color of our commits after the rebase? Take a close look
at the commit history changes as well. Even though our commits have the same
content, they have a new hash assigned, meaning they're entirely new commits!
This is what we mean by "rewriting history": we've actually changed how Git
refers to these changes now.
[image-git-rebase-feature-before]:
https://appacademy-open-assets.s3-us-west-1.amazonaws.com/Module-JavaScript/git/assets/image-git-rebase-feature-before.svg
[image-git-rebase-after]:
https://appacademy-open-assets.s3-us-west-1.amazonaws.com/Module-JavaScript/git/assets/image-git-rebase-after.svg
[image-git-rebase-before-and-after]:
https://appacademy-open-assets.s3-us-west-1.amazonaws.com/Module-JavaScript/git/assets/image-git-rebase-before-and-after.svg
194. One last warning & the "Golden Rule of Git"
These tools can all feel pretty nifty, but be very wary of using them too much!
While they can augment your Git skills from good to great, they can also have
catastrophic side effects.
There's a "Golden Rule of Git" you should know that directly relates to both
git reset and git rebase:
Never change the history of a branch that's shared with others.
That's it! It's simple and to the point. If you're resetting or rebasing your
own code and you make a mistake, your worst case scenario is losing your own
changes. However, if you start changing the history of code that others have
contributed or are relying on, your accidental loss could affect many others!
195. What we've learned
What a wild trip we've been on! Watching commits come and go as we git reset
and get rebase can get a little confusing. Remember that while these tools are
unlikely to be part of your everyday workflow, they're great topics for
technical interviews. You should:
- Understand how
git resetdiffers fromgit checkout. - Be able to list the 3 types of
git resetand differentiate them. - Be comfortable comparing and contrasting
git rebaseandgit merge. - Remember the "Golden Rule of Git": never rewrite history after a
git push!
Git Merge Conflicts & You
Welcome to the arena! Let's discuss what you'll need to do when attempting to
merge two conflicting Git branches. You'll get to make the final say in which
code enters...and which code leaves!
In this lesson, we'll discuss:
- The
git mergeprocess in-depth - Managing conflicting code across branches
- Common workflows to help know how & when to merge
196. What is a "merge conflict"?
Whoa there - maybe we dove in a little too fast. Let's discuss what a merge
conflict is and how we can resolve it.
First off, what is a merge conflict? It's a special state Git presents us with
when two branches have code changes that are incompatible with each other.
Here's a very simple example:
- You're working on a team trying to design a new app. You're working on the Git
branchmy-red-app, because you've decided that the app's primary color
should be red! You add the following code to line 3 of your app's main file,
App.js:
this.primaryColor = red;
- At the same time, one of your teammates has opened the
my-blue-appbranch
with an alternative decision on your app's aesthetics. They add the following
code to line of 3 of theirApp.jsfile:
this.primaryColor = blue;
- Your friend types a little faster than you and has already merged their code
into themasterbranch. You get ready to merge your own code and...Merge
Conflict!
Git identifies changes tomastersince your branch began and flags similar
changes in the same place on your branch. Instead of trying to make a decision
on your behalf, it hands you control. A merge conflict is Git's way of saying
"I'm not sure what to do - help!".
Here's what a merge conflict looks like between branches:
![mrg-conflict][mrg-conflict]
Yikes! Remember that this looks awfully complicated, but the theory is pretty
simple. In the workplace you'll need to resolve much more complicated conflicts
than this so now's the time to get your practice in.
[mrg-conflict]:
https://appacademy-open-assets.s3-us-west-1.amazonaws.com/Module-JavaScript/git/assets/image-git-merge-conflict.svg
197. Resolving a merge conflict
Git is a complex tool, but it's built to help guide us as much as it can. Merge
conflicts are no different. You will find that resolving them is easy once you
know what you're looking at.
We'll stick with our "Red vs. Blue" example from above. When you attempt to
git merge, you'll get a message like the following:
![mrg-conflict-msg][mrg-conflict-msg]
Git is so helpful - it's telling us where to look and what to do! Following
the instructions here, we'll look at App.js, resolve the conflict, and
git commit with our resolved file(s).
For even more info, check out git status during a merge conflict:
![mrg-conflict-status][mrg-conflict-status]
Notice the both modified prefix, reminding us that we have a conflict. "Both"
refers to our two branches, my-red-app and master, which each include
changes to the conflicting file. It's up to us to decide what code the file
should contain when we complete the merge.
[mrg-conflict-msg]:
https://appacademy-open-assets.s3-us-west-1.amazonaws.com/Module-JavaScript/git/assets/image-git-merge-conflict-message.svg
[mrg-conflict-status]:
https://appacademy-open-assets.s3-us-west-1.amazonaws.com/Module-JavaScript/git/assets/image-git-merge-conflict-status-output.svg
198. Conflict Resolution
If we open the conflicting file, we'll see some new syntax:
![conflict-operators][conflict-operators]
Notice the <<<<<< (line 3), ====== (line 5), and
>>>>>> (line 7). These
are special delimiters that Git uses to separate two pieces of conflicting code.
The first piece of code (between <<<<<< and ======) comes from our
base
branch - the branch we're merging in to, which we're currently on. We can see
it's labelled "HEAD", and VS Code is helping us out by noting that this is the
"Current Change".
The second piece of code (between ====== and >>>>>>) comes from
our
incoming branch. VS Code is again helping us out by labelling this as the
"Incoming Change".
To resolve this conflict, we need to decide which code to keep and which to get
rid of. This is where your communication skills become important! During a merge
conflict, you'll need to check in with teammates to decide what's best. Once
you've come to a decision, you can edit the file, leaving only the code you want
in the base branch when the conflict is over. If we decided to keep "red" in our
example, we would delete lines 3, 4, 5, and 7.
You can do this manually in other editors, but VS Code helps us by providing the
"Accept" buttons above our conflict. You can click "Accept Incoming Changes" to
automatically update the code for us. It will remove the "Current Changes" and
any delimiters related to this conflict, leaving only the "Incoming Changes" we
chose to keep.
[conflict-operators]:
https://appacademy-open-assets.s3-us-west-1.amazonaws.com/Module-JavaScript/git/assets/image-git-merge-conflict-inline-operators.svg
199. Back on solid ground
Once you've saved your resolved file, the process is more familiar. You'll save
your file, use git add to add it to the staging area, and git commit to
complete the merge. Git will help you out with the commit message: it should say
something like "Merge branch 'my-red-branch'", though you can change this during
the commit process if you'd like.
There are a few important things to note:
- Not every merge results in a conflict, and not every change between two
branches requires resolution! Git is smart about bringing code together when
it's in separate files or on different lines, so it won't need your help to
resolve every single change. It's only when two pieces of code actually
conflict that Git will ask you to get involved. git mergeis the safest way to ensure your code is up to date. We've looked
at merging a "finished" branch back intomasterhere, but you can also merge
masterinto your feature branch while you're working on it! While this may
cause conflicts, you're well-equipped to handle them now.- Merge conflicts will always result in a merge commit: an extra commit in
your history documenting where code was merged in from other sources. We'll
discuss more dangerous ways of merging in code without these commits in an
upcoming lesson.
200. What we've learned
Whew! We've emerged victorious from our merge conflict and can start work on a
new branch or feature. Merge conflicts are a nearly daily part of life as a
developer.
- You should now be able to identify the difference between a base branch and
incoming branch. - You should understand how
git mergeworks and what it does when it's unable
to proceed automatically. - You're now familiar with resolving merge conflicts, both with VS Code's
helpers and when in another editor by manually editing code.
"Scrum" Stands For ... Nothing!
The word "scrum" is not an acronym. Rather, it is a term borrowed from the sport
of rugby where it refers to the method of restarting a game after an accidental
infringement, or when the ball has gone out of play. The players of the two
teams group together around the rugby ball, arms locked, heads down, struggling
to gain possession of the ball. An article in the Harvard Business Review used
this sports-based phenomenon as a metaphor for product development in the 1986
article "The New New Product Development Game".
The ... "relay race" approach to product development ... may conflict with the
goals of maximum speed and flexibility. Instead a holistic or “rugby”
approach—where a team tries to go the distance as a unit, passing the ball
back and forth—may better serve today’s competitive requirements.
This article inspired Jeff Sutherland to invent the "Scrum process" in 1993 for
use on a software development team. at Easel Corporation. Two years later, Ken
Schwaber published the first paper on Scrum at OOPSLA. From that conference,
others tried the methodology as Sutherland and Schwaber wrote books, articles,
and presented at conferences about their novel approach to creating software.
In this reading, you will learn about all of the different practices and
artifacts in the standard Scrum framework.
201. The standard Scrum process
Surprise! There is no standardized process! There is no series of sequential
steps for you and your team to methodically follow to produce high-quality
products. Instead, Scrum is a framework for organizing and managing work. It
is a framework based on a set of values, practices, and principles that provide
a foundation to which your team can add its unique practices and specific
approaches for realizing "Scrum". This results in a version of Scrum that
uniquely fits your team.
This is the reason that Scrum has become the leading contender in the pantheon
of certified Agile software development methodologies. Most of the other
methodologies have sets of strict rules about what must be done and actions that
people must take. These restrictions made those other Agile software development
methodologies unpalatable to many companies.
Of course, the flip side is that an organization's "unique practices and special
approaches" can pollute the Scrum process, turing it into an aberration and
rendering it a useless and frustrating morass of bureaucracy and bookkeeping.
So, best to keep it as pure and simple as the Scrum framework describes.
202. The Scrum practices
Scrum has been described as a "refreshingly simple, people-centric framework
based on the values of honesty, openness, courage, respect, focus, trust,
empowerment, and collaboration." These value manifest themselves in four
dimensions in Scrum:
- the roles of the people that participate in Scrum;
- the activities in which a team using Scrum will participate;
- the artifacts created to manage the process; and,
- the rules that bind the interactions of the roles, activiites, and artifacts.
203. Scrum roles
When you work on a team using Scrum, the people on that team take on a role in
the Scrum process. The three roles are product owner, Scrum master, and
a member of the development team. It is best when no one person fills more
than one role. (Of course, many companies say, "We can customize Scrum to meet
our own special way of doing things, and our special way of doing things is to
be cheap and not spend money on humans to actually help out with product
development!") The product owner shoulders the responsibility for what will be
developed and the order in which the features of the software will be
implemented. The Scrum master gets to guide the team in creating and following
its own Scrum-based process. The members of the development team determine how
to deliver the features asked for by the product owner.
So, where is "manager" or "team lead"? Where is "Vice President" and "CEO?
You
should note that product owner, Scrum master, and being a member of the
development team are roles and not titles. Anyone can fit into those roles
as long as they live up to the expectations set by that role.
203.1. The product owner
The product owner provides the leadership needed to define the product. That
person has the singlular authority to decide which features and functionality to
build and in which order to build them. The product owner must have a clear
vision of what the product the Scrum team is trying to build. Because this
person must define and communicate that vision, the product owner is responsible
for the overall success of the software (or other product) in development or
maintenance.
It doesn't matter if the focus for the software being built is something to be
sold to consumers (B2C software), sold to other businesses (B2B software), or
used solely within the company (internal software). The product owner has the
obligation to make sure the team performs the most valuable work possible. To
ensure that the team rapidly builds what the product owner wants, the product
owner actively collaborates with the Scrum master and development team. The
product owner must avail themselves for questions from the development team that
could arise at any time.
203.2. The Scrum master
The Scrum master helps everyone understand and embrace the Scrum values and
principles, the practices and procedures. The Scrum master provides process
leadership. The Scrum master helps the Scrum team and the rest of the company
develop their own organization-specific, high-performance adaptation of Scrum.
As a facilitator of Scrum, the Scrum master helps the team continuously improve
it use of Scrum, allowing the team to focus on its product development
priorities. Preventing the team from getting distracted by outside interference
and by removing roadblocks that inhibit the team's productivity, the Scrum
master plays the pivotal role of the facilitator of team focus.
It is extremely important to note that the Scrum master is not a project
manager or development manager. The Scrum master has no formal authority to
control what a team does. Instead, the Scrum master acts as a leader, not a
manager.
203.3. The development team
You may have heard of different types of people that fit into the software
development process: QA tester, database administrator, user interface designer,
user experience engineer, programmer, architect, and more. Scrum eschews any of
those and provides only the single term of "development team" to encapsulate and
acknowledge the diverse group of people that it takes to make any non-trivial
software product.
The development team organizes itself around the principles of Scrum to
determine the best way to practice Scrum. A development team typically ranges in
size from five to ten people. Together, the members of the team have the
necessary skills to produce well-designed and well-tested software. Some very
large companies practice Scrum; instead of having their hundreds of software
developers all on a single huge Scrum team, they will normally create groups of
five to ten people to make up small Scrum teams all working on parts of a larger
product.
204. Scrum activities. Scrum artifacts.
The activities that make up the performances of the different roles of a Scrum
team are simple to list. They are a cycle that gets performed over and over
again.
- The product owner has a vision of what needs to be created.
- The product owner takes that vision and breaks it down into a list of
features yet to be implemented called the backlog. - The product owner manages the backlog through a process called grooming
which leaves the list in a prioritized order. - The development process begins with an activity named sprint planning
which culminates in the team forecasting how many features they will be able
to complete within a predetermined amount of time. - Once planning ends, the Scrum team attempts to complete the features that
that they forecasted they could complete. Each day during sprint execution,
the team members help coordinate their work through am inspection,
synchronization, and adaptive planning activity known as the daily scrum.
(Notice the lowercase "s" in "daily scrum".) - The team completes the Sprint by performing two more inspection and
adaptation activities: the show and tell and the sprint
retrospective. The outcome of these activities can alter the way the team
decides to complete their work in the future.
The time that it takes to perform steps 4, 5, and 6 is the predetermined amount
of time called a sprint. A sprint normally lasts from one week to one month
depending on how the team has implemented Scrum.
204.1. The product backlog
All Agile software development methodologies try to do the most valuable or the
most complex work first. The product owner, with input from the rest of the
Scrum team (and bosses), determines and manages this sequnce of work by
communicating it to the Scrum master and development team through the
prioritized list known as the product backlog. When creating new products,
usually the product owner fills the backlog with features that are required to
meet the vision of the product for it to go to market. For on-going product
development (maintenance mode), the product backlog will usually contain new
features combined with changes to existing features, bugs that need repairing,
fixes to technical debt, and more,
The product owner gathers the priorities of external and internal stakeholders
to define the items in the product backlog. Based on those priorities, the
product owner orders the items in the product backlog so that the high-value
items appear at the top of the product backlog. The product owner grooms the
backlog in that manner as often as necessary to make sure that the highest
priority items are always at the top of the list.
204.2. Sprints
In Scrum, work is performed in iterations or cycles of up to a month called
sprints. The work completed in each sprint should create something of tangible
value for the people that use the software.
Sprints are timeboxed so they always have a fixed start and end date. They
are usually all the same duration. A new sprint immediately follows the
completion of an old sprint. As a rule, the team does do not change the team
members or what they work on during a sprint; however, business needs sometimes
make it impossible to follow that rule.
204.3. Sprint planning
A product backlog may represent many weeks or months of work, which is much more
than can be completed in a single, short sprint. To determine the most important
subset of product backlog items to build in the next sprint, the product owner,
development team, and Scrum master perform sprint planning.
During sprint planning, the product owner and development team agree on a sprint
goal that defines what the upcoming sprint is supposed to achieve. Using this
goal, the development team reviews the product backlog and determines the
high-priority items that the team can realistically accomplish in the upcoming
sprint while working at a sustainable pace. It is important to note that the
team agrees on what it believes to be its own sustainable pace. Some teams can
work longer than others. Some teams have maintenance commitments. Each team has
different demands on it.
To acquire confidence in what it can get done, many development teams break down
each targeted feature into a set of tasks. The collection of these tasks, along
with their associated product backlog items, forms a second backlog called the
sprint backlog.
The development team then provides an estimate (typically in hours) of the
effort required to complete each task. Breaking product backlog items into
tasks is a form of design and just-in-time planning for how to get the features
done.
205. Running the sprint
Once the Scrum team finishes sprint planning and determines the features that it
will complete in the next sprint, the development team, guided by the Scrum
master’s coaching, performs all of the task-level work necessary to get the
features done. “Done” means that the software developers have performed tasks to
ensure the highest quality of software, and that the product owner has approved
each feature's completion.
Nobody tells the development team in what order or how to do the task-level work
in the sprint backlog. Instead, team members define their own task-level work
and then self-organize in any manner they feel is best for achieving the sprint
goal.
205.1. Daily scrum
Each day of the sprint, ideally at the same time, the development team members
hold a short (15 minutes or less) daily scrum. This activity is often
referred to as the daily stand-up because of the common practice of everyone
standing up during the meeting to help promote brevity.
A common approach to performing the daily scrum has each team member taking
turns answering three questions for the benefit of the other team members:
- What did I accomplish yesterday?
- What do I hope to accomplish today?
- What obstacles or impediments prevent me from making progress?
By answering these questions, everyone understands the big picture of what is
occurring, how they are progressing toward the sprint goal, any modifications
they want to make to their plans for the upcoming day’s work, and what issues
need to be addressed. The daily scrum is essential for helping the development
team manage the fast, flexible flow of work within a sprint.
The daily scrum is not a problem-solving activity. Rather, many teams decide
to talk about problems after the daily scrum. They will form small groups of
interested people. The daily scrum also is not a traditional status meeting. A
daily scrum, however, can be useful to communicate the status of sprint backlog
items among the development team members. Mainly, the daily scrum is an
inspection, synchronization, and adaptive daily planning activity that helps a
self-organizing team do its job better.
205.2. Done
In Scrum, the sprint results should be "shippable" software, meaning that
whatever the Scrum team agreed to do is really done according to its agreed-upon
definition of done. This definition specifies the degree of confidence that the
work completed is of good quality and is potentially shippable. For example,
when developing software, a bare-minimum definition of done should yield a
complete slice of product functionality that is designed, built, integrated,
tested, and documented.
A holistic definition of done enables the business to decide each sprint if
it wants to make the software available to its customers, internal or external.
As a practical matter, over time some teams may vary the definition of done. For
example, in the early stages of game development, having features that are
potentially shippable might not be economically feasible or desirable (given
the exploratory nature of early game development). In these situations, an
appropriate definition of done might be a slice of product functionality that is
sufficiently functional and usable to generate feedback that enables the team to
decide what work should be done next or how to do it.
205.3. Show and tell
Show and tell gives the opportunity for everyone on the team to see what has
been created. In the case of many Scrum teams working in concert, this provides
a way for teams to see the work performed by other team. Critical to this
activity is the conversation that takes place among its participants, which
include the Scrum team, stakeholders, sponsors, customers, and interested
members of other teams. The conversation is focused on reviewing the just-com-
pleted features in the context of the overall development effort. Everyone in
attendance gets clear visibility into what is occurring and has an opportunity
to help guide the forthcoming development to ensure that the most
business-appropriate solution is created.
A successful review results in information flowing in both directions. The
people who aren’t on the Scrum team get to sync up on the development effort and
help guide its direction. At the same time, the Scrum team members gain a deeper
appreciation for the business and marketing side of their product by getting
frequent feedback on the growth of the product. The show and tell therefore
represents a scheduled opportunity to inspect and adapt the product.
205.4. Sprint retrospective
The other activity at the end of the sprint is the sprint retrospective. It
frequently occurs after the show and tell and before the next sprint planning.
Whereas the show and tell is a time to inspect and adapt the product, the sprint
retrospective is an opportunity to inspect and adapt the process. During the
sprint retrospective the development team, Scrum master, and product owner come
together to discuss what is and is not working with all of the development
practices. The focus is on the continuous process improvement necessary to help
a good Scrum team become great. At the end of a sprint retrospective the Scrum
team should have identified and committed to a practical number of process
improvement actions, actions that they will enact during the next sprint.
After the sprint retrospective is completed, the whole cycle is repeated again—
starting with the next sprint-planning session, held to determine the current
highest- value set of work for the team to focus on.
206. What you learned
You learned that Scrum is a framework that teams can use to build a sustainable
product-development process. The framework defines
- The product owner as the person that directs the highest priority development
of the product - The Scrum master that helps the team follow its process and be most efficient
- The development team that completes the work that the product owner specifies
- The sprint, some amount of time during which the Scrum process is run
- Sprint planning which provides the road map for what to accomplish during a
sprint - The daily scrum, a meeting that the Scrum team attends to communicate its
activities and blockers - The show and tell which allows a larger group visibility into the products of
the sprint - The retrospective, which allows the team to determine process improvements
- Backlog grooming performed by the product owner to ensure that the backlog of
stories is well ordered and defined
That's the framework of Scrum, the most popular Agile software development
methodology in use today.
Let's Talk About Sprints
Scrum organizes work in iterations or cycles of up to a calendar month called
sprints. This reading provides a more detailed description of a sprint.
It then discusses several key characteristics of sprints
- That they are timeboxed;
- That they have a short and consistent duration
- That they have an unalterable goal; and,
- That they can only conclude using the team’s definition of done.
Although each team or company will have its own unique implementation of Scrum,
these sprint characteristics, with few exceptions, are meant to apply to every
sprint and every team.
207. Put your sprint in a pretty timebox
Sprints are rooted in the concept of timeboxing, a time-management technique
that helps organize the performance of work and manage scope. Each sprint takes
place in a time frame with specific start and end dates, called a timebox.
Inside this timebox, the team is expected to work at a sustainable pace to
complete a chosen set of work that aligns with a sprint goal. Timeboxing is
important for several reasons.
A reason to timebox is to establish work-in-progress (WIP) limits. WIP
represents an inventory of work that is started but not yet finished. Failing to
properly manage it can have serious economic consequences. Because the team will
plan to work on only those items that it believes it can start and finish within
the sprint, timeboxing establishes a WIP limit each sprint.
Timeboxing forces the team to prioritize and perform the small amount of work
that matters most. This sharpens the team's focus on getting something valuable
done quickly.
Timeboxing also helps us demonstrate relevant progress by completing and
validating important pieces of work by a known date (the end of the sprint).
This type of progress reduces risk by shifting the focus away from unreliable
forms of progress reporting, such as conformance to a project plan. Timeboxing
also helps to demonstrate progress against big features that require more than
one timebox to complete. Completing some work toward those features ensures that
valuable, measurable progress is being made each sprint. It also helps the
stakeholders and team learn exactly what remains to be done to deliver the
entire feature.
Timeboxing helps avoid unnecessary perfectionism. At one time or another
people spend too much time trying to get something “perfect” when “good enough”
would suffice. Timeboxing forces an end to potentially unbounded work by
establishing a fixed end date for the sprint by which a good solution must be
done.
Timeboxing also motivates closure. Teams can focus on getting things done when
they have a known end date. The fact that the end of the sprint brings with it a
hard deadline encourages team members to diligently apply themselves to complete
the work on time. Without a known end date, there is less of a sense of urgency
to complete the job.
Timeboxing improves predictability. Although we can’t predict with great
certainty exactly the work we will complete a year from now, it is completely
reasonable to expect that we can predict the work we can complete in the next
short sprint.
208. Take advantage of this short-term deal!
Short-duration sprints make it easier to plan. It is easier to plan a few
weeks’ worth of work than six months’ worth of work. Also, planning on such
short time spans requires far less effort and is far more accurate than
longer-term planning.
Short-duration sprints generate fast feedback. During each sprint, the team
creates working software. Then, they have the opportunity to inspect and adapt
what was built and how they built it. This fast feedback enables the team to
quickly prune unfavorable product paths or development approaches before those
choices can compound a bad decision with many follow-on decisions that are
coupled to the bad decision. Fast feedback also allows us to more quickly
uncover and exploit time-sensitive emergent opportunities.
Short-duration sprints not only improve the economics via fast feedback; they
also allow for early and more frequent deliverables. As a result, the company
can have the opportunity to generate revenue sooner, improving the overall
return on investment.
Short-duration sprints also bound error. How wrong can a team get in a
two-week sprint? Even if the team does everything wrong, the group has lost only
two weeks. Scrum insists on short-duration sprints because they provide frequent
coordination and feedback. That way, if the team gets something wrong, then
they get something wrong in only a small way.
Short-duration sprints also provide multiple, meaningful checkpoints. One
valued aspect of sequential projects is a well-defined set of "milestones".
These milestones provide managers with expectations about what should be
delivered by a certain date. If things don't happen by that date, it allows the
team to decide if the project should continue. Although potentially useful from
a governance perspective, these milestones give an unreliable indication of the
true status of a project.
Scrum provides managers, stakeholders, product owners, and others with many more
checkpoints than they would have with sequential projects. At the end of each
short sprint, there is a meaningful checkpoint (the show and tell) that allows
everyone to base decisions on demonstrable, working features. People are better
able to deal with a complex environment when they have more actionable
checkpoint opportunities to inspect and adapt.
209. The duration remains the same
As a rule, on a given development effort, a team should pick a consistent
duration for its sprints and not change it unless there is a compelling reason.
Compelling reasons might include the following:
- Your team may move from one-month sprints to two-week sprints in order to
obtain more frequent feedback - The annual holidays or end of the fiscal year make it more practical to run
a longer sprint - The product release occurs in one week, so a two-week sprint would be
incongruous
The fact that the team cannot get all the work done within the current sprint
length is not a compelling reason to extend the sprint length. Neither is it
permissible to get to the last day of the sprint, realize you are not going to
be done, and lobby for an extra day or week. These are symptoms of dysfunction
and opportunities for improvement; they are not good reasons to change the
sprint length.
As a rule, therefore, if a team agrees to perform two-week sprints, all sprints
should be two weeks in duration. As a practical matter, most (but not all) teams
will define two weeks to mean ten calendar weekdays. If there is a one-day
holiday or training event during the sprint, it reduces the team’s capacity for
that sprint but doesn’t necessitate a sprint length change.
209.1. The metronome effect
Sprints of the same duration provide the team with cadence, a regular,
predictable rhythm or heartbeat to a Scrum development effort. A steady, healthy
heartbeat allows the Scrum team and the organization to acquire an important
rhythmic familiarity with when things need to happen to achieve the fast,
flexible flow of business value. Having a regular cadence to sprints enables
people to “get into the zone,” “be on a roll,” or “get into a
groove.”
Having a short sprint cadence also tends to level out the intensity of work.
Unlike a traditional sequential project where we see a steep increase in
intensity in the latter phases, each sprint has a similar intensity to that of
the other sprints.
Sprinting on a regular cadence also significantly reduces coordination overhead.
With fixed-length sprints everyone can predictably schedule the sprint-planning,
sprint review, and sprint retrospective activities for many sprints at the same
time. Because everyone knows when the activities will occur, the overhead
required to schedule them for a large batch of sprints is substantially reduced.
As an example, if you work on two-week sprints on a yearlong development effort,
you can send out the recurring event on everyone’s calendar for the next 26
sprint reviews. If you allowed sprint durations to vary from sprint to sprint,
imagine the extra effort you would need to coordinate the schedules of the
stakeholders on what might be just one or two weeks’ notice for an upcoming
sprint review! That assumes that you could even find a time that worked for the
core set of stakeholders, whose schedules are likely filled up many weeks ahead.
210. Keeping your eye on the goal
An important Scrum rule states that once the sprint goal has been established
and sprint execution has begun, no change is permitted that can materially
affect the sprint goal.
Each sprint can be summarized by a sprint goal that describes the business
purpose and value of the sprint. Typically the sprint goal has a clear, single
focus, such as:
- Support customer service with new tooling
- Load and curate new geophysical data
- Integrate a new billing process into the application
There are times when a sprint goal might be multifaceted, for example, “Get
large-screen support working and support search by customer name.”
During sprint planning, the development team should help refine and agree to the
sprint goal and use it to determine the product backlog items that it can
complete by the end of the sprint. These product backlog items serve to further
elaborate the sprint goal.
210.1. We commit to one another
The sprint goal is the foundation of a mutual commitment made by the team and
the product owner. The team commits to meeting the goal by the end of the
sprint, and the product owner commits to not altering the goal during the
sprint.
This mutual commitment demonstrates the importance of sprints in balancing the
needs of the business to be adaptive to change, while allowing the team to
concentrate and efficiently apply its talent to create value during a short,
fixed duration. By defining and adhering to a sprint goal, the Scrum team is
able to stay focused on a well-defined, valuable target.
210.2. Clarifying the goal should not change the goal
Although the sprint goal should not be materially changed, it is permissible to
clarify the goal.
What constitutes a change? A change is any alteration in work or resources that
has the potential to generate meaningful wasted effort, egregiously disrupt the
flow of work, or substantially increase the scope of work within a sprint.
Adding or removing a product backlog item from a sprint or significantly
altering the scope of a product backlog item that is already in the sprint
typically constitutes change. The following example illustrates a change:
Product owner: "Hey! When I said that we need to be able to search the
inventory database by product name or description, I also meant that we should
be able to search for it by a picture of the product!"
Adding the ability to search based on a picture likely represents substantially
more effort and almost certainly would affect the team’s ability to meet a
commitment to deliver search based on a name and description. In this case, the
product owner should consider creating a new product backlog item that captures
the search-by-picture feature. Then, they can add it to the product backlog to
be worked on in a later sprint.
What constitutes a clarification? Clarifications are additional details provided
during the sprint that assist the team in achieving its sprint goal. All of the
details associated with product backlog items might not be fully known or
specified at the start of the sprint. Therefore, it is completely reasonable for
the team to ask clarifying questions during a sprint and for the product owner
to answer those questions. The following example illustrates a clarification:
Development team: "When you said that the matches for a product search should
be displayed ina list, did you have a preference for how the list should be
sorted?Product owner: "Yeah, by product name."
Development team: "Great! We can do that!"
210.3. The weight of change
It may appear that the no-goal-altering-change rule is in direct conflict with
the core Scrum principle that teams should embrace change. Though teams do
embrace change, they want to embrace it in a balanced, economically sensible
way.
The team invests in product backlog items to get them ready to be worked on in a
sprint. However, once a sprint starts, that investment in those product backlog
items has increased (because everyone spent time during sprint planning to
discuss and plan them at a task level). If someone wants to make a change after
sprint planning has occurred, they not only jeopardize the planning investment,
but the team also incur additional costs for having to replan any changes during
the sprint.
In addition, once we begin sprint execution, our investment in work increases
even more as product backlog items transition through the states of to do (work
not yet started), doing (work in process), and done (work completed).
Let’s say the product owner want to swap out feature X, currently part of the
sprint commitment, and substitute feature Y, which isn’t part of the existing
commitment. Even if no one has started working on feature X, the team still
incurs planning waste. In addition, feature X might also have dependencies with
other features in the sprint, so a change that affects feature X could affect
one or more other features, thus amplifying the negative effect on the sprint
goal.
Continuing that analysis, if work on feature X has already begun, in addition to
the wasted work completed, there can be other potential wastes. For example, all
of the work already performed on feature X might have to be thrown away. And the
team might have the additional waste of removing the partially completed work on
feature X, which may never get used in the future.
In addition to the direct economic consequences of waste, the economics can be
indirectly affected by the potential deterioration of team motivation and trust
that can accompany a change to a sprint. When the product owner makes a
commitment to not alter the goal and then violates the commitment, the team
naturally will be demotivated, which will almost certainly affect its desire to
work diligently to complete other prod- uct backlog items. In addition,
violating the commitment can harm the trust within the Scrum team, because the
development team will not trust that the product owner is willing to stick to
his commitments.
210.4. Pragmatism in the face of perfection
The rule to not change a sprint goal is just that: a rule, not a law. The Scrum
team has to be pragmatic.
What if business conditions change in such a way that making a change to the
sprint goal seems warranted? Say a competitor launches its new product during a
sprint. After reviewing the new product, the product owner concludes that the
team needs to alter the goal it established for the current sprint because the
current tasks the team is doing is now far less valuable given what the
competitor has done. Should the team blindly follow the rule of no goal-altering
changes and not alter the sprint? Probably not.
What if a critical production system has failed miserably and some or all of the
people on the development team are the only ones who can fix it? Should the team
not interrupt the current sprint to fix it? Does the team tell the business that
they will fix the production failure first thing next sprint? Probably not.
In the end, being pragmatic trumps the "do not mess with the sprint" rule. The
team must act in a sensible way. Everyone on the Scrum team can appreciate that.
If the team changes the current sprint, they will experience the negative
economic consequences previously discussed. However, if the economic
consequences of the change are far less than the economic consequences of
deferring the change, making the change is the smart business decision. If the
economics of changing versus not changing are immaterial, no change to the
sprint goal should be made.
As for team motivation and trust, when a product owner has a frank, economically
focused discussion with the team about the necessity of the change, most teams
understand and appreciate the need, so the integrity of motivation and trust
is upheld.
210.5. Stopping the sprint before the box is full
Should the sprint goal become completely invalid, the Scrum team may decide that
continuing with the current sprint makes no sense and advise the product owner
to abnormally terminate the sprint. When a sprint is abnormally terminated, the
current sprint comes to an abrupt end and the Scrum team gathers to perform a
sprint retrospective. The team then meets with the product owner to plan the
next sprint, with a different goal and a different set of product backlog items.
Sprint termination is used when an economically significant event has occurred,
such as a competitor’s actions that completely invalidate the sprint or product
funding being materially changed.
Although the product owner reserves the option to cancel each and every sprint,
it is rare that product owners invoke this option. Often there are less drastic
measures that a Scrum team can take to adjust to the situation at hand.
Remember, sprints are short, and, on average, the team will be about halfway
through a sprint when a change-causing situation arises. Because there may be
only a week or so of time left in the sprint when the change occurs, the
economics of terminating may be less favorable than just staying the course. And
many times it is possible to make a less dramatic change, such as dropping a
feature to allow time to fix a critical production failure instead of ending the
sprint.
It is important to realize that ending the sprint early, in addition to having a
negative effect on morale, is a serious disruption of the fast, flexible flow of
features and negates many of the benefits of consistent-duration sprints.
Terminating a sprint should be the last resort.
If a sprint is ended early, the Scrum team needs to decide the length of the
next sprint. Normally, there are three options. In a multi-team development
effort, choosing option 1 or option 2 is the preferred method.
- Make the next sprint bigger than a normal sprint to cover the remaining time
in the terminated sprint plus the time for the next full sprint. - Make the next sprint just long enough to get to the end date of the
terminated sprint. - Stay with the original sprint length. This has the advantage of keeping a
uniform sprint length throughout development (except for the terminated
sprint, of course).
211. What is "done"?
Conceptually the definition of done is a checklist of the types of work that
the team is expected to successfully complete before it can declare its work to
be ready for deployment for use.
Most of the time, a bare-minimum definition of done should yield a complete
slice of product functionality, one that has been designed, built, integrated,
tested, and documented and would deliver validated customer value. To have a
useful checklist, however, these larger-level work items need to be further
refined. For example, what does "tested" mean? Unit tested? Integration tested?
System tested? Platform tested? Internationalization tested? Are all of those
types of testing included in the definition of done?
Keep in mind that if you don’t do an important type of testing every sprint
(say, performance testing), you’ll have to do it sometime. Are you going to have
some specialized sprint in the future where the only thing you do is performance
testing? If so, and performance testing is essential to being“done,” you really
don’t have a usable product each sprint. And even worse, when you actually do
the performance testing at a later time and it doesn’t go quite as planned, not
only will you discover a critical problem very late in the process, but you will
also have to spend much more time and money to fix it at that time than if you
had done the performance testing earlier.
Sometimes the testing might take longer than the duration of a sprint. If this
occurs because the development team has accrued a huge manual testing debt, the
team needs to start automating its tests so that the testing can be completed
within a sprint like with the mocha library used in this course to write unit
tests for JavaScript applications.
Scrum teams need to have a robust definition of done, one that provides a high
level of confidence that what they build is of high quality and can be shipped.
Anything less robs the organization of the business opportunity of shipping at
its discretion and can lead to the accrual of technical debt.
211.1. The evolution of done
You can think of the definition of done as defining the state of the work at the
end of the sprint. For many high-performance teams, the target end state of the
work enables it to be potentially shippable and that end state remains
relatively constant over the product's development.
Many teams, start out with a definition of done that doesn’t end in a state
where all features are completed to the extent that they could go live or be
shipped. For some, real impediments might prevent them from reaching this state
at the start of development, even though it is the ultimate goal. As a result,
they might start with a lesser end state and let their definition of done evolve
over time as organizational impediments are removed.
211.2. Done and "done done"
Some teams have adopted the concept of “done” versus “done done.” Somehow done-
done is supposed to be more done than done! Teams that are unaccustomed to
really getting things done early and often are more likely to use "done done" as
a crutch. For them, using "done done" makes the point that being done (doing as
much work as they are prepared to do) is a different state from "done done"
(doing the work required for customers to believe it is done). Teams that have
internalized that you can be done only if you did all the work necessary to
satisfy customers don’t need to have two states; to them, done means "done
done"!
212. What you've learned
In this reading, you learned a lot more about sprints. You now know that sprints
- are timeboxed;
- have a short and consistent duration
- have an unalterable goal; and,
- can only conclude using the team’s definition of done.
Requirements and User Stories
Scrum treats requirements very differently than traditional project planning.
With traditional product development, requirements are nonnegotiable, detailed
up front, and meant to stand alone. In Scrum, the details of a requirement are
negotiated through conversations that happen continuously during development and
are fleshed out just in time and just enough for the teams to start building
functionality to support that requirement.
With traditional product development, requirements are treated much as they are
in manufacturing: they are required, nonnegotiable specifications to which the
product must conform. These requirements are created up front and given to the
development group in the form of a highly detailed document. It is the job of
the development group, then, to produce a product that conforms to the detailed
requirements.
When a change from the original plan is deemed necessary, it is managed through
a formal change control process. Because conformance to specifications is the
goal, these deviations are undesirable and expensive. After all, much of the
work in process (WIP), in the form of highly detailed requirements (and all work
based on them), might need to be changed or discarded.
In contrast, Scrum views requirements as an important degree of freedom that we
can manipulate to meet our business goals. For example, if the product team is
running out of time or money, they can drop low-value requirements. If, during
development, new information indicates that the cost/benefit ratio of a
requirement has become significantly less favorable, that requirement can be
chosen to be dropped from the product. And if a new high-value requirement
emerges, the team has the ability to add it to the product, perhaps discarding a
lower-value requirement to make room.
The fact is, when developing innovative products, no one can create complete
requirements or designs up front by simply working longer and harder. Some
requirements and design will always emerge once product development is under
way; no amount of comprehensive up-front work will prevent that.
Thus, when using Scrum, the team doesn’t invest a great deal of time and money
in fleshing out the details of a requirement up front. Because the team expects
the specifics to change as time passes and as it learns more about what is being
built, the team avoids overinvesting in requirements that might later be
discarded. Instead of compiling a large inventory of detailed requirements up
front, the Scrum team create placeholders for the requirements, called product
backlog items (PBIs). Each product backlog item represents desirable business
value usually in the form of some desired functionality.
Initially the product backlog items are large (representing large swaths of
business value), and there is very little detail associated with them. Over
time, the team flows these product backlog items through a series of
conversations among the stakeholders, product owner, and development team,
refining them into a collection of smaller, more detailed PBIs. Eventually a
product backlog item is small and detailed enough to move into a sprint, where
it will be designed, built, and tested. Even during the sprint, however, more
details will be exposed in conversations between the product owner and the
development team.
While Scrum doesn’t specify any standard format for these product backlog items,
many teams represent PBIs as user stories. You don’t have to. Some teams
prefer "use case" format, and others choose to represent their PBIs in their own
custom formats.
213. A PBI is a conversation waiting to happen
As a communication vehicle, requirements facilitate a shared understanding of
what needs to be built. They allow the people who understand what should be
created to clearly communicate their desires to the people who have to create
it.
Traditional product development relies heavily on written requirements, which
look impressive but can easily be misunderstood. A way to better ensure that the
desired features are being built is for the people who know what they want to
have timely conversations with the people who are designing, building, and
testing those features.
Scrum leverages conversation as a key tool for ensuring that requirements are
properly discussed and communicated. Verbal communication has the benefit of
being high-bandwidth and providing fast feedback, making it easier and cheaper
to gain a shared understanding. In addition, conversations enable bidirectional
communication that can spark ideas about problems and opportunities. Those are
discussions that would not likely arise from reading a document.
Conversation, however, is just a tool. It doesn’t replace all documents. In
Scrum, the product backlog is a “living document,” available at all times during
product development. Those who still want or must have a requirements
specification document can create one at any time, simply by collecting the
product backlog items and all of their associated details into a document
formatted however they like.
214. Refining the refinements
With traditional product development all requirements must be at the same level
of detail at the same time. In particular, the approved requirements document
must specify each and every requirement so that the teams doing the design,
build, and test work can understand how to conform to the specifications. There
are no details left to be added.
Forcing all requirements to the same level of detail at the same time has many
disadvantages:
- They must predict all of the details early during product development when
they have the least knowledge that they'll ever have about the prodcut and
market. - They treat all requirements the same regardless of their priority.
- They create a huge inventory of requirements that will likely be very
expensive to rework or discard. - They reduce the likelihood of using conversations to elaborate and clarify
requirements because the requirements are "complete".
when using Scrum, not all requirements have to be at the same level of detail at
the same time. Requirements that the team will work on sooner will be smaller
and more detailed than ones that won’t be worked on for some time. Employing
this strategy of progressive refinement allows the entire team to work in a
just-in-time fashion.
215. User stories
User stories are a convenient format for expressing the desired business value
for many types of product backlog items, especially features. User stories are
crafted in a way that makes them understandable to both business people and
technical people. They are structurally simple and provide a great placeholder
for a conversation. Additionally, they can be written at various levels of
granularity and are easy to progressively refine.
As well adapted to the needs of a development team as user stories might be,
don’t consider them to be the only way to represent product backlog items. They
are simply a lightweight approach that dovetails nicely with core agile
principles and our need for an efficient and effective placeholder.
So what exactly are user stories? Ron Jeffries offers a simple yet effective way
to think about user stories. He describes them as the three Cs: card,
conversation, and confirmation.
215.1. The card
The card idea is pretty simple. People originally wrote (and many still do) user
stories directly on 3 × 5-inch index cards or sticky notes.
A common template format for writing user stories uses the "Conextra format"
known as the "as a-I want-so that" format. That format specifies a class of
users (the user role), what that class of users wants to achieve (the goal), and
why the users want to achieve the goal (the benefit). The “so that” part of a
user story is optional, but unless the purpose of the story is completely
obvious to everyone, it should be included with every user story.
As a typical member, I want to see unbiased reviews of a restaurant
near an address so that I can decide where to go for dinner.
The card isn’t intended to capture all of the information that makes up the
requirement. In fact, most agile methodologies deliberately use small cards with
limited space to promote brevity. A card should hold a few sentences that
capture the essence or intent of a requirement. It serves as the placeholder for
more detailed discussions that will take place among the stakeholders, product
owner, and development team.
215.2. The conversation
The details of a requirement are exposed and communicated in a conversation
among the development team, product owner, and stakeholders. The user story is
simply a promise to have that conversation.
The conversation is typically not a one-time event, but rather an ongoing
dialogue. There can be an initial conversation when the user story is written,
another conversation when it’s refined, yet another when it’s estimated, another
during sprint planning (when the team is diving into the task-level details),
and finally, ongoing conversations while the user story is being designed,
built, and tested during the sprint.
One of the benefits of user stories is that they shift some of the focus away
from writing and onto conversations. These conversations enable a richer form of
exchanging information and collaborating to ensure that the correct requirements
are expressed and understood by everyone.
Although conversations are largely verbal, they can be and frequently are
supplemented with documents. Conversations may lead to a UI sketch, or an
elaboration of business rules that gets written down. Scrum does not do away
with all other documentation in favor of user stories. User stories are simply
a good starting point for eliciting the essence of the requirement.
215.3. The confirmation
A user story also contains confirmation information in the form of conditions of
satisfaction. These are acceptance criteria that clarify the desired behavior.
They are used by the development team to better understand what to build and
test and by the product owner to confirm that the user story has been
implemented to his satisfaction.
If the team uses physical index cards, the front of the card has a few-line
description of the story, the back of the card could specify the conditions of
satisfaction.
These conditions of satisfaction can be expressed as high-level acceptance
tests. However, these tests would not be the only tests that are run when the
story is being developed. In fact, for the handful of acceptance tests that are
associated with a user story, the team will have many more tests (perhaps 10 to
100 times more) at a detailed technical level that the product owner doesn’t
even know about.
The acceptance tests associated with the story exist for several reasons. First,
they are an important way to capture and communicate, from the product owner’s
perspective, how to determine if the story has been implemented correctly.
These tests can also be a helpful way to create initial stories and refine them
as more details become known.
216. How much detail is enough?
User stories are an excellent vehicle for carrying items of customer or user
value through the Scrum value-creation flow. However, if your team has only one
story size (the size that would comfortably fit within a short-duration sprint),
it will be difficult to do higher-level planning and to reap the benefits of
progressive refinement.
Small stories used at the sprint level are too small and too numerous to support
higher-level product and release planning. At these levels you need fewer, less
detailed, more abstract items. Otherwise, you’ll be mired in a swamp of mostly
irrelevant detail. Imagine having 500 very small stories and being asked to
provide an executive-level description of the proposed product to secure your
funding. Or try to prioritize among those 500 really small items to define the
next release.
Also, if there is only one (small) size of story, we will be obligated to define
all requirements at a very fine-grained level of detail long before we should.
Having only small stories precludes the benefit of progressively refining
requirements on a just- enough, just-in-time basis.
Fortunately, user stories can be written to capture customer and user needs at
various levels of abstraction. The largest would be stories that are a few to
many months in size and might span an entire release or multiple releases. Many
people refer to these as epics, alluding to the idea that they are Lord of
the Rings or War and Peace size stories. Epics are helpful because they give a
very big-picture, high-level overview of what is desired.
Epic: As someone that regularly uses the restaurant review product, I want
to train the system on what types of cuisine I prefer so that it will know
what restaurants to use when filtering reviews on my behalf.
You would never move an epic into a sprint for development because it is way too
big and not very detailed. Instead, epics are excellent placeholders for a large
collection of more detailed stories to be created at an appropriate future time.
The next-size stories are those that are often on the order of weeks in size and
therefore too big for a single sprint. Some teams might call these features.
The smallest forms of user stories are those typically refered to as
stories.
217. Good stories are INVESTments
Good user stories exhibit six aspects. They are
- Independent of one another
- Negotiable
- Valuable to the people using the product
- Estimable by the development team
- Small enough to fit in a sprint
- Testable to know when its done
217.1. Celebrate your independence
As much as is practical, user stories should be independent or at least only
loosely coupled with one another. Stories that exhibit a high degree of
interdependence com- plicate estimating, prioritizing, and planning. When
applying the independent criteria, the goal is not to eliminate all
dependencies, but instead to write stories in a way that minimizes dependencies.
217.2. Negotiate for profit
The details of stories should also be negotiable. Stories are not a written
contract in the form of an up-front requirements document. Instead, stories are
placeholders for the conversations where the details will be negotiated.
Good stories clearly capture the essence of what business functionality is
desired and why it is desired. However, they leave room for the product owner,
the stakeholders, and the team to negotiate the details.
This negotiability helps everyone involved avoid the us-versus-them, finger-
pointing mentality that is commonplace with detailed up-front requirements docu-
ments. When stories are negotiable, developers can’t really say, “Hey, if you
wanted it, you should have put it in the document,” because the details are
going to be negoti- ated with the developers. And the business people can’t
really say, “Hey, you obviously didn’t understand the requirements document
because you built the wrong thing,” because the business people will be in
frequent dialogue with the developers to make sure there is shared clarity.
Writing negotiable stories avoids the problems associated with up-front detailed
requirements by making it clear that a dialogue is necessary.
A common example of where negotiability is violated is when the product owner
tells the team how to implement a story. Stories should be about what and why,
not how. When the how becomes nonnegotiable, opportunities for the team to be
innovative are diminished.
There are times, however, when how something is built is actually important to
the product owner. For example, there might be a regulatory obligation to
develop a feature in a particular way, or there might be a business constraint
directing the use of a specific technology. In such cases the stories will be a
bit less negotiable because some aspect of the “how” is required. That’s OK; not
all stories are fully negotiable, but most stories should be.
217.3. Valuable for everyone
Stories need to be valuable to a customer, user, or both. Customers (or
choosers) select and pay for the product. Users actually use the product. If a
story isn’t valuable to either, it doesn’t belong in the product backlog.
How about stories that are valuable to the developers but aren’t of obvious
value to the customers or users? Is it OK to have technical stories.
Technical story: As a developer, I want to migrate the system to work on
the latest version of ReactJS so that we are not operating on a stale version
of the UI library and get stuck in an expensive upgrade later.
In the case of the “Migrate to New Version of ReactJS" story, the product owner
might not initially understand why it is valuable to change databases. However,
once the team explains the risks of continuing to develop on an unsupported
version of a database, the product owner might decide that migrating databases
is valuable enough to defer building some new features until the migration is
done. By understanding the value, the product owner can treat the technical
story like any other business-valuable story and make informed trade-offs. As a
result, this technical story might be included in the product backlog.
In practice, though, most technical stories should not be included in the
product backlog. Instead, these types of stories should be tasks associated with
getting normal stories done. If the development team has a strong definition of
done, there should be no need to write stories like these, because the work is
implied by the definition of being done.
217.4. Estimations are the lifeblood of prediction
Stories should be estimable by the team that will design, build, and test them.
Estimates provide an indication of the size and therefore the effort and cost of
the stories (bigger stories require more effort and therefore cost more money to
develop than smaller stories).
Knowing a story’s size provides actionable information to the Scrum team. The
product owner, for example, needs to know the cost of a story to determine its
final priority in the product backlog. The Scrum team, on the other hand, can
determine from the size of the story whether additional refinement or
disaggregation is required. A large story that we plan to work on soon will need
to be broken into a set of smaller stories.
If the team isn’t able to size a story, the story is either just too big or
ambiguous to be sized, or the team doesn’t have enough knowledge to estimate a
size. If it’s too big, the team will need to work with the product owner to
break it into more manageable stories. If the team lacks knowledge, some form of
exploratory activity will be needed to acquire the information.
217.5. Small enough to accomplish
Stories should be sized appropriately for when you plan to work on them. Stories
worked on in sprints should be small. If you’re doing a several-week sprint, you
will want to work on several stories that are each a few days in size. If you
have a two-week sprint, you don’t want a two-week-size story, because the risk
of not finishing the story is just too great.
So ultimately you need small stories, but just because a story is large, that
doesn’t mean it’s bad. Let’s say you have an epic-size story that you aren’t
planning to work on for another year. Arguably that story is sized appropriately
for when you plan to work on it. In fact, if you spent time today breaking that
epic down into a collection of smaller stories, it could easily be a complete
waste of your time. Of course, if you have an epic that you want to work on in
the next sprint, it’s not sized appropriately and you have more work to do to
bring it down to size. You must consider when the story will be worked on when
applying this criterion.
217.6. Test makes the world go 'round
Stories should be testable in a binary way: they either pass or fail their
associated tests. Being testable means having good acceptance criteria (related
to the conditions of satisfaction) associated with the story, which is the
“confirmation” aspect of a user story.
It may not always be necessary or possible to test a story. For example,
epic-size stories probably don’t have tests associated with them, nor do they
need them because you don’t directly build the epics.
Also, on occasion there might be a story that the product owner deems valuable,
yet there might not be a practical way to test it. These are more likely to be
so-called nonfunctional requirements, such as “As a user, I want the system
to have 99.999% uptime.” Although the acceptance criteria might be clear, there
may be no set of tests that can be run when the system is put into production
that can prove that this level of uptime has been met, but the requirement is
still valuable as it will drive the design.
218. What you've learned
A hard thing is having proper requirements as a team to guide your work. In
this reading, you learned about user stories and how they should be INVESTable.
Some of this may not make sense, just now, and that's ok. It will make sense as
you run into more real-world requirements in this course, as well as when you
move into real-world development scenarios.
Censor Project
Time to practice some Node Input/Output! In this project, you'll utilize both
user I/O and file I/O to create a program that censors forbidden words that are
specified in a dictionary file.
The solution for this project is available at the end of these instructions. Be
sure to give it an honest shot before you take a peek!
219. The Objective
Let's begin by taking a bird's-eye view of how the final product should behave.
Let's say that we had a forbidden-dictionary.txt containing the following
words:
potato
tomato
cat
strange
real
park
When we execute the program, censor.js, the user will be prompted to enter a
sentence. The program will respond with the same sentence, but with the
forbidden words censored. A censored word will have its vowels replaced with
stars (*). Below is an example of the program at runtime. For clarity, we have
wrapped the user's input in -dashes-:
$ node censor.js
Enter a sentence to be censored: -what a really strange place to park a car-
what a really str*ng* place to p*rk a car
220. Phase 1: Setting Up and Censoring Sentences
We'll be designing this project from scratch, so begin by creating directory
named censor-project and cd into it. This will be our working directory for
the duration of the project. Inside of your working directory, create two files:
censor.js and forbidden-dictionary.txt. Your directory should have the
following structure:
/censor-project
├── censor.js
└── forbidden-dictionary.txt
220.1. Creating a dictionary
Inside of your forbidden-dictionary.txt use VSCode to write some words that
we'll eventually censor. For the rest of these instructions, you can assume that
our forbidden-dictionary.txt contains exactly:
potato
tomato
cat
strange
real
park
Note that we have typed each forbidden word on it's own line, be sure to do the
same! Until phase 2, we'll put this dictionary file to the side.
220.2. Censoring Sentences
Before we perform any I/O, let's knock out the censoring behavior of our
program. Our program should censor a word by replacing its vowels with stars
(*). To keep things nice and tidy, create a function starVowels that accepts
a word as an argument and returns that word with all of its vowels replaced with
stars. We leave the implementation detail up to you. Your function should be
able to satisfy the following examples:
console.log(starVowels("caterpillar")); // 'c*t*rp*ll*r' console.log(starVowels("snowstorm")); // 'sn*wst*rm' console.log(starVowels("programmer")); // 'pr*gr*mm*r'
Test your function thoroughly with the above test cases and feel free to test it
with other arguments.
You may have noticed that we are assuming the starVowels function will be
passed a single word and not a sentence containing many words. This is because
our final product should be deliberate in which words will be targeted.
starVowels is just a helper function that will be used within our main
censorSentence function. Create a function named censorSentence that accepts
two arguments: a sentence and an array of strings. The function should return a
new sentence where words of the original sentence are censored if they are found
inside of the array argument. You should use starVowels as a helper function,
but we leave the rest of the implementation detail to you. You can assume that
won't contain any punctuation. Your censorSentence should satisfy the
following behavior:
console.log(censorSentence("what a wonderful life", ["wonderful", "tree"])); // 'what a w*nd*rf*l life' console.log( censorSentence("hey programmer why the long face", [ "long", "programmer", "hey" ]) ); // 'h*y pr*gr*mm*r why the l*ng face'
Great! We're done with the censoring logic of our program. Notice how we
designed a function to perform the act of censoring. This keeps our code
modular. We didn't even have to deal with any I/O yet! In general, you'll want
to keep your code loosely coupled so that it is easy to test and maintain. Now
that we have censorSentence, for the rest of the project we will concern
ourselves with passing the arguments dynamically into censorSentence. That is,
we have two open questions:
- how can we get the sentence argument for
censorSentencefrom the user? - how can we get the array argument for
censorSentencefrom the dictionary
file?
Before moving onto the next phase, don't forget to delete any test calls to
censorSentence.
221. Phase 2: Interacting with the user
Let's tackle prompting the user for a sentence using the readline module.
You've seen this pattern a few times now. Reference the [readline
docs][readline-docs] to do three things:
- import the readline module
- create an interface so that the terminal can be used for I/O
- use the
questionmethod to ask the user to enter a sentence; once they hit
enter, repeat the sentence to them andclosethe interface
Here is an example of how the program should behave if you have satisfied the
three points above. For clarity, we've denoted the user's input with -dashes-:
$ node censor.js
Enter a sentence to be censored: -hey programmers-
hey programmers
Once you are satisfied with the user input, you can even begin to mock out how
the user's sentence will be modified. Instead of simply repeating their sentence
once they hit enter, use your censorSentence function to censor some arbitrary
words of their sentence. This means you'll have to pass a hard-coded array as
the second argument to censorSentence.
Just one more piece of the puzzle! Instead of using the static dictionary array
that we just hard-coded, we'll want to refactor our code to get this data from a
separate file.
222. Phase 3: Parsing the dictionary
This part is tricky, so read the full instructions for this entire phase before
writing any more code.
Our task now is to use the fs module to read the contents of the
forbidden-dictionary.txt file that we created initially. To do this, feel free
to reference the [docs for readFile][fs-read-file-docs] and our previous reading
on file I/O. Like usual, you should use 'utf8' as the encoding and print any
potential errors that may occur when the file is read.
Since both the readline question method and fs readFile method are
asynchronous, you'll need to utilize callback chaining in order to read the
forbidden-dictionary.txt file after the user has entered their sentence.
Recall that callback chaining is implemented by nesting callbacks. This means
that you'll have to call readFile from within the callback that is passed
into question.
Remember that our censorSentence needs to be passed an array of strings to be
censored as its second argument. However, if we read the contents of the
forbidden-dictionary.txt, we will receive one long string that contains all of
the words. You'll need to reconcile this difference. How did we overcome this in
the previous reading? We'll leave it to you!
Test your final product by entering different sentences at runtime and changing
what words are included in the dictionary file. Amazing!
Ask an instructor for a code review.
223. Bonus: Pick a file, any file
We recommend completing all other core projects in this lesson before going back
and working on this bonus or any other bonus features.
Create a copy of your entire censor-project directory so that you have a
working version of the core project to reference. You may find yourself making
some drastic changes in this bonus (but hopefully not 😃).
In the core phases of this project, we hard-coded the location of the dictionary
file to be forbidden-dictionary.txt. Your objective for this bonus is to now
allow the user to specify which dictionary file they would like to use after
they enter their sentence. For example, let's say that we added some additional
files to our working directory so that it had the following structure:
/censor-project
├── censor.js
├── forbidden-dictionary.txt
├── bonus-dictionary-a.txt
└── some_deeper_directory
└── bonus-dictionary-b.txt
We recommend that you mimic the structure above. Feel free to populate the
.txt files with whatever words you like (be sure to separate each word with a
newline).
Here are a few examples of how the final product might behave:
$ node censor.js
Enter a sentence to be censored: what a really strange place to park a car
Enter a path to a dictionary: forbidden-dictionary.txt
what a really str*ng* place to p*rk a car
$ node censor.js
Enter a sentence to be censored: eat your vegetables
Enter a path to a dictionary: bonus-dictionary-a.txt
eat y**r v*g*t*bl*s
$ node censor.js
Enter a sentence to be censored: don't slam the door
Enter a path to a dictionary: ./some_deeper_directory/bonus-dictionary-b.txt
don't slam the d**r
We'll leave the rest to you, programmer!
[readline-docs]: https://nodejs.org/api/readline.html
[fs-read-file-docs]:
https://nodejs.org/api/fs.html#fs_fs_readfile_path_options_callback
Global Replace Project
Let's continue practicing I/O with another quick guided project. In this
project, you will be creating a program that will edit a file, replacing all
occurrences of a given string with another string. You may be familiar with this
"global replace" feature as it is frequently supported by word processors.
VSCode also supports this functionality through the cmd/ctrl + f shortcut.
Your goal is to implement this feature for yourself using JavaScript and Node's
fs module!
The solution for this project is available at the end of these instructions. Be
sure to give it an honest shot before you take a peek!
224. The Objective
Let's take a bird's-eye-view of how our final product will behave. Let's say
that we had an essay.txt file that had the following random text:
Lorem ipsum dolor amet single-origin coffee trust fund organic
normcore, wayfarers narwhal fam hashtag ugh VHS af. Try-hard
brooklyn you probably haven't heard of them stumptown. Coloring book
selfies pickled plaid small batch butcher beard fixie disrupt
schlitz irony. Offal deep v meditation squid.
Truffaut ramps VHS, pabst air plant la croix godard authentic
everyday carry street art deep v shaman. 3 wolf moon cloud bread
brooklyn health goth meditation literally salvia, tumblr chambray.
Taiyaki slow-carb distillery, seitan food truck drinking vinegar
hexagon gastropub offal gluten-free banjo.
For the remainder of these instructions, you may assume that our original
essay.txt contains the text above, before the program edits it.
When we run our program, global-replace.js, we should be able to specify
command line arguments for the file to edit, the target string, and the
replacement string. For example, we should be able to use our program to edit
essay.txt by replacing every occurrence of 'oo' with
'HIYAAAH' by
executing the following command in our terminal:
$ node global-replace.js essay.txt oo HIYAAAH
Afterwards, the modified contents of essay.txt will be:
Lorem ipsum dolor amet single-origin coffee trust fund organic
normcore, wayfarers narwhal fam hashtag ugh VHS af. Try-hard
brHIYAAAHklyn you probably haven't heard of them stumptown. Coloring bHIYAAAHk
selfies pickled plaid small batch butcher beard fixie disrupt
schlitz irony. Offal deep v meditation squid.
Truffaut ramps VHS, pabst air plant la croix godard authentic
everyday carry street art deep v shaman. 3 wolf mHIYAAAHn cloud bread
brHIYAAAHklyn health goth meditation literally salvia, tumblr chambray.
Taiyaki slow-carb distillery, seitan fHIYAAAHd truck drinking vinegar
hexagon gastropub offal gluten-free banjo.
With this high-level goal in mind, let's jump in!
Did you know? The random text we used above is a variation of [lorem
ipsum][lorem-ipsum-wiki]. Lorem ipsum is meaningless placeholder text that is
commonly used to temporarily fill space. You'll likely be seeing lorem ipsum
text on websites that are in development when actual data isn't available yet.
To generate our essay.txt, we used lorem hipsum.
225. Phase 1: Setup and Command Line Arguments
We'll create this project from scratch. Begin by creating a
global-replace-project directory. This will be our working directory for the
entirety of this project, so cd into it. Inside of your directory, create two
files: global-replace.js and essay.txt. We recommend that you use VSCode to
populate the essay.txt file with our original text from above so you can
follow our examples. Your directory structure should be:
/global-replace-project
├── essay.txt
└── global-replace.js
We'll put essay.txt aside until the second phase.
225.1. Taking command line arguments
Let's work on reading command line arguments when the user executes the program.
You may have noticed that the final product output provided in the introduction
shows the user specifying arguments along with the command that we classically
use to run the program, node global-replace.js. Previously, we've been
collecting input during runtime with the readline module, but that is not
the case here.
Taking command line arguments is very simple in Node and doesn't require any
modules. To do this, we'll reference the process.argv value that is available
when a .js file is executed with Node. See this for yourself by writing this
simple line at the top of your global-replace.js file:
console.log(process.argv);
If you execute your script with node global-replace.js, you should see an
array containing the paths to the Node runtime and your script. Here is what the
output looked like on our machine:
[ '/usr/local/bin/node',
'/Users/az/Desktop/global-replace-project/global-replace.js' ]
See where this is heading? If you execute your script with additional arguments
separated by spaces, such as node global-replace.js potato.txt tomato squash,
the process.argv array will contain those additional arguments:
[ '/usr/local/bin/node',
'/Users/az/app_academy/Module-JavaScript/projects/node/global-replace-project/global-replace-project/global-replace.js',
'potato.txt',
'tomato',
'sqash' ]
We'll assume that the user will specify the TARGET_FILE, OLD_STR, and
NEW_STR arguments in that order. In your script, assign three global const
variables to contain these arguments from process.argv. Bragging rights
awarded if you do this with array destructuring.
Did you know? It is convention in many programming languages to style
global constant variables with CONSTANT_CASE.
The globalprocessobject is specific to Node and is not available in the
browser runtime. We use it here for [process.argv][process-argv] and we used it
previously forprocess.stdinandprocess.stdoutwhen creating interfaces for
the readline module in past projects.
One more note before moving on. Depending on how you decide to implement things
during this project, your program may require you to enter all three command
line arguments in order to execute. That is, you'll have to execute your code
withnode global-replace.js arg1 arg2 arg3and not just
node global-replace.js.
226. Phase 2: Simple string replacement and file reading
For now, we won't be utilizing the command line arguments. Let's work on
implementing logic to perform global replacement on a string.
In global-replace.js, write a function named replace that accepts three
string arguments. The function should return a modified version of the first
string where all occurrences of the second string are replaced with the third.
Your function should satisfy the following examples:
console.log(replace("what a great program", "a", "o")); // 'whot o greot progrom' console.log(replace("what a great program", "gr", "d")); // 'what a deat prodam' console.log(replace("have a nice day", "a nice", "an amazing")); // 'have an amazing day'
Now that the replace function is complete, delete all test calls you made to
it. We'll set this function aside for a moment to focus our attention on
performing some file I/O on the TARGET_FILE.
Import the fs module and use the readFile method to read the
TARGET_FILE.
Look up the documentation if you forgot how to do this. Use 'utf8' as the
encoding and print any errors that occur during the read. Also simply print out
the contents of the file to check if everything is working as it should.
Upon running node global-replace.js essay.txt, you should see the contents of
your file printed out. If you do, take things a step further by printing out a
modified version of the file contents where all instances of OLD_STR are
replaced with NEW_STR. Recall that the data from readFile will be read as
one long string since we specified 'utf8'; this is a perfect fit for our
replace function. Do not worry about overwriting the contents of the file yet,
simply console.log the modified contents.
Test your work by passing three valid command line arguments. For example here
is what our program printed upon running node global-replace.js essay.txt a X:
Lorem ipsum dolor Xmet single-origin coffee trust fund orgXnic
normcore, wXyfXrers nXrwhXl fXm hXshtXg ugh VHS Xf. Try-hXrd
brooklyn you probXbly hXven't heXrd of them stumptown. Coloring book
selfies pickled plXid smXll bXtch butcher beXrd fixie disrupt
schlitz irony. OffXl deep v meditXtion squid.
TruffXut rXmps VHS, pXbst Xir plXnt lX croix godXrd Xuthentic
everydXy cXrry street Xrt deep v shXmXn. 3 wolf moon cloud breXd
brooklyn heXlth goth meditXtion literXlly sXlviX, tumblr chXmbrXy.
TXiyXki slow-cXrb distillery, seitXn food truck drinking vinegXr
hexXgon gXstropub offXl gluten-free bXnjo.
Almost done! Now we just need to take this new string and rewrite the
TARGET_FILE.
227. Phase 3:
Let's take a quick recap of what we are dealing with before we put the finishing
touch on this project. So far, our program asynchronously reads data from the
TARGET_FILE and we use replace to modify the incoming data from the
TARGET_FILE. In order to write this modified data back into the TARGET_FILE,
we need to utilize callback chaining because all of these file operations are
asynchronous!
Utilize callback chaining and [writeFile][write-file] to rewrite the
TARGET_FILE with the new data. This means you will have to call writeFile
within the callback for readFile. Be sure to use 'utf8' and print any errors
that occur during the write.
Test your final product by running your program a few times, replacing different
substrings. Verify that the contents of essay.txt are changed. Test things
further by creating your own .txt files to edit! Remember that we can specify
any TARGET_FILE through command line arguments, so your program is very
dynamic!
Ask an instructor for a code review.
228. Bonus: Replacing the first 'n' occurrences
We recommend completing all other core projects in this lesson before going back
and working on this bonus or any other bonus features.
For this bonus, we'll give our program the ability to accept an additional
fourth argument representing the number of occurrences to replace. In other
words, we should be able to run the program with the following arguments:
node global-replace.js essay.txt i hello 3
This should edit the essay.txt file, replacing the first 3 occurrences of 'i'
with 'hello'. This new argument should be optional, so if we run the program
with:
node global-replace.js essay.txt i hello
It should replace all occurrences of 'i' with 'hello', as it did in the
core
project.
We'll leave the implementation up to you! Good luck.
[lorem-ipsum-wiki]: https://en.wikipedia.org/wiki/Lorem_ipsum
[process-argv]:
https://nodejs.org/docs/latest/api/process.html#process_process_argv
[write-file]:
https://nodejs.org/api/fs.html#fs_fs_writefile_file_data_options_callback
Repo Madness Project: Managing Your Code With Git
Now that you've developed an understanding of what Git is and why we use it,
let's get to work! We're going on a time-traveling adventure with Git as our
vehicle.
We'll review:
- Creating and navigating a Git repository,
- Adding and changing our files,
- Browsing a timeline of our changes,
- and rewriting history!
229. Phase 1: Laying the foundation
To get started, we need to create a timeline. For this project, we'll be working
with plain old JavaScript objects. As we move forward and back in time, we'll
observe changes in our objects.
Let's start by creating our own timeline from scratch. Once we've practiced
this, we'll import an already-organized timeline from GitHub and use it as a
base for our adventure.
229.1. Phase 1a: Create your own reality
We'll take control of time and space by creating our own timeline first! Create
a new Git repository called "my-custom-timeline". Within this repository, create
a file called me.js. Add an empty JavaScript object to your js file.
Finally, add me.js to the staging area of your repo and commit the new file
with a commit message of "Initial commit (before I came along)".
Since this is your timeline, let's add some important dates in your own life.
We'll start (as we all do!) with your birthday. Inside me.js, add a couple
properties to your JavaScript object. Add an "age" property and set it to
0,
and add at least one more property to describe yourself: maybe
"hairColor": "brown". Add these changes to your repo and commit them with a
message like
"Add birthday (1987)". Including the year in your commit messages for this phase
will make it easy to follow your timeline in your commit history later on.
Time marches on - and so should you! Think of at least three more significant
dates in your life. These could be graduations, vacations, or even the day your
cohort started at App Academy! With each event, make appropriate changes to
me.js. Update your "age" value and modify the object to reflect what
changes
you experienced. For example: if one of your significant dates was a wedding,
you might add a "spouse" property.
Your repository should end up with at least four commits: one for "Initial
commit (before I came along)" and three for events on your timeline. Remember:
we're focusing on Git, so you should use clear commit messages in imperative
voice that make it easy to look back over your changes.
Once you're satisfied, take a look at your Git commit log. It should read like a
(very) abridged biography. This is what every repo's commit history should look
like: a concise history of significant changes as the project has evolved.
229.2. Phase 1b: A shared experience
Let's move on to more advanced techniques. For this, we'll need to ensure we're
all starting with the same timeline. Leave your my-custom-timeline directory
and download the skeleton for this project below. After opening the .ZIP file,
you should end up with a new directory containing a single file: earth.js.
Navigate into this directory using cd my-shared-timeline from your terminal.
We'll build on this shared timeline from here on.
Take a look at earth.js. You'll see a JavaScript object containing the name of
our planet as well as very rough population estimates. This object will
include all the data we track on our new timeline.
A quick aside: Our "population estimates" are pretty silly, but you should be
focused on the "time-traveling" techniques of Git and not the historical
authenticity of these examples. If you'd like to know more, we've loosely
based our original timeline on the ["Timeline of the evolutionary history of
life"][Life timeline source]. Feel free to draw from this resource for ideas
as you customize your own history!
230. Phase 2: Exploring our timeline
What we're seeing in earth.js is representative of the present. Take a look at
your commit history. Notice how our log here reads like a very simplified
history of Earth. Let's travel back and see what we can find!
231. Phase 2a: Looking around without moving
Before we set off, let's look back over our timeline so we know what we're
getting into. Using git diff, compare your current commit to the first commit
in the repository's history. You should see a single line change: one
subtraction, one addition, both on the same line.
Of course, we can tell from the commit history that more has changed than just
that one line! git diff is a great tool for seeing the overall change
since a particular point in time, but to see all the changes since that
time, we have to look at each commit separately.
Try comparing more commits in the repo. Between which diffs can you see the most
changes? Are there any commits with a net neutral (no change) diff between
them?
Notice that nothing changes about your current state as you view diffs. Diffing
is a safe way of browsing a repo without changing your position, so it's great
as a "quick reference" if you need to check a detail in your repo's history.
232. Phase 2b: Our first steps through time
Now, let's relocate and see each commit with its respective context. Using git checkout,
navigate to the first commit in the repository. How many of each
population are there at this time?
Let's jump back to the present! Check out the master ref to return to the
latest commit on this branch.
Try stepping through your history one commit at a time and observing how
earth.js changes. As you browse through your repo, keep an eye on your git log output as
well. Notice that you're unable to see commits ahead of your
current position - only those that were created in the past.
Remember: checking out a commit is non-destructive, so it's a safe way to
explore the state of a repository at a given point in time.
233. Phase 3: Changing history
Checking out and comparing commits are both safe, non-destructive ways of
browsing your repo. What if we would rather do some damage and make real
changes? It's time to get messy!
Before we make any changes, we need to ensure we're not damaging our original
timeline. The safest way to make isolated changes to a repo is via a branch.
Let's create a new branch titled
alternate-timeline-for-<your-github-username-here>. Use git status to make
sure you've checked your new branch out before continuing.
Let's go back a few million years and make a change that will have serious
effects on our timeline. Using git reset, travel back to 4.5 million years
ago. Let's assume mankind had never come along to drive the woolly mammoth to
extinction. How many mammoths might there be today: 200+? 500+? Even more?
Update earth.js to include your estimate of how many mammoths might roam the
Earth today. Add this change to your staging area and commit it with a message
like "Today: Mammoths rule the world".
Now, take a look at your commit history. You should see that the previous two
commits for "2.5 million years ago" and "Today" have been totally replaced by
your one new commit for "Today". Congratulations: you've changed history! You
can use git diff to compare your new branch with the master branch.
234. Phase 4: Choose your fate
Take a few minutes to play around with your new branch. You can add additional
commits and rewrite different parts of history as you see fit. Did the dinosaurs
live into modern times, letting you own a cool Tyrannosaurus Rex pet? It's up to
you!
When you're done, let's share your new vision with the world. We'll do this with
the help of GitHub.
First, we need to make sure your alternative timeline is compatible with our
original timeline. Merge the master branch into your branch and resolve any
conflicts. Since we're only changing numbers, this should be an easy conflict to
resolve: just remove the "old" numbers from the master branch, replace them
with your "new" population totals, and make sure you don't leave any merge
conflict artifacts (<<<<<, =====, or >>>>>)
hanging around in there! git status will provide some helpful details if you're unsure how to
proceed.
Once you've successfully merged master into your branch, we need to
go to GitHub and create a new remote for our project.
Go to GitHub and create a new repo under your account
called my-shared-timeline. This will serve as our new "remote". You can
give it a description, but do not create a README file. The repository can be
public or private.
Once you have created this repo, you need to tell your local git repository
to use this Github repo as its remote. Do the following on your local terminal:
git checkout master
git remote add origin https://github.com/<USERNAME>/my-shared-timeline.git
git push -u origin master
A note on HTTPS vs. SSH: For now, you should use HTTPS for cloning and pushing
GitHub repos. This will require you to enter your username and password.
Eventually, we will have you generate SSH keys which allow you to store a
unique key on your local machine that GitHub reads for authentication purposes.
Now that we have our remote repository, we need to push up our new branch and
open a pull request. You'll want master to be the base branch and
your branch to be the compare branch. Don't forget to add a short description
of the changes you made. You can review your changes on GitHub before opening
the PR.
235. What We've Learned
Whew! We're safely back in the present. Git is a powerful tool that lets us
explore and manage the history of our repository with ease. While playing with
dinosaurs can be fun, you've also been flexing your programming muscles by:
- Creating a new code repository from scratch,
- Tracking changes to a JavaScript file over time,
- Practicing how to explore an unfamiliar repo,
- Branching off a shared repo to make your own changes,
- and sharing those changes with your team and/or the world via GitHub.
These are skills you'll use on the job many times per day, so we'll continue to
get lots of practice together as you incorporate Git in upcoming projects.
[Life timeline source]: https://en.wikipedia.org/wiki/Timeline_of_the_evolutionary_history_of_life
WEEK-03 DAY-3
Unix
Command Line Interface Basics Lesson Learning Objectives
Below is a complete list of the terminal learning objectives for this lesson.
When you complete this lesson, you should be able to perform each of the
following objectives. These objectives capture how you may be evaluated on the
assessment for this lesson.
- Given a folder structure diagram, a list of 'cd (path)' commands and target
files, match the paths to the target files. - Create, rename, and move folders using unix command line tools.
- Use grep and | to count matches of a pattern in a sample text file and save
result to another file. - Find what -c, -r, and -b flags do in grep by reading the manual.
- Identify the difference in two different files using diff.
- Open and close nano with and without saving a file.
- Use ‘curl’ to download a file.
- Read the variables of $PATH.
- Explain the difference between .bash_profile and .bashrc.
- Create a new alias by editing the .bash_profile.
- Given a list of common scenarios, identify when it is appropriate and safe
to use sudo, and when it is a dangerous mistake. - Write a shell script that greets a user by their $USER name using echo.
- Use chmod to make a shell script executable.list of the terminal learning objectives for this lesson.
When you complete this lesson, you should be able to perform each of the
following objectives. These objectives capture how you may be evaluated on the
assessment for this lesson. - Given a folder structure diagram, a list of 'cd (path)' commands and target
files, match the paths to the target files. - Create, rename, and move folders using unix command line tools.
- Use grep and | to count matches of a pattern in a sample text file and save
result to another file. - Find what -c, -r, and -b flags do in grep by reading the manual.
- Identify the difference in two different files using diff.
- Open and close nano with and without saving a file.
- Use ‘curl’ to download a file.
- Read the variables of $PATH.
- Explain the difference between .bash_profile and .bashrc.
- Create a new alias by editing the .bash_profile.
- Given a list of common scenarios, identify when it is appropriate and safe
to use sudo, and when it is a dangerous mistake. - Write a shell script that greets a user by their $USER name using echo.
- Use chmod to make a shell script executable.
Navigating Your Filesystem
Imagine you're on a trip to a new country. You're carrying a dictionary, but
it's slow to translate every word you hear and you need to use a map. You would
get used to these limitations eventually, but wouldn't it be great if you spoke
a bit of the local language instead?
Believe it or not, this is likely how you've been using computers for most of
your life! Modern machines are built to make navigating easy and entertaining,
but you're not "speaking the computer's language". That changes today. Let's
explore the terminal!
We'll discuss:
- How to find your way around your files without double-clicking any folders,
- Creating & managing new files & directories,
- and cleaning up after yourself.
236. Getting the lay of the land
You've already used a terminal for some tasks like controlling Git, but let's
dive a little deeper. Your terminal is the interface you use to direct the
computer. The word "terminal", as used here, comes from the early days of modern
computing, when a terminal interface (often a screen & keyboard) would be
hooked up to an otherwise manually-operated computer. This interface allowed a
human to provide instructions to the computer without turning dials or requiring
a complex manual to do so. Today, even though our terminal is built into our
computer, we still use the term to refer to the application we're using to input
our own instructions!
To keep everything in one place, we'll use the terminal that's built into Visual
Studio Code. If you haven't yet, go ahead and open it. You can do so by clicking
"View" from the top menu in VS Code, then "Terminal". You should see a new pane
at the bottom of your editor.
236.1. Parts of the terminal

Here are a few keyboard shortcuts to help you along. Some of these may be review
for you. Give them a quick try before moving on.
Return/Enterwill submit the command you've typed.↑/↓will move up & down in your command history.- Pressing
Ctrl + Awill move your cursor to the beginning of the line, while
Ctrl + Ewill move you to the end. - To clear the terminal screen, press
Ctrl + L. You can still scroll up to see
your previous output if you need to.
236.3. Understanding directories
Let's run through a quick review of how your file system is structured. Your
computer contains both files and directories. We distinguish these by their
content: a file contains text or binary content that we can interact with, and a
directory contains both files and other directories!
As an aside: It's easy to confuse "files" and "folders", so it's best to use
the term "directory" instead. It's worth an extra syllable to prevent
confusion!
Directories and files form a tree-like structure, where each directory creates a
new branch and each file is like a leaf. We can write the path to the file or
directory we want by joining all its ancestors with forward slashes, like so:
/users/app_academy_student/homework/my-homework.txt
Here's what that looks like in "tree" form:

Now, we're comfortable on our command line. Let's start navigating our
filesystem directly from our keyboard - no touchpad required!
237.1. Where am I?
When getting started in a new place, it's often helpful to orient yourself to
your surroundings. The easiest way to orient yourself in the terminal is with
the pwd command. pwd stands for "Print Working Directory". It will print
the
full path to your current directory out to your terminal. Give it a try now!
You might get back something unexpected here. If your prompt includes ~, pwd
will return /Users/your-user-name/ in its place. Remember that pwd always
returns the full path where you are, without any special characters or
shortcuts.
Once you know where you are, it's good to see what else is there! We can look at
what's present in the current folder with ls. ls is short for "List",
and
will display the contents of whatever path you provide it with. For example, you
could run ls . to see your current directory's contents, or ls ~/Projects to
see the contents of the "Projects" directory inside your home directory. When
you don't provide any path, ls defaults to the contents of your current
working directory.
237.2. A closer look at our contents
By itself, ls is useful but can be a little misleading. Linux & MacOS both
support the concept of hidden files. These are files or directories whose names
are preceded by a .. We've seen this before with the .git directory. Within
a Git repository, ls alone won't display the .git folder at all. We'll see
many more hidden files in upcoming lessons.
Command line instructions allow you to use options to alter their behavior. We
set these options with either a single - (for shorthand options of one letter)
or a -- (for option keywords: whole words or phrases). Here's an example
using short options with ls:
> ls -a -l
The above command runs ls, showing all files and displaying them in a
list format. This ensures that we see all files, including those that
are hidden. Viewing contents in a list format can make it a little easier to
read, and it will show us some extra info about each file/directory! We'll dig
into what that extra info means in a future lesson.
Here's one neat trick you'll see often with command line options: you can
combine short options! Instead of typing -a and -l separately, you can run
the same command this way:
> ls -al
Short options like this aren't order dependent, so ls -la will perform the
same action.
237.3. Navigating directories
Now we know where we are and we know how to see what's around us. Let's set off
on an adventure! It's time to navigate to other directories.
We switch to a different directory with the cd command. cd, which stands for
"Change Directory", expects a path just like ls. Running cd with no
arguments will assume you'd like to change to your home directory, and you'll
end up back at ~.
You can cd from any folder you have permission to access to any other folder
on your system. There's no need to move in small steps! You can jump directly
from ~ to ~/Projects/Homework-Week-1/Project-Name/code with a single cd
command.
Here are some short examples of common cd commands you'll use:
- Change to your home directory:
> cd # OR > cd ~ # OR > cd /Users/YourUserName
- Navigate up a single level from your current position:
> cd ..
- Move back to the last directory you were in:
> cd -
237.4. A caveat
You're browsing through your file system when you hit a snag: you encounter a
"Permission denied" error. Oh no!
Have no fear. This is perfectly normal. Your operating system has a strict
permissions system that tries its best to keep you from doing accidental damage.
This is less obvious when you're browsing folders with Finder or File Explorer,
where dangerous files/directories are hidden from view. In the terminal, though,
these unexpected blocks can be jarring.
If you have a problem with "Permission denied", it's best to ignore it and go
another direction for now. We'll discuss ways around this once you've had more
practice in the directories you already have permission to access.
238. Making changes
You're a lean, mean, navigating machine! That's great, but now it's time to gain
more control of your environment. Let's discuss how to create your own files and
folders from the command line.
238.1. Creating new files & directories
You may not have much navigating to do if you're in an empty home directory. To
start, let's discuss files. The fastest way to create an empty file is with the
touch command. You give touch a path & file name, and it creates an empty
file at that path with your given name. Here's an example:
> touch myApp.js > touch ~/.js_settings
Note that touch doesn't put any content in the file, nor does it open the file
for editing. This is a great utility for laying your files out, but you'll
quickly want to move to a file editor (like VS Code) to make changes to these
files.
For directories, we have the mkdir command. mkdir is short for "Make
Directory" and will create a new, empty directory with the name you pass it:
> mkdir my-cool-projects > mkdir ~/new-code
A common problem when learning mkdir is trying to create nested directories.
For example, if I wanted to create a "first-week" directory inside a "homework"
directory in my home folder, I would need to ensure the "homework" directory
exists first. Here's what that looks like:
> mkdir ~/homework/first-week mkdir: ~/homework: No such file or directory
We can solve this with a commonly-used short option for mkdir: -p. The
-p
option stands for parent, and it will cause mkdir to create all parent
directories it needs to create the requested directory:
> mkdir -p ~/none/of/these/directories/exist/but/now/they/will
One last thing: when naming files and directories, do not use spaces! You can
make multi-word names more distinct by using underscores, hyphens, and using
camelCase. While files are allowed to have spaces in their names, this can
complicate navigation. You'll thank yourself later if you avoid them altogether.
238.2. Manipulating existing files
You're browsing directories. You're making files. Woohoo! Are you ready to make
some changes?
Just like using your mouse in Finder, you can copy/relocate files and
directories from the terminal. The commands you'll need are cp and mv.
cp is short for "copy" and will create a duplicate of a file. It requires two
arguments: a source and a destination. source can be the relative or
absolute path of a file, destination can be a path to a file or a directory.
If destination is a directory, cp will copy the source file into that
directory. If destination is a file path, cp will copy the source file into
that new location.
Gotcha: If a file already exists in the destination of your copy command,
cp will overwrite the existing file.
# Will copy the file into the `people` subdirectory. > cp best-friend.txt people/ # This command is identical to the above. > cp best-friend.txt people/best-friend.txt
In each of these cases, we'll create an exact copy of best-friend.txt from
your current working directory and place that copy in the people folder.
You can copy directories just like files, but you'll need a special short
options to do so: -r. This option, short for "Recursive", copies not just the
directory but all of its contents! Without it, the directory will fail to copy:
> ls my_dir my_other_dir > cp my_dir my_other_dir/ cp: -r not specified; omitting directory 'my_dir/'
Alternatively, mv "moves" a file from one place to another. Think of this like
the "Cut" options on other operating systems. Again, you pass two arguments:
> mv breakfast-foods/cereal.txt anytime-foods/cereal.txt # or identically: > my breakfast-foods/cereal.txt anytime-foods/
What if you need to rename a file? There is no rename command in the terminal.
Instead, you'll use mv to accomplish this:
mv speled-rong.txt spelled-wrong.txt
Like cp, mv can be used to move or rename directories. However, unlike
cp,
mv does not require a flag to do so. This is because the mv operation
simply renames the directory, so we're not concerned about the contents within
it.
238.3. Clean up: aisle
~!
Okay, file system traveler. You've thrown mkdir and touch around for long
enough! Let's discuss how we remove files and directories.
There are two removal commands in your terminal: rm and rmdir. The former is
for files or directories, while the latter is for directories only. The use
cases can be a little confusing, so let's look at some examples.
First, rmdir. This command, short for "Remove Directory" is only for removing
an empty directory. If the directory has any files or other directories within
it, the command will fail. You'll use this command occasionally for cleaning up
extra directories you've created, but you're more likely to use the other
removal command we mentioned.
# Remember, ~/my-app must be empty for this succeed! rmdir ~/my-app
Last, rm. This command is short for "Remove" and can be one of the most
dangerous tools in your arsenal. We've mentioned this before, but it bears
repeating: never use rm unless you're absolutely sure of what you're
removing! The terminal is often much less forgiving than the Finder app or
Recycle Bin.
To use rm, you provide a filename or path. If you need to remove a directory
along with all of its contents, you can use the -r short option, which will
"Recursively" remove all files within the directory before removing the
directory itself. Your terminal will guide you along this process - all you have
to do is type "y" for "Yes" or any other key for "no" as it asks you about each
file within the directory you're deleting. Once a file has been rm'ed, it's
unrecoverable, so be careful about what you use rm on!
> rm file-we-dont-need.txt > rm -r directory-full-of-files-we-dont-need/
Try practicing these new tools by cleaning up the mess you've made while
experimenting. You'll get lots more practice using these as the days progress.
239. What we've learned
Navigating in the terminal is a little different than we're used to, but it's
much faster to type commands than to drag a mouse! You should now have a greater
mastery of:
- Exploring your file system via the terminal,
- Creating, updating, and removing files and directories,
- Using command line options to enhance our tools with new functionality.
Common Tasks On The Command Line
Let's go for a deeper dive into the tools we'll use day in and day out. We'll
cover:
- Searching for files by content,
- Performing multiple commands in sequence,
- Terminal text editors & file comparison,
- and how to perform common web tasks from the command line.
240. grep
marks the spot
One of the most common tasks you'll have is searching for a particular piece of
code in a project. This might be to help diagnose unexpected behavior, or it
might just be because you can't remember exactly where you left off! Either way,
having a tool to help you find your way to a specific point in your code is
critical to your workflow.
grep is a command line utility that was originally created in 1974 and stands
out as a well-tested, reliable tool that does one thing well: text search. The
name comes from the command sequence g/re/p, meaning "Globally search for
a Regular Expression and Print" (We'll discuss
regular expressions
in a future lesson). You can use grep to find text in a particular file or
across multiple files in a particular directory! It's like using "Cmd + F" from
the CLI.
The simplest use of grep is with the contents of a single file. Here's an
example of using it to find all the variables in a JavaScript file:
> grep var ./myAppFile.js
Notice that grep expects at least 2 arguments: a pattern and a source to
search. In the above example, var is the pattern and ./myAppFile.js is the
source. If your search string is more than a single word, you'll need to wrap it
in double-quotes:
> grep "I'm a programmer" ./resume.txt
By default, grep will return the whole line where your search string appears.
This can be a little confusing at first:

We'll occasionally need to modify grep's default behavior. One common
situation is when searching directories. It's likely that you'll want to use
grep to find any files in a directory that contain a certain pattern. You can
do this with the -r option, which stands for "Rescursive". When run
this
way, grep expects a directory path as its source. It will search the directory
and all of its children (files and subdirectories). Be aware: if there are lots
of files and you're searching a common phrase, you might get back more than you
expect with this option!
Another commonly-used option is -n, for "line Number". This will show
you
the exact line for each match. Handy if you want to find something extra-fast!
By default, grep is case-sensitive, so searching for Let won't bring back
instances of let. To override this behavior, use the -i option, for
"Ignore Case".
The last common option we'll discuss is -c, for "Count". This will
return
only the number of matches, and not a full list of them. If you use this option
in conjunction with -r, you'll see filenames for each count as well. This will
be helpful when trying to track trends in code or when you need to know which
directory contains the largest number of matches.
241. Teach yourself anything
grep, like most terminal commands, has many more options than we've discussed.
How can we keep track of them all? Fortunately, we don't have to! Our system
includes the man utility (short for Manual) to help guide us when
questions arise.
To learn more about any built-in command, just use man:
> man grep
This will open grep's manual page, the official documentation for the command.
You'll open in a pager, a lightweight document viewer meant to run in your
terminal. To browse the man page, use your arrow keys to scroll up & down, and
press the "Q" key on your keyboard to quit.
man pages contain all the info you need to work with a command line utility.
They're typically structured in a predictable way:
- A short summary & description of special features at the top,
- Command line options with explanations in the middle,
- And examples & cool facts (like when the command was created) at the bottom.
They are often terse & technical, butmanpages are the official word on the
tool you're curious about and are always a good place to start. Take some time
to read through themanpages of some of the commands we've already covered!
242. Command redirection
With both man and grep, we experienced some serious terminal overload.
Wouldn't it be great if we could send that output somewhere else, like our text
editor or a file to read later? We can do this via command redirection.
As the name implies, redirection is all about taking the output from one command
and making it the input for a different command. Let's look at a very simple
example using |, the pipe operator, where we'll combine man and
grep to
discover how to count pattern matches on a man page:
> man grep | grep -C1 count
Notice that we're not using the letters "L" or "I" but the vertical pipe
character, found on the same key as \ and above your "Return" key on US
keyboard layouts. This operator takes the output from its left side and passes
it to the command on its right as the final argument.
When we run the command above, we'll get back only the lines from grep's
man
page that include the word "count", along with one line above & below for
context:

We can create files from the command line, search for content, and even combine
commands into a single line! What about editing files directly from the command
line too? Yup - there's a utility for that!
In fact, there are a large number of text editors available for the
command line. Two of the most popular ones you'll hear about are vim and
emacs, which can both act as full development environments with a little
customization! While you'll see lots of details about these editors online,
it's best to avoid them for now. We'll focus on simpler editors with a much
smaller learning curve.
We're going to take a look atnano, a terminal text editor that provides
easy-to-read instructions and is available on most systems. To get started, just
typenanoon your command line.
Let's take a look at thenanointerface:

While nano is pretty stripped-down compared to a tool like VS Code, there are
really great reasons to get familiar with it. The biggest benefits come when
working in remote environments.
You'll sometimes need to log into a server somewhere else in the world and
change a configuration file or run an update. If you need to edit text in that
remote environment, it's unlikely you'll have access to VS Code. It's
dramatically more likely that you'll have access to nano on your remote
terminal. Now you can confidently edit files on computers you may never see in
person! How cool is that?
244. Bringing the internet into your terminal
One last task you'll perform frequently on the command line is downloading
files. This could be anything: an icon pack for your cool new app, an
installation script for a larger program, or even a whole webpage to scrape for
a project.
You can use the curl command to download from a URL to a file on your
computer:
> curl https://www.my-website.com/my-file.html
With no other options, curl would download the contents of that URL to a new
file titled my-file.html on our system. If you'd rather name the new file
yourself, you can use the -o option:
> curl -o my-downloaded-file.html https://www.my-website.com/my-file.html
Like our other CLI utilities, curl is well-known and highly available. There's
an extensive man page that's worth browsing through, too! curl offers lots
of options that let you manage authentication, upload your own files, or even
customize the type of request you're making. It's a powerful tool behind its
rather simple facade.
245. What we've learned
Whew! If this feels like a lot of new tools, don't worry! They're all things
you'll use on a daily basis. The beauty of using terminal tools like these is
their simplicity: you can build complex workflows out of very simple utilities,
and you get lots of practice in the process.
After reading this lesson and exploring on your own, you should be able to:
- find specific phrases in files and directories with
grep, - learn more about any command using
man - link commands together by redirecting output as input,
- edit file content using
nano, - and download files from the web using
curl.
Understanding The Shell
As a developer, you'll spend much of your time working at the command line.
Learning the commands you can use is important, but it's even more important to
build a foundational understanding of where those commands go! Let's get under
the hood and discuss the shell.
You'll learn:
- What a "shell" is,
- Shell-specific files and how to customize them,
- How commands are executed from the command line.
246. No turtles here!
We've used the word "shell" a few times with no context. Let's fix that now! A
shell in computing terms is the software layer that translates your command
line instructions into actual commands. Generally speaking, the shell serves two
purposes: Calling applications using your input and supporting user
environments/customization.
The shell is a small part of the much larger operating system, the software
that sits between your input and the microchips inside your computer. The
operating system, or OS, translates your actions all the way down into machine
instructions that can be processed by your CPU. You've heard of the most popular
OSes out there: Windows, macOS, and Linux.
246.1. Selling C shells by the seashore
Like most things in web development, many people have strong opinions about
which shell is best. There are many shells available that you can install & use,
each with its own idiosyncrasies.
In our lessons, we'll focus on two shells, the Bash shell and Zsh.
Bash has been around for a little over 30 years and has been battle-tested on
the most popular operating systems on the web. The biggest Linux operating
systems all use it as the default shell, and macOS has used it as the default
until switching to [Zsh in macoS Catalina].
Zsh is now the default shell in macOS Catalina and has been in use since the
1990s and has a strong following amongst linux users.
You'll want to keep which shell you use in mind as you search for help with
command line problems, as an answer intended for one shell may not work with
your shell.
One nice thing about Zsh is it's scripting compatibility with Bash. Which means
a shell script written for Bash will work in Zsh, although the opposite is not
always true.
246.2. Shells vs Terminals
Your operating system may have an application called a "Terminal". It's good to
note that a terminal is not a shell and a shell is not a terminal. Terminal
applications are really emulating a piece of hardware known as a terminal which
nobody really uses anymore.
![Terminal]
So we emulate a terminal using an application on our computers. The Terminal
application will then execute the shell and it will give us a prompt so we can
then type commands.
246.3. Shell Prompts
You'll notice your shell prompts you to type something by putting either a $
or a % before the cursor. Bash uses $ by default while Zsh uses a %.
But
there's one more character you may see as your prompt character and that is
#. This appears if you are logged in as root, the unix superuser. Since with
great power comes great responsibility, whenever we see the # prompt we want
to be careful what we type because we could delete system files or cause files
to have the wrong permissions if we aren't absolutely sure what we are doing.
246.4. Two purposes
A shell's primary purpose is to interpret your commands. It does this by looking
for applications installed on your computer and sharing any arguments or
environment-specific data they need. Let's think about the following command,
which will print the word "Test" to your terminal:
$ echo Test
In this command, echo refers to a program called "echo", while Test is an
argument you've given the program. Bash doesn't know what echo does, only that
it needs to find an application with that name and give it the word "Test". The
shell trusts the application will handle this input appropriately.
Bash searches for applications using the PATH variable. PATH is a special
variable that's available system-wide and includes all the directories you might
store applications in. You can view your own PATH using that echo utility:
$ echo $PATH
You should see a list of directory paths separated by colons. When you run a
command, your shell extracts the application name from the command and starts
going through the PATH, directory by directory, looking for that name. Once it
finds it, it passes along your input (or just starts the application, if there's
no input available), and stops looking.
Note that we didn't just write echo PATH above. Instead, we included a $
before the name of the variable. That's not a typo! On the command line, $
before a word indicates that we're looking for a variable with the following
name. Executing the command echo PATH would simply print out the word "PATH".
You might see a risk from this process right away: what happens if we have two
different versions of the same program? Bash will call whichever version of the
program it finds first in your PATH! If you're unsure which version of an
application Bash is going to run, you can use the which command:
$ which echo /bin/echo
This output means Bash is going to run the application found at /bin/echo
every time you enter a command beginning with "echo". If which returns a
different version than you'd like to be running, you'll need to modify your
PATH, which we'll discuss as part of our customization options.
Speaking of customizations: that's the shell's secondary purpose! Your shell
makes things uniquely yours in a few different ways. The first is environment
variables. These are variables that are stored in memory and made available to
running applications by the shell. PATH is an example of an environment
variable. Another is HOME, which stores the location of your home directory.
You can see all your environment variables with the env command, but be
prepared to scroll! The list can get pretty long.
Other customizations include scripts, command aliases, and your prompt. We'll
discuss these more as we dig into deeper customization options in this and
future lessons.
246.5. From the command line to the screen
It can be helpful to have a high-level overview of what's happening after you
press "Enter" on the command line. Check out the diagram below to see how your
command goes from keyboard to the monitor.

Your shell's defaults (which may differ from system to system) are likely not
doing a lot to help you. They're meant to get things up and going quickly, but
you'll want to expand on them to suit your own tastes! Let's talk about how to
make changes to your shell.
247.1. Startup files
The easiest way to make changes to the shell is directly from the command line.
For instance, you can use the export command to change/initialize a new
environment variable:
$ export NEW_VARIABLE=value
However, if you close your current terminal or open a new one, your environment
variable will no longer be present! To persist environment variables and other
customization settings, you'll need to put them in a file.
Bash supports several files intended for you to customize: .profile,
.bash_profile and .bashrc.
Zsh supports several customization files as well, but we will only need to use
.zshrc for most setups.
Each of these customization files are found in your home directory and are
hidden (as indicated by the . at the beginning of filename).
These customization files are sometimes referred to as dotfiles.
These startup files are executed automatically at different times when
you start your shell.
247.2. Bash startup files
The .bash_profile or .profile are executed when bash is started with a
-l or --login command line flag. This is called a login shell. If you
run bash without this commmand line flag it instead is a non-login shell and
runs the .bashrc file.
To add a little complexity, Bash will run the .profile only if there isn't a
bash_profile.
Now to confuse matters even more, often the .bash_profile will have a snippet of
code in it that executes the .bashrc as well (this is the default on Ubuntu
for instance)
To read more about which files Bash runs at which times at this link:
https://www.gnu.org/software/bash/manual/html_node/Bash-Startup-Files.html
247.3. Zsh startup files
The .zshrc file is started anytime you start Zsh for both login shells and
non-login shells. It does have a .zlogin file which is only executed on
login shells but since .zshrc loads on both most Zsh users don't use .zlogin
and instead put all their customizations in .zshrc.
To read more about all Zsh's various startup files you can follow this link:
http://zsh.sourceforge.net/Intro/intro_3.html
248. To Login or Not to Login
So how can you tell if you have a login shell or a non-login shell? It depends
on how your operating system works.
248.1. macOS
On macOS prior to Catalina if you open the Terminal
application, it runs Bash as a login shell and therefore runs the
.bash_profile on every terminal window you open.
After macOS Catalina, if you open the Terminal application it launches Zsh
as a login shell and therefore runs both .zlogin and .zshrc.
248.2. Windows using WSL
On Windows using WSL, the Windows Ubuntu terminal app runs every bash
as a login-shell and therefore will run the .profile.
248.3. Ubuntu Linux
On Ubuntu Linux, by default the .profile is executed when
you login to the Ubuntu Desktop. Ubuntu does not include .bash_profile by
default. Then when you open the Terminal application, it runs each bash as a
non-login shell which only runs .bashrc.
This can be somewhat frustrating to have to logout of the Ubuntu Desktop and
login back in each time you change your startup file. So instead you can change
the Terminal application to run each shell as a login shell by checking this
checkbox in the Terminal preferences that reads "Run command as a login shell"
![Ubuntu Terminal]
248.4. Visual Studio Code
When you use Visual Studio Code's integrated terminal, on macOS it defaults
to being a login shell, while on Linux and Windows it does not.
You can change the integrated shell in vscode on Ubuntu and Windows using WSL
by modifying or adding these settings in the VSCode settings.json file.
"terminal.integrated.shell.linux": "bash", "terminal.integrated.shellArgs.linux": [ "-l" ]
If you use macOS Catalina, VSCode will still default to bash in it's integrated
shell, so you can set it to use Zsh like so:
"terminal.integrated.shell.osx": "zsh", "terminal.integrated.shellArgs.osx": [ "-l" ]
248.5. Whew this seems complicated, can you just tell me which file to use?
Sure, here's our recommendations on how to customize your system depending on
platform to have the best results.
248.5.1. macOS Catalina with Zsh
- Put your customizations into your
.zshrcfile. - Change Visual Studio Code to use
zshas it's shell.
248.5.2. macOS pre-Catalina with Bash
- Put your customizations into your
.bash_profilefile.
248.5.3. Ubuntu Linux
- Change your terminal to open login shells
- Put your customization into your
.profilefile. - Change Visual Studio Code's integrated terminal to launch login shells as well.
248.5.4. Windows with WSL
- Put your customization into your
.profilefile. - Change Visual Studio Code's integrated terminal to launch login shells as well.
248.6. Customization options
Whew, that's a lot of new jargon & theory! Let's look at some practical examples
of what you can do with your dotfiles in Bash or Zsh.
Adding new options to your dotfiles starts with editing them.
You can open them directly from the command line using VS Code:
$ code ~/.bash_profile # OR $ code ~/.bashrc # OR for Zsh % code ~/.zshrc
Once you've saved your changes, you'll need to load any updated files into your
shell. You can do ths with the source command. source will execute the file
it's given, updating your currently-running environment with any changes you've
made:
# For Bash $ source ~/.bash_profile
OR
# For Zsh % source ~/.zshrc
One of the most common customizations are environment variables. These should
always be capitalized & use underscores instead of spaces to delineate words.
Here are a couple examples of code customizing environment variables, along with
comments explaining how each works.
# The simplest option: adding a totally new environment variable. export FAVORITE_COLOR=blue # Let's overwrite an existing environment variable with our own. export HOME=/User/Student/Home # Time to get get more creative: what if we want to _prepend_ # to the PATH variable, instead of overwriting it if it exists? export PATH=/User/Student/Applications:$PATH
In that last example, notice how we used $ before PATH. The dollar sign
indicates that we're referencing a variable. Bash will replace $PATH with the
value of the PATH variable, so we're effectively adding our own directory to
the beginning of the PATH variable. You'll see this technique used a lot
in dotfiles.
Another common customization is aliasing. An alias is a shorthand way of
running a command. You might alias because a command is very long to type, or to
modify the system's default behavior! Here are some examples:
# Here's a Git alias that will save you a few keystrokes. alias gst="git status" # Some more Git magic: show the short log with an even shorter command! alias glog="git log --oneline" # By default, 'rm' will remove the file you pass it. The '-i' # option makes 'rm' ask you "Are you sure?" before removing the # given file. This is a great safety net to have while you're learning! alias rm="rm -i"
Don't forget to source your dotfiles if you're following along!
Entering an alias on the command line makes the aliased command act just like
the full command was entered. You can still pass arguments like you normally
would! Here are some "before & after" examples of our aliases in action:


We're diving deeper behind the scenes of our terminal & operating system, and
hopefully you're beginning to understand how things work together! You should
now be comfortable with:
- What a "shell" is in computer terms,
- explaining, at a very high level, how your computer interprets your commands,
- reading and redefining the
PATHenvironment variable, - and customizing your system via dotfiles
[prior to Catalina which uses Zsh]: https://support.apple.com/en-us/HT208050
[Zsh in macoS Catalina]: https://support.apple.com/en-us/HT208050
[Ubuntu Terminal]:https://appacademy-open-assets.s3-us-west-1.amazonaws.com/Module-Unix/cli/assets/cli-shell-basics-ubuntu-terminal.png
[Terminal]:https://upload.wikimedia.org/wikipedia/commons/thumb/9/9f/DEC_VT100_terminal_transparent.png/675px-DEC_VT100_terminal_transparent.png at the command line.
Learning the commands you can use is important, but it's even more important to
build a foundational understanding of where those commands go! Let's get under
the hood and discuss the shell.
You'll learn: - What a "shell" is,
- Shell-specific files and how to customize them,
- How commands are executed from the command line.
250. No turtles here!
We've used the word "shell" a few times with no context. Let's fix that now! A
shell in computing terms is the software layer that translates your command
line instructions into actual commands. Generally speaking, the shell serves two
purposes: Calling applications using your input and supporting user
environments/customization.
The shell is a small part of the much larger operating system, the software
that sits between your input and the microchips inside your computer. The
operating system, or OS, translates your actions all the way down into machine
instructions that can be processed by your CPU. You've heard of the most popular
OSes out there: Windows, macOS, and Linux.
250.1. Selling C shells by the seashore
Like most things in web development, many people have strong opinions about
which shell is best. There are many shells available that you can install & use,
each with its own idiosyncrasies.
In our lessons, we'll focus on two shells, the Bash shell and Zsh.
Bash has been around for a little over 30 years and has been battle-tested on
the most popular operating systems on the web. The biggest Linux operating
systems all use it as the default shell, and macOS has used it as the default
until switching to [Zsh in macoS Catalina].
Zsh is now the default shell in macOS Catalina and has been in use since the
1990s and has a strong following amongst linux users.
You'll want to keep which shell you use in mind as you search for help with
command line problems, as an answer intended for one shell may not work with
your shell.
One nice thing about Zsh is it's scripting compatibility with Bash. Which means
a shell script written for Bash will work in Zsh, although the opposite is not
always true.
250.2. Shells vs Terminals
Your operating system may have an application called a "Terminal". It's good to
note that a terminal is not a shell and a shell is not a terminal. Terminal
applications are really emulating a piece of hardware known as a terminal which
nobody really uses anymore.
![Terminal]
So we emulate a terminal using an application on our computers. The Terminal
application will then execute the shell and it will give us a prompt so we can
then type commands.
250.3. Shell Prompts
You'll notice your shell prompts you to type something by putting either a $
or a % before the cursor. Bash uses $ by default while Zsh uses a %.
But
there's one more character you may see as your prompt character and that is
#. This appears if you are logged in as root, the unix superuser. Since with
great power comes great responsibility, whenever we see the # prompt we want
to be careful what we type because we could delete system files or cause files
to have the wrong permissions if we aren't absolutely sure what we are doing.
250.4. Two purposes
A shell's primary purpose is to interpret your commands. It does this by looking
for applications installed on your computer and sharing any arguments or
environment-specific data they need. Let's think about the following command,
which will print the word "Test" to your terminal:
$ echo Test
In this command, echo refers to a program called "echo", while Test is an
argument you've given the program. Bash doesn't know what echo does, only that
it needs to find an application with that name and give it the word "Test". The
shell trusts the application will handle this input appropriately.
Bash searches for applications using the PATH variable. PATH is a special
variable that's available system-wide and includes all the directories you might
store applications in. You can view your own PATH using that echo utility:
$ echo $PATH
You should see a list of directory paths separated by colons. When you run a
command, your shell extracts the application name from the command and starts
going through the PATH, directory by directory, looking for that name. Once it
finds it, it passes along your input (or just starts the application, if there's
no input available), and stops looking.
Note that we didn't just write echo PATH above. Instead, we included a $
before the name of the variable. That's not a typo! On the command line, $
before a word indicates that we're looking for a variable with the following
name. Executing the command echo PATH would simply print out the word "PATH".
You might see a risk from this process right away: what happens if we have two
different versions of the same program? Bash will call whichever version of the
program it finds first in your PATH! If you're unsure which version of an
application Bash is going to run, you can use the which command:
$ which echo /bin/echo
This output means Bash is going to run the application found at /bin/echo
every time you enter a command beginning with "echo". If which returns a
different version than you'd like to be running, you'll need to modify your
PATH, which we'll discuss as part of our customization options.
Speaking of customizations: that's the shell's secondary purpose! Your shell
makes things uniquely yours in a few different ways. The first is environment
variables. These are variables that are stored in memory and made available to
running applications by the shell. PATH is an example of an environment
variable. Another is HOME, which stores the location of your home directory.
You can see all your environment variables with the env command, but be
prepared to scroll! The list can get pretty long.
Other customizations include scripts, command aliases, and your prompt. We'll
discuss these more as we dig into deeper customization options in this and
future lessons.
250.5. From the command line to the screen
It can be helpful to have a high-level overview of what's happening after you
press "Enter" on the command line. Check out the diagram below to see how your
command goes from keyboard to the monitor.
Your shell's defaults (which may differ from system to system) are likely not
doing a lot to help you. They're meant to get things up and going quickly, but
you'll want to expand on them to suit your own tastes! Let's talk about how to
make changes to your shell.
251.1. Startup files
The easiest way to make changes to the shell is directly from the command line.
For instance, you can use the export command to change/initialize a new
environment variable:
$ export NEW_VARIABLE=value
However, if you close your current terminal or open a new one, your environment
variable will no longer be present! To persist environment variables and other
customization settings, you'll need to put them in a file.
Bash supports several files intended for you to customize: .profile,
.bash_profile and .bashrc.
Zsh supports several customization files as well, but we will only need to use
.zshrc for most setups.
Each of these customization files are found in your home directory and are
hidden (as indicated by the . at the beginning of filename).
These customization files are sometimes referred to as dotfiles.
These startup files are executed automatically at different times when
you start your shell.
251.2. Bash startup files
The .bash_profile or .profile are executed when bash is started with a
-l or --login command line flag. This is called a login shell. If you
run bash without this commmand line flag it instead is a non-login shell and
runs the .bashrc file.
To add a little complexity, Bash will run the .profile only if there isn't a
bash_profile.
Now to confuse matters even more, often the .bash_profile will have a snippet of
code in it that executes the .bashrc as well (this is the default on Ubuntu
for instance)
To read more about which files Bash runs at which times at this link:
https://www.gnu.org/software/bash/manual/html_node/Bash-Startup-Files.html
251.3. Zsh startup files
The .zshrc file is started anytime you start Zsh for both login shells and
non-login shells. It does have a .zlogin file which is only executed on
login shells but since .zshrc loads on both most Zsh users don't use .zlogin
and instead put all their customizations in .zshrc.
To read more about all Zsh's various startup files you can follow this link:
http://zsh.sourceforge.net/Intro/intro_3.html
252. To Login or Not to Login
So how can you tell if you have a login shell or a non-login shell? It depends
on how your operating system works.
252.1. macOS
On macOS prior to Catalina if you open the Terminal
application, it runs Bash as a login shell and therefore runs the
.bash_profile on every terminal window you open.
After macOS Catalina, if you open the Terminal application it launches Zsh
as a login shell and therefore runs both .zlogin and .zshrc.
252.2. Windows using WSL
On Windows using WSL, the Windows Ubuntu terminal app runs every bash
as a login-shell and therefore will run the .profile.
252.3. Ubuntu Linux
On Ubuntu Linux, by default the .profile is executed when
you login to the Ubuntu Desktop. Ubuntu does not include .bash_profile by
default. Then when you open the Terminal application, it runs each bash as a
non-login shell which only runs .bashrc.
This can be somewhat frustrating to have to logout of the Ubuntu Desktop and
login back in each time you change your startup file. So instead you can change
the Terminal application to run each shell as a login shell by checking this
checkbox in the Terminal preferences that reads "Run command as a login shell"
![Ubuntu Terminal]
252.4. Visual Studio Code
When you use Visual Studio Code's integrated terminal, on macOS it defaults
to being a login shell, while on Linux and Windows it does not.
You can change the integrated shell in vscode on Ubuntu and Windows using WSL
by modifying or adding these settings in the VSCode settings.json file.
"terminal.integrated.shell.linux": "bash", "terminal.integrated.shellArgs.linux": [ "-l" ]
If you use macOS Catalina, VSCode will still default to bash in it's integrated
shell, so you can set it to use Zsh like so:
"terminal.integrated.shell.osx": "zsh", "terminal.integrated.shellArgs.osx": [ "-l" ]
252.5. Whew this seems complicated, can you just tell me which file to use?
Sure, here's our recommendations on how to customize your system depending on
platform to have the best results.
252.5.1. macOS Catalina with Zsh
- Put your customizations into your
.zshrcfile. - Change Visual Studio Code to use
zshas it's shell.
252.5.2. macOS pre-Catalina with Bash
- Put your customizations into your
.bash_profilefile.
252.5.3. Ubuntu Linux
- Change your terminal to open login shells
- Put your customization into your
.profilefile. - Change Visual Studio Code's integrated terminal to launch login shells as well.
252.5.4. Windows with WSL
- Put your customization into your
.profilefile. - Change Visual Studio Code's integrated terminal to launch login shells as well.
252.6. Customization options
Whew, that's a lot of new jargon & theory! Let's look at some practical examples
of what you can do with your dotfiles in Bash or Zsh.
Adding new options to your dotfiles starts with editing them.
You can open them directly from the command line using VS Code:
$ code ~/.bash_profile # OR $ code ~/.bashrc # OR for Zsh % code ~/.zshrc
Once you've saved your changes, you'll need to load any updated files into your
shell. You can do ths with the source command. source will execute the file
it's given, updating your currently-running environment with any changes you've
made:
# For Bash $ source ~/.bash_profile
OR
# For Zsh % source ~/.zshrc
One of the most common customizations are environment variables. These should
always be capitalized & use underscores instead of spaces to delineate words.
Here are a couple examples of code customizing environment variables, along with
comments explaining how each works.
# The simplest option: adding a totally new environment variable. export FAVORITE_COLOR=blue # Let's overwrite an existing environment variable with our own. export HOME=/User/Student/Home # Time to get get more creative: what if we want to _prepend_ # to the PATH variable, instead of overwriting it if it exists? export PATH=/User/Student/Applications:$PATH
In that last example, notice how we used $ before PATH. The dollar sign
indicates that we're referencing a variable. Bash will replace $PATH with the
value of the PATH variable, so we're effectively adding our own directory to
the beginning of the PATH variable. You'll see this technique used a lot
in dotfiles.
Another common customization is aliasing. An alias is a shorthand way of
running a command. You might alias because a command is very long to type, or to
modify the system's default behavior! Here are some examples:
# Here's a Git alias that will save you a few keystrokes. alias gst="git status" # Some more Git magic: show the short log with an even shorter command! alias glog="git log --oneline" # By default, 'rm' will remove the file you pass it. The '-i' # option makes 'rm' ask you "Are you sure?" before removing the # given file. This is a great safety net to have while you're learning! alias rm="rm -i"
Don't forget to source your dotfiles if you're following along!
Entering an alias on the command line makes the aliased command act just like
the full command was entered. You can still pass arguments like you normally
would! Here are some "before & after" examples of our aliases in action:
We're diving deeper behind the scenes of our terminal & operating system, and
hopefully you're beginning to understand how things work together! You should
now be comfortable with:
- What a "shell" is in computer terms,
- explaining, at a very high level, how your computer interprets your commands,
- reading and redefining the
PATHenvironment variable, - and customizing your system via dotfiles
[prior to Catalina which uses Zsh]: https://support.apple.com/en-us/HT208050
[Zsh in macoS Catalina]: https://support.apple.com/en-us/HT208050
[Ubuntu Terminal]:https://appacademy-open-assets.s3-us-west-1.amazonaws.com/Module-Unix/cli/assets/cli-shell-basics-ubuntu-terminal.png
[Terminal]:https://upload.wikimedia.org/wikipedia/commons/thumb/9/9f/DEC_VT100_terminal_transparent.png/675px-DEC_VT100_terminal_transparent.png
Bash Permissions & Scripting
Now that you're familiar with Bash, let's get back to what we're all here for:
PROGRAMMING! We'll discuss the basics of Bash scripting, including:
- Creating a new script file,
- Accepting user input and conditionally responding to it,
- Modifying permissions to make the script executable,
- and choosing how to execute your script (or any other application).
254. Understanding sudo and file permissions
Before we can write any code, we need to get a quick look at file permissions in
UNIX-based operating systems. Without understanding this critical part of file
management, you'll have a difficult time creating new scripts of your own.
Remember the command/option combo ls -al? We'll focus in particular on the
-l command line option, which lists the files in the directory along with
their metadata. This includes their file permissions (also sometimes referred
to as modes). Permissions determine who can access a given file or directory.
Here's an example of what a directory and file look like via ls -al:


While the letters r, w, and x are easy to read, you'll also see a
numeric
notation for file permissions. To convert letter notation to numeric, you'll
need to grant each permission a number value. x is worth 1, w is worth 2,
and r is worth 4. Now, tally up points for each group and write them out side
by side.
From our example above, we'd get 644. This is the numeric notation for the
permissions of my-shared-timeline.zip. You'll sometimes see these numeric
formats referenced in documentation or Bash error messages, so it's good to know
how to read them even if you don't use them often!
Numeric permissions are presented in octal notation. You can read a few more
details about how this works on [LinuxCommand.org][LinuxCommand octal
permissions].
254.2. Modifying permissions
We're not stuck with the permissions a file starts with! We can use the chmod
command to update the permissions of a file ourselves. chmod, short for
"change mode", dates back to the early days of UNIX. You may hear
it
pronounced as "cha-mod", "see-aych-mod", or even referred to as "change mod".
Let's say we've written a cool "How To" guide that we'd like to share with all
users of our system. Assume we're starting with permissions where the owner can
read or update the file but no one else can even read it (-rw------- or
600).
To change this so that anyone on the system can read it, we could run:
> chmod +r my-guide.txt
This is saying "Add the 'r' permission for all users who try to access
my-guide.txt.
To revoke that permission, you can exchange + for -:
> chmod -r my-guide.txt
Uh oh! If we check my-guide now, we'll see that we're not back at -rw-------
- we're now at
--w------! When you change permissions using letter notation
and don't specify a target group, the change affects all three groups at
once. You can scope this down by preceding the operator with eitheru(for
user, meaning the file's owner),g(for the file's owning group),
ando(for others).
Let's add read permissions back for the owner:
> chmod u+r my-guide.txt
Perfect! Now we've reverted our permissions back to their original state.
254.3. Ignoring permissions entirely with sudo
Most systems include a root user that has total authority. The root user can
run applications and change files indiscriminately. With that much power, it's
hard to keep a system safe! For this reason, it's a bad practice to log in as
root.
To keep us from having to memorize both our own password and that of the root
account for every system, we've got a helpful command called sudo. sudo is
short for "Super User Do", and as the name implies it
allows you to
impersonate the root user for a particular task.
sudo is inherently dangerous. Every time you use it, you're at risk of
doing real damage to the system you're on. While there are some [advanced
safeguards & security features][sudo manpage] for the sudo command, it's best
to use is sparingly if at all.
Generally, applications will provide a message letting you know if sudo is
needed. This might include installing new applications or browsing system
configuration files. These decisions are only as safe as you make them, so be
sure you're confident about the changes you're making before using sudo.
There's a common trap we've mentioned before where sudo comes up frequently:
the rm command. Using rm indiscriminately as an unprivileged user can cause
you some frustration but is unlikely to do any permanent damage. Using sudo rm
in any capacity can wreak havoc on a system and may result in significant data
loss.
Never use sudo with rm or with code from the internet that you don't
understand!
255. Bash scripting
Let's talk about scripting. We've used the word "script" quite a few times
already, but what exactly is it? A script is simply a text file that we've
granted permission to execute on our system.
You'll have lots of opportunities to run scripts for everything from setting up
your environment on a new computer to installing new applications. Writing your
own scripts is a great way to automate repetitive tasks.
255.1. Script requirements
An effective script requires three things:
- An interpreter directive
- A commented description
- A script body
The interpreter directive (more commonly called the shebang) is the first
line of the script file. It's used by the operating system to know which
application should be used to run your code.
Why "shebang"? This name is a combination of two words: hash, a reference to
the octothorpe symbol (#) and bang, a reference to the exclamation point
(!). Helpfully, the "shebang" nickname will also help you remember in which
order these characters are expected!
Here's an example shebang for a Bash script:
#!/bin/bash
Adding that line to the top of your script file lets the system know that you'd
like to use the application /bin/bash to run your script file. As you learn
more scripting languages, you can change change the shebang to make sure the
script's language matches its executing environment.
The commented description is a best practice. Your script won't fail to run
without it, but saving scripts without comments is a dangerous game - if you
forget what it is or how it works, you won't have any reference to help re-learn
it! Investing a few minutes in a good comment explaining why you're writing this
script will save you a few of hours of headache down the road. Comments in Bash
scripts must be preceded by an octothorpe (#) on each line.
The script body is where the magic happens. Here, you'll write commands just as
you would enter them on your command line, and they'll be sequentially executed
to complete the script. Each line should include a separate command.
255.2. A sample script
Here's a very simple "Hello World!" application in Bash:
#!/bin/bash # "Hello, World!" by Alex Martin # # Prints a friendly message to the screen echo "Hello, World! "
Notice that we've got all three of our key ingredients for a successful script.
All we need is to copy this script into an empty file and make it executable.
255.3. Updating & running a script
Once you've written your script into a new file, you need to make that file
executable. For security, your system won't run just any file! You'll need to
mark it "safe" through the magic of chmod.
Assuming our script is called hello-world, this will make the file executable:
> chmod +x hello-world
We can now run it simply by invoking the file:
> ./hello-world Hello, World!
Notice how we used ./ before the script. This isn't strictly necessary, but
it's a good habit to get into. If we ran just hello-world and happened to have
an application called "hello-world" available in our PATH, we might never make
it to our own script! Preceding the script name with ./ ensures we're going to
the run the script with that name in the current directory.
256. What we've learned
We've covered some of the basics of files and security, and we've looked at
Bash's native scripting support. After this lesson you should be able to:
- explain the basics of file permissions from
ls -loutput, - read and modify file permissions from the command line,
- create and a run a small Bash script.
[LinuxCommand octal permissions]: http://linuxcommand.org/lc3_lts0090.php
[sudo manpage]: http://manpages.ubuntu.com/manpages/trusty/man8/sudo_root.8.html
WEEK-03 DAY-4
Recursion
Recursion Learning Objectives
Below is a complete list of the terminal learning objectives for this lesson.
When you complete this lesson, you should be able to perform each of the
following objectives. These objectives capture how you may be evaluated on the
assessment for this lesson.
- Given a recursive function, identify what is the base case and the recursive
case. - Explain when a recursive solution is appropriate to solving a problem over
an iterative solution. - Write a recursive function that takes in a number, n, argument and
calculates the n-th number of the Fibonacci sequence. - Write a function that calculates a factorial recursively.
- Write a function that calculates an exponent (positive and negative)
recursively. - Write a function that sums all elements of an array recursively.
- Write a function that flattens an arbitrarily nested array into one
dimension. - Given a buggy recursive function that causes a RangeError: Maximum call
stack and examples of correct behavior, debug the function. learning objectives for this lesson.
When you complete this lesson, you should be able to perform each of the
following objectives. These objectives capture how you may be evaluated on the
assessment for this lesson. - Given a recursive function, identify what is the base case and the recursive
case. - Explain when a recursive solution is appropriate to solving a problem over
an iterative solution. - Write a recursive function that takes in a number, n, argument and
calculates the n-th number of the Fibonacci sequence. - Write a function that calculates a factorial recursively.
- Write a function that calculates an exponent (positive and negative)
recursively. - Write a function that sums all elements of an array recursively.
- Write a function that flattens an arbitrarily nested array into one
dimension. - Given a buggy recursive function that causes a RangeError: Maximum call
stack and examples of correct behavior, debug the function.
Re-learning Functions With Recursion
Imagine it's your first day at a new job and your boss has asked you to unpack
some fruit crates. Not too bad, right? Now imagine each crate has smaller crates
inside. Still easy? Consider even smaller crates, nested within one another,
each needing to be unpacked. How long before you throw your hands up in
frustration and walk away?
Sometimes simple tasks get complicated and we need new tools to help us solve
them. Working with digital data is a little like working with those crates: they
may be simple to unpack, or they may be incredibly dense! Let's explore a new
way of approaching problems: recursion.
We'll cover:
- what recursion is and how to identify it,
- implementing recursive functions,
- and breaking complex problems down into simpler tasks.
257. Re-what now?
So far, we've solved complex problems with iteration: the process of counting
through each item in a collection. Like most things in programming, though,
there's another way! Let's check out recursion: the process of calling a
function within itself.
To wrap your mind around this new concept, think back to that example of crates
within crates. If we have to gently unpack each crate but we don't know the
contents, we'll have to go one-by-one through each crate, pulling items out
individually. Let's think about a better way! What if we open each crate and
look inside. If it's more crates, we dump them out. If it's fruit, we gently
remove the fruit and set it aside.
What might this process look like in code? Here's some pseudocode to help us
think through it:
function gentlyUnpackFruit(contents) { console.log("Your " + contents + " have been unpacked!"); } function dump(crate) { if (crate.content_type === "crate") { dump(crate.contents); } else if (crate.content_type === "fruit") { gentlyUnpackFruit(crate.contents); } }
Notice how we call the dump function from within the dump
function.
That's recursion in action! The dump function may recurse if we have crates
nested within each other.
257.1. A note on language
You'll notice we've used the term recurse here, which you may not have heard
before. Technically, the root word in "recursion" is "recur", but this is
ambiguous. Consider these two examples:
console.log("Hello"); console.log("Hello"); // versus... console.log(console.log("Hello"));
Both of these functions recur (as in, call the console.log function more
than once), but only one of these functions is recursive (as in, calling
console.log from within another console.log). To reduce confusion,
researchers began using the term ["recurse"][1] to refer specifically to
functions that are being called from within themselves. Creating a new word by
removing a suffix in this way is known as back-formation.
We'll prefer "recurse" when discussing this topic, but you may see "recur" in
other places! Carefully read the context and make sure you understand how these
words might differ. Interviewers may use the terms interchangeably to trip you
up, but we know you'll be ready for the challenge!
258. Two cases
Understanding recursion means understanding the two cases, or expected output
for a particular input, in a recursive function. These are known as the base
case and recursive case.
- The base case describes the situation where data passed into our function is
processed without any additional recursion. When the base case is executed,
the function runs once and ends. Since this results in the function stopping,
we may also refer to this as the terminating case. - The recursive case, as the name suggests, is the situation where the
function recurses. This represents the data state that causes a function to
call itself. Without a recursive case, a function's just another function!
In our fruit crate example, the base case is "when the crate contains fruit" and
the recursive case is "when the crate contains other crates". When we encounter
fruit, we remove the fruit and the action is complete. However, when we
encounter more crates, we go back to the start and repeat the whole process
again.
Identifying these cases for a process won't always be that simple, but it's
critical to figure out each one before writing any code. Without a recursive
case, we don't need recursion at all, and we should consider an alternative
approach. Without a base case, we might be creating an infinite loop - yikes!
We need to know when to stop the process before we start it.
259. A recursive example
Let's look at a more practical problem you might encounter in the wild. We're
going to use the "Movie Theater Problem" to demonstrate how recursion can help
us with a real world issue.
Imagine you're meeting a friend in a movie theater. The lights have gone down,
it's totally dark, and your friend just sent you a message asking which row
you're seated in. Without being able to see the rows or your ticket, how might
you figure out the row number?
Let's assume a few things:
- The theater is mostly occupied, so you can rely on people being in front of &
behind you. - You don't want to knock over anyone's drinks & snacks, so you must remain in
your seat. - Your phone is almost dead, so you can't use the flashlight or screen to
illuminate the seats - no cheating!
What if we tap the person in front of us on the shoulder? If there's someone in
front of us, we know that we're at least one row back from the front of the
theater. If someone is in front of them, we're at least two rows back!
This pattern continues until we reach the screen.
If each person performs this action and they all report back, we can
count how many rows back we are! We've missed a key part in this analysis,
though - when do we stop tapping each other? If someone reaches forward and
there's no one else in front of them, we can assume we've reached the front of
the theater. That person becomes "Row #1", and our test stops.
In this example, our base case is "No one in front of me = Row #1" and our
recursive case is "Someone in front of me = Row #(1 + person in front of me's
row #)". Now the we know both cases, we can build a recursive function out of
them! Here's what this might look like in JavaScript:
determineRow = function(moviegoer) { if (moviegoer.personInFront) { return 1 + determineRow(moviegoer.personInFront); } else { return 1; } }
Now it doesn't matter if our movie theater has 5 rows or 5,000 rows - we have a
tool to figure out where we are at any time. We've also gone through an
important exercise in understanding our space to get here! By working to our
sides instead of in front of us, we could use the same process to figure out
exactly which seat we're in on the row.
260. What we've learned
Whew! If your head is spinning, don't worry - it's totally natural. Recursion
can get a lot mre complex than what we've covered here, but it comes down to
working smarter, not harder. We'll dig a little deeper into advanced recursion
and how to know when to build a recursive function in our next lesson.
Check out Computerphile's What on Earth is
Recursion? to learn more about recursion and the stack.
After completing the reading and video, you should be able to:
- define recursion,
- explain its use,
- and identify a simple base & recursive case in a problem.
[1]: https://en.wiktionary.org/wiki/recurse
When To Hold & When To Fold(Fold(Fold())): Recursion vs. Iteration
We know what recursion is, but to truly understand what's happening, we need
to go deeper! Let's investigate the process of recursion and build a better
understanding of the risks involved.
We'll cover:
- recursion and the call stack,
- differentiating recursive and iterative functions,
- and know when to use each tool for maximum effect.
261. A deeper dive into recursion
Learning about recursion requires that we review the call stack. Remember that
each function call in JavaScript pushes a new stack frame onto the top of
the call stack, and the last pushed frame gets popped off as it gets executed.
We sometimes refer to this as a Last In, First Out, or LIFO, stack.
Here's an example to jog your memory:
![Stack trace reminder from "Call Stack" lesson][stack-trace-04]
Recursive functions risk placing extra load on the call stack. Each recursive
function call depends on the call before it, meaning we can't start executing a
recursive function's stack frames until we reach the base case. So what
happens if we never do? Look out!
261.1. London Stack is falling down!
The JavaScript call stack has a size limit which varies between different
browsers and even different systems! Once the stack reaches this limit, we get
what's called a stack overflow. The program halts, the stack gets wiped out
entirely, and we're left with no results wondering what we did wrong.
![Stack overflow example with call stack][stack-overflow]
Let's look at an example of an obvious stack overflow issue:
function pythagoreanCup() { pythagoreanCup(); }; pythagoreanCup();
Output:
Uncaught RangeError: Maximum call stack size exceeded
at pythagoreanCup (<anonymous>)
at pythagoreanCup (<anonymous>)
at pythagoreanCup (<anonymous>)
at pythagoreanCup (<anonymous>)
at pythagoreanCup (<anonymous>)
...
The function pythagoreanCup is clearly recursive, since it calls itself, but
we're missing a base case to work towards! This means the function will recurse
until the call stack overflows, resulting in a RangeError. Whoops! Notice that
in our stack trace (the output below the error name & message), we can see
that pythagoreanCup is the only function currently in the call stack.
Fixing the overflow issue in this case is straightforward: determine a base case
and implement it in your function. Here's a fixed version of the example above
with some extra comments:
let justEnoughWine = false; function pythagoreanCup() { // Base case: // - Is `justEnoughWine` true? Return & exit. if (justEnoughWine === true) { console.log("That's plenty, thanks!"); return true; } // Recursive case: // - justEnoughWine must not have been true, // so let's set it and check again. justEnoughWine = true; pythagoreanCup(); }; pythagoreanCup();
Output:
"That's plenty, thanks!"
The stack size limit varies due to different implementations: some JavaScript
environments might have a fixed limit, while others will rely on available
memory on your computer. Regardless of your environment, if you're receiving
RangeErrors, you should refactor your function! It's bad practice to build
software that only runs in one particular browser or using a specific runtime.
261.2. Step by step
Notice that our change to pythagoreanCup did two things:
- Provided a base case that lets us end the recursion,
- and added an action that moves us towards the base case.
Without changing the value ofjustEnoughWine, we would never enter the base
case and our stack would still be at risk of growing out of control.
We refer to the action that gets us closer to the base case as the recursive
step. Don't forget to build this step into your function! Your base case
doesn't mean anything if you're not moving towards it with each recurrence.
261.3. Types of recursion
Our examples of recursion so far have involved a single function calling itself.
We refer to this situation as direct recursion: functions directly calling
themselves. There's a trickier type of recursion to debug, though. Take a look
at the following example:
function didYouDoTheThing() { ofCourseIDidTheThing(); } function ofCourseIDidTheThing() { didYouDoTheThing(); } didYouDoTheThing();
Uh oh! Neither of these functions appears to be recursive by itself, but calling
either of them will put us into a recursive loop with no base case in sight. We
refer to recursive loops across multiple functions as indirect recursion.
There's nothing wrong with using this technique, but be careful! Because the
call stack will have multiple function names in it, debugging problems with
indirectly recursive functions can be a headache.
262. When to iterate, when to recur
Alright, slow down, programmers. Before you rewrite all your recent projects to
use recursive functions, let's investigate why you might choose iteration
instead.
Remember that iteration is when we call a function for each member of a
collection, instead of letting the function call itself. So far, the code you've
written using for loops and iterator functions like .forEach has been
iterative. Iterative code tends to be less resource-intensive than recursive
code, and it requires less planning to get working. It's also usually easier to
read & understand - an important thing to consider when writing software!
Iterative approaches tend to break down when our data becomes very complex or
very large. Consider the task of sorting paper folders by the number of files
in each. If you only had a few folders, this wouldn't be very daunting, and you
could take an iterative approach: open each folder individually, count the
files, and place the folders in the correct order.
However, if you had thousands or even millions of folders, iteration would take
days instead of minutes. You'd want time to implement a system for getting
through those folders efficiently, and that system would likely involve a
procedure for ordering in batches. This is exactly what recursive functions do
best: repetitive processes on subsets of given data.
Consider recursion when your inputs are unpredictable, large, or highly complex.
Otherwise, iteration will almost always be the best approach. We'll look at lots
of examples to help you get a feel for this before someone asks you to identify
the best approach to a given problem in an interview
263. Compare these approaches
Before we move on, let's compare an iterative & recursive approach with each
other. We'll create a countdown function that takes a number and counts down
from that number to zero.
Here's an iterative approach:
countdown(startingNumber) { for(let i = startingNumber; i > 0; i--) { console.log(i); } console.log("Time's up!"); }
For comparison, a recursive approach:
countdown(startingNumber) { if (startingNumber === 0) { console.log("Time's up!"); return; } console.log(startingNumber); countdown(startingNumber - 1); }
Can you identify the base case, recursive case, and recursive step?
264. What we've learned
We're now equipped to solve problems of varying complexity with two different
approaches! Don't forget to be considerate of which approach might be best for
new challenges you encounter.
After completing this lesson, you should be able to:
- define "stack overflow" and debug functions causing one,
- differentiate between iterative and recursive functions,
- and identify good candidates for each type of approach.
[stack-trace-04]:
https://appacademy-open-assets.s3-us-west-1.amazonaws.com/Module-JavaScript/asynchronous-functions/assets/stack-trace/04.png
[stack-overflow]:
https://appacademy-open-assets.s3-us-west-1.amazonaws.com/Module-JavaScript/recursion/assets/image-recursion-stack-overflow.png
Recursion Problems
Here we go(go(go()))! It's time to flex your coding muscles on recursion. For
each problem, implement a recursive function that satisfies all the listed
requirements. Iterative solutions will be considered incorrect. The problems
aren't dependent on each other and may be completed in any order you wish.
As you complete each problem, use mocha to test your solutions. Make sure
you're in the project's root: you should be in the same place as the problems/
and test/ directories. Once there, run the following command:
> mocha
Having trouble? Reach out to a TA for assistance! Once you've completed the
first 5 problems and all tests are passing, you can move onto the 6th bonus
problem.
We know you've got this!
Debugging A Stack Overflow
Uh oh! We've written a recursive function, but it's throwing an error!
Investigate the included problem and see if you can figure out what's going on.
Once you think you've fixed the issue, use mocha to confirm. Make sure
you're in the project's root: you should be in the same place as the problems/
and test/ directories. Once there, run the following command:
> mocha
If you get stuck, step back and try breaking the problem down. Are we missing
any key steps for a recursive function?
When the tests pass and the error is gone, take a minute to celebrate - you're
officially a recursion debugger!
WEEK-03 DAY-5
JS Trivia
JS Trivia Learning Objectives
Below is a complete list of the terminal learning objectives for this lesson.
When you complete this lesson, you should be able to perform each of the
following objectives. These objectives capture how you may be evaluated on the
assessment for this lesson.
- Given a code snippet of a unassigned variable, predict its value.
- Explain why functions are “First Class Objects” in JavaScript
- Define what IIFEs are and explain their use case
- (Whiteboarding) Implement a closure
- Identify JavaScript’s falsey values
- Interpolate a string using back-ticks
- Identify that object keys are strings or symbols
- A primitive type is data that is not an object and therefore cannot have
methods(functions that belong to them). - Given a code snippet where variable and function hoisting occurs, identify
the return value of a function learning objectives for this lesson.
When you complete this lesson, you should be able to perform each of the
following objectives. These objectives capture how you may be evaluated on the
assessment for this lesson. - Given a code snippet of a unassigned variable, predict its value.
- Explain why functions are “First Class Objects” in JavaScript
- Define what IIFEs are and explain their use case
- (Whiteboarding) Implement a closure
- Identify JavaScript’s falsey values
- Interpolate a string using back-ticks
- Identify that object keys are strings or symbols
- A primitive type is data that is not an object and therefore cannot have
methods(functions that belong to them). - Given a code snippet where variable and function hoisting occurs, identify
the return value of a function.
Stop Feeling Iffy about IIFEs!
It's time to learn about some built in JavaScript functionality that will allow
you to define an anonymous function and then immediately run that function as
soon as it has been defined. In JavaScript we call this an Immediately-Invoked
Function Expression or IIFE (pronounced as “iffy”).
When you finish this reading you should be able to identify an
Immediately-Invoked Function Expression, as well as write your own.
265. Quick review of function expressions
Before we get started talking about IIFEs lets quickly do a review of the syntax
anonymous function expressions.
A function expression is when you define a function and assign that function to
a variable:
// here we are assigning a named function declaration to a variable const sayHi = function sayHello() { console.log("Hello, World!"); }; sayHi(); // prints "Hello, World!"
We can also use function expression syntax to assign variables to anonymous
functions effectively giving them names:
// here we are assigning an anonymous function declaration to a variable const sayHi = function() { console.log("Hello, World!"); }; sayHi(); // prints "Hello, World!"
Now what if we only ever wanted to invoke the above anonymous function once? We
didn't want to assign it a name? To do that we can define an Immediately-Invoked
Function Expression.
266. IIFE syntax
An Immediately-Invoked Function Expression is a function that is called
immediately after it had been defined. The typical syntax we use to write an
IIFE is to start by writing an anonymous function and then wrapping that
function with the grouping operator, ( ). After the anonymous function is
wrapped in parenthesis you simply add another pair of closed parenthesis to
invoke your function.
Here is the syntax as described:
// 1. wrap the anonymous function in the grouping operator // 2. invoke the function! (function() { statements; })();
Let's take a look at an example. The below function will be invoked right after
it has been defined:
(function() { console.log("run me immediately!"); })(); // => 'run me immediately!'
Our above function will be defined, invoked, and then will never be invoked
again. What we are doing with the above syntax is forcing JavaScript to run our
function as a function expression and then to invoke that function
expression immediately.
Since an Immediately-Invoked Function Expression is immediately invoked
attempting to assign an IIFE to a variable will return the value of the invoked
function.
Here is an example:
let result = (function() { return "party!"; })(); console.log(result); // prints "party!"
So we can use IIFEs to run an anonymous function immediately and we can still
hold onto the result of that function by assigning the IIFE to a variable.
267. IIFEs keep functions and variables private
Using IIFEs ensures our global namespace remains unpolluted by a ton of function
or variable names we don't intend to reuse. IIFEs can additionally protect
global variables to ensure they can't ever be read or overwritten by our
program. In short using an IIFE is a way of protecting not only the variables
within a function, but the function itself. Let's explore how IIFEs do this.
When learning about scope we talked about how an outer scope does not have
access to an inner scope's variables:
function nameGen() { const bName = "Barry"; console.log(bName); } // we can not reference the bName variable from this outer scope console.log(bName); console.log(nameGen()); // prints "Barry"
Now what if we didn't want our outer scope to be able to access our function at
all? Say we wanted our nameGen function to only be invoked once and not ever
be invoked again or even to be accessible by our application again? This is
where IIFEs come in to the rescue.
One of the main advantages gained by using an IIFE is the very fact that the
function cannot be invoked after the initial invocation. Meaning that no other
part of our program can ever access this function again.
Since we don't ever intend to invoke this function again - there is no point in
assigning a name to our function. Let's take a look at rewriting our nameGen
function using a sneaky IIFE:
(function() { const bName = "Barry"; console.log(bName); })(); // prints "Barry" // we still cannot reference the bName variable from this outer scope // and now we have no hope of ever running the above function above again console.log(bName);
268. What you learned
How to identify an IIFE, as well as how to write one.
Interpolation in JavaScript
When working with the String primitive type in JavaScript, you've probably
noticed it is not always an easy experience adding in variables or working with
multi-line strings. In the ES6 edition of JavaScript one of the new features
that was introduced to help with this problem was the Template Literal. A
Template Literal is a new way to create a string literal that expands on the
syntax of the String primitive type allowing for interpolated expressions to
be inserted easily into strings.
When you finish this reading you should be able to interpolate a string using
template literals.
269. Let's talk syntax
To create a template literal, instead of single quotes (') or double quotes
(") we use the grave character, also known as the backtick (`). Defining a new
string using a template literal is easy - we can simply use backticks to create
that new string:
let apple = `apple`; console.log(apple); // apple
The important thing to know is that a template literal is still a String -
just with some really nifty features! The real benefits of template literals
become more obvious when we start talking about interpolation.
269.1. Interpolation using template literals
One of the main advantages we gain by using template literals is the ability to
interpolate variables or expressions into strings. We do this by denoting the
values we'd like to interpolate by wrapping them within curly braces with a
dollar sign in front(${}). When your code is being run - the variables or
expressions wrapped within the ${} will be evaluated and then will be replaced
with the value of that variable or expression.
Let's take a look at that syntax by looking at a simple example. Compare how
easy to read the following two functions are:
function boringSayHello(name) => { console.log("Hello " + name + "!"); }; function templateSayHello(name) => { console.log(`Hello ${name}!`); }; boringSayHello("Joe"); // prints "Hello Joe!" templateSayHello("Joe"); // prints "Hello Joe!"
As we can see in the above example, the value of the variable is being
interpolated into the string that is being created using the template literal.
This makes our code easier to both write and read.
You'll most often be interpolating variables with template literals, however we
can also interpolate expressions. Here is an example of evaluating an expression
within a template literal:
let string = `Let me tell you ${1 + 1} things!`; console.log(string); // Let me tell you 2 things!
269.2. Multi-line strings using template literals
We can also use template literals to create multi-line strings! Previously we'd
write multi-line strings by doing something like this:
console.log("I am an example\n" + "of an extremely long string");
Using template literals this becomes even easier:
console.log(`I am an example of an extremely long string on multiple lines`);
270. What you learned
How to use template literals to interpolate values into a string.
Object Keys in JavaScript
As we previously covered, the Object type in JavaScript is a data structure that
stores key value pairs. An object's values can be anything: Booleans,
Functions, other Objects, etc. Up to this point we have been using strings as
our object keys. However, as of ES6 edition of JS we can use another data type
to create Object keys: Symbols.
In this reading we'll be talking about the Symbol primitive data type and how
an object's keys can be either a String or a Symbol.
271. A symbol of unique freedom
The main advantage of using the immutable Symbol primitive data type is that
each Symbol value is unique. Once a symbol has been created it
cannot
be recreated.
Let's look at the syntax used to create a new symbol:
// the description is an optional string used for debugging Symbol([description]);
To create a new symbol you call the Symbol() function which will return a new
unique symbol:
const sym1 = Symbol(); console.log(sym1); // Symbol()
Here is an example of how each created symbol is guaranteed to be unique:
const sym1 = Symbol(); const sym2 = Symbol(); console.log(sym1 === sym2); // false
You can additionally pass in an optional description string that will allow
for easier debugging by giving you an identifier for the symbol you are working
with:
const symApple = Symbol("apple"); console.log(symApple); // Symbol(apple)
Don't confuse the optional description string as way to access the Symbol you
defining though - the string value isn't included in the Symbol in anyway. We
can invoke the Symbol() function multiple times with the same description
string and each newly returned symbol will be unique:
const symApple1 = Symbol("apple"); const symApple2 = Symbol("apple"); console.log(symApple1); // Symbol(apple) console.log(symApple2); // Symbol(apple) console.log(symApple1 === symApple2); // false Symbol("foo") === Symbol("foo"); // returns false
Now that we've learned how to define symbols and that symbols are unique it's
time to talk about why you would use a symbol. The main way the Symbol
primitive data type is used in JavaScript is to create unique object keys.
272. Symbols vs. Strings as keys in Objects
Before the ES6 edition of JavaScript Object keys were exclusively strings. We
could you either dot or bracket notation to set or access an object's string
key's value.
Here is a brief refresher on that syntax:
const dog = {}; dog["sound"] = "woof"; dog.age = 4; // using bracket notation with a variable const col = "color"; dog[col] = "grey"; console.log(dog); // { sound: 'woof', age: 4, color: 'grey' }
One of the problems with using strings as object keys is that in the Object type
each key is unique. Meaning that sometimes we could inadvertently overwrite a
key's value if we mistakenly try to reassign the same key name twice:
const dog = {}; // I set an 'id' key value pair on my dog dog["id"] = 39; // Here imagine someone else comes into my code base and // accidentally adds another key with the same name! dog.id = 42; console.log(dog); // { id: 42 }
When a computer program attempts to use the same variable name twice for
different values we call this a name collision. While the above code snippet
is a contrived example, it is a good demonstration of a common issue. Further on
in this course you'll find yourself installing many code libraries (like the
mocha test library) for each project you work on. The more libraries that are
imported into a single application the greater the chance of a name collision.
I bet you are sensing a unique theme by now. Using Symbols as your object
keys is a great way to prevent name collision on objects because Symbols are
unique!
Let take a took at how we could fix the above code snippet using symbols:
const dog = {}; const dogId = Symbol("id"); dog[dogId] = 39; const secondDogId = Symbol("id"); dog[secondDogId] = 42; console.log(dog[dogId]); // 39 console.log(dog); // { [Symbol(id)]: 39, [Symbol(id)]: 42 }
Note above that we can access our key value pair using bracket notation and
passing in the variable we assigned our symbol to (in this case dogId).
272.1. Iterating through objects with symbol keys
One of the other ways that Symbols differ from String keys in an object is
the way we iterate through an object. Since Symbols are relatively new to
JavaScript older Object iteration methods don't know about them.
This includes using for...each and Object.keys():
const name = Symbol("name"); const dog = { age: 29 }; dog[name] = "Fido"; console.log(dog); // { age: 29, [Symbol(name)]: 'Fido' } console.log(Object.keys(dog)); // prints ["age"] for (let key in dog) { console.log(key); } // prints age
This provides an additional bonus to using symbols as object keys because your
symbol keys that much more hidden (and safe) if they aren't accessible via the
normal object iteration methods.
If we do want to access all the symbols in an object we can use the built in
Object.getOwnPropertySymbols(). Let's take a look at that:
const name = Symbol("name"); const dog = { age: 29, // when defining an object we can use square brackets within an object to // interpolate a variable key [name]: "Fido" }; Object.getOwnPropertySymbols(dog); // prints [Symbol(name)];
Using symbols as object keys has some advantages in your local code but they
become really beneficial when dealing with importing larger libraries of code
into your own projects. The more code imported into one place means the more
variables floating around which leads to a greater chance of a name collisions -
which can lead to some really devious debugging.
273. What you learned
There are two primitive data types that can be used to create keys on an Object
in JavaScript: Strings and Symbols. The main advantage to using a
Symbol
as an object's key is that Symbols are guaranteed to be unique.
274. Primitive Data Types in Depth
It's time to dive deeper into the world of JavaScript data types! Previously, we
learned about the difference between the Primitive and Reference data types. The
main difference we covered between the two data types is that primitive types
are immutable, meaning they cannot change. It's now time to dive a little deeper
into this subject and talk about how primitive data types are not just immutable
in terms of reassignment - and also because we are not able to define new
methods on primitive data types in JavaScript.
At the end of this reading you you be able to identify why primitive types do
not have methods.
275. Data types in JavaScript
With the JavaScript ECMAScript 2015 release, there are now eight different data
types in JavaScript. There are seven primitive types and one reference type.
Below we have listed JS data types along with a brief description of each type.
Primitive Types:
Boolean-trueandfalseNull- represents the intentional absence of value.Undefined- default return value for many things in JavaScript.Number- like the numbers we usually use (15,4,42)String- ordered collection of characters ('apple')Symbol- new to ES5 a symbol is a unique primitive valueBigInt- a data type that can represent larger integers than theNumber
type can safely handle.
One Reference Type:Object- a collection of properties and methods
As we have previously discussed one of the main differences between primitive
and reference data types in JavaScript is that primitive data types are
immutable, meaning that they cannot be changed. The other main thing that
sets primitives apart is that primitive data types are not Objects and therefore
do not have methods.
276. Methods and the object type
When we first learned about the Object data type we learned about the definition
of a method. As a reminder, the definition of a method is a function that
belongs to an object.
Here is a simple example:
const corgi = { name: "Ein", func: function() { console.log("This is a method!"); } }; corgi.func(); // prints "This is a method!"
The Object type is the only data type in JavaScript that has methods. Meaning
that primitive data types cannot have methods. That's right - we cannot
declare new methods or use any methods on JavaScript primitive data types
because they are Objects.
For example when finding the square root of a number in JavaScript we would do
the following:
// This works because we are calling the Math object's method sqrt let num = Math.sqrt(25); // 5 // This will NOT work because the Number primitive has NO METHODS let num = 25.sqrt; // SyntaxError: Invalid or unexpected token
The Number primitive data type above (25) does not have a sqrt method
because only Objects in JavaScript can have methods. To sum up the previous
sections: Primitive data types are not Objects therefore they do not have
methods.
277. Primitives with object wrappers
Right now you might be thinking - wait a second what about the string type?
After all, we can call String#toUpperCase on an instance of a string? Well
that is because of how the string type is implemented in JavaScript.
The underlying primitive data type of String does not have methods. However,
to make the String data type easier to work with in JavaScript it is implemented
using a String object that wraps around the String primitive data type.
This means that the String object will be responsible for constructing new
String primitive data types as well as allowing us to call methods upon it
because it is an Object.
We'll be diving a lot more into this concept when we get to JavaScript Classes
but for brevity's sake we are going to do a walkthough of the code snippet below
to clarify the difference between the String primitive type, and the String
object that wraps around it:
let str1 = "apple"; str1.toUpperCase(); // returns APPLE let str2 = str1.toUpperCase(); console.log(str1); //prints apple console.log(str2); //prints APPLE
So in the above example when we call str1.toUpperCase() we are calling that on
the String object that wraps around the String primitive type.
This is why in the above example when we console.log both str1 and str2
we
can see they are different. The value of str1 has not changed because it
can't - the String primitive type is immutable. The str2 variable
calls
the String#toUpperCase method on the String object which wraps around the
String primitive. This method cannot mutate the String primitive type
itself - it can only point to a new place in memory where the String primitive
for APPLE lives. This is why even though we call str1.toUpperCase() multiple
times the value of that variable will never change until we reassign it.
Don't worry if this is confusing at first, as we dive more into JavaScript
you'll learn more about how JavaScript implements different types of Objects to
try and make writing code as clear as possible.
278. What you learned
The important takeaway here is that primitive data types in JavaScript are not
objects and therefore cannot have methods.
Unassigned Variables in JavaScript
Up this point we've covered a lot of of information about the different ways to
declare a variable in JavaScript. This reading is going to center in on a topic
we've touched on but haven't gone over in great detail: what is the value of a
declared variable with no assigned value?
By the end of this reading you should be able to look at a code snippet and
predict the value of any declared variable that is not assigned a value.
279. The default value of variables
Whenever you declare a let or var variable in JavaScript that variable will
have a name and a value. That is true of let or var variables with
no
assigned value either! When declaring a variable using let or var we can
optionally assign a value to that variable.
Let's take a look at an example of declaring a variable with var:
var hello; console.log(hello); // prints undefined
So when we declare a variable using var the default value assigned to that
variable will be undefined if no value is assigned.
The same is true of declaring a variable using let. When declaring a variable
using let we can also choose to optionally assign a value:
let goodbye; console.log(goodbye); // prints undefined
However, this is a case where let and const variables differ. When declaring
a variable with const we must provide a value for that variable to be assigned
to.
const goodbye; console.log(goodbye); // SyntaxError: Missing initializer in const declaration
This behavior makes sense because a const variable cannot be reassigned -
meaning that is we don't assign a value when a const variable is declared we'd
never be able to assign a new value!
So the default assigned value of a variable declared using var or let is
undefined, whereas variables declared using const need to be assigned a
value.
280. The difference between default values and hoisting
When talking about default values for variables we should also make sure to
underline the distinction between hoisting variable names and default values.
Let's look at an example:
function hoistBuddy() { var hello; console.log(hello); // prints undefined } hoistBuddy();
Whenever a variable is declared with var that variable's name is hoisted to
the top of its declared scope with a value of undefined until a value is
assigned to that variable name. If we never assign a value to the declared
variable name then the default value of a var declared variable is
undefined.
Now let's take a look at the example above but this time using let:
function hoistBuddy() { let hello; console.log(hello); // prints undefined } hoistBuddy();
The default value of a let declared variable is undefined. However, don't
confuse this with how a let defined variable is hoisted. When a let variable
is declared the name of that variable is hoisted to the top of its declared
scope and if a line of code attempts to interact with that variable before it
has been assigned a value an error is thrown.
The following example shows the difference in hoisting between var and
let declared variables:
function hoistBuddy() { console.log(hello); // prints undefined var hello; console.log(goodbye); // ReferenceError: Cannot access 'goodbye' before initialization let goodbye; } hoistBuddy();
281. What you learned
The default value of a variable assigned with either let or var is
undefined. Variables declared using const need to have an assigned value
upon declaration to be valid.
WhiteBoarding Problem
282. The Question
Write a function named dynamicDivider(divisor). When invoked the
dynamicDivider function will intake a number to be used as a divisor and will
then return a new function. The function returned by dynamicDivider will
accept a number - and that number will then be divided by the divisor that was
defined when the dynamicDivider was first invoked.
Examples:
let halvedbyTwo = dynamicDivider(2); //returns a function halvedbyTwo(12); // returns 6 halvedbyTwo(18); // returns 9 let halvedbyThree = dynamicDivider(3); // returns a function halvedbyThree(12); // returns 4 halvedbyThree(18); // returns 6
283. The Answer
function dynamicDivider(divisor) { // here we are returning an inner function that will create a closure by // closing over and accessing the above divisor argument to use within the // function returned below return function(num) { return num / divisor; }; }
WEEK 4
Intermediate JavaScript (Part 2)
Browser Basics Learning Objectives
- Browsers: They’re The BOM Dot Com!
- The Request-Response Cycle
- Running Scripts In The Browser
- Project: Fresh Cookies In The Window: Come And
Get ‘Em!
- Introduction
- Project overview
- Phase 1: Using a local Node/Express server (Whoa!)
- Phase 2: Add a script on DOM/page load (Practice makes perfect.)
- Phase 3: Set a cookie in the window (Freshly baked!)
- Phase 4: No such thing as just one more cookie
- Phase 5: Gimme all the cookies
- Phase 6: Removing a cookie
- Bonuses: More fun with cookies!
- Bonus A: Open a
new window and resize it based on cookie value (Smells great!)
Element Selection Learning Objectives
- Hello, World DOMination: Element Selection And Placement
- Hello, World DOMination: Inserting Elements in JS File and Script Block
- Hello, World DOMination: Adding a CSS Class After DOM Load Event
- Brush Up On Your HTML
- Hello, World DOMination: Console.log, Element.innerHTML, and the Date Object
- DOM Project: Create a profile page with Javascript
- Event Handling: Common Page Events
- Event Handling: Input Focus and Blur
- Event Handling: Form Validation
- Event Handling: HTML Drag-And-Drop API
- Event Handling: Click Events With Event.target
- Event Handling: The Bubbling Principle
- Project: Event Handling With Mr. Spud Face
- Cookies and Web Storage
- Jason? No, JSON!
- Using Web Storage To Store Data In The Browser
- Project: Shop Local Storage!
- Project overview
- Phase 1: Write a function to store an item in the cart
- Phase 2: Write a function to display the cart items
- Phase 3: Write a function to remove items from the cart
- Check that your shopping cart functions correctly
- Bonus A: Update cart item quantities and reset values
- Bonus B: Calculate the item totals
WEEK-04 DAY-1
Browser Basics
Browser Basics Learning Objectives
Below is a complete list of the terminal learning objectives for this lesson.
When you complete this lesson, you should be able to perform each of the
following objectives. These objectives capture how you may be evaluated on the
assessment for this lesson.
- Explain the difference between the BOM (browser object model) and the
DOM(document object model). - Given a diagram of all the different parts of the Browser identify each part.
Use the Window API to change the innerHeight of a user's window. - Identify the context of an anonymous functions running in the Browser (the
window). - Given a JS file and an HTML file, use a script tag to import the JS file and
execute the code therein when all the elements on the page load (using
DOMContentLoaded) - Given a JS file and an HTML file, use a script tag to import the JS file and
execute the code therein when the page loads - Identify three ways to prevent JS code from executing until an entire HTML
page is loaded - Label a diagram on the Request/Response cycle.
- Explain the Browser's main role in the request/response cycle. (1.Parsing
HTML,CSS, JS 2. Rendering that information to the user by constructing a DOM
tree and rendering it) - Given several detractors - identify which real-world situations could be
implemented with the Web Storage API (shopping cart, forms saving inputs
etc.) - Given a website to visit that depends on cookies (like Amazon), students
should be able to go to that site add something to their cart and then
delete that cookie using the Chrome Developer tools in order to empty their
cart.minal learning objectives for this lesson.
When you complete this lesson, you should be able to perform each of the
following objectives. These objectives capture how you may be evaluated on the
assessment for this lesson. - Explain the difference between the BOM (browser object model) and the
DOM(document object model). - Given a diagram of all the different parts of the Browser identify each part.
Use the Window API to change the innerHeight of a user's window. - Identify the context of an anonymous functions running in the Browser (the
window). - Given a JS file and an HTML file, use a script tag to import the JS file and
execute the code therein when all the elements on the page load (using
DOMContentLoaded) - Given a JS file and an HTML file, use a script tag to import the JS file and
execute the code therein when the page loads - Identify three ways to prevent JS code from executing until an entire HTML
page is loaded - Label a diagram on the Request/Response cycle.
- Explain the Browser's main role in the request/response cycle. (1.Parsing
HTML,CSS, JS 2. Rendering that information to the user by constructing a DOM
tree and rendering it) - Given several detractors - identify which real-world situations could be
implemented with the Web Storage API (shopping cart, forms saving inputs
etc.) - Given a website to visit that depends on cookies (like Amazon), students
should be able to go to that site add something to their cart and then
delete that cookie using the Chrome Developer tools in order to empty their
cart.
Browsers: They’re The BOM Dot Com!
If the Internet exists, but there’s no way to browse it, does it even really
exist? Unless you’ve been living under a rock for the past couple decades, you
should know what a browser is, and you probably use it multiple times a day.
Browsers are something most people take for granted, but behind the scenes is a
complex structure working to display information to users who browse the Web.
Web developers rely on browsers constantly. They can be your best friend or your
worst enemy. (Yes, we’re looking at you, IE!) Spending some time learning
about browsers will help you get a higher-level understanding of how the Web
operates, how to debug, and how to write code that works across browsers. In
this reading, we’ll learn about the BOM (Browser Object Model), how it’s
structured, and how it differs from the DOM (Document Object Model).
284. The DOM vs. the BOM
By now, you’ve learned about the DOM, or Document Object Model, and that it
contains a collection of nodes (HTML elements), that can be accessed and
manipulated. In essence, the document object is a Web page, and the DOM
represents the object hierarchy of that document.
How do we access a document on the Web? Through a browser, of course! If we took
a bird’s-eye view of the browser, we would see that the document object is part
of a [hierarchy of browser objects][1]. This hierarchy is known as the BOM, or
Browser Object Model.
The chief browser object is the window object, which contains properties and
methods we can use to access different objects within the window. These include:
window.navigator- Returns a reference to the navigator object.
window.screen- Returns a reference to the screen object associated with the window.
window.history- Returns a reference to the history object.
window.location- Gets/sets the location, or current URL, of the window object.
window.document, which can be shortened to justdocument- Returns a reference to the document that the window contains.
Note how we can shortenwindow.documenttodocument.For example, the
documentindocument.getElementById(‘id’)actually refers to
window.document. All of the methods above can be shortened in the same way.
- Returns a reference to the document that the window contains.
285. The browser diagram
We started in the DOM, and we stepped outside it into the BOM. Now, let’s take
an even higher view of the browser itself. Take a look at this diagram depicting
a high-level structure of the browser, from [html5rocks.com][2]:

- Review of the DOM, or Document Object Model
- How the BOM differs from the DOM
- The window object and related methods
[1]: http://itwebtutorials.mga.edu/js/chp1/browser-object-model.aspx
[2]: https://www.html5rocks.com/en/tutorials/internals/howbrowserswork/
The Request-Response Cycle
Browsing the Web might seem like magic, but it’s really just a series of
requests and responses. When we search for information or navigate to a
Web page, we are requesting something, and we expect to get a response back.
We can think about the request-response cycle as the communication pattern
between a client, or browser, and a server. Whenever we type a URL into the
address bar of a browser, we are making a request to a server for information
back. The most common of these is an http request.
287. The request-response cycle diagram
Let’s take a look at this diagram of the request-response cycle from
[O’Reily][1]:

As depicted in the diagram, the browser plays a key role in the request-response
cycle. Besides letting the user make the request to the server, the browser
also:
- Parses HTML, CSS, and JS
- Renders that information to the user by constructing and rendering a DOM tree
When we make a successful request to the server, we are able to view a Web page
with content and functionality. Unsuccessful requests prevent the page from
loading and displaying information. You've probably seen a 404 page before!
Understanding the request-response cycle is fundamental to developing for the
Web. If a server is down, or something is wrong with the request, you’ll most
likely see an error on the client side. Learning how to debug these errors and
set up error handling is a common task for Web developers.
You can go to the Network tab of your browser’s Developer Tools to view
these requests and responses. Open a new tab, open up the Developer Tools in
your browser, and then navigate togoogle.com. Watch the request go through in
your Network tab!
289. What we learned:
- Reviewed diagram of request-response cycle
- The client side vs. the server side
- The role of the browser
- Where to view Network requests in the browser
[1]: https://www.oreilly.com/library/view/using-google-app/9780596802462/
Running Scripts In The Browser
Timing is everything, in life as well as in code that runs in a browser.
Executing a script at the right time is an important part of developing
front-end code. A script that runs too early or too late can cause bugs and
dramatically affect user experience. After reading this section, you should be
able to utilize the proper methods for ensuring your scripts run at the right
time.
In previous sections, we reviewed how the DOM and BOM works and used event
listeners to trigger script execution. In this lesson, we’ll dig deeper into the
window object and learn multiple ways to ensure a script runs after the
necessary objects are loaded.
290. Using the Window API
The window object, the core of the Browser Object Model (BOM), has a number of
properties and methods that we can use to reference the window object. Refer to
the MDN documentation on the [Window API][1] for a detailed list of methods and
properties. We'll explore some of these methods now to give you a better grasp
on what the window object can do for you.
Let’s use a Window API method called resizeTo() to change the width and height
of a user's window in a script.
// windowTest.js // Open a new window newWindow = window.open("", "", "width=100, height=100"); // Resize the new window newWindow.resizeTo(500, 500);
You can execute the code above in your web browser in Google Chrome by right
clicking the page, selecting inspect, and selecting the console tab. Paste the
code above into the console. When you do this, make sure you are not in
full-screen mode for Chrome, otherwise you won't be able to resize the new
window!
Note: You must open a new window using window.open before it can be resized.
This method won’t work in an already open window or in a new tab.
Check out the documentation on [Window.resizeTo()][2] and [Window.resizeBy()][3]
for more information.
Go to [wikipedia][wikipedia] and try setting the window scroll position by
pasting window.scroll(0,300) in the developer console (right click, inspect,
console like usual). Play around with different scroll values. Pretty neat, huh?
291. Context, scope, and anonymous functions
Two important terms to understand when you’re developing in Javascript are
context and scope. Ryan Morr has a great write-up about the differences
between the two here: [“Understanding Scope and Context in Javascript”][4].
The important things to note about context are:
- Every function has a context (as well as a scope).
- Context refers to the object that owns the function (i.e. the value of
this inside a given function). - Context is most often determined by how a function is invoked.
Take, for example, the following code:
const foo = { bar: function() { return this; } }; console.log(foo.bar() === foo); // returns true
The anonymous function above is a method of the foo object, which means that
this returns the object itself — the context, in this case.
What about functions that are unbound to an object, or not scoped inside of
another function? Try running this anonymous function, and see what happens.
(function() { console.log(this); })();
When you open your console in the browser and run this code, you should see the
window object printed. When a function is called in the global scope, this
defaults to the global context, or in the case of running code in the browser,
the window object.
Refer to [“Understanding Scope and Context in Javascript”][4] for more about the
scope chain, closures, and using .call() and .apply() on functions.
292. Running a script on DOMContentLoaded
Now you will learn how to run a script on DOMContentLoaded, when the
document has been loaded without waiting for stylesheets, images and subframes
to load.
Let’s practice. Set up an HTML file, import an external JS file,
and run a script on DOMContentLoaded.
HTML
<!DOCTYPE html> <html> <head> <script type="text/javascript" src="dom-ready-script.js"></script> </head> <body></body> <html></html> </html>
JS
window.addEventListener("DOMContentLoaded", event => { console.log("This script loaded when the DOM was ready."); });
293. Running a script on page load
DOMContentLoaded ensures that a script will run when the document has been
loaded without waiting for stylesheets, images and subframes to load. However,
if we wanted to wait for everything in the document to load before running
the script, we could instead use the window object method window.onload.
Let’s practice it here. Set up an HTML file, import an external JS file, and run
a script on window.onload.
HTML
<!DOCTYPE html> <html> <head> <script type="text/javascript" src="window-load-script.js"></script> </head> <body></body> <html></html> </html>
JS
window.onload = () => { console.log( "This script loaded when all the resources and the DOM were ready." ); };
294. Ways to prevent a script from running until page loads
There are actually multiple ways to prevent a script from running until the page
has loaded. We’ll review three of them here:
- Use the
DOMContentLoadedevent in an external JS file - Put a script tag importing your external code at the bottom of your HTML file
- Add an attribute to the script tag, like
asyncordefer
We’ve reviewed the first method above. Let’s now review numbers 2 and 3.
If you want to make sure that all your HTML has loaded before a script runs, an
easy option is to include your script immediately after the HTML you need. This
works because HTML builds the DOM tree in the order of how your HTML file is
structured. Whatever is on top will be loaded first, such as script tags in the
<head>. It makes sense, then, to keep your script at the bottom of your HTML,
right before the closing</body>tag, like below.
<html> <head></head> <body> … <script src="script.js"></script> </body> </html>
If you want to include your script in the <head> tags, rather than the
<body> tags, there is another option: We could use the async or
defer
methods in our <script> tag. [Flavio Copes has a great write-up][5] on using
async or defer with graphics showing exactly when the browser parses HTML,
fetches the script, and executes the script.
With async, a script is fetched asynchronously. After the script is fetched,
HTML parsing is paused to execute the script, and then it’s resumed. With
defer, a script is fetched asynchronously and is executed only after HTML
parsing is finished.
You can use the async and defer methods independently or simultaneously.
Newer browsers recognize async, while older ones recognize defer. If you use
async defer simultaneously, async takes precedence, while older browsers
that don’t recognize it will default to defer. Check caniuse.com to see
which browsers are compatible with [async][6] and [defer][7].
<script async src="scriptA.js"></script> <script defer src="scriptB.js"></script> <script async defer src="scriptC.js"></script>
295. What we learned:
- How to use Window API methods
- The context and scope of a function
- Review of
DOMContentLoadedandwindow.onload - How to prevent a script from running until a page loads
[1]: https://developer.mozilla.org/en-US/docs/Web/API/Window
[2]: https://developer.mozilla.org/en-US/docs/Web/API/Window/resizeTo
[3]: https://developer.mozilla.org/en-US/docs/Web/API/Window/resizeby
[4]: http://ryanmorr.com/understanding-scope-and-context-in-javascript/
[5]: https://flaviocopes.com/javascript-async-defer/
[6]: https://caniuse.com/#search=async attribute for external scripts
[7]: https://caniuse.com/#search=defer attribute for external scripts
[wikipedia]: https://en.wikipedia.org/
Project: Fresh Cookies In The Window: Come And Get ‘Em!
Now that you know all about the browser, the BOM, and the window, let’s get
cooking! In this project, you will:
- Set up a server and run files locally
- Practice running a script when the page has loaded
- Set, Get, and Delete cookies using JavaScript
- Open and resize a window using JavaScript
296. Introduction
Picture yourself baking some fresh cookies (chocolate chip? snickerdoodle?
peanut butter?) on a crisp autumn day.
The timer’s gone off, and as you take the piping hot tray out of the oven, you
salivate in anticipation of a tasty treat. But, the cookies are way too hot and
need to cool down. You crack open the nearest window just enough, and set the
tray down next to it, letting a cool breeze waft over the cookies. You’re
looking forward to the first bite!
Let the imagery above be your inspiration while completing this coding project.
We can think of the browser’s window object as a physical window, and browser
cookies as actual doughy desserts, if for no other reason that it’s a fun
mnemonic device.
297. Project overview
Let’s practice running a script when the page has loaded. We’ll also manipulate
the window object by changing its height. Finally, we’ll bake some byte-sized
cookies and set them in the window.
298. Phase 1: Using a local Node/Express server (Whoa!)
Express is a Node framework that you'll be using to set up a local server on
your machine. This will come in handy when we’re practicing how to set a cookie.
We've set up an Express app for you to use. Open the cookies-project folder
inside of this Module. Then go through the following:
- Make sure Node is installed on your machine.
- Run
npm install. - Run
npm start, you should see "Example app listening on port 3000!" in your
terminal. - Open up
localhost:3000in your browser and make sure you see 'Cookies!!!'
You'll be using the public/index.html file to write your HTML and
public/js/cookies.js file to write your JavaScript.
299. Phase 2: Add a script on DOM/page load (Practice makes perfect.)
Inside of your cookies.js file:
- Practice running your script after the page has loaded. You can use
DOMContentLoadedorwindow.onload. If you’re linking to an external JS
file, practice using theasyncordefermethods.
300. Phase 3: Set a cookie in the window (Freshly baked!)
Inside of your cookies.js file, practice setting a cookie. Here are a couple
of examples:
document.cookie = "monster_name=cookie";document.cookie = "favorite_cookie=snickerdoodle";
Now looking at your Developer Tools, did the cookies you set appear in the
correct place? Try defining one more cookie in yourcookies.jsand refresh
your page. Do you see it in the Developer Tools? Now delete your most recent
cookie and refresh your page. If you delete a cookie, what happens in the
browser tab when you refresh?
Let's show our new cookies to our user! Try using the
[window.alert()][window-alert] method to let our user know the information of
all the cookies stored in the browser.
[window-alert]: https://developer.mozilla.org/en-US/docs/Web/API/Window/alert
301. Phase 4: No such thing as just one more cookie
Setting cookies one at a time by hand is probably getting old by now. Let's
write a new function called setCookie(name, value). The setCookie function
will accept two arguments, a name and a value, and will create a new cookie
using those arguments.
Nice! Try testing out your new function by creating a few cookies. Now that we
have a way to set cookies it'd sure be nice to have a way to return all the
cookies. So... let's hop to it!
302. Phase 5: Gimme all the cookies
Write a function named getCookies() that will return an array of the key value
pairs of each set cookie. This is easy to do when you remember that
document.cookie returns a string!
Look below for an example of how getCookies is used:
setCookie("dog", "Fido"); setCookie("cat", "Jet"); console.log(getCookies()); // prints ["dog=Fido", "cat=Jet"]
Let's take this one step further - what if we wanted to get the value for one
particular cookie?
Write a new function getCookieValue(name) that intakes that name of a cookie
as an argument. If the given cookie name exists getCookieValue will return the
value of that cookie. If a cookie with the given name doesn't exist the
getCookieValue function should return null.
Here is an example of getCookieValue in action:
setCookie("cat", "Jet"); console.log(getCookies()); // prints ["cat=Jet"] console.log(getCookieValue("cat")); // "Jet" console.log(getCookieValue("rabbit")); // null
303. Phase 6: Removing a cookie
Now that we have a couple of functions in place to set and get cookies lets
write a function called deleteCookie(name). The deleteCookie function will
accept the name of a cookie to be deleted and will delete that cookie, if it
exists. If deleteCookie is given the name of a cookie that doesn't exist it
should print a message to the user saying the cookie wasn't found.
Here is an example of deleteCookie in action:
setCookie("cat", "Jet"); setCookie("dog", "Fido"); console.log(getCookies()); // prints ["cat=Jet", "dog=Fido"] deleteCookie("cat"); console.log(getCookies()); // prints ["dog=Fido"] deleteCookie("rabbit"); // prints "cookie not found!"
We now have set up some nice utility function to get, set, and delete cookies!
Pretty yummy if you ask me! 🍪
304. Bonuses: More fun with cookies!
Check out the MDN documentation on [Document.cookie][3] to help you complete the
tasks below.
305. Bonus A: Open a new window and resize it based on cookie value (Smells great!)
Let's trying doing something fun will all our new cookie functions. Let's write
some code to do the following:
- generate a random number
- store that number in a cookie
- open a new window and set the new window's height and width to the cookie
value we stored in step 2.
- Hint: Recall that we can use [Math.random()][1] to generate a random number.
- Hint: Use
window.open()ANDwindow.resizeTo()ORwindow.resizeBy()
When you run the script, you should see a new window open with the width and
height set to the value that was stored in the cookie. Baked and cooled!
305.1. Bonus B: Create new cookies at the click of a button
Are you a master baker? Create the necessary html elements and JavaScript so
that a user can input a cookie name and value and click a button to create a
cookie with the name and value they specified.
The sequence of events will be:
- A user inputs the name and value they want for their cookie
- The user clicks the button to create their new cookie
- The new cookie is created
- To ensure the best user experience, empty the two inputs for the cookie name
and value (so a user can easily create another cookie) - Log all the cookies to the console so the user can see their new cookie!
Congratulations! Hang up your your apron for now knowing you are a cookie
master.
[1]:
https://developer.mozilla.org/en-US/docs/Web/JavaScript/Reference/Global_Objects/Math/random
[3]: https://developer.mozilla.org/en-US/docs/Web/API/Document/cookie
WEEK-04 DAY-2
Element Selection
Element Selection Learning Objectives
Below is a complete list of the terminal learning objectives for this lesson.
When you complete this lesson, you should be able to perform each of the
following objectives. These objectives capture how you may be evaluated on the
assessment for this lesson.
- Given HTML that includes
<div id=”catch-me-if-you-can”>HI!</div>, write a
JavaScript statement that stores a reference to the HTMLDivElement with the
id “catch-me-if-you-can” in a variable named “divOfInterest”. - Given HTML that includes seven SPAN elements each with the class “cloudy”,
write a JavaScript statement that stores a reference to a NodeList filled
with references to the seven HTMLSpanElements in a variable named
“cloudySpans”. - Given an HTML file with HTML, HEAD, TITLE, and BODY elements, create and
reference a JS file that in which the JavaScript will create and attach to
the BODY element an H1 element with the id "sleeping-giant" with the content
"Jell-O, Burled!". - Given an HTML file with HTML, HEAD, TITLE, SCRIPT, and BODY elements with the
SCRIPT's SRC attribute referencing an empty JS file, write a script in the JS
file to create a DIV element with the id "lickable-frog" and add it as the
last child to the BODY element. - Given an HTML file with HTML, HEAD, TITLE, SCRIPT, and BODY elements with no
SRC attribute on the SCRIPT element, write a script in the SCRIPT block to
create a UL element with no id, create an LI element with the id
"dreamy-eyes", add the LI as a child to the UL element, and add the UL
element as the first child of the BODY element. - Write JavaScript to add the CSS class "i-got-loaded" to the BODY element when
the window fires the DOMContentLoaded event. - Given an HTML file with a UL element with the id "your-best-friend" that has
six non-empty LIs as its children, write JavaScript to write the content of
each LI to the console. - Given an HTML file with a UL element with the id "your-worst-enemy" that has
no children, write JavaScript to construct a string that contains six LI tags
each containing a random number and set the inner HTML property of
ul#your-worst-enemy to that string. - Write JavaScript to update the title of the document to the current time at a
reasonable interval such that it looks like a real clock.terminal learning objectives for this lesson.
When you complete this lesson, you should be able to perform each of the
following objectives. These objectives capture how you may be evaluated on the
assessment for this lesson. - Given HTML that includes
<div id=”catch-me-if-you-can”>HI!</div>, write a
JavaScript statement that stores a reference to the HTMLDivElement with the
id “catch-me-if-you-can” in a variable named “divOfInterest”. - Given HTML that includes seven SPAN elements each with the class “cloudy”,
write a JavaScript statement that stores a reference to a NodeList filled
with references to the seven HTMLSpanElements in a variable named
“cloudySpans”. - Given an HTML file with HTML, HEAD, TITLE, and BODY elements, create and
reference a JS file that in which the JavaScript will create and attach to
the BODY element an H1 element with the id "sleeping-giant" with the content
"Jell-O, Burled!". - Given an HTML file with HTML, HEAD, TITLE, SCRIPT, and BODY elements with the
SCRIPT's SRC attribute referencing an empty JS file, write a script in the JS
file to create a DIV element with the id "lickable-frog" and add it as the
last child to the BODY element. - Given an HTML file with HTML, HEAD, TITLE, SCRIPT, and BODY elements with no
SRC attribute on the SCRIPT element, write a script in the SCRIPT block to
create a UL element with no id, create an LI element with the id
"dreamy-eyes", add the LI as a child to the UL element, and add the UL
element as the first child of the BODY element. - Write JavaScript to add the CSS class "i-got-loaded" to the BODY element when
the window fires the DOMContentLoaded event. - Given an HTML file with a UL element with the id "your-best-friend" that has
six non-empty LIs as its children, write JavaScript to write the content of
each LI to the console. - Given an HTML file with a UL element with the id "your-worst-enemy" that has
no children, write JavaScript to construct a string that contains six LI tags
each containing a random number and set the inner HTML property of
ul#your-worst-enemy to that string. - Write JavaScript to update the title of the document to the current time at a
reasonable interval such that it looks like a real clock.
Hello, World DOMination: Element Selection And Placement
The objective of this lesson is to familiarize yourself with the usage and inner
workings of the DOM API. When you finish this lesson, you should be able to:
- Reference and manipulate the DOM via Javascript
- Update and create new DOM elements via Javascript
- Change CSS based on a DOM event
- Familiarize yourself with the console
306. What is the DOM?
The
Document Object
Model,
or DOM, is an object-oriented representation of an HTML document or Web page,
meaning that the document is represented as objects, or nodes. It allows
developers to access the document via a programming language, like Javascript.
The DOM is typically depicted as a tree with a specific hierarchy. (See the
image below.) Higher branches represent parent nodes, while lower branches
represent child nodes, or children. More on that later.

The DOM API is one of the most powerful tools frontend developers have at their
disposal. Learning how to reference, create, and update DOM elements is an
integral part of working with Javascript. We'll start this lesson by learning
how to reference a DOM element in Javascript.
Let’s assume we have an HTML file that includes the following div:
HTML
<div id="”catch-me-if-you-can”">HI!</div>
Because we've added the element to our HTML file, that element is available in
the DOM for us to reference and manipulate. Using JavaScript, we can reference
this element by scanning the document and finding the element by its id with the
method document.getElementById(). We then assign the reference to a variable.
Javascript
const divOfInterest = document.getElementById(“catch-me-if-you-can”)
Now let’s say that our HTML file contains seven span elements that share a
class name of cloudy, like below:
HTML
<span class="“cloudy”"></span> <span class="“cloudy”"></span> <span class="“cloudy”"></span> <span class="“cloudy”"></span> <span class="“cloudy”"></span> <span class="“cloudy”"></span> <span class="“cloudy”"></span>
In Javascript, we can reference all seven of these elements and store them in a
single variable.
Javascript
const cloudySpans = document.querySelectorAll("span.cloudy");
While getElementById allows us to reference a single element,
querySelectorAll references all elements with the class name “cloudy” as a
static NodeList (static meaning that any changes in the DOM do not affect
the content of the collection). Note that a NodeList is different from an array,
but it is possible to iterate over a NodeList as with an array using
forEach().
Refer to the MDN doc on
NodeList for more
information.
Using forEach() on a NodeList:
Javascript
const cloudySpans = document.querySelectorAll("span.cloudy"); cloudySpans.forEach(span => { console.log("Cloudy!"); });
308. Creating New DOM Elements
Now that we know how to reference DOM elements, let's try creating new elements.
First we'll set up a basic HTML file with the appropriate structure and include
a reference to a Javascript file that exists in the same directory in the
head.
HTML
<!DOCTYPE html> <html> <head> <title></title> <script type="text/javascript" src="example.js"></script> </head> <body></body> </html>
In our example.js file, we'll write a function to create a new h1 element,
assign it an id, give it content, and attach it to the body of our HTML
document.
Javascript
const addElement = () => { // create a new div element const newElement = document.createElement("h1"); // set the h1's id newElement.setAttribute("id", "sleeping-giant"); // and give it some content const newContent = document.createTextNode("Jell-O, Burled!"); // add the text node to the newly created div newElement.appendChild(newContent); // add the newly created element and its content into the DOM document.body.appendChild(newElement); }; // run script when page is loaded window.onload = addElement;
If we open up our HTML file in a browser, we should now see the words
Jell-O Burled! on our page. If we use the browser tools to inspect the page
(right-click on the page and select “inspect”, or hotkeys fn + f12), we notice
the new h1 with the id we gave it.
Hello, World DOMination: Inserting Elements in JS File and Script Block
Let's practice adding new elements to our page. We'll create a second element, a
div with an id of lickable-frog, and append it to the body like we did
the
first time. Update the Javascript function to append a second element to the
page.
Javascript
const addElements = () => { // create a new div element const newElement = document.createElement("h1"); // set the h1's id newElement.setAttribute("id", "sleeping-giant"); // and give it some content const newContent = document.createTextNode("Jell-O, Burled!"); // add the text node to the newly created div newElement.appendChild(newContent); // add the newly created element and its content into the DOM document.body.appendChild(newElement); // append a second element to the DOM after the first one const lastElement = document.createElement("div"); lastElement.setAttribute("id", "lickable-frog"); document.body.appendChild(lastElement); }; // run script when page is loaded window.onload = addElements;
Notice that our function is now called addElements, plural, because we're
appending two elements to the body. Save your Javascript file and refresh the
HTML file in the browser. When you inspect the page, you should now see two
elements in the body, the h1 and the div we added via Javascript.
309. Referencing a JS File vs. Using a Script Block
In our test example above, we referenced an external JS file, which contained
our function to add new elements to the DOM. Typically, we would keep Javascript
in a separate file, but we could also write a script block directly in our HTML
file. Let's try it. First, we'll delete the script source so that we have an
empty script block.
HTML
<!DOCTYPE html> <html> <head> <script type="text/javascript"> //Javascript goes here! </script> </head> <body></body> </html>
Inside of our script block, we'll:
- create a
ulelement with no id - create an
lielement with the iddreamy-eyes - add the
lias a child to theulelement - add the
ulelement as the first child of thebodyelement.
HTML
<!DOCTYPE html> <html> <head> <title>My Cool Website</title> <script type="text/javascript"> const addListElement = () => { const listElement = document.createElement("ul"); const listItem = document.createElement("li"); listItem.setAttribute("id", "dreamy-eyes"); listElement.appendChild(listItem); document.body.prepend(listElement); }; window.onload = addListElement; </script> </head> <body></body> </html>
Refresh the HTML in your browser, inspect the page, and notice the ul and li
elements that were created in the script block.
Hello, World DOMination: Adding a CSS Class After DOM Load Event
In our previous JS examples, we used window.onload to run a function after the
window has loaded the page, which ensures that all of the objects are in the
DOM, including images, scripts, links, and subframes. However, we don't need to
wait for stylesheets, images, and subframes to finish loading before our
JavaScript runs because JS isn't dependent on them. And, some images may be so
large that waiting on them to load before the JS runs would make the user
experience feel slow and clunky. There is a better method to use in this case:
DOMContentLoaded.
According to
MDN,
"the DOMContentLoaded event fires when the initial HTML document has been
completely loaded and parsed, without waiting for stylesheets, images, and
subframes to finish loading."
We'll use DOMContentLoaded to add CSS classes to page elements immediately after
they are loaded. Let's add the CSS class "i-got-loaded" to the body element
when the window fires the DOMContentLoaded event. We can do this in the script
block or in an external JS file, as we did in the examples above.
Javascript
window.addEventListener("DOMContentLoaded", event => { document.body.className = "i-got-loaded"; });
After adding the Javascript above, refresh the HTML in your browser, inspect the
page, and notice that the body element now has a class of "i-got-loaded".
Brush Up On Your HTML
You'll be using a lot of HTML in the following days (weeks, months, years), so
might as well get a leg up by reacquainting yourself with HTML.
The definitive resource on the Internet for HTML, CSS, and JavaScript is the
Mozilla Developer Network. Go there and work through, at a minimum, the
following sections:
- The following sections in [Introduction to HTML]
- [Getting started with HTML]
- [What's in the head? Metadata in HTML]
- [HTML text fundamentals]
- [Creating hyperlinks]
- The following section in [Multimedia and embedding]
- [Images in HTML]
- The following section in [HTML forms]
- [Your first HTML form]
- [How to structure an HTML form]
- [The native form widgets]
- [Client-side form validation]
- [Styling HTML forms]
[Introduction to HTML]: https://developer.mozilla.org/en-US/docs/Learn/HTML/Introduction_to_HTML
[Getting started with HTML]: https://developer.mozilla.org/en-US/docs/Learn/HTML/Introduction_to_HTML/Getting_started
[What's in the head? Metadata in HTML]: https://developer.mozilla.org/en-US/docs/Learn/HTML/Introduction_to_HTML/The_head_metadata_in_HTML
[HTML text fundamentals]: https://developer.mozilla.org/en-US/docs/Learn/HTML/Introduction_to_HTML/HTML_text_fundamentals
[Creating hyperlinks]: https://developer.mozilla.org/en-US/docs/Learn/HTML/Introduction_to_HTML/Creating_hyperlinks
[Multimedia and embedding]: https://developer.mozilla.org/en-US/docs/Learn/HTML/Multimedia_and_embedding
[Images in HTML]: https://developer.mozilla.org/en-US/docs/Learn/HTML/Multimedia_and_embedding/Images_in_HTML
[HTML forms]: https://developer.mozilla.org/en-US/docs/Learn/Forms
[Your first HTML form]: https://developer.mozilla.org/en-US/docs/Learn/HTML/Forms/Your_first_HTML_form
[How to structure an HTML form]: https://developer.mozilla.org/en-US/docs/Learn/HTML/Forms/How_to_structure_an_HTML_form
[The native form widgets]: https://developer.mozilla.org/en-US/docs/Learn/HTML/Forms/The_native_form_widgets
[Client-side form validation]: https://developer.mozilla.org/en-US/docs/Learn/Forms/Form_validation
[Styling HTML forms]: https://developer.mozilla.org/en-US/docs/Learn/Forms/Styling_web_forms
Hello, World DOMination: Console.log, Element.innerHTML, and the Date Object
In this section, we'll learn about how to use console.log to print element
values. We'll also use Element.innerHTML to fill in the HTML of a DOM element.
Finally, we'll learn about the Javascript Date object and how to use it to
construct a clock that keeps the current time.
310. Console Logging Element Values
Along with the other developer tools, the console is a valuable tool Javascript
developers use to debug and check that scripts are running correctly. In this
exercise, we'll practice logging to the console.
Create an HTML file that contains the following:
HTML
<!DOCTYPE html> <html> <head> </head> <body> <ul id="your-best-friend"> <li>Has your back</li> <li>Gives you support</li> <li>Actively listens to you</li> <li>Lends a helping hand</li> <li>Cheers you up when you're down</li> <li>Celebrates important moments with you</li> </ul> </body> </html>
In the above code, we see an id with which we can reference the ul element.
Recall that we previously used document.querySelectorAll() to store multiple
elements with the same class name in a single variable, as a NodeList. However,
in the above example, we see only one id for the parent element. We can
reference the parent element via its id to get access to the content of its
children.
Javascript
window.addEventListener("DOMContentLoaded", event => { const parent = document.getElementById("your-best-friend"); const childNodes = parent.childNodes; for (let value of childNodes.values()) { console.log(value); } });
In your browser, use the developer tools to open the console and see that the
values of each li have been printed out.
311. Using Element.innerHTML
Thus far, we have referenced DOM elements via their id or class name and
appended new elements to existing DOM elements. Additionally, we can use the
inner HTML property to get or set the HTML or XML markup contained within an
element.
In an HTML file, create a ul element with the id "your-worst-enemy" that has
no children. We'll add some JavaScript to construct a string that contains six
li tags each containing a random number and set the inner HTML property of
ul#your-worst-enemy to that string.
HTML
<!DOCTYPE html> <html> <head> <script type="text/javascript" src="example.js"></script> </head> <body> <ul id="your-worst-enemy"></ul> </body> </html>
Javascript
// generate a random number for each list item const getRandomInt = max => { return Math.floor(Math.random() * Math.floor(max)); }; // listen for DOM ready event window.addEventListener("DOMContentLoaded", event => { // push 6 LI elements into an array and join const liArr = []; for (let i = 0; i < 6; i++) { liArr.push("<li>" + getRandomInt(10) + "</li>"); } const liString = liArr.join(" "); // insert string into the DOM using innerHTML const listElement = document.getElementById("your-worst-enemy"); listElement.innerHTML = liString; });
Save your changes, and refresh your browser page. You should see six new list
items on the page, each containing a random number.
312. Inserting a Date Object into the DOM
We've learned a lot about accessing and manipulating the DOM! Let's use what
we've learned so far to add extra functionality involving the Javascript Date
object.
Our objective is to update the title of the document to the current time at a
reasonable interval such that it looks like a real clock.
We know we'll be starting with an HTML document that contains an empty title
element. We've learned a couple of different ways to fill the content of an
element so far. We could create a new element and append it to the title
element, or we could use innerHTML to set the HTML of the title element. Since
we don't need to create a new element nor do we care whether it appears last, we
can use the latter method.
Let's give our title an id for easy reference.
HTML
<title id="title"></title>
In our Javascript file, we'll use the Date constructor to instantiate a new
Date object.
const date = new Date();
Javascript
window.addEventListener("DOMContentLoaded", event => { const title = document.getElementById("title"); const time = () => { const date = new Date(); const seconds = date.getSeconds(); const minutes = date.getMinutes(); const hours = date.getHours(); title.innerHTML = hours + ":" + minutes + ":" + seconds; }; setInterval(time, 1000); });
Save your changes and refresh your browser. Observe the clock we inserted
dynamically keeping the current time in your document title!
313. What We Learned:
- What the DOM is and how we can access it
- How to access DOM elements using
document.getElementById()and
document.querySelectorAll() - How to create new elements with
document.createElement()and
document.createTextNode, and append them to existing DOM elements with
Element.appendChild() - The difference between
window.onloadandDOMContentLoaded - How to access children nodes with
NodeList.childNodes - Updating DOM elements with
Element.innerHTML - The Javascript Date object
DOM Project: Create a profile page with Javascript
Now that you’ve learned about the DOM and how to access and manipulate it, put
skills to use by building your own basic profile page! In this project, you
will:
- Create an HTML file and link to a Javascript file
- Use Javascript to create and update page elements
- Add CSS classes with Javascript
- Create a clock using the Date object
314. Introduction
The best way to learn is to create something that is meaningful or relevant to
you, so why not start by making a page all about yourself?
In this project, you’ll create a simple profile page that displays details about
you, such as who you are, what you like to do, and where you are located.
Put as many or as few details as you like. Don’t worry, the government already
knows where you live. It’s your page, so feel free to give it your own flair!
315. Project Overview
You’ve learned about the DOM, and now it’s time to put that knowledge into
practice.
In this project, you’ll create a simple profile page and fill it with details
about yourself.
You could hard-code your content into your HTML file, but where’s the fun in
that? We’ll practice using Javascript to access DOM elements and insert content
into your page dynamically.
We’ll also go over how to add CSS class attributes to elements dynamically, so
you can add a bit of styling to your profile.
316. Phase 1: Setting up your HTML and Javascript files
Create an HTML file in a new project folder called myProfile.html. Set up your
html file with a head and body section. Other than the appropriate HTML
tags, leave the file empty of content, ids and classes.
In your HTML file, add a link to an external Javascript file in your project
directory called myProfile.js. Test that your Javascript file is linked
correctly by printing something you can read in the browser console. Example:
console.log(“This is my profile page!”)
317. Phase 2: Populating your profile
Again, don’t hard-code any content in your HTML file. Instead, construct the
page content using your Javascript file.
First, you should make sure all the DOM objects you need are loaded before you
add new things to the page. Add a DOMContentLoaded event listener in your
Javascript file.
window.addEventListener("DOMContentLoaded", event => { // Your Javascript goes here });
317.1. Phase 2A: Creating and appending new elements
It’s time to add some content to your profile page! Insert your name as an h1
into the page using Javascript, and give it an id. Hint: You may want to use
the following:
document.createElement()Element.setAttribute()document.createTextNode()Node.appendChild()
After you’ve inserted theh1, open your HTML page in your browser and make
sure theh1with your name appears on the page.
You’ve added your name to the page, but it still looks sparse. Fill out your
page with some details about yourself by creating and appending new elements.
Use what you’ve learned about manipulating the DOM to add to your Javascript
file.- Create a new unordered list element.
- Append at least four list items of details about yourself to your list.
- Append your list to the body of your page.
Below is an example list item:
const listItem1 = document.createElement("li"); const listItem1Content = document.createTextNode( "I like to drink iced lattes." ); listItem1.appendChild(listItem1Content); // Append listItem1 to your unordered list here
317.2. Phase 2B: Refactoring to make it programmatic
The code we wrote above works, but it is lengthy and leads to needless
repetition. Imagine we want to display 20 hobbies. Following the pattern above
means we would have to create an element, create a text node, and append a child
node to the details list 20 times for each hobby. That’s 80 extra lines of code!
Let's approach this differently and make the work easier for ourselves. Can we
refactor it to make inserting the li elements more programmatic and easily
repeatable? Yes, we can! First, let’s create the ul and append it to the body
of our page, as we did in the last section.
// Create the element with document.createElement() // Set the attribute with Element.setAttribute() // Append the element to the page with Node.appendChild()
Now, let’s add the list items. We can shorten the code up by creating an array
that stores all of the list items as string values, join all the string values
into a single string, and insert that string into the DOM.
const detailsArr = [ "<li>I like to drink iced lattes.</li>", "<li>I have two cats and eight kittens.</li>", "<li>My favorite place to get lunch is Chipotle.</li>", "<li>On the weekends, I play flag football.</li>" ]; const liString = detailsArr.join(" "); const listElement = document.getElementById("details"); listElement.innerHTML = liString;
Notice that we used innerHTML here rather than appendChild. If we tried to
insert the string using appendChild, what would happen? Why? Refer to the MDN
documentation on
Element.innerHTML
and
Node.appendChild
for the answers.
You’ve cut down on the lines of code as well as made your code more readable!
You can easily add new list items inside your array and they’ll be automatically
added to your ul element. Now that you’ve refactored your code, can you add
new sections to your page?
318. Phase 3: Adding CSS classes and styles
You’ve added the details, but now they need some pizazz! Let’s add some CSS
classes to your elements that you can use to style the page. In your Javascript,
add a class named my-details to the unordered list you added in the last
section. You can use Element.setAttribute to set the class name to your ul.
Here’s an example:
const myDetails = document.createElement("ul"); myDetails.setAttribute(“class”, “my-details”);
Now that you know how to set an element’s class name, practice setting
attributes by adding class names to the other elements you created.
- Add a class name of
nameto theh1containing your name. - Add a class name of
detailto eachlielement you created inside your
list. - Use
document.querySelectorAllto access eachli. - Use
forEach()to iterate over thelilist and add a class using
Element.className.
Create a CSS file and remember to link to it in your HTML file. In your CSS
file, add some styles using the classes we added to theuland theli
elements:detailsanddetail. Update your CSS to: - Change the color of your
h1 - Add a border around your
ul - Add padding to your list items
h1.my-name { color: green; padding: 40px 20px; } ul.my-details { border: 1px solid gray; padding: 40px; } li.detail { list-style-type: square; padding: 10px; }
Feel free to add more CSS styles beyond the ones above to your page to
personalize it!
319. Phase 4: Adding a clock with the Date object
By now, you should know how to add new elements to your page programmatically.
Let’s kick it up a notch by adding a clock that keeps the current time onto your
profile page.
Objectives:
- Create a new element and add it to the body of your page
- Use the Javascript Date object to get the current time
- Insert the current time into a DOM element
You just created a live clock, and it’s time for congratulations! (Har har.)
Can you go the extra mile? Figure out how to insert your clock into a new list
item under your personal details that says “I live in City, State, and it’s
currently[CLOCK]here.
320. Bonus: You’re so extra!
Congratulations! You’ve created a basic profile page by manipulating the DOM and
inserting elements dynamically with Javascript. But, why be basic when you can
be a little extra? Make your profile extra shiny by adding more to your page.
320.1. Bonus A: Add more sections to your page
Using Javascript, create new elements and:
- Insert an image into your profile under your name. Hint: You could insert a
newimg, or you could add adivand set the background image using a CSS
class. - Insert more sections to your profile. Examples: “Likes” list and “Dislikes”
list, “Favorite Restaurants”, “My Activities”, etc.
320.2. Bonus B: Use other Element methods
Check the MDN documentation for more
Element methods you
can use to manipulate the DOM. Try doing the following:
- Use
.outerHTMLto replace an element. - Use the
classListAPI to add/remove classes. - Try using :
Element.closest,getElementsByClassName,
getElementsByTagNameto select elements on your page.
320.3. Bonus C: Fire JS on different DOM events
You have used DOMContentLoaded to run Javascript on a DOM event. It is one of
many different DOM events that developers can use to trigger functionality.
Check out MDN`’s
Event Reference
documentation to see how many different DOM events there are. Trying using a few
of them in your code. Some relevant methods to use would be under:
- Keyboard events
- Mouse events
- DOM mutation events
320.4. Bonus D: Make a countdown clock
Instead of keeping the current time on your profile page, make a countdown clock
to your birthday.
Refer to the MDN documentation on the
Date
object
for help with this task. Review how to calculate the elapsed time between two
dates.
WEEK-04 DAY-3
Event Handling
Event Handling Learning Objectives
Below is a complete list of the terminal learning objectives for this lesson.
When you complete this lesson, you should be able to perform each of the
following objectives. These objectives capture how you may be evaluated on the
assessment for this lesson.
- Given an HTML page that includes
<button id="increment-count">I have been clicked <span id="clicked-count">0</span> times</button>, write JavaScript
that increases the value of the content of span#clicked-count by 1 every time
button#increment-countis clicked. - Given an HTML page that includes
<input type="checkbox" id="on-off"><div id="now-you-see-me">Now you see me</div>, write JavaScript that sets the display of div#now-you-see-me to
"none" when input#on-off is checked and to "block" when input#on-off is not
checked. - Given an HTML file that includes
<input id="stopper" type="text" placeholder="Quick! Type STOP">, write
JavaScript that will change the background color of the page to cyan five
seconds after a page loads unless the field input#stopper contains only the
text "STOP". - Given an HTML page with that includes
<input type=”text” id=”fancypants”>,
write JavaScript that changes the background color of the textbox to #E8F5E9
when the caret is in the textbox and turns it back to its normal color when
focus is elsewhere. - Given an HTML page that includes a form with two password fields, write
JavaScript that subscribes to the forms submission event and cancels it if
the values in the two password fields differ. - Given an HTML page that includes a div styled as a square with a red
background, write JavaScript that allows a user to drag the square around the
screen. - Given an HTML page that has 300 DIVs, create one click event subscription
that will print the id of the element clicked on to the console. - Identify the definition of the bubbling principle.minal learning objectives for this lesson.
When you complete this lesson, you should be able to perform each of the
following objectives. These objectives capture how you may be evaluated on the
assessment for this lesson. - Given an HTML page that includes
<button id="increment-count">I have been clicked <span id="clicked-count">0</span> times</button>, write JavaScript
that increases the value of the content of span#clicked-count by 1 every time
button#increment-countis clicked. - Given an HTML page that includes
<input type="checkbox" id="on-off"><div id="now-you-see-me">Now you see me</div>, write JavaScript that sets the display of div#now-you-see-me to
"none" when input#on-off is checked and to "block" when input#on-off is not
checked. - Given an HTML file that includes
<input id="stopper" type="text" placeholder="Quick! Type STOP">, write
JavaScript that will change the background color of the page to cyan five
seconds after a page loads unless the field input#stopper contains only the
text "STOP". - Given an HTML page with that includes
<input type=”text” id=”fancypants”>,
write JavaScript that changes the background color of the textbox to #E8F5E9
when the caret is in the textbox and turns it back to its normal color when
focus is elsewhere. - Given an HTML page that includes a form with two password fields, write
JavaScript that subscribes to the forms submission event and cancels it if
the values in the two password fields differ. - Given an HTML page that includes a div styled as a square with a red
background, write JavaScript that allows a user to drag the square around the
screen. - Given an HTML page that has 300 DIVs, create one click event subscription
that will print the id of the element clicked on to the console. - Identify the definition of the bubbling principle.
Event Handling: Common Page Events
Event handling is the core of front-end development. When a user interacts with
HTML elements on a website, those interactions are known as events.
Developers use Javascript to respond to those events. In this reading, we’ll go
over three common events and do exercises to add functionality based on those
events:
- A button click
- A checkbox being checked
- A user typing a value into an input
321. Handling a button click event
Let’s start with a common event that occurs on many websites: a button click.
Usually some functionality occurs when a button is clicked -- such as displaying
new page elements, changing current elements, or submitting a form.
We’ll go through how to set up a [click event][1] listener and update the click
count after each click. Let’s say we have a button element in an HTML file, like
below:
HTML
<!DOCTYPE html> <html> <head> <script src="script.js"> </head> <body> <button id="increment-count">I have been clicked <span id="clicked-count">0</span> times</button> </body> </html>
We’ll write Javascript to increase the value of the content of
span#clicked-count by one each time button#increment-count is clicked.
Remember to use the DOMContentLoaded event listener in an external script to
ensure the button has loaded on the page before the script runs.
Javascript
If you open up the HTML file in a browser, you should see the button. If you
click the button rapidly and repeatedly, the value of span#clicked-count
should increment by one after each click.
// script.js window.addEventListener("DOMContentLoaded", event => { const button = document.getElementById("increment-count"); const count = document.getElementById("clicked-count"); let clicks = 0; button.addEventListener("click", event => { clicks += 1; count.innerHTML = clicks; }); });
321.1. Using addEventListener() vs. onclick
Adding an event listener to the button element, as we did above, is the
preferred method of handling events in scripts. However, there is another method
we could use here: [GlobalEventHandlers.onclick][3]. Check out
[codingrepo.com][4] for a breakdown of the differences between using
addEventListener() and onclick. One distinction is that onclick
overrides
existing event listeners, while addEventListener() does not, making it easy to
add new event listeners.
The syntax for onclick is: target.onclick = functionRef; If we wanted to
rewrite the button click event example using onclick, we would use the
following:
let clicks = 0; button.onclick = event => { clicks += 1; count.innerHTML = clicks; };
We’ll stick to using addEventListener() in our code, but it’s important for
front-end developers to understand the differences between the methods above and
use cases for each one.
322. Handling a checkbox check event
Another common event that occurs on many websites is when a user checks a
checkbox. Checkboxes are typically recorded values that get submitted when a
user submits a form, but checking the box sometimes also triggers another
function.
Let’s practice displaying an element when the box is checked and hiding it when
the box is unchecked. We’ll pretend we’re on a pizza delivery website, and we’re
filling out a form for pizza toppings. There is a checkbox on the page for extra
cheese, and when a user checks that box we want to show a div with pricing
info. Let’s set up our HTML file with a checkbox and div to show/hide, as
well as a link to our Javascript file:
HTML
<!DOCTYPE html> <html> <head> <script src="script.js"> </head> <body> <h1>Pizza Toppings</h1> <input type="checkbox" id="on-off"> <label for="on-off">Extra Cheese</label> <div id="now-you-see-me" style="display:none">Add $1.00</div> </body> </html>
Note that we’ve added style="display:none" to the div so that, when
the page
first loads and the box is unchecked, the div won’t show.
In our script.js file, we’ll set up an event listener for DOMContentLoaded
again to make sure the checkbox and div have loaded. Then, we’ll write
Javascript to show div#now-you-see-me when the box is checked and hide it when
the box is unchecked.
Javascript
// script.js window.addEventListener("DOMContentLoaded", event => { // store the elements we need in variables const checkbox = document.getElementById("on-off"); const divShowHide = document.getElementById("now-you-see-me"); // add an event listener for the checkbox click checkbox.addEventListener("click", event => { // use the 'checked' attribute of checkbox inputs // returns true if checked, false if unchecked if (checkbox.checked) { // if the box is checked, show the div divShowHide.style.display = "block"; // else hide the div } else { divShowHide.style.display = "none"; } }); });
Open up the HTML document in a browser and make sure that you see the checkbox
when the page first loads and not the div. The div should show when you
check the box, and appear hidden when you uncheck the box.
The code above works. However, what would happen if we had a whole page of
checkboxes with extra options inside each one that would show or hide based on
whether the boxes are checked? We would have to call
Element.style.display = "block" and Element.style.display = "none"
on each
associated div.
Instead, we could add a show or hide class to the div based on the
checkbox and keep our display:block and display:none in CSS. That way, we
could reuse the classes on different elements, as well as see class names change
in the HTML. Here’s how the code we wrote above would look if we used CSS
classes:
Javascript
// script.js // we need to wait for the stylesheet to load window.onload = () => { // store the elements we need in variables const checkbox = document.getElementById("on-off"); const divShowHide = document.getElementById("now-you-see-me"); // add an event listener for the checkbox click checkbox.addEventListener("click", event => { // use the 'checked' attribute of checkbox inputs // returns true if checked, false if unchecked if (checkbox.checked) { // if the box is checked, show the div divShowHide.classList.remove("hide"); divShowHide.classList.add("show"); // else hide the div } else { divShowHide.classList.remove("show"); divShowHide.classList.add("hide"); } }); };
CSS
.show { display: block; } .hide { display: none; }
HTML (Remove the style attribute, and add the "hide" class)
<div id="now-you-see-me" class="hide">Add $1.00</div>
323. Handling a user input value
You’ve learned a lot about event handling so far! Let’s do one more exercise to
practice event handling using an input. In this exercise, we’ll write JavaScript
that will change the background color of the page to cyan five seconds after a
page loads unless the field input#stopper contains only the text "STOP".
Let’s set up an HTML file with the input and a placeholder directing the user to
type "STOP": HTML
<!DOCTYPE html> <html> <head> <script src="script.js"> </head> <body> <input id="stopper" type="text" placeholder="Quick! Type STOP"> </body> </html>
Now let’s set up our Javascript:
Javascript
// script.js // run when the DOM is ready window.addEventListener("DOMContentLoaded", event => { const stopCyanMadness = () => { // get the value of the input field const inputValue = document.getElementById("stopper").value; // if value is anything other than 'STOP', change background color if (inputValue !== "STOP") { document.body.style.backgroundColor = "cyan"; } }; setTimeout(stopCyanMadness, 5000); });
The code at the bottom of our function might look familiar. We used
setInterval along with the Javascript Date object when we set up our current
time clock. In this case we're using setTimeout, which runs stopCyanMadness
after 5000 milliseconds, or 5 seconds after the page loads.
324. What we learned:
- How to add an event listener on a button click
- How to add an event listener to a checkbox
- Styling elements with Javascript vs. with CSS classes
- How to check the value of an input
[1]: https://developer.mozilla.org/en-US/docs/Web/API/Element/click_event
[2]: https://developer.mozilla.org/en-US/docs/Web/API/UIEvent/detail
[3]: https://developer.mozilla.org/en-US/docs/Web/API/GlobalEventHandlers/onclick
[4]: https://www.simonewebdesign.it/onclick-vs-addeventlistener/
Event Handling: Input Focus and Blur
Form inputs are one of the most common HTML elements users interact with on a
website. By now, you should be familiar with how to listen for a click event
and run a script. In this reading, we’ll learn about a couple of other events on
an input field and how to use them:
- Element: focus event
- Element: blur event
325. Listening for focus and blur events
According to MDN, the [focus event][1] fires when an element, such as an input
field, receives focus (i.e. when a user has clicked on that element).
The opposite of the focus event is the [blur event][2]. The blur event fires when
an element has lost focus (i.e. when the user clicks out of that element).
Let’s see these two events in action. We’ll set up an HTML page that includes
<input type="text" id="fancypants">. Then, we’ll write JavaScript
that changes
the background color of the fancypants textbox to #E8F5E9 when the focus is
on the textbox and turns it back to its normal color when focus is elsewhere.
HTML
<!DOCTYPE html> <html> <head> <script src="script.js"> </head> <body> <input type="text" id="fancypants"> </body> </html>
Javascript
// script.js window.addEventListener("DOMContentLoaded", event => { const input = document.getElementById("fancypants"); input.addEventListener("focus", event => { event.target.style.backgroundColor = "#E8F5E9"; }); input.addEventListener("blur", event => { event.target.style.backgroundColor = "initial"; }); });
In the code above, we changed the background color of the input on focus and
changed it back to its initial value on blur. This small bit of functionality
signals to users that they’ve clicked on or off of an input field, which is
especially helpful and more user-friendly when there is a long form on the page.
Now you can use focus and blur on your form inputs!
326. What we learned:
- How to listen for the focus event on inputs
- How to listen for the blur event on inputs
[1]: https://developer.mozilla.org/en-US/docs/Web/API/Element/focus_event
[2]: https://developer.mozilla.org/en-US/docs/Web/API/Element/blur_event
Event Handling: Form Validation
Everyone has submitted a form at some point. Form submissions are another common
action users take on a website. We’ve all seen what happens if we put in values
that aren’t accepted on a form -- frustrating errors! Those errors prompt the
user to input accepted form values before submission and are the first check to
ensure valid data gets stored in the database.
Learning how to implement front-end validation before a user submits a form is
an important skill for developers. In this reading, we’ll learn how to check
whether two password values on a form are equal and prevent the user from
submitting the form if they’re not.
327. Validate passwords before submitting a form
In order to validate passwords, we need a form with two password fields: a
password field and a confirmation field. We’ll also include two other fields
that are common on a signup page: a name field and an email field. See the
example below:
HTML
<!DOCTYPE html> <html> <head> <script src="script.js"> </head> <body> <form class="form form--signup" id="signup-form"> <input class="form__field" id="name" type="text" placeholder="Name" style="display:block"> <input class="form__field" id="email" type="text" placeholder="Email" style="display:block"> <input class="form__field" id="password" type="text" placeholder="Password" style="display:block"> <input class="form__field" id="confirm-password" type="text" placeholder="Password" style="display:block"> <button class="form__submit" id="submit" type="submit">Submit</button> </form> </body> </html>
Now, we’ll set up our script.js file with code that will:
- Listen for a form submission event
- Get the values of the two password fields and check for a match
- Alert the user if there’s not a match, or submit the form
Javascript
// script.js window.addEventListener("DOMContentLoaded", event => { // get the form element const form = document.getElementById("signup-form"); const checkPasswordMatch = event => { // get the values of the pw field and pw confirm field const passwordValue = document.getElementById("password").value; const passwordConfirmValue = document.getElementById("confirm-password") .value; // if the values are not equal, alert the user // otherwise, submit the form if (passwordValue !== passwordConfirmValue) { // prevent the default submission behavior event.preventDefault(); alert("Passwords must match!"); } else { alert("The form was submitted!"); } }; // listen for submit event and run password check form.addEventListener("submit", checkPasswordMatch); });
In the code above, we prevented the form submission if the passwords don’t match
using [Event.preventDefault()][1]. This method stops the default action of an
event if the event is not explicitly handled. We then alerted the user that the
form submission was prevented.
328. What we learned:
- Front-end form validation prevents invalid data from being recorded in the
database. - We use
Event.preventDefault()to stop form submission. - Users are typically notified when default behavior is prevented.
[1]: https://developer.mozilla.org/en-US/docs/Web/API/Event/preventDefault
Event Handling: HTML Drag-And-Drop API
Dragging and dropping a page element is a fun and convenient way for users to
interact with a Web page! HTML drag-and-drop interfaces are most commonly used
for dragging files, such as PDFs or images, onto a page in a specified area
known as a drop zone.
While less typical than button clicks and form submission events, HTML
drag-and-drop is relevant to event handling because it uses the [DOM event
model][1] and [drag events][2] inherited from [mouse events][3].
This reading will go over how to use the [HTML Drag and Drop API][4] to create
"draggable" page elements and allow users to drop them into a drop zone.
329. Basic drag-and-drop functions
Let’s go over how to set up basic drag-and-drop functionality, according to the
[MDN documentation][4]. You'll need to mark an element as "draggable". Then, to
do something with that dragging, you need
- A dragstart handler -- occurs when the user clicks the mouse and starts
dragging - A drop handler -- occurs when the user releases the mouse click and "drops"
the element
You will also see how to use thedragenteranddragleaveevents to do some
nice interactions.
330. The example
Here's an HTML document that you can copy and paste into a text editor if you
want to follow along.
<!DOCTYPE html> <html lang="en"> <head> <meta charset="UTF-8"> <meta name="viewport" content="width=device-width, initial-scale=1.0"> <title>Red Square is a Drag</title> <style> #red-square { background-color: red; box-sizing: border-box; height: 100px; width: 100px; } </style> </head> <body> <div id="red-square"></div> </body> </html>
You don't need to know what box-sizing does. That'll be covered in future
lessons. It's in this example to make sure the box looks ok when it's dragged.
331. The first step of drag and drop
The first step to making an element draggable is to add that attribute to the
element itself. Change the red square div to have the draggable attribute
with a value of "true".
<div id="red-square" draggable="true"></div>
Now, if you refresh your page, you can start dragging the red square. When you
release it, it will "snap" back to it's original position.

331.1. Handling the start of a drag
Now that the element is draggable, you need some JavaScript to handle the event
of when someone starts dragging an element. This is there so that your code
knows what's being dragged! Otherwise, how will it know what to do when the
dragging ends?
The following code creates a handler for the dragstart event. Then, it
subscribes to the red square's dragstart event with that event handler. The
event handler, in this case, will add a class to the red square to make it show
that it's being dragged. Then, it adds the value of the id of the element to
the "data transfer" object. The "data transfer" object holds all of the
information that will be needed when the dragging operation ends.
The classList object for the HTML element is just a way to add and remove
CSS classes to and from a DOM object. You're not going to be tested over that
bit of information for some weeks, so don't worry about remembering it. Just
understand that using the add method on it adds the CSS class to the HTML
element.
<!DOCTYPE html> <html lang="en"> <head> <meta charset="UTF-8"> <meta name="viewport" content="width=device-width, initial-scale=1.0"> <title>Red Square is a Drag</title> <script type="text/javascript"> const handleDragStart = e => { e.target.classList.add('is-being-dragged'); e.dataTransfer.setData('text/plain', e.target.id); e.dataTransfer.dropEffect = 'move'; } window.addEventListener('DOMContentLoaded', () => { document .getElementById('red-square') .addEventListener('dragstart', handleDragStart); }); </script> <style> #red-square { background-color: red; box-sizing: border-box; height: 100px; width: 100px; } .is-being-dragged { opacity: 0.5; border: 2px dashed white; } </style> </head> <body> <div id="red-square"></div> </body> </html>
If you update your version of the code, you can now see that the square's border
gets all dashy when you drag it!

331.2. The drop zone is all clear!
A drop zone is just another HTML element. Put another div in your HTML and
give it an id of drop-zone. It could, conceivably, look like this.
<body> <div id="red-square"></div> <div id="drop-zone">drop zone</div> </body>
To make it visible, add some CSS. Note that most of that in there is to make it
look pretty. You should understand the simple things like "background-color" and
"color" and "font-size", "height" and "width". You won't yet be
tested on any of
those other properties. But, feel free to play around with them!
<style> #drop-zone { align-items: center; border: 1px solid #DDD; color: #CCC; display: flex; font-family: Arial, Helvetica, sans-serif; font-size: 2em; font-weight: bold; height: 200px; justify-content: center; position: absolute; right: 0; width: 200px; } #red-square { background-color: red; box-sizing: border-box; height: 100px; width: 100px; } .is-being-dragged { opacity: 0.5; border: 2px dashed white; } </style>

331.3. Handle when the red square gets enters the drop zone (and leaves)
This is another couple of JavaScript event handlers, but this time, it will
handle the dragenter and dragleave events on the drop zone element. You can
replace the <script> tag in your HTML with this version, here, to handle those
events. Note that the handleDragEnter event handler merely adds a CSS class to
the drop zone. The handleDragLeave removes the CSS class. Then, in the
DOMContentLoaded event handler, the last three lines gets a reference to the
drop zone element and attaches the event handlers to it.
<script type="text/javascript"> const handleDragStart = e => { e.target.classList.add('is-being-dragged'); e.dataTransfer.setData('text/plain', e.target.id); e.dataTransfer.dropEffect = 'move'; }; const handleDragEnter = e => { e.target.classList.add('is-active-drop-zone'); }; const handleDragLeave = e => { e.target.classList.remove('is-active-drop-zone'); }; window.addEventListener('DOMContentLoaded', () => { document .getElementById('red-square') .addEventListener('dragstart', handleDragStart); const dropZone = document.getElementById('drop-zone'); dropZone.addEventListener('dragenter', handleDragEnter); dropZone.addEventListener('dragleave', handleDragLeave); }); </script>
The CSS to make the item change looks like this. Just add the class to the
<style> tag in the HTML.
.is-active-drop-zone { background-color: blue; }
Just look at that drop zone turn blue with glee!

331.4. Do something with a "drop"!
Finally, the drop event of the drop target handles what happens when you let
go of the draggable element over the drop zone. However, there's one small
problem. From the MDN documentation on [Drag Operations]:
If the mouse is released over an element that is a valid drop target, that is,
one that cancelled the lastdragenterordragoverevent, then the drop
will be successful, and a drop event will fire at the target. Otherwise, the
drag operation is cancelled, and no drop event is fired.
For this to work properly, you will also have to subscribe to thedropevent
for the drop zone. Then, in both the handlers for thedropanddragenter
events, you'll need to cancel the event. Recall that in the last article you
learned about thepreventDefault()method on the event object. That's what you
need to call in both thedropanddragenterevent handlers to make the
dropevent fire.
That's a lot of words! Here is the final HTML for this little dragging example.
<!DOCTYPE html> <html lang="en"> <head> <meta charset="UTF-8"> <meta name="viewport" content="width=device-width, initial-scale=1.0"> <title>Red Square is a Drag</title> <script type="text/javascript"> const handleDragStart = e => { e.target.classList.add('is-being-dragged'); e.dataTransfer.setData('text/plain', e.target.id); e.dataTransfer.dropEffect = 'move'; }; const handleDragEnter = e => { // Needed so that the "drop" event will fire. e.preventDefault(); e.target.classList.add('is-active-drop-zone'); }; const handleDragLeave = e => { e.target.classList.remove('is-active-drop-zone'); }; const handleDragOver = e => { // Needed so that the "drop" event will fire. e.preventDefault(); }; const handleDrop = e => { const id = e.dataTransfer.getData('text/plain'); const draggedElement = document.getElementById(id); draggedElement.draggable = false; e.target.appendChild(draggedElement); }; window.addEventListener('DOMContentLoaded', () => { document .getElementById('red-square') .addEventListener('dragstart', handleDragStart); const dropZone = document.getElementById('drop-zone'); dropZone.addEventListener('drop', handleDrop); dropZone.addEventListener('dragenter', handleDragEnter); dropZone.addEventListener('dragleave', handleDragLeave); dropZone.addEventListener('dragover', handleDragOver); }); </script> <style> #drop-zone { align-items: center; border: 1px solid #DDD; color: #CCC; display: flex; font-family: Arial, Helvetica, sans-serif; font-size: 2em; font-weight: bold; height: 200px; justify-content: center; position: absolute; right: 0; top: 100px; width: 200px; } #red-square { background-color: red; box-sizing: border-box; height: 100px; width: 100px; } .is-being-dragged { opacity: 0.5; border: 8px dashed white; } .is-active-drop-zone { background-color: blue; color: } </style> </style> </head> <body> <div id="red-square" draggable="true"></div> <div id="drop-zone">drop zone</div> </body> </html>

332. What you learned:
There is a lot going on, here. Here's a quick review of what you should get
from this article.
- HTML has a Drag and Drop API that you can use to do dragging and dropping in
an application. - To make it so that a person can drag an HTML element around, you add the
draggable="true"attribute/value pair to the element (or elements) that you
want to drag. - You can subscribe to one event on the thing you want to drag, the
dragstart
event. That event will allow you to customize the element and save data to the
dataTransferobject. - You can subscribe to four events for the "drop zone" element(s):
dragenter,
dragover, anddragleave. If you want thedropevent to work, you must
subscribe to bothdragenteranddragoverand cancel the event using the
preventDefault()method of the event.
[1]: https://developer.mozilla.org/en-US/docs/Web/API/Event
[2]: https://developer.mozilla.org/en-US/docs/Web/API/DragEvent
[3]: https://developer.mozilla.org/en-US/docs/Web/API/MouseEvent
[4]: https://developer.mozilla.org/en-US/docs/Web/API/HTML_Drag_and_Drop_API
[5]: https://developer.mozilla.org/en-US/docs/Web/API/Document/dragover_event
[6]: https://developer.mozilla.org/en-US/docs/Web/API/Document/drop_event
[Drag Operations]: https://developer.mozilla.org/en-US/docs/Web/API/HTML_Drag_and_Drop_API/Drag_operations#drop
Event Handling: Click Events With Event.target
Imagine a user is viewing a Web page showing 300 different products. The user
carefully studies the page, makes a selection, and clicks on one of the 300
products. Could we find out through code which element was clicked on? Yes!
Previously we learned how to handle a click event using an element’s ID.
However, what if we don’t know the ID of the clicked element before it’s
clicked? There is a simple property we can use to discover on which element the
click event occurred: event.target.
According to the MDN doc on [event.target][1], "the target property of the
Event interface is a reference to the object that dispatched the event. It is
different from [event.currentTarget][2] when the event handler is called during
the bubbling or capturing phase of the event." Essentially:
event.targetrefers to the element on which the event occurred (e.g. a
clicked element).event.currentTargetrefers to the element to which the event handler has
been attached, which could be the parent element of theevent.target
element. (Note: We’ll talk about this in more detail in the reading on The
Bubbling Principle.)
It is common practice for developers to useevent.targetto reference the
element on which the event occurs in an event handling function. Let’s practice
using this handy property to get the ID of a clicked element.
333. Use event.target to console.log the ID of a clicked div
Let’s say we had an HTML page with 10 divs, each with a unique ID, like below.
We want to click on any one of these divs and print the clicked div’s ID to the
console.
HTML
<!DOCTYPE html> <html> <head> <link rel="stylesheet" type="text/css" href="example.css" /> <script type="text/javascript" src="example.js"></script> </head> <body> <div id="div-1" class="box">1</div> <div id="div-2" class="box">2</div> <div id="div-3" class="box">3</div> <div id="div-4" class="box">4</div> <div id="div-5" class="box">5</div> <div id="div-6" class="box">6</div> <div id="div-7" class="box">7</div> <div id="div-8" class="box">8</div> <div id="div-9" class="box">9</div> <div id="div-10" class="box">10</div> </body> </html>
In our linked example.css file, we’ll add style to the .box class to
make
our divs easier to click on:
CSS
.box { border: 2px solid gray; height: 50px; width: 50px; margin: 5px; }
Now, we’ll write Javascript to print the clicked div’s ID to the console. Again,
we want to wait for the necessary DOM elements to load before running our script
using DOMContentLoaded. Then, we’ll listen for a click event and console.log
the clicked element’s ID.
Javascript
// example.js // Wait for the DOM to load window.addEventListener("DOMContentLoaded", event => { // Add a click event listener on the document’s body document.body.addEventListener("click", event => { // console.log the event target’s ID console.log(event.target.id); }); });
If you open up your HTML in a browser, you should see the 10 divs. Click on
any one of them. Open up the browser console by right-clicking, selecting
Inspect, and opening the Console tab. The ID of the div you clicked should
be printed to the console. Click on the other divs randomly, and make sure their
IDs print to the console as well.
334. What we learned:
- The definition of
event.target - How
event.targetdiffers fromevent.currentTarget - How to console.log the ID of a clicked element using
event.target
[1]: https://developer.mozilla.org/en-US/docs/Web/API/Event/target
[2]: https://developer.mozilla.org/en-US/docs/Web/API/Event/currentTarget
Event Handling: The Bubbling Principle
Bubbles are little pockets of air that make for an amusing time in the bath.
Sometimes, though, bubbles can be annoying -- like when they suddenly pop, or
when there are too many and they’re overflowing! We can think about Javascript
events and their handlers as bubbles that rise up through the murky waters of
the DOM until they reach the surface, or the top-level DOM element.
It’s important for developers to understand The Bubbling Principle and use it to
properly handle events and/or to stop events from bubbling up to outer elements
and causing unintended effects.
335. What is the bubbling principle?
According to [this handy bubbling explainer][1] on Javascript.info, The
Bubbling
Principle means that when an event happens on an element, it first runs the
handlers on it, then on its parent, then all the way up on other ancestors.
Consider the following example HTML.
<!DOCTYPE html> <html> <head> <script type="text/javascript"> window.addEventListener("DOMContentLoaded", event => { document.body.addEventListener("click", event => { console.log(event.target.id); }); }); </script> </head> <body> <div onclick="console.log('The onclick handler!')"> <p id="paragraph"> If you click on this P, the onclick event for the DIV actually runs. </p> </div> </body> </html>
In the <script>, you can see the event listener for DOMContentLoaded, and
inside it, another listener for a click event on the <body> element of the
document accessed through the special property document.body. (You could also
use document.querySelector('body'), too.) By now, we should be used to
listening for click events in our scripts. However, there's another way to run a
function on a click event as an attribute of the div in the body of the
HTML, a way that you should never ever ever use in real production code!
Check out that onclick attribute with some JavaScript code to print out a
message about the so-called onclick handler. For almost ever event type like
click or change or keypress, you can put an attribute by prefixing the
event name with the word "on". However, you should never ever ever use that in
real production code!
Save the above HTML in a file, and run that file in a browser. Open up the
browser console (right-click -> Inspect -> Console), click on the <p>
element, and observe what happens. The message "The onclick handler" should
appear, then you should see the id paragraph printed to the console.
What happened here? The console.log shows that an event happened on the <p>
(i.e. the event.target), and yet the onclick handler on the <div>
also
fired -- meaning that the click event on the <p> bubbled up to the <div>
and
fired its onclick event!
Once again, here's the deal:
Don't ever use the
on-event-name attribute version of an event handler.
Instead, always use theaddEventListenermethod of the DOM object that you
get from something likedocument.getElementByIdordocument.querySelector.
336. An event bubbling example
To visualize event bubbling, it might be helpful to watch this short and fun
YouTube video on bubbles inside bubbles inside bubbles.
[Bubble Inside a Bubble Video][3]
We can think of events that happen on nested DOM elements as these nested
bubbles. An event that happens on the innermost element bubbles up to its parent
element, and that parent’s parent element, and so on up the chain. Let’s look at
another example that demonstrates bubbling.
HTML
<!DOCTYPE html> <html> <body> <main> <div> <p>This is a paragraph in a div in a main in a body in an html</p> </div> </main> <script> function handler(e) { console.log(e.currentTarget.tagName); } document.querySelector('main').addEventListener('click', handler); document.querySelector('div').addEventListener('click', handler); document.querySelector('p').addEventListener('click', handler); </script> </body> </html>
If you save this HTML file, open it in a browser, and click on the <p>, three
different messages should appear in the console: first “P”, second “DIV”, and
third “MAIN”. The click event bubbled upwards from the <p> element to the
<div> and finally to the <main>.
We could think of this succession of events as bubbles popping. The innermost
bubble (the <p> element) popped (i.e. displayed an alert), which caused its
parent’s bubble to pop, which caused its parent’s bubble to pop. Since there
aren’t any onclick handlers above the <main> nothing else happens on
the
page, but the bubbles would travel all the way up the DOM until they reached the
top (<html>) looking for event handlers to run.
337. Stopping event bubbling with stopPropagation()
As stated in the introduction, event bubbling can cause annoying side effects.
This MDN doc on [Event bubbling and capture][4] explains what would happen if a
user clicked on a <video> element that has a parent <div> with a
show/hide
toggle effect. On a click, the video would disappear along with its parent div!
How can you stop this unintended behavior from occurring? The answer is with the
[event.stopPropagation()][5] method which stops the bubbling from continuing up
the parent chain. Here’s what it would look like on the <video> element:
Javascript
document .querySelector('video') .addEventListener('click', event => { event.stopPropagation(); video.play(); });
338. Event delegation
While event bubbling can sometimes be annoying, it can also be helpful. The
bubbling effect allows us to make use of event delegation, which means
that we can delegate events to a single element/handler -- a parent element that
will handle all events on its children elements.
Say you had an unordered list (<ul>) element filled with several list item
(<li>) elements, and you want to listen for click events on each list item.
Instead of attaching a click event listener on each and every list item, you
could conveniently attach it to the parent unordered list, like so:
HTML
<ul id="my-list"> <li>This is list item 1.</li> <li>This is list item 2.</li> <li>This is list item 3.</li> <li>This is list item 4.</li> <li>This is list item 5.</li> </ul> <script> document .getElementById('my-list') .addEventListener('click', e => { // will print out "This is list item X" // depending on which list item is clicked console.log(e.target.innerHTML); // always prints "my-list" console.log(e.currentTarget.id); }); </script>
This example is a lot like the first example you saw with the <p> inside of a
<div>, where the click on the <p> bubbled up to the
<div>. In the above
example, a click on any <li> will bubble up to its parent, the <ul>.
When clicked on, a single <li> element becomes the [event.target][7] -- the
object that dispatched the event. The <ul> element is the
[event.currentTarget][8] -- the element to which the event handler has been
attached.
Now that you know how to handle events responsibly, go frolic in the bubbles!
339. What we learned:
- The definition of The Bubbling Principle
- Examples of event bubbling
- How to stop events from bubbling
- How to use bubbling for event delegation
[1]: https://javascript.info/bubbling-and-capturing
[2]: https://developer.mozilla.org/en-US/docs/Web/Guide/Events/Event_handlers
[3]: https://www.youtube.com/watch?v=OntX1115Tw4
[4]: https://developer.mozilla.org/en-US/docs/Learn/JavaScript/Building_blocks/Events#Event_bubbling_and_capture
[5]: https://developer.mozilla.org/en-US/docs/Web/API/Event/stopPropagation
[6]: https://developer.mozilla.org/en-US/docs/Web/API/Event/stopImmediatePropagation
[7]: https://developer.mozilla.org/en-US/docs/Web/API/Event/target
[8]: https://developer.mozilla.org/en-US/docs/Web/API/Event/currentTarget
Project: Event Handling With Mr. Spud Face
Mr. Spud Face is a charming potato with an inexplicably handsome face. He has
recently moved to your state and needs to get an updated driver’s license with
his current information, so that he can do nifty things like drive to the
grocery store, vote, and take his spud spouse on special dates.
Use Javascript to create a driver’s license for Mr. Spud Face. If you want to
go the extra mile, create a Mr. Spud Face drag-and-drop game as a bonus.
Now that you know how to handle page events with Javascript, put that knowledge
into use on this project!
In this project, you will:
- Write Javascript to handle common form events
- Handle input, checkbox, and button click events
- Grab form values and update elements with those values
- Utilize bubbling and event delegation
- Use the HTML Drag-and-Drop API (if you dare!)
340. Project overview
Use what you’ve learned about event handling to complete this project.
Demonstrate that you can use event listeners on page elements and event
handlers.
We have set up a project folder for you to use inside this folder called
spud-face-project.zip with an HTML file, CSS file, and Javascript file. Use
this folder to complete your project.
In phases 1-4, you will write Javascript to grab the driver’s license form
values and update Mr. Spud Face’s license, as well as handle other form events
on inputs and button clicks. To get a good understanding of the HTML
Drag-and-Drop API, complete the bonus section by making a drag-and-drop spud
game.
341. Phase 1: Create a spud driver’s license
In your spud-face-project folder, open up your spud-face.html file. Open it
up in a browser to see what the page looks like.
We’ve filled it with elements, chief of which are a <form> element and a
<div> depicting a driver’s license. Use the form to build out the driver’s
license information.
341.1. Phase 1A: Get form values and display on driver’s license
The form values on the left should update the driver’s license information on
the right. Set up event listeners on the form whenever the user inputs a value
into a form input. Get the value of that form input and update the
corresponding information on the driver’s license. You might want to use the
following:
- [document.getElementById()][1]
- [eventTarget.addEventListener()][2]
- [HTMLElement: input event][3]
- [checkbox.checked attribute][4]
341.2. Phase 1B: Refactor to use event delegation and event.target
In phase 1A, you might have set up event listeners on each form input. While
that does work, it would be ideal to make use of [event delegation][5] and
attach a single listener to our form.
- Set up a single event listener on the form to listen for an input change.
- Write some logic, in the form of an
ifstatement orswitchcase
statement, to update theinnerHTMLof the driver’s license elements that
correspond withevent.target. - You may want to use
event.target.idandevent.target.value. - Make sure your script runs after the DOM has loaded.
342. Phase 2: Add focus and blur events to form inputs
Jazz up your form inputs by adding a quick color change on focus, and
removing it on blur. Give active inputs a background color of lightgreen
and no background color (initial state) when inactive. Use the following to do
so:
Element: focus eventElement: blur event
343. Phase 3: Check that license numbers match
Check that the numbers entered by the user on the license number fields match.
In your HTML file, these are represented by the inputs with the IDs of
input-license-num and input-license-num-confirm.
If the numbers don’t match, then change the background color of both inputs to
be lightcoral.
Again, you’ll use event.target.value here. You might want to use
setTimeout() to give the user some time to fill out the form.
344. Phase 4: Update submit button click count
Since this isn’t a real form that actually submits the driver’s license info
anywhere, you won’t need to make a server or API request. Instead, write a
function to increment the click count every time the submit button is clicked.
Listen for a click event on the button. Then, update the click count inside
of the button.
345. Bonus: Mr. Spud Face Drag-and-Drop Game
Use the [HTML Drag-and-Drop API][6] to create a Mr. Spud Face drag-and-drop
game inside of your spud-face.html file.
Add the images inside of the project’s images folder to your HTML file, and
write Javascript that will let the user drag the spud body parts and drop them
onto the spud body. Set up handlers for these drag events:
dragStartdragordragOverdragEndordrop
[1]: https://developer.mozilla.org/en-US/docs/Web/API/Document/getElementById
[2]: https://developer.mozilla.org/en-US/docs/Web/API/EventTarget/addEventListener
[3]: https://developer.mozilla.org/en-US/docs/Web/API/HTMLElement/input_event
[4]: https://developer.mozilla.org/en-US/docs/Web/HTML/Element/input/checkbox#checked
[5]: https://javascript.info/event-delegation
[6]: https://developer.mozilla.org/en-US/docs/Web/API/HTML_Drag_and_Drop_API
WEEK-04 DAY-4
JSON and Storage
JSON Learning Objectives
The objective of this lesson is to familiarize you with the JSON format and
how to serialize to and deserialize from that format.
The learning objectives for this lesson are that you can:
- Identify and generate valid JSON-formatted strings
- Use
JSON.parseto deserialize JSON-formatted strings - Use
JSON.stringifyto serialize JavaScript objects - Correctly identify the definition of "deserialize"
- Correctly identify the definition of "serialize"
This lesson is relevant because JSON is the lingua franca of data
interchange.ou with the JSON format and
how to serialize to and deserialize from that format.
The learning objectives for this lesson are that you can: - Identify and generate valid JSON-formatted strings
- Use
JSON.parseto deserialize JSON-formatted strings - Use
JSON.stringifyto serialize JavaScript objects - Correctly identify the definition of "deserialize"
- Correctly identify the definition of "serialize"
This lesson is relevant because JSON is the lingua franca of data
interchange.
Storage Learning Objectives
Below is a complete list of the terminal learning objectives for this lesson.
When you complete this lesson, you should be able to perform each of the
following objectives. These objectives capture how you may be evaluated on the
assessment for this lesson.
- Write JavaScript to store the value "I ❤️ falafel" with the key "eatz" in
the
browser's local storage. - Write JavaScript to read the value stored in local storage for the key
"paper-trail".earning objectives for this lesson.
When you complete this lesson, you should be able to perform each of the
following objectives. These objectives capture how you may be evaluated on the
assessment for this lesson. - Write JavaScript to store the value "I ❤️ falafel" with the key "eatz" in
the
browser's local storage. - Write JavaScript to read the value stored in local storage for the key
"paper-trail".
Cookies and Web Storage
As we’ve learned in previous sections, most data on the Web is stored in a
database on a server, and we use the browser to retrieve this data. However,
sometimes data is stored locally for the purposes of persisting throughout an
entire session or until a specified expiration date.
In this reading, we’ll go over using cookies to store data versus using the
Web Storage API and the use cases for each storage method.
346. Cookies
Cookies have been around forever, and they are still a widely used method to
store information about a site’s users.
What is a cookie?
A cookie is a small file stored on a user’s computer that holds a bite-sized
amount of data, under 4KB. Cookies are included with HTTP requests. The server
sends the data to a browser, where it's typically stored and then sent back to
the server on the next request.
What are cookies used for?
Cookies are used to store stateful information about a user, such as their
personal information, their browser habits or history, or form input information
they have filled out. A common use case for cookies is storing a session
cookie on user login/validation. Session cookies are lost once the browser
window is closed. To make sure the cookie persists beyond the end of the
session, you could set up a persistent cookie with a specified expiration
date. A use case for a persistent cookie is an e-commerce website that tracks a
user’s browsing or buying habits.
How to create a cookie in Javascript:
As we've previously covered, the document interface represents the web page
loaded in a user's browser. Since cookies are stored on a user's browser, it
makes sense that the document object also allows us to get/set cookies on a
user's browser:
const firstCookie = "favoriteCat=million"; document.cookie = firstCookie; const secondCookie = "favoriteDog=bambi"; document.cookie = secondCookie; document.cookie; // Returns "favoriteCat=million; favoriteDog=bambi"
Using the following syntax will create a new cookie:
document.cookie = aNewCookieHere;
If you want to set a second cookie, you would assign a new key value pair using
the same syntax a second time. Make sure to set the cookie to a string formatted
like a key-value pair:
const firstCookie = "favoriteCat=million"; document.cookie = firstCookie; document.cookie; // Returns "favoriteCat=million"
Formatting your string like we do in the firstCookie variable above sets the
cookie value with a defined key, known as the cookie's name, instead of an
empty name. Refer to the MDN docs on [Document.cookie][1] for more examples.
You can view all the cookies a website is storing about you by using the
Developer Tools. On Google Chrome, see the Application tab, and on
Firefox, see the Storage tab.
Deleting a cookie:
We can delete our own cookies using JavaScript by setting a cookie's expiration
date to a date in the past, causing them to expire:
const firstCookie = "favoriteCat=million"; document.cookie = firstCookie; document.cookie; // Returns "favoriteCat=million" // specify the cookies "name" (the key) with an "=" and set the expiration // date to the past document.cookie = "favoriteCat=; expires = Thu, 01 Jan 1970 00:00:00 GMT"; document.cookie; // ""
We can also delete cookies using the Developer Tools!
Navigate to a website, such as Amazon, and add an item to your cart. Open up the
Developer Tools in your browser and delete all the cookies. In Chrome, you can
delete cookies by highlighting a cookie and clicking the delete button. In
Firefox, you can right-click and delete a cookie. If you’ve deleted all the
cookies in your Amazon cart, and you refresh the page, you should notice your
cart is now empty.
347. Web Storage API
Cookies used to be the only way to store data in the browser, but with HTML5
developers gained access to the [Web Storage API][2], which includes
localStorage and Session Storage. Here are the differences between the
two, according to MDN:
sessionStorage:
- Stores data only for a session, or until the browser window or tab is closed
- Never transfers data to the server
- Has a storage limit of 5MB (much larger than a cookie)
The following [example from MDN][3] shows how we can use sessionStorage to
autosave the contents of a text field and restore the contents of that text
field if the browser is accidentally refreshed.
// Get the text field that we're going to track let field = document.getElementById("field"); // See if we have an autosave value // (this will only happen if the page is accidentally refreshed) if (sessionStorage.getItem("autosave")) { // Restore the contents of the text field field.value = sessionStorage.getItem("autosave"); } // Listen for changes in the text field field.addEventListener("change", function () { // And save the results into the session storage object sessionStorage.setItem("autosave", field.value); });
localStorage:
- Stores data with no expiration date and is deleted when clearing the browser
cache - Has the maximum storage limit in the browser (much larger than a cookie)
Like withsessionStorage, we can use thegetItem()andsetItem()methods
to retrieve and setlocalStoragedata. The following [example from MDN][4]
will: - Check whether
localStoragecontains a data item calledbgcolorusing
getItem(). - If
localStoragecontainsbgcolor, run a function calledsetStyles()that
grabs the data items usingStorage.getItem()and use those values to update
page styles. - If it doesn't, run a function called
populateStorage(), which uses
Storage.setItem()to set the item values, then runsetStyles().
if (!localStorage.getItem("bgcolor")) { populateStorage(); } setStyles(); const populateStorage = () => { localStorage.setItem("bgcolor", document.getElementById("bgcolor").value); localStorage.setItem("font", document.getElementById("font").value); localStorage.setItem("image", document.getElementById("image").value); }; const setStyles = () => { var currentColor = localStorage.getItem("bgcolor"); var currentFont = localStorage.getItem("font"); var currentImage = localStorage.getItem("image"); document.getElementById("bgcolor").value = currentColor; document.getElementById("font").value = currentFont; document.getElementById("image").value = currentImage; htmlElem.style.backgroundColor = "#" + currentColor; pElem.style.fontFamily = currentFont; imgElem.setAttribute("src", currentImage); };
When would we use the Web Storage API?
Since web storage can store more data than cookies, it’s ideal for storing
multiple key-value pairs. Like with cookies, this data can be saved only as a
string. With localStorage, the data is stored locally on a user’s machine,
meaning that it can only be accessed client-side. This differs from cookies
which can be read both server-side and client-side.
There are a few common use cases for Web storage. One is storing information
about a shopping cart and the products in a user’s cart. Another is saving input
data on forms. You could also use Web storage to store information about the
user, such as their preferences or their buying habits. While we would normally
use a cookie to store a user’s ID or a session ID after login, we could use
localStorage to store extra information about the user.
You can view what’s in local or session storage by using the Developer Tools. On
Google Chrome, see the Application tab, and on Firefox, see
the
Storage tab.
348. What we learned:
- What cookies are and when to use them
- Differences between cookies and localStorage
- Use cases for cookies and localStorage
[1]: https://developer.mozilla.org/en-US/docs/Web/API/Document/cookie
[2]: https://developer.mozilla.org/en-US/docs/Web/API/Web_Storage_API
[3]: https://developer.mozilla.org/en-US/docs/Web/API/Window/sessionStorage
[4]: https://developer.mozilla.org/en-US/docs/Web/API/Storage
Jason? No, JSON!
[Jason] is an ancient Greek mythological hero who went traipsing about the known
world looking for "the golden fleece".
[JSON] is an open-standard file format that "uses human-readable text to
transmit objects consisting of key-values pairs and array data types."
We're going to ignore [Jason] and focus solely on [JSON] for this reading so
that you can, by the end of it, know what [JSON] is and how to work with it.
349. JSON is a format!
This is the most important thing that you can get when reading this article. In
the same way that HTML is a format for hypertext documents, or DOCX is a format
for Microsoft Word documents, JSON is just a format for data. It's just text. It
doesn't "run" like JavaScript does. It is just text that contains data that both
machines and humans can understand. If you ever hear someone say "a JSON
object", then you can rest assured that phrase doesn't make any sense
whatsoever.
JSON is just a string. It's just text.
That's so important, here it is, again, but in a fancy quote box.
JSON is just a string. It's just text.
350. Why all the confusion?
The problem is, JSON looks a lot like JavaScript syntax. Heck, it's even named
JavaScript Object Notation. That's likely because the guy who invented it,
[Douglas Crockford], is an avid JavaScripter. He's the author of [JavaScript:
The Good Parts] and was the lead JavaScript Architect at Yahoo! back when Yahoo!
was a real company.
At that time, like in the late 1990s and early 2000s, there were a whole bunch
of competing formats for how computers would send data between one another. The
big contender at the time is a format called XML, or the eXtensible Markup
Language. It looks a lot like HTML, but has far stricter rules than HTML.
Douglas didn't like XML because it took a lot of bytes to send the data (and
this was a pre-broadband/pre-3G world). Worse, XML is not a friendly format to
read if you're human. So, he set out to come up with a new format based on the
way JavaScript literals work.
351. "Remind me about JavaScript literals..."
Just to refresh your memory, a literal in JavaScript is a value that you
literally just type in. If you type 7 into a JavaScript file, when it runs,
the JavaScript interpreter will see that character 7 and say to itself, "Hey
self, the programmer literally typed the number seven so that must mean they
want the value 7."
Here's a table of some literals that you may type into a program.
| What you want to type | The JavaScript literal |
|---|---|
| The value that means "true" | true |
| The number of rows in this table | 6 |
| A bad approximation of π | 3.14 |
| An array that contains some US state names | ["Ohio", "Iowa"] |
| An object that represents Roberta | { person: true, name: "Roberta" } |
Back to Douglas Crockford, inventor of [JSON]. Douglas thought to himself, why
can't I create a format that has that simplicity so that I can write programs
that can send data to each other in that format? Turns out, he could, and he
did.
352. Boolean, numeric, and null values
The following table shows you what the a JavaScript literal is in the JSON
format. Notice that everything in the JSON column is actually a string!
| JavaScript literal value | JSON representation in a string |
|---|---|
true |
"true" |
false |
"false" |
12.34 |
"12.34" |
null |
"null" |
353. String literals in JSON
Say you have the following string in JavaScript.
'this is "text"'
When that gets converted into the JSON format, you will see this:
"this is \"text\""
First, it's important to notice one thing: JSON always uses double quotes for
strings. Yep, that's worth repeating.
JSON always uses double-quotes to mark strings.
Notice also that the quotation marks (") are "escaped". When you write a string
surrounded by quotation-marks like "escaped", everything's fine. But, what
happens when your string needs to include a quotation mark?
// This is a bad string with quotes in it "Bob said, "Well, this is interesting.""
Whatever computer is looking at that string gets really confused because once it
reads that first quotation mark it's looking for another quotation mark to show
where the string ends. For computers, the above code looks like this to them.
"Bob said, " // That's a good string Well, this is interesting // What is THIS JUNK???? "" // That's a good string
You need a way to indicate that the quotation marks around the phrase that Bob
says should belong in the string, not as a way to show where the string starts
or stops. The way that language designers originally addressed this was by
saying
If your quotation mark delimited string has a quotation mark in it, put a
backslash before the interior quotation mark.
Following that rule, you would correctly write the previous string like this.
"Bob said, \"Well, this is interesting.\""
Check out all of the so-called [JavaScript string escape sequences] over on
MDN.
What happens if you had text that spanned more than one line? JSON only allows
strings to be on one line, just like old JavaScript did. Let's say you just
wrote an American sentence that you want to submit to a contest.
She woke him up with
her Ramones ringtone "I Want
to be Sedated"
(from American Sentences by Paul E. Nelson)
If you want to format that in a string in JSON format, you have to escape the
quotation marks and the new lines! The above would look like this:
She woke him up with\nher Ramones ringtone \"I Want\nto be Sedated\"
The new lines are replaced with "\n".
354. Array values
The way that JSON represents an array value is using the same literal notation
as JavaScript, namely, the square brackets []. With that in mind, can you answer the
following question before continuing?
What is the JSON representation of an array containing the numbers one, two,
and three?
Well, in JavaScript, you would type [1, 2, 3].
If you were going to type the corresponding JSON-formatted string that contains
the representation of the same array, you would type "[1, 2, 3]". Yep, pretty
much the same!
355. Object values
Earlier, you saw that example of an object that represents Roberta as
{ person: true, name: "Roberta" }
The main difference between objects in JavaScript and JSON is that the keys in
JSON must be surrounded in quotation marks. That means the above, in a JSON
formatted string, would be:
"{ \"person\": true, \"name\": \"Roberta\" }"
356. Some terminology
When you have some data and you want to turn it into a string (or some other
kind of value like "binary") so your program can send it to another computer,
that is the process of serialization.
When you take some text (or something another computer has sent to your program)
and turn it into data, that is the process of deserialization.
357. Using the built-in JSON object
In modern JavaScript interpreters, there is a JSON object that has two methods
on it that allows you to convert JSON-formatted strings into JavaScript objects
and JavaScript object into JSON-formatted strings. They are:
JSON.stringify(value)will turn the value passed into it into a string.JSON.parse(str)will turn a JSON-formatted string into a JavaScript object.
So, it shouldn't come as much of a surprise how the following works.
const array = [1, 'hello, "world"', 3.14, { id: 17 }]; console.log(JSON.stringify(array)); // prints [1, "hello, \"world\"", 3.14, {"id":17}]
It shouldn't surprise you that it works in the opposite direction, too.
const str = '[1,"hello, \\"world\\"",3.14,{"id":17}]'; console.log(JSON.parse(str)); // prints an array with the following entries: // 0: 1 // 1: "hello, \"world\"" // 2: 3.14 // 3: { id: 17 }
You may ask yourself, "What's up with that double backslash thing going on in
the JSON representation?". It has to do with that escaping thing. When
JavaScript reads the string the first time to turn it into a String object in
memory, it will escape the backslashes. Then, when JSON.parse reads it, it
will still need backslashes in the string. This is all really confusing, escaped
strings and double backslashes. There's an easy solution for that.
358. You will almost never write raw JSON
Yep. But, you do need to be able to recognize it and read it. What you'll likely
end up doing in your coding is creating values and using JSON.stringify to
create JSON-formatted strings that represent those values. Or, you'll end up
calling a data service which will return JSON-formatted content to your code
which you will then use JSON.parse on to convert the string into a JavaScript
object.
359. Brain teaser
Now that you know JSON is a format for data and is just text, what will the
following print?
const a = [1, 2, 3, 4, 5]; console.log(a[0]); const s = JSON.stringify(a); console.log(s[0]); const v = JSON.parse(s); console.log(v[0]);
360. What you just learned
With some more practiced, of course, you will be able to do all of these really
well. However, right now, you should be able to
- Identify and generate valid JSON-formatted strings
- Use
JSON.parseto deserialize JSON-formatted strings - Use
JSON.stringifyto serialize JavaScript objects - Correctly identify the definition of "deserialize"
- Correctly identify the definition of "serialize"
[Jason]: https://en.wikipedia.org/wiki/Jason
[JSON]: https://en.wikipedia.org/wiki/JSON
[Douglas Crockford]: https://www.crockford.com/add.html
[JavaScript: The Good Parts]: https://isbndb.com/book/9780596517748
[JavaScript string escape sequences]: https://developer.mozilla.org/en-US/docs/Web/JavaScript/Reference/Global_Objects/String#Escape_notation
Using Web Storage To Store Data In The Browser
Like cookies, the [Web Storage API][1] allows browsers to store data in the
form of key-value pairs. Web Storage has a much larger storage limit than
cookies, making it a useful place to store data on the client side.
In the cookies reading, we reviewed the two main mechanisms of Web Storage:
sessionStorage and localStorage. While sessionStorage persists for the
duration of the session and ends when a user closes the browser, localStorage
persists past the current session and has no expiration date.
One typical use case for local storage is caching data fetched from
a server on the client side. Instead of making multiple network requests to the
server to retrieve data, which takes time and might slow page load, we can
fetch the data once and store that data in local storage. Then, our website
could read the persisting data stored in localStorage, meaning our website
wouldn't have to depend on our server's response - even if the user closes their
browser!
In this reading, we’ll go over how to store and read a key-value pair in local
storage.
361. Storing data in local storage
Web Storage exists in the window as an object, and we can access it by using
[Window.localStorage][2]. As we previously reviewed, with window properties we
can omit the ”window” part and simply use the property name, localStorage.
We can set a key-value pair in local storage with a single line of code. Here
are a few examples:
localStorage.setItem('eatz', 'I <3 falafel'); localStorage.setItem('coffee', 'black'); localStorage.setItem('doughnuts', '["glazed", "chocolate", "blueberry", "cream-filled"]');
The code above calls the setItem() method on the Storage object and sets a
key-value pair. Examples: eatz (key) and I <3 falafel (value),
coffee
(key) and black (value), and doughnut (key) and
["glazed", "chocolate", "blueberry", "cream-filled"] (value).
Both the key and the value must be
strings.
362. Reading data in local storage
If we wanted to retrieve a key-value pair from local storage, we
could use getItem() with a key to find the corresponding value. See the
example below:
localStorage.setItem('eatz', 'I <3 falafel'); localStorage.setItem('coffee', 'black'); localStorage.setItem('doughnuts', '["glazed", "chocolate", "blueberry", "cream-filled"]'); const eatz = localStorage.getItem('eatz'); const coffee = localStorage.getItem('coffee'); const doughnuts = localStorage.getItem('doughnuts'); console.log(eatz); // 'I <3 falafel' console.log(coffee); // 'black' console.log(doughnuts); // '["glazed", "chocolate", "blueberry", "cream-filled"]'
The above code reads the item with a key of eatz, the item with a key of
doughnut, and the item with a key of coffee. We stored these in variables
for handy use in any function we write.
Check the MDN docs on [localStorage][2] for other methods on the Storage
object to remove and clear all key-value pairs.
363. JSON and local storage
When we store and read data in local storage, we're actually storing [JSON][3]
objects. JSON is text format that is independent from JavaScript but
also resembles JavaScript object literal syntax. It's important to note that
JSON exists as a string.
Websites commonly get JSON back from a server request in the form of a
text file with a .json extension and a MIME type of application/json. We can
use JavaScript to parse a JSON response in order to work with it as a regular
JavaScript object.
Let's look at the doughnuts example from above:
localStorage.setItem('doughnuts', '["glazed", "chocolate", "blueberry", "cream-filled"]'); const doughnuts = localStorage.getItem('doughnuts'); console.log(doughnuts + " is a " + typeof doughnuts); // prints '["glazed", "chocolate", "blueberry", "cream-filled"] is a string'
If we ran the code above in the browser console, we'd see that doughnuts is a
string value because it's a JSON value. However, we want to be able to store
doughnuts as an array, in order to iterate through it or map it or any
other nifty things we can do to arrays.
We can construct a JavaScript value or object from JSON by parsing it:
const doughnuts = JSON.parse(localStorage.getItem('doughnuts'));
We used [JSON.parse()][4] to parse the string into JavaScript. If we printed
the parsed value of doughnuts to the console, we'd see it's a
plain ol' JavaScript array!
See the MDN doc on [Working with JSON][5] for more detail about using
JSON and JavaScript.
364. What you learned:
- Why we use local storage
- How to store data in local storage
- How to read data in local storage
- How storage objects are JSON that we need to parse
[1]: https://developer.mozilla.org/en-US/docs/Web/API/Web_Storage_API
[2]: https://developer.mozilla.org/en-US/docs/Web/API/Window/localStorage
[3]: https://json.org/
[4]: https://developer.mozilla.org/en-US/docs/Web/JavaScript/Reference/Global_Objects/JSON/parse
[5]: https://developer.mozilla.org/en-US/docs/Learn/JavaScript/Objects/JSON
Project: Shop Local Storage!
Learning how to set up an online shop is useful for everyone from large
e-commerce companies to an indie small business owner with a hobby website.
Shopping carts are an integral part of any online store. In this project you
will set one up with JavaScript -- and then, sell, baby, sell!
As we previously reviewed, localStorage is an ideal place to store data in
the browser without affecting the server-side database. One use-case for
localStorage is saving a user’s shopping cart so it persists from page to
page. Now that you know how to set and get items in localStorage, put that
knowledge to use in this project.
In this project, you will practice:
- Setting up a quick shopping cart
- Storing items in
localStorage - Reading items in
localStorage - Removing an item from
localStorage
365. Project overview
We’ve set up a project folder called local-storage-project.zip. Use these files to
complete the project.
We have filled out the HTML file with a few elements and the CSS with some
basic styles to represent a page where users can add items to a shopping cart.
Open storage-project.html in a browser to see what this page looks like.
In Phases 1-3, you will write JavaScript functions to let the user do the
following:
- Add an item to the shopping cart (i.e. store the item in
localStorage) - Display the items in the shopping cart (i.e. read the item in
localStorage) - Remove an item from the shopping cart (i.e. remove the item from
localStorage)
366. Phase 1: Write a function to store an item in the cart
Our HTML file contains a simple form with a couple of inputs and a submit
button, as well as an area to display cart items.
In a code editor, open the storage-project.js file, where you’ll write all
of your JavaScript. You should see an event listener for DOMContentLoaded
because, again, it’s a good idea to wrap functions that manipulate the DOM in
this listener (or else, have a bad time with async issues!).
The first order of business is to write a function that stores the form values
in localStorage whenever the user clicks the add-to-cart button. This
function should:
- Listen for a click event
- Grab the form values
- Store the item in
localStorage
Hint: Recall that we use [Storage.setItem()][1] to set a key-value pair in
localStorage.
367. Phase 2: Write a function to display the cart items
The second order of business is to write a function to display the items that
have been saved in localStorage to the Shopping Cart part of the page. In
your HTML file, this is represented by the div with an ID of shopping-cart.
This function should:
- Retrieve the item(s) stored in
localStorage - Insert the items into the DOM in the
shopping-cartDIV - Display both the item’s name and its quantity
Hint: You might want to use a loop!
Hint: Recall that we use [Storage.getItem(key)][2] to get a value via its
key.
Hint: We can also use [Storage.key(index)][3] to get a key name via its
index.
368. Phase 3: Write a function to remove items from the cart
The last thing we need to have a fully functional cart is for the user to be
able to remove items from the cart. Write a function that lets the user remove
items from their cart. In order to do this, you might want to add to or amend
the function you wrote in Phase 2.
Insert Remove buttons next to each cart item you inserted on the page. Then,
write a function that does the following:
- Listen for a click event on the “Remove” buttons
- Remove the corresponding item from
localStorage - Remove the item from the
shopping-cartDIV
Hint: We can use [Storage.removeItem()][4] to remove an item from
localStorage.
Hint: We can use [document.querySelectorAll()][5] to get a Node List of the
buttons. Then, loop through the list.
Hint: Recall what you know about [event.target][6] and [Element.parentNode][7].
It would be helpful to store the item’s key in an ID attribute on the Remove
button or the button’s containing DIV, so that you know which corresponding
key-value pair to remove fromlocalStorage.
Hint: We can use [location.reload][8] to refresh the page when an item is
removed. If everything is working correctly, the other cart items should still
display after a page refresh.
369. Check that your shopping cart functions correctly
After you’ve written your JS, test that the page functions as it should. A user
should be able to add an item with a given quantity to the cart. You should be
able to see this item in localStorage in your browser’s Developer Tools, and
it should show up in the Shopping Cart section of the page.
When a user removes an item by clicking the “Remove” button, that item should
be removed from localStorage as well as the page.
When you refresh the page, or close and reopen the browser, the cart items that
have not been removed should still appear on the page.
370. Bonus A: Update cart item quantities and reset values
Instead of displaying text values of the item quantities (e.g. “1”, “5”,
“12”)
on the page, replace those with an [HTML5 number spinner][9]. What’s that, you
ask? It’s really just a fancy way to say an input field that lets you increment
and decrement a number value. We’ve actually already used one on the page.
Check the input for quantity for an example.
When a user increments or decrements the input value of an item’s quantity, get
the input value and use it to update the corresponding key-value pair in
localStorage.
371. Bonus B: Calculate the item totals
Currently, if a user adds an item to the cart, let’s say Apples: 1, and
then adds that same item to the cart again with a different value, let’s say
Apples: 3, the value in localStorage gets overwritten with the new value
-- Apples: 3.
Write a function to calculate the total quantity added to the cart, instead of
rewriting the value. Using the above example, the actual total would be
Apples: 4. After calculating the total quantity of an item, update the
corresponding key-value pair in localStorage with the total.
When you’ve finished all of the above, congratulate yourself for all the hard
work. You made a shopping cart!
[1]: https://developer.mozilla.org/en-US/docs/Web/API/Storage/setItem
[2]: https://developer.mozilla.org/en-US/docs/Web/API/Storage/getItem
[3]: https://developer.mozilla.org/en-US/docs/Web/API/Storage/key
[4]: https://developer.mozilla.org/en-US/docs/Web/API/Storage/removeItem
[5]: https://developer.mozilla.org/en-US/docs/Web/API/Document/querySelectorAll
[6]: https://developer.mozilla.org/en-US/docs/Web/API/Event/target
[7]: https://developer.mozilla.org/en-US/docs/Web/API/Node/parentNode
[8]: https://developer.mozilla.org/en-US/docs/Web/API/Location/reload
[9]: https://www.html5tutorial.info/html5-number.php
372. OOP
WEEK 5
Object-Oriented Programming
- Free Same-Day Delivery: Package Managers & npm
- Return To Sender: Understanding Dependency Management With npm
- Introduction to npm
- Going Further with npm
- npm and Application Security
- Project: Create Your Own File Utilities!
- Constructor Function, What's Your Function?
- Putting the Class in JavaScript Classes
- The DNA of JavaScript Inheritance
- Using Modules in Node.js
- Constructor Functions and Classes Project
Object-Oriented Programming Learning Objectives - Object-Oriented Programming Explained
- The SOLID Principles Explained
- Controlling Coupling With The Law Of Demeter
- OOPS! I Forgot A Thing Project
WEEK-05 DAY-1
Node Package Manager
npm Learning Objectives
Below is a complete list of the terminal learning objectives for this lesson.
When you complete this lesson, you should be able to perform each of the
following objectives. These objectives capture how you may be evaluated on the
assessment for this lesson.
- Explain what "npm" stands for.
- Explain the purpose of the
package.jsonfile andnode_modulesdirectory. - Given multiple choices, identify the difference between npm's
package.json
andpackage-lock.jsonfiles. - Use
npm --versionto check what version is currently installed and use npm
to update itself to the latest version. - Use
npm initto create a new package andnpm installto add a package as
a dependency. Then userequireto import the module and utilize it in a
JavaScript file. - Given a package version number following the MAJOR.MINOR.PATCH semantic
versioning spec that may include tilde (~) and caret (^) ranges, identify the
range of versions of the package that will be compatible. - Explain the difference between a dependency and a development dependency.
- Given an existing GitHub repository, clone the repo and use npm to install
it's dependencies. - Use
npm uninstallto remove a dependency. - Use
npm updateto update an out-of-date dependency. - Given a problem description, use the npm registry to find a reputable
package (by popularity and quality stats) that provides functionality to
solve that problem. - Given a package with vulnerabilities due to outdated dependency versions,
usenpm auditto scan and fix any vulnerabilities. - Write and run an npm script.ing objectives for this lesson.
When you complete this lesson, you should be able to perform each of the
following objectives. These objectives capture how you may be evaluated on the
assessment for this lesson. - Explain what "npm" stands for.
- Explain the purpose of the
package.jsonfile andnode_modulesdirectory. - Given multiple choices, identify the difference between npm's
package.json
andpackage-lock.jsonfiles. - Use
npm --versionto check what version is currently installed and use npm
to update itself to the latest version. - Use
npm initto create a new package andnpm installto add a package as
a dependency. Then userequireto import the module and utilize it in a
JavaScript file. - Given a package version number following the MAJOR.MINOR.PATCH semantic
versioning spec that may include tilde (~) and caret (^) ranges, identify the
range of versions of the package that will be compatible. - Explain the difference between a dependency and a development dependency.
- Given an existing GitHub repository, clone the repo and use npm to install
it's dependencies. - Use
npm uninstallto remove a dependency. - Use
npm updateto update an out-of-date dependency. - Given a problem description, use the npm registry to find a reputable
package (by popularity and quality stats) that provides functionality to
solve that problem. - Given a package with vulnerabilities due to outdated dependency versions,
usenpm auditto scan and fix any vulnerabilities. - Write and run an npm script.
Free Same-Day Delivery: Package Managers & npm
So far, you've written lots of code yourself. Think of all the other developers
out there writing code by themselves as well. Wouldn't it be great if we could
share that code and all work together - without needing one giant office
space? Lucky for us, we don't need to share desks: we've got the Internet!
Let's discuss packages and package management, a simple way of sharing
working code across time & space.
We'll cover:
- defining "packages" in relation to programming;
- understanding package management;
- and using npm to manage packages in our JavaScript projects;
373. Package management
It's rare that you'd prepare a meal by grinding grain to make flour, or that
you'd hatch your own chickens just to get some scrambled eggs! Most industries
have learned to bundle the work of others into off-the-shelf goods, like a loaf
of bread or a dozen eggs, that everyone can benefit from.
Up to now, you've mostly written projects from scratch. This is a little like
grinding your own grain: it's a great learning experience, but you'll quickly
find that you're writing the same code over and over to accomplish common tasks
like authentication, file parsing, or accepting user input. Thankfully, we've
got a better way: packages.
A package is a collection of files & configuration wrapped up in an
easy-to-distribute wrapper. By using packages, we can rely on the work of other
developers to help move our own projects along at a rapid pace. Even better, we
can create our own packages to share our code with the world!
Applications you write may be dependent on packages to work. We refer to these
packages as dependencies of your code. Depending on the size of your project,
you may have hundreds or even thousands of dependencies! In addition, a package
may have its own dependencies on other packages. We'll discuss dependency
management in an upcoming lesson.
373.1. Special delivery!
The oldest and most basic way of sharing code is good old "copy & paste". One
developer could write a file they're proud of and share it directly with another
person on their team. This is fast and simple, but unsustainable for quite a few
reasons:
- Each time the file changes, the author would need to re-share the file.
- The author would need to keep multiple versions of the same file, just in case
an old project breaks unexpectedly. - Other developers might want to improve the file, but how? Now there are lots
of different files that no one's keeping track of.
You can probably think of other reasons, too. It's like mailing a gift: you
wouldn't throw your unwrapped gift in a mailbox and hope it ends up in the right
place! You package your gift up and add important information the postal service
can use to manage it appropriately.
373.2. Package managers
Software packages work in a similar way. Package managers are applications
that accept your code, bundled up with some important metadata, and provide
services like versioning, change-management, and even tracking how many
projects are using your code. This would be a ton of work for one person to
handle by themselves! Package managers have been used for decades to manage
server software, but are relatively new to web development.
When we talk about a package manager, we may be referring to a few different
things. Most package managers consist of at least two parts: a command line
interface (CLI) and a registry. The CLI is an application you run locally, and
lets you download and install/uninstall packages as needed. The registry is a
database of package information, tracking which are available at any time.
These parts work together to make your experience smoother. Without a CLI, you'd
have to manually download and configure each dependency of your app. Without a
registry, you'd have to remember exactly where each package is stored to
download it. Yikes!
Package managers may include lots of other functionality, like bundling,
build pipelines, and dependency management. At their core, though, the CLI &
registry are their primary parts. Without these, they're likely to fall into the
broader category of build tools, which we'll introduce more about later on.
374. Package management for JavaScript
Like all languages, JavaScript went through a long period of unmanaged sharing.
Since early JavaScript was used exclusively for the browser runtime, embedded
<script> tags were the preferred way to share code. However, Node.js changed
the game! Backend developers working with JavaScript brought common patterns
from their own backgrounds, including package management.
Node.js was released in 2009. In early 2010, npm was released and included in
Node.js. npm, the "Node Package Manager", was designed to give Node.js
engineers a similar experience to backend development in other languages. It was
[inspired by yinst][1], a package manager used at "Yahoo!", where npm's
creator had worked previously.
npm took off quickly as the de facto standard for Node.js packages. However,
the JavaScript development world was still fragmented! Some frontend developers
working in the browser runtime created their own package managers for
frontend-oriented packages ([Bower][2] was one popular manager still in use
today). Ultimately, the confusion of dealing with multiple package managers for
the same programming language grew too great, and frontend developers started
adding their packages to npm. Today, npm is the most widely-used package manager
for all JavaScript packages, regardless of whether they're backend dependencies,
frontend dependencies, or command-line tools.
An aside on "npm": If you're attentive to grammar, seeing the name of this
package manager written in all lowercase letters may be infuriating! It's a
[hot topic][3] online, too. We'll stick with formatting used by npm itself,
but you may see it capitalized elsewhere. Just remember: we're all referring
to the same tool!
375. Getting started with npm
Here's a great thing about npm: since it's part of Node.js, you don't have to
install it separately. Once you've added Node.js to your system, you've got npm
for free. Nice!
We'll walk through setting up & using the npm CLI tool soon, but if you'd like
to experiment on your own, here are a few basic terminal commands to get you
started:
npmwill show npm's help info, including some common commands and how to
access more detailed guides.npm initwill set your current project directory up for npm. This requires
answering a few questions to generate apackage.jsonfile, a critical part
of npm's dependency management functionality.npm installwill download and install a package into your project. You can
use the-g(or--global) flag to install a package for use everywhere on
your system. To have some fun, runnpm install -g cowsay. Once the
download's completed, try runningcowsay Hello, world!.
375.1. Just the basics
Here's a (very short) overview of how npm works its magic. Let's imagine we're
installing a package called pack-overflow:
- You request the package with
npm install pack-overflow. - The
npmCLI tool updates yourpackage.jsonfile to includepack-overflow
as a dependency and requests the package from the npm registry. npmdownloads the package and installs it to thenode_modulesfolder in
your current directory (one will be created if it's not already there). It
chooses the most recent version by default.npmcreates apackage-lock.jsonfile that includes where the installed
package is located and exactly which version was used.- You're all set! You can now
require('pack-overflow');in your project.
We'll walk through this process in more detail later in this lesson.
376. What we've learned
Package management is a massive topic that we're just scratching the surface of.
You'll get lots of practice using packages and npm as we get into more complex
projects. For now, after reading this lesson, you should be comfortable with:
- discussing the role of packages & package managers;
- and explaining what npm stands for.
Next up, we'll learn more about what npm does can do for us.
[1]: https://www.reddit.com/r/npm/comments/aounfi/best_package_manager/eg4r6oo/
[2]: https://bower.io/
[3]: https://css-tricks.com/start-sentence-npm/
Return To Sender: Understanding Dependency Management With npm
Now that you've seen npm in action, let's dig into the details. How can we
read npm's file changes ourselves?
We'll cover:
- dependency management;
- semantic versioning;
- and how npm implements these features;
377. Dependency management
To understand dependency management, let's revisit our kitchen. Making a
sandwich depends on us having bread. The type of sandwich depends on a certain
type of bread: a hamburger might call for a sesame seed bun, while a falafel
wrap uses pita. In each of these cases, we'd consider the bread a
dependency of our sandwich.
Of course, the dependency chain goes further than our breadbox. The baker
who made our bread has dependencies as well. Baking a gluten-free loaf? They
might need almond flour. Specialty breads might require a unique oven or
technique. Even though we don't see this process in our own kitchen, we're
dependent on it too! If the baker can't make the correct bread, we can't create
the sandwich of our dreams.
Software has a similar problem with dependencies. If my application depends on
an authentication library that itself depends on an insecure password encryption
package, then my application is now inherently insecure. Oh no!
Keeping all the possible dependencies of an application straight ourselves would
be nearly impossible. Package managers to the rescue!
377.1. Get the right package every time
Many package managers, including npm, have the ability to resolve correct
dependency versions. This means the manager can compare all the packages used by
an application and determine which versions are most compatible. This ability
makes dependencies much safer: there's less worry that an update will break your
app if your package manager is warning you of changes.
npm accomplishes this dependency resolution process using both the
package.json and package-lock.json files. Let's take a look at how this
works.
377.2. Ask...
The package.json file contains lots of JSON-formatted metadata for your
project, including its dependencies. Each dependency is formatted like so:
"package-name": "semantic.version.number"
The package name tells npm which package to search for, and the semantic
version number lets the CLI know more about exactly which version of that
package to grab. npm compares the version number with all your own dependencies
to resolve the correct version.
You should consider your package.json's dependencies to be a list of requests.
Adding a dependency here lets you say "I'd like at least version 1.0 of the
'vue' package, please". It sets the stage for dependency resolution.
377.3. ...and you shall receive!
The actual record of packages being used by an application is in
package-lock.json. This file, commonly known as a lockfile in package
manager parlance, contains every detail needed to identify the exact version of
an npm package that's being used by an application. The lockfile is the key;
without it, you can't say with any certainty whether a particular version was
installed or not.
The lockfile for npm will be updated whenever an update is made to
package.json and npm install is run. You can do this manually (for example,
when you'd like to try a particular version of a package), or you can run
npm update <package-name>. While you'll frequently make manual changes to your
package.json, you should never make manual changes to your
package-lock.json! Let npm be responsible for generating the lockfile.
378. Little boxes, all the same.
When the npm CLI utility installs a package, it adds it to the node_modules
subdirectory in your project. Each package will be placed in a directory named
after itself, and contain the raw code for the package along with any associated
package.jsons and documentation.
The node_modules folder is special for a couple reasons. For one, it's a great
way to keep dependencies separated for each project. Some package managers keep
dependencies in a central location on your computer. While npm can do this when
run with the --global flag, it's not ideal, as it makes it harder to keep
different versions of the same dependency. By keeping node_modules for each
project separate, you can have as many different versions of each package as you
like! Each project has the specific version it needs right on-hand.
This introduces a challenge, though. If you have every version of a package,
imagine how much space that might take up! Your node_modules folders,
especially on larger apps, may grow to a massive size. There are build tools you
will encounter that minimize storage space being used by dependencies, but in
general it's good practice to keep node_modules out of git repositories or
other version control. After all, future users can use your package.json along
with npm install to recreate their own node_modules directory!
379. Saying a lot with three little numbers
Let's talk about that semantic.versioning.number above. Semantic versioning
(often abbreviated to semver) is a way of tracking version numbers that lets
other developers know what to expect from each release of your package.
Semantic version numbers are made up of three parts, each numbered sequentially
and with no limit on how large they can be. The leftmost digit in semver is most
significant, meaning that 1.0.0 is "larger" than 0.8.99, though both are
valid.
Here's a high-level overview:
![Version number with major, minor, and patch numbers labeled][image-npm-semver]
- Major changes should be considered breaking. They will be incompatible
with other major versions of the same package and may require significant
changes in any app that depends on them. Creating a sequel to a hit video game
would be a major change. - Minor changes generally represent new features. These shouldn't totally
break anything, but might require a little tweak to keep dependent apps
up-to-date. Adding a new level to a video game would be a minor change. - Patch-level changes are for fixing bugs or small issues. These shouldn't
break any other functionality or force dependent apps to make any changes
themselves. Fixing a typo in a video game's instructions would be a
patch-level change.
Notice that each of these versions is most-concerned with compatibility. This is
semver's greatest strength! With it, we can compare two versions of a package
and know immediately whether they are compatible or not, even if we don't know
much about how the code changed between those two versions.
379.1. Creating version ranges
Of course, part of the reason we're using a package manager is that we may not
know exactly which version we need. Don't worry, though - semver & npm have you
covered! When adding a new dependency to your package.json file, you can
designate a range by adding some special characters to your version number:
*indicates "whatever the latest version is".>1.0.0indicates "any version above major version 1".^1.0.0indicates "any version in the 1.x.x range".~1.0.0indicates "any patch version in the 1.0.x range".1.0.0indicates "exactly version 1.0.0".
You may also omit consecutive trailing zeroes, so^1.0.0is the same as^1.0
or just^1.~1.0.2("any patch version greater than 1.0.2") would need to
written out in its entirely, though. You should consider the numbers in your
semver to be a minimum value, so~2.1.3would include2.1.4, but not
2.1.2.
npm's website includes a fantastic [semver calculator][1] you can use to
practice as you're learning this new syntax. Check it out!
380. Semantic versioning & npm
Semantic versioning is npm's secret weapon for dependency management. Using the
rules of semver, npm is able to determine whether a package will be compatible
with your application or not based on minimum-acceptable versions you set.
You might determine your minimums by trial and error, or you might just start
building against the latest version and work hard to keep your code up to date
as dependencies change. No matter how you do it, npm will make sure the packages
you install fit within the version range you've set in your package.json.
Beware! While npm helps manage your dependencies, it won't automatically keep
them up to date! Out-of-date dependencies may introduce serious security risks
and require a substantial amount of work to fix. At the very least, you should
ensure that any apps you maintain stay up-to-date with the latest patch
versions of their dependencies. We'll look at some cool tools npm provides to
assist with this during lecture.
381. What we've learned
Dependency management can be a lot of work! We're lucky to have package managers
to help sort things out for us.
After reading this lesson, you should feel confident:
- defining "dependency management" and explaining why we need it;
- explaining npm's
package.jsonandpackage-lock.jsonfiles; - and evaluating semantic versions to find acceptable ranges.
[1]: https://semver.npmjs.com/
[image-npm-semver]: https://assets.aaonline.io/Module-JavaScript/npm/assets/image-npm-semver.svg
Introduction to npm
Now that you've learned about npm, it's time to apply your knowledge!
In this project, you'll:
- verify the version of npm you have installed;
- use npm to update itself to the latest version;
- initialize a project to use npm;
- use npm to install a dependency;
- and use a dependency in code.
382. Phase 1: Using npm to manage npm
Before you create your project, let's verify what version of npm you have
installed. Visit [the npm package page][npm package] in the npm registry to
check what the current version is. If you don't have the current version
installed, use npm to update itself to the latest version.
383. Phase 2: Using npm to manage a project's dependencies
Now let's use npm to initialize your project and install a dependency. After
installing the dependency, you'll use it in code.
383.1. Phase 2A: Initializing a new package
Create a folder for your project, open a terminal window (if you haven't
already), and browse to your project folder. Use npm to initialize your project
to use npm. Ensure that you have a package.json file in the root of your
project before continuing to the next step.
383.2. Phase 2B: Installing a dependency
Use npm to install the moment npm package. Per moment's page in the npm
registry, it's a "lightweight JavaScript date library for parsing, validating,
manipulating, and formatting dates".
383.3. Phase 2C: Using a dependency
Add a file named index.js to your project and use the require function to
import the moment module. Then add the following code to the index.js file:
console.log(moment().format('MMMM Do YYYY, h:mm:ss a')); console.log(moment().format('dddd')); console.log(moment().format("MMM Do YY"));
Now you're ready to test your application using Node.js by running the following
command:
node index.js
You should see in the terminal today's date/time formatted three different ways.
Congrats!
384. What we've learned
In this project, you
- verified the version of npm you have installed;
- used npm to update itself to the latest version;
- initialized a project to use npm;
- used npm to install a dependency;
- and used a dependency in code.
[npm package]: https://www.npmjs.com/package/npm
Going Further with npm
It's time to stretch a bit and dig a little further into npm's capabilities.
In this project, you'll:
- initialize a project to use npm;
- use npm to install multiple dependencies;
- use one of your project's dependencies in code;
- write an npm script;
- initialize and configure Git for your project;
- and use the npm registry to find a package.
385. Phase 1: Creating a project with multiple dependencies
Let's create a project!
385.1. Phase 1A: Setting up the project
Create a folder for your project, open a terminal window (if you haven't
already), and browse to your project folder. Use npm to initialize your project
to use npm.
Then use npm to:
- install the
fakerpackage as a dependency; - and install the
nodemonpackage as a development dependency.
385.2. Phase 1B: Writing the code
Add an index.js file to the root of your project. Update the index.js file
to use the faker package to print 10 random names to the console. Use Node.js
(i.e. node index.js) to run your application and check if your code is working
as expected.
385.3. Phase 1C: Adding an npm script
In the package.json file, add an npm script named watch that uses the
nodemon package to restart the application whenever changes are made to any of
the project files. After adding the script, be sure to use npm to test that it
functions as expected.
385.4. Phase 1D: Initialize and configure Git
Now it's time to initialize your project as a Git repository. After you've initialized
Git, you'll need to add the node_modules folder to a .gitignore file to
prevent that folder from being committed to your repository. Remember that you only
need to commit the package.json and package-lock.json files to your repository as
that's all that npm needs to download and install your project's dependencies.
Once you're confident that you've got Git configured properly, go ahead and
commit your project's files to your repository.
386. Phase 2: Using the npm registry
For this part of the project, use the [npm registry][npm registry] to find a
reputable package (by popularity and quality stats) to pluralize a given word.
When comparing packages, remember to ask yourself the following questions:
- Does the package do what I need?
- How popular is the package?
- Is the package being maintained?
Once you've found a package that you like, go ahead and add it as a dependency
to your project. Optionally, you can experiment with adding code to your project
that uses your new package.
387. What we've learned
In this project, you
- initialized a project to use npm;
- used npm to install multiple dependencies;
- used one of your project's dependencies in code;
- wrote an npm script;
- initialized and configured Git for your project;
- and used the npm registry to find a package.
[npm registry]: https://www.npmjs.com/
npm and Application Security
Sooner or later, you'll encounter a project that has a dependency with a
security vulnerability. To prepare you for that, let's practice auditing and
updating a package with security vulnerabilities.
In this project, you'll:
- clone an existing project from a GitHub repository;
- use npm to install the project's dependencies;
- and use npm to audit and fix security vulnerabilities.
388. Phase 1: Setting up the project
To get started with this project, clone the following GitHub repository:
[https://github.com/appacademy-starters/javascript-npm-and-application-security][repo
to clone]
Then use npm to install the project's dependencies.
389. Phase 2: Using npm to audit and fix security vulnerabilities
When installing the project's dependencies, you might have noticed that npm
found security vulnerabilities. Use npm to view more information about those
security vulnerabilities and to update the offending package.
To confirm that you've resolved security vulnerabilities, use npm to audit your
project's dependencies again.
390. What we've learned
In this project, you
- cloned an existing project from a GitHub repository;
- used npm to install the project's dependencies;
- and used npm to audit and fix security vulnerabilities.
[repo to clone]: https://github.com/appacademy-starters/javascript-npm-and-application-security
Project: Create Your Own File Utilities!
It's kind of a rite of passage that developers get the chance to write their own
versions of command line utilities. You're going to get to do that, now, using
Node.js!
This project is meant to give you an opportunity to learn how to use the
require keyword to load CommonJS modules. Then, you get to practice reading
the Node.js documentation to get a better understanding of the built-in
libraries and how to use them. Finally, you'll bring in some third-party
packages to really get the party started!
391. Setting up your project
Create a directory named my-file-utilities in which you will create your
utility files. In that directory, initialize an npm package.
392. Hash Bang files
All of the utilities that you create, today, are going to be in so-called "hash
bang" files. That's because the first line of them start with the sequence "#!".
In old Unix, "#" is known as "hash" and "!" is known as "bang". (Also,
"*" is
known as "splat" 😃
Once you have a file opened in Visual Studio Code, the first line that you write
in it will be this:
#!/usr/bin/env node
The "hash-bang" instructs the shell (Bash or Zsh) to run the file with the
command that follows it. In this case, /usr/bin/env node tells the shell to
find the executable "node" in the user's environment.
The final step is to make the file executable. To do that, you may recall that
you use the "change mode" command (chmod). If your file is named
cp.js,
then to make it executable, you would type the following in your shell.
chmod +x cp.js
Then, to run that file, you will type ./cp.js.
393. Getting command-line arguments in your program
The first stop you need to make is to learn about the process.argv array that
every running Node.js process has. ([process.argv documentation]) That array
will allow you to access any arguments that someone types on the command line.
For example, when writing your first utility, the copy utility, you will need
to have two arguments: the file someone wants copied and the file that they
want it copied to. When you run your utility (assuming you did the hash-bang
thing above), you could run it like this:
./cp.js original.txt copy.txt
The process.argv array will contain the following:
[
'/path/to/your/node',
'/path/to/your/cp.js',
'original.txt',
'copy.txt'
]
You will access the third and fourth arguments in that array, for example, to
know the files that the user has specified.
394. Specifying an exit code from your utility
When a program finishes without an error, it returns an "exit code" to the shell
of 0. That way, the shell knows everything went ok.
When a program finishes due to an error, it returns a non-zero "exit code" to
the shell. That way, the shell knows something went awry.
Check out [the documentation for process.exit] to find out how you can return
a non-zero "exit code" from your programs.
395. Copy
Create your own file copying utility. Use the built-in [File System] library.
Don't use any of the methods in the library that end with Sync. Those are
not in the spirit of JavaScript.
For your copy utility:
- It should be run with the form
./cp.js source-file-path target-file-path - If the user does not provide exactly two arguments, write a "using" message
which shows the user how to properly use your copy utility. - If the
source-file-pathdoes not exist, write an error message that
describes the problem and exit with a status code of 9. - If the
source-file-pathis a directory, write an error message that
describes the problem and exit with a status code of 10. - If an error occurs during the copy, throw the error provided to the callback.
- If everything succeeds, don't print anything.
396. Delete
Create your own file removal utility. Use the built-in [File System] library.
You'll notice that there's no method named "remove" or "delete". Look through
the options. There's a method in there that you can use to accomplish this.
Don't use any of the methods in the library that end with Sync. Those are
not in the spirit of JavaScript.
For your delete utility:
- It should be run with the form
./rm.js file-pathswhere the user can specify
one or more files to remove from the file system. For example, they could type
./rm.js original.txtto remove one file or./rm.js 1.txt 2.txt 3.txtto
remove three files. - If the user does provides no arguments, write a "using" message which shows
the user how to properly use your copy utility. - If an error occurs during the removal of any file, throw the error provided to
the callback. - If everything succeeds, don't print anything.
397. Touch
Create your own "touch" utility. Touch takes one parameter, a file path. If the
file at the path does not exist, it will create an empty file at that path. If
the file does exist, it updates the last modified time to "now".
Don't use any of the methods in the library that end with Sync. Those are
not in the spirit of JavaScript.
For your touch utility:
- It should be run with the form
./touch.js file-path. - If the user does not provide exactly one argument, write a "using" message
which shows the user how to properly use your copy utility. - If the
file-pathpoints to a directory, write an error message and exit with
a status code of 2. - If everything succeeds, don't print anything.
398. Head
Create your own "head" utility. Head takes one parameter, a file path. It then
displays tp to the first 10 lines of the file.
Don't use any of the methods in the library that end with Sync. Those are
not in the spirit of JavaScript.
For your head utility:
- It should be run with the form
./head.js file-path. - If the user does not provide exactly one argument, write a "using" message
which shows the user how to properly use your copy utility. - If the
file-pathdoes not point to a file, write an error message and exit
with a status code of 17. - If everything succeeds, it will print up to the first ten lines of the file.
399. Chalk it up to ls
Have a look at [Chalk], a commonly-used library to make colorful output in
Node.js console applications. Install Chalk to your project directory.
Create your own "ls" utility using Chalk. Color files based on their extension.
You choose the colors. For example, maybe you decide that all JavaScript files
should show up as purple in the terminal. Then, when you type ./ls.js for a
directory, all of the files that are JavaScript files will appear in purple.
For your ls utility:
- It should be run with the form
./ls.js path. - If the path does not exist, write an error message describing the error and
exit with status code 2. - If the path is a file, write out the colorized name of the file.
- If the path is a directory, write out the colorized names of all the files
in the directory.
400. Word count
Create your own "wc" utility. Wc takes a file path and prints out the number of
characters, words, and lines in the file.
For your wc utility:
- It should be run with the form
./wc.js path. - If the path does not exist, write an error message describing the error and
exit with status code 2. - If the path is a directory, write an error message describing that it can't
count the number of words in a directory. Be a little snarky about it. Exit
with status code 14. - If the path is a file, count the number of characters, the number of words (as
separated by spaces, tabs, and new lines), and lines. Output the findings in
the following format:
number of lines«tab»number of words«tab»number of characters
Start out by reading the entire file into memory. Once you get that working,
try to come up with a way to do the same thing but without reading the entire
file into memory. You'll want to read about how [Readable Streams] work in
Node.js. Then, maybe, you can use something like the [line-reader package] to
read the file line-by-line while you keep track of all of its stats.
[process.argv documentation]: https://nodejs.org/api/process.html#process_process_argv
[File System]: https://nodejs.org/api/fs.html
[the documentation for process.exit]: https://nodejs.org/api/process.html#process_process_exit_code
[Chalk]: https://github.com/chalk/chalk
[Readable Streams]: https://nodejs.org/api/stream.html#stream_readable_streams
[line-reader package]: https://www.npmjs.com/package/line-reader
WEEK-05 DAY-2
Classes and Objects
Classes Learning Objectives
Below is a complete list of the terminal learning objectives for this lesson.
When you complete this lesson, you should be able to perform each of the
following objectives. These objectives capture how you may be evaluated on the
assessment for this lesson.
- Define a constructor function using ES5 syntax.
- Define a method on the prototype of a constructor function.
- Declare a class using ES6 syntax.
- Define an instance method on a class (ES6).
- Define a static method on a class (ES6).
- Instantiate an instance of a class using the
newkeyword. - Implement inheritance using the ES6
extendssyntax for an ES6 class. - Utilize the
superkeyword in a child class to inherit from a parent class. - Utilize
module.exportsandrequireto import and export functions and
class from one file to another.earning objectives for this lesson.
When you complete this lesson, you should be able to perform each of the
following objectives. These objectives capture how you may be evaluated on the
assessment for this lesson. - Define a constructor function using ES5 syntax.
- Define a method on the prototype of a constructor function.
- Declare a class using ES6 syntax.
- Define an instance method on a class (ES6).
- Define a static method on a class (ES6).
- Instantiate an instance of a class using the
newkeyword. - Implement inheritance using the ES6
extendssyntax for an ES6 class. - Utilize the
superkeyword in a child class to inherit from a parent class. - Utilize
module.exportsandrequireto import and export functions and
class from one file to another.
Constructor Function, What's Your Function?
Up until now, you've used object initializer or "literal notation" to create
POJOs (plain old JavaScript objects). While this approach to creating objects is
convenient (and not to mention easy), it's not an ideal way to define the
attributes and behaviors for an object type nor is it an efficient way to create
many objects of that type.
In ES2015, JavaScript gained the class keyword, giving developers a formal way
to create a class definition to specify an object type's attributes and
behavior. The class definition is also used to create objects of that specific
type.
In this article, you'll learn how constructor functions and prototypes were
used, prior to the introduction of the ES2015 class keyword, to mimic or
imitate classes. Understanding constructor functions and prototypes will not
only prepare you for working with legacy code, it'll prepare you to understand
how ES2015's classes are really just a syntactic layer of sugar over these
language features.
When you finish this article, you should be able to:
- Define a constructor function for an object type that initializes one or more
properties; - Invoke a constructor function using the
newkeyword; - Use the
instanceofoperator to check if an object is an instance of a
specific object type; and - Define sharable methods on the
prototypeproperty of a constructor function.
401. Defining a constructor function
To review, an object created using object initializer or literal notation syntax
looks like this:
const fellowshipOfTheRing = { title: 'The Fellowship of the Ring', series: 'The Lord of the Rings', author: 'J.R.R. Tolkien' };
While it's not explicitly stated, the above object literal represents a "Book"
object type. An object type is defined by its attributes and behaviors. This
particular "Book" object type has "title", "series", and "author"
attributes
which are represented by the object literal's title, series, and
author
properties.
Behaviors are represented by methods, but this particular object literal
doesn't define any methods. We'll see an example of an object type behavior
later in this article.
A constructor function in JavaScript handles the creation of an object—it's a
"factory" for creating objects of a specific type. Calling a constructor
function returns an object with its properties initialized to the provided
argument values along with any available methods for operating on the object's
data.
Here's an example of a constructor function for the "Book" object type:
function Book(title, series, author) { this.title = title; this.series = series; this.author = author; }
This Book constructor function is responsible for creating "Book" objects. If
your application had four unique object types, then you'd typically declare four
constructor functions—one constructor function for each unique object type.
While the Book constructor function uses JavaScript's standard syntax for
function declarations, there are a few things specific to constructor functions
worth highlighting:
- The name of the constructor function is capitalized. Following this
convention will help you (and other developers) to correctly identify this
function as a constructor function. - The function doesn't explicitly return a value. When invoked with the
newkeyword, constructor functions implicitly return the newly created
object. In just a bit, you'll see an example of this. - Within the constructor function's body, the
thiskeyword references the
newly created object. This allows you to initialize properties on the
object.
402. Invoking a constructor function
Constructor functions are designed to be invoked with the new keyword:
function Book(title, series, author) { this.title = title; this.series = series; this.author = author; } const fellowshipOfTheRing = new Book( 'The Fellowship of the Ring', 'The Lord of the Rings', 'J.R.R. Tolkien'); console.log(fellowshipOfTheRing); // Book { title: 'The Fellowship of the Ring', ... }
Four things occur when invoking a constructor function with the new keyword:
- A new empty object is created (i.e.
{}); - The new object's prototype is set to the object referenced by the constructor
function'sprototypeproperty (more about this in just a bit); - The constructor function is called and
thisis bound to the new object; and - The new object is returned after the constructor function has completed.
Important: If you return something from a constructor function then you'll
break the behavior described in item #4 as the return value will be whatever
you're explicitly returning instead of the new object.
402.1. Understanding object type instances
Remember that a constructor function handles the creation of an object—it's a
"factory" for creating objects of a specific type. An object created from a
constructor function is said to be an instance of the object type defined by
the constructor function.
In the below example, the Book constructor function defines a Book object
type. Calling the Book constructor function with the new keyword creates an
instance of the Book object type:
// This constructor function defines // a `Book` object type. function Book(title, series, author) { this.title = title; this.series = series; this.author = author; } // Use the `new` keyword to create // three instances of the `Book` object type. const fellowshipOfTheRing = new Book( 'The Fellowship of the Ring', 'The Lord of the Rings', 'J.R.R. Tolkien'); const twoTowers = new Book( 'The Two Towers', 'The Lord of the Rings', 'J.R.R. Tolkien'); const returnOfTheKing = new Book( 'The Return of the King', 'The Lord of the Rings', 'J.R.R. Tolkien'); // Logging each instance to the console // shows that each is a `Book` object type. console.log(fellowshipOfTheRing); // Book { title: 'The Fellowship of the Ring', ... } console.log(twoTowers); // Book { title: 'The Two Towers', ... } console.log(returnOfTheKing); // Book { title: 'The Return of the King', ... } // Comparing each instance to the others // shows that each instance is a unique object // and not equal to the others even though they // are all `Book` object types. console.log(fellowshipOfTheRing === twoTowers); // false console.log(fellowshipOfTheRing === returnOfTheKing); // false console.log(twoTowers === returnOfTheKing); // false
In this example, the new keyword is used to create three instances of the
Book object type, which are referenced by the fellowshipOfTheRing,
twoTowers, and returnOfTheKing variables. While each instance is a Book
object type, they are also unique objects and therefore not equal to each other.
403. Using the instanceof operator
to check an object's type
Sometimes it's helpful to know if an object is an instance of a specific type.
JavaScript makes this easy to do using the instanceof operator:
function Book(title, series, author) { this.title = title; this.series = series; this.author = author; } const fellowshipOfTheRing = new Book( 'The Fellowship of the Ring', 'The Lord of the Rings', 'J.R.R. Tolkien'); // Use the `instanceof` operator to check if the // `fellowshipOfTheRing` object is an instance of `Book`. console.log(fellowshipOfTheRing instanceof Book); // true
The instanceof operator allows us to confirm that calling the Book
constructor with the new keyword creates an instance of the Book object
type.
403.1. Invoking a constructor function without
the new keyword
We can use the instanceof operator to prevent our constructor functions from
being misused.
Invoking a constructor function without the new keyword results in one of two
unexpected outcomes:
- When running in non-strict mode,
thiswill be bound to the global object
not the newly created object; or - When running in strict mode,
thiswill beundefined, which results in a
runtime error when attempting to initialize a property on the newly created
object using thethiskeyword.
You can write the string below at the top of your file to enable strict mode
for an entire script or inside a function body for function-level strict mode.
Strict mode
can be enabled by writing the following string:
"use strict";
Because the second outcome results in an error when calling the constructor
function, it's a bit easier to debug than the first outcome. Up until now,
we've only seen errors generated by JavaScript. With the throw keyword and the
Error constructor function, we can throw our own custom errors:
function Book(title, series, author) { if (!(this instanceof Book)) { // Throws a custom error when `Book` is called without the `new` keyword. throw new Error('Book needs to be called with the `new` keyword.'); } this.title = title; this.series = series; this.author = author; } // Calling the `Book` constructor method with the `new` keyword // successfully creates a new instance. const fellowshipOfTheRing = new Book( 'The Fellowship of the Ring', 'The Lord of the Rings', 'J.R.R. Tolkien'); // Calling the `Book` constructor method without the `new` keyword // throws an error with the message // "Book needs to be called with the `new` keyword." const fellowshipOfTheRing = Book( 'The Fellowship of the Ring', 'The Lord of the Rings', 'J.R.R. Tolkien');
In this example, an if statement has been added to the Book constructor
function that checks if this isn't bound to an instance of the Book
constructor and throws an error explaining the problem.
404. Defining sharable methods
When defining the behavior or methods for an object type, avoid the temptation
to define the methods within the constructor function:
function Book(title, series, author) { this.title = title; this.series = series; this.author = author; // For example only! // To avoid inefficient use of computer memory // don't define methods directly on the newly created object. this.getInformation = function() { return `${this.title} by ${this.author}`; }; }
Remember that a method is a function that's associated with a specific object
using a property.
Using this approach is inefficient in terms of computer memory usage as each
object instance would have its own method definition. If you had a hundred
object instances there'd be a hundred method definitions! A better approach is
to define the method once and then share that method definition across all
instances of that object type.
Let's explore how prototypes can be used to define sharable methods.
404.1. Prototypes and delegation
In JavaScript, a prototype is an object that is delegated to when a
reference to an object property or method can't be resolved.
For example, if a property or method isn't available on an object, JavaScript
will delegate to the object's prototype to see if that object has the requested
property or method. If the property or method is found on the prototype, then
the action is carried out on the prototype object. The delegation to the
prototype happens automatically, so from the caller's perspective it looks as if
the original object had the request property or method.
In JavaScript, you can make an object the prototype of another object. When an
object is a prototype of another object, it's properties and methods are made
available to the other object.
Here's a simple, arbitrary example involving two [object literals][mdn object literal]: a and
b.
Object a defines a method named alpha() and object b defines a method
named beta():
const a = { alpha() { return 'Alpha'; } }; const b = { beta() { return 'Beta'; } };
The first time that you attempt to call the alpha() and beta() methods on
object a, only the call to the alpha() method succeeds as the beta()
method is only defined on object b:
console.log(a.alpha()); // Alpha console.log(a.beta()); // Error: a.beta is not a function
When you check the data type of a or b, you see that they are
[objects][mdn object]. This means you can access the alpha() and beta()
with [property accessors][mdn property accessors] using dot notation or
bracket notation.
console.log(typeof a); // Prints 'object' // Dot notation a.alpha(); // Alpha // Bracket notation a["alpha"](); // Alpha
After using the Object.setPrototypeOf() method to set object b as the
prototype of a, the call to the beta() method on object a succeeds:
// For example only! // Calling the `Object.setPrototypeOf()` method can have // a negative impact on the performance of your application. Object.setPrototypeOf(a, b); console.log(a.alpha()); // Alpha console.log(a.beta()); // Beta
Important: The
Object.setPrototypeOf()method is used in this example for
demonstration purposes only. Calling theObject.setPrototypeOf()method
can have a negative impact on the performance of your application, so you
should generally avoid using it.
The call tobeta()method works now because when the method isn't found on
objecta, the call is delegated to objecta's prototype which is objectb.
Thebeta()method is found on objectband it's successfully called.
Starting with ES2015, you can use theObject.getPrototypeOf()method to get an
object's prototype. Calling theObject.getPrototypeOf()method and passing
objectaallows us to verify that objecta's prototype is objectb:
// Use the `Object.getPrototypeOf()` method // to get the prototype of object `a`. console.log(Object.getPrototypeOf(a)); // { beta: [Function: beta] }
An object's prototype is sometimes referred to in writing using the notation
[[prototype]]. For example, [MDN Web Docs' JavaScript documentation][mdn js]
will sometimes refer to an object's prototype as its[[prototype]].
404.2. The
__proto__ property
Prior to ES2015 and the addition of the Object.getPrototypeOf() and
Object.setPrototypeOf() methods, there wasn't an official way to get or set an
object's internal [[prototype]] object. As a workaround, many browsers
(including Google Chrome and Mozilla Firefox) made available a __proto__
property providing an easy way to access an object's [[prototype]]:
// For example only! // The `__proto__` property is deprecated in favor of // the `Object.getPrototypeOf()` and `Object.setPrototypeOf()` methods. console.log(a.__proto__); // { beta: [Function: beta] }
While the __proto__ property is widely supported by browsers and handy to
use when debugging, you should never use it in your code as it's deprecated in
favor of the Object.getPrototypeOf() and Object.setPrototypeOf() methods.
Code that relies upon the deprecated __proto__ property will unexpectedly stop
working if any of the browser vendors decide to remove the property from their
implementation of the JavaScript language specification. When the need arises,
use the Object.getPrototypeOf() method to get an object's prototype.
Instead of having to say "underscore underscore proto underscore underscore"
or "double underscore proto double underscore" when referring to the
__proto__property, developers will sometimes say "dunder proto".
404.3. Defining sharable
methods on a constructor function's prototype property
Let's use what you've learned about prototypes and delegation in JavaScript to
define methods for an object type that'll be shared across all of its instances.
Every constructor function has a prototype property that represents the object
that'll be used as the prototype for instances created by invoking the
constructor function with the new keyword. We can confirm this by comparing
the prototype for an instance created from a constructor function to the
constructor function's prototype property:
function Book(title, series, author) { this.title = title; this.series = series; this.author = author; } const fellowshipOfTheRing = new Book( 'The Fellowship of the Ring', 'The Lord of the Rings', 'J.R.R. Tolkien'); const twoTowers = new Book( 'The Two Towers', 'The Lord of the Rings', 'J.R.R. Tolkien'); // Get the prototypes for both `Book` instances. const fellowshipOfTheRingPrototype = Object.getPrototypeOf(fellowshipOfTheRing); const twoTowersPrototype = Object.getPrototypeOf(twoTowers); // Compare the `fellowshipOfTheRing` and `twoTowers` prototypes // to the `Book` constructor function's `prototype` property. console.log(fellowshipOfTheRingPrototype === Book.prototype); // true console.log(twoTowersPrototype === Book.prototype); // true // Compare the `fellowshipOfTheRing` and `twoTowers` prototypes // to each other. console.log(fellowshipOfTheRingPrototype === twoTowersPrototype); // true
This example shows that:
- Every instance created by a constructor function has its prototype (i.e.
[[prototype]]) set to the object referenced by the constructor function's
prototypeproperty; and - The object referenced by the constructor function's
prototypeproperty isn't
copied when it's set as an instance's prototype—every instance's prototype
references the same object.
This means that any method that we define on the constructor function's
prototypeproperty will be shared across all instances of that object type:
function Book(title, series, author) { this.title = title; this.series = series; this.author = author; } // Any method defined on the `Book.prototype` property // will be shared across all `Book` instances. Book.prototype.getInformation = function() { return `${this.title} by ${this.author}`; }; const fellowshipOfTheRing = new Book( 'The Fellowship of the Ring', 'The Lord of the Rings', 'J.R.R. Tolkien'); console.log(fellowshipOfTheRing.getInformation()); // The Fellowship of the Ring by J.R.R. Tolkien
When the getInformation() method is called, the fellowshipOfTheRing object
is checked first to see if the method is defined on that object. When the method
isn't found, the method call is delegated to the instance's prototype, which is
set to the Book constructor function's prototype property. This time, the
getInformation() method is found and called.
Notice that we can use the this keyword in our shared getInformation()
method implementation to access properties (or methods) on the instance that
we're calling the method on.
404.4. The problem with arrow functions
If you're like me, you like the concise syntax of arrow functions.
Unfortunately, you can't use arrow functions when defining methods on a
constructor function's prototype property:
function Book(title, series, author) { this.title = title; this.series = series; this.author = author; } // For example only! // Using an arrow function to define a method // on a constructor function doesn't work as expected // when using the `this` keyword. Book.prototype.getInformation = () => `${this.title} by ${this.author}`; const fellowshipOfTheRing = new Book( 'The Fellowship of the Ring', 'The Lord of the Rings', 'J.R.R. Tolkien'); // Oops! Not what we expected. console.log(fellowshipOfTheRing.getInformation()); // undefined by undefined
Remember that arrow functions don't have their own this binding—they use the
this binding from the enclosing lexical scope. This is why the this keyword
within the getInformation() method doesn't work as expected in the above
example as it doesn't reference the current instance (the object instance
created by the Book constructor function).
For more information on arrow functions, the
thiskeyword, and lexical
scoping, see [this page][mdn arrow functions] on MDN Web Docs.
This problem is easily avoided—just stick with using thefunctionkeyword when
defining methods on a constructor function'sprototypeproperty.
404.5. Prototypes and the instanceof operator
Earlier, you saw an example of how the instanceof operator can be used to
check if an object is an instance of a specific type:
function Book(title, series, author) { this.title = title; this.series = series; this.author = author; } const fellowshipOfTheRing = new Book( 'The Fellowship of the Ring', 'The Lord of the Rings', 'J.R.R. Tolkien'); // Use the `instanceof` operator to check if the // `fellowshipOfTheRing` object is an instance of `Book`. console.log(fellowshipOfTheRing instanceof Book); // true
The instanceof operator uses prototypes to determine if an object is an
instance of a specific constructor function. To do that, the instanceof
operator checks if the prototype of the object on the left side of the operator
is set to the prototype property of the constructor function on the right side
of the operator.
405. What you learned
In this article, you learned
- how to define a constructor function for an object type that initializes one
or more properties; - how to invoke a constructor function using the
newkeyword; - how to use the
instanceofoperator to check if an object is an instance of a
specific object type; and - how to define sharable methods on the
prototypeproperty of a constructor
function.
[mdn js]: https://developer.mozilla.org/en-US/docs/Web/JavaScript
[mdn arrow functions]: https://developer.mozilla.org/en-US/docs/Web/JavaScript/Reference/Functions/Arrow_functions
[mdn object]: https://developer.mozilla.org/en-US/docs/Learn/JavaScript/Objects/Basics
[mdn object literal]: https://developer.mozilla.org/en-US/docs/Web/JavaScript/Reference/Operators/Object_initializer#Computed_property_names
[mdn property accessors]: https://developer.mozilla.org/en-US/docs/Web/JavaScript/Reference/Operators/Property_Accessors
Putting the Class in JavaScript Classes
For years, JavaScript developers used constructor functions and prototypes to
mimic classes. Starting with ES2015, support for classes were added to the
language, giving developers an official way to define classes.
When you finish this article, you should be able to:
- Define an ES2015 class containing a constructor method that initializes one or
more properties; - Instantiate an instance of a class using the
newkeyword; - Define instance and static class methods;
- Understand that ES2015 classes are primarily syntactic sugar over constructor
functions and prototypes; and - Use the
instanceofoperator to check if an object is an instance of a
specific class.
406. Defining an ES2015 class
To review, a constructor function in JavaScript handles the creation of an
object—it's a "factory" for creating instances of a specific object type. Here's
an example of a constructor function for a Book object type:
function Book(title, series, author) { this.title = title; this.series = series; this.author = author; }
An ES2015 class defines the attributes and behavior for an object type and is
used to create instances of that type—just like a constructor function. Classes
are defined using the class keyword, followed by the name of the class, and a
set of curly braces. Here's an example of the above Book constructor function
rewritten as an ES2015 class:
class Book { constructor(title, series, author) { this.title = title; this.series = series; this.author = author; } }
Note that you cannot use the following syntax inside of classes:
// THIS IS BAD CODE. DO NOT COPY. ILLUSTRATIVE USE ONLY. class MyClass { function constructor() { } }
or
// THIS IS BAD CODE. DO NOT COPY. ILLUSTRATIVE USE ONLY. class MyClass { let constructor = () => { } }
Notice that class names, like constructor functions, begin with a capital
letter. Following this convention will help you (and other developers) to
correctly identify the name as a class.
While not required, the above class definition includes a constructor method.
Class constructor methods are similar to constructor functions in the
following ways:
constructormethods don't explicitly return a value. When instantiating
class instances with thenewkeyword,constructormethods implicitly
return the newly created object instance. In just a bit, you'll see an example
of this.- Within a
constructormethod's body, thethiskeyword references the
newly created object instance. This allows you to initialize properties on
the object instance.
407. Instantiating an instance of a class
To create or instantiate an instance of a class, you use the new keyword:
class Book { constructor(title, series, author) { this.title = title; this.series = series; this.author = author; } } const fellowshipOfTheRing = new Book( 'The Fellowship of the Ring', 'The Lord of the Rings', 'J.R.R. Tolkien'); // Output: // Book { // title: 'The Fellowship of the Ring', // series: 'The Lord of the Rings', // author: 'J.R.R. Tolkien' // } console.log(fellowshipOfTheRing);
Four things occur when instantiating an instance of a class:
- A new empty object is created (i.e.
{}); - The new object's prototype is set to the class'
prototypeproperty value
(more about this in just a bit); - The
constructormethod is called andthisis bound to the new object; and - The new object is returned after the
constructormethod has completed.
Important: Just like with constructor functions, if you return something
from aconstructormethod then you'll break the behavior described in item
#4 as the return value will be whatever you're explicitly returning instead of
the new object.
407.1. Attempting to instantiate a
class instance without the new keyword
You might recall that invoking a constructor function without the new keyword
produced an unexpected outcome. Unlike constructor functions, attempting to
instantiate a class instance without using the new keyword results in a
runtime error:
// This code throws the following runtime error: // TypeError: Class constructor Book cannot be invoked without 'new' // Notice the lack of the `new` keyword. const fellowshipOfTheRing = Book( 'The Fellowship of the Ring', 'The Lord of the Rings', 'J.R.R. Tolkien');
This default behavior is an example of how ES2015 classes improve upon
constructor functions.
407.2. Class definitions aren't hoisted
In JavaScript, you can call a function before it's declared:
test(); function test() { console.log('This works!'); }
This behavior is known as [hoisting][hoisting].
Unlike function declarations, class declarations aren't hoisted. The following
code will throw an error at runtime:
// This code throws the following runtime error: // ReferenceError: Cannot access 'Book' before initialization const fellowshipOfTheRing = new Book( 'The Fellowship of the Ring', 'The Lord of the Rings', 'J.R.R. Tolkien'); class Book { constructor(title, series, author) { this.title = title; this.series = series; this.author = author; } }
This error is easy to avoid: simply get into the habit of declaring your classes
before you use them.
408. Defining methods
A class can contain two types of method definitions: instance methods and static
methods. So far, when working with constructor functions, you've only seen
examples of instance methods.
408.1. Defining an instance method
Instance methods, as the name suggests, are invoked on an instance of the class.
Instance methods are useful for performing an action on a specific instance.
The syntax for defining a class instance method is the same as the shorthand
method syntax for object literals: the method name, the method's parameters
wrapped in parentheses, followed by a set of curly braces for the method body.
Here's an example of an instance method named getInformation():
class Book { constructor(title, series, author) { this.title = title; this.series = series; this.author = author; } getInformation() { return `${this.title} by ${this.author}`; } } const fellowshipOfTheRing = new Book( 'The Fellowship of the Ring', 'The Lord of the Rings', 'J.R.R. Tolkien'); console.log(fellowshipOfTheRing.getInformation()); // The Fellowship of the Ring by J.R.R. Tolkien
Notice that you can use the this keyword within the instance method body to
access properties (and methods) on the instance that the method was invoked on.
408.2. Instance methods and prototypes
While the code for a class instance method doesn't give any indication of this,
instance methods are made available to instances via a shared prototype object.
Just like with constructor functions, this approach prevents method definitions
from being unnecessarily duplicated across instances, saving on memory
utilization.
Because instance methods are actually defined on a shared prototype object,
they're sometimes referred to as "prototype" methods.
408.3. Defining a static method
Static methods are invoked directly on a class, not on an instance. Attempting
to invoke a static method on an instance will result in a runtime error.
The syntax for defining a class static method is the same as an instance method
except that static methods start with the static keyword. Here's an example of
a static method named getTitles():
class Book { constructor(title, series, author) { this.title = title; this.series = series; this.author = author; } // Static method that accepts a variable number // of Book instances and returns an array of their titles. // Notice the use of a rest parameter (...books) // to capture the passed parameters as an array of values. static getTitles(...books) { return books.map((book) => book.title); } getInformation() { return `${this.title} by ${this.author}`; } } const fellowshipOfTheRing = new Book( 'The Fellowship of the Ring', 'The Lord of the Rings', 'J.R.R. Tolkien'); const theTwoTowers = new Book( 'The Two Towers', 'The Lord of the Rings', 'J.R.R. Tolkien'); // Call the static `Book.getTitles()` method // to get an array of the book titles. const bookTitles = Book.getTitles(fellowshipOfTheRing, theTwoTowers); console.log(bookTitles.join(', ')); // The Fellowship of the Ring, The Two Towers
The getTitles() static method accepts a variable number of Book instances and
returns an array of their titles.
Notice that the method makes use of a [rest parameter][rest parameters]
(...books) to capture the passed parameters as an array of values. Using
this approach is merely a convenience; the code could be rewritten to require
callers to pass in an array ofBookinstances.
Static methods aren't invoked on an instance, so they can't use thethis
keyword to access an instance. You can pass one or more instances into a static
method via a method parameter, which is exactly what the abovegetTitles()
method does. This allows static methods to perform actions across groups of
instances.
Static methods can also be used to perform "utility" actions—actions that are
independent of any specific instances but are related to the object type in some
way.
408.4. Static methods and constructor functions
Static methods aren't unique to ES2015 classes. It's also possible to define
static methods when working with constructor functions.
Here's the above example rewritten to use a constructor function:
function Book(title, series, author) { this.title = title; this.series = series; this.author = author; } // Static methods are defined // directly on the constructor function. Book.getTitles = function(...books) { return books.map((book) => book.title); } // Instance methods are defined // on the constructor function's `prototype` property. Book.prototype.getInformation = function() { return `${this.title} by ${this.author}`; }; const fellowshipOfTheRing = new Book( 'The Fellowship of the Ring', 'The Lord of the Rings', 'J.R.R. Tolkien'); const theTwoTowers = new Book( 'The Two Towers', 'The Lord of the Rings', 'J.R.R. Tolkien'); console.log(fellowshipOfTheRing.getInformation()); // The Fellowship of the Ring by J.R.R. Tolkien console.log(theTwoTowers.getInformation()); // The Two Towers by J.R.R. Tolkien // Call the static `Book.getTitles()` method // to get an array of the book titles. const bookTitles = Book.getTitles( fellowshipOfTheRing, theTwoTowers); console.log(bookTitles.join(', ')); // The Fellowship of the Ring, The Two Towers
409. Comparing classes to constructor functions
You've already seen how class constructor, instance, and static methods behave
in a similar fashion to their constructor function counterparts. This is
evidence that ES2015 classes are primarily syntactic sugar over constructor
functions and prototypes.
"Syntactic sugar" refers to the addition of syntax to a programming language
that provides a simpler or more concise way to leverage features that already
exist as opposed to adding new features.
We can use theinstanceofoperator to validate how the various elements of a
class map to constructor functions and prototypes.
For reference, here's theBookclass definition that we've been working with
in this article:
class Book { constructor(title, series, author) { this.title = title; this.series = series; this.author = author; } static getTitles(...books) { return books.map((book) => book.title); } getInformation() { return `${this.title} by ${this.author}`; } }
First, we can use the instanceof operator to verify that the Book class is
actually a Function object, not a special "Class" object or type:
console.log(Book instanceof Function); // true
We can also use the instanceof operator to verify that the getInformation()
instance method is defined on the underlying Book function's prototype
property:
console.log(Book.prototype.getInformation instanceof Function); // true
Similarly, we can verify that the getTitles() static method is defined on the
Book function:
console.log(Book.getTitles instanceof Function); // true
Going even further, we can use the isPrototypeOf() method to check if an
instance of the Book class has its prototype set to the Book.prototype
property:
const fellowshipOfTheRing = new Book( 'The Fellowship of the Ring', 'The Lord of the Rings', 'J.R.R. Tolkien'); console.log(Book.prototype.isPrototypeOf(fellowshipOfTheRing)); // true
All of this confirms that the Book class is simply an alternative way of
writing this Book constructor function:
function Book(title, series, author) { this.title = title; this.series = series; this.author = author; } Book.getTitles = function(...books) { return books.map((book) => book.title); } Book.prototype.getInformation = function() { return `${this.title} by ${this.author}`; };
410. Using the instanceof
operator to check an object's type
When working with constructor functions, you saw how the instanceof operator
could be used to check if an object is an instance of a specific type. This
technique also works to check if an object is an instance of a specific class:
class Book { constructor(title, series, author) { this.title = title; this.series = series; this.author = author; } } const fellowshipOfTheRing = new Book( 'The Fellowship of the Ring', 'The Lord of the Rings', 'J.R.R. Tolkien'); // Use the `instanceof` operator to check if the // `fellowshipOfTheRing` object is an instance of the `Book` class. console.log(fellowshipOfTheRing instanceof Book); // true
Knowing that ES2015 classes are a layer of syntactic sugar over constructor
functions and prototypes, this use of the instanceof operator probably isn't
surprising to you. The instanceof operator checks if the prototype of the
object on the left side of the operator is set to the prototype property of
the class on the right side of the operator.
411. What you learned
In this article, you learned
- how to define an ES2015 class containing a constructor method that initializes
one or more properties; - how to instantiate an instance of a class using the
newkeyword; - how to define instance and static class methods;
- that ES2015 classes are primarily syntactic sugar over constructor functions
and prototypes; and - how to use the
instanceofoperator to check if an object is an instance of a
specific class.
[hoisting]: https://developer.mozilla.org/en-US/docs/Glossary/Hoisting
[rest parameters]: https://developer.mozilla.org/en-US/docs/Web/JavaScript/Reference/Functions/rest_parameters
The DNA of JavaScript Inheritance
Classes don't have to be defined and used in isolation from one another. It's
possible to base a class—a child class—upon another class—the parent
class—so that the child class can access or inherit properties and methods
defined within the parent class.
Basing a class upon another class is commonly known as inheritance. Leveraging
inheritance gives you a way to share code across classes, preventing code
duplication and keeping your code DRY (don't repeat yourself).
When you finish this article, you should be able to:
- Define a parent class;
- Use the
extendskeyword to define a child class that inherits from a parent
class; - Understand that inheritance in JavaScript is implemented using prototypes; and
- Define a method in a child class that overrides a method in the parent class.
412. Defining a parent class
Imagine that you recently started a new project developing an application to
track your local library's catalog of books and movies. You're excited to get
started with coding, so you jump right in and define two classes: Book and
Movie.
412.1. Defining the Book and Movie classes
The Book class contains title, series, and author properties
and a
getInformation() method. The getInformation() method returns a string
containing the title and series property values if the series property
has
a value. Otherwise, it simply returns the title property value. Here's what
your initial implementation looks like:
class Book { constructor(title, series, author) { this.title = title; this.series = series; this.author = author; } getInformation() { if (this.series) { return `${this.title} (${this.series})`; } else { return this.title; } } }
The Movie class contains title, series, and director
properties and a
getInformation() method which behaves just like the Book.getInformation()
method. Here's your initial implementation:
class Movie { constructor(title, series, director) { this.title = title; this.series = series; this.director = director; } getInformation() { if (this.series) { return `${this.title} (${this.series})`; } else { return this.title; } } }
To help facilitate a quick test, you instantiate an instance of each class and
log to the console a call to each instance's getInformation() method:
const theGrapesOfWrath = new Book('The Grapes of Wrath', null, 'John Steinbeck'); const aNewHope = new Movie('Episode 4: A New Hope', 'Star Wars', 'George Lucas'); console.log(theGrapesOfWrath.getInformation()); // The Grapes of Wrath console.log(aNewHope.getInformation()); // Episode 4: A New Hope (Star Wars)
To test your code, you use Node.js to execute the JavaScript file that contains
your code (index.js) from the terminal by running the command node index.js.
Here's the output in the terminal window:
The Grapes of Wrath Episode 4: A New Hope (Star Wars)
Feeling good about the progress that you've made on the project, you decide to
take a break and grab a snack and something to drink. Upon your return, you
review your code for the Book and Movie classes and quickly notice that the
classes both contain the following members (i.e. properties and methods):
- The
titleandseriesproperties; and - The
getInformation()method.
Your code isn't very DRY (don't repeat yourself)!
412.2. Defining the CatalogItem parent class
While this is an arbitrary example, it illustrates a situation that often arises
in software development projects. It can be difficult to anticipate when and
where code duplication will occur.
While the Book and Movie classes represent two different types of items
found in the library's catalog, they're also both catalog items. That
commonality between the classes allows you to leverage inheritance to keep your
code DRY.
Inheritance is when a class is based upon another class. When a class inherits
from another class, it gets access to its properties and methods.
To use inheritance, you'll create a new CatalogItem parent class and move the
title and series properties and the getInformation() method into that
class. Then you'll update the Book and Movie classes to inherit from the
CatalogItem parent class.
Here's what the implementation for the CatalogItem parent class looks like:
class CatalogItem { constructor(title, series) { this.title = title; this.series = series; } getInformation() { if (this.series) { return `${this.title} (${this.series})`; } else { return this.title; } } }
413. Inheriting from a class
Now you need to update the Book and Movie classes to inherit from the
CatalogItem parent class. To do that, you'll make the following changes to the
Book class:
- Use the
extendskeyword to indicate that theBookclass inherits from the
CatalogItemclass; - Use the
superkeyword to call theCatalogItemclass'sconstructor()
method from within theBookclass'sconstructor()method; and - Remove the
getInformation()method from theBookclass.
To indicate that theBookclass inherits from theCatalogItemclass, add the
extendskeyword after the class name followed by the name of the parent class:
class Book extends CatalogItem { constructor(title, series, author) { this.title = title; this.series = series; this.author = author; } getInformation() { if (this.series) { return `${this.title} (${this.series})`; } else { return this.title; } } }
Remember that class declarations aren't hoisted like function declarations, so
you need to ensure that theCatalogItemclass is declared before the
BookandMovieclasses or a runtime error will be thrown.
Since theBookclass defines aconstructor()method, theconstructor()
method in theCatalogItemparent class must be called before attempting to use
thethiskeyword to initialize properties within theBookclass's
constructor()method. To call theconstructor()method in the parent class,
use thesuperkeyword:
class Book extends CatalogItem { constructor(title, series, author) { super(title, series); this.author = author; } getInformation() { if (this.series) { return `${this.title} (${this.series})`; } else { return this.title; } } }
Notice that the title and series parameters are passed to the parent class's
constructor() method by calling the super keyword as a method and passing in
the title and series parameters as arguments. Failing to call the parent
class's constructor() method before attempting to use the this keyword would
result in a runtime error.
Lastly, since the getInformation() is defined in the CatalogItem parent
class, the getInformation() method can be safely removed from the Book
class:
class Book extends CatalogItem { constructor(title, series, author) { super(title, series); this.author = author; } }
That completes the updates to the Book class! Now you can turn your attention
to the Movie class, which needs to be refactored in a similar way.
Time to practice! To help reinforce your learning, try to make the changes
to theMovieclass on your own. When you're done, compare your code to the
code shown below.
Here's the updatedMovieclass:
class Movie extends CatalogItem { constructor(title, series, director) { super(title, series); this.director = director; } }
Go ahead and use Node to re-run your application (node index.js) to confirm
that the output to the terminal window is unchanged. You should see the
following output:
The Grapes of Wrath Episode 4: A New Hope (Star Wars)
Great job! You've improved your code without breaking the behavior of your
application.
For reference, here's the current state of your code:
class CatalogItem { constructor(title, series) { this.title = title; this.series = series; } getInformation() { if (this.series) { return `${this.title} (${this.series})`; } else { return this.title; } } } class Book extends CatalogItem { constructor(title, series, author) { super(title, series); this.author = author; } } class Movie extends CatalogItem { constructor(title, series, director) { super(title, series); this.director = director; } } const theGrapesOfWrath = new Book('The Grapes of Wrath', null, 'John Steinbeck'); const aNewHope = new Movie('Episode 4: A New Hope', 'Star Wars', 'George Lucas'); console.log(theGrapesOfWrath.getInformation()); // The Grapes of Wrath console.log(aNewHope.getInformation()); // Episode 4: A New Hope (Star Wars)
The
CatalogItem,Book, andMovieclasses form a simple class
hierarchy. More complicated class hierarchies can include as many as a dozen
or more classes.
413.1. Understanding how this
works from within a parent class
Reviewing the CatalogItem parent class, you'll notice that the this keyword
is used both in the constructor() and getInformation() methods:
class CatalogItem { constructor(title, series) { this.title = title; this.series = series; } getInformation() { if (this.series) { return `${this.title} (${this.series})`; } else { return this.title; } } }
Regardless of where the this keyword is used, it always references the
instance object (the object created using the new keyword). This behavior
allows the constructor() method in a class—child or parent—to initialize
properties on the instance object. It also gives access to instance object
properties from within any instance method, regardless if the method is defined
in a child or parent class.
414. Understanding how inheritance works in JavaScript
Earlier in this lesson, you saw how the instanceof operator and the
Object.getPrototypeOf() method could be used to confirm that ES2015 classes
are primarily syntactic sugar over constructor functions and prototypes. We
can use similar debugging techniques to see how class inheritance in JavaScript
is implemented using prototypes.
Syntactic sugar refers to the addition of syntax to a programming language
that provides a simpler or more concise way to leverage features that already
exist as opposed to adding new features.
For reference, here are theCatalogItemandBookclass definitions that
we've been working with in this article:
class CatalogItem { constructor(title, series) { this.title = title; this.series = series; } getInformation() { if (this.series) { return `${this.title} (${this.series})`; } else { return this.title; } } } class Book extends CatalogItem { constructor(title, series, author) { super(title, series); this.author = author; } }
To review, we can use the instanceof operator to verify that the CatalogItem
and Book classes are actually Function objects, not special "Class"
objects
or types:
console.log(Catalogitem instanceof Function); // true console.log(Book instanceof Function); // true
The underlying function for the Book class, like a constructor function, has a
prototype property. The object referenced by the Book.prototype property is
used to set the prototype (i.e. [[prototype]]) for every instance of the
Book class.
We can verify this using the Object.getPrototypeOf() method:
// Create an instance of the Book class. const theGrapesOfWrath = new Book('The Grapes of Wrath', null, 'John Steinbeck'); // Verify that the prototype of the instance // references the `Book.prototype` object. console.log(Object.getPrototypeOf(theGrapesOfWrath) === Book.prototype); // true
The Book class uses the extends keyword to inherit from the
CatalogItem
class. This gives instances of the Book class access to the getInformation()
method defined within the CatalogItem class. But how is that accomplished?
414.1. Inheritance, prototype chains, and delegation
Just like the Book class, the underlying function for the CatalogItem class
has a prototype property. Because the Book class inherits from the
CatalogItem class, the object referenced by the Book.prototype property will
have its [[prototype]] set to the CatalogItem.prototype property.
Again, we can verify this using the Object.getPrototypeOf() method:
console.log(Object.getPrototypeOf(Book.prototype) === CatalogItem.prototype); // true
The relationships between the Book instance, the Book.prototype property,
and the CatalogItem.prototype property form a prototype chain.
In fact, the prototype chain doesn't end with the CatalogItem.prototype
property. The object referenced by the CatalogItem.prototype property has its
[[prototype]] set to the Object.prototype property, which is the default
base prototype for all objects.
Yet again, we can verify this using the Object.getPrototypeOf() method:
console.log(Object.getPrototypeOf(CatalogItem.prototype) === Object.prototype); // true
Notice that as we move from the bottom of the prototype chain to the top, from
the Book.prototype object to the CatalogItem.prototype object to the
Object.prototype object, we move from more specialized objects to more generic
objects.
Prototype trivia:
Object.prototypeis the[[prototype]]for all object
literals and the base[[prototype]]for any objects created with thenew
keyword.
Remember that a prototype is an object that's delegated to when a property or
method can't be found on an object. We just saw that a class hierarchy defines a
prototype chain. A prototype chain in turn defines a series of prototype objects
that are delegated to, one by one, when a property or method can't be found on
an instance object.
For example, we can call thegetInformation()method on an instance of the
Bookclass, like this:
console.log(theGrapesOfWrath.getInformation()); // The Grapes of Wrath
The following occurs when the getInformation() method is invoked:
- JavaScript looks for the
getInformation()method on thetheGrapesOfWrath
object. - When the method isn't found, the method call is delegated to the
theGrapesOfWrathobject's[[prototype]](the object referenced by the
Book.prototypeproperty). - When the method isn't found (again), the method call is delegated to the
Book.prototypeproperty object's[[prototype]](the object referenced by
theCatalogItem.prototypeproperty). - This time the method is found (yes!) and the method is successfully called
withthisset to thetheGrapesOfWrathobject.
Using this system of delegation, JavaScript provides a mechanism for objects to
"inherit" properties and methods from other objects. Because of its use of
prototypes, JavaScript's implementation of inheritance is technically known as
prototypal inheritance.
415. Overriding a method in a parent class
Defining a method in a parent class to add behavior to all of its descendant
classes is useful and helps to keep your code DRY (don't repeat yourself). But
what if a specific child class needs to modify the behavior of the parent class
method?
For example, what if the getInformation() method for the Movie class needs
to add the director's name to the end of the string that's returned by the
method? One way to satisfy this requirement is to override the parent class's
getInformation() method in the child class.
Method overriding is when a child class provides an implementation of a
method that's already defined in a parent class.
Taking advantage of how delegation works in JavaScript, to override a method in
a parent class, you can simply define a method in a child class with the same
method name:
class Movie extends CatalogItem { constructor(title, series, director) { super(title, series); this.director = director; } getInformation() { // TODO Implement this method! } }
Now when the getInformation() method is called on an instance of the Movie
class, the method will be found on the instance's [[prototype]] (the object
referenced by the Movie.prototype property). This stops JavaScript from
searching any further up the prototype chain, so the getInformation() method
that's defined in the CatalogItem class isn't even considered.
You can think of the
getInformation()method that's defined in theMovie
class as "shadowing" or "hiding" thegetInformation()method that's defined
in theCatalogItemclass.
Now we need to implement thegetInformation()method in theMovieclass. We
could copy and paste the code from thegetInformation()method in the
CatalogItemclass as a starting point, but we want to keep our code DRY!
What if we could call thegetInformation()method in theCatalogItemclass
from within thegetInformation()method in theMovieclass? Using the
superkeyword, we can:
class Movie extends CatalogItem { constructor(title, series, director) { super(title, series); this.director = director; } getInformation() { let result = super.getInformation(); if (this.director) { result += ` [directed by ${this.director}]`; } return result; } }
In the above implementation of the getInformation() method, the super
keyword is used to reference the getInformation() method that's defined in the
parent class—the CatalogItem class. We then take that result of calling the
getInformation() method in the parent class and append the director property
in brackets (i.e. []) as long as the director property actually has a value.
Now we've modified the behavior of a parent class method without having to
duplicate code between classes!
416. What you learned
In this article, you learned
- how to define a parent class;
- how to use the
extendskeyword to define a child class that inherits from a
parent class; - that inheritance in JavaScript is implemented using prototypes; and
- how to define a method in a child class that overrides a method in the parent
class.
Using Modules in Node.js
Up until now, you've used Node to run a single JavaScript file that contains all
of your code. For trivial Node applications, this approach works fine, but for
most Node applications, a different approach is required. Instead of a single,
monolithic JavaScript file that contains all of your application code, you'll
use multiple files, with each file containing a logical unit of code that
defines a module.
When you finish this article, you should be able to:
- Add a local module to a Node.js application;
- Use the
module.exportsproperty to export from a module; - Use the
require()function to import from a module; - Use modules that export a single item; and
- Understand how module loading works in Node.js.
This article only covers using modules in Node.js. Later on, you'll learn
how to use modules with JavaScript that runs in the browser.
417. Introducing Node.js modules
In Node.js, each JavaScript file in a project defines a module. A module's
content is private by default, preventing content from being unexpectedly
accessed by other modules. Content must be explicitly exported from a module so
that other modules can import it. You'll learn how to share content between
modules later in this article.
Modules defined within your project are known as local modules. Ideally, each
local module has a single purpose that's focused on implementing a single bit of
functionality. Local modules, along with core and third-party modules, are
combined to create your application.
417.1. Core and third-party modules
Core modules are the native modules contained within Node.js that you can use
to perform tasks or to add functionality to your application. Node contains a
variety of core modules, including modules for working with file paths (path),
reading data from a stream one line at a time (readline), reading and writing
files to the local file system (fs), and creating HTTP servers (http).
Developers, companies, and organizations that use Node.js also create and
publish modules that you can use in your applications. These third-party
modules are distributed and managed using [npm][npm], a popular package manager
for Node.js. You'll learn about npm and package managers in a future lesson.
417.2. The CommonJS module system
Recent versions of Node.js actually contain two different module systems. A
legacy module system known as CommonJS and a newer module system known as
ECMAScript Modules or simply ES Modules. Conceptually, CommonJS and ES
Modules are similar, but their syntax and implementation details differ.
ES Modules will eventually replace CommonJS, but the transition won't happen
overnight. Like older versions of JavaScript, CommonJS modules may never
disappear completely due to the amount of legacy Node.js code that exists.
You'll start with learning about and using CommonJS modules. In a future
lesson, you'll be introduced to ES Modules.
418. Adding a local module to a Node.js application
To add a local module to a Node application, simply add a new JavaScript file
(.js) to your project! You can locate the file in the root of the project or
within a folder or a nested folder.
Here's a screenshot of adding a classes module (classes.js) to the root
folder of a Node application in Visual Studio Code:
![new-module][new-module]
[new-module]:
https://appacademy-open-assets.s3-us-west-1.amazonaws.com/Module-JavaScript/classes/assets/js-classes-new-module.png
The classes module will define the classes for a simple library catalog
application, which will be used to track a library's catalog of books and
movies.
Here's the code for the CatalogItem, Book, and Movie classes:
classes.js
class CatalogItem { constructor(title, series) { this.title = title; this.series = series; } getInformation() { if (this.series) { return `${this.title} (${this.series})`; } else { return this.title; } } } class Book extends CatalogItem { constructor(title, series, author) { super(title, series); this.author = author; } } class Movie extends CatalogItem { constructor(title, series, director) { super(title, series); this.director = director; } getInformation() { let result = super.getInformation(); if (this.director) { result += ` [directed by ${this.director}]`; } return result; } }
The CatalogItem class represents an item in the library's catalog. The
CatalogItem class serves as the parent class to the Book and Movie
classes, which respectively represent books and movies in the library's catalog.
Code contained within a module is private by default, meaning that it's only
accessible to other code contained with that module. If you attempted to
reference the Book or Movie classes in the index.js file, you'd get
a
runtime error.
The
index.jsfile is the entry point for the application. A Node
application's entry point is the file that's passed to thenodecommand
(i.e.node index.js) when starting an application from the terminal.
419. Exporting from a module
To make the Book and Movie classes accessible to other modules in our
application, you need to export them.
Each module in Node has access to a module object that represents the current
module. The module object contains a number of properties that provide
information about the current module. One of those properties, the
module.exports property, is used to export items from the module.
To export an item, simply define a property for that item on the
module.exports object:
classes.js
class CatalogItem { // Contents removed for brevity. } class Book extends CatalogItem { // Contents removed for brevity. } class Movie extends CatalogItem { // Contents removed for brevity. } module.exports.Book = Book; module.exports.Movie = Movie;
Node initializes the module.exports property to an empty object. If you don't
declare and initialize any properties on the module.exports object, then
nothing will be exported from the module.
The module.exports property names don't need to match the class names, but for
this specific example, it makes sense to keep the property names consistent with
the class names.
Notice that we're intentionally not exporting the
CatalogItemclass. The
CatalogItemclass is the parent class for theBookandMovieclasses and
can stay private to this module.
In this example (and the others that follow), we're exporting an ES2015 class,
but what you can export from a module isn't restricted to just classes. You can
just as easily export a function or an object.
419.1. Assigning a new object to the
module.exports property
Instead of defining properties on the module.exports property, you can assign
a new object that contains a property for each item that you want to export:
classes.js
class CatalogItem { // Contents removed for brevity. } class Book extends CatalogItem { // Contents removed for brevity. } class Movie extends CatalogItem { // Contents removed for brevity. } module.exports = { Book, Movie };
Both approaches will look the same to the consumers of the module, so choosing
which approach to use is a stylistic choice.
419.2. The
exports shortcut
In addition to the module.exports property, Node provides an exports
variable that's initialized to the module.exports property value. Instead of
defining properties on the module.exports property, you can use the exports
variable as a shortcut:
classes.js
class CatalogItem { // Contents removed for brevity. } class Book extends CatalogItem { // Contents removed for brevity. } class Movie extends CatalogItem { // Contents removed for brevity. } exports.Book = Book; exports.Movie = Movie;
While this is handy, it's important to note that you can't use the exports
variable if you want to assign a new object to the module.exports property:
classes.js
class CatalogItem { // Contents removed for brevity. } class Book extends CatalogItem { // Contents removed for brevity. } class Movie extends CatalogItem { // Contents removed for brevity. } // Don't do this! // Assigning a new value to the `exports` variable // doesn't update the `module.exports` property. exports = { Book, Movie };
To understand why this doesn't work, let's imagine how Node initializes the
module.exports property and declares and initializes the exports variable:
// Initialize the `module.exports` property to an empty object. module.exports = {}; // Declare and initialize the `exports` variable. let exports = module.exports;
Assigning a new value to the exports variable breaks the linkage between the
variable and the module.exports property:
classes.js
// Class definitions removed for brevity. // Assign a new value to the `exports` variable. exports = { Book, Movie }; // The `module.exports` property still references an empty object. console.log(module.exports); // {}
While the exports variable now references your new object, the
module.exports property still references the empty object that Node assigned
to it. This results in nothing being exported from your module.
Just remember to only define properties on the exports variable—never assign a
new value to it!
Because of this issue, some developers and teams prefer to use the
module.exportsproperty exclusively and ignore that theexportsshortcut
exists. As long as you understand how to properly use theexportsvariable,
it's safe to use in your applications.
420. Importing from a module
The code for the application's entry point, index.js, looks like this:
index.js
const theGrapesOfWrath = new Book( "The Grapes of Wrath", null, "John Steinbeck" ); const aNewHope = new Movie( "Episode 4: A New Hope", "Star Wars", "George Lucas" ); console.log(theGrapesOfWrath.getInformation()); // The Grapes of Wrath console.log(aNewHope.getInformation()); // Episode 4: A New Hope (Star Wars) [directed by George Lucas]
If you attempted to run your application using the command node index.js,
you'd receive the following error:
ReferenceError: Book is not defined
You're attempting to instantiate an instance of the Book class but that class
is defined in the classes module, not the index module (the module defined
by the index.js file).
Each module needs to explicitly state what it needs from other modules by saying
"I need this and this to run". When a module needs something from another
module, it's said to be dependent on that module. A module's dependencies are
the modules that it needs to run.
420.1. The
require() function
The index module is dependent upon the Book and Movie classes, so you
need
to import them from the classes module. To do that, you can use the
require() function:
index.js
// Use the `require()` function to import the `classes` module. const classes = require("./classes"); // Declare variables for each of the properties // defined on the `classes` object. const Book = classes.Book; const Movie = classes.Movie; const theGrapesOfWrath = new Book( "The Grapes of Wrath", null, "John Steinbeck" ); const aNewHope = new Movie( "Episode 4: A New Hope", "Star Wars", "George Lucas" ); console.log(theGrapesOfWrath.getInformation()); // The Grapes of Wrath console.log(aNewHope.getInformation()); // Episode 4: A New Hope (Star Wars) [directed by George Lucas]
To import from a local module, you pass to the require() function a path to
the module: ./classes. The dot in the path means to start in the current
folder and look for a module named classes. The module name is the name of the
file without the .js file extension.
You can optionally include the
.jsfile extension after the module name, but
most of the time it's omitted.
Remember that theclassesmodule exports an object (using themodule.exports
property) with two properties,BookandMovie, which reference theBook
andMovieclasses defined within theclassesmodule. The object that the
classesmodule exports is what's returned from therequire()function call
and captured by theclassesvariable:
index.js
const classes = require("./classes");
To make it a little easier to reference the Book and Movie classes, local
variables are declared for each:
index.js
const Book = classes.Book; const Movie = classes.Movie;
Now if you run your application using the command node index.js, you'll see
the following output:
The Grapes of Wrath Episode 4: A New Hope (Star Wars) [directed by George Lucas]
To review, when a module requires code from another module it becomes dependent
on that module. So, in this example, the index module has a dependency on the
classes module—without the Book and Movie classes this code in the
index
module wouldn't be able to successfully run.
420.2. Using destructuring when importing
Instead of declaring a variable for the module that you're importing and then
declaring a variable for each individual item that the module exports, you can
use destructuring to condense that code to a single statement:
index.js
const { Book, Movie } = require("./classes"); const theGrapesOfWrath = new Book( "The Grapes of Wrath", null, "John Steinbeck" ); const aNewHope = new Movie( "Episode 4: A New Hope", "Star Wars", "George Lucas" ); console.log(theGrapesOfWrath.getInformation()); // The Grapes of Wrath console.log(aNewHope.getInformation()); // Episode 4: A New Hope (Star Wars) [directed by George Lucas]
Either approach works fine, so this is one of the many stylistic choices you'll
make as a developer.
421. Using single item modules
Knowing how best to organize a project using modules is challenging—even for
experienced developers. There's also a variety of valid approaches for
organizing projects. While there's no single "best" way (each approach has
benefits and drawbacks), some developers prefer modules that only export a
single item.
Following the convention of a single exported item per module helps to keep
modules focused and less likely to become bloated with too much code. This has
many advantages including improving the readability and manageability of your
code.
421.1. Splitting apart the classes module
Currently, the classes module (defined by the classes.js file) defines and
exports three classes: CatalogItem, Book, and Movie. Let's split apart
the
classes module so that each class will become its own module.
Start by adding a folder to your project named classes. Then add three files
to the classes folder, one for each class: catalog-item.js, book.js,
and
movie.js. Here's a screenshot of the project after these changes:
![module-refactoring][module-refactoring]
[module-refactoring]:
https://appacademy-open-assets.s3-us-west-1.amazonaws.com/Module-JavaScript/classes/assets/js-classes-module-refactoring.png
Now you're ready to move the CatalogItem class from the classes module to
the catalog-item module. To do that, copy and paste the code for the
CatalogItem class from one module to the other:
classes/catalog-item.js
class CatalogItem { constructor(title, series) { this.title = title; this.series = series; } getInformation() { if (this.series) { return `${this.title} (${this.series})`; } else { return this.title; } } }
For any module that contains or exports a single item, we can simply assign that
item to the module.exports property:
classes/catalog-item.js
class CatalogItem { // Contents removed for brevity. } module.exports = CatalogItem;
Next, move the Book class from the classes module to the book module,
copying and pasting the code for the Book class from one module to the other:
classes/book.js
class Book extends CatalogItem { constructor(title, series, author) { super(title, series); this.author = author; } }
Sharp eyes will notice that the Book class inherits from the CatalogItem
class (using the extends keyword). This means that the book module has a
dependency on the catalog-item module.
You can import the CatalogItem class using the require() function, declaring
and initializing a variable for the single item that's exported from the module:
classes/book.js
const CatalogItem = require("./catalog-item"); class Book extends CatalogItem { // Contents removed for brevity. }
This demonstrates that when importing from a module, you need to be aware if the
module exports a single item or multiple items. For local modules, you can
review the code for the module you're importing from to determine how the
module.exports property is being used. For core modules in Node or third-party
modules, you'll need to consult the documentation for the module if you're
unfamiliar with the module.
Finish up the book module by exporting the Book class from the module:
classes/book.js
const CatalogItem = require("./catalog-item"); class Book extends CatalogItem { // Contents removed for brevity. } module.exports = Book;
Now you're ready to move the Movie class from the classes module to the
movie module. The process and end result, will look a lot like the book
module:
classes/movie.js
const CatalogItem = require("./catalog-item"); class Movie extends CatalogItem { constructor(title, series, director) { super(title, series); this.director = director; } getInformation() { let result = super.getInformation(); if (this.director) { result += ` [directed by ${this.director}]`; } return result; } } module.exports = Movie;
After moving the classes to their own modules, you can safely remove the
classes module by deleting the classes.js file.
The last change that you need to make is to the index module. The index
module needs to import the Book and Movie classes from the new modules:
index.js
const Book = require("./classes/book"); const Movie = require("./classes/movie"); const theGrapesOfWrath = new Book( "The Grapes of Wrath", null, "John Steinbeck" ); const aNewHope = new Movie( "Episode 4: A New Hope", "Star Wars", "George Lucas" ); console.log(theGrapesOfWrath.getInformation()); // The Grapes of Wrath console.log(aNewHope.getInformation()); // Episode 4: A New Hope (Star Wars) [directed by George Lucas]
Notice that the classes folder name needed to be added to the path that's
passed to the require() function.
If you run your application again using the command node index.js, you'll see
the following output (which is unchanged from the previous version of the
application):
The Grapes of Wrath Episode 4: A New Hope (Star Wars) [directed by George Lucas]
422. Understanding module loading
In this article, we've focused on creating and using local modules, but that's
just one of the available module types. How does Node determine if a module is a
local, core, or third-party module?
422.1. Module loading logic
When attempting to load a module, Node will examine the identifier passed to the
require() function to determine if the module is a local, core, or third-party
module:
- Local module = identifier starts with
./,../, or/ - Node.js core module = identifier matches a core module name
- Third-party module = identifier matches a module in the
node_modulesfolder
If the identifier starts with./,../, or/, then Node will attempt to
load a local module from the current project using the provided path.
If the identifier passed to therequire()function isn't a path, then Node
will check if the module name matches a core module name.
If the identifier isn't a core module, then Node will attempt to load the module
from thenode_modulesfolder. Thenode_modulesfolder is a special folder
that thenpmpackage manager creates. You'll learn more about npm and the
node_modulesfolder in a future lesson.
422.2. Module loading process
The first time that a module is imported by another module, Node will load the
module, execute the code contained with the module, and return the
module.exports object to the consuming module. To help improve performance,
Node caches modules so that they only need to be loaded and executed once.
An interesting side effect of the module loading process is that code contained
within a module is only executed when it's first imported by another module. If
a module is never imported by another module—meaning that it's not a dependency
of another module—then the code contained within that module won't be executed.
The exception to this rule is the module that's specified as the entry point for
your application. Typically that's the index.js or app.js file located in
the root of your project folder. Code in the entry point module is automatically
executed by Node when the application is started.
423. What you learned
In this article, you learned
- how to add a local module to a Node.js application;
- how to use the
module.exportsproperty to export from a module; - how to use the
require()function to import from a module; - how to use modules that export a single item; and
- how module loading works in Node.js.
[npm]: https://www.npmjs.com/
Constructor Functions and Classes Project
Time to practice creating and using constructor functions and ES2015 classes.
Your objective is to implement the requirements listed in each file of the
/problems directory. In addition to the prompts available at the top of each
file, Mocha specs are provided to test your work.
To get started, use the following commands:
cdinto the project directorynpm installto install any dependenciesmochato run the test cases
WEEK-05 DAY-3
Classes and Objects
Object-Oriented Programming Learning Objectives
Object-Oriented Programming (OOP) is one of the most popular programming
paradigms. Additionally, OOP can help beginning engineers learn how to breakdown
complex problems.
You will be tested on this material by completing a guided project using the
following principles. You will also answer questions about their definitions.
- The three pillars of object-oriented programming
- How to apply the Law of Demeter
Object-Oriented Programming Explained
JavaScript is an object-oriented language. You've already used objects in your
programming. For example, when you write
const array = [1, 2, 3, 4]; const squares = array.map(x => x * x);
the value stored in array is an object! The value stored in squares is
another object! There are objects all over the place!
In this article, you're going to learn the theory of object-oriented
programming, the features that make it different than other kinds of
programming.
- The property of encapsulation.
- The property of inheritance.
- The property of polymorphism.
These features allow us to thoughts in a way that (hopefully) represents the way
that we, as humans, think and reason about the world.
424. Encapsulation: enclose (something) in or as if in a capsule
When you write a class, you do something amazing which revolutionized the
organization of computer software source code: you put behavior (the methods)
and the data it works on (instance variables, also called fields) together. Up
to that point, programmers had to deal with code that declared data structures
in one file and used in multiple other files all over the code base.
Understanding where data got changed became exponentially difficult as the size
of software grew.
Knowing where data changes is the most important aspect of software. Every
change in the way programmers like yourself organize your code has been about
maintainability, about how and where you should put the code that runs the
instructions that makes the software works. In a lot of object-oriented
languages, like Java, C++, Objective-C, and C#, they tend to either enforce or
encourage putting one class definition per file. You are not bound by that
restriction or convention in JavaScript.

Imagine, if you will, that you want to buy something from a vending machine. You
tap your phone against the payment reader (or insert coins into a slot, or swipe
a credit card). Once the payment is authorized in any of those forms, you can
make a selection and receive your tasty treat. If you were to think about that
as a series of steps, you could write them like this.
- Authorize payment through payment vendor
- Make selection
- Retrieve tasty treat
With respect to the concepts of object-oriented programming, the vending machine
would be an object. All of the internal workings of the machine, how it
communicates wirelessly with a payment vendor, how its internal mechanics thrash
about to deliver a beverage or snack to you, all of that is hidden behind a
plastic advertisement. All of that behavior is encapsulated inside the machine
so that you don't have to worry about the details. Imagine a less encapsulated
world where you had to perform the following steps to get your tasty treat. - Call your payment provider.
- Specify that you want to spend no more than $2 on your next purchase.
- Write down a confirmation number for an authorization of up to a $2 payment.
- Call the vending machine company.
- Give them your payment authorization confirmation number.
- Key in a 16-digit authorization number that they tell you.
- Make selection.
- Tell the vending company the transaction number and the total amount.
- Retrieve tasty treat.
Now, instead of hiding all the details about how payments work, the vending
machines forces you to have to participate in the payment process. A system such
as this relies on people acting as good agents when they report the total amount
with the transaction number. A system such as this is inconvenient for the
person that has a desire to sate. The vending machine encapsulates the
complexity of its internal mechanisms behind easy-to-use interactions. The same
goes with encapsulation with object-oriented programming.
Say that you wanted to write software that helped gyms manage their business.
Something that can happen at the gym would be that you want to register a person
as a member for the gym. Code that does that may look something like this.
class Gym { registerMember(firstName, lastName, email, creditCardInfo) { const person = new Person(lastName, firstName, email); person.addCardInfo(creditCardInfo); this.members.push(person); } // Lots of other code }
When other code uses this, all it knows about how the gym object works is that
there's a method named registerMember and if you give it some information,
then a person becomes a member of the gym. Imagine that the code inside the
registerMember function was written like this instead:
class Gym { registerMember(firstName, lastName, email, creditCardInfo) { this.members[this.members.length] = { firstName: firstName, lastName: lastName, email: email, creditCardInfo: creditCardInfo, }; } // Lots of other code }
The encapsulation of the behavior (adding a new member to the gym) is hidden
behind the method name registerMember. Any code which uses the registerMember
method of the Gym class doesn't care what the code looks like inside of Gym.
It still just uses it like this:
gym = new Gym(); gym.registerMember('Margaret', 'Hamilton', 'mh@mit.edu', null);
Encapsulation puts the behavior and data together behind methods that hide the
specific implementation so that code that uses it doesn't need to worry about
the details of it.
425. Inheritance: derived from one's ancestors

In the same way that biology passes traits of a parent organism to its
descendants, so does object-oriented programming through its support of
inheritance. There are a lot of different kinds of inheritance because there
are a bunch of different "type systems" that programming languages support.
JavaScript, in particular, supports a type of inheritance known as
implementation inheritance through a mechanism known as prototypal
inheritance. Implementation inheritance means that the data and methods
defined on a parent class are available on objects created from classes that
inherit from those parent classes. Prototypal inheritance means that
JavaScript uses prototype objects to make its implementation inheritance
actually work.
Notes: Here is some terminology for you.
- For the sake of brevity, you should understand that whenever you read the
phrase "parent class", that also means "prototype". - "Super class" is another name for "parent class".
- "Base class" is another name for "parent class".
- Sometimes, you will see "inheritance" referred to as "subtyping".
425.1. A built-in example of inheritance
All object in JavaScript share a common parent class, the Object parent class.
The Object class has a method named toString() on it. Since all objects in
JavaScript are child classes (or grandchild classes or great grandchild classes
or great great...), that means that every object in JavaScript has a
toString() method! If a class doesn't create its own, then it will fall back
to its parent class' implementation of toString(). If the parent class doesn't
have an implementation, and the parent's parent class doesn't have an
implementation, it will keep going until it gets to the Object class and use
that one. (That's some recursion in there. Did you sense that?) Open a terminal,
start node, and type the following.
> [1, 2, 3].toString(); '1,2,3' > "some text".toString(); 'some text' > new Date().toString(); '«the current date and time»' > new Object().toString(); [object Object]
You'll note the following:
- The
toString()method of an array takes the values in the array and turns
them into a comma-delimited string, that is, it puts commas between each of
the items. - The
toString()method of a string does nothing and just returns the string
object. (You might remember that strings are primitive types, but strings are
special and you can also call methods on them like they are objects.) - The
toString()method of aDateobject returns a long textual
representation of the date and time that theDateobject represents. - The
toString()method ofObjectreturns the not so helpful "".
When you declare a class with no explicit parent class, then JavaScript will
make it a child ofObject.
class MyClass {} // is the same as class MyClass extends Object {}
425.2. A custom example of implementation inheritance
Imagine that you have created the following code in a JavaScript file and loaded
it into a browser (through a <script> tag) or run it with the node command.
class Charity {} class Business { toString() { return 'Give us your money.'; } } class Restaurant extends Business { toString() { return 'Eat at Joe\'s!'; } } class AutoRepairShop extends Business {} class Retail extends Business { toString() { return 'Buy some stuff!'; } } class ClothingStore extends Retail {} class PhoneStore extends Retail { toString() { return 'Upgrade your perfectly good phone, now!'; } } console.log(new PhoneStore().toString()); console.log(new ClothingStore().toString()); console.log(new Restaurant().toString()); console.log(new AutoRepairShop().toString()); console.log(new Charity().toString());
What do you think those last four lines will print out? Try running that code
to confirm your suspicions. (Important: When given the opportunity to try
out short snippets of code like the above example, do not copy and paste it.
This is an opportunity for you to type it into an editor or command line to
become familiar with the syntax.)
The three classes AutoRepairShop, Charity, and ClothingStore in the
example above do not have their own toString() methods. That means that an
object of one of those three types can't respond to that method invocation. The
JavaScript runtime at that point starts inspecting prototype objects to find
a toString() method.
- For
AutoRepairShop, it finds atoString()method on its parent class
Business, and prints "Give us your money.". - For
ClothingStore, it finds atoString()method on its parent class
Retail, and prints "Buy some stuff!". - For
Charity, it finds atoString()method on its implicit parent class
Object, and prints "[object Object]".
425.3. The nuts and bolts of prototypal inheritance
JavaScript is almost singularly unique in its concept of prototype-based
inheritance. No other commonly used language in the modern world has this kind
of inheritance. (Examples of languages that do have prototypal inheritance
are [Common Lisp], [Self], and [Io]. These languages have niche markets that
some people adore. However, you would be hard-pressed to find them in use in
most software development shops.)
As you saw in the example from the last section, when you write code that
accesses a method (or property) on an object, if JavaScript doesn't find it, it
will "delegate" it to its prototype, that is, it will determine if the prototype
has that method (or property). If it doesn't find it there, it will delegate it
to the object's prototype's prototype until it reaches Object. If it doesn't
find it on Object, then you'll get an error or undefined, depending on the
mechanism that you're using.
Consider the following diagrams which show an object with name and getAge
properties. It has a parent object (prototype) that has name and lastName
properties. That parent object has another parent object that has a toString
property.
If you write code to get the name property of the object, it will look on that
object, determine that a name property exists, and return the value of that
property, "Djimon".

If you write code to get the lastName property of the object, it will look at
that object, see that there's no lastName property on it, and go to its parent
object, its prototype object. There, it sees a lastName property defined and
returns the value of that property, "Hounsou".

If you write code to invoke the toString() method of the object, it will look at
that object, see that there's no toString property on it, and go to its parent
object, which also doesn't have a toString property. Finally, it will look at
the grandparent object (the one in green) and see that it has that toString()
method on it and invoke it. But, the story doesn't end there.

When the toString() method runs, it accesses the this property to get
this.name and this.lastName. The this property references the object
that
the call originally came from. That's really important.
When JavaScript uses a property (or method) from a prototype that it found
through prototypal inheritance, then thethisproperty points to the
original object on which the first call was made.
In this case, the call tothis.namein thetoString()method of the original
object's grandparent class acts just like the call too.namefrom
two examples back. The call tothis.lastNameacts the same way.
Try the following code in your JavaScript environment to get a feel for it.
Change the assignments in the constructor. Remove assignments in the
constructor. See how changes affect the messages printed to the console.
class Parent { constructor() { this.name = 'PARENT'; } toString() { return `My name is ${this.name}`; } } class Child extends Parent { constructor() { super(); this.name = 'CHILD'; } } const parent = new Parent(); console.log(parent.toString()); const child = new Child(); console.log(child.toString());
426. Polymorphism: a cool sounding word to impress your friends
In object-oriented programming, polymorphism means that you can treat a variable
as if it were one of its parent types. You've already been doing this in
JavaScript through its prototypal inheritance. So, just remember its definition
for this course. It's a perennial favored question in interviews:
Polymorphism is the ability to treat an object as if it were an instance of one
of its parent classes.
427. What you've learned
In this reading, you learned about the three pillars of object-oriented
programming (encapsulation, inheritance, and polymorphism) and how they relate
to JavaScript.
You learned that encapsulation is just all of the details behind an object's
methods.
You learned that inheritance is the ability to gain behavior and data from
parent classes.
You learned that polymorphism is just a fancy work for being able to use the
methods of a parent class on an object of a child class.
[Common Lisp]: http://common-lisp.net/
[Io]: http://iolanguage.com/
[Self]: http://www.selflanguage.org/
The SOLID Principles Explained
The three pillars of object-oriented programming describe how classes and
objects work. What they don't describe are good practices for what should go
into a class. That's the difference between object-oriented programming
(pillars) and object-oriented design (SOLID)! That's where the SOLID Principles
come in. "SOLID" is an anagram that stands for
- The Single-Responsibility Principle
- The Open-Close Principle
- The Liskov Substitution Principle
- The Interface Segregation Principle
- The Dependency Inversion Principle
Of these five principles, only two are directly applicable to your use of
JavaScript (and Python) in this course. Moreover, two are only truly applicable
in languages like Java, C++, and C#. This article spends many words explaining
the applicable ones and provides a definition for those that are not so
applicable in JavaScript (and Python).
It's really important that you don't stress out over being able to expertly
apply these principles any time in the next three years. Being able to apply
them takes practice and experience. You're getting introduced to them, now, so
that you can have the ideas in your brain. With them in your brain, they can
influence how you go about writing classes.
But, don't sit around thinking about the best way to apply these object-oriented
design principles. That is analysis paralysis! You'll get stuck and not be
able to get out of it. Working code is usually better than no code at all. You
can write code and, then, think about it, look at it, and start asking yourself
whether it follows these principles. That's the best way to start out. Don't
worry about applying them to your design before you write any code. That will
come with practice.
428. Single-Responsibility Principle
A class should do one thing and do it well.
Robert C. Martin, otherwise known as "Uncle Bob", created the SOLID principles.
He explains the Single-Responsibility Principle as, "A class should have only
one reason to change." He has also described the way to do it as "Gather
together the things that change for the same reasons. Separate those things that
change for different reasons."
This principle is about limiting the impact of change.
A class should have the responsibility to have the data and behavior over a
single part of the functionality provided by your software, and that
responsibility should be entirely encapsulated by the class.
For example, consider the following class.
// THIS IS BADLY DESIGNED CODE class Book { constructor (title, author, pages) { this.title = title; this.author = author; this.pages = pages; this.currentPage = 0; } addPage(page) { this.pages.push(page); } getCurrentPage() { return this.pages[this.currentPage]; } turnPage() { this.currentPage += 1; if (this.currentPage >= this.pages.length) { this.currentPage = this.pages.length - 1; } } printText() { const firstPage = [this.title + "\n" + this.author]; return firstPage.concat(this.pages); } printHTML() { const firstPage = [`<h1>${this.title}</h1>`]; const htmlPages = this.pages.map(x => `<section>${x}</section>`); return htmlPages; } }
What does the book class know about?
- How to manage the information about a book.
- How to print that book to different formats.
Think about a book that you would hold in your hand. Which of those two
"concerns" does the physical book know nothing about?
If you answered "printing to different formats", yeah, that's the one. Printing
is a different "concern", a different set of responsibilities. Instead of having
a singleBookclass that can print itself, following the Single-Responsibility
Principle would have you create two classes.
class Book { constructor (title, author, pages) { this.title = title; this.author = author; this.pages = pages; this.currentPage = 0; } addPage(page) { this.pages.push(page); } getCurrentPage() { return this.pages[this.currentPage]; } getPrintableUnits() { return this.pages; } turnPage() { this.currentPage += 1; if (this.currentPage >= this.pages.length) { this.currentPage = this.pages.length - 1; } } } class SimplePrinter { constructor(printable) { this.printable = printable; } printText() { const firstPage = [this.printable.title + "\n" + this.printable.author]; return firstPage.concat(this.printable.pages); } printHTML() { const firstPage = [`<h1>${this.printable.title}</h1>`]; const units = this.printable.getPrintableUnits(); const htmlPages = units.map(x => `<section>${x}</section>`); return firstPage.concat(htmlPages); } }
Now, you have two things, a Book and a SimplePrinter. The Book now
knows
all about being a book. The Printer is interested in things that are
"printable". In this case, "printable" means having title and
author
properties, and a method called getPrintableUnits(), that it can use to turn
something into text.
What's neat about this is that you can now create any other kind of thing that
might get printed and, as long as it has a title property, author property,
and a method called getPrintableUnits(), the SimplePrinter can handle it! If
you now add this Poem class to your program, then the SimplePrinter can
print it, too!
class Poem { constructor (title, author, lines) { this.title = title; this.author = author; this.lines = lines; } addLine(line) { this.lines.push(line); } getPrintableUnits() { return [this.lines.join('\n')]; } }
429. The Liskov Substitution Principle
This principle is named after Barbara Liskov, a computer scientist of some
renown from MIT. It has a very mathematical definition that you can now read.
However, if it doesn't make any sense, don't worry. You'll get an
easy-to-understand definition after this one.
Subtype Requirement: Let ϕ(x) be a property provable about objects x
of type T. Then ϕ(y) should be true for objects y of type S where
S is a subtype of T.
Boy, if you're ever asked about the Liskov Substitution Principle in an
interview (or a party) and you can rattle off that definition followed by an
explanation, you're going to impress the heck out of the interviewer (or your
party mates)! What that means is this.
You can substitute child class objects for parent class objects and not cause
errors.
All this means is that if you have a class with a method on it, any child class
that overrides that method must not do something unexpected. For example, let's
say you have the following class in JavaScript.
class Dog { speak() { return "woof!"; } /* other code about dogs */ }
Any instance of Dog will be able to say "woof!" Now, chihuahuas have a
different vocabulary.
class Chihuahua extends Dog { speak() { return "yip!"; } /* other code about chihuahuas */ }
What you can't do is create something like the following.
class Shitzu extends Dog { speak() { const fs = require('fs'); fs.unlink('~/.bash_profile'); return "YOU'RE PWNED!"; } /* other code about shitzus */ }
That would delete the profile for the Bash shell of the person who is running
your program! The speak method should have no side effects as defined by the
Dog class. The fact that a child class, Shitzu, will delete files when the
speak method is called is ludicrous.
The methods that you override in child classes must match the intent of the
methods found on the parent classes.
430. The other principles
These other three principles, as mentioned, are important for languages that
have static typing. That means a variable can have only one kind of thing in
it. In JavaScript, you have no such restriction. In JavaScript, you can declare
a variable, assign a string to it, then a number, then a date. That's amazing!
let value = "Hello, Programmer!"; value = 6.28; value = new Date();
In languages like Java, C++, and C#, you have to specify the kind of data type
you want to store in the variable. Then, only that kind (or instances of child
classes through polymorphism) can be stored in those variables. The following
code in C++ does not compile and reports errors.
// THIS IS ERROR-FILLED CODE std::string value = "Hello, Programmer!"; value = 6.28; // ERROR: Cannot assign a float to // a variable of type std::string.
In those worlds, these other principles have much more applicability. Again,
just memorize their names and definitions.
- Open-Close Principle means that a class is open for extension and closed
for modification. It means that creating new functionality can happen in
child classes and not the original class. - Interface Segregation Principle means that method names should be grouped
together into granular collections called "interfaces". - Dependency Inversion Principle means that functionality that your class
depends on should be provided as parameters to methods rather than usingnew
in the class to create a new instance.
431. What you learned
In this article, you learned a lot about the Single-Responsibility Principle
(SRP) and the Liskov Substitution Principle (LSP). You then learned some
definitions for the other three SOLID principles. You can start applying the SRP
and LSP in all of your code!
Controlling Coupling With The Law Of Demeter
To reduce the complexity of the software that you write, you should try to
reduce what is known as the "coupling" of the classes in your source code. In
this section, you will learn about the Law of Demeter, a way to help reduce
coupling in your software. Then, you will learn about when you can ignore the
Law of Demeter altogether.
432. Coupling
For the purposes of this article, coupling is defined as "the degree of
interdependence between two or more classes," not the award-winning British TV
show.
To reduce coupling, you must reduce how many other classes must know about to do
their job. A caller method is not coupled with all of the inner dependencies. It
is only coupled with one object. Using this principle you can also change a
class without affecting others. This is an improvement to the way that
encapsulation helps you.
The fewer the connections between classes, the less chance there is for the
ripple effect. Ideally, changing the implementation of a class should not
require a change in another class. If it does, that means a class must
understand the details of a class on which it doesn't directly depend. This is
known as the principle of locality.
433. The formal definition
The definition of the Law of Demeter is as follows.
A method of an object can only invoke the methods (or use the properties) of the
following kinds of objects:
- Methods on the object itself
- Any of the objects passed in as parameters to the method
- And object created in the method
- Any values stored in the instance variables of the object
- Any values stored in global variables
434. Practical advice
The Law of Demeter is more of a guideline than a principle to help reduce
coupling between components. The easiest way to comply with the Law of Demeter
is don't use more than one dot (not counting the one after "this"). For
example, the following code breaks the Law of Demeter.
// THIS CODE BREAKS THE LAW OF DEMETER class Airplane { constructor() { this.engine = new PropEngine(); } takeOff() { // this.engine is a value stored in an instance variable this.engine.getThrottle().open(); // two dots^ and ^ } } class PropEngine { constructor() { this.throttle = new Throttle(); } getThrottle() { return this.throttle; } } class Throttle { open() { return "VROOOOM"!; } }
That code breaks the Law of Demeter because it uses two dots to get its work
done, the first between engine and getThrottle() and the second between
getThrottle() and open().
The Airplane class is now coupled to the PropEngine class. Assume that the
getThrottle() method of the PropEngine class returns a Throttle object
that has the open method on it. Now, the Airplane class need to know about
two classes, that is, the PropEngine class and the Throttle class.
It
should only know about the one that it created, the PropEngine class.
Instead, you should change the way the engine works.
class Airplane { constructor() { this.engine = new PropEngine(); } takeOff() { this.engine.openThrottle(); } } class PropEngine { constructor() { this.throttle = new Throttle(); } openThrottle() { return this.throttle.open(); } } class Throttle { open() { return "VROOOOM"!; } }
This reduces the coupling of Airplane. It now only depends on the
PropEngine class, now.
An important thing to notice here is that the Airplane is now "telling" and
not "asking". You'll often hear that in object-oriented programming, "tell,
don't ask".
In the previous version, the takeOff method asked for the engine's
Throttle object using the getThrottle() method. Then, it told the
Throttle
object to open. In the better version, the takeOff method simple tells the engine to
openThrottle and let's the engine figure out how to do that.
435. You can't cheat the Law
Separating calls onto different lines DOES NOT get around the Law of Demeter.
You can't cheat. Here's the earlier code but with a different body for the
takeOff method.
// THIS CODE BREAKS THE LAW OF DEMETER class Airplane { constructor() { this.engine = new PropEngine(); } takeOff() { const engine = this.engine; // This is the PropEngine const throttle = engine.getThrottle(); // This is a Throttle throttle.open(); } }
Sure, it looks like there's only one dot per line. But, the Law of Demeter is
really about a class knowing about other classes. It still has to know that
there is an open method on the Throttle class to do it's work. So, even
though it doesn't break the "one dot" rule, it breaks the stricter definition of
the Law of Demeter which is that it is calling a method (open) on an object
throttle that doesn't match any of the five conditions of the definition.
436. When to ignore the Law of Demeter
When you're working with objects that come from code that you didn't create,
you often have to break the Law of Demeter. Hopefully, the other code doesn't
change often (or ever)!
For example, here's some code that you might see in a Web application.
document .getElementById('that-link') .addEventListener('click', e => e.preventDefault());
That's an obvious violation of the Law of Demeter. Your code must know the
details of the HTMLDocumentElement and HTMLLinkElement objects. But, there's no
way around it because you have to use the API provided by the DOM from the
browser.
So, if you don't own the code, and there's no way for you to get the job done
without more than one dot, just dot it up!
437. When else should you ignore the Law of Demeter?
We try very hard to decouple things. The things that are nearly impossible to
prevent tight coupling with are the visualizations of our program. The user
interface (UI) that people see has to know about the structure of the data.
Because of that, it is normal to have UIs that break the Law of Demeter all over
the place.
UIs are a special thing. They break all kinds of rules because UIs are not
object-oriented concepts. Their components may be objects, like the
HTMLDivElement object in the DOM that lets you interact with a div element
in JavaScript. Using that thing is object-oriented. However, the way that you
go about bridging between the state of your application to the visualiation is
not object-oriented.
Go ahead and couple those views to your models. This is just the normal price of
software development.
(Lots of very smart people have tried to come up with ways to decouple views and
the objects that make up software. No one has really created a satisfactory
solution.)
438. What you've learned
You learned that the Law of Demeter is a way to reduce coupling by following the
"one dot" rule, otherwise known as the "don't talk to strangers" rule. You also
know, now, that it's practical to break that law when you have to rely on other
people's code.
OOPS! I Forgot A Thing Project
"You'd forget your head if it weren't attached!" You don't need to worry
anymore! This to-do item manager will keep track of the stuff you just can't
forget.
In this project, you will work to put your object-oriented knowledge to work by
creating a To-Do application list. This is harder than it sounds because you're
going to support more than one kind of to-do item! As a friend of mine is fond
of saying, "just kindly do the needful" to reinforce these OO ideas.
There's a starter repository available for you at [To-Do Item Command Line
Utility] if you want to only do the modeling of the to-do items and application
state.
You can also decide to do it all on your own and make each screen its own class.
That's the funnest, but it will take a long while. You could always start on
this path and, if it gets to be too much, use the starter repository.
439. Interacting with your to-do-list
In this, please write a command-line application that uses the built-in
readline (or similar [npm]-based package) to support the following application
flow. Use the built-in fs (or similar [npm]-based package) to support the
saving of to-do items to disk. Use [chalk] if you want to have fancy colors.
Between each screen, you should clear the console.
In each of the screen mockups below, the underscore indicates the place where
the person will start typing their answer.

439.1. Main menu
This is the screen that appears when you first run the program. When someone
types a "1" and hits enter, it will take them to the to-do items list. When
someone types "2" and hits enter, it takes them to the search screen. When
someone types "3" and hits enter, it takes them to the category management
screen. When someone types "X" and hits enter, it cleanly exits your program.
If the user types something that doesn't match the options, have it reprint this
same screen.
********************************************
* TO-DO FOR YOU!!!!! (c) 1987 *
********************************************
Please choose one of the following options:
1. Review my to-do items
2. Search for a to-do item
3. Manage categories
X. Exit
Type a number to go to another screen. Type
an X to return to the main menu.
> _
439.2. Category management
Support the ability to categorize your to-do items. When someone chooses "3"
from the main screen, they should get this page. Support up to five categories
and no more.If the user types something that doesn't match the options, have it
reprint this same screen.
********************************************
* CATEGORIES (c) 1987 *
********************************************
1. Category 1
2. Category 2
3. Category 3
4. Category 4
5. Category 5
X. Go to main screen
Type a number to edit a category. Type an X
to return to the main menu.
> _
439.3. Editing a category
When someone selects a category on the last screen, it will bring them to this
screen that will allow someone to rename a category. Limit the category name to
30 characters. If someone types more than 30 characters, it's up to you to
determine how to handle that. After someone successfully submits a new category
name, have it return the Category management screen.
********************************************
* EDIT CATEGORY (c) 1987 *
********************************************
You are editing "Category 2".
What would you like to rename it? Hit
"Enter" when you are done.
> _
439.4. To-do item search screen
When someone is here, they can type a search term to search the to-do items'
text values. If a to-do item has more than one text field, then search by any
of them. Category names should not be text fields. When someone types a value
and hits enter, it goes to the search results screen.
********************************************
* SEARCH ITEMS (c) 1987 *
********************************************
Please type your search term and hit Enter.
> _
439.5. To-do item search results
Here you can see the to-do items that matched your search result. Determine
how many rows are in the console (you can use process.stdout.rows to get the
number), subtract eight for the non-item text, and print up to that many tasks.
When the person hits the "Enter" key, it will return to the main screen.
********************************************
* SEARCH RESULTS (c) 1987 *
********************************************
Your search matches:
1. Item 1
2. Item 2
3. Item 3
Press Enter to return to the main screen. _
439.6. To-do items list
Here you can see a number of to-do items that will fit in the console (you can
use process.stdout.rows to get the number). If a person types "X" and hits
"Enter", it will take them to the main screen. If a person types a number of
a task and hits "Enter", it will take them to the to-do item detail screen.
If as person types an "A", it will take them to the to-do item create
screen.
This screen should only show tasks that are not completed!
If it's a Note, show only the first 70 characters of the value. If it's a
Task, show the first 70 characters of the title.
********************************************
* TO-DO ITEMS (c) 1987 *
********************************************
1. Item 1
2. Item 2
3. Item 3
A. Add a new item
X. Return to main menu
> _
439.7. To-do item detail screen
Depending on the type of to-do item (see below for the two different types), you
will see one of the following screens.
********************************************
* TO-DO ITEM (NOTE) (c) 1987 *
********************************************
This is a note to myself to do a thing.
Type "C" and hit "Enter" to complete this
task and return to the list screen. Just
hit "Enter" to return to the list screen.
> _
********************************************
* TO-DO ITEM (TASK) (c) 1987 *
********************************************
TITLE: Do that thing
CATEGORY: Category 1
DESCRIPTION
You know that thing you want to do? You
really should do it, you know? Before time
runs out on you.
Type "C" and hit "Enter" to complete this
task and return to the list screen. Just
hit "Enter" to return to the list screen.
> _
439.8. To-do item create screen
When someone comes to this screen, they have a choice to create a Note or a
Task. After they choose that, the appropriate prompts are given to them.
********************************************
* CREATE AN ITEM (c) 1987 *
********************************************
What kind of to-do item do you want to
create?
1. Note
2. Task
Type the number and hit "Enter".
> _
439.8.1. Create a note
********************************************
* CREATE A NOTE (c) 1987 *
********************************************
(Type your text and hit "Enter" to return to
the to-do list screen, 300 characters max.)
What is the note?
> _
439.8.2. Create a task - step 1
********************************************
* CREATE A TASK (c) 1987 *
********************************************
What is the title?
> _
439.8.3. Create a task - step 2
********************************************
* CREATE A TASK (c) 1987 *
********************************************
TITLE: This is the title
What is the category?
1. Category 1
2. Category 2
3. Category 3
4. Category 4
5. Category 5
> _
439.8.4. Create a task - step 3
********************************************
* CREATE A TASK (c) 1987 *
********************************************
TITLE: This is the title
CATEGORY: Category 3
(Type your text and hit "Enter" to return to
the to-do list screen, 300 characters max.)
What is the description?
> _
And, this will complete creating the task.
440. Modeling your application
Use object-oriented design principles to model the following:
- Each screen should be an object that has a method that allows it to print to
the console and handle input. - Each kind of to-do item should be its own thing:
- Note: Just a simple text-based item
- Task: An item that has a name, description, and category
- All to-do items have a "completed" property on them
- Searches should search the text of the Note objects, and the name and
description of the Task objects. Think about implementing amatches(text)
method that returnstrueif the to-do item contains the provided text. - When the application loads, it should restore the state of the application,
that is, the to-do items and categories that are saved on the filesystem. - Whenever a person makes a change to the data (creating a new item, renaming a
category, finishing a to-do item, etc.), the application should save the data
to the filesystem. - The default category names are:
- Category 1
- Category 2
- Category 3
- Category 4
- Category 5
441. Stretch goal
On your items list, constrain the number of tasks show to fit in the screen and
add a "Continue" option.
********************************************
* TO-DO ITEMS (c) 1987 *
********************************************
1. Item 1
2. Item 2
3. Item 3
A. Add a new item
X. Return to main menu
C. Continue
> _
Subtract ten for the non-item text, and print up to that many tasks. If a person
types "C" and hits "Enter", it will show the next number of to-do items that
will fit in the console (assuming there are any).
For example, if someone has 19 unfinished tasks in their application and this
screen can show 10 at a time, then when they come to this list, it will show the
first 10. If the person types "C" and hits "Enter", then they will see the next
nine items (numbered 1 - 9, 11
- 19, however you want to number them, you decide).
[To-Do Item Command Line Utility]: https://github.com/appacademy-starters/oop-task-manager-cli
[npm]: https://www.npmjs.com
[chalk]: https://github.com/chalk/chalk
Promises & Async Await & TESTING
WEEK 6
Promises, Testing, and HTTP
- HTTP Basics
- HTTP Requests
- HTTP Responses
- HTTP Project: From Zero To Server
- A Promise is a Promise: A Mostly Complete Guide to JavaScript Promises I
- A Promise is a Promise: A Mostly Complete Guide to JavaScript Promises II
- A Promise is a Promise: A Mostly Complete Guide to JavaScript Promises II
- Project: Curl Up With A Nice Promise
- Getting started
- Step 1: Just getting a URL
- Step 2: Command-line arguments
- Step 3: Now, put it in a file
- Bonus A: Setting an arbitrary header
- Bonus B: Capturing response headers
- Bonus C: Sending data
- Bonus D: Multiple files, multiple output destinations
- Bonus E: List globbing
- Nightmare round A: The progress meter
- Nightmare round B: Progress meter for
multiple files
Promises Learning Objectives II
HTML Learning Objectives
- Modern
Promises WithasyncAndawait - The Basics of HTML
- Walk-Through Building A Web Page
- Project: Trivia Game Three Ways
- All About Testing!
- Test-Driven Development
- A Comedy of Errors in JavaScript
- Practice: Writing Tests
- Towers of Hanoi Project: Reading and Passing Tests
- Test-Driven Development Project
- Well-Tested Full-Stack To-Do Items Project
WEEK-06 DAY-1
HTTP
HTTP Learning Objectives
The objective of this lesson is for you to get comfortable with the main
concepts of HTTP. HTTP is the underlying protocol used by the World Wide Web.
It's essential knowledge for developers who work with the web. At the end of it,
you'll be able to identify common HTTP verbs and status codes, as well as
demonstrating how HTTP is used by setting up a simple server.
When you finish, you should be able to
- match the header fields of HTTP with a bank of definitions.
- matching HTTP verbs (GET, PUT, PATCH, POST, DELETE) to their common uses.
- match common HTTP status codes (200, 302, 400, 401, 402, 403, 404, 500) to
their meanings. - send a simple HTTP request to
google.com - write a very simple HTTP server using ‘http’ in node with paths that will
result in the common HTTP status codes.main
concepts of HTTP. HTTP is the underlying protocol used by the World Wide Web.
It's essential knowledge for developers who work with the web. At the end of it,
you'll be able to identify common HTTP verbs and status codes, as well as
demonstrating how HTTP is used by setting up a simple server.
When you finish, you should be able to - match the header fields of HTTP with a bank of definitions.
- matching HTTP verbs (GET, PUT, PATCH, POST, DELETE) to their common uses.
- match common HTTP status codes (200, 302, 400, 401, 402, 403, 404, 500) to
their meanings. - send a simple HTTP request to
google.com - write a very simple HTTP server using ‘http’ in node with paths that will
result in the common HTTP status codes.
HTTP Basics
In the late 1980s, a computer scientist named Tim Berners-Lee proposed the
concept of the "WorldWideWeb", laying the foundation for our modern Internet. A
critical part of this concept was HTTP, the Hypertext Transfer Protocol.
We're going to to dive into what makes HTTP such an important part of Web
browsing and learn how to leverage it in our applications.
We'll cover:
- the vocabulary of the Web,
- how stateless connections work,
- and HTTP request & response types.
442. First, some context
"If you want to build a ship, don’t drum up the men and women to gather wood,
divide the work, and give orders. Instead, teach them to yearn for the vast and
endless sea."-- Antoine de Saint-Exupéry (paraphrased)
So far, you've written code that runs in isolation on your own system. Now it's
time to set sail into the "vast and endless" Internet! Before we can do so, we
need to review the fundamentals: what makes the Web a "web"?
We're going to share a lot of vocabulary here, and it may be a little dry at
times, but remember that these are the principles upon which the rest of your
journey will be built! You'll find these concepts missing from most programming
tutorials, so you'll be ahead of the game if you lay a strong foundation now.
443. Breaking it down...
Like many disciplines, computer science is built around a shared vocabulary.
Let's demystify the acronym "HTTP" to understand it better.
443.1. HT-: HyperText
Hypertext is simply "content with references to other content". This term is
used specifically to refer to content in computing, and may include text,
images, video, or any other digital content. If "hypertext" sounds familiar,
that's because you've heard it before: HTML stands for
"HyperText
Markup Language".
Hypertext is what makes the Web a "web", and it's the most fundamental part of
how we interact online. We refer to references between hypertext resources as
hyperlinks, though you're probably used to hearing them referred to as
links. Without links, the Internet would resemble a massive collection of
separate books: each blog, news report, and social media site would exist in
total isolation from each other. The ability to link these pages is what makes
the kind of interactivity you're learning to build possible, and it was a
revolutionary concept when it was introduced!
443.2. -TP: Transfer Protocol
A protocol in computer science is a set of guidelines surrounding the
transmission of data. Protocols define the process of exchanging data, but don't
define exactly what that data must be. Think of it like a multi-course meal: we
expect the appetizer, then the entree, then the dessert, but we could have any
type of food for each of those courses! As long as the plates arrive in the
particular order we expect, protocol is being followed.
HTTP acts as a transfer protocol. It defines the expectations for both ends of
the transfer, and it defines some ways the transfer might fail. More
specifically, HTTP is defined as a request/response protocol. An HTTP exchange
is more like a series of distinct questions & answers than a conversation
between two systems.
444. ...and bringing it back together
HTTP defines the process of exchanging hypertext between systems. Specifically,
HTTP works between clients and servers. A client (sometimes called the
user agent) is the data consumer. This is usually your web browser. A server
(sometimes referred to as the origin) is the data provider, often where an
application is running. In a typical HTTP exchange, the client sends a request
to the server for a particular resource: a webpage, image, or application
data. The server provides a response containing either the resource that the
client requested or an explanation of why it can't provide the resource.
Here's a high-level overview of the exchange:
We'll look more closely at the request and response in separate lessons.
445. Properties of HTTP
There are a few important properties of HTTP that we need to understand in order
to use it effectively.
445.1. Reliable connections
Let's consider the example of two friends passing a note. If the note contains
important information, the sender will want to make sure that it gets to its
destination. They'll likely take a little extra time to deliver it carefully,
and they'll expect confirmation once it's been received. In computing, we'd
refer to this as a reliable connection: messages passed between a client &
server sacrifice a little speed for the sake of trust, and we can rest assured
that each message will be confirmed.
HTTP doesn't work well if messages aren't received in the correct order, so it's
critical that the connection your hypertext is crossing is reliable! Tim
Berners-Lee chose TCP, another transmission protocol, as HTTP's preferred
connection type. We'll discuss TCP in greater detail when we get into network
models in a future lesson.
445.2. Stateless transfer
HTTP is considered a stateless protocol, meaning it doesn't store any
information. Each request you send across an HTTP connection should contain all
its own context. This is unlike a stateful protocol, that might include
specifications for storing data between requests.
This can be nice because we only ever need to read a single HTTP request to
understand its intent, but it can cause headaches when it comes to things like
maintaining your login status or the contents of your shopping cart!
To help us with this, HTTP supports cookies, bits of data that a client sends
in with their request. The server can examine this data and look up a session
for your account, or it can act on the info in the cookie directly. Note that
neither the cookie nor the session are part of HTTP. They're just workarounds
we've created due to the protocol's stateless nature.
445.3. Intermediaries
The Web is a big place, and it's unlikely that your request will go directly to
its destination! Instead, it will pass through a series of intermediaries:
other servers or devices that pass your request along. These intermediaries come
in three types:
- proxies, which may modify your request so it appears to come from a
different source, - gateways, which pretend to be the resource server you requested,
- and tunnels, which simply pass your request along.
Here's an idea of how these intermediaries might be laid out:

We're just scratching the surface of how HTTP works. If you're interested in
learning more, you can go straight to the source: [the HTTP spec][1]. A spec
(short for specification) describes a protocol in great detail. It's the
document generated by an idea's founders, and it's reviewed and carefully edited
before being adopted by the [IETF][2] (Internet Engineering Task Force).
Specs are intended to be exhaustive, so they can be overwhelming at first! This
is definitely not light reading but any question you have about a particular
protocol can likely be answered from its spec.
447. What we've learned
Whew, that's a lot of jargon! Hopefully the fundamental aspects of HTTP are
clearer to you now. Next up, we'll look at an HTTP request & response, and we'll
cover how to generate each.
After completing this lesson, you should have a clear understanding of:
- HTTP's origin & purpose,
- special properties of HTTP,
- and how to learn more from the HTTP spec.
[1]: https://tools.ietf.org/html/rfc2616#section-1.4
[2]: https://www.ietf.org/
HTTP Requests
Without a query, there wouldn't be a need for a response! Let's take a look at
the request: the client-initiated portion of an HTTP exchange.
We'll cover:
- what an HTTP request looks like,
- fields that make up a request,
- and how to send a request of your own!
448. Retrieving hypertext
Years ago, daily shopping looked very different. Instead of walking the aisles
and picking up what they wanted, customers would approach a counter and ask a
clerk to retrieve the items on their list. The clerk was responsible for knowing
where those items were located and how best to get them to the customer.
While the retail industry has changed dramatically since that time, the Web
follows that old tried-and-true pattern. You tell your browser which website you
would like to access, and your browser hands that request off to a server that
can get you what you've asked for. At the simplest level, the Web is just made
up of computers asking each other for things!
Your browser's part in this transaction is called the request. Since the
browser is acting on your behalf, we sometimes refer to it as the user-agent
(you being the user). You might also hear this referred to more generically as
the client in the exchange.
449. Structure of an HTTP request
Your browser is designed to be compliant with the HTTP specification, so it
knows how to translate your instructions into a well-formatted HTTP request. An
important part of the HTTP spec is that it's simple to read, so let's take a
look at an example.
Here's what the HTTP request looks like for visiting appacademy.io:
GET / HTTP/1.1
Host: appacademy.io
Connection: keep-alive
Upgrade-Insecure-Requests: 1
User-Agent: Mozilla/5.0 (Macintosh; Intel Mac OS X 10_14_5) AppleWebKit/537.36 (KHTML, like Gecko) Chrome/76.0.3809.132 Safari/537.36
Accept: text/html,application/xhtml+xml,application/xml;q=0.9,image/webp,image/apng,*/*;q=0.8,application/signed-exchange;v=b3
Accept-Encoding: gzip, deflate
Accept-Language: en-US,en;q=0.9
Let's break it down!
449.1. Request-line & HTTP verbs
The first line of an HTTP request is called the request-line, and it sets
the stage for everything to come. It's made up of three parts, separated by
spaces:
- the method, indicated by an HTTP verb,
- the URI (Uniform Resource Indicator) that identifies what we've requested,
- and the HTTP version we expect to use (usually
HTTP/1.1orHTTP/2).
In ourappacademy.ioexample, we can see that our version matches the most
common HTTP version (1.1) and that our URI is/, or the root resource of
our target. That first word,GETis the HTTP verb we're using for this
request.
HTTP verbs are a simple way of declaring our intention to the server. We do the
same thing with English verbs when asking for help: "Can you get me that?",
"Should I remove this?", etc. HTTP has a small handful of verbs available,
but we're going to look at the five most common:GET,POST,PUT,PATCH,
andDELETE. GETis used for direct requests. AGETrequest is generally how websites
are retrieved, and they only require that the server return a resource. These
types of requests will never have a body. Any data you need to send in aGET
request must be shared via the URI.POSTis typically used for creating new resources on the server. Most of the
time, when you submit a form aPOSTrequest is generated. These types of
requests can have a body containing any data the server might need to
complete your request, like your username & password or the contents of your
shopping cart.PUTrequests are used to update a resource on the server. These will contain
the whole resource you'd like to update. For example: when updating your name
on a website, aPUTrequest will be generated containing not just your new
name but also your user ID, email, etc.PATCHrequests are very similar toPUTrequests, but do not require the
whole resource to perform the update. Keeping with our example of updating
your name: aPATCHrequest would only require your new name, not the rest of
your account details, to succeed.DELETErequests destroy resources on the server. These might be saved
database records, like removing a product that's sold out, or more ephemeral
resources, like logging a user out of their current session.
Ultimately, how these verbs get acted upon is up to the server. You could write
an application that totally ignores these rules and uses aDELETErequest to
log in, but that's only going to confuse your teammates and frustrate you in the
future! It's best to use them as the spec intends.
449.2. Headers
The request-line sets the table, but it's the headers that describe the menu!
Headers are key/value pairs that come after the request-line. They each
appear on separate lines and define metadata needed to process the request. Here
are some common request headers you'll see:
Host: The root path for our URI. This is typically the domain we'd like to
request our resource from. As you can see above, ourHostheader for
appacademy.iois, appropriately,appacademy.io.!User-Agent: This header displays information about which browser the request
originated from. It's generally formatted asname/version. You can see in
theUser-Agentheader above that we're usingChrome/76.0Our
User-Agenthas much more content, including references to Mozilla,
makers of the popular Firefox browser, and Safari, Apple's default browser of
choice. What gives?There is some [interesting history][1] behind those additional references,
and you can use [www.useragentstring.com][2] for additional details about
your current browser'suser-agent.Referer: This defines the URL you're coming from. There's none in our
example since we navigated directly to the App Academy website, but if we
click any link on the page, the resulting HTTP request will haveReferer: https://appacademy.io/in its headers. Also, you're not reading it wrong -
this header is misspelled! It should be "referrer", but it was written
incorrectly in the original specification and the typo stuck. Let this be a
lesson: your poorly-written code might still be around in 20 years, too!Accept: "Accept-" headers indicate what the client can receive. When we go
to most websites, ourAcceptheader will be long to ensure we get all the
various types of content that site might include. However, we can modify this
header in our requests to only get back certain types of data. One common use
is settingAccept: application/jsonto get a response in JSON format instead
of HTML. You may see variations of this header likeAccept-Languagefor
internationalized websites orAccept-Encodingfor sites that support
alternative compression formats.Content-*: Content headers define details about the body of the request. The
most common content header isContent-Type, which lets the server know what
format we're sending our body data as. This might beapplication/jsonfrom a
JavaScript app orapplication/x-www-form-urlencodedfor info submitted from
a web form. Content headers will only show up on requests that support content
in the body, soGETrequests should never have this!
There are LOTS of other header keys! [MDN][3] has an exhaustive reference list
with examples.
449.3. Body
When we need to send data that doesn't fit in a header & is too complex for the
URI, we can place it in the body of our HTTP request. The body comes right
after the headers and can be formatted a few different ways.
The most common way form data is formatted is URL encoding. This is the
default for data from web forms and looks a little like this:
name=claire&age=29&iceCream=vanilla
Alternatively, you might format your request body using JSON or XML or some
other standard. What's most important is that you remember to set the
appropriate Content-Type header so the server knows how to interpret your
body.
450. Sending an HTTP request from the command line
We've discussed HTTP requests mostly in the context of your web browser, but
that's not the only way. There are lots of HTTP clients out there you can use to
send requests.
Let's stay close to the exchange itself with a lightweight tool that requires us
to do most of the work ourselves. We'll use netcat (also known as nc), a
utility that comes as part of Unix-like environments such as Ubuntu and macOS.
netcat allows you to open a direct connection with a URL and manually send
HTTP requests. Let's see how this works with a quick GET request to App
Academy's homepage.
From your command line, type nc -v appacademy.io 80. This will open a
connection to appacademy.io on port 80 (the port most-often used for web
connections). Once the connection is established, you'll be able to type out a
simple HTTP request by hand! Let's copy the request-line and Host: header
from our request above:
GET / HTTP/1.1 Host: appacademy.io
Now hit "Return" on your keyboard twice. This will send the request and display
the server's response. You should see something similar to this:
HTTP/1.1 301 Moved Permanently Date: Thu, 03 Oct 2019 04:17:23 GMT Transfer-Encoding: chunked Connection: keep-alive Cache-Control: max-age=3600 Expires: Thu, 03 Oct 2019 05:17:23 GMT Location: https://www.appacademy.io/ Server: cloudflare CF-RAY: 51fc1b0f8b98d304-ATL
Congratulations! You've sent your first manual HTTP request. We'll discuss the
parts of the HTTP response you received in an upcoming lesson.
Try it one more time, this time typing nc -v neverssl.com 80 and making the
same HTTP request with the command GET / HTTP/1.1 and the header Host: neverssl.com.
Don't forget to hit Enter twice. Look! That's the HTML coming
back from the server! Neat-o!
You can read much more about netcat by invoking the manual: man nc. We'll
also use it in an upcoming project for extra practice.
451. What we've learned
HTTP requests are the first step to getting what you want on the web. Having
completed this lesson, you should be able to recount:
- what an HTTP request is,
- some common HTTP request verbs,
- a rough outline of the HTTP request format,
- and how to use
netcatto send HTTP requests from your command line.
[1]: https://security.stackexchange.com/questions/126407/why-does-chrome-send-four-browsers-in-the-user-agent-header
[2]: http://www.useragentstring.com/
[3]: https://developer.mozilla.org/en-US/docs/Web/HTTP/Headers
HTTP Responses
A web server delivers content via responses, the second part of the HTTP's
request/response cycle. Let's dive into how a response is structured and what
your client can expect from the server.
We'll cover:
- HTTP response structure,
- differentiating errors & successful transfers,
- and how to use a server to generate your own responses.
452. Hypertext delivered
An HTTP response contains either the content we requested or an explanation of
why that content couldn't be delivered. It's just like ordering at a restaurant:
you place your order and receive either a plate of delicious food or an apology
from the chef. In a good restaurant, the apology will include some extra help:
"I'm sorry, we're out of broccoli. Can we get you something else? How can we
make this right?".
When designing your own HTTP responses, remember that restaurant example. It's
important to note that there's a problem, but it's equally important to provide
reliable, helpful details. We'll look at some examples of this when we build our
own HTTP server in a later lesson.
453. Structure of a Response
Responses are formatted similarly to requests: we'll have a status-line
(instead of a request-line), headers that provide helpful metadata about the
response, and the response body: a representation of the requested resource.
Here's what the HTTP response looks like when visiting appacademy.io:
HTTP/1.1 200 OK
Content-Type: text/html; charset=utf-8
Transfer-Encoding: chunked
Connection: close
X-Frame-Options: SAMEORIGIN
X-Xss-Protection: 1; mode=block
X-Content-Type-Options: nosniff
Cache-Control: max-age=0, private, must-revalidate
Set-Cookie: _rails-class-site_session=BAh7CEkiD3Nlc3Npb25faWQGOgZFVEkiJTM5NWM5YTVlNTEyZDFmNTNlN; path=/; secure; HttpOnly
X-Request-Id: cf5f30dd-99d0-46d7-86d7-6fe57753b20d
X-Runtime: 0.006894
Strict-Transport-Security: max-age=31536000
Vary: Origin
Via: 1.1 vegur
Expect-CT: max-age=604800, report-uri="https://report-uri.cloudflare.com/cdn-cgi/beacon/expect-ct"
Server: cloudflare
CF-RAY: 51d641d1ca7d2d45-TXL
<!DOCTYPE html>
<html>
...
...
</html>
Oof! That's a lot of unfamiliar stuff. Let's walk through the important bits
together.
453.1. Status
Like the request, an HTTP response's first line gives you a high-level overview
of the server's intention. For the response, we refer to this as the
status-line.
Here's the status line from our appacademy.io response:
HTTP/1.1 200 OK
We open with the HTTP version the server is responding with. 1.1 is still the
most commonly used, though you may occasionally see 2 or even 1.0. We follow
this with a Status-Code and Reason-Phrase. These give us a quick way of
understanding if our request was successful or not.
HTTP status codes are a numeric way of representing a server's response. Each
code is a three-digit number accompanied by a short description. They're grouped
by the first digit (so, for example, all "Informational" codes begin with a 1:
100 - 199).
Let's take a look at the most common codes in each group.
453.1.1. Status codes 100 - 199: Informational
Informational codes let the client know that a request was received, and provide
extra info from the server. There are very few informational codes defined by
the HTTP specification and you're unlikely to see them, but it's good to know
that they exist!
453.1.2. Status codes 200 - 299: Successful
Successful response codes indicate that the request has succeeded and the server
is handling it. Here are a couple common examples:
- 200 OK: Request received and fulfilled. These usually come with a
body
that contains the resource you requested. - 201 Created: Your request was received and a new record was created as a
result. You'll often see this response toPOSTrequests.
453.1.3. Status codes 300 - 399: Redirection
These responses let the client know that there has been a change. There are a
few different ways for a server to note a redirect, but the two most common are
also the most important:
- 301 Moved Permanently: The resource you requested is in a totally new
location. This might be used if a webpage has changed domains, or if resources
were reorganized on the server. Most clients will automatically process this
redirect and send you to the new location, so you may not notice this response
at all. - 302 Found: Similarly, to 301 Moved Permanently, this indicates that a
resource has moved. However, this code is used to indicate a temporary move.
It's not often that you see temporary moves online, but this code may be used
to indicate a permanent move where the old domain should still be valid too.
Clients will usually follow this redirect automatically as well, but you
shouldn't necessarily update your links until the server returns a301.
301 Moved Permanently and 302 Found often get confused. When might we want
to use a 302 Found`_? The most common use case today is for the transition
from HTTP to HTTPS. HTTPS is secure HTTP messaging, where requests &
responses are encrypted so they can't be read by prying eyes while en route
to their destinations.This is a much safer way of communicating online, so most websites require
access viahttps://before the domain. However, we don't want to ignore folks
still trying to access our content from the olderhttp://approach!In this case, we'll return a 302 Found response to the client, letting them
know that it's okay to keep navigating tohttp://our-website.com, but we're
going to redirect them tohttps://our-website.comfor their protection.
453.1.4. Status codes 400 - 499: Client Error
The status codes from 400 to 499, inclusive, indicate that there is a problem
with the client's request. Maybe there was a typo, or maybe the resource we
requested is no longer available. You'll see lots of these as you're learning to
format HTTP requests. Here are the most common ones:
- 400 Bad Request: Whoops! The server received your request, but couldn't
understand it. You might see a 400 Bad Request in response to a typo or
accidentally truncated request. We often refer to these as malformed
requests. - 401 Unauthorized: The resource you requested may exist, but you're not
allowed to see it without authentication. These type of responses might mean
one of two things: either you didn't log in yet, or you tried to log in but
your credentials aren't being accepted. - 403 Forbidden: The resource you requested may exist, but you're not
allowed to see it at all. This response code means this resource isn't
accessible to you, even if you're logged in. You just don't have the correct
permission to see it. - 404 Not Found: The resource you requested doesn't exist. You may see this
response if you have a typo in your request (for example: going to
appaccccademy.io), or if you're looking for something that has been removed.
403 Forbidden requests let the client know that a valid resource was
requested. This can be a security risk! For example: if I guess that you have
passwords.html on your website because you just want to be hacked, a 403
Forbidden response tells me I'm correct. For this reason, some sites will
return a 404 Not Found for resources that exist but aren't accessible.A well-known example is GitHub. If you try to open a repository you don't have
permission to access, GitHub will return a 404 Not Found even if your URL is
correct! This protects you from random users guessing the names of your
projects.
453.1.5. Status codes 500 - 599: Server Error
This range of response codes are the Web's way of saying "It's not you, it's
me." These indicate that your request was formatted correctly, but that the
server couldn't do what you asked due to an internal problem.
There are two common codes in this range you'll see while getting started:
- 500 Internal Server Error: Your request was received, and the server tried
to process it, but something went awry! As you're learning to write your own
servers, you'll often see a 500 Internal Server Error as your code fails
unexpectedly. - 504 Gateway Timeout: Your request was received but the server didn't
respond in a reasonable amount of time. Timeout errors can be tricky: your
first instinct may be that your own connection is bad, but this code means the
problem is likely on the server's side. You'll often see these when a server
is no longer reachable (maybe due to an unexpected outage or power failure).
453.2. Headers
Headers on HTTP responses work identically to those on requests. They establish
metadata that the receiving client might need to process the response. Here are
a few common response headers you'll see:
- Location: Used by the client for redirection responses. This contains the
URL the client should redirect to. - Content-Type: Lets the client know what format the body is in. Your client
will display different types of response content in different ways, to setting
the Content-Type is important! Notice that this header can be present on
responses and requests. It's a generic header for any HTTP interaction
involving content. - Expires: When the response should be considered stale, or no longer valid.
The Expires header lets your client cache responses (that is: save them
locally to prevent having to repeatedly re-download them). The client may
ignore requests to that same resource until after the date set in the
Expires header. - Content-Disposition: This header lets the client know how to display the
response, and is specifically devoted to whether the response should be
visible to the client or delivered as a download. Think about your own
experience online: sometimes you click a button and get an immediate download,
while in other cases you click a button and get to "preview" the content
before you download it. This is controlled by the Content-Disposition
header. - Set-Cookie: This header sends data back to the client to set on the
cookie, a set of key/value pairs associated with the server's domain.
Remember how HTTP is stateless? Cookies are one way to get around that!
Set-Cookie may send back information like a unique ID for the user you've
logged in as or details about other resources you've requested on this domain.
Remember - this isn't an exhaustive list of headers! Sites and intermediate
gateways/proxies can define their own custom headers, so you'll see many more
than these. If you're unsure what a header does, the [MDN HTTP Header
documentation][1] is a great place to start searching.
453.3. Body
Assuming a successful request, the body of the response contains the resource
you've requested. For a website, this means the HTML of the page you're
accessing.
The format of the body is dictated by the Content-Type header. This is an
important detail! If you accidentally configure your server to send
"Content-Type: application/json" along with a body containing HTML, your HTML
won't be rendered properly and your users will see plain text instead of
beautifully-rendered elements. In the same way, API responses should be clearly
marked so that other applications know how to manage them.
We can see in our appacademy.io response above that the body begins with
!<DOCTYPE html> and ends with </html>. If you inspect the source of the
page
in your browser, you'll see that this is exactly what's being rendered. Headers
may change how the browser handles the body, but they won't modify the
body's content.
454. Using a custom server to generate responses
At its most basic, a web server is just a tool to generate HTTP responses.
Therefore, the best way to practice is to build your own webserver!
We'll walk through building our own server from scratch using Node.js in an
upcoming video lesson.
455. What we've learned
Like HTTP requests, HTTP responses involve lots of new lingo and details. Hang
in there - we'll start doing practical work with this new vocabulary in the
projects & video demos coming up.
After this reading, you should:
- Understand the parts of an HTTP response,
- be able to identify common status codes & their meanings,
- recognize common response headers,
- and be prepared to build your own server!
[1]: https://developer.mozilla.org/en-US/docs/Web/HTTP/Headers
HTTP Project: From Zero To Server
We've been knee-deep in everyone else's HTTP workflow; let's build one of our
own! Together we're going to build an HTTP server from scratch. We'll cover:
- Node's
httpmodule &createServermethod, - Routing requests based on multiple factors,
- Returning content and headers in your response,
- and testing your server locally using command line tools.
DO NOT GIVE INTO COPY & PASTE! In the following instructions, you will see
code samples. Do not copy and paste them. Type them in or watch someone type
them in. Do this so that you feel the syntax. If you just copy and paste, when
it comes to typing the code yourself, you will be at a loss.
456. Phase 1: Proof of concept
Your goal is to go from "zero to server" in this project, so let's get "zero"
ready. Clone this project's starter repo:
git clone https://github.com/appacademy-starters/http-from-zero-to-server-starter.git
You'll notice that this starter project only has a test directory. In the
project directory, outside of the test folder, create an empty file named
server.js.
You'll be basing your server on the http module that's built into Node.js. You
can't use this module until we include it in your application! Use the require
directive to import Node's http module right away and assign it to a variable
named http.
Next, time to get a bare bones server up and running. Drop down a line and call
the createServer method on http. This method accepts a single argument that
is a function. The function should have two parameters. By convention, we name
the parameters req (short for "request") and res (short for
"response").
Within the body of that function argument, call the end method on response.
This will generate a simple 200 OK response to any request at all, regardless
of what's asking for.
Remember that you can't run your server without letting it know where to expect
requests from! Chain the listen method on to the end of the createServer
call we just made. listen accepts two parameters: a port number and a
function. The port number indicates where the server will be accessible from,
and the function argument is meant for any initialization code you'd like to run
when the server starts. Use port 3000 and, within your function argument,
console.log a helpful startup message. Make sure you include the port number
in your message in case your users forget!
By now you should have a dead-simple HTTP server. This app will accept requests
and respond with http's default response: 200 OK, no custom headers, no body
content. You can confirm this by running the server in your terminal and
visiting http://localhost:3000 in your browser. You won't see any content in
the browser, but check the "Network" tab in your dev tools to confirm that the
server response matches what you expect. You may need to refresh the page to see
the request/response.
Save and commit your changes to version control! This completes your first unit
of work and results in a runnable server that's all your own. We know we can do
better, though! Let's look into routing.
To see what this should look like, have a peek at [About Node.js®].
457. Phase 2: Status code all the things!
When discussing Web servers, routing generally refers to controlling which
part of your application processes each request. For example, you may route
emails differently than website requests. There are lots of complex, high
throughput routing libraries available for Node, but you'll keep it as simple as
possible here and rely on your hard work.
You need something to control how we route each request. For your server, the
best bet is the request's url property. This is a key provided by http
that's present on every request our server processes. You can check the url
of each inbound request and decide what we want to return for that particular
resource.
457.1. Phase 2a: Start small
Build out your routing like so: when someone requests a particular
Reason-Phrase, you should respond with the matching HTTP Status-Code. For
example:
http://localhost:300/OKshould returnHTTP/1.1 200 OK
You can use the [writeHead] method on theresponseobject to control which
status code gets returned.
if (req.url === "/OK") { console.log("Inbound 'OK' request being processed..."); res.writeHead(200); res.end(); }
There are a couple important details to note in this condition:
- Your
urlproperty includes a leading slash. - You still have to
end()each response to send it back to the client. If you
don't do this, the browser will wait and wait and wait and, eventually, tell
you that the request timed out.
This code should go in the function argument ofcreateServer, where yourreq
andresparams are accessible.
You're only controlling for oneurloption here. What about all the other
possibilities? Before you save this portion of our work as done, you should add
anelseto this condition that returns a appropriate status code. A perfect
choice would be status code 404! Don't forget to include a relevant
console.login your else condition as well.
Before saving & committing, make sure you can run your server, and that visiting
http://localhost:3000/OKreturns a200, while visiting any other URL returns
a404. You should see a new line in your terminal, consistent with the
messages in yourconsole.logs, for each request that's made.
457.2. Phase 2b: Rinse, repeat
You've read about many more codes than 200 and 404. Extend your server to
respond to each reason phrase we discussed in our readings. You can omit OK
and Not Found because we've already handled those cases.
Here's an alphabetical list of each url your server should respond to:
- /Bad-Request
- /Created
- /Forbidden
- /Found
- /Gateway-Timeout
- /Internal-Server-Error
- /Moved-Permanently
- /Unauthorized
It's up to you to look up the matching HTTP status codes each will need to
return. Use [DuckDuckGo] (or your favorite search engine) to search for HTTP
status codes. You can bet there's at least a Wikipedia entry on it!
Follow the pattern you used with /OK and don't forget the details. This may
feel a little repetitive, but it's a great opportunity to practice matching
status codes to reasons. This is the sort of minutiae that technical
interviewers will want to quiz you on during your job hunt - try to lock it down
now!
Save, commit, and test your new server out.
458. Phase 3: Confirming functionality
The tricky thing about the HTTP specification that most clients are configured
to respond to certain codes in certain ways. Browsers, for example, will try to
follow redirection codes and will show special pages for server errors unless
directed otherwise. This means that browser testing can be a little flaky.
Try using one of a couple tools you already know how to use to test our server,
instead of hoping the browser will keep working the way you'd like.
459. Phase 3a: A command line client
The lowest-friction approach you can take is using a native command line tool to
test our HTTP server like netcat.
Run your server in one terminal, and in another terminal run nc -v localhost 3000. This will run
netcat in "verbose" mode, so you get a little extra info
with each request. Now you can manually craft HTTP requests to your server.
Try typing (or copying/pasting) GET /OK HTTP/1.1 first. Remember to press the
"Return" key twice after entering that request line. You should receive a 200 OK response
immediately. If your response is taking more than a couple seconds
to process, try restarting netcat by pressing Ctrl + C on your keyboard
and starting over.
Now test your other routes - do they all return what you expect?
460. Phase 3b: Double-check your work
Automated testing can be a little more work, but don't worry: we've put some
tests together for you!
With your server running on port 3000 and run mocha on your command line to
watch the tests fly!
Your tests will confirm that your routes are all returning the expected status
codes, and will let you know of any that might have been missed. If you get
confused, don't be afraid to read the test file for extra details. The code &
comments within may be clearer than mocha's error messaging.
461. Bonus phase: Take it up a notch
Ready to go beyond the basics? Here are some improvements to explore:
- The [
writeHead] on response accepts a second argument: an object
containing custom headers. Knowing this, try to update your responses with
redirection codes to actually redirect. Is there a custom header you can use
to tell your browser where the request should be directed to? Try searching
for more information about the status code that redirects the browser to
another resource. - This project didn't discuss the [
write] method on the response object, but
it adds content to the body of your response. Using both the correct
Content-Typeheader and thewritemethod, try sending some HTML back with
responses. Can you render a very simple webpage from your server? - Certain codes (like 201, for example) are often only seen in response to
POSTrequests. You've only been usingGETrequests so far, but you could
improve your server by having it check therequest.methodbefore responding
to some URLs. Try limiting theCreatedresponse toPOSTrequests only.
Otherwise, it should respond with a 405 Method Not Allowed, a status code
created for just the purpose of telling clients that they've used an HTTP
method (GET, POST, PUT, PATCH, or DELETE) that the URL doesn't support.
462. What you've learned
You've mastered the art of the HTTP server - congratulations! You'll soon grow
into larger, more fully-featured frameworks, but don't forget your basics. Every
server out there is based on these same simple principles.
After completing this project, you should be able to:
- write up a basic server for Node,
- respond to requests of all types with appropriate status codes & data,
- and test servers (both your own and others') using reliable command line
tools.
[1]:
https://nodejs.org/api/http.html#http_response_writehead_statuscode_statusmessage_headers
[write]:
https://nodejs.org/api/http.html#http_response_write_chunk_encoding_callback
[About Node.js®]: https://nodejs.org/en/about/#about-node-js [writeHead]:
https://nodejs.org/api/http.html#http_response_writehead_statuscode_statusmessage_headers
[DuckDuckGo]: https://www.duckduckgo.com
WEEK-06 DAY-2
Promises
Promises Learning Objectives I
Below is a complete list of the terminal learning objectives for this lesson.
When you complete this lesson, you should be able to perform each of the
following objectives. These objectives capture how you may be evaluated on the
assessment for this lesson.
- Instantiate a
Promiseobject - Use
Promisesto write more maintainable asynchronous code - Use the
fetchAPI to makePromise-based API callsl learning objectives for this lesson.
When you complete this lesson, you should be able to perform each of the
following objectives. These objectives capture how you may be evaluated on the
assessment for this lesson. - Instantiate a
Promiseobject - Use
Promisesto write more maintainable asynchronous code - Use the
fetchAPI to makePromise-based API calls
A Promise is a Promise: A Mostly Complete Guide to JavaScript Promises I
This article is about a JavaScript feature formally introduced into the language
in 2015: the Promise object. The technical committee that governs the
JavaScript language recognized that programmers had a hard time reasoning about
and maintaining asynchronous code. They included Promises as a way to
encourage writing asynchronous code in a way that appeared synchronous.
When you finish this article, you should be able to:
- Provide examples of why
Promise-based code is easier to maintain than
traditional asynchronous callbacks; - Recall the three states of a
Promise, what each state means, and any
associated data with that state.
463. A quick review of function declarations
It's important to remember about how JavaScript handles the declaration of a
function. Please look at the following code.
function loudLog(message) { console.log(message.toUpperCase()); }
When JavaScript encounters that code, it does not run the function. You probably
know that, but it's important to read again. When JavaScript encounters that
code, it does not run the function.
It does create a Function object and stores that in a variable named
loudLog. At some time later, you can run the function object in that variable
with the syntax loudLog("error occurred");. That runs the function. Just
declaring a function doesn't run it. Look at this following code.
function () { console.log('How did you call me?'); }
JavaScript will, again, create a Function object. However, there's no name for
the function, so it doesn't get assigned to any variable, and just disappears
with no way for us to use it. So, why would you declare functions without names?
464. The looming problem of asynchronous code with callbacks
Let's look at the documentation for how to read files in Node.js. Don't worry if
you haven't used Node.js, yet. It's just like any other JavaScript.
readFile(path, encoding, callback)
Arguments:
path <string> path to the file
encoding <string> the encoding of the file
callback <function> two arguments:
err <error object>
content <string>
Asynchronously reads the entire contents of a file.
The function named readFile accepts three arguments: a string that contains
the path to the file, the encoding of the file, and a callback function that
readFile calls once it's read the content of the file. If you wanted to write
out the content of the file with a header, you could write code like this.
function writeWithHeader(err, content) { console.log("YOUR FILE CONTAINS:"); console.log(content); } readFile('~/Documents/todos.txt', 'utf8', writeWithHeader);
Recall that when JavaScript found the function declaration at the beginning of
that code block, it created a Function object and stored it in a variable
named writeWithHeader. Now, that variable contains the actual function that
can later be run. That code passes the value of that variable, the Function
object, into the readFile function so the readFile function can run it
later.
If you're not going to use the writeWithHeader function anywhere else in your
code, idiomatic JavaScript instructs you to get rid of the name of the function
and declare it directly as the second argument of the readFile functions. That
would turn the above code block into the following.
readFile('~/Documents/todos.txt', 'utf8', function (err, content) { console.log("YOUR FILE CONTAINS:"); console.log(content); });
Since 2015, idiomatic JavaScript would instruct you to get rid of the function
keyword and just use an arrow function.
readFile('~/Documents/todos.txt', 'utf8', (err, content) => { console.log("YOUR FILE CONTAINS:"); console.log(content); });
The key to remember here is that you have only declared that function that
readFile will call later, readFile is in charge of running that function.
Imagine that you have a file that has a list of other file names in it named
manifest.txt. You want to read the file and read each of the files listed in
it. Then, you want to count the characters in each of those files and print
those numbers.
You would start out by reading manifest.txt and splitting the content on the
newline character to get the names of the files. That would look like this:
readFile('manifest.txt', 'utf8', (err, manifest) => { const fileNames = manifest.split('\n'); // More to come });
Now that you have the list of file names, you can loop over them to read each
of those files. As each of those files are read, you want to count the characters
in each file. Imagine that you already have the function named countCharacters
somewhere. The looping code could look like this:
readFile('manifest.txt', 'utf8', (err, manifest) => { const fileNames = manifest.split('\n'); const characterCounts = {}; // Loop over each file name for (let fileName of fileNames) { // Read that file's content readFile(fileName, 'utf8', (err, content) => { // Count the characters and store it in // characterCounts countCharacters(characterCounts, content); }); } });
At this point, you feel pretty good. There's only one thing left to do: print out the
total of all the characters in the files. So, where do you put that console.log
statement?
This is kind of a trick question because there's no place to put it in the way the code
works now.
If you put it here:
readFile('manifest.txt', 'utf8', (err, manifest) => { const fileNames = manifest.split('\n'); const characterCounts = {}; // Loop over each file name for (let fileName of fileNames) { // Read that file's content readFile(fileName, 'utf8', (err, content) => { // Count the characters and store it in // characterCounts countCharacters(characterCounts, content); }); } // MY PRINT STATEMENT HERE console.log(characterCounts); });
then you will get the output {} every time because the code in the inner
readFiles doesn't run until after the console.log because readFile
doesn't
run the function with the arguments (err, content) until after the file is
read and the current function completes.
If you put it here:
readFile('manifest.txt', 'utf8', (err, manifest) => { const fileNames = manifest.split('\n'); const characterCounts = {}; // Loop over each file name for (let fileName of fileNames) { // Read that file's content readFile(fileName, 'utf8', (err, content) => { // Count the characters and store it in // characterCounts countCharacters(characterCounts, content); // MY PRINT STATEMENT HERE console.log(characterCounts); }); } });
then it will print the number of times that your code reads a file. That's not
what you want, either. To get it to work, you have to count the number of files
that have been read each time one completes. Then, you only print when that
number equals the total number of files to be read. The code could like this:
readFile('manifest.txt', 'utf8', (err, manifest) => { const fileNames = manifest.split('\n'); const characterCounts = {}; let numberOfFilesRead = 0; // Loop over each file name for (let fileName of fileNames) { // Read that file's content readFile(fileName, 'utf8', (err, content) => { // Count the characters and store it in // characterCounts countCharacters(characterCounts, content); // Increment the number of files read numberOfFilesRead += 1; // If the number of files read is equal to the // number of files to read, then print because // you're done! if (numberOfFilesRead === fileNames.length) { console.log(characterCounts); } }); } });
The asynchronous nature of this code requires you to do a lot of housekeeping
just to figure out when everything is done. Imagine writing this code and going
back to it in six months to add a new feature. It's not the clearest code in the
world, even with code comments. That leads to a maintenance nightmare. The
JavaScript community wanted a way to code better and clearer.
465. Designing a better solution
Look at the following code that has numbers in the order in which the
console.log statements are run. It will print out "Q", "W", "E",
"R", and "T"
on separate lines.†
console.log('Q'); //---- 1 setTimeout(() => { console.log('E'); //-- 3 setTimeout(() => { console.log('T'); // 5 }, 100); console.log('R'); //-- 4 }, 200); console.log('W'); //---- 2
What would really help is if you could get those numbers in order so that what
appears in the code at least appears to be synchronous even though it might
be asynchronous in nature. As humans, we understand things from top-to-bottom
much better than in the order 1, 3, 5, 4, 2.
Reordering the code above to reflect how it really runs, you'd get this somewhat
more maintainable block.
console.log('Q'); //---- 1 console.log('W'); //---- 2 setTimeout(() => { console.log('E'); //-- 3 console.log('R'); //-- 4 setTimeout(() => { console.log('T'); // 5 }, 100); }, 200);
But, now you're stuck with those human-necessary indents to understand the
function calls that occur in the code. And, to know how long the setTimeouts
run, you have to go way to the bottom of the code blocks. The JavaScript
community agreed with you and decided it'd be great if they could somehow just
chain a bunch of those things together without the indentation, something like
this. (The function names are completely invented for this code block.);
log('Q') .then(() => log('W')) .then(() => pause(200)) .then(() => log('E')) .then(() => log('R')) .then(() => pause(100)) .then(() => log('T'));
The JavaScript community realized that they'd have to use functions in the
then blocks lest the function be immediately invoked. Remember, a function
declaration is not invoked when interpreted. That means each function in each of
the then calls is passed into the then function for it to run at a later
time, presumably when the previous thing finishes, a previous log or pause
in this example. They decided to create a new kind of abstraction in JavaScript
named the "Promise".
466. So, what is a "Promise"?
Look at a line of code using the readFile method found in Node.js. Don't worry
if you don't know the specifics about this function. It's the form of the code
to which you should draw your attention.
readFile('manifest.txt', 'utf8', (err, manifest) => {
You could interpret that line of code as "Read the file named "manifest.txt"
and, when done, call the method that is declared with (err, manifest) => {.
The important part to understand is the "when done, call the method...". That's
the part that's potentially asynchronous, the part that is beyond your control.
When it calls that function, it will either provide an error in the err
parameter or a value in the manifest parameter. When you change it to the
then version, you still get the same kind of guarantee: eventually, you will
get an error or the value of the operation. So that's what a Promise is.
A
Promisein JavaScript is a commitment that sometime in the future, your
code will get a value from some operation (like reading a file or getting
JSON from a Web site) or your code will get an error from that operation
(like the file doesn't exist or the Web site is down).
Promises can exist in three states. They are:
- Pending: The
Promiseobject has not resolved. Once it does, the state of
thePromiseobject may transition to either the fulfilled or rejected state. - Fulfilled: Whatever operation the
Promiserepresented succeeded and your
success handler will get called. Now that it's fulfilled, thePromise:- must not transition to any other state.
- must have a value, which must not change.
- Rejected: Whatever operation the
Promiserepresented failed and your
error handler will get called. Now that it's rejected, thePromise:- must not transition to any other state.
- must have a reason, which must not change.
Promiseobjects have the following methods available on them so that you can
handle the state change from pending to either fulfilled or rejected.
then(successHandler, errorHandler)is a way to handle aPromisewhen it
leaves the pending state.catch(errorHandler)
The handlers mentioned in the previous list are:- Success Handler is a function that has one parameter, the value that a
fulfilledPromisehas. - Error Handler is a function that has one parameter, the reason that the
Promisefailed.
We'll elaborate on these methods in part two of this article.
467. What you've learned
In this reading, you learned some fancy new things that allows you to turn
asynchronous code into seemingly synchronous-looking code. You did that by
learning that...
- A
Promisein JavaScript is a commitment that sometime in the future, your
code will get a value from some operation (like reading a file or getting
JSON from a Web site) or your code will get an error from that operation
(like the file doesn't exist or the Web site is down).
†: One can argue that the code following this statement is already very bad
and shouldn't be written that way. I would agree. Please don't write code
like that. It is only for demonstration purposes. However, do not be
surprised if you find someone else wrote code like that. 😉
A Promise is a Promise: A Mostly Complete Guide to JavaScript Promises II
This is part two of an article about classic JavaScript promises. If you have
not read part one, we recommend that you navigate to the previous task to do so.
When you finish this article, you should be able to:
- Create your own
Promises - Use
Promiseobjects returned by language and framework libraries
468. Handling success with then
Returning to another file-reading example, consider the following block of code.
readFile("manifest.txt", "utf8", (err, manifest) => { if (err) { console.error("Badness happened", err); } else { const fileList = manifest.split("\n"); console.log("Reading", fileList.length, "files"); } });
If this succeeds, then you would expect a statement like "Reading 12 files" to
appear if the file contained a list of 12 files.
Now, to rewrite that using a Promise and printing that same statement, you
would get a file-reading function that returns a Promise object. Later on,
you'll see how to create one for yourself. At this moment, just presume that a
function named readFilePromise exists. When you call it, it would return a
promise that, when fulfilled, would invoke the success handler registered for
the object through the then method. Very explicitly, you could write that code
like this.
/* EXPLICIT CODE: NOT FOR REAL USE */ // Declare a function that will handle the content of // the file read by readFilePromise. function readFileSuccessHandler(manifest) { const fileList = manifest.split("\n"); console.log("Reading", fileList.length, "files"); } // Get a promise that will return the contents of the // file. const filePromise = readFilePromise("manifest.txt"); // Register a success handler to process the contents // of the file. In this case, it is the function // defined above. filePromise.then(readFileSuccessHandler);
Most Promise-based code does not look like that, though. Idiomatic
JavaScript instructs to not create variables that don't need to be created. You
would see the above code in a real-live code base written like this, instead.
Spend a moment comparing and contrasting the forms from very explicit to
idiomatic.
readFilePromise("manifest.txt").then(manifest => { const fileList = manifest.split("\n"); console.log("Reading", fileList.length, "files"); });
That's slightly easier to read than the weird callback thing you had above. But,
you still have that nasty double indentation. The designers of the Promise
didn't want that for you, so they allow you to chain thens.
469. Chaining thens.
In the above code that uses readFilePromise, it does not look like the ideal
code that JavaScript could give us because of the success-handling function
being on multiple lines that require another indent. It may be a little thing,
but it still prevents you from the most readable code. Again, the Technical
Committee 39 had your back. They designed "chainable thens" for you. The rules
are a little complex to read.
- Each
Promisehas athenmethod that handles what happens when the
Promisetransitions out of the pending state. - Each
thenmethod returns aPromisethat transitions out of its pending
state when thethenthat created it completes. - (One more condition described below.)
That chaining property gives you the ability to break apart the two lines of the
success handler in the previous example to two one-line functions that do the
same thing with less code! If you write that form explicitly, you'd have the
following.
/* EXPLICIT CODE: NOT FOR REAL USE */ // Get a Promise that fulfills when the file is read // with the value of the content of the file. const filePromise = readFilePromise("manifest.txt"); // Register a success handler that takes the fulfilled // value of the filePromise in the parameter named "manifest", // which is the content of the file, split it on newline // characters, and return a Promise whose fulfilled value is // list of lines. const fileListPromise = filePromise.then(manifest => manifest.split("\n")); // Register a success handler to the fileListPromise that // receives the fulfilled value in the "fileList" parameter // and returns a Promise whose fulfilled value is the length // of the fileList array. const lengthPromise = fileListPromise.then(fileList => fileList.length); // Register a success handler to the lengthPromise that // receives the fulfilled value in the "numberOfFiles" parameter // and uses it to print the number of files to be read. lengthPromise.then(numberOfFiles => console.log("Reading", numberOfFiles, "files") );
That code block has a lot of words to describe what happens at each step of the
process of using "chainable thens". In the real world, were you to find that
code in a real application, it would likely look like the following.
readFilePromise("manifest.txt") .then(manifest => manifest.split("\n")) .then(fileList => fileList.length) .then(numberOfFiles => console.log("Reading", numberOfFiles, "files"));
Here's a diagram of what happens in the above code.

As you may recall from the section
So, what is a "Promise"?, you learned that the then
method can also accept a second argument that is an error handler that takes
care of things should something go wrong. Back to the file reading example from
above, you add a second method to the then which accepts a reason that the
error happened. For reading a file, that could be that the file doesn't exist,
the current user doesn't have permissions to read it, or it ran out of memory
trying to read a huge file.
readFilePromise("manifest.txt").then( manifest => { const fileList = manifest.split("\n"); console.log("Reading", fileList.length, "files"); }, reason => { console.error("Badness happened", reason); } );
That works, but has taken you back to the original bad multiline form of the
success handler. What happens if you did it like this? How does this work?
readFilePromise("manifest.txt") .then( manifest => manifest.split("\n"), reason => console.err("Badness happened", reason) ) .then(fileList => fileList.length) .then(numberOfFiles => console.log("Reading", numberOfFiles, "files"));
Here's what happens with regard to the Promises in this chain of thens.

Rather than using a then with a success and error handler, you can use the
similar catch method that takes just an error handler. By doing that, the code
from the last section ends up looking like this.
readFilePromise("manifest.txt") .then(manifest => manifest.split("\n")) .then(fileList => fileList.length) .then(numberOfFiles => console.log("Reading", numberOfFiles, "files")) .catch(reason => console.err("Badness happened", reason));
That is exactly what the design expressed. The catch acts just like an error
handler in the last then. If the catch doesn't throw an exception, then it
returns a Promise in a fulfilled state with whatever the return value is, just
like the error handler of a then.
catchis a convenient way to do error handling in athenchain that looks
kind of like part of a try/catch block.
472. Using Promise.all for many future values
You're almost to the place where you can read the manifest file, get the list,
and then count the characters in each of the files, and print out the result.
You need to learn about two more features of JavaScript Promises.
Imagine that you have three files that you want to read with the
readFilePromise method. You want to wait until all three are done, but let
them read files simultaneously. How do you manage all three Promises as one
Promise? That's what the Promise.all method allows you to do.
For example, imagine you have the following array.
const values = [ readFilePromise("file-boop.txt"), // this is a Promise object: pending readFilePromise("file-doop.txt"), // this is a Promise object: pending readFilePromise("file-goop.txt"), // this is a Promise object: pending ];
When you pass that array into Promise.all, it returns a Promise object that
manages all of the Promises in the array!
const superPromise = Promise.all(values); // superPromise is a Promise object in the pending state. // // Inside superPromise is an array of Promise objects // that look like this: // // 1. file reading promise in pending state, same as the one passed in // 2. file reading promise in pending state, same as the one passed in // 3. file reading promise in pending state, same as the one passed in
When all of the Promise objects in the super Promise transition out of the
pending state, then the super Promise will also transition out of the pending
state. If any one of the Promise objects in the array transition to the
rejected state, then the super Promise will immediately transition to the
rejected state with the same reason as the inner Promise failed with. If
all of the internal Promise objects transition to the fulfilled state,
then the super Promise will transition to the fulfilled state and its
value will be an array of all of the resolved values of the original array.
With that in mind, you could continue the above code with a then and a catch
that would demonstrate what happens.
superPromise .then(values => console.log(values)) .catch(reason => console.error(reason)); // If the function successfully reads the file, the values passed // to the then come from the values that were in the superPromise // // 1. the content of file-boop.txt // 2. the content of file-doop.txt // 3. the content of file-goop.txt // If something goes wrong with reading the file, then the `catch` // gets called with the error reason from the Promise object that // first failed.
Promise.allaccepts an array of values and returns a newPromiseobject in
the pending state colloquially called a "super promise". It converts all
non-Promisevalues intoPromiseobjects that are immediately in the
fulfilled state. Then,
- If any one of the
Promises in the array transitions to the rejected
state, then the "super promise" transitions to the rejected state with
the same reason that the innerPromiseobject failed.- If all of the inner
Promiseobjects in the array transition to the
fulfilled state, then the "super promise" transitions to the
fulfilled state with a value of an array populated, in order, of the
resolved values of the original array.
473. Flattening
Promises
The last thing you need to learn about Promises is the coolest feature of them
all. If you return a Promise object from either a success or error handler,
the next step doesn't get run until that Promise object resolves! Here's what
happens when you type the following code. It's step 4 that is the amazing part.
readFilePromise("manifest.txt") .then(manifestContent => manifestContent.split("\n")) .then(manifestList => manifestList[0]) .then(fileName => readFilePromise(fileName)) .then(otherFileContent => console.log(otherFileContent)); // Interpreted as: // 1. Read the file of the manifest.txt file and pass the // content to the first then. // 2. Split the content from manifest.txt on newline chars // to get the full list of files. // 3. Return just the first entry in the list of files. // 4. RETURN A PROMISE THAT WILL READ THE FILE NAMED ON THE // FIRST LINE OF THE manifest.txt! The next then method // doesn't get called until this Promise object completes! // 5. Get the content of the file just read and print it.
Again, here's the rule.
If you return a
Promisefrom a success or error handler, the next handler
isn't called until thatPromisecompletes.
474. Putting it all together
You can now use all of this knowledge to use Promises to read a manifest file,
read each of the files in the manifest files, and count all of the characters in
those files with code that reads much better than this.
readFile("manifest.txt", "utf8", (err, manifest) => { const fileNames = manifest.split("\n"); const characterCounts = {}; let numberOfFilesRead = 0; // Loop over each file name for (let fileName of fileNames) { // Read that file's content readFile(fileName, "utf8", (err, content) => { // Count the characters and store it in // characterCounts countCharacters(characterCounts, content); // Increment the number of files read numberOfFilesRead += 1; // If the number of files read is equal to the // number of files to read, then print because // we're done! if (numberOfFilesRead === fileNames.length) { console.log(characterCounts); } }); } });
Remember that you've created a countCharacters methods elsewhere that does the
grunt work of counting characters. So, now, if you were to list out the steps
that you'd like to have the code perform, you should be able to write a
Promise-based chain of thens that does that work.
- Read
manifest.txt. - Split the content into a list of files.
- Read the contents of each file.
- If all of them succeed, then
- count the characters in each file and
- print the character counts.
- If anything fails, print the error.
So, in code, that you would translate that to the following.
const characterCounts = {}; readFilePromise('manifest.txt') .then(fileContent => fileContent.split('\n')) .then(fileList => fileList.map(fileName => readFilePromise(fileName))) .then(lotsOfReadFilePromises => Promise.all(lotsOfReadFilePromises)) .then(contentsArray => contentsArray.forEach(c => countCharacters(characterCounts, c)) .then(() => console.log(characterCounts)) .catch(reason => console.error(reason));
Through the magic of Promises, you have now been able to do lots of
asynchronous work but make it look synchronous!
475. Creating your own Promises
Early on, you designed the way Promises should work to look something like
this.
log("Q") .then(() => log("W")) .then(() => pause(2)) .then(() => log("E")) .then(() => log("R")) .then(() => pause(1)) .then(() => log("T"));
That code uses two functions that you can define:
- a
logfunction that takes a value to print and returns aPromiseobject
that is in the fulfilled state; and, - a
pausefunction that takes a number and returns aPromiseobject that,
after the indicated number of seconds, transitions to the fulfilled state.
Here is a way that you could create those functions.
function log(message) { console.log(message); return Promise.resolve(); }
The above function logs the message passed to it and, then creates a Promise
object already transitioned to the fulfilled state. If you provide a value
to the resolve method, then that becomes the value of the Promise object.†
The pause method is a little more difficult. You have to create a new
Promise object from scratch to pause and then continue. To do that, you will
use the Promise constructor.
The Promise constructor accepts a function that has two parameters. Each of
those parameters will be functions, themselves. The first parameter is the
so-called resolve parameter which, when called, transitions the Promise
object to the fulfilled state. The second parameter is the so-called
reject parameter which, when called, transitions the Promise object to the
rejected state.
function pause(numberOfSeconds) { return new Promise((resolve, reject) => { setTimeout(() => resolve(), numberOfSeconds * 1000); }); }
As you can see from the above code, the new Promise gets a single argument, a
two-parameter function that does some asynchronous thing. The two parameters are
the resolve and the reject functions that you can use to transition the
state of the Promise object being constructed. In this case, after a certain
amount of time, the resolve() method is invoked which transitions the
Promise object to the fulfilled state. The value is undefined
because
you've passed no value into the resolve() function invocation. If you wanted
the Promise to have the value of 6.28, then you would invoke it like this
resolve(6.28). You can pass any one value into the resolve function, be it a
number, a boolean, an array, an object, or whatever.
With that knowledge, think about how you would write a function using the
readFile function that would return a Promise object that would resolve to
the contents of the file on success and reject the Promise if an error
occurred. Take a moment to scratch that out into an editor or something.
If you wrote something similar to the following, then you did a great job! If
you didn't, work through the following in a Node.js JavaScript environment to
figure out how it works. You can use it like in any of the above examples.
const { readFile } = require("fs"); // This is just the way to get // the readFile method into the // current file. If you don't // understand it, that's ok. function readFilePromise(path) { return new Promise((resolve, reject) => { readFile(path, "utf8", (err, content) => { if (err) { reject(err); } else { resolve(content); } }); }); }
476. What you've learned
In this reading, you learned some fancy new things that let's you turn
asynchronous code into seemingly synchronous-looking code. You did that by
learning that...
thencan handle both success and failures. The success handler is called
with the value of the operation of thePromisewhen thePromiseobject
transitions to the fulfilled state. If an error condition occurs, them the
error handler of thethenis called.- If a
Promiseobject transitions to the rejected state and no error
handler exists for thethen, then thatthenis skipped altogether. - If an error handler is called and does not raise an exception, then the next
Promiseobject transitions to the fulfilled state and the next success
handler is called. catchis a convenient way to do error handling in athenchain that looks
kind of like part of a try/catch block.Promise.allaccepts an array of values and returns a newPromiseobject in
the pending state colloquially called a "super promise". It converts all
non-Promisevalues intoPromiseobjects that are immediately in the
fulfilled state. Then,- If any one of the
Promises in the array transitions to the rejected
state, then the "super promise" transitions to the rejected state with
the same reason that the innerPromiseobject failed. - If all of the inner
Promiseobjects in the array transition to the
fulfilled state, then the "super promise" transitions to the
fulfilled state with a value of an array populated, in order, of the
resolved values of the original array.
- If any one of the
- If you return a
Promisefrom a success or error handler, the next handler
isn't called until thatPromisecompletes. - You can create a fulfilled
Promiseobject by using the
Promise.resolve(value)method. - You can create your own
Promiseobjects from scratch by using thePromise
constructor with the formnew Promise((resolve, reject) => { // do some async stuff // call resolve(value) to make the Promise succeed // call reject(reason) to make the Promise fail });
477. See also
- Section: Promises,
ECMAScript® 2015 Language Specification
is the minimum standard for how JavaScript Promises should act in all
JavaScript environments. Language standards are dense and hard to read. You
may want to give it a shot. The more you grow in your knowledge of how
JavaScript works, the clearer it should become. - The Promises/A+ Specification has a very nice
terse description of how Promises work. It is mostly the standard that was
adopted by the Technical Committee 39 when including thePromiseobject into
JavaScript.
†: There's a correspondingPromise.reject(reason)method that creates a
Promiseobject immediately in the rejected state.
Project: Curl Up With A Nice Promise
You've learned about how to use Promise objects to help master the problems of
asynchronous program logic. Now, you can really get your hands dirty by building
a Node.js-based version of the popular curl utility!
You may not know, but curl is a command line program to get the content at
URLs. cURL. Get it?
478. This project
You will create a version of the curl utility that will be able to
- Download content from the Internet
- Save it into files
- Modify the HTTP request using command-line arguments
- Send data with the HTTP request
- Save the metadata of the HTTP response
Detailed steps will be provided for the project setup, so you can follow
along and get the pieces in place for your practice with promises.
You're going to do great!
479. Getting started
You'll build this in steps. Eventually, you'll have something pretty powerful.
To get started, create a project directory, create file in it named "curl.js",
and open it up in Visual Studio Code.
Now, use the npm command to install "node-fetch".
479.1. A word about fetch
The fetch command allows you to call another server or service hosted on the
web and returns you the results. Since fetch is asynchronous, you will need to
use a promise to handle the response when it returns from the remote server.
Specifically, fetch makes HTTP requests for XML, JSON, text, files or any
content that can be sent through the REST protocol.
The node-fetch package includes a fetch function which has two arguments:
a url and an options object. This function returns a promise. The promise is
what allows you to wait for the response and then handle it.
The response from the fetch promise includes a text() function that also
returns a promise. That is because the text can stream when it's long.
Streaming text is the same as streaming video you are probably familiar with
where the first part is available after a short time and the rest continues
to load in the background.
To learn more about using fetch within NodeJS, you may look at the npm page for
node-fetch, specifically the [section on fetch] and section on body text, or
additional documentation such as body content and catching errors.
479.2. As you go along
Every new feature that you add should not break a previously-implemented
feature. If your utility can print out a file to the console and then it doesn't
after you add the "save to a file" feature, you broke it. Make sure everything
works every time you do something new.
A good way to help with this is to initialize a Git repository at the beginning
of your project. Then, whenever you get something to work, add and commit those
changes. That way, you can get yourself out of an "oh, geez, I really messed it
up right now" moment by doing something like git checkout -- ..
480. Step 1: Just getting a URL
The first feature that you need to support is making a normal GET request to a
URL and printing out the content to "standard out" (console.logging it).
This service is a great starting point:
https://artii.herokuapp.com/make?text=curl++this
It points to the ASCII art API. It takes some text in the URL and turns it into
ASCII art. You can try it in standard curl if you'd like to see how it works
before you write your code. In you terminal, run this command.
> curl https://artii.herokuapp.com/make?text=curl++this
Now write code in your curl.js file to make the fetch call using a promise
to grab the result and log it out to the console.
Tip: Put the above url into a constant or variable as you'll be replacing it
soon with a command-line parameter.
When you run your program you should see the following.
> node curl.js https://artii.herokuapp.com/make?text=curl++this
_ _ _ _
| | | | | | (_)
___ _ _ _ __| | | |_| |__ _ ___
/ __| | | | '__| | | __| '_ \| / __|
| (__| |_| | | | | | |_| | | | \__ \
\___|\__,_|_| |_| \__|_| |_|_|___/
>
Congrats! That's ASCII art. 😃
480.1. Just failing to get a URL
Let's say the host server doesn't exist. You should handle that gracefully.
You're using Promises. That means this probably goes in a catch handler
somewhere.
Since you are emulating the curl command, you can see what it does with an
invalid url.
> curl https://artii.herokuFLAP.com/make?text=curl++this curl: (6) Could not resolve host: artii.herokuFLAP.com >
You can check for this error (hint 1 - the code is ENOTFOUND) to output
an equivalent message (hint 2 - the URL object can help you get the host
property from a url string). Since the error message is showing that the process
ended with status code "6", you can and should do the same from your program.
process.exit(6);
Any other errors can be sent as-is through to console as an error.
You can temporarily change the URL in your code to see both of these errors.
- ENOTFOUND:
https://artii.herokuappxxxx.com/make?text=curl++this - Other error:
https://artii.herokuapp.com/makexxxx?text=curl++this
Hint: Remember to change the URL back to the working one before continuing.
481. Step 2: Command-line arguments
Instead of hard-coding the URL, it would be nice to pass it to the program for
more flexibility and reuse. When you've completed this upgrade, the command to
run your program will look like this.
> node curl.js https://artii.herokuapp.com/make?text=curl++this
There are three types of command-line arguments.
- arguments with values (e.g.
-o output-file.txt) - arguments without values, sometimes referred to as "flags" (e.g.
-hand
--helpare often used to output help or usage information) - positional arguments (e.g. the url or urls to fetch)
Throughout the rest of this project you'll get to try them all.
In order to accept command-line arguments, you'll want to include a package to
help you access them. One of the better options is dashdash. Install it now
usingnpm.
To get you started quickly, here's some code you can add to your curl.js.
const dash = require('dashdash'); const options = { allowUnknown: true, options: [], }; const parser = dash.createParser(options); const opts = parser.parse(options); console.log('Options are:', opts);
Remember to run your program with some options following the program name.
> node curl.js
> node curl.js -h
> node curl.js https://appacademy.io
> node curl.js -o output.txt https://appacademy.io
481.1. Predefined options
Now, try adding a predefined option to the configuration, one that you would use
to specify the output file name. (This isn't the entire JavaScript file, here.
It's just the snippet of the options variable declaration. Please just modify
the options variable.)
const options = { allowUnknown: true, options: [{ names: ['output', 'o'], type: 'string', help: 'file in which to store the fetched content' }], };
Run the last command again and see how the output differs from before.
> node curl.js -o output.txt https://appacademy.io Options are: { output: 'output.txt', _order: [ { key: 'output', value: 'output.txt', from: 'argv' } ], _args: [ 'https://appacademy.io' ] } ...
Notice that you can get the list of URLs from the _args property. Then, you
can get the value of the "output" argument that you wrote using the -o
signifier through the output property on the opts value.
Go ahead and add the option for -h as well. (Hint: the type of a flag option
is bool.) Verify it's working by running node curl.js -h.
481.2. Url from command-line
Now change your url variable (or constant) to use the argument instead of a
hard-coded string. Then test it with several calls to your program with
different urls.
> node curl.js https://appacademy.io > node curl.js https://artii.herokuapp.com/make?text=curl++this
It is pleasing for users if you provide a message when they forget to include a
required option, such as at least one url. Go ahead and add that (obviously
before using args to set the url so the program doesn't crash). Verify by
running node curl.js.
Also, you may comment out or remove the logging of the options whenever you feel
you don't need them any more.
481.3. Help message
It is useful to map variables to the various properties of the options, if you'd
like. For example, you might want to do something like this.
const { help, output, _args: urls } = opts;
Also output the help information, if that flag is set.
if (help) { console.log('node curl.js [OPTIONS] URL'); console.log('OPTIONS:'); console.log(parser.help().trimRight()); return; }
482. Step 3: Now, put it in a file
When the person using your utility specifies that they'd like the content of the
fetch to be stored in a file, they will do it with one of these forms. Of course
the string "«file-name»" will be an actual file name and not have those fancy
guillemets (or those funky double bracket things).
-o «file-name»--output «file-name»
When your program gets that argument, it will not "console log" it. Instead,
it will write it to the specified file. It should do that asynchronously, as
well. In fact, node-fetch is designed to work directly with writing files, so it
has built-in support for streams with node-fetch.
Remember to importfs(you don't need to install, of course, because it is a
native part of NodeJS), then use the documentation to write the fetched content
to theoutputfile, if provided by the user calling your program.
(Hint:process.stdoutworks like a file stream.)
Make sure you can still run without the-oflag or if the filename is missing
(after the-ooption in the command line).
Test a variety of different commands to ensure all supported variations and
previous error handling are still working.
482.1. Error handling for writing files
If the file fails to get written, then it should look like this. You need to
modify your code to make this happen.
> node curl.js -o node_modules https://artii.herokuapp.com/make?text=curl++this
curl: (23) Failed writing body
(Though you're still using Promises, because you're saving as a writable stream,
then it's at that point that you're getting this error. Hint: on('error') is
a good place to begin according to the node error handling
documentation under
the bullet that starts with "When an asynchronous method is called" because
"use of the 'error' event mechanism is most common for stream-based ... APIs".)
483. Congratulations!
You made it through the minimum project exploring promises and command-line
arguments. As time and desire permits, you may continue with the following
bonus rounds to make your program more like the curl command.
484. Bonus A: Setting an arbitrary header
Have a look at Examples using
Fetch to see how to add headers on an invocation
of fetch in the second code example of the section. You may also want to check
out the Syntax
of Fetch for a property on the object you pass into for the
"init" parameter that would allow you to set the headers of the request. Or,
let me DuckDuckGo that for you.
Use that knowledge to be able to handle one or more of the -H or --header
command line option. It's value should have the form "«Header Name»: «Header
Value»" like "Accept: application/json" or "Content-Type: application/json".
484.1. Setting special headers
Now that you can set arbitrary headers, support the command line arguments and
their meaning.
| Command Line Argument | Meaning | HTTP Header |
|---|---|---|
-A «string» |
Set the user agent header | "User-Agent: «string»" |
-e «URL» |
Set the referer header | "Referer: «URL»" |
485. Bonus B: Capturing response headers
Sometimes the person using the command wants to see the output of the metadata
of the request, too. That's where the "--dump-header" flag comes into play. When
someone issues the command with that flag
> node curl.js --dump-header ./headers.txt \
https://artii.herokuapp.com/make?text=curl++this
Then it will print out the content of the response like it normally does. In
addition to that, though, it will create a file named "./headers.txt" and put
the HTTP response status line and all of the headers of the response in it. An
example content of the file would look like this.
HTTP/1.1 200 OK
Connection: keep-alive
Content-Type: text/plain
Content-Length: 319
Server: Goliath
Date: Tue, 03 Feb 2019 05:52:55 GMT
Via: 1.1 vegur
486. Bonus C: Sending data
When someone adds the -d «string» or --data «string» flag to the
command,
that should become the body of the HTTP request. So, make it the body of your
fetch. Check out the Syntax of
Fetch for a property on the object you pass
into for the "init" parameter that would allow you to set the body of a
request. This should also set the method of the request to POST.
486.1. Overriding the method of the request
When someone adds the -X command line argument followed by an HTTP method,
then set that method on the fetch request. You'll want to find the property on
the "init" parameter that would allow you to override the method of the HTTP
request.
> node curl.js -X 'POST' \
-d '{"title": "Sir", "name": "Robin"}' \
-H 'Content-Type: application/json' \
https://jsonplaceholder.typicode.com/posts
which should result in something like
{ "title": "Sir", "name": "Robin", "id": 101 }
487. Bonus D: Multiple files, multiple output destinations
Now that you can download a single file, make it like the way curl handles
multiple URLs and -o parameters.
- Do the transfers in parallel, not one right after another
- For each URL provided, a corresponding
-oor--outputis its target. If
there are more URLs than there are output targets, the remainder of the
content gets output to standard out.
Here are some examples to get you used to it.
Prints both files to standard out
> node curl.js https://artii.herokuapp.com/make?text=curl++this \
https://artii.herokuapp.com/make?text=curl++that
Saves the first to the file "first.txt" and prints the second to standard out
> node curl.js -o first.txt \
https://artii.herokuapp.com/make?text=curl++this \
https://artii.herokuapp.com/make?text=curl++that
Saves the first to the file "first.txt" and saves the second to the file
"second.txt"
> node curl.js -o first.txt \
-o second.txt \
https://artii.herokuapp.com/make?text=curl++this \
https://artii.herokuapp.com/make?text=curl++that
488. Bonus E: List globbing
If a person specifies a "list glob", then expand it to all of the files that it
represents. A list glob uses curly braces to specify a list.
> node curl.js https://artii.herokuapp.com/make?text={this,that,the+other}
The previous statement would "expand" to the following equivalent command.
> node curl.js https://artii.herokuapp.com/make?text=this \
https://artii.herokuapp.com/make?text=that \
https://artii.herokuapp.com/make?text=the+other
489. Nightmare round A: The progress meter
When your utility saves all of its contents into files, then show a progress
meter for the download. It should show the percent total that it is at. You'll
need to look at the "Content-Length" header of the response headers. Then, you
can get a reader from the response body to monitor how much has been read.
% Total
-- -----
make 18 151M
490. Nightmare round B: Progress meter for multiple files
What you just did for the download progress meter, do it so that it can track
multiple files, too.
% Total
-- -----
make 18 151M
make 14 111M
WEEK-06 DAY-3
async and await
Promises Learning Objectives II
Below is a complete list of the terminal learning objectives for this lesson.
When you complete this lesson, you should be able to perform each of the
following objectives. These objectives capture how you may be evaluated on the
assessment for this lesson.
- Use
async/awaitwith promise-based functions to write asynchronous code
that behaves synchronously.al learning objectives for this lesson.
When you complete this lesson, you should be able to perform each of the
following objectives. These objectives capture how you may be evaluated on the
assessment for this lesson. - Use
async/awaitwith promise-based functions to write asynchronous code
that behaves synchronously.
HTML Learning Objectives
The objective of this lesson is for you to know how to effectively use HTML5
to build semantically and structurally correct Web pages. HTML is the language
that renders the cross-platform human-computer interfaces that made the World
Wide Web accessible by the world! You'll be able to create structurally and
semantically valid HTML5 pages using the following elements:
- html
- head
- title
- link
- script
- The six header tags
- p
- article
- section
- main
- nav
- header
- footer
- Itemized list tags
- ul
- ol
- li
- a
- img
- Tabular-data tags
- table
- thead
- tbody
- tfoot
- tr
- th
- tdhow to effectively use HTML5
to build semantically and structurally correct Web pages. HTML is the language
that renders the cross-platform human-computer interfaces that made the World
Wide Web accessible by the world! You'll be able to create structurally and
semantically valid HTML5 pages using the following elements:
- html
- head
- title
- link
- script
- The six header tags
- p
- article
- section
- main
- nav
- header
- footer
- Itemized list tags
- ul
- ol
- li
- a
- img
- Tabular-data tags
- table
- thead
- tbody
- tfoot
- tr
- th
- td
Modern Promises With async And
await
While Promises helped revolutionize the way that JavaScript programmers could
structure asynchronous code, the technical committee that governs JavaScript
realized it could take this feature one step further. It could design a language
feature that allowed programmers to write true synchronous code based on
Promises. Thus, the async and await keywords came into being in 2017.
When you finish this article, you should be able to:
- Properly implement a function declaration with the
async function
expression; - Explain how the JavaScript runtime creates an implicit
Promiseforasync functiondeclarations; and, - Execute functions marked with the
asynckeyword using theawaitkeyword.
491. Classic promise example
Let's review with an example of classic promise handling using two functions.
walkTheDog will return a promise that resolves with a 'happy dog' after 1
second. doChores will act as our main function and will handle that promise
with a then:
function walkTheDog() { return new Promise((resolve, reject) => { setTimeout(() => { resolve('happy dog'); }, 1000); }); } function doChores() { console.log('before walking the dog'); walkTheDog() .then(res => { console.log(res); console.log('after walking the dog'); }); return 'done'; } console.log(doChores()); // prints: // // before walking the dog // done // happy dog // after walking the dog
Notice that 'done' will be returned by doChores before the promise
resolves,
because it is asynchronous.
If we want to take any actions after the promise resolves, we can do so by
chaining then. This code works, but we may have one complaint regarding
aesthetics: there is some added bulk because the then accepts a callback
containing the code we want to execute after the promise resolves. This bulk
compounds further if we want to chain multiple thens. Let's refactor this.
Enter async and await.
492. async function declarations
Declaring a function with [async] will create the function so it returns an
implicit promise containing it's result. Let's declare our doChores function
as async and check it's return value. For now we'll leave out the explicit
walkTheDog promise:
async function doChores() { // ... return 'done'; } console.log(doChores()); // prints: // Promise { 'done' }
This function now returns a promise automatically! Notice that the promise
returned contains the immediately resolved value of 'done'. An async
declaration isn't super useful by itself. However, it allows us to utilize the
await keyword inside the function.
493. awaiting a promise
The [await] operator can be used to wait for promise to be fulfilled. We are
only allowed to use await in an async function. Using await outside of
an
async will result in a SyntaxError. When a promise is awaited, execution of
the containing async function will pause until the promise is fulfilled.
Let's use await in our doChores function:
function walkTheDog() { return new Promise((resolve, reject) => { setTimeout(() => { resolve('happy dog'); }, 1000); }); } async function doChores() { console.log('before walking the dog'); const res = await walkTheDog(); console.log(res); console.log('after walking the dog'); } doChores(); // prints: // before walking the dog // happy dog // after walking the dog
Whoa! This code looks synchronous. Instead of using then, we can await the
walkTheDog() promise, pausing execution until the promise is fulfilled. Once
fulfilled, the await expression will evaluate to the resolved value,
'happy dog' in this case.
Remember that the async doChores function will implicitly return a promise.
Now that promise will fulfill once the entire function is finished executing.
The function's return value will be the resolved value of the implicit promise.
Let's handle it with then:
function walkTheDog() { return new Promise((resolve, reject) => { setTimeout(() => { resolve('happy dog'); }, 1000); }); } async function doChores() { console.log('before walking the dog'); const res = await walkTheDog(); console.log('after walking the dog'); return res.toUpperCase(); } doChores().then(result => console.log(result)); // prints: // before walking the dog // after walking the dog // HAPPY DOG
You're probably wondering why we chain then and not simply use await doChores(),
that's because we can only use await inside of an async
function. Currently our call to doChores is not within any function.
For fun, let's use a surrounding async function to await doChores(). We'll
also add some numbered print statements to show the order of execution:
function walkTheDog() { return new Promise((resolve, reject) => { setTimeout(() => { console.log('2'); resolve('happy dog'); }, 1000); }); } async function doChores() { console.log('1'); const res = await walkTheDog(); console.log('3'); return res.toUpperCase(); } async function wrapper() { console.log('0'); const finalResult = await doChores(); console.log('4'); console.log(finalResult + '!!!'); } wrapper(); // prints: // 0 // 1 // 2 // 3 // 4 // HAPPY DOG!!!
494. Refactoring a promise chain
Refactoring a promise chain is straightforward with async/await. Let's say
wanted to print the resolved values for 3 promises in order:
function wrapper() { promise1 .then(res1 => { console.log(res1); return promise2; }) .then(res2 => { console.log(res2); return promise3; }) .then(res3 => { console.log(res3); }); }
We can refactor it into this:
async function wrapper() { console.log(await promise1); console.log(await promise2); console.log(await promise3); console.log(await promise4); }
495. Error handling
Since async / await allows for seemingly synchronous execution, we can use a
normal try...catch pattern to handle errors when the promise is rejected:
function action() { return new Promise((resolve, reject) => { setTimeout(() => { reject('uh-oh'); // rejected }, 3000); }); } async function handlePromise() { try { const res = await action(); console.log('resolved with', res); } catch (err) { console.log('rejected because of', err); } } handlePromise(); // prints: // rejected because of: uh-oh
496. What you learned
In this article, you learned how to use the async and await keywords in
modern JavaScript to truly turn asynchronous code into synchronous style code.
You will want to do this to make the code more readable and maintainable. The
steps to do this are to
- mark a function with the
asynckeyword to make JavaScript have it return a
Promiseif your code doesn't, and - use the
awaitkeyword to turn the invocation of a function markedasync
into a blocking call that returns the resolved value of the underlying
Promiseor throws an exception.
[async]: https://developer.mozilla.org/en-US/docs/Web/JavaScript/Reference/Statements/async_function
[await]: https://developer.mozilla.org/en-US/docs/Web/JavaScript/Reference/Operators/await
The Basics of HTML
The HyperText Markup Language (HTML) revolutionized the way that we use
computers. Before HTML and Web browsers, all computer applications were
so-called "desktop applications" that had to be created by software developers
using Win32 C and other such specialized languages. With the advent of HTML,
anyone with a text editor and a way to host HTML files could create content that
people all over the world could see!
In this reading, you will either get to know HTML or brush up on the basics. At
the end, you should know
- The three components that are the building blocks of HTML
- How to add a title to a Web page
- Add some headings to your HTML document
- Add blocks of paragraph text
- Use lists to itemize or define content
- Use hyperlinks to instruct the browser to go from one page (or resource) to
another - Put an image in your Web page
- Properly display tabular data
- Put comments in the source of your HTML code
497. The three components of HTML
HTML has three components that form its basic building blocks: tags,
elements, and attributes. Once you’ve learned the rules for how each
of
these components function, you should have no trouble writing and editing HTML.
497.1. These things called "tags"
Any text that you write inside the angle brackets "<" and ">" will not be
displayed in the browser. The text inside the angle brackets is just used to
tell the browser how to display or transform regular text located between the
opening tag (also called the start tag) and the closing tag (also called the end
tag).
Tags usually come in pairs, and the difference between an opening tag and a
closing tag is that the first symbol inside the brackets of a closing tag is a
slash “/“ symbol.
For example, here’s a pair of h1 tags (used to identify heading text), with some
content in-between:
<h1>This is some content.</h1>
In that example, the <h1> is the opening tag and the </h1> is the closing
tag.
There are a whole mess of tags in HTML for you to use. The ones that you should
know because you'll put them to use are in the following list. Go read each of
the following documentation pages.
- [
html] - [
head] - [
title] - [
link] - [
script] - [Header tags] There are six of these. This link is to just "h1".
- [
p] - [
article] - [
section] - [
main] - [
nav] - [
header] - [
footer] - Itemized list tags
- [
ul] - [
ol] - [
li]
- [
- [
a] - [
img] - Table tags
- [
table] - [
thead] - [
tbody] - [
tfoot] - [
tr] - [
th] - [
td]
There are two main rules that you need to follow when using tags. So, don't
forget them.
- [
- You must always use angle brackets for tags. Square brackets, curly
braces, parentheses, none of those are for tags in HTML. Just the "<" and
">". - Tags almost always come in pairs. This means that, except for a few
number of tags, you must always close a tag after opening it. If you forget
to add a closing tag, sometimes the browser will kindly figure it out and
insert one for you when it renders your content. However, don't rely on that
behavior! Different browsers will do different things. Put the closing tag
when you are supposed to put it.
There's also a general guideline for writing tags: please write them in lower
case letters. Sure, you can write them with upper case letters. The browsers
will accept "img" and "IMG" and "ImG" and "iMg" as the image tag. However, for
consistency, convention, and clarity, please choose lower case.
497.2. These things called "elements"
You now know that most tags come in pairs, and some tags don't have a closing
tag. An HTML element is defined as
- If a tag is supposed to have both an opening tag and a closing tag, then when
you refer to it as an HTML element, you actually mean:- The opening tag
- The closing tag
- All of the content between the opening and closing tags
- If a tag is not supposed to have a closing tag, then when you refer to it as
an HTML element, you mean just the tag itself.
Here's an example of how to specify a title in an HTML document.
<title>Pictures of Barry's Beautiful Baby</title>
The HTML element is the opening tag (<title>), the closing tag
(</title>),
and the content inside the tags ("Pictures of Barry's Beautiful Baby").
Here's an example of how you can show an image in an HTML document.
<img src="images/baby-bess-bouncing-backwards.jpg">
Because images don't have closing tags, the HTML element is everything from
<img to the >. Tags that don't have closing tags are called empty
tags.
In some examples you find on the Internet, you are going to see empty tags with
a weird slash at the end like this.
<!-- This is bad code with the slash --> <img src="images/baby-bess-bouncing-backwards.jpg" />
That is OLD SYNTAX and should not be used unless you are working on an old
Web site where all of the empty elements have that syntax. (It is from an old
standard called "XHTML", an abomination if ever there was one on the face of the
World Wide Web.)
497.3. These things called "attributes"
Attributes are used to define additional information about an element. They are
located inside the opening tag, and usually come in name/value pairs (name=
“value”).
All HTML elements can have attributes, but for most elements, we only use them
when we need to. Attributes common to all HTML elements are the class and
id attributes that you can use to categorize and identify HTML elements in
your HTML document. Of course, the most common reason to use those is so that
you can write CSS to style those elements or write JavaScript to manipulate the
elements through the document object model.
You may have noticed that the previous example had a name-value pair in it. That
is an attribute. Here's the example, again, for convenience.
<img src="images/baby-bess-bouncing-backwards.jpg">
The attribute's name is "src" and the attribute's value is
"./images/baby-bess-bouncing-backwards.jpg". The "src" attribute provides the
additional information to the browser that this specific image's source file
can be found at that path.
There are three main guidelines for using attributes. They're not really rules.
However, you should follow them irrespective of the examples you see on the
Internet, especially some of the sludge found on Stack Overflow.
- Write attributes in lower case only. You can write them in upper case. HTML
tags and attributes are "case insensitive". So,<img src="images/...">is the same
to a browser as<IMG SRC="...">is the same as<Img Src="...">. Just use
lower case. Everybody else does it, too. Be cool. Stay in the lower-case HTML
school. - Put quotation marks around the value. This makes it easy to identify. In
some cases, you will find it necessary because you'll need to put a space in
the value of the attribute. - Those quotations marks, make them double quotes. HTML will take single
quotes as delimiters for attributes. Just don't do it. Double quotes are the
convention, even though you'll see plenty of people railing against the
convention, proclaiming "It doesn't matter! I like single quotes better!"
Let them do what they want. If you don't have any real compelling reason,
please use double quotes.
When you put together all of these guidelines, the general way an HTML element should
look is
<closeabletag attribute="value">Some content</closeabletag> <noclosetag attribute="value">
498. Whitespace, tags, attributes, and content
When a browser is parsing an HTML document, it ignores whitespace, including
line breaks, between the tag name and the attributes. So, the three element
declarations are considered the same to the browser. The whitespace that is
ignored is called negligible whitespace.
<tag attr1="value1" attr2="value2" attr3="really-long-attribute-value-that-is-really-long">content</tag> <tag attr1="value1" attr2="value2" attr3="really-long-attribute-value-that-is-really-long">content</tag> <tag attr1="value1" attr2="value2" attr3="really-long-attribute-value-that-is-really-long" >content</tag>
You cannot put space between the opening angle bracket and the tag name. This
is wrong HTML.
<!-- This is NOT HTML. --> < tag attr1="value">content</tag>
Whitespace between the opening tag and the closing tag is _part of the content
of the tag. So, the two elements in the following HTML snippet are not the same
because the second one has a line break and two spaces before the words and a
line break after the words. This kind of whitespace is called non-negligible
whitespace.
<tag attr1="value">Some content</tag> <tag attr1="value"> Some content </tag>
499. What you've learned
You've learned about the three components of HTML documents: tags, elements, and
attributes. You've learned about how to write them in the document. You've also
gone and read about some of the most commonly used elements. You also know about
how to add line breaks in-between attributes to make your document easier to
read.
[html]: https://developer.mozilla.org/en-US/docs/Web/HTML/Element/html
[head]: https://developer.mozilla.org/en-US/docs/Web/HTML/Element/head
[title]: https://developer.mozilla.org/en-US/docs/Web/HTML/Element/title
[link]: https://developer.mozilla.org/en-US/docs/Web/HTML/Element/link
[script]: https://developer.mozilla.org/en-US/docs/Web/HTML/Element/script
[Header tags]: https://developer.mozilla.org/en-US/docs/Web/HTML/Element/h1
[p]: https://developer.mozilla.org/en-US/docs/Web/HTML/Element/p
[ul]: https://developer.mozilla.org/en-US/docs/Web/HTML/Element/ul
[ol]: https://developer.mozilla.org/en-US/docs/Web/HTML/Element/ol
[li]: https://developer.mozilla.org/en-US/docs/Web/HTML/Element/li
[a]: https://developer.mozilla.org/en-US/docs/Web/HTML/Element/a
[img]: https://developer.mozilla.org/en-US/docs/Web/HTML/Element/img
[table]: https://developer.mozilla.org/en-US/docs/Web/HTML/Element/table
[thead]: https://developer.mozilla.org/en-US/docs/Web/HTML/Element/thead
[tbody]: https://developer.mozilla.org/en-US/docs/Web/HTML/Element/tbody
[tfoot]: https://developer.mozilla.org/en-US/docs/Web/HTML/Element/tfoot
[tr]: https://developer.mozilla.org/en-US/docs/Web/HTML/Element/tr
[th]: https://developer.mozilla.org/en-US/docs/Web/HTML/Element/th
[td]: https://developer.mozilla.org/en-US/docs/Web/HTML/Element/td
[article]: https://developer.mozilla.org/en-US/docs/Web/HTML/Element/article
[section]: https://developer.mozilla.org/en-US/docs/Web/HTML/Element/section
[main]: https://developer.mozilla.org/en-US/docs/Web/HTML/Element/main
[nav]: https://developer.mozilla.org/en-US/docs/Web/HTML/Element/nav
[header]: https://developer.mozilla.org/en-US/docs/Web/HTML/Element/header
[footer]: https://developer.mozilla.org/en-US/docs/Web/HTML/Element/footer
Walk-Through Building A Web Page
In this walk through, you are highly encouraged to open Visual Studio Code and
type along to familiarize (or continue to practice) creating HTML documents. You
are going to build your own HTML cheat sheet. You can come back and refer to it
if your forget how to add an image to an HTML document, or how to properly
structure tabular data.
Do not copy and paste. Really. Practice makes perfect. If you're still
fairly new to HTML, type it out so that you can get the hang of it. If you can
type HTML in your sleep, then this will take no time at all for you to complete.
Whatever skill level you are, make with the typing, friend.
The best way to learn the basics of programming is to think about what you're
doing while typing. Don't just copy. Copy and think! If you practice writing out
all your code now, before long you’ll be closing elements and using double
quotations without having to think about it. This will make things much easier
when the projects that you're expected to complete become more and more complex.
So, create a new directory, open Visual Studio Code to that directory, create a
file in it named "index.html", and open the HTML document in a browser. Now,
start with the...
500. Creating the basic HTML5 structure
On the first line of your HTML file, you want to tell the browser that your HTML
document will follow the rules of HTML Version 5 as opposed to HTML 4 or XHTML
or XML or whatever. To do that, the first line should read:
<!DOCTYPE html>
The DOCTYPE declaration officially tells the browser that you plan on using
HTML 5 in your document. Don't worry. If you mess up, the browser is very
forgiving. However, try not to mess up.
Now, you need to specify the root element of the HTML document, the html
element. All of the content of your HTML document will be the content of this
element.
<!DOCTYPE html> <html> </html>
The html element has two valid child elements, the head element and the
body element. Both of those tags are non-empty tags, which means they will
have both an open tag and a close tag. Generally, when you add a child element
to an existing element, you indent one level. By convention, indentation is
normally two or four spaces, depending on your team's preferences. Sometimes,
people use tabs instead of spaces. Relationships have [broken up over this
issue].
<!DOCTYPE html> <html> <head> </head> <body> </body> </html>
Finally, add an opening and closing title tag as a child of the head. Make
sure it has content reading "My HTML Cheat Sheet". That is the content that you
will see in the tab or the title bar of your browser. It can be (and is, in this
case) different from the name of your HTML file.
<!DOCTYPE html> <html> <head> <title>My HTML Cheat Sheet</title> </head> <body> </body> </html>
And, that is a valid, minimal HTML 5 document just waiting for some happy
content. (It is not the most minimal as pedants across the Internet will
happily tell you. Technically, the most minimal is
<!DOCTYPE html><title>.</title>. But, that's not really usable, now, is it?)
501. Add a style sheet to your HTML document
This isn't necessary. But, hey, no one likes looking at the ugly that is the
default browser settings. There are a whole lot of CSS modules and frameworks
out there for you to use and add to accelerate your Web page styling. Since this
walk through is primarily about HTML, you're asked to use a small CSS project
named Pure.css.
You do this using a link tag. The link tag is an empty tag, which
means
that it has no content and no end tag in its element. When you link another file
to this file, you have to specify the relation of the link using the "rel"
attribute. For stylesheets, you set the value of the "rel" attribute to
"stylesheet". Then you specify the URL of the linked file using the "href"
attribute. To link Pure.css, add the following.
<!DOCTYPE html> <html> <head> <title>My HTML Cheat Sheet</title> <link rel="stylesheet" href="https://unpkg.com/purecss@1.0.1/build/pure-min.css"> </head> <body> </body> </html>
It doesn't matter that this is the one you're using for this project. If you'd
like to try a different one, search for ["small css frameworks" using
DuckDuckGo] and choose one that shows up.
Document this as part of the body. Add a main element as a child to the
body. As the content of the main, add an h1 element with the content
"Linking a stylesheet". After it, add a p element with the content describing
what you just did.
<!DOCTYPE html> <html> <head> <title>My HTML Cheat Sheet</title> <link rel="stylesheet" href="https://unpkg.com/purecss@1.0.1/build/pure-min.css"> </head> <body> <main> <h1>Linking a stylesheet</h1> <p>Describe here what you just did to add a stylesheet to the page</p> </main> </body> </html>
The main element represents "the dominant content of the of a
document. The main content area consists of content that is directly related to
or expands upon the central topic of a document, or the central functionality of
an application." (from MDN)
502. Creating some lists
There are three types of lists in HTML: unordered lists (bullet lists),
ordered lists (numbered lists), and definition lists. Very few
programmers use definition lists, so you can investigate those on your own.
502.1. The unordered list
Create a new h1 element after the paragraph element containing the description
of how you added a stylesheet. Set it's content to "List-o-rama!". After that
element, create an unordered list element (ul). Add three list item
elements as children of the unordered list element and set the content to
"Lettuce", "Bananas", and "Jalapeños", respectively. Refresh your page to
see
your list.
<!DOCTYPE html> <html> <head> <title>My HTML Cheat Sheet</title> <link rel="stylesheet" href="https://unpkg.com/purecss@1.0.1/build/pure-min.css"> </head> <body> <main> <h1>Linking a stylesheet</h1> <p>Describe here what you just did to add a stylesheet to the page</p> <h1>List-o-rama!</h1> <ul> <li>Lettuce</li> <li>Bananas</li> <li>Jalapeños</li> </ul> </main> </body> </html>
Challenge: Change the type of bullets from circles to squares using an
attribute of the ul element.
502.2. The ordered list
After the unordered list element, add an ordered list (ol) element
with
three list item elements with the content "Have an idea", "Write an app",
"Profit!", respectively. Refresh your page and see the steps to success!
Note that the ordered list and the unordered list both use the common list
item element to provide the structure to each list. The browser then determines
to show each with either a bullet or a number depending on the type of enclosing
list.
<!DOCTYPE html> <html> <head> <title>My HTML Cheat Sheet</title> <link rel="stylesheet" href="https://unpkg.com/purecss@1.0.1/build/pure-min.css"> </head> <body> <main> <h1>Linking a stylesheet</h1> <p>Describe here what you just did to add a stylesheet to the page</p> <h1>List-o-rama!</h1> <ul> <li>Lettuce</li> <li>Bananas</li> <li>Jalapeños</li> </ul> <ol> <li>Have an idea</li> <li>Write an app</li> <li>Profit!</li> </ol> </main> </body> </html>
Challenge: Change the numbering type from numbers to lowercase Roman
numerals using an attribute of the ol element.
Challenge: Change the starting number of the ordered list from 1 to 10 using
an attribute of the ol element.
Challenge: Reverse the order of the numbers in the list using an attribute
of the ol element.
Add a paragraph element between the h1 and the ul. Describe what you did to
make your lists.
503. Now, you're going places!
People navigate between Web pages by clicking on links. Now, you think you'd use
the link element to do that. NOPE! SURPRISE! GOTCHA! That's not what you use.
Instead, you use an anchor element (a). According to HTML for Dummies,
"An anchor element is called an anchor because web designers can use it to
"anchor" a URL to some text on a web page."
The anchor element uses the same attributes as the link element, primarily
relying on the "href" attribute to point where the link goes. After the lists,
add a new h1 element that describes the section, add a paragraph that contains
some text about how links work, and then, in the paragraph, add an anchor
element with an "href" attribute that points to DuckDuckGo with the content "Go
to DuckDuckGo to search for more information."
<!DOCTYPE html> <html> <head> <title>My HTML Cheat Sheet</title> <link rel="stylesheet" href="https://unpkg.com/purecss@1.0.1/build/pure-min.css"> </head> <body> <main> <h1>Linking a stylesheet</h1> <p>Describe here what you just did to add a stylesheet to the page</p> <h1>List-o-rama!</h1> <ul> <li>Lettuce</li> <li>Bananas</li> <li>Jalapeños</li> </ul> <ol> <li>Have an idea</li> <li>Write an app</li> <li>Profit!</li> </ol> <h1>Anchors (which are really links)</h1> <p> Some text about anchor tags. <a href="https://duckduckgo.com"> Go to DuckDuckGo to search for more information. </a> </p> </main> </body> </html>
504. Wait. Sections!
That's right! HTML 5 introduced a new element called the section element!
You now have three sections on the page! Go put _section element_s around each
of the sections. Indent properly for human readability.
<!DOCTYPE html> <html> <head> <title>My HTML Cheat Sheet</title> <link rel="stylesheet" href="https://unpkg.com/purecss@1.0.1/build/pure-min.css"> </head> <body> <main> <section> <h1>Linking a stylesheet</h1> <p>Describe here what you just did to add a stylesheet to the page</p> </section> <section> <h1>List-o-rama!</h1> <ul> <li>Lettuce</li> <li>Bananas</li> <li>Jalapeños</li> </ul> <ol> <li>Have an idea</li> <li>Write an app</li> <li>Profit!</li> </ol> </section> <section> <h1>Anchors (which are really links)</h1> <p> Some text about anchor tags. <a href="https://duckduckgo.com"> Go to DuckDuckGo to search for more information. </a> </p> </section> </main> </body> </html>
When you refresh the page, you will notice that there is no difference to what
is shown. That's because section elements are about the structure of the
document. You can now look at this document and see that it has three
stand-alone sections to it and understand the content is independent of one
another. Structure is very important in HTML 5.
505. Add an image
Add a new section. Add a new header that labels this is the image section.
Add a paragraph. Now, in the paragraph, add an image element (img) that
has a source attribute named "src" to which you assign the URL of the image that
you want to see. Here's a list of URLs from which you can choose.
Cute kitty: http://images.freeimages.com/images/premium/large-thumbs/2582/25827620-itty-bitty-kitty.jpg
Cute hippo: https://www.babyanimalzoo.com/wp-content/uploads/2011/10/cute-baby-hippo-tortoise-friends-pic-150x150.jpg
Cute lemur: images/Lemur-5-150x150.jpg
<!DOCTYPE html> <html> <head> <title>My HTML Cheat Sheet</title> <link rel="stylesheet" href="https://unpkg.com/purecss@1.0.1/build/pure-min.css"> </head> <body> <main> <section> <h1>Linking a stylesheet</h1> <p>Describe here what you just did to add a stylesheet to the page</p> </section> <section> <h1>List-o-rama!</h1> <ul> <li>Lettuce</li> <li>Bananas</li> <li>Jalapeños</li> </ul> <ol> <li>Have an idea</li> <li>Write an app</li> <li>Profit!</li> </ol> </section> <section> <h1>Anchors (which are really links)</h1> <p> Some text about anchor tags. <a href="https://duckduckgo.com"> Go to DuckDuckGo to search for more information. </a> </p> </section> <section> <h1>Images</h1> <p> You can use the img tag to add images to your page. <img src="images/Lemur-5-150x150.jpg"> </p> </section> </main> </body> </html>
506. Adding tabular data
Add a new section. Add a new header that labels this is the table section.
Tables in HTML are great for displaying tabular data, such as an address book or
a list of product descriptions and prices. Although tables are good for keeping
things organized, tables should only be used for displaying data, not for
defining the layout of a page.
Creating tables can be a little confusing at first. The best way to learn tables
is to create an example.
You create a table using the <table> tag.
<table> </table>
If your table has a header, that is, rows that should be considered as the
column headers, you add a <thead>. Then you add a <tbody> which should
contain the data of your table. If your table has a footer, that is, rows that
summarize the tabular data, then you add a <tfoot>, too. Finally
<table> <thead> </thead> <tbody> </tbody> <tfoot> </tfoot> </table>
Now, add rows to the table, row by row, using the table row tag for each
row.
<table> <thead> <tr> </tr> </thead> <tbody> <tr> </tr> <tr> </tr> <tr> </tr> </tbody> <tfoot> <tr> </tr> </tfoot> </table>
In the rows, put <th> elements and signify that it is a column or row header
using the "scope" attribute. Put <td> to hold the data.
<table> <thead> <tr> <th scope="column">Insect</th> <th scope="column">Family</th> <th scope="column">Fact</th> </tr> </thead> <tbody> <tr> <th scope="row">Ladybug</th> <td>Coccinellidae</td> <td>Can eat more than 5,000 insects!</td> </tr> <tr> <th scope="row">Fruit flies</th> <td>Drosophilidae</td> <td>First living creatures in outer space!</td> </tr> <tr> <th scope="row">Caterpillars</th> <td>Heterobathmiidae</td> <td>Have 12 eyes!</td> </tr> </tbody> <tfoot> <tr> <td></td> <td>I had no idaes!</td> <td>Those are neat!</td> </tr> </tfoot> </table>
Just to make it pretty with the Pure.css on the page, add the classes
"pure-table" and "pure-table-striped" to the opening "table" tag.
<table class="pure-table pure-table-striped">
Add a paragraph and describe the structure of a table and how it works.
<!DOCTYPE html> <html> <head> <title>My HTML Cheat Sheet</title> <link rel="stylesheet" href="https://unpkg.com/purecss@1.0.1/build/pure-min.css"> </head> <body> <main> <section> <h1>Linking a stylesheet</h1> <p>Describe here what you just did to add a stylesheet to the page</p> </section> <section> <h1>List-o-rama!</h1> <ul> <li>Lettuce</li> <li>Bananas</li> <li>Jalapeños</li> </ul> <ol> <li>Have an idea</li> <li>Write an app</li> <li>Profit!</li> </ol> </section> <section> <h1>Anchors (which are really links)</h1> <p> Some text about anchor tags. <a href="https://duckduckgo.com"> Go to DuckDuckGo to search for more information. </a> </p> </section> <section> <h1>Images</h1> <p> You can use the img tag to add images to your page. <img src="http://wanderlord.com/wp-content/uploads/2015/11/Lemur-5-150x150.jpg"> </p> </section> <section> <h1>Tables</h1> <table> <thead> <tr> <th scope="column">Insect</th> <th scope="column">Family</th> <th scope="column">Fact</th> </tr> </thead> <tbody> <tr> <th scope="row">Ladybug</th> <td>Coccinellidae</td> <td>Can eat more than 5,000 insects!</td> </tr> <tr> <th scope="row">Fruit flies</th> <td>Drosophilidae</td> <td>First living creatures in outer space!</td> </tr> <tr> <th scope="row">Caterpillars</th> <td>Heterobathmiidae</td> <td>Have 12 eyes!</td> </tr> </tbody> <tfoot> <tr> <td></td> <td>I had no idaes!</td> <td>Those are neat!</td> </tr> </tfoot> </table> <p>Write some text about your experience with tables, here.</p> </section> </main> </body> </html>
507. Other content section tags
Here are some tags that you will definitely want to use in your own work.
However, there's not really a section on this page to use them, really. So, add
a new section, and add them and their summaries to a list or table of your cheat
sheet.
- [article] element
- [footer] element
- [header] element
- [nav] element
508. Forms
Please read the following articles on Mozilla Developer Network to give yourself
good exposure to forms. Add the forms that you build to one or more new sections
in this cheat sheet.
- [Your first form]
- [How to structure a web form]
- [The HTML5 input types]
- [Other form controls]
- [Client-side form validation]
509. What you've learned
You've learned how to create valid HTML 5 pages using structural and form
elements with client side validation. Moreover, using those elements, you
created a cheat sheet for yourself so that you can come back and refer to it as
you continue to grow familiar with how to wield HTML 5 as a markup language to
create compelling Web experiences!
[broken up over this issue]: https://www.youtube.com/watch?v=SsoOG6ZeyUI
Pure.css: https://purecss.io
["small css frameworks" using DuckDuckGo]: https://duckduckgo.com/?q=small+css+frameworks
[Your first form]: https://developer.mozilla.org/en-US/docs/Learn/Forms/Your_first_form
[How to structure a web form]: https://developer.mozilla.org/en-US/docs/Learn/Forms/How_to_structure_a_web_form
[The HTML5 input types]: https://developer.mozilla.org/en-US/docs/Learn/Forms/HTML5_input_types
[Other form controls]: https://developer.mozilla.org/en-US/docs/Learn/Forms/Other_form_controls
[Client-side form validation]: https://developer.mozilla.org/en-US/docs/Learn/Forms/Form_validation
[article]: https://developer.mozilla.org/en-US/docs/Web/HTML/Element/article
[footer]: https://developer.mozilla.org/en-US/docs/Web/HTML/Element/footer
[header]: https://developer.mozilla.org/en-US/docs/Web/HTML/Element/header
[nav]: https://developer.mozilla.org/en-US/docs/Web/HTML/Element/nav
Project: Trivia Game Three Ways
In this project, you are going to create a trivia game using the three
different asynchronous programming styles that you know: using callbacks, using
Promise objects, and using async and await. You will use jservice.xyz,
a data service that contains the data of over 6000 Jeopardy games.
You'll be using ES6 modules in this project. After you create your project
directory, don't forget to start a local HTTP server using python3 -m http.server and opening
your browser to http://localhost:8000 (or whatever the
correct port number is).
510. Create the HTML and CSS
Create the following files:
- game.js: This will be the entry point for your game.
- game.css: This will contain the CSS to make your HTML look good.
- index.html: This will contain the HTML for your game.
Create HTML that has the following structure inside a well-formed HTML document
that containshtml,head,title,body, andmainelements.
In thehead, add alinkelement that links in the CSS from Pure.css. Click
on the link to get the exact text for thelinkelement from the Pure Web site.
Also, use thelinkelement to include the "game.css" file. Use ascript
element to include the "game.js" file as an ES6 module.
In themainelement, add the following: - A
divelement with an "id" of "game-board" - Inside the "game-board" element
- Laid out in a row,
- A
buttonelement with an "id" of "use-callback" that reads "Use a
callback" and the class "pure-button" - A
buttonelement with an "id" of "use-promise" that reads "Use a
Promise" and the class "pure-button" - A
buttonelement with an "id" of "use-async-await" that reads "Use
async/await" and the class "pure-button"
- A
- A
divelement with an "id" of "score" - A
divelement with an "id" of "category-title" - A
divelement with an "id" of "question" - A
divelement with an "id" of "value" - A
divelement with an "id" of "invalid-count" - A
formelement with a class of "pure-form" and a child element of- A
textareaelement with an "id" of "player-response" and the class
"pure-input-1"
- A
- A
buttonelement with an "id" of "check-response" that reads "Check
response" and the class "pure-button" - A
divelement with an "id" of "answer"
Now, add the following to your CSS file
- Laid out in a row,
- A rule for the "body" element that sets the background color to "#DFDFDF"
- A rule for the element with the id of "game-board" that sets its "width" to
600px, its "margin" to "auto", its "padding" to "1em", and its background
color to "white" - A rule for the element with the id of "score" that sets its "font-size" to
"1.5em" and its "margin" to "1.25em 0" - A rule for the element with the id of "answer" that sets its "font-size" to
"1.5em" and its "margin" to "1.25em 0" - A rule for the element with the id of "value" that sets its "font-size" to
"1.25em" and its "margin" to "1.25em 0" - A rule for the element with the id of "category-title" that sets its
"font-size" to "1em" and its "margin" to "1.25em 0" - A rule for the element with the id of "invalid-count" that sets its
"font-size" to "1em" and its "margin" to "1.25em 0" - A rule for the element with the id of "question" that sets its "font-size" to
"1.25em" and its "margin" to "1.25em 0"
511. Using a callback
You will now use a callback to get a random clue from the data service. The
JSON string that will be returned will have the following structure when the
call succeeds.
{ "id": number, "answer": string, "question": string, "value": number, "categoryId": number, "category": { "id": number, "title": string }, "invalid_count"?: number }
Create a new file named "callback-version.js". Declare and export a function
named getClue with a single parameter that is a callback. This is going to use
the XMLHttpRequest object to get data from the jservice.xyz data service.
511.1. Using Callbacks and XMLHttpRequest
Back in the early 2000s, Microsoft released its Outlook for the Web Application,
otherwise called "OWA" by those that had to install, configure, and use it. It
was a beast. It was slow. It was hard to navigate. Then, Microsoft came up with
this great idea: what if we invent a way to make an HTTP request in the
browser without refreshing the page that the person is currently looking at?
What if we could have some kind of "background request"? And, because we love
this stuff called XML, we'll put that in the name! Even
though nowadays we
almost never use it to transfer XML, we almost exclusively use
JSON.
Hence, the XMLHttpRequest object was born into Microsoft Internet Explorer 5.5
and Web 2.0 was born.
This kind of object, the XMLHttpRequest object, it works exactly like the way
you'd expect software designed by C++ programmers in the early 2000s to design
anything: like yuck. Serious yuck. It performs an asynchronous HTTP request
and expects you to register callbacks to make it do its thing. Say you wanted to
get the forecast data for Linn, KS. Well, you'd want to issue an HTTP GET
request for the URL https://api.weather.gov/points/39.7456,-97.0892. To
do that
with XMLHttpRequest, it's a three step process:
- Create an instance of the
XMLHttpRequestclass - Add an event listener for the "readystatechange" event on the object
- In the event handler, check the
readyStateproperty to be equal to
XMLHttpRequest.DONE. If it's not, return. - If it is done, check the
statusproperty to make sure that its in the
range 200 - 299, the "good" range. If it's not, return. - Since everything is ok, do something with the content of the
responseText
property.
- In the event handler, check the
- Use the
openmethod to specify the method and the URL. This doesn't really
"open" anything. It's named that because it could open something. It
doesn't open something. It just registers the HTTP method and URL. - Use the
sendmethod to actually make the network request.
In code, that looks like this.
// Step 1 const xhr = new XMLHttpRequest(); // Step 2 xhr.addEventListener('readystatechange', () => { // Step 2.1 if (xhr.readyState !== XMLHttpRequest.DONE) return; // Step 2.2 if (xhr.status < 200 || xhr.status >= 300) return; // Step 2.3 const data = JSON.parse(xhr.responseText); console.log(data); }); // Step 3 xhr.open('GET', 'https://api.weather.gov/gridpoints/TOP/31,80/forecast'); // Step 4 xhr.send();
The order in which those actually execute are:
- Step 1
- Step 2
- Step 3
- Step 4
- Step 2.1 (more than once)
- Step 2.2
- Step 2.3
So, asynchronous programming with a callback. Ugly, asynchronous programming
with a callback. Ick. Guess what. Now you have to do your own version. Why?
Because the industry moves slowly and not everyone has adopted the Fetch API.
511.2. Back to the code
The function should take a callback function as its only parameter. Write code
in your getClue function that does the following.
Review the example at Getting
Started to see how to use an XMLHttpRequest
object.
- Create an instance of the
XMLHttpRequestclass using thenewoperator. - Add an event listener for the
"readystatechange"event on the object. In the
event listener do the following:- If the
readyStateproperty of the object created in step 1 is not equal
to the valueXMLHttpRequest.DONE, then return from the method. This
should look something like the following, assuming you named the object in
step 1 "xhr":
if (xhr.readyState !== XMLHttpRequest.DONE) return;
- If the
statusproperty of the object created in step 1 is not 200, then
something went awry. Call the callback function that is the argument to the
getCluefunction with the value of thestatusproperty. - If the
statusproperty of the object created in step 1 is 200, then all
is well and you got a clue back. Use theJSON.parsemethod to turn the
value in theresponseTextproperty of the object created in step 1 into
an object that contains the clue information. Call the callback method that
is the argument to thegetCluemethod withnullas the first parameter
and the deserialized object as the second.
- If the
- Use the
openmethod of the object created in step 1, passing in "GET" as the
first argument and "https://jservice.xyz/api/random-clue" as the second
argument. - Invoke the
sendmethod of the object created in step 1, giving no arguments.
In the "game.js" file, import thegetCluefunction (using ES6 import syntax)
from the "callback-version.js" file and alias it asgetClueFromCallback.
Create a click handler for the button with the id "use-callback". In that event
handler, call thegetClueFromCallbackfunction that you just imported,
providing a callback function that takes two arguments, the error status code as
the first parameter and the clue object as the second.
If the error status code is not null, then useconsole.errorto write the
error status code to the console.
Otherwise, set the content (innerHTML) of thedivelements with the
following ids to the values of the corresponding properties in the deserialized
object:
- #question
- #answer
- #value
- #categoryTitle
Hint: use
console.logto print out the clue object to see what it contains.
You can also use the Network tab in the Chrome developer tools to see the JSON
being returned.
For thedivwith the id "invalid-count", if the key
"invalid_count" exists on the clue object and is greater than zero, then set the
innerHTMLof "invalid-count" to "invalid". Otherwise, set it to "valid".
Please try to implement the above code from your understanding of how it should
work in addition to the description provided. If you find yourself struggling,
there is code at the bottom of this article that shows you what to do. DO NOT
COPY AND PASTE.
512. Using a Promise object with fetch
You will now use the "fetch API" built into the browsers to do the same
thing. Please refer to the documentation for the "fetch API" on MDN's Using
Fetch article.
Unlike Node.js you do not have to import any modules to use fetch in the
Browser, it's built in!
Create a new file named "promise-version.js". You will use the same HTTP method
and URL as you did in the previous section. The response object provided by
the Fetch API has a convenience property on it namedok. If that value is
true, then the HTTP request went okay and you can get the data from the
response. Otherwise, you'll want to indicate an error. Remember that the Fetch
API will not fail on HTTP status codes in the ranges of 400 - 499 and 500 -
- Instead, you will have to do make your own errors if
okisfalse.
Declare and export a function namedgetClue. In the function: - Use the
fetchmethod to make a "GET" request to
"https://jservice.xyz/api/random-clue". You will only need to pass in the URL
to thefetchmethod because, by default, it makes "GET" requests. - Chain a
thenmethod to thefetchinvocation. Thethenshould have a
function as its argument. The function will take a single parameter that
represents the response from the server. In the function:- If the
okvalue of the response object isfalse, throw a newError
object that you create using thestatusproperty of the response object
as the argument to theErrorconstructor. - If the
okvalue of the response object istrue, invoke thejson
method on the response object and return its return value which
automatically parses the data from server for you.
So why don't we just let
.catchhandle this you might be thinking? Well
if we get something like a 404 back, fetch does not throw an error.
Instead we'll blindly try to parse the 404 as if it's JSON. So we check
to make sure it'sok(a 200 status) and if it's not we manually throw
an error. - If the
- Return the object created by calling the
fetchmethod and itsthen
handler.
In the "game.js" file, import thegetCluefunction from the
"promise-version.js" file and alias it asgetClueFromPromise.
Create a click handler for the button with the id "use-promise". In that event
handler, call thegetClueFromPromisefunction that you just imported.
Chain athenhandler onto the function call which will receive the clue object
as it's parameter. In that function handler, set the content (innerHTML) of
thedivelements with the following ids to the values of the corresponding
properties in the deserialized object:
- #question
- #answer
- #value
- #categoryTitle
For thedivwith the id "invalid-count", if the key
"invalid_count" exists on the clue object and is greater than zero, then set the
innerHTMLof "invalid-count" to "invalid". Otherwise, set it to "valid".
After that, chain acatchhandler after thethenhandler. Have it print out
to the console themessageproperty of any error it gets.
You might notice this last step of setting theinnerHTMLof the elements is
the exact same thing we did forXMLHttpRequest!
Since we don't want to repeat ourselves, refactor this code into its own helper
function that extracts values from the clue object and sets the HTML elements
with those values. Then, in the two places where you get a clue object from the
different asynchronous methods, call that function.
The solution code is in the last sections of this page.
513. Using async and await
You will now use the "fetch API" built into the browsers to do the same
thing but you will use the "async/await" keywords in modern JavaScript.
Create a new file named "async-await-version.js". In it, declare and export an
async function named getClue using ES6 Module format.
(Yes, you can totally export an async function!)
In the function:
- Declare a constant named "response" and set it to the awaited value of the
proper call to fetch with the URL "https://jservice.xyz/api/random-clue". - If the response is not
ok, throw a newErrorobject that you create using
thestatusproperty of the response object as the argument to theError
constructor. - If the response is
ok, then return the awaited value of an invocation of
thejsonmethod of the response object.
In the "game.js" file, import thegetCluefunction from the
"async-await-version.js" file and alias it asgetClueFromAsyncFunction.
Create an async click handler for the button with the id "use-async-await".
Hint: you can even make arrow functions async by putting the
asynckeyword
in front of them! Fancy!
In that event handler, write atry/catchblock. In thetry, get the value
returned from awaiting thegetClueFromAsyncFunctionfunction.
Set the value to a variable named "clue". Pass that object into the function
that you refactored in the last step that takes clue objects and sets the
corresponding HTML elements to the appropriate property values.
In the catch block have it print out to the console the message property of any
error it gets.
514. Make it a game
Start off a player's score as zero. Hide the answer div by adding a CSS selector
named .is-hidden with a property display: none to your game.css file.
Set
the class is-hidden on the #answer and #check-response elements in your
index.html.
Add a click handler for #check-response. In that click handler, compare the
value the player typed into the textarea with the id player-response with
the innerHTML in the #answer element.
Hint: you might have to use the
trim()method on the strings to remove
leading and trailing spaces from the user's typed answer and maybe even the
answer divinnerHTML
If they're the same, add the value of the clue (from the#value) to the
player's score; otherwise, subtract the value of the clue from the player's
score.
Remove the "is-hidden" class from#answer. Add the "is-hidden" class to
#check-response.
After a player clicks one of the "Use a" buttons to get a clue and a clue is
returned, remove the "is-hidden" class from#check-responseand set the
valueof thetextareato an empty string to clear out the previous answer.
Also, add the "is-hidden" to#answerto hide the answer until after the player
checks their response. You can do this in your existing function which updates
the HTML when you load a new clue.
Hint: Another way to check the answer would be to create a global
currentCluevariable and set it with the current clue everytime you fetch a
new clue from the server. Then you'll be able to easily compare the current
clue with the players's answer from thetextarea
515. Bonus round: make a progressively enhanced application
Preserve the player's score between page refreshes.
Preserve the current clue between page refreshes. Try all three methods below
using the communication paradigm (Callback, Promise or, async/await) you like
most.
- Store just the id. Then, when the page loads, if the id exists in the local
storage, have it call "https://jservice.xyz/api/clues/:id" using a "GET" HTTP
method. Replace the ":id" in the URL with the id that you got from local
storage. - Store the entire clue data in local storage and just plop it into the HTML if
it exists. - Use progressive data display. Store the entire clue in local storage and put
it into the HTML when the page loads. Then, make an HTTP request to the URL in
step 1. When you get the data back, update what's in local storage and what
the player sees on the screen with the most recent data available.
516. Nightmare round: mark clues as invalid
Add three buttons to your form to mark the clue as invalid, one each that will
use XMLHttpRequest callbacks, Promise objects, and async/await methods.
Create methods in each of the communication modules to make an HTTP request with
a method of "DELETE" to the URL "https://jservice.xyz/api/clues/:id" where ":id"
is replaced with the value of the id of the current clue.
517. Nightmare round: create new clues
Add a form that lets you add clues to the service using the "POST" method of the
URL "https://jservice.xyz/api/clues". Create a form that
allows a person to put
in an answer, a question, a value, and the id of a category (number). When They
click a button, read that information from the form elements, create an object
with the following key/value pairs, and submit it using the "POST" to the
indicated URL.
{ "answer": string, "question": string, "value": number, "categoryId": number }
If everything works, you should get back a "201 Created" with the content of the
newly-created question. You should then display it as the current question. Do
this for all three types of communication paradigms, as well: XMLHttpRequest
callbacks, Promise objects, and async/await methods.
518. Code samples
These are provided as references as you work through the project. Please try to
solve the problems yourself before using these code examples. They do not show
you the answers for the bonus or nightmare rounds.
518.1. Using a callback
// callback-version.js export function getClue(callback) { const xhr = new XMLHttpRequest(); xhr.addEventListener('readystatechange', () => { if (xhr.readyState !== XMLHttpRequest.DONE) return; if (xhr.status !== 200) { callback(xhr.status); } else { const clue = JSON.parse(xhr.responseText); callback(null, clue); } }); xhr.open('GET', 'https://jservice.xyz/api/random-clue'); xhr.send(); }
// game.js import { getClue as getClueFromCallback } from './callback-version.js' document .getElementById('use-callback') .addEventListener('click', () => { getClueFromCallback((err, clue) => { if (err !== null) return console.error(err); document.getElementById('answer').innerHTML = clue.answer; document.getElementById('value').innerHTML = clue.value; document.getElementById('category-title').innerHTML = clue.category.title; document.getElementById('invalid-count').innerHTML = clue.invalid_count; document.getElementById('question').innerHTML = clue.question; }); });
518.2. Using a Promise
// promise-version.js export function getClue() { return fetch('https://jservice.xyz/api/random-clue') .then(response => { if (!response.ok) throw new Error(response.status); return response.json(); }); }
// game.js import { getClue as getClueFromCallback } from './callback-version.js'; import { getClue as getClueFromPromise } from './promise-version.js'; function setHtmlFromClue(clue) { document.getElementById('answer').innerHTML = clue.answer; document.getElementById('value').innerHTML = clue.value; document.getElementById('category-title').innerHTML = clue.category.title; document.getElementById('question').innerHTML = clue.question; let validity = 'valid'; if (clue.invalid_count && clue.invalid_count > 0) { validity = 'invalid'; } document.getElementById('invalid-count').innerHTML = validity; } document .getElementById('use-callback') .addEventListener('click', () => { getClueFromCallback((err, clue) => { if (err !== null) return console.error(err); setHtmlFromClue(clue); }); }); document .getElementById('use-promise') .addEventListener('click', () => { getClueFromPromise() .then(clue => setHtmlFromClue(clue)) .catch(err => console.error(err.message)); // Could also be the following code. Why? // getClueFromPromise() // .then(setHtmlFromClue) // .catch(err => console.error(err.message)); });
518.3. Using async/await
// async-await-version.js export async function getClue() { const response = await fetch("https://jservice.xyz/api/random-clue"); if (!response.ok) throw new Error(response.status); return await response.json(); }
// game.js import { getClue as getClueFromCallback } from './callback-version.js'; import { getClue as getClueFromPromise } from './promise-version.js'; import { getClue as getClueFromAsyncFunction } from './async-await-version.js'; function setHtmlFromClue(clue) { document.getElementById('answer').innerHTML = clue.answer; document.getElementById('value').innerHTML = clue.value; document.getElementById('category-title').innerHTML = clue.category.title; document.getElementById('question').innerHTML = clue.question; let validity = 'valid'; if (clue.invalid_count && clue.invalid_count > 0) { validity = 'invalid'; } document.getElementById('invalid-count').innerHTML = validity; } document .getElementById('use-callback') .addEventListener('click', () => { getClueFromCallback((err, clue) => { if (err !== null) return console.error(err); setHtmlFromClue(clue); }); }); document .getElementById('use-promise') .addEventListener('click', () => { getClueFromPromise() .then(clue => setHtmlFromClue(clue)) .catch(err => console.error(err.message)); }); document .getElementById('use-async-await') .addEventListener('click', async () => { try { const clue = await getClueFromAsyncFunction(); setHtmlFromClue(clue); } catch (e) { console.error(e.message); } });
WEEK-06 DAY-4
Unit Testing - Day 1
Testing Learning Objectives
The objective of this lesson is to ensure that you understand the
fundamentals of testing and are capable of reading and solving specs. This
lesson is relevant to you because good testing is one of the foundations of
being a good developer.
When you finish, you should be able to:
- Explain the "red-green-refactor" loop of test-driven development.
- Identify the definitions of SyntaxError, ReferenceError, and TypeError
- Create, modify, and get to pass a suite of Mocha tests
- Use Chai to structure your tests using behavior-driven development principles.
- Use the pre- and post-test hooks provided by Mocha
fundamentals of testing and are capable of reading and solving specs. This
lesson is relevant to you because good testing is one of the foundations of
being a good developer.
When you finish, you should be able to: - Explain the "red-green-refactor" loop of test-driven development.
- Identify the definitions of SyntaxError, ReferenceError, and TypeError
- Create, modify, and get to pass a suite of Mocha tests
- Use Chai to structure your tests using behavior-driven development principles.
- Use the pre- and post-test hooks provided by Mocha
All About Testing!
In your daily life you have encountered tests before - though school, work, or
even through trivia, a test is a way to ensure something is correct. In your
programming careers so far you've tested most of your work by hand. Testing one
function at a time can be tedious, repetitive, and worst of all, it is a method
vulnerable to both false positives and false negatives.
Let's talk about automated testing - the how, the what, and most importantly
the why. The general idea across all testing frameworks is to allow
developers to write code that would specify the behavior of a function or module
or class. We've reached a point in software development where developers can now
run test code against their application code and have confidence that their code
will work as intended.
When you finish this reading you should be able to paraphrase the how and why we
test as well as how to read automated tests without necessarily knowing the
syntax.
519. Why do we test?
Yes, making sure the dang thing actually works is important. But beyond the
obvious, why take the time to write tests?
- To make sure the dang thing works
Yes, that's obvious, but dagnabit, it's important! - Increase flexibility & reduce fear (of code)
You've written a whole bunch of functionality, multiple other developers have
worked on the code, you're deep into the project... And then you realize you
have to refactor big chunks of it. Without automated tests, you'll be walking
on eggshells, frightened of the codebase and the various landmines that are
surely lying in wait.
With tests, you can aggressively refactor with confidence. If anything breaks,
you'll know. And you'll know exactly what the expectations are for the module
you're refactoring, so as long as it meets the specs, you're good.
When you are writing automated tests for an application you are writing the
specfications of how that application should behave. In the software
industry automated tests are often called "specs", which is short for the word
"specification".
- Make collaboration easier
Complex applications are built by teams of developers. It may be that not all
those developers will actually get the chance to talk to one another (they're
busy, they may live in different places, some of them may have left the
company, new people just joined, it's a huge project, etc.).
Specs allow teams to have confidence that each module performs a specific task
and reduces the need for expensive coordination. The specs themselves become
an effective form of communication. - Produce documentation
If the tests are written well, the tests can serve as documentation for the
codebase. Need to know what such and such module does? Check out the specs.
This is related to easing collaboration.
520. How we Test
520.1. Testing frameworks vs Assertion libraries
An important distinction to understand is the difference between a testing
framework and an assertion library. The job of a testing framework is to
run tests and present them to a user. An assertion library is the backbone
of any written test - it is the code that we use to write our tests.
Assertion libraries will do the heavy lifting of comparing and verifying our
code. Some testing frameworks will have built in assertion libraries, others
will need you to import an assertion library to use.
520.2. Mocha
[Mocha][mocha-docs] is a JavaScript testing framework that specializes in
running tests and presenting them in an organized user friendly way. The
Mocha testing framework is widely used because of it's flexibility. Mocha
supports a whole variety of different assertion libraries and DSL interfaces for
writing tests in the way the best suites the developer.
When writing tests with Mocha we will be using Mocha's [DSL][dsl-wiki] (Domain
Specific Language). A Domain Specific Language refers to a computer language
specialized for a particular purpose - in Mocha's case the DSL has been
engineered for providing structure for writing tests. A DSL is it's own language
that will usually be familiar but syntactically a little different from the
languages you know. That being said you don't have to worry about memorizing
every single piece of syntax for writing tests - just get a good grasp of the
basics of testing and use the documentation to fill in any knowledge gaps.
You've seen what Mocha looks like already because all the specs for your
assessments and projects so far have been written utilizing Mocha as the
testing framework.
We'll be talking more about different assertion libraries a little later when we
talk about writing tests.
[dsl-wiki]: https://en.wikipedia.org/wiki/Domain-specific_language
[mocha-docs]: https://mochajs.org/#getting-started
521. What do we test?
So now that we talked about why we test and what we use to test...what exactly
do we test?
521.1. Test the public interface
When you're trying to figure out what you should be testing, ask yourself, "What
is (or will be) the public interface of the module or class I'm writing?" That
is, what are the functions that the outside world will have access to and rely
on?
Ideally, you'd have thorough test coverage on the entire public interface. When
that's not possible, ensure that your tests cover the most important and/or
complex parts of that interface - that is, the pieces that you need to make sure
work as intended (and expected).
Kent Dodds has a [great article][testing-art] on how to identify what you should
be testing.
[testing-art]: https://kentcdodds.com/blog/how-to-know-what-to-test
521.2. The testing pyramid
A common metaphor used to group software tests into separate levels of testing
is the testing pyramid.
![test-pry][test-pry]
Let's quickly go over each level before talking about the pyramid as a whole:
- Unit Tests: The smallest unit of testing - used to test the smallest
pieces of your application in isolation to ensure each piece works before you
attempt to put those pieces together. Each unit test should focus on testing
one thing. These are generally the fastest tests to write and run. - Integration Tests: Once you have your unit tests in place you know each
piece works in isolation - but what about when those pieces interact with each
other? Integration tests are the next level up, they will test the
interactions between two pieces of your application. Integration tests will
ensure the units you've written work coherently together. - End-to-End (E2E) Tests: End-to-end tests are the highest level of
testing - these will test the whole of your application. End-to-end tests are
the closest automated tests come to testing the an actual user experience of
your application. These are generally the slowest tests to write and run.
For a real life example of how you'd utilize each of these tests imagine coding
a Chess game and wanting to test it. Unit tests would be best for testing each
class your wrote in isolation - like ensuring each piece's instance methods work
as you expect them to before involving them with any other pieces. Next you'd
write integration tests - so you'd want to ensure that each piece instance
interacted correctly with theBoardclass. The final level would be End-to-End
tests which would be like testing a round of chess - testing theBoard,
Game, andPiececlasses all working together.
According to the testing pyramid - you want to have a solid base of a lot of
Unit tests, then a medium amount of integration tests built upon that base, then
finally a smaller amount of End-to-End tests. Writing tests in this way is
practical for a couple of reasons. As we said before, unit tests ensure each
piece of your application works in isolation - if you know each piece works then
you can more easily find errors. Unit tests are also fast. The bigger your
application gets the longer your testing suite will take to run - if all your
tests are end-to-end tests your tests could be running for hours.
Here is a great blog from google about why they use the [testing
pyramid][google-test].
[test-pry]:
https://2.bp.blogspot.com/-YTzv_O4TnkA/VTgexlumP1I/AAAAAAAAAJ8/57-rnwyvP6g/s1600/image02.png
[google-test]:
https://testing.googleblog.com/2015/04/just-say-no-to-more-end-to-end-tests.html
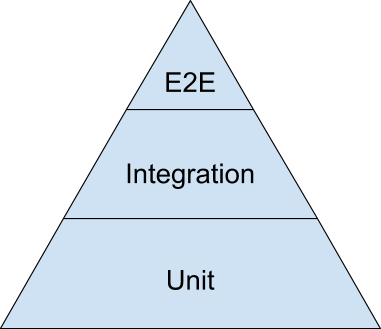
522. Reading Tests
No matter what kind of test you are encountering the most important thing about
a test is that it is readable and understandable. Good tests use
descriptive strings to enumerate what they are testing as well as how they are
testing it.
We'll be diving more into the actual syntax of writing tests soon but for right
now let's see what you can glean without knowing the syntax:
describe("avgValue()", function() { it("should return the average of an array of numbers", function() { assert.equal(avgValue([10, 20]), 15); }); });
So without knowing the specfic syntax we can tell a few things from the outset -
the outer function has a string with the name of a function avgValue() which
is most likely the function we will be testing. Next we see a description string
should return the average of an array of numbers.
So even without understanding the syntax for the test above we can tell what
we are testing - the avgValue function, and how we are testing it -
should return the average of an array of numbers.
Being able to read tests is an important skill. You'll sometimes find yourself
working with unfamiliar testing libraries, but if the test is well written you
should be able to determine what the test is doing regardless of the syntax it
uses.
Below we've re-written the above example using the Ruby language testing library
RSpec:
describe "avg_value" do it "should return the average of an array of numbers" do expect(avg_value([10, 20])).to eq(15) end end
Now you probably don't know Ruby - but using the same methods of deduction as we
used above we can figure out what is being testing in the above snippet. The
outer block mentions avg_value which is probably the method or function being
tested and the inner block says how things are being tested -
"should return the average of an array of numbers". Without knowing the
language, or the testing library, we can still figure out generally what what is
being tested. That is the important thing about reading tests - having the
patience to parse the information before you.
523. What you learned
We covered a high level overview of testing - the why, the what and the
how of testing as well as the basics of how to read a test regardless of the
syntax used in writing that test.
Test-Driven Development
At this point of the course you have all encountered an automated test also
known as a "spec" - short for specification. In software engineering a
collection of automated tests, also known as test suites, are a common way to
ensure that when a piece of code is run it will perform the minimum of a
specified set of behaviors. We've used the JavaScript testing framework, Mocha,
up to this point to test the behavior of functions of all kinds from myForEach
to avgValue to ensure each function runs as intended.
The main question we should be able to answer when writing any piece of code is:
what does this code do? How should this code behave? One of the popular ways to
answer this question is through a software development process called
Test-driven development or TDD. TDD is a quick repetitive cycle that revolves
around first determining what a piece of code should do and writing tests for
that behavior before actually writing any code.
Test-driven development dictates that tests, not application code, should be
written first, and then application code should only be written to pass the
already written tests. When you finish this reading you should be able to
identify the three steps of Test Driven Development as well as identify the
advantages of using TDD to write code.
524. Motivations for TDD
Imagine being handed a file of 10 functions that all invoke each other and being
told to add a new function to the mix and ensure all the previous functions work
properly. First you'd have to figure out what each function actually did, then
determine if they did what they were supposed to do. Sounds like a total pain
right? A modern web application is thousands of lines of code that are worked on
and maintained by teams of developers. Using TDD is one way for developers to
ensure that the code written by every member of their team is testable and
modular.
Here are some of the biggest motivations for why developers use test-driven
development:
- Writing tests before code ensures that the code written works.
- Code written to pass specs is guaranteed to be testable.
- Code with pre-written tests easily allows other developers to add and test
new code while ensuring nothing else breaks along the way.
- Only required code is written.
- In the face of having to write tests for every piece of added functionality
TDD can help reduce bloated un-needed functionality. - TDD and YAGNI ("you ain't gonna need it") go hand in hand!
- In the face of having to write tests for every piece of added functionality
- TDD helps enforce code modularity.
- A TDD developer is forced to think about their application in small,
testable chunks - this ensures the developer will write each chunk to be
modular and capable of individual testing.
- A TDD developer is forced to think about their application in small,
- Better understanding of what the code should be doing.
- Writing tests for a piece of code ensures that the developer writing that
code knows what the piece of code is trying to achieve.
Now that we've covered why developers would want to use TDD let's go into how
to do TDD.
- Writing tests for a piece of code ensures that the developer writing that
525. The three steps of TDD: red, green, refactor!
![tdd-cycle][rgr]
The Test-driven development workflow can be broken down intro three simple
steps. Red, Green, Refactor:
- Red: Write the tests and watch them fail (a failing test is red). It's
important to ensure the tests initially fail so that you don't have false
positives. - Green: Write the minimum amount of code to ensure the tests pass (a
passing test will be green). - Refactor: Refactor the code you just wrote. Your job is not over when the
tests pass! One of the most important things you do as a software developer
is to ensure the code you write is easy to maintain and read.
Generally, the TDD workflow loop of Red, Green, Refactor is quick. TDD
developers will write small tests ensuring each individual part of their
application works properly and their code looks good before moving on - making
for a short development cycle.
[rgr]:
https://appacademy-open-assets.s3-us-west-1.amazonaws.com/Module-JavaScript/testing/assets/rgr.png
526. What you learned
TDD stands for test-driven development. TDD is a repetitive process that
revolves around three steps: Red, Green, Refactor.
A Comedy of Errors in JavaScript
You know that feeling when you've just finished your perfect function then you
go to run your code and: BAM! A big error is thrown? We all have felt that pain
from the starting student to the experienced engineer. Runtime errors are a part
of daily life when writing code. It is now time to dive into what each type of
error you encounter means in order to more quickly and efficiently fix the
problem that created that error.
When you finish this reading you should be able to: identify the difference
between SyntaxError, ReferenceError, and TypeErrors as well as create
and
throw new errors.
527. JavaScript Errors
In JavaScript the Error constructor function is responsible for creating
different instances of Error objects. The Error object is how JavaScript
deals with runtime errors and the type of error created and thrown will
attempt to communicate why that error occurred.
[error-docs]:
https://developer.mozilla.org/en-US/docs/Web/JavaScript/Reference/Global_Objects/Error
527.1. Creating your own errors
Since the [Error][error-docs] constructor is just a constructor function we
can use it to create new Error object instances with the following syntax:
new Error([message[, fileName[, lineNumber]]])
As seen above you can optionally supply a message, fileName and
lineNumber
where the error occurred. The Error constructor is also somewhat unique in
that you can call it with or without the new keyword and it will return a new
Error object:
const first = Error("I am an error object!"); const second = new Error("I am too an error object!"); console.log(first); // Error: I am an error object! console.log(second); // Error: I am too an error object!
Let's take a look at what we can do with our newly created Error objects.
527.2. Throwing your own errors
Tired of JavaScript being the only one to throw errors? Well you can too! Using
the keyword throw you can throw your own runtime errors that will stop program
execution.
Let's take a look at the syntax for throw:
function giveMeNumber(num) { if (typeof num !== "number") { throw new Error("Give me a number!"); } else { return "yay number!"; } } console.log(giveMeNumber(1)); // prints "yay number!"; console.log(giveMeNumber("apple")); // Uncaught Error: Give me a number! console.log(giveMeNumber(1)); // doesn't get run
Now as we can see in the above example throwing an error is a powerful tool that
stops program execution. If we wanted to throw an error without stopping
program execution we can use a try...catch block.
Let's look at the syntax for using the try...catch block syntax:
try { // statements that will be attempted to here } catch (error) { // if an error is thrown it will be "caught" // allowing the program to continue execution // these statements will be run and the program will continue! }
We normally use try...catch blocks with functions that might throw an error.
Let's look at an example where an error will not be thrown:
function safeDivide(a, b) { if (b === 0) { throw new Error("cannot divide by zero"); } else { return a / b; } } try { console.log(safeDivide(30, 5)); // prints 6 } catch (error) { console.error(error.name + ": " + error.message); } console.log("hello"); // prints hello
Note: We can use console.error instead of console.log to make
logged
errors more noticeable.
Above you can see our safeDivide function ran as expected. Now let's see what
happens when an error will be thrown and caught inside a try...catch
block:
function safeDivide(a, b) { if (b === 0) { throw new Error("cannot divide by zero"); } else { return a / b; } } try { console.log(safeDivide(30, 0)); } catch (error) { console.error(error.name + ": " + error.message); // Error: cannot divide by zero } // the above error will be caught allowing our program to continue! console.log("hello"); // prints "hello"
Those are the basics of creating and throwing your own errors. You can throw
your newly created Error to stop program execution or use a try...catch
block to catch your error and continue running your code. Now that we've learned
how to create new errors let's go over the core errors built into JavaScript and
what they signify.
528. Types of JavaScript errors
There are seven core errors you'll encounter in JavaScript and each type of
error will try to communicate why that error occurred:
SyntaxError- represents an error in the syntax of the code.ReferenceError- represents an error thrown when an invalid reference is
made.TypeError- represents an error when a variable or parameter is not of a
valid type.RangeError- representing an error for when a numeric variable or parameter
is outside of its valid range.InternalError- represents an error in the internal JavaScript engine.EvalError- represents an error with the globalevalfunction.URIError- represents an error that occurs whenencodeURI()or
decodeURI()are passed invalid parameters.
For this reading we'll be going in depth of the three most common errors you
have encountered so far:SyntaxError,ReferenceError, andTypeError.
528.1. SyntaxError
A SyntaxError is thrown when the JavaScript engine attempts to parse code that
does not conform to the syntax of the JavaScript language. When learning the
JavaScript language this error is a constant companion for any missing } or
misspelled function keywords.
Let's look at a piece of code that would throw a syntax error:
funtion broken () { // Uncaught SyntaxError: Unexpected identifier console.log("I'm broke") }
Another example with an extra curly brace }:
function broken () { // Uncaught SyntaxError: Unexpected identifier console.log("I'm broke") }} // Uncaught SyntaxError: Unexpected token '}'
The examples go on and on - you can count on a SyntaxError to be thrown
whenever you attempt to run code that is not syntactically correct JavaScript.
Important! One thing to note about Syntax Errors is that many of them can't be caught using
try catch blocks.
For instance, the following code will throw a SyntaxError and no matter how hard you try, you
can't catch it.
try { if (true { // throws "SyntaxError: Unexpected token '{'" console.log("SyntaxErrors are the worst!"); } } catch (e) { console.log(e); }
The missing parenthesis after true will throw a SyntaxError but can't be caught by
the catch block.
This is because this kind of SyntaxError happens at compile time not run time. Any
errors that happen at compile time can't be caught using try catch blocks.
528.2. ReferenceError
Straight from the MDN
docs: "The ReferenceError object
represents an error when a non-existent variable is referenced." This is the
error that you'll encounter when attempting to reference a variable that does
not exist (either within your current scope or at all).
Let's take a took at some examples for the causes of this error. One common
cause for this error is misspelling a variable name:
function callPuppy() { const puppy = "puppy"; console.log(pupy); } callPuppy(); // ReferenceError: pupy is not defined
Another common cause for a thrown ReferenceError is attempting to access a
variable that is not in scope:
function callPuppy() { const puppy = "puppy"; } console.log(puppy); // ReferenceError: puppy is not defined
The aptly named ReferenceError will be thrown whenever you attempt to
reference a variable that doesn't exist.
528.3. TypeError
A TypeError is commonly thrown for a couple of reasons:
- When an operation cannot be performed because the operand is a value of the
wrong type. - When you are attempting to modify a value that cannot be changed.
Let's look at a couple of examples that will each throw aTypeErrorfor a
different reason. Below we are attempting an operation (in this case a function
call) on a value of the wrong type:
let dog; // Remember unassigned variables are undefined! dog(); // TypeError: dog is not a function
In the above example we attempt to invoke a declared but not assigned variable
(which will evaluate to undefined). This will cause a TypeError because
undefined cannot be invoked - it is the wrong type.
Next let's look at a example of attempting to change a value that cannot be
changed:
const puppy = "puppy"; puppy = "apple"; // TypeError: Assignment to constant variable.
Attempting te reassign a const declared variable will result in a TypeError.
You've probably run into many other examples of TypeError yourself but, the
most important thing to know is that a TypeError is thrown when you attempting
to perform an operation on the wrong type of value.
528.4. Catching known errors
Now that we've covered the the names of common JavaScript errors as well as how
to use a try...catch block we can combine these two ideas to catch specific
types of errors using instanceof:
function callThatArg(arg) { arg(); // this will cause a TypeError because callThatArg is being passed a number } try { callThatArg(42); console.log("call successful"); // this line never executes } catch (error) { if (error instanceof TypeError) { console.error(`Wrong Type: ${error.message}`); // prints: Wrong Type: arg is not a function } else { console.error(error.message); // prints out any errors that aren't TypeErrors; } } console.log("done"); // prints: done
529. What you learned
If you read an error and know why that error is being thrown it'll be much
easier to find the cause of the problem! In this reading we went over how to
create and throw new Error objects as well as the definitions for some of the
most common types of errors: SyntaxError, ReferenceError, and TypeErrors.
Practice: Writing Tests
For weeks you have been using one of JavaScript's most popular test frameworks,
Mocha, to run tests that ensure a function you've written works as expected.
It's time to dive deeper into how to write our own tests using Mocha as
our test framework coupled with Assertion libraries such as the built-in
Assert module of Node or the Chai library.
For the rest of the readings in this section we will be covering how to write
tests. These readings will be done in the style of a code-along demo so make
sure you follow these in order. When you have finished the next series of
reading you should know how to:
- properly format and denote your mocha tests using
describe,contextand
itblocks - write tests for individual functions as well as writing tests for class
instance and static methods - test that functions will throw certain errors
- use
chai-spiesto test how many times a function has been called - recognize and utilize the Mocha hooks:
before,beforeEach,after, and
afterEach
In this reading we'll be covering: - the file structure of testing with
Mocha - testing with
Mochaand Node's built-inAssertmodule
530. Part Zero: Testing file structure
We find that reading about testing is best understood when you can play around
within the functions being tested so for that reason this reading will be in the
style of a code along demo. We started this reading by created a directory
called testing-demo where all the code within this reading will be written.
Let's start off with how to write tests for a basic function. Say we've been
handed a directory with a function to test problems/reverse-string.js. Below
is the named function we'll be testing, reverseString, which will intake a
string argument and then reverse it:
// in testing-demo/problems/reverse-string.js const reverseString = str => { // throws a specific error unless the the incoming arg is a string if (typeof str !== "string") { throw new TypeError("this function only accepts string args"); } return str .split("") .reverse() .join(""); }; // note this function is being exported! module.exports = reverseString;
How would you go about testing the above function? Let's start by setting up our
file system correctly. Whenever you are running tests with Mocha the important
thing to know is that the Mocha CLI will automatically be looking for a
directory named test.
The created test directory's file structure should mirror that of the files
you intend to test - with each test file appending the word "spec" to the end of
the file name. So for the above example we would create
test/reverse-string-spec.js which should be on the same level as the
problems directory.
Our file structure should look like this:
testing-demo
└──
problems
└── reverse-string.js
test
└── reverse-string-spec.js
Take a moment to ensure your file structure looks like the one above and that
you've copied and pasted the reverseString function into the
reverse-string.js file. Now that we've ensured our file structure is correct
let's write some tests!
531. Part One: Writing tests with Mocha and Assert
The first step in any testing workflow is initializing our test file. Now let's
make a clear distinction before moving forward - Mocha is a test framework
that specializes in running tests and presenting them in an organized user
friendly way. The code responsible for actually verifying things for us will
come from using an Assertion Library. Assertion Libraries will do the heavy
lifting of comparing and verifying code while Mocha will run those tests and
then present them to us.
The tests we'll be writing for this next section will use Node's built-in
Assert module as our Assertion Library.
So inside of test/reverse-string-spec.js at the top of the file we will
require the assert module and the function we intend to test:
const assert = require("assert"); // this is a relative path to the function's location const reverseString = require("../problems/reverse-string.js");
Take a moment to open up the [Mocha][mocha-docs] documentation - it will come
in handy as a reference for the syntax we'll be using. The Mocha DSL (Domain
Specific Language) comes with a few different interfaces or "flavors" of their
DSL for our purposes we'll be structuring our tests using the [BDD
interface][bdd-docs].
The describe function is an organizational function that accepts a descriptive
string and a callback. We'll use the describe function to describe what we
will be testing - in this case the reverseString function:
// test/reverse-string-spec.js const assert = require("assert"); const reverseString = require("../problems/reverse-string.js"); describe("reverseString()", function() {});
The callback handed to the describe function will be where we insert our
actual tests. We can now use the it function - the it function is an
organizational function we will use to wrap around each test we write. The it
function accepts a descriptive string and callback to set up our test:
describe ('reverseString()', function () { it('should reverse the input string', function () { // a test will go here! }) }
The code written above will serve as a great template for future tests we wish
to write. Finally, we can insert the actual test we intend to write within the
callback handed to the it function. We'll use the
[assert.strictEqual][assert-equal] function which allows you to compare one
value with another value. We'll use assert.strictEqual to compare two
strings - one from our function's result and our expected result which we will
we define ourselves:
// remember we required the assert module at the top of this file describe("reverseString()", function() { it("should reverse the input string", function() { let test = reverseString("hello"); let result = "olleh"; // the line below is where the actual test is! assert.strictEqual(test, result); }); });
Now if we run mocha in the upper most testing-demo directory we will see:
reverseString() ✓ should reverse the input string 1 passing (5ms)
We now have a working spec! Take notice of how Mocha structures its response
in exactly the way we nested our test. The outer describe function's message
of reverseString() is on the upper level and the inner it function's message
of should reverse the input string is nested within.
Strictly speaking we aren't required to nest our it functions within
describe functions but it is best practice to do so. As you can see yourself -
it will make your tests a lot easier to read!
Let's add one more spec for reverseString, we'll do this by adding another
it function within the describe callback:
describe("reverseString()", function() { it("should reverse the input string", function() { let test = reverseString("hello"); let result = "olleh"; assert.strictEqual(test, result); }); it("should reverse the input string and output the same capitalization", function() { let test = reverseString("Apple"); let result = "elppA"; assert.strictEqual(test, result); }); });
Running the mocha command again will return:
reverseString() ✓ should reverse the input string ✓ should reverse the input string and output the same capitalization 2 passing (11ms)
Looking good so far - head to the next reading to learn how to test errors.
[assert-throw]:
https://nodejs.org/api/assert.html#assert_assert_strictequal_actual_expected_message
[mocha-docs]: https://mochajs.org/#getting-started
[bdd-docs]: https://mochajs.org/#bdd
[assert-equal]:
https://nodejs.org/api/assert.html#assert_assert_equal_actual_expected_message
[assert-docs]: https://nodejs.org/api/assert.html#assert_assert
Writing Tests
In this reading we'll be covering:
- how to test errors using
MochaandAssert - test organization using
contextfunctions
532. Part Two: Testing errors
Let's jump right in where we left off! We've written a couple of nice unit
tests - ensuring that this function works in isolation by testing the input we
provided matches the expected output. One aspect of this function is not yet
being tested - the error thrown when the argument is not of type String:
// str is the passed in parameter if (typeof str !== "string") { throw new TypeError("this function only accepts string args"); }
532.1. Organizing tests
Now the above error actually sets up two different scenarios - one where the
incoming argument is a string and the second where the incoming argument isn't a
string and an error is thrown. We can denote these two different states by
adding an additional level of organizational nesting to our tests. You can nest
describe function callbacks arbitrarily deep - but this quickly becomes
unreadable. When nesting, we make use of the context function, which is an
alias for the describe function - the context function denotes that we are
setting up the context for a particular set of tests.
Let's refactor our tests from before with some context functions before moving
on:
describe("reverseString()", function() { context("given a string argument", function() { it("should reverse the given string", function() { let test = reverseString("hello"); let result = "olleh"; assert.strictEqual(test, result); }); it("should reverse the given string and output the same capitalization", function() { let test = reverseString("Apple"); let result = "elppA"; assert.strictEqual(test, result); }); }); context("given an argument that is not a string", function() {}); });
Running the above test will give us this readable output:
reverseString() given a string argument ✓ should reverse the given string ✓ should reverse the given string and output the same capitalization given an argument that is not a string 2 passing (11ms)
532.2. Testing errors
Nice now that we have our context functions in place we can work on our second
scenario where the incoming argument is not a string. When using an assertion
library like Node's built in [Assert][assert-docs] we will have access to many
functions that will allow us the flexibility to test all kinds of things. For
testing errors using Node's built in Assert module we can use the
[assert.throws][assert-throw] function.
Now we'll setup up our it function within the context function we setup
above:
context("given an argument that is not a string", function() { it("should throw a TypeError when given an argument that is not a string", function() { assert.throws(); }); });
The assert.throws function works different from the assert.strictEqual
function in that it does not compare the return value of a function, but it
attempts to invoke a function in order to verify that it will throw a particular
error. The assert.throws function accepts a function as the first argument,
then the error that should be thrown as the second argument with an optional
error message as our third argument.
So following that logic, we can test the TypeError error thrown by
reverseString with something like this:
context("given an argument that is not a string", function() { it("should throw a TypeError when given an argument that is not a string", function() { assert.throws(reverseString(3), TypeError); }); });
However, when we run the mocha command we will get:
reverseString() # etc. given an argument that is not a string 1) should throw a TypeError when given an argument that is not a string 2 passing (11ms) 1 failing 1) reverseString() given an argument that is not a string should throw a TypeError when given an argument that is not a string: TypeError: this function only accepts string args
We are failing the above spec because we passed the invoked version of the
reverseString function with a number argument - which as we know will throw a
TypeError and halt program execution. This is a common mistake made everyday
by developers when writing tests. We can get around this by wrapping our error
expecting function within another function. This will ensure we can still invoke
the reverseString function with an argument but not throw the error until
assert.throws is ready to catch it.
We can also add the explicit error message that reverseString throws to make
our spec as specific as possible:
context("given an argument that is not a string", function() { it("should throw a TypeError when given an argument that is not a string", function() { assert.throws( function() { reverseString(3); }, TypeError, "this function only accepts string args" ); }); });
Now when we run mocha we will see:
reverseString() given a string argument ✓ should reverse the given string ✓ should reverse the given string and output the same capitalization given an argument that is not a string ✓ should throw a TypeError when given an argument that is not a string 3 passing (13ms)
Awesome! So we've covered writing unit tests using describe, context, and
it functions for organization. We have also covered how to test for equality
and thrown errors using Node's built-in assertion library, Assert.
Head to the next reading to learn about how to test classes using Mocha and
another assertion library named Chai.
[assert-throw]:
https://nodejs.org/api/assert.html#assert_assert_throws_fn_error_message
[mocha-docs]: https://mochajs.org/#getting-started
[bdd-docs]: https://mochajs.org/#bdd
[assert-equal]:
https://nodejs.org/api/assert.html#assert_assert_equal_actual_expected_message
[assert-docs]: https://nodejs.org/api/assert.html#assert_assert
Writing Tests
In this reading we'll be covering:
- how to test classes using
MochaandChai
533. Part Three: Testing classes using Mocha and Chai
Let's expand our knowledge of testing syntax by testing some classes! In order
to fully test a class, we'll be looking to test that class's instance and
static methods. Create a new file in the problems folder - dog.js. We'll
use the following code for the rest of our tests so make sure to copy it over:
// testing-demo/problems/dog.js class Dog { constructor(name) { this.name = name; } bark() { return `${this.name} is barking`; } chainChaseTail(num) { if (typeof num !== "number") { throw new TypeError("please only use numbers for this function"); } for (let i = 0; i < num; i++) { this.chaseTail(); } } chaseTail() { console.log(`${this.name} is chasing their tail`); } static cleanDogs(dogs) { let cleanDogs = []; dogs.forEach(dog => { let dogStr = `I cleaned ${dog.name}'s paws.`; cleanDogs.push(dogStr); }); return cleanDogs; } } // ensure to export our class! module.exports = Dog;
To test this class we'll create a new file in our test directory -
dog-spec.js so your file structure should now look like this:
testing-demo
└──
problems
└── reverse-string.js
└── dog.js
test
└── reverse-string-spec.js
└── dog-spec.js
Let's now set up our dog-spec.js file. For this example we'll get experience
using another assertion library named Chai. As you'll soon
see,
the Chai library comes with a lot more built-in more functionality than Node's
Assert module.
Now since Chai is another external library we'll need to import it in order to
use it. We need to run a few commands to first create a package.json and then
we can import the chai library. Start off by running npm init --y in the top
level directory (testing-demo) to create a package.json file. After that is
finished you can import the Chai library by running npm install chai.
Here is what that will look like in your terminal:
~ testing-demo $ npm init --y Wrote to /testing-demo/problems/package.json: { "name": "testing-demo", "version": "1.0.0", "description": "", "main": "index.js", "directories": { "test": "test" }, "scripts": { "test": "echo \"Error: no test specified\" && exit 1" }, "keywords": [], "author": "", "license": "ISC" } ~ testing-demo $ npm install chai
Now that we've installed Chai we can set up our test file. Create a new file
in the test folder named dog-spec.js We'll require the expect module
from
Chai for our assertions, import our Dog class, and set up our outer describe
function for testing the Dog class:
// testing-demo/test/dog-spec.js // set up chai const chai = require("chai"); const expect = chai.expect; // don't forget to import the class you are testing! const Dog = require("../problems/dog.js"); // our outer describe for the whole Dog class describe("Dog", function() {});
So the first thing we'll generally want to test on classes is their
constructor functions - we need to make sure new instances have the correct
properties and that those properties are being set properly before we can test
anything else. For the Dog class it looks like a name is accepted on
instantiation, so let's test that!
We'll start with a nested describe function within our outer Dog describe
function:
describe("Dog", function() { describe("Dog Constructor Function", function() { it('should have a "name" property', function() {}); }); });
Now we are using a different assertion library so we'll be working with some
different syntax. Open up the Chai Expect
documentation
for reference, we won't be going into tons of detail into every function we use
with Chai because Chai allows for a lot of smaller chainable functions and we
know you have lives outide this reading.
The nice thing about Chai is that the chainable functions available will often
read like English. Check out the right column of this handy Chai
cheatsheet for a quick and easy reference on chainable
functions.
We'll start our first spec off by using the property matcher to
ensure that a newly instantiated object has a specified property:
describe("Dog", function() { describe("Dog Constructor Function", function() { it('should have a "name" property', function() { const layla = new Dog("Layla"); // all our of chai tests will begin with the expect function // .to and .have are Chai chainable functions // .property is the matcher we are using expect(layla).to.have.property("name"); }); }); });
Now to test our new spec we can run just the Dog class specs by running
mocha test/dog-spec.js from our top level directory. Running that command
we'll see:
Dog
Dog Constructor Function
✓ should have a "name" property
1 passing (8ms)
Nice! We tested that the name property exists on a new dog instance. Next, we
can make sure our name is set properly with another test:
describe("Dog Constructor Function", function() { it('should have a "name" property', function() { const layla = new Dog("Layla"); expect(layla).to.have.property("name"); }); it('should set the "name" property when a new dog is created', function() { const layla = new Dog("Layla"); // we are using the eql function to compare the value of layla.name // with the provided string expect(layla.name).to.eql("Layla"); }); });
Running the above using mocha we'll see both of our specs passing! Now take
extra note of the fact that we are defining the same variable twice using
const within the above it callbacks. This is important to note because it
underlines the fact that each of the unit tests you write will have their own
scope - meaning that they are each independent of the specs that came before or
after them.
Head to the next reading to refactor some of the code we just wrote using
Mocha hooks!
chai-docs: https://www.chaijs.com/
chai-expect-docs: https://www.chaijs.com/api/bdd/
prop-docs: https://www.chaijs.com/api/bdd/#method_property
chai-cheatsheet: https://devhints.io/chai
chai-throw: https://www.chaijs.com/api/bdd/#method_throw
chai-spies: https://www.chaijs.com/plugins/chai-spies/
Writing Tests
This will be the final demo in our writing tests series! In this reading we'll
be covering:
- Using
MochaHooks to DRY up testing - Using
Chai Spiesto "spy" on functions to see how many times they've been
invoked
534. Part Four: Mocha Hooks and Chai Spies
Let's jump right back in. We've written some nice unit tests up to this point:
describe("Dog Constructor Function", function() { it('should have a "name" property', function() { const layla = new Dog("Layla"); expect(layla).to.have.property("name"); }); it('should set the "name" property when a new dog is created', function() { const layla = new Dog("Layla"); // we are using the eql function to compare the value of layla.name // with the provided string expect(layla.name).to.eql("Layla"); }); });
This is how unit tests are supposed to work, buuuut it will be annoying over
time if we have to define a new Dog instance in every single spec. Mocha
has some built in functionality to help us with this problem though: Mocha
Hooks!
534.1. Introducing Mocha Hooks
Mocha Hooks give you a convenient way to do set up prior to
running a related group of specs or to do some clean up after running those
specs. Using hooks helps to keep your testing code DRY so you don't
unnecessarily repeat set up and clean up code within each test.
Mocha Hooks have very descriptive function names and two levels of granularity -
before/after each block of tests or before/after each test:
- the hooks
beforeandafterwill be invoked either before or after the
block of tests is run (depending on which function is used) - the hooks
beforeEachandafterEachwill be invoked either before or after
each test (depending on which function is used)
Let's look at a simple example that uses each of the available hooks to log a
message to the console. Two placeholder tests are also defined to help
demonstrate the differences between the available hooks:
const assert = require('assert'); describe('Hooks demo', () => { before(() => { console.log('Before hook...'); }); beforeEach(() => { console.log('Before each hook...'); }); afterEach(() => { console.log('After each hook...'); }); after(() => { console.log('After hook...'); }); it('Placeholder one', () => { assert.equal(true, true); }); it('Placeholder two', () => { assert.equal(true, true); }); });
Running the above spec produces the following output:
Hooks demo Before hook... Before each hook... ✓ Placeholder one After each hook... Before each hook... ✓ Placeholder two After each hook... After hook... 2 passing (5ms)
Notice that the before and after hooks only ran once while the
beforeEach
and afterEach hooks each ran once per test.
Hooks are defined within a describe or context function. While hooks can be
defined before, after, or interspersed with your tests, keeping all of your
hooks together (before or after your tests) will help others to read and
understand your code.
Defining hooks out of their logical order has no effect on when they're ran.
Consider the following example that defines an afterHook before a beforeEach
hook:
const assert = require('assert'); describe('Hooks demo', () => { afterEach(() => { console.log('After each hook...'); }); beforeEach(() => { console.log('Before each hook...'); }); it('Placeholder one', () => { assert.equal(true, true); }); it('Placeholder two', () => { assert.equal(true, true); }); });
Running the above spec produces the following output:
Hooks demo Before each hook... ✓ Placeholder one After each hook... Before each hook... ✓ Placeholder two After each hook... 2 passing (6ms)
The order of your hooks only matters when you define multiple hooks of the same
type. When a hook type is defined more than once, they'll be ran in the order
that they're defined in:
const assert = require('assert'); describe('Hooks demo', () => { beforeEach(() => { console.log('Before each hook #1...'); }); beforeEach(() => { console.log('Before each hook #2...'); }); it('Placeholder one', () => { assert.equal(true, true); }); it('Placeholder two', () => { assert.equal(true, true); }); });
Running the above spec produces the following output:
Hooks demo Before each hook #1... Before each hook #2... ✓ Placeholder one Before each hook #1... Before each hook #2... ✓ Placeholder two 2 passing (5ms)
You can also define hooks within nested describe or context functions:
const assert = require('assert'); describe('Hooks demo', () => { before(() => { console.log('Before hook...'); }); beforeEach(() => { console.log('Before each hook...'); }); afterEach(() => { console.log('After each hook...'); }); after(() => { console.log('After hook...'); }); it('Placeholder one', () => { assert.equal(true, true); }); it('Placeholder two', () => { assert.equal(true, true); }); describe('nested tests', () => { before(() => { console.log('Nested before hook...'); }); beforeEach(() => { console.log('Nested before each hook...'); }); afterEach(() => { console.log('Nested after each hook...'); }); after(() => { console.log('Nested after hook...'); }); it('Placeholder one', () => { assert.equal(true, true); }); it('Placeholder two', () => { assert.equal(true, true); }); }); });
Running the above spec produces the following output:
Hooks demo Before hook... Before each hook... ✓ Placeholder one After each hook... Before each hook... ✓ Placeholder two After each hook... nested tests Nested before hook... Before each hook... Nested before each hook... ✓ Placeholder one Nested after each hook... After each hook... Before each hook... Nested before each hook... ✓ Placeholder two Nested after each hook... After each hook... Nested after hook... After hook... 4 passing (7ms)
Notice that the before and after hooks defined in the top-level
describe
function run only once while the beforeEach and afterEach hooks run before
and after (respectively) for each of the tests defined in the top-level
describe function and for each of the tests defined in the nested describe
function.
While the need to define nested hooks won't come up very often (especially
when you're just starting out with unit testing), it is very helpful to be
able to define abeforeEachhook in a top-leveldescribefunction that
will run before every test in that block and before every test within nested
describeorcontextfunctions (you'll do exactly that in just a bit).
You can also optionally pass a description for a hook or a named function:
beforeEach('My hook description', () => { console.log('Before each hook...'); }); beforeEach(function myHookName() { console.log('Before each hook...'); });
If an error occurs with executing the hook, the hook description or function
name will display in the console along with the error information to assist with
debugging.
534.2. Using the beforeEach Mocha Hook
Let's go back to our spec and see how we can use hooks to DRY up our code.
Here's where we left off:
describe("Dog Constructor Function", function() { it('should have a "name" property', function() { const layla = new Dog("Layla"); expect(layla).to.have.property("name"); }); it('should set the "name" property when a new dog is created', function() { const layla = new Dog("Layla"); // we are using the eql function to compare the value of layla.name // with the provided string expect(layla.name).to.eql("Layla"); }); });
Let's refactor our code to use a beforeEach hook to assign the value of
our new dog instance:
describe("Dog", function() { // we'll declare our variable here to ensure it's available within the scope // of all the specs below let layla; // now for each test below we'll create a new instance to ensure each of our // dog instances is exactly the same beforeEach("set up a dog instance", function() { layla = new Dog("Layla"); }); describe("Dog Constructor Function", function() { it('should have a "name" property', function() { expect(layla).to.have.property("name"); }); it('should set the "name" property when a new dog is created', function() { expect(layla.name).to.eql("Layla"); }); }); });
Now let's write a test from the next method on the Dog class:
Dog.prototype.bark(). For testing classes we'll create a new describe
function to test each individual method. We'll now write our unit test inside
taking advantage of our beforeEach hook:
describe("Dog", function() { let layla; beforeEach("set up a dog instance", function() { layla = new Dog("Layla"); }); // etc, etc. describe("prototype.bark()", function() { it("should return a string with the name of the dog barking", function() { expect(layla.bark()).to.eql("Layla is barking"); }); }); });
Not only are we avoiding repeating our setup code within each test but we've
improved the readability of our code by making it more self-descriptive. The
code that runs before each test is literally contained with a hook named
beforeEach!
The after and afterEach hooks are generally used less often than the
before and beforeEach hooks. Most of the time, it's preferable to avoid
using the after and afterEach hooks to perform clean up tasks after your
tests. Instead, simply use the before and beforeEach hooks to create a clean
starting point for each of your tests. Doing this will ensure that your tests
run in a consistent, predictable manner.
534.3. Using Chai Spies
Sweet - let's now look to the next method on the Dog.prototype -
Dog.prototype.chainChaseTail. This instance method intakes a number (num) and
will then invoke the Dog.prototype.chaseTail function num number of times.
The chaseTail function will just console.log a string - meaning that we have
no function output to test. The Dog.prototype.chainChaseTail function will
additionally throw a TypeError if the incoming argument is not a number.
We'll start by setting up our outer describe block for the
prototype.chainChaseTail method. Next we'll add two context functions for
our two contexts - valid or invalid parameters:
contextis just an alias fordescribeit's just another way to make your
tests more understandable and readable, in this case we are testing our method
with different parameters, and thus in different contexts. (not to be confused
with "context" in the javascript sense of the value ofthis)
describe("prototype.chainChaseTail()", function() { context("with an invalid parameter", function() {}); context("with a valid number parameter", function() {}); });
We'll start by writing our test for when the method is invoked with invalid
parameters. To do this we'll use Chai's throw method ensuring to
wrap our error throwing function in another function:
context("with an invalid parameter", function() { it("should throw a TypeError when given an argument that is not a number", function() { expect(() => layla.chainChaseTail("3")).to.throw(TypeError); }); });
Note here we are passing the literal string
"3"not the number 3.
Nice, now we can concentrate on our other context with a valid parameter - and
how to go about testing this function. In order to testchainChaseTail
properly we'll need to see how many times thechaseTailmethod is invoked.
Which means we'll need to import another library that will add extra
functionality toChai. We'll import theChai Spieslibrary
usingnpm install chai-spiesin our top level directory.
Now we'll insert a few lines of code to the top of file to set up our shiny new
Chai Spies:
// top of dog-spec.js const chai = require("chai"); const expect = chai.expect; const spies = require("chai-spies"); chai.use(spies);
We now have access to the chai-spies module in our tests. The Chai Spies
library provides a lot of added functionality including the ability to determine
if a function has been called and how many times that function has been called.
So let's get started spying! We'll setup our it function with an appropriate
string:
context("with a valid number parameter", function() { it("should call the chaseTail method n times", function() {}); });
Now in order to spy on a function we first need to tell Chai which function we'd
like to spy on using the chai.spy.on method. In this case we'd like to spy on
the instance of a Dog that will be invoking the chainChaseTail method to
determine how many times the chaseTail method is then invoked.
So we will set up our spy on the dog instance in question, as well as tell our
chai spy which method to keep track of:
context("with a valid number parameter", function() { it("should call the chaseTail method n times", function() { // the first argument will be the instance we are spying on // the second argument will be the method we want to keep track of const chaseTailSpy = chai.spy.on(layla, "chaseTail"); }); });
Now that our spy is set up we now need make sure our dog instance will actually
call the chainChaseTail function! Otherwise our spy won't have anything to spy
on:
context("with a valid number parameter", function() { it("should call the chaseTail method n times", function() { const chaseTailSpy = chai.spy.on(layla, "chaseTail"); // we need to invoke chainChaseTail because that is the method that // will invoke chaseTail which is the method we are spying on layla.chainChaseTail(3); }); });
Finally, we need to add our actual test - otherwise this is all for naught! Chai
has some really nice chaining methods when it comes to checking how many times a
function has been invoked. Here we'll use the method chain of
expect(func).to.have.been.called.exactly(n) to test that the method we are
spying on - chaseTail was invoked a certain number of times:
context("with a valid number parameter", function() { it("should call the chaseTail method n times", function() { const chaseTailSpy = chai.spy.on(layla, "chaseTail"); layla.chainChaseTail(3); // below is our actual test to see how many times our spy was invoked expect(chaseTailSpy).to.have.been.called.exactly(3); }); });
534.4. Testing static methods on classes
Sweet! We are almost done testing this class - just one more method to go. We'll
now work on testing the class method Dog.cleanDogs. To denote that this is a
class method, not an instance method, our describe string will not use the
word prototype:
describe("cleanDogs()", function() { it("should return an array of each cleaned dog string", function() {}); });
Now the Dog.cleanDogs class method will intake an array of dogs and output an
array where each element is a string noting that the passed in dog instance's
paws are now clean. In order to properly test this function we'll probably want
an array of more than one dog instance. Let's create a new dog and pass an array
of two dog instances to the Dog.cleanDogs method:
describe("cleanDogs()", function() { it("should return an array of each cleaned dog string", function() { const zoey = new Dog("Zoey"); let cleanDogsArray = Dog.cleanDogs([layla, zoey]); }); });
Then we'll create a variable for our expected output and compare the output we
received from Dog.cleanDogs:
describe("cleanDogs()", function() { it("should return an array of each cleaned dog string", function() { const zoey = new Dog("Zoey"); let cleanDogsArray = Dog.cleanDogs([layla, zoey]); let result = ["I cleaned Layla's paws.", "I cleaned Zoey's paws."]; expect(cleanDogsArray).to.eql(result); }); });
Awesome! We have fully testing the Dog class's methods and learned a lot about
testing along the way.
Here is our full testing file so you can ensure you got everything:
const chai = require("chai"); const expect = chai.expect; const spies = require("chai-spies"); chai.use(spies); // this is a relative path to the function location const Dog = require("../problems/dog.js"); describe("Dog", function() { let layla; beforeEach("set up a dog instance", function() { layla = new Dog("Layla"); }); describe("Dog Constructor Function", function() { it('should have a "name" property', () => { expect(layla).to.have.property("name"); }); it('should set the "name" property when a new dog is created', () => { expect(layla.name).to.eql("Layla"); }); }); describe("prototype.bark()", function() { it("should return a string with the name of the dog barking", () => { expect(layla.bark()).to.eql("Layla is barking"); }); }); describe("prototype.chainChaseTail()", function() { context("with a valid number parameter", function() { it("should call the chaseTail method n times", function() { const chaseTailSpy = chai.spy.on(layla, "chaseTail"); layla.chainChaseTail(3); expect(chaseTailSpy).to.have.been.called.exactly(3); }); }); context("with an invalid parameter", function() { it("should throw a TypeError when given an argument that is not a number", function() { expect(() => layla.chainChaseTail("3")).to.throw(TypeError); }); }); }); describe("cleanDogs()", function() { it("should return an array of each cleaned dog string", function() { const zoey = new Dog("Zoey"); let cleanDogsArray = Dog.cleanDogs([layla, zoey]); let result = ["I cleaned Layla's paws.", "I cleaned Zoey's paws."]; expect(cleanDogsArray).to.eql(result); }); }); });
535. What you learned
In the upcoming project we'll be covering a lot more Chai syntax - but don't
worry about memorizing this syntax! The point we are trying to make is that in
the future you'll be using a variety of software testing frameworks and
assertion libraries - the most important things are to know the basics of how to
structure tests as well as being able to read and parse documentation to write
tests.
In this series of readings we covered the basics of how to:
- properly format and denote your mocha tests using
describe,contextand
itblocks - write tests for individual functions as well as writing tests for classes
- use
chai-spiesto test how many times a function has been called - test that functions will throw certain errors
- recognize and utilize the Mocha hooks:
before,beforeEach,after, and
afterEach
Towers of Hanoi Project: Reading and Passing Tests
Time to put your newfound mocha knowledge to the test! In this project you'll be
following what is now a familiar pattern - running automated tests and writing
code to pass those tests. The difference this time round is that we will only
provide very minimal written information for the code you'll be writing. This
project will revolve around reading the provided tests and then writing code to
pass those tests.
We've provided you with a skeleton for a JavaScript version of the famous
[Towers of Hanoi][hanoi] game. If you've never played the game take a moment to
watch a quick video of how it is played or check out [this][hanoi-game] playable
version (beware the game has sound). For the version we are building, a game of
Towers of Hanoi will be played using three towers and using three pieces which
we'll refer to as disks from now on.
Once you've downloaded the skeleton make sure you npm install to install the
dependencies the tests will rely on. We'll be using [Chai][chai] in
combination with chai-spies as our assertion
libraries for this
project so we recommend keeping both documentation pages open. The tests you'll
be working on will be in the test/game-spec.js file and you'll be doing all
your work within the hanoi/hanoi-game.js file. You will not need to specify
any new methods upon the HanoiGame class - just fill in empty methods
provided.
Carefully read each spec and concentrate on passing them one at a time in the
order they are written. As always, to run the specs use the mocha command in
the top level directory.
You got this! Once you've passed all the specs feel free to play a game of Hanoi
in your terminal by running node hanoi/play-script.js before moving on to the
next project.
To get the skeleton just git clone the repository at [https://github.com/appacademy-starters/project-hanoi-game-skeleton]
[https://github.com/appacademy-starters/project-hanoi-game-skeleton]:
https://github.com/appacademy-starters/project-hanoi-game-skeleton
[hanoi]: https://en.wikipedia.org/wiki/Tower_of_Hanoi
[hanoi-game]: https://www.mathplayground.com/logic_tower_of_hanoi.html
[chai]: https://www.chaijs.com/api/bdd/
chai-spies: https://www.chaijs.com/plugins/chai-spies/
Test-Driven Development Project
So now it is finally time to flex your fingers and start writing some tests! For
this next project we'll be using test-driven development (TDD). A TDD approach
dictates that we'll follow the TDD workflow, meaning that you'll need to follow
the TDD workflow of Red, Green, Refactor.
![tdd-cycle][rgr]
[rgr]:
https://appacademy-open-assets.s3-us-west-1.amazonaws.com/Module-JavaScript/testing/assets/rgr.png
So the three steps for approaching all of the below problems will be to:
- Red: Write the tests and watch them fail (a failing test is red).
- Green: Write the minimum amount of code to ensure the test passes.
- Refactor: Refactor the code you just wrote to make it readable and
maintainable.
You can assume for the rest of the project that you will be using Mocha as your
testing framework, and you can use either Node's built inassertmodule or the
Chai library unless otherwise specified.
Before beginning to write tests we'll start by installing the dependencies we'll
need forchaiandchai-spies. Start by creating a directory for this project
on your computer namedtdd-project. Navigate into the directory in your
terminal, then runnpm init --yto create apackage.json. Once that has been
created you can installchaiandchai-spiesby running
npm install chai chai-spies. Once the dependencies have been installed you are
ready to start writing tests!
536. Phase 0: Testing the reverseString function
We'll begin by writing tests for a function named reverseString. Create two
directories in your tdd-project directory - one named problems and one named
test. In the problems directory create a new file named
reverse-string.js,
then within the test folder create a corresponding reverse-string-spec.js
file.
This would be a good time to open up the documentation for [Mocha][mocha],
[Assert][assert], [Chai][chai], and Chai Spies. The tests
you are
writing today will be good practice for the rest of your programming career so
take your time and ensure you are writing the best tests you can!
For this first phase feel free to use either assert or chai as your
assertion library. Whichever you choose make sure you require it into
reverse-string-spec.js.
Hint: You can look back at the Tower of Hanoi project if you can't remember the proper require lines for this.
Also make sure you require yourreverseStringfunction so you will have it available to test.
Hint: Since the file lives in theproblemsfolder you might need to use our old friend..in the path.
Now it's your time to shine - write a test that will ensure that when given the
input"fun"thereverseStringfunction will return the reversed output
(nuf). Now run your spec and watch it fail. If you did this correctly you should have mocha telling youTypeError: reverseString is not a function.
Remember! This is expected because we are doing test-driven development and we have written the test before we have written thereverseStringfunction.
Now that the red step is complete, time to move onto the green step. Write
the minimum amount of code to pass the spec you just wrote - make sure you
remember to properly import and export your function!
Reminder: You can run all the tests in thetestdirectory by running the
mochacommand in the top level directory that thetestdirectory is
located within. You can also run a single test file with Mocha by specifying
the file path like so:mocha test/reverse-string-spec.js.
Once you've passed the spec you wrote it's time to refactor. Take a look at
yourreverseStringfunction and see how it could be improved to be more
readable. For example: could it be more DRY?
Okay, let's add another spec to this function to test how it handles errors. Use
chaiorassert'sthrowsfunction to ensure that when thereverseString
function is invoked with an argument that is not a string it will throw a
TypeError.
Nice! As you are writing these tests make sure you are following the TDD
workflow and writing readable tests. Each of yourdescribe,context, and
itfunctions should always be passed a string that clearly indicates what is
being testing.
537. Phase 1: Testing multiple functions
Create a new file within the problems directory named number-fun.js. Make
sure your create the corresponding testing file within the test directory.
We'll be using Node's Assert for this one so be sure you import it at the top
of your testing file. You'll be testing two functions in this file so you'll
want to make sure you set up two outer describe blocks - one for each
function.
We'll start off easy by writing a spec for a function called returnsThree.
Test that this function returns the number 3. Now write the code to pass that
spec.
Cool, let's step it up a notch - in the second describe function you'll be
writing the tests for a function called reciprocal(num). This function should
intake a number and then return the [reciprocal][reciprocal] of that number.
Start by writing a spec to ensure that your reciprocal function will return
the reciprocal of the given argument. For this test include more than one
assertion line (assert.strictEqual(value, value)) within your it callback
function to make sure your function will behave as expected with multiple
inputs.
Now write the code to pass those tests, then refactor that code. Once you've
finished we'll be adding some different contexts for your reciprocal
function. Your reciprocal function will now only intake arguments between 1 and 1000000. If the given
argument is less than 1 or greater than 1,000,000 then a TypeError will be thrown with a descriptive
string message.
In order to properly test the reciprocal function you'll need to create two
context blocks within the reciprocal describe function callback - one
for
invalid arguments and one for valid arguments. Move the the spec you wrote
previously into the context callback for valid arguments. You'll want to write
at least two new specs within your invalid argument context block to ensure
your reciprocal is being fully tested.
Once you've passed all your written specs and refactored move on!
[reciprocal]: https://www.mathopenref.com/reciprocal.html
538. Phase 2: Testing the myMap Function
Next let's write a spec for a function you've all undoubtedly grown to love,
good old myMap. Create a new file in your problems directory, with a
corresponding file in your test directory for testing this function. This
version of myMap(array, callback) will intake an array and a callback, and
then return a new array where the callback has been called upon each element in
the original array. The myMap should not mutate the original argument array.
We'll be using chai and chai-spies for this series of tests.
Here is a quick example of how we expect this to work:
const arr = [1, 2, 3]; const callback = el => el * 2; console.log(myMap(arr, callback)); // prints [2,4,6] console.log(arr); // prints [1,2,3]
Start off by writing your tests. You want to ensure that your myMap works like
the built-in Array#Map method. Once you've written the test, write the code
that will pass the test, then refactor.
Nice! Now let's really thoroughly test the myMap function. However, before we
do that we'll want to make sure that any specs we write after this first spec
will be working with a fresh array to ensure each unit test is done in
isolation. The DRYest way to do this is by setting up a Mocha hook! Use the
beforeEach Mocha hook to reassign a new instance of an Array each time a
spec is run.
Now that our hook is in place we'll write two tests:
- Ensure that
myMapdoes not mutate the passed-in array argument - Ensure that
myMapdoes not call the built-inArray#map - Ensure that the passed-in callback is invoked once for each element in the
passed-in array argument.
Write the first of these specs now before moving on below.
For the described specs for 2-3 in the above list you will be required to use
chai-spiesso make sure you have the documentation up! Approach these specs
one at a time - we recommend using thechai.spy.onfunction for both of the
above specs.
Hint: In order to use
chai.spy.onyou'll want to think carefully about
what object you are spying on the methods for. For spec 3 described above
you'll need to make sure you have an object to spy on so don't be afraid to
make an object just for testing purposes.Also in order to spy on a plain function instead of a property of an object you use
chai.spyinstead ofchai.spy.onand then use the resulting spied function directly.
Once you've finished the above specs and written the code to pass them make sure
you refactor your code before moving on!
539. Phase 3: Testing Classes
For this next phase you will be utilizing Chai to test a Person class. Create
the necessary files within your test and problems directories. Work one spec
at a time through the list below using Red, Green, Refactor as you go and don't
forget to use Mocha Hooks to make your specs super DRY!
Write specs for each of the described Person class methods below:
- The
PersonConstructor - will intake a name and age and set them as
properties on the instance. Make sure you test that these properties exist on
an instance, as well as ensuring they are set properly. prototype.sayHello- will return a string of the person instance's name and
a greeting messageprototype.visit(otherPerson)- will return a string stating that this
instance visited the passed-in person instance (i.e.person1.visit(person2)
returnsMai visited Erin).prototype.switchVisit(otherPerson)- will invoke thevisitfunction of the
parameter (otherPerson), passing in the current instance as the argument.prototype.update(obj)- this method will have two contexts if the incoming
argument is or is not a valid object.- A: If the incoming argument is not an object throw a new TypeError with a
clear message - B: If the incoming argument is an object then the instance's properties
should be updated to match the passed-in object's values as shown below. - C: If the incoming object does not have a name and an age property, throw a TypeError with an appropriate message
- A: If the incoming argument is not an object throw a new TypeError with a
let coolPerson = new Person("mai", 32); // Person { name: 'mai', age: 32 } coolPerson.update({ name: "lulu", age: 57 }); console.log(coolPerson); // Person { name: 'lulu', age: 57 }
prototype.tryUpdate(obj)- this method will call theprototype.update
method with the incoming argument, and it will have two contexts if the
invocation ofprototype.updatewas or was not successful:- A: If
prototype.updateis successfully invoked (it does not throw an
error) then atrueis returned indicating the update was successful (make
sure that the instance was updated as well) - B: If
prototype.updateis not successfully invoked it should not throw
an error, instead it should returnfalse.
- A: If
greetAll(obj)- this static method will intake an array ofPerson
instances. ThegreetAllmethod will then call thesayHellomethod on each
Personinstance and store each returned string in an array, before finally
returning an array of the stored strings.
Once you've finished and you've refactored all your code feel free to run
mochaand look at all those passed specs! Give yourself a pat on the back for
starting your journey into TDD development.
[assert]: https://nodejs.org/api/assert.html
[mocha]: https://mochajs.org/#bdd
[chai]: https://www.chaijs.com/api/bdd/
chai-spies: https://www.chaijs.com/plugins/chai-spies/
WEEK-06 DAY-5
Unit Testing - Day 2
Well-Tested Full-Stack To-Do Items
In this project, you will test a full-stack JavaScript and HTML application! You
will write tests to make sure the code that was written for the project will
meet the expectations of the requirements. Your tests will not have to be
exhaustive. Instead, there are guidelines for your tests in each test file. Use
those guidelines to implement the Web application.
The upcoming video provides you a full walk-through of the system as it is
created. Then, once you understand how the application works from watching it
be built, you will need to apply your knowledge of writing tests.
It may be hard. However, stick with it. You'll do great. Just take your time,
write good tests, and you will be amazed at how much confidence that you will
gain in writing code that comes together.
One of the ways that you can make this project more enjoyable is to vary the
way that you pair on it. For each step,
- Discuss what the next feature is that you want to write
- One person writes a unit test to test the code
- Both examine the code and determine if there is any duplication to refactor
into common functions or classes - Loop, but swap who writes the unit test and who writes the code
At the end, you will leverage your test by swapping out the mechanism used to
generate the HTML. This is the other part of writing good tests: tests give you
the confidence to change code. If you do something that is "wrong" in that it
breaks current expectations, the tests will tell you!
Tests are such an important part of a developers life. While some developers
will complain about having to write them, when you start working on an existing
"legacy" code base, making changes can cause a lot of stress unless you have the
work of other developers' tests to make sure you don't unintentionally change a
method in such a way to break code that you're not working on.
To get started, - clone the project from
https://github.com/appacademy-starters/testing-an-existing-app-project - change directory into the project
- run
npm installto install the modules
If you want to run the server, typenode server.jsand go to
http://localhost:3000/items to see what it does. You can add categories, add
items, search for items, and complete items.
The code that you will test are the functions used to create the functionality
of the data and the creation of the views, not the actual HTTP server. The
video after shows a person writing the entire application. You will see what
each piece does. Then, you will understand the intent of the code that you
have to test.
Create And Serve the Category Screen
You'll now write the tests for the part of the application that shows the
list of categories. That code, in server.js looks like this.
const filePath = path.join(__dirname, 'category-list-screen.html'); const template = await fs.promises.readFile(filePath, 'utf-8'); const html = mergeCategories(template, categories, 'li'); res.setHeader('Content-Type', 'text/html'); res.writeHead(200); res.write(html);
You need to write tests for the function mergeCategories() for the portion that outputs the HTML for
list items. Open the file test/merge-categories-spec.js. You
will see
describe("mergeCategories()", () => { context("Using <li> tags", () => { const template = ` <div> <ul> <!-- Content here --> </ul> </div> `; it("should return no <li>s for no categories", () => { expect.fail('please write this test'); }); it("should return a single <li> for one category", () => { expect.fail('please write this test'); }); it("should return an <li> for each category", () => { expect.fail('please write this test'); }); }); // more code ...
The context block is for writing tests for when we use mergeCategories() and
pass it <li> tags.
You will need to write tests in all the it blocks. Just replace the expect.fail
calls with your own tests. (expect.fail is a chai assertion to force a spec to fail
so we are using it for all the unwritten tests so that when you run npm test
you will see all the tests you haven't written failing)
Open merge-categories.js to review the code before writing the tests.
The mergeCategories function takes a string through its template parameter, a list of
strings through its categories parameter and an HTML tag through it's tagName
parameter.
It then replaces the HTML comment <!-- Content here ..> with the newly created
<li> tags (one for each catagory) and returns a new string of HTML.
Use the template variable that is available to you for these tests.
540. The first test
The first test reads
it("should return no <li>s for no categories", () => { expect.fail('please write this test'); });
Replace the expect.fail line with a test that properly follows the Three As
of unit testing.
In the arrange section, you will need to create an empty array for the
categories and store it in a variable. You will use the variable in the
action.
In the act section, you will invoke the mergeCategories function with the
template as the first argument, the variable that contains an empty array as
the second argument, and the string 'li' for the tag name as the third argument.
Store the return value in a variable.
In the assert section, assert that each of the following are true using the
[include] assertion provided by Chai:
- To make sure that the method doesn't remove the wrong things
- Assert that it contains the string "<div>"
- Assert that it contains the string "</div>"
- Assert that it contains the string "<ul>"
- Assert that it contains the string "</ul>"
- To make sure that the method doesn't add the wrong things
- Assert that it does not contain the string "<li>"
- Assert that it does not contain the string "</li>"
- To make sure it replaces what you expect it to replace
- Assert that it does not contain the string "<!-- Content here -->"
Run the test to make sure it passes.
Here's what the test could look like.
- Assert that it does not contain the string "<!-- Content here -->"
it("should return no LIs for no categories", () => { const categories = []; const result = mergeCategories(template, categories, 'li'); expect(result).to.contain('<div>'); expect(result).to.contain('</div>'); expect(result).to.contain('<ul>'); expect(result).to.contain('</ul>'); expect(result).to.not.contain('<li>'); expect(result).to.not.contain('</li>'); });
Notice we are using
containhere instead ofinclude.containis an alias
toincludethat chai provides, and it reads better here thaninclude.
541. The second test
The second test reads
it("should return a single <li> for one categories", () => { expect.fail('please write this test'); });
Replace the expect.fail line with a test that properly follows the Three As
of unit testing.
In the arrange section, you will need to create an array for the categories
argument that contains a single string and store it in a variable. You will use
the variable in the action and the value that you typed in the assertion.
In the act section, you will invoke the mergeCategories function with the
template as the first argument, the variable that contains the array with the
single value as the second argument, and the string 'li' for the tag name as the
third argument. Store the return value in a variable.
In the assert section, assert that each of the following are true using the
[include] assertion provided by Chai:
- To make sure that the method doesn't remove the wrong things
- Assert that it contains the string "<div>"
- Assert that it contains the string "</div>"
- Assert that it contains the string "<ul>"
- Assert that it contains the string "</ul>"
- To make sure that the method adds the right things
- Assert that it does contain the string "<li>your string here</li>"
where "your string here" is the single value that you placed in the array
- Assert that it does contain the string "<li>your string here</li>"
- To make sure it replaces what you expect it to replace
- Assert that it does not contain the string "<!-- Content here -->"
Run the test to make sure it passes.
Here's what the test could look like.
- Assert that it does not contain the string "<!-- Content here -->"
it("should return a single LI for one categories", () => { const categories = ['Cat 1']; const result = mergeCategories(template, categories, 'li'); expect(result).to.contain('<div>'); expect(result).to.contain('</div>'); expect(result).to.contain('<ul>'); expect(result).to.contain('</ul>'); expect(result).to.contain('<li>Cat 1</li>'); });
542. The third test
The third test reads
it("should return an <li> for each category", () => { expect.fail('please write this test'); });
Replace the expect.fail line with a test that properly follows the Three As
of unit testing.
In the arrange section, you will need to create an array for the categories
argument that contains multiple strings and store it in a variable. You will use
the variable in the action and the values that you typed in the assertion.
In the act section, you will invoke the mergeCategories function with the
template as the first argument, the variable that contains the array with the
multiple values as the second argument, and the string 'li' for the tag name as the
third argument. Store the return value in a variable.
In the assert section, assert that each of the following are true using the
[include] assertion provided by Chai:
- To make sure that the method doesn't remove the wrong things
- Assert that it contains the string "<div>"
- Assert that it contains the string "</div>"
- Assert that it contains the string "<ul>"
- Assert that it contains the string "</ul>"
- To make sure that the method adds the right things, for each of the values
that you put in your categories array:- Assert that it does contain the string "<li>value n</li>" where "value n"
is
one of the values in your array
- Assert that it does contain the string "<li>value n</li>" where "value n"
is
- To make sure it replaces what you expect it to replace
- Assert that it does not contain the string "<!-- Content here -->"
Run the test to make sure it passes.
Here's what that code could look like.
- Assert that it does not contain the string "<!-- Content here -->"
it("should return an LI for each category", () => { const categories = ['Cat 1', 'Cat 2', 'Cat 3']; const result = mergeCategories(template, categories, 'li'); expect(result).to.contain('<div>'); expect(result).to.contain('</div>'); expect(result).to.contain('<ul>'); expect(result).to.contain('</ul>'); expect(result).to.contain('<li>Cat 1</li>'); expect(result).to.contain('<li>Cat 2</li>'); expect(result).to.contain('<li>Cat 3</li>'); });
You have won this round!
[include]: https://www.chaijs.com/api/bdd/#method_include
Save Submitted Category Information
You'll now write the tests for the part of the application that saves a category
when it is submitted. That code, in server.js looks like this and is what
happens when a new category is sent to the server in an HTTP POST.
else if (req.url === "/categories" && req.method === 'POST') { const body = await getBodyFromRequest(req); const newCategory = getValueFromBody(body, 'categoryName') categories = saveCategories(categories, newCategory); res.setHeader('Location', '/categories'); res.writeHead(302); }
There are three main functions we need to test in this block of code.
Here's what they all three do in a nutshell:
getBodyFromRequest - Gets the raw POST body string from the HTTP POST request
getValueFromBody - Parses this raw string into individual values representing the new categories
saveCategories - Saves the new categories into the existing list of categories;
You need to write tests for all three functions getBodyFromRequest,
getValueFromBody, and saveCategories.
543. Testing getting the body from the
request (getBodyFromRequest())
Open up get-body-from-request.js and review it.
The getBodyFromRequest() function takes one argument req which is an [IncomingMessage]
object. It returns a Promise which means it is an asynchronous function.
The IncomingMessage stored in req contains properties like url and
method, but also a stream of data that was sent to us by the browser. We call this stream of data the
POST "body".
"GET" requests have no data in the body, ever. "POST" submissions almost
always contain data. Because this is a POST that the code is handling, the code needs to read
all of the data from the stream. To do that, it listens for two events, the "data" event and
the "end" event.
When data shows up for the server to read, it has to do it in chunks because we can't predict how much data
the browser will be sending the server and the data could be huge!
The code to do that is
req.on('data', chunk => { data += chunk; });
The callback will be called everytime the server receives a chunk of data from the browser. Then we just append
the incoming chunk of data to the existing data variable with +=.
We will continue to do this as long as the server is still receiving chunks.
When the data finishes arriving at the server, the "end" event occurs. That
signals the code that it has finished arriving and the Promise in the method
can finish with a call to resolve passing it the data. That is this piece of code from
getBodyFromRequest:
req.on('end', () => { resolve(data); });
This is a hard one to test because you need to test those events. The stream of
data inherits from a class EventEmitter. You can use an instance of the
EventEmitter class to test this code. This is called a stub or a fake
because it's not a real IncomingMessage. You can trigger an event using the
emit method which takes the name of the event as the first parameter and, as
an optional second parameter, any data.
For Example:
const fakeReq = new EventEmitter(); fakeReq.emit('end');
would emit the "end" event.
Another thing that makes this hard is that it is an asynchronous test which
means that you must use the done method that mocha provides as part of the test
callback. If everything is ok, then you call done without any arguments. If something bad happens,
you call done with the error message.
You can see an example in this it block from the get-body-from-request-spec.js file.
The done function is the first argument to the it callback.
it('returns an empty string for no body', done => { expect.fail('please write this test'); });
This should remind you of the
resolvefunction in Promises, it's a similar pattern.
543.1. The first body request test
For the first test, returns an empty string for no body, the following code
uses the EventEmitter stored in fakeReq (which is created in the beforeEach
block) as the fake request to test the getBodyFromRequest function.
Write your assertion in the then handler of the promise returned by getBodyFromRequest.
Check to see if the value in body is an empty string. If it is, the function works as you expect and
you should call done(). If not, you should call done with an error message. The comments
in the then function are there to guide you to do that.
it('returns an empty string for no body', done => { // Arrange const bodyPromise = getBodyFromRequest(fakeReq); // Act // This next line emits an event using // emit(event name, optional data) fakeReq.emit('end'); // Assert bodyPromise .then(body => { // Write the following code: // Determine if body is equal to "" // If it is, call done() // If it is not, call // done(`Failed. Got "${body}"`) }); });
543.2. The second body request test
For the second test, returns the data read from the stream, use the
EventEmitter stored in fakeReq as the fake request to test the
getBodyFromRequest function. This time, though, you need to emit some "data"
events before you emit the "end" event to test the data-gathering functionality
of the method.
From the last section, you know that the signature for the emit method is
eventEmitter.emit('event name', 'optional data');
In the cases below, the event name is "data" and the optional data is stored in
data1 and data2. So, you should have two calls to emit before
the
fakeReq.emit('end');. You can see space for you to write those calls.
Then, in the then handler of the Promise, you should check to see if the
value in body is the same as data1 + data2. If it is, the function works as
you expect and you should call done(). If not, you should call done with an
error message. The comments in the then function are there to guide you to
do that.
it('returns the data read from the stream', done => { // Arrange const bodyPromise = getBodyFromRequest(fakeReq); const data1 = "This is some"; const data2 = " data from the browser"; // Act // Write code to emit a "data" event with // the data stored in data1 // Write code to emit a "data" event with // the data stored in data2 fakeReq.emit('end'); // Assert bodyPromise .then(body => { // Write the following code: // Determine if body is equal to data1 + data2 // If it is, call done() // If it is not, call // done(`Failed. Got "${body}"`) }); });
544. Testing getting the value from the body
(getValueFromBody)
It's not enough to just get the stream of raw data from the POST body,
we also need to parse that data into the categories the user is saving.
When someone POSTs a form from the browser to the server, it comes to the server
in a format called "x-www-form-urlencoded". This is also sometimes called a "Query String"
"x-www-form-urlencoded" is just a format for data just like
JSON is also a format for data. This specific format is made up of key/value pairs.
The key/value pairs are in the form "key=value". Those pairs are joined
together in a single string by using the ampersand character. The following are
valid strings contained in the "x-www-form-urlencoded" format.
- "": The empty string is a valid x-www-form-urlencoded string.
- "name=Morgan": The key in this case is "name" and the value is "Morgan"
- "name=Petra&age=31": There are two key/value pairs in this, "name"
and
"Petra", and "age" and "31" - "name=Bess&age=&job=Boss": There are three key/value pairs in this
- "name" and "Bess"
- "age" and "" (I guess they didn't answer?)
- "job" and "Boss"
If one of the values contains a character that's not a letter or number, it's
replaced by a weird number that begins with a percent sign. That's known as
URL encoding. The most common replacement is "%20" for the space character. Here
are some valid strings with that replacement.
- "name=Chandra%20K&age=13%20years%20old": This string has two key/value
pairs- "name" and "Chandra K"
- "age" and "13 years old"
- "title=Boop%20Lord": This string has one key/value pair, "title" and
"Boop
Lord"
In the tests that you write, you will not have to write these
"x-www-form-urlencoded" strings. They will be provided to you in the test.
However, you should be able to read them so that you become familiar with how they > work.
Open up the get-value-from-body.js file to see the two lines of code in thegetValueFromBodyfunction that implement this behavior. Notice we are using the built inquerystringmodule in Node.js toparse()ourx-www-form-urlencodedstring.
getValueFromBodytakes in two arguments,bodyandkey. It then parses the
x-www-form-urlencodedbody and returns the value that cooresponds tokey.
To make sure that it behaves, though, there are multiple tests in get-value-from-body-spec.js in the test directory.
Let's look at those.
There are five tests. The first three have the body and key defined for you.
The last two have the body defined and you should figure out the key to test.
544.1. The first test
The first test is returns an empty string for an empty body. So, if the body
is empty, regardless of the key, the getValueFromBody method returns an empty
string.
it('returns an empty string for an empty body', () => { // Arrange const body = ""; const key = "notThere"; // Act // Write code to invoke getValueFromBody and collect // the result // Assert // Replace the fail line with an assertion for the // expected value of "" expect.fail('please write this test'); });
In this test, you need to write the code that invokes the getValueFromBody
method with the body and key arguments. The result that comes back is what
you should assert instead of just having it fail.
Take a moment and try to complete that on your own. The following code snippet
will show you the solution, so give it a shot figuring out the two lines of
code that you need to complete the previous one.
Here's the solution:
it('returns an empty string for an empty body', () => { // Arrange const body = ""; const key = "notThere"; // Act // Write code to invoke getValueFromBody and collect // the result const result = getValueFromBody(body, key); // Assert // Replace the fail line with an assertion for the // expected value of "" expect(result).to.equal(''); });
544.2. The second test
The second test is returns an empty string for a body without the key. So, if
you ask for the value of a key that is not in the body, the getValueFromBody
method returns an empty string.
it('returns an empty string for a body without the key', () => { // Arrange const body = "name=Bess&age=29&job=Boss"; const key = "notThere"; // Act // Write code to invoke getValueFromBody and collect // the result // Assert // Replace the fail line with an assertion for the // expected value of "" expect.fail('please write this test'); });
This code will look very, very similar to the last test. Complete it to make it
pass.
544.3. The third test
The third test, returns the value of the key in a simple body, is also very
similar to the past two tests. In this case, you have to compare it to the
expected value "Bess".
it('returns the value of the key in a simple body', () => { const body = "name=Bess"; const key = "name"; // Act // Write code to invoke getValueFromBody and collect // the result // Assert // Replace the fail line with an assertion for the // expected value of "Bess" expect.fail('please write this test'); });
544.4. The fourth test
The fourth test, returns the value of the key in a complex body, is also very
similar to the past three tests. In this case, you have to choose a key that you
want to test from the existing keys in the body and, then, the value that it has
so that you can make the assertion at the end.
it('returns the value of the key in a complex body', () => { const body = "name=Bess&age=29&job=Boss"; // Select one of the keys in the body // Act // Write code to invoke getValueFromBody and collect // the result // Assert // Replace the fail line with an assertion for the // expected value for the key that you selected expect.fail('please write this test'); });
544.5. The fifth test
The fifth test, decodes the return value of URL encoding, is also very
similar to the past three tests. In this case, you will test the value of the
"level" key. Complete the code with the correct assertion. Remember that %20
should be decoded and be turned into the space character.
it('decodes the return value of URL encoding', () => { const body = "name=Bess&age=29&job=Boss&level=Level%20Thirty-One"; const key = "level"; // Act // Write code to invoke getValueFromBody and collect // the result // Assert // Replace the fail line with an assertion for the // expected value for the "level" key expect.fail('please write this test'); });
545. Testing saving the categories
Open up save-categories.js and review it. This contains a method that pushes
a new category in the newCategory parameter onto the argument provided in
categories (hopefully an array!). Then, it sorts the categories array.
Finally, it returns a "clone" of the array by just creating a new array with all
of the old entries. This is done to keep modifications to the old array from
messing with the new array. It is an implementation detail that you just need to
test for.
Open save-categories-spec,js. It has three tests in it for you to complete.
545.1. The first test
In the first test, you must provide the "Act" stage by calling the
saveCategories method with the provided categories and newCategory
values
and store its return value in a variable named "result".
Of note with the first test is that the assertion (that you do not have to
write) uses the "include" method to test if a value is in an array.
545.2. The second test
In the second test, you must provide the "Assert" stage by writing the assertion
to test using a new method named "eql" rather than "equal". Everything else
remains the same.
The reason that you use [eql] instead of equal is the "type" of equality
each one provides. The equal function, which you've used until now, compares
objects and arrays only by their instance. That means equality between arrays
and objects using equal will only pass if they're the same object in memory.
// Different arrays with the same content expect(['a', 'b']).to.equal(['a', 'b']); // => FAIL // Same arrays const array = ['a', 'b']; expect(array).to.equal(array); // => PASS
The [eql] method performs "member-wise equality". It will compare the values
inside the array as opposed to the instance of the array. Because of that,
both of the previous examples pass with the eql method.
// Different arrays with the same content expect(['a', 'b']).to.eql(['a', 'b']); // => PASS // Same arrays const array = ['a', 'b']; expect(array).to.eql(array); // => PASS
545.3. The third test
In the third test, you must provide the "Arrange" portion. Interestingly, you
can really provide any array and string value. That's an easy one.
546. Et, voila!
It seems that you have fully tested all of the code that it takes to test the
"save category" code. Well done!
You win this round, too!
[eql]: https://www.chaijs.com/api/bdd/#method_eql
[IncomingMessage]: https://nodejs.org/api/http.html#http_class_http_incomingmessage
Create And Serve A To-Do Item Form
To display the form that lets you enter new items, it has to create a dropdown
that contains the categories that are in the application. This is identical in
intent to the code that creates a list of categories to display on the
category screen. Because of that, here's the code that handles displaying the
"new item" screen.
else if (req.url === "/items/new" && req.method === 'GET') { const filePath = path.join(__dirname, 'todo-form-screen.html'); const template = await fs.promises.readFile(filePath, 'utf-8'); const html = mergeCategories(template, categories, 'option'); res.setHeader('Content-Type', 'text/html'); res.writeHead(200); res.write(html); }
In this case, the mergeCategories method is now called with the third argument
of "option" rather than "li" as it was before. This is what the last three tests
in the merge-categories-spec.js file address. You will write tests that
generate "option" tags rather than "li" tags. You'll also test that the
replacement correctly occurred.
In this case, you'll modify the tests in the second sub-"describe" section, the
one that reads "For selects".
547. The first test
The first test reads
it("should return no <option>s for no categories", () => { expect.fail('please write this test'); });
Replace the expect.fail line with a test that properly follows the Three As
of unit testing.
In the arrange section, you will need to create an empty array for the
categories and store it in a variable. You will use the variable in the
action.
In the act section, you will invoke the mergeCategories function with the
template as the first argument, the variable that contains an empty array as
the second argument, and the string 'option' for the tag name as the third
argument. Store the return value in a variable.
In the assert section, assert that each of the following are true in the
return value that you saved in the act section using the [include] assertion
provided by Chai:
- To make sure that the method doesn't remove the wrong things
- Assert that it contains the string "<div>"
- Assert that it contains the string "</div>"
- Assert that it contains the string "<select>"
- Assert that it contains the string "</select>"
- To make sure that the method doesn't add the wrong things
- Assert that it does not contain the string "<option>"
- Assert that it does not contain the string "</option>"
- To make sure it replaces what you expect it to replace
- Assert that it does not contain the string "<!-- Content here -->"
Run the test to make sure it passes.
Except for some string differences, this test will look nearly identical to the
first test that you did for the<li>tags earlier in this project.
- Assert that it does not contain the string "<!-- Content here -->"
548. The second test
The second test reads
it("should return a single <option> for one category", () => { expect.fail('please write this test'); });
Replace the expect.fail line with a test that properly follows the Three As
of unit testing.
In the arrange section, you will need to create an array for the categories
argument that contains a single string and store it in a variable. You will use
the variable in the action and the value that you typed in the assertion.
In the act section, you will invoke the mergeCategories function with the
template as the first argument, the variable that contains the array with the
single value as the second argument, and the string 'option' for the tag name as
the third argument. Store the return value in a variable.
In the assert section, assert that each of the following are true using the
[include] assertion provided by Chai:
- To make sure that the method doesn't remove the wrong things
- Assert that it contains the string "<div>"
- Assert that it contains the string "</div>"
- Assert that it contains the string "<select>"
- Assert that it contains the string "</select>"
- To make sure that the method adds the right things
- Assert that it does contain the string "<option>your string
here</option>" where "your string here" is the single value that you
placed in the array
- Assert that it does contain the string "<option>your string
- To make sure it replaces what you expect it to replace
- Assert that it does not contain the string "<!-- Content here -->"
Run the test to make sure it passes.
Except for some string differences, this test will look nearly identical to the
second test that you did for the<li>tags earlier in this project.
- Assert that it does not contain the string "<!-- Content here -->"
549. The third test
The third test reads
it("should return an <option> for each category", () => { expect.fail('please write this test'); });
Replace the expect.fail line with a test that properly follows the Three As
of unit testing.
In the arrange section, you will need to create an array for the categories
argument that contains multiple strings and store it in a variable. You will use
the variable in the action and the values that you typed in the assertion.
In the act section, you will invoke the mergeCategories function with the
template as the first argument, the variable that contains the array with the
many values as the second argument, and the string 'option' for the tag name as
the third argument. Store the return value in a variable.
In the assert section, assert that each of the following are true using the
[include] assertion provided by Chai:
- To make sure that the method doesn't remove the wrong things
- Assert that it contains the string "<div>"
- Assert that it contains the string "</div>"
- Assert that it contains the string "<select>"
- Assert that it contains the string "</select>"
- To make sure that the method adds the right things, for each of the values
that you put in your categories array:- Assert that it does contain the string "<option>value n</option>"
where "value n" is one of the values in your array
- Assert that it does contain the string "<option>value n</option>"
- To make sure it replaces what you expect it to replace
- Assert that it does not contain the string "<!-- Content here -->"
Run the test to make sure it passes.
Except for some string differences, this test will look nearly identical to the
third test that you did for the<li>tags earlier in this project.
You have won this round!
[include]: https://www.chaijs.com/api/bdd/#method_include
- Assert that it does not contain the string "<!-- Content here -->"
Save And Show To-Do Items
In this step, you'll test the code for two different handlers, the one that
shows the screen that has the list of items on it and the one that handles the
creation of a new item. Here are those two parts of the if-else block in
server.js.
else if (req.url === "/items" && req.method === 'GET') { const filePath = path.join(__dirname, 'list-of-items-screen.html'); const template = await fs.promises.readFile(filePath, 'utf-8'); const html = mergeItems(template, items); res.setHeader('Content-Type', 'text/html'); res.writeHead(200); res.write(html); } else if (req.url === "/items" && req.method === 'POST') { const body = await getBodyFromRequest(req); const category = getValueFromBody(body, 'category') const title = getValueFromBody(body, 'title') items = saveItems(items, { title, category }); res.setHeader('Location', '/items'); res.writeHead(302); }
What's really great to note here is that you have already tested
getBodyFromRequest and getValueFromBody! That means, out of all that code,
there are only two methods for which you must write tests! Those are
mergeItems and saveItems.
550. Testing the merge items method
This is really similar to the mergeCategories method that you've now written
tests for twice. But, instead of creating an <li> or an <option>, it creates
a row
for a table for the items that are passed in and a form that shows a button
to complete the item.
Open merge-items.js and review that code, please. You can see the loop on
lines 5 - 23 that builds the rows of the table. Then, the form is created only
if the item is not complete. Then, the <tr> and its <td>s are
created. This just
means that you will want to test instead of for <li>s and <option>s,
you'll test for many <td>s that contain the expected values.
Open merge-items-spec.js and see that you have essentially the same tests
that you had for the mergeCategories function. It may not surprise you to
learn that many tests look the same, especially if they handle similar
functionality. This can get monotonous, at times. It is better, though, to have
the protection of tests by investing a little bit of time in writing them as
opposed to spending days trying to find a bug that inadvertently got into the
code base when someone was writing other code.
550.1. The first test
The first test reads
it("should return no <tr>s and no <td>s for no items", () => { expect.fail('please write this test'); });
Replace the expect.fail line with a test that properly follows the Three As
of unit testing.
In the arrange section, you will need to create an empty array for the items
and store it in a variable. You will use the variable in the action.
In the act section, you will invoke the mergeItems function with the
template as the first argument and the variable that contains an empty array
as the second argument. Store the return value in a variable.
In the assert section, assert that each of the following are true using the
[include] assertion provided by Chai on the result of the act:
- To make sure that the method doesn't remove the wrong things
- Assert that it contains the string "<table>"
- Assert that it contains the string "</table>"
- Assert that it contains the string "<tbody>"
- Assert that it contains the string "</tbody>"
- To make sure that the method doesn't add the wrong things
- Assert that it does not contain the string "<tr>"
- Assert that it does not contain the string "</tr>"
- Assert that it does not contain the string "<td>"
- Assert that it does not contain the string "</td>"
- To make sure it replaces what you expect it to replace
- Assert that it does not contain the string "<!-- Content here -->"
Run the test to make sure it passes.
Because you already have examples of what this looks like inmergeCategories,
please refer to that.
- Assert that it does not contain the string "<!-- Content here -->"
550.2. The second test
The second test reads
it("should return a single <tr>, four <td>s, and a <form> for one uncompleted item", () => { expect.fail('please write this test'); });
Replace the expect.fail line with a test that properly follows the Three As
of unit testing.
If you look at the code in the mergeItems method, you can see that it relies
on the item to have the following properties:
titlecategoryisComplete
In the arrange section, you will need to create an array for theitems
argument that contains a single item and store it in a variable. You will use
the variable in the action and the value that you typed in the assertion.
Something like the following would suffice.
const items = [ { title: 'Title 1', category: 'Category 1' }, ];
In the act section, you will invoke the mergeItems function with the
template as the first argument and the variable that contains an array that
contains a single item as the second argument.
In the assert section, assert that each of the following are true using the
[include] assertion provided by Chai:
- To make sure that the method doesn't remove the wrong things
- Assert that it contains the string "<table>"
- Assert that it contains the string "</table>"
- Assert that it contains the string "<tbody>"
- Assert that it contains the string "</tbody>"
- To make sure that the method adds the right things
- Assert that it contains the string "<tr>"
- Assert that it contains the string "</tr>"
- Assert that it contains the string "<td>Title 1</td>"
- Assert that it contains the string "<td>Category 1</td>"
- Assert that it contains the string "<form method="POST"
action="/items/1">"
- To make sure it replaces what you expect it to replace
- Assert that it does not contain the string "<!-- Content here -->"
Run the test to make sure it passes.
- Assert that it does not contain the string "<!-- Content here -->"
550.3. The third test
Now, you will test that no form is created when an item is complete. This will
be nearly identical to what you just wrote except that your item should have
an "isComplete" property set to true, and you will assert that it does not
contain the "<form method="POST" action="/items/1">" string.
Replace the expect.fail line with a test that properly follows the Three As
of unit testing.
In the arrange section, you will need to create an array for the items
argument that contains a single item that is completed and store it in a
variable. Something like the following would suffice.
const items = [ { title: 'Title 1', category: 'Category 1', isComplete: true }, ];
In the act section, you will invoke the mergeItems function with the
template as the first argument and the variable that contains an array that
contains a single completed item as the second argument.
In the assert section, assert that each of the following are true using the
[include] assertion provided by Chai:
- To make sure that the method doesn't remove the wrong things
- Assert that it contains the string "<table>"
- Assert that it contains the string "</table>"
- Assert that it contains the string "<tbody>"
- Assert that it contains the string "</tbody>"
- To make sure that the method adds the right things
- Assert that it contains the string "<tr>"
- Assert that it contains the string "</tr>"
- Assert that it contains the string "<td>Title 1</td>"
- Assert that it contains the string "<td>Category 1</td>"
- To make sure that the method does not add the wrong things
- Assert that it does not contain the string "<form method="POST"
action="/items/1">"
- Assert that it does not contain the string "<form method="POST"
- To make sure it replaces what you expect it to replace
- Assert that it does not contain the string "<!-- Content here -->"
Run the test to make sure it passes.
- Assert that it does not contain the string "<!-- Content here -->"
550.4. The fourth test
Now, try writing the last test it('should return three <tr>s for three items') as a
combination or extension of the previous two. Check to make sure that you get all of the indexes for the items
that you have in your array. Make sure that the "form" elements appear for those items that are not
complete.
551. Testing the save items method
Open the save-items.js file and review the function. It merely adds a new
item to the array passed in using the push method. Then, it creates a clone
of the old array using the "spread operator". If you're not familiar with that
syntax, don't worry. All it does is make a copy of the array.
Open the save-items-spec.js. You will see two methods in there. These are
nearly identical to the first and last tests for the saveCategories method.
Use the same pattern to complete those tests.
Just as a reminder, a solution for the save-categories-spec.js file (with
comments removed) could look like this.
describe("The saveCategories function", () => { it('adds the new category to the list', () => { const categories = ['Cat 3', 'Cat 2']; const newCategory = 'Cat 1'; const result = saveCategories(categories, newCategory); expect(result).to.contain(newCategory); }); it('makes sure the result and the original are different', () => { const categories = ['Cat 3', 'Cat 2']; const result = saveCategories(categories, 'Cat 1'); expect(result).to.not.equal(categories); }); });
Your code will look a lot like this except you should have arrays of items and
new items, not strings. Remember from the last section, an array of items might
look like this:
const items = [ { title: 'Title 1', category: 'Category 1' }, ];
Run your tests to make sure they pass.
Show And Complete A To-Do Item
You're almost done with testing this application! Have a look at the method that
completes a to-do item.
else if (req.url.startsWith('/items/') && req.method === 'POST') { const index = Number.parseInt(req.url.substring(7)) - 1; items[index].isComplete = true; res.setHeader('Location', '/items'); res.writeHead(302); }
That's interesting. There's nothing to test there, no methods. That's some kind
of wonderful! On to the next item!
Search For To-Do Items
What may be the most complex set of tests to write (except that weird event
emitter thing), search makes you think though what it should do in a variety
of cases.
Here's the relevant part of the server that handles a search query.
else if (req.url.startsWith('/search') && req.method === 'GET') { const [_, query] = req.url.split('?', 2); const { term } = querystring.parse(query); const filePath = path.join(__dirname, 'search-items-screen.html'); const template = await fs.promises.readFile(filePath, 'utf-8'); let foundItems = []; if (term) { foundItems = searchItems(items, term); } const html = mergeItems(template, foundItems); res.setHeader('Content-Type', 'text/html'); res.writeHead(200); res.write(html); }
You've already tested mergeItems, so that's not needed, again. The only method
that you will need to test is searchItems.
Open search-items.js and review how that code is working. It takes a list of
items and a search term. The first thing it does is force the term to lower
case.
term = term.toLowerCase();
Then, it uses the filter function on the array to create a new array of items
that meet the comparison in the function. The comparison function makes the
title lower case and checks to see if the term is contained in that string.
return items.filter(x => { const title = x.title.toLowerCase(); return title.indexOf(term) >= 0; });
If the term is in the title, then the comparison returns true and the
filter function will add it to the new array. If the term is not in the
title, the comparison returns false and it is not added to the new array.
Here is an example. Supposed you have the following items in your array.
[ { title: 'Go grocery shopping', category: 'Home' }, { title: 'Play with my puppy', category: 'Pet' }, { title: 'Shop for a puppy bed', category: 'Pet' }, ]
Now, say the search term someone entered is "SHOP". This is what happens in the
function.
Convert "SHOP" to "shop"
Filter the array of items based on the term "shop":
Item 1:
Convert "Go grocery shopping" to "go grocery shopping"
Does it contain the term "shop"? YES
Add it to the new array
Item 2:
Convert "Play with my puppy" to "play with my puppy"
Does it contain the term "shop"? NO
Item 3:
Convert "Shop for a puppy bed" to "shop for a puppy bed"
Does it contain the term "shop"? YES
Add it to the new array
Return the new array that contains items 1 and 3
So, that's what you want to test for.
Open search-items-spec.js. You'll see three tests.
In the first test, you are asked to fix the arrange step to declare items
and term given the directions. This is not a trick. It's just declaring those
two variables that it's asking you to create.
In the second test, fix the assert step to assert the proper length of the
result by completely replacing the expect.fail line.
In the third test, you are asked to fix the arrange step by choosing a string
value for term that makes the rest of the test pass.
552. What have you done?
Now that you've done that, you've won the entire game! All of the meaty logic of
the game is now well tested. If someone were to come along and try to change the
code, when the tests ran, it would check to make sure they didn't accidentally
break something in their earnest to add new functionality!
Here's what you did:
- You've looked at, read, and understood other people's code
- You've seen and used a variety of assertions
- You've seen how to do real (not fake) asynchronous testing using the
done
method - You've invested time in hardening the maintainability of an application
Here's a link to a solution.
https://appacademy-open-assets.s3-us-west-1.amazonaws.com/Module-JavaScript/testing/projects/testing-an-existing-project-solution.zip
In the next step, you're going to use the fact that you have tests to radically
change the code.
Refactor To Use A Template Engine
Note: the solution project does not have this step included in it because
it changes earlier tests.
The hard work you've done with mergeCategories and mergeItems to make sure
that the important parts of the HTML are generated, those are some really good
tests that you're now going to use to change the way the entire HTML is
generated.
This is the other side of testing. When you can feel confident that what you
are doing will not break the code because you have tests that tell you what to
do.
You're going to follow some steps to replace the HTML-generating portion of the
application. The steps will be explicit, because this is less about learning a
library as it is proving to yourself that tests are a good thing.
553. Hello, handlebars
There's very little chance that you would create a Web application, anymore, and
generate your own HTML the way it was done in the mergeCategories and
mergeItems functions. Instead, you would use a "templating engine" which is a
library that takes some template (with some fancy instructions) and some data
and generates HTML for you.
You'll change your tests to use a [handlebars] style template which looks nearly
identical to HTML. This will break your tests. Then, you will change the
functions to use the [handlebars] engine. Then, you will know that they properly
handle [handlebars] templates, so you'll change the HTML files to use that
syntax rather than using the "<!-- Content here -->" placeholder.
554. All you need to know about handlebars
This is just an informative section so you know what will actually be going on
in the tests. You're not going to be asked to come up with any of this yourself.
This is showing you how you would, in the real world, update existing code and
tests in a real application.
When you use the handlebars engine, you pass it two things, a string that
contains the template and an object that contains the data that you want to
show.
Assume that this is your data object.
const data = { name: 'Remhai', nicknames: [ 'R', 'Rem', 'Remrem' ], addresses: [ { street: '123 Main St', city: 'Memphis', state: 'TN' }, { street: '2000 9th Ave', city: 'New York', state: 'NY' }, ], };
In your template, if you want to output the value in the name property, you
just put the name of the property in double curly brackets.
<div> Name: {{ name }} </div>
In your template, if you want to output all of the nicknames of the person, you
loop over that property using the #each helper like this. Then, inside the
#each "block", you refer to the value of the string itself as this.
<ul> {{#each nicknames}} <li>{{ this }}</li> {{/each}} </ul>
In your template, if you want to output all of the addresses of the person, you
loop over the property using the #each helper in which you will use the
property names of the objects inside the array. You can use @index to give you
the current index.
<tbody> {{#each addresses}} <tr> <td>{{ @index }}</td> <td>{{ street }}</td> <td>{{ city }}</td> <td>{{ state }}</td> </tr> {{/each}} </tbody>
If you want to do a conditional, you can just do something like this.
{{#if isVisible}}
<div>You can see me!</div>
{{else}}
<div></div>
{{/if}}
So, that's handlebars. Again, it's just so that you can understand the syntax
of the tests and HTML that you'll be changing.
555. Install handlebars
You just need to use npm to do this. npm install handlebars. Yay!
To do some math, you'll need to install some handlebars helpers. You just need
to use npm to do this. npm install handlebars-helpers. Yay!
556. Now, change your merge items test
Inside merge-items-spec.js, you will change the template string. And, that
is all you'll change. Instead of having the "<!-- Content here -->", you'll
replace that with handlebars code. Then, your tests will fail. Then, you'll make
then pass. Once they pass, you'll know you're safe to change the real HTML
file.
Update the template from what it is now to the following code.
const template = ` <table> <tbody> {{#each items}} <tr> <td>{{ add @index 1 }}</td> <td>{{ title }}</td> <td>{{ category }}</td> <td> {{#if isComplete}} {{else}} <form method="POST" action="/items/{{ add @index 1 }}"> <button class="pure-button">Complete</button> </form> {{/if}} </td> </tr> {{/each}} </tbody> </table> `;
This seems like a lot when compared to the other template we had. However, this
moves all of the HTML-generation to the template. There will be no looping and
string manipulation in the mergeItems function after you're done with it.
Run your tests and make sure they fail. Without a failing test, you don't know
what to fix. And, in this case, all three tests fail.
557. Fix the merge items function
Now that you have this, it's time to update the mergeItems function. You'll
know you're done when the tests all pass.
Inside mergeItems, import the handlebars library at the top of your file,
the helpers library, and then register the 'math' helpers with the handlebars library
according to the [helpers documentation]. We need this so we can use the add
helper in the template to add 1 to the @index.
const handlebars = require('handlebars'); const helpers = require('handlebars-helpers'); helpers.math({ handlebars });
Now, delete everything inside the function. Replace it with the following
lines.
const render = handlebars.compile(template); return render({ items });
You've moved the complexity of the HTML generation from the source code to the
HTML code. HTML code is easier to change because it's only about the display and
generally won't crash your entire application.
558. Now, change your merge categories tests
Open merge-categories-spec.js. Change the first template to this code.
const template = ` <div> <ul> {{#each categories}} <li>{{ this }}</li> {{/each}} </ul> </div> `;
Change the second template to this code.
const template = ` <div> <select> {{#each categories}} <option>{{ this }}</option> {{/each}} </select> </div> `;
Now, your merge categories tests should not work. Run them to make sure.
559. Fix the merge categories function
Open merge-categories.js and import just handlebars. There's no math in
the templates, so there's no need for the helpers.
const handlebars = require('handlebars');
Again, delete everything inside the function and replace it with the following
to make the tests pass, again.
const render = handlebars.compile(template); return render({ categories });
AMAZING!
560. What just happened?
You just performed a major refactor of the application and you knew you did it
because you had tests to guide you during the refactor!
Here's an even more amazing thing. You did it without actually running the
code! You did it because you had tests that told you if the inputs and outputs
matched your expectations!
Now, you can change the content of the HTML pages to use the new handlebars
syntax. There are only four of them, and you can use the stuff from your tests
to update the source code.
Open category-list-screen.html and replace the "<!-- Content here -->"
with this handlebars syntax lifted straight from the tests.
{{#each categories}}
<li>{{ this }}</li>
{{/each}}
Open list-of-items-screen.html and replace the "<!-- Content here -->"
with this handlebars syntax lifted straight from the tests.
{{#each items}}
<tr>
<td>{{ add @index 1 }}</td>
<td>{{ title }}</td>
<td>{{ category }}</td>
<td>
{{#if isComplete}}
{{else}}
<form method="POST" action="/items/{{ add @index 1 }}">
<button class="pure-button">Complete</button>
</form>
{{/if}}
</td>
</tr>
{{/each}}
Open search-items-screen.html and replace the "<!-- Content here -->"
with this handlebars syntax lifted straight from the tests.
{{#each items}}
<tr>
<td>{{ add @index 1 }}</td>
<td>{{ title }}</td>
<td>{{ category }}</td>
<td>
{{#if isComplete}}
{{else}}
<form method="POST" action="/items/{{ add @index 1 }}">
<button class="pure-button">Complete</button>
</form>
{{/if}}
</td>
</tr>
{{/each}}
Open todo-form-screen.html and replace the "<!-- Content here -->"
with this handlebars syntax lifted straight from the tests.
{{#each categories}}
<option>{{ this }}</option>
{{/each}}
That completes the upgrade of the HTML files. You can run your server using
node server.js and checkout that everything just works by going to
http://localhost:3000/items.
561. Just another note
This may not seem very amazing to you. This unit testing revolutionized the
way that programmers write software! The fact that you could go into a code
base and run tests to see how code works, change code and know that you haven't
broken anything, that enabled people to work more confidently that they were
not introducing bugs into the software as they were going along.
This is the stuff dreams are made of.
So, good work. Good work
[handlebars]: https://handlebarsjs.com/
[helpers documentation]: https://github.com/helpers/handlebars-helpers#usage
562. Data Structures & Algorithms & Networking
WEEK 7
Data Structures and Algorithms
GitHub Profile and Projects Learning Objectives
- Improving Your Profile Using GitHub
- Your GitHub Identity
Big O Learning Objectives
Memoization And Tabulation Learning Objectives - Recursion Videos
- Curating Complexity: A Guide to Big-O Notation
- Common Complexity Classes
- Memoization
- Tabulation
- Analysis of Linear Search
- Analysis of Binary Search
- Analysis of the Merge Sort
- Analysis of Bubble Sort
- LeetCode.com
- Memoization Problems
- Tabulation Problems
Sorting Algorithms Learning Objectives - Bubble Sort
- Selection Sort
- Insertion Sort
- Merge Sort
- Quick Sort
- Binary Search
- Bubble Sort Analysis
- Selection Sort Analysis
- Insertion Sort Analysis
- Merge Sort Analysis
- Quick Sort Analysis
- Binary Search Analysis
- Practice: Bubble Sort
- Practice: Selection Sort
- Practice: Insertion Sort
- Practice: Merge Sort
- Practice: Quick Sort
- Practice: Binary Search
Lists, Stacks, and Queues Learning Objectives - Linked Lists
- Stacks and Queues
- Linked List Project
- Stack Project
- Queue Project
Graphs and Heaps Learning Objectives - Introduction to Heaps
- Heaps Project
WEEK-07 DAY-1
Your GitHub Identity
GitHub Profile and Projects Learning Objectives
GitHub is a powerful platform that hiring managers and other developers can use
to see how you create software.
- You will be able to participate in the social aspects of GitHub by starring
repositories, following other developers, and reviewing your followers - You will be able to use Markdown to write code snippets in your README files
- You will craft your GitHub profile and contribute throughout the course by
keeping your "gardens green" - You will be able to identify the basics of a good Wiki entries for proposals
and minimum viable products - You will be able to identify the basics of a good project README that includes
technologies at the top, images, descriptions and code snippetsing managers and other developers can use
to see how you create software. - You will be able to participate in the social aspects of GitHub by starring
repositories, following other developers, and reviewing your followers - You will be able to use Markdown to write code snippets in your README files
- You will craft your GitHub profile and contribute throughout the course by
keeping your "gardens green" - You will be able to identify the basics of a good Wiki entries for proposals
and minimum viable products - You will be able to identify the basics of a good project README that includes
technologies at the top, images, descriptions and code snippets
Improving Your Profile Using GitHub
By now you are likely familiar with certain aspects of GitHub. You know how to
create repos and add and commit code, but there is much, much more that GitHub
can do.
GitHub is an online community of software engineers - a place where we not only
house our code, but share ideas, express feedback, gain inspiration, and present
ourselves as competent, qualified software engineers. Yes, this is a place to
manage version control and collaborate on projects, but in this module we are
going to discuss how to harness the power of GitHub to your advantage.
Aside from your actual code repositories, there are several other sections that
represent who you are as a developer.
- Followers and Following: Think of this as your “friends’ list on GitHub.
If you see a social media profile of a person with two friends, what are you
going to think? Though you’re not expected to have hundreds of followers on
GitHub, you should follow your peers and encourage them to follow you to show
industry engineers that there are people who would vouch for your skillset. - Stars: These are the “likes” on your GitHub profile. Similar to
encouraging others to follow you and following them, you should also “star”
their popular repositories. By the end of the curriculum, you should have
several stars on each of your portfolio projects. - Green Gardens: This is birds-eye view of your “newsfeed” if your newsfeed
reflected the number of commits that you were making. If you are very active
on GitHub, your activity squares, AKA “green gardens” will be verdant and
green. This tells anyone who views your profile that you are actively coding
and engaged with your identity as a software engineer. However, if your “green
gardens” are not green, this suggests that you are not actively coding and
therefore perhaps not the best candidates for a development job. - Photo and brief intro: This is fairly straight-forward and should mirror
the photo from you LinkedIn. Choose a professional photo and brief description
that highlights the fact that you are a software engineer.
Your followers, stars, green gardens, and photo represent who you are as a
developer and should be constantly monitored and updated. It can be easy to fall
into the trap of not pushing commits to GitHub or keeping your commits on your
local machine - be careful to avoid these tendencies because they are
counter-productive to your candidacy as a software engineer.
Not only is GitHub as representation of you as a developer, but it is also a
place to present proposals, recaps, and provide additional project context. Two
features that you will soon become familiar with are Wikis and READMEs.
563. Wikis (pre-project)
Wikis are features of PUBLIC repositories on GitHub and are where your design
documents, explanation of technologies used and insight into what your repo
contains will live.
Wikis are created at the beginning of any significant project and should be
updated as your project evolves.
To create or update your repository’s Wiki, click on the “Wiki” tab in your repo
header and click “Edit” to update your home page and “New Page” to add a new
section.

Best practices for Wiki creation:
- List of technologies in a visually accessible place
- Separate design documents into their own sections
- Write clearly and concisely - grammar and spelling matters!
Design documents will become very important when you begin your projects, but
for now just know that you will spend time creating a solid Wiki in order to
facilitate a smooth development process. One of the most important aspects of
your Wiki will be the outline of your project’s features and the minimum
viable product (MVP).
As you begin any project, you will consider what constitutes a “final product”
and break down features into bite-sized “minimum viable products.” For example,
if you intend to create an a/A version of Twitter, your list of MVPs may
include: - Users are able to log into application
- Users are able to create, edit, and delete tweets
- Users are able to follow other users and see their tweets
- Users are able to like other users tweets
- Users are able to comment on other users tweets
In order for your project to stay on track, it is very important to break down
your features and tackle one MVP at a time. All of the MVPs combined result in a
final application.
Your MVP breakdown will live in your project’s Wiki and is subject to evolution.
As your project comes to life, your MVPs may merge, divide, or become
irrelevant. Update your Wiki as things change and continue to referring to it as
your go through the development process.
564. README files (post-project)
READMEs are text files that introduce and explain a project. Typically, READMEs
are created and completed when you are ready to roll your application into
production. READMEs should contain information about two impressive features
that you implemented in your project, the technologies used, how to install the
program, and anything else that makes you stand out as a software developer.
Think of READMEs as the “first impression” that prospective employers,
colleagues, and peers will have of you as a developer. You want their first
impression to be “wow, this person is thorough and this project sounds
interesting,” not “oh no, typos, missing instructions, and snores-galore.”
When it is time to create your README, you should allocate about three hours to
guarantee you have enough time to make your project shine.
README.md files are written using markdown syntax (.md) which makes them appear
nicely on-screen. Markdown is a lightweight markup language with plain text
formatting syntax. It’s a very simple language used to create beautiful and
presentable README and Wiki files for GitHub. There are many good resources out
there for creating markdown documents, but here are two of our favorite:
- GitHub's guide to [Mastering Markdown]
- [Repository with a collection of examples]
- [Browser side-by-side markdown and on-screen program] (this is a favorite, code
here and copy markdown into GitHub).
README Best Practices - Divide your README into distinct sections
- List the technologies used at the top of your README for increased visibility
- Include nice pictures or Gifs to show and/or demonstrate how things work
- Include code snippets
- Provide instructions for how to install project (if applicable)
- Include link to the live site
565. Wrap up
The bottom line is that the way you represent yourself on GitHub matters! Take
the time you need to write clearly, accurately reflect your process and
applications, and immerse yourself in the diverse and interesting pool of
software professionals who work and play on GitHub.
[Mastering Markdown]: https://guides.github.com/features/mastering-markdown/
[Repository with a collection of examples]: https://github.com/matiassingers/awesome-readme
[Browser side-by-side markdown and on-screen program]: https://stackedit.io/app#
Your GitHub Identity
It is hard to write about yourself. But, today, you need to do that. This is a
day of starting to establish how other software developers and hiring managers
will perceive you.
Go to your GitHub profile page. Edit your profile to contain your description,
"App Academy (@appacademy)" as your current company, your location (if you
desire), and your Web site.
Now, make a personal Web site for your GitHub profile. You can do that using
GitHub Pages. Follow the instructions at [Getting Started with GitHub Pages] to
create your site, add a theme, create a custom 404, and use HTTPS (if you want).
Spend time writing about yourself. Like you read earlier, this is hard. But,
tell the story of you in a way that will engage people.
Now, go follow all of your class mates and star their personal Web site
repository, if they created one.
If you want to get really fancy and set up a blog, you can use a "static site
generator" known as Jekyll to do that. It's a Ruby-based program; however,
you don't need to know Ruby to use it. All you have to be able to do is use
command line programs, something you're really getting to be a pro at! To do
this, follow the well-documented instructions at [Setting up a GitHub Pages site
with Jekyll].
[Getting Started with GitHub Pages]: https://help.github.com/en/github/working-with-github-pages/getting-started-with-github-pages
[Setting up a GitHub Pages site with Jekyll]: https://help.github.com/en/github/working-with-github-pages/setting-up-a-github-pages-site-with-jekyll
WEEK-07 DAY-2
Big-O and Optimizations
Big O Learning Objectives
The objective of this lesson is get you comfortable with identifying the
time and space complexity of code you see. Being able to diagnose time
complexity for algorithms is an essential for interviewing software engineers.
At the end of this, you will be able to
- Order the common complexity classes according to their growth rate
- Identify the complexity classes of common sort methods
- Identify complexity classes of codeable with identifying the
time and space complexity of code you see. Being able to diagnose time
complexity for algorithms is an essential for interviewing software engineers.
At the end of this, you will be able to - Order the common complexity classes according to their growth rate
- Identify the complexity classes of common sort methods
- Identify complexity classes of code
Memoization And Tabulation Learning Objectives
The objective of this lesson is to give you a couple of ways to optimize a
computation (algorithm) from a higher complexity class to a lower complexity
class. Being able to optimize algorithms is an essential for interviewing
software engineers.
At the end of this, you will be able to
- Apply memoization to recursive problems to make them less than polynomial
time. - Apply tabulation to iterative problems to make them less than polynomial
time.** is to give you a couple of ways to optimize a
computation (algorithm) from a higher complexity class to a lower complexity
class. Being able to optimize algorithms is an essential for interviewing
software engineers.
At the end of this, you will be able to - Apply memoization to recursive problems to make them less than polynomial
time. - Apply tabulation to iterative problems to make them less than polynomial
time.
Recursion Videos
A lot of algorithms that we use in the upcoming days will use recursion. The
next two videos are just helpful reminders about recursion so that you can get
that thought process back into your brain.
Big-O By Colt Steele
Colt Steele provides a very nice, non-mathy introduction to Big-O notation.
Please watch this so you can get the easy introduction. Big-O is, by its very
nature, math based. It's good to get an understanding before jumping in to
math expressions.
[Complete Beginner's Guide to Big O Notation] by Colt Steele.
[Complete Beginner's Guide to Big O Notation]: https://www.youtube.com/embed/kS_gr2_-ws8
Curating Complexity: A Guide to Big-O Notation
As software engineers, our goal is not just to solve problems. Rather, our goal
is to solve problems efficiently and elegantly. Not all solutions are made
equal! In this section we'll explore how to analyze the efficiency of algorithms
in terms of their speed (time complexity) and memory consumption (space
complexity).
In this article, we'll use the word efficiency to describe the amount of
resources a program needs to execute. The two resources we are concerned with
are time and space. Our goal is to minimize the amount of time and space
that our programs use.
When you finish this article you will be able to:
- explain why computer scientists use Big-O notation
- simplify a mathematical function into Big-O notation
566. Why Big-O?
Let's begin by understanding what method we should not use when describing the
efficiency of our algorithms. Most importantly, we'll want to avoid using
absolute units of time when describing speed. When the software engineer
exclaims, "My function runs in 0.2 seconds, it's so fast!!!", the computer
scientist is not impressed. Skeptical, the computer scientist asks the following
questions:
- What computer did you run it on? Maybe the credit belongs to the hardware
and not the software. Some hardware architectures will be better for certain
operations than others. - Were there other background processes running on the computer that could have
effected the runtime? It's hard to control the environment during
performance experiments. - Will your code still be performant if we increase the size of the input? For
example, sorting 3 numbers is trivial; but how about a million numbers?
The job of the software engineer is to focus on the software detail and not
necessarily the hardware it will run on. Because we can't answer points 1 and 2
with total certainty, we'll want to avoid using concrete units like
"milliseconds" or "seconds" when describing the efficiency of our algorithms.
Instead, we'll opt for a more abstract approach that focuses on point 3. This
means that we should focus on how the performance of our algorithm is affected
by increasing the size of the input. In other words, how does our performance
scale?
The argument above focuses on time, but a similar argument could also be
made for space. For example, we should not analyze our code in terms of the
amount of absolute kilobytes of memory it uses, because this is dependent on
the programming language.
567. Big-O Notation
In Computer Science, we use Big-O notation as a tool for describing the
efficiency of algorithms with respect to the size of the input argument(s). We
use mathematical functions in Big-O notation, so there are a few big picture
ideas that we'll want to keep in mind:
- The function should be defined in terms of the size of the input(s).
- A smaller Big-O function is more desirable than a larger one. Intuitively,
we want our algorithms to use a minimal amount of time and space. - Big-O describes the worst-case scenario for our code, also known as the
upper bound. We prepare our algorithm for the worst case, because the
best case is a luxury that is not guaranteed. - A Big-O function should be simplified to show only its most dominant
mathematical term.
The first 3 points are conceptual, so they are easy to swallow. However, point 4
is typically the biggest source of confusion when learning the notation. Before
we apply Big-O to our code, we'll need to first understand the underlying math
and simplification process.
567.1. Simplifying Math Terms
We want our Big-O notation to describe the performance of our algorithm with
respect to the input size and nothing else. Because of this, we should to
simplify our Big-O functions using the following rules:
- Simplify Products: if the function is a product of many terms, we drop the
terms that don't depend on the size of the input. - Simplify Sums: if the function is a sum of many terms, we keep the term
with the largest growth rate and drop the other terms.
We'll look at these rules in action, but first we'll define a few things: - n is the size of the input
- T(f) refers to an unsimplified mathematical function
- O(f) refers to the Big-O simplified mathematical function
567.2. Simplifying a Product
If a function consists of a product of many factors, we drop the factors that
don't depend on the size of the input, n. The factors that we drop are called
constant factors because their size remains consistent as we increase the size
of the input. The reasoning behind this simplification is that we make the input
large enough, the non-constant factors will overshadow the constant ones. Below
are some examples:
| Unsimplified | Big-O Simplified |
|---|---|
| T( 5 * n2 ) | O( n2 ) |
| T( 100000 * n ) | O( n ) |
| T( n / 12 ) | O( n ) |
| T( 42 * n * log(n) ) | O( n * log(n) ) |
| T( 12 ) | O( 1 ) |
Note that in the third example, we can simplify T( n / 12 ) to O( n )
because we can rewrite a division into an equivalent multiplication. In other
words, T( n / 12 ) = T( 1/12 * n ) = O( n ).
567.3. Simplifying a Sum
If the function consists of a sum of many terms, we only need to show the term
that grows the fastest, relative to the size of the input. The reasoning behind
this simplification is that if we make the input large enough, the fastest
growing term will overshadow the other, smaller terms. To understand which term
to keep, you'll need to recall the relative size of our common math terms from
the previous section. Below are some examples:
| Unsimplified | Big-O Simplified |
|---|---|
| T( n3 + n2 + n ) | O( n3 ) |
| T( log(n) + 2n ) | O( 2n ) |
| T( n + log(n) ) | O( n ) |
| T( n! + 10n ) | O( n! ) |
567.4. Putting it all together
The product and sum rules are all we'll need to Big-O simplify any math
functions. We just apply the product rule to drop all constants, then apply the
sum rule to select the single most dominant term.
| Unsimplified | Big-O Simplified |
|---|---|
| T( 5n2 + 99n ) | O( n2 ) |
| T( 2n + nlog(n) ) | O( nlog(n) ) |
| T( 2n + 5n1000) | O( 2n ) |
Aside: We'll often omit the multiplication symbol in expressions as a form of
shorthand. For example, we'll write O( 5n2 ) in place of O( 5 *
n2 ).
568. What you've learned
In this reading we:
- explained why Big-O is the preferred notation used to describe the efficiency
of algorithms - used the product and sum rules to simplify mathematical functions into Big-O
notation
Common Complexity Classes
Analyzing the efficiency of our code seems like a daunting task because there
are many different possibilities in how we may choose to implement something.
Luckily, most code we write can be categorized into one of a handful of common
complexity classes. In this reading, we'll identify the common classes and
explore some of the code characteristics that will lead to these classes.
When you finish this reading, you should be able to:
- name and order the seven common complexity classes
- identify the time complexity class of a given code snippet
569. The seven major classes
There are seven complexity classes that we will encounter most often. Below is a
list of each complexity class as well as its Big-O notation. This list is
ordered from smallest to largest. Bear in mind that a "more efficient"
algorithm is one with a smaller complexity class, because it requires fewer
resources.
| Big-O | Complexity Class Name |
|---|---|
| O(1) | constant |
| O(log(n)) | logarithmic |
| O(n) | linear |
| O(n * log(n)) | loglinear, linearithmic, quasilinear |
| O(nc) - O(n2), O(n3), etc. | polynomial |
| O(cn) - O(2n), O(3n), etc. | exponential |
| O(n!) | factorial |
There are more complexity classes that exist, but these are most common. Let's
take a closer look at each of these classes to gain some intuition on what
behavior their functions define. We'll explore famous algorithms that correspond
to these classes further in the course.
For simplicity, we'll provide small, generic code examples that illustrate the
complexity, although they may not solve a practical problem.
569.1. O(1) - Constant
Constant complexity means that the algorithm takes roughly the same number of
steps for any size input. In a constant time algorithm, there is no relationship
between the size of the input and the number of steps required. For example,
this means performing the algorithm on a input of size 1 takes the same number
of steps as performing it on an input of size 128.
569.1.1. Constant growth
The table below shows the growing behavior of a constant function. Notice that
the behavior stays constant for all values of n.
| n | O(1) |
|---|---|
| 1 | ~1 |
| 2 | ~1 |
| 3 | ~1 |
| ... | ... |
| 128 | ~1 |
569.1.2. Example Constant code
Below is are two examples of functions that have constant runtimes.
// O(1) function constant1(n) { return n * 2 + 1; } // O(1) function constant2(n) { for (let i = 1; i <= 100; i++) { console.log(i); } }
The runtime of the constant1 function does not depend on the size of the
input, because only two arithmetic operations (multiplication and addition) are
always performed. The runtime of the constant2 function also does not depend
on the size of the input because one-hundred iterations are always performed,
irrespective of the input.
569.2. O(log(n)) - Logarithmic
Typically, the hidden base of O(log(n)) is 2, meaning O(log2(n)).
Logarithmic complexity algorithms will usual display a sense of continually
"halving" the size of the input. Another tell of a logarithmic algorithm is that
we don't have to access every element of the input. O(log2(n)) means
that every time we double the size of the input, we only require one additional
step. Overall, this means that a large increase of input size will increase the
number of steps required by a small amount.
569.2.1. Logarithmic growth
The table below shows the growing behavior of a logarithmic runtime function.
Notice that doubling the input size will only require only one additional
"step".
| n | O(log2(n)) |
|---|---|
| 2 | ~1 |
| 4 | ~2 |
| 8 | ~3 |
| 16 | ~4 |
| ... | ... |
| 128 | ~7 |
569.2.2. Example logarithmic code
Below is an example of two functions with logarithmic runtimes.
// O(log(n)) function logarithmic1(n) { if (n <= 1) return; logarithmic1(n / 2); } // O(log(n)) function logarithmic2(n) { let i = n; while (i > 1) { i /= 2; } }
The logarithmic1 function has O(log(n)) runtime because the recursion will
half the argument, n, each time. In other words, if we pass 8 as the original
argument, then the recursive chain would be 8 -> 4 -> 2 -> 1. In a similar way,
the logarithmic2 function has O(log(n)) runtime because of the number of
iterations in the while loop. The while loop depends on the variable i, which
will be divided in half each iteration.
569.3. O(n) - Linear
Linear complexity algorithms will access each item of the input "once" (in the
Big-O sense). Algorithms that iterate through the input without nested loops or
recurse by reducing the size of the input by "one" each time are typically
linear.
569.3.1. Linear growth
The table below shows the growing behavior of a linear runtime function. Notice
that a change in input size leads to similar change in the number of steps.
| n | O(n) |
|---|---|
| 1 | ~1 |
| 2 | ~2 |
| 3 | ~3 |
| 4 | ~4 |
| ... | ... |
| 128 | ~128 |
569.3.2. Example linear code
Below are examples of three functions that each have linear runtime.
// O(n) function linear1(n) { for (let i = 1; i <= n; i++) { console.log(i); } } // O(n), where n is the length of the array function linear2(array) { for (let i = 0; i < array.length; i++) { console.log(i); } } // O(n) function linear3(n) { if (n === 1) return; linear3(n - 1); }
The linear1 function has O(n) runtime because the for loop will iterate n
times. The linear2 function has O(n) runtime because the for loop iterates
through the array argument. The linear3 function has O(n) runtime because each
subsequent call in the recursion will decrease the argument by one. In other
words, if we pass 8 as the original argument to linear3, the recursive chain
would be 8 -> 7 -> 6 -> 5 -> ... -> 1.
569.4. O(n * log(n)) - Loglinear
This class is a combination of both linear and logarithmic behavior, so features
from both classes are evident. Algorithms the exhibit this behavior use both
recursion and iteration. Typically, this means that the recursive calls will
halve the input each time (logarithmic), but iterations are also performed on
the input (linear).
569.4.1. Loglinear growth
The table below shows the growing behavior of a loglinear runtime function.
| n | O(n * log2(n)) |
|---|---|
| 2 | ~2 |
| 4 | ~8 |
| 8 | ~24 |
| ... | ... |
| 128 | ~896 |
569.4.2. Example loglinear code
Below is an example of a function with a loglinear runtime.
// O(n * log(n)) function loglinear(n) { if (n <= 1) return; for (let i = 1; i <= n; i++) { console.log(i); } loglinear(n / 2); loglinear(n / 2); }
The loglinear function has O(n * log(n)) runtime because the for loop
iterates linearly (n) through the input and the recursive chain behaves
logarithmically (log(n)).
569.5. O(nc) - Polynomial
Polynomial complexity refers to complexity of the form O(nc) where
n is the size of the input and c is some fixed constant. For example,
O(n3) is a larger/worse function than O(n2), but they
belong to the same complexity class. Nested loops are usually the indicator of
this complexity class.
569.5.1. Polynomial growth
Below are tables showing the growth for O(n2) and O(n3).
| n | O(n2) |
|---|---|
| 1 | ~1 |
| 2 | ~4 |
| 3 | ~9 |
| ... | ... |
| 128 | ~16,384 |
| n | O(n3) |
| --- | ---------------- |
| 1 | ~1 |
| 2 | ~8 |
| 3 | ~27 |
| ... | ... |
| 128 | ~2,097,152 |
569.5.2. Example polynomial code
Below are examples of two functions with polynomial runtimes.
// O(n^2) function quadratic(n) { for (let i = 1; i <= n; i++) { for (let j = 1; j <= n; j++) {} } } // O(n^3) function cubic(n) { for (let i = 1; i <= n; i++) { for (let j = 1; j <= n; j++) { for (let k = 1; k <= n; k++) {} } } }
The quadratic function has O(n2) runtime because there are nested
loops. The outer loop iterates n times and the inner loop iterates n times. This
leads to n * n total number of iterations. In a similar way, the cubic
function has O(n3) runtime because it has triply nested loops that
lead to a total of n * n * n iterations.
569.6. O(cn) - Exponential
Exponential complexity refers to Big-O functions of the form O(cn)
where n is the size of the input and c is some fixed constant. For example,
O(3n) is a larger/worse function than O(2n), but they both
belong to the exponential complexity class. A common indicator of this
complexity class is recursive code where there is a constant number of recursive
calls in each stack frame. The c will be the number of recursive calls made in
each stack frame. Algorithms with this complexity are considered quite slow.
569.6.1. Exponential growth
Below are tables showing the growth for O(2n) and O(3n).
Notice how these grow large, quickly.
| n | O(2n) |
|---|---|
| 1 | ~2 |
| 2 | ~4 |
| 3 | ~8 |
| 4 | ~16 |
| ... | ... |
| 128 | ~3.4028 * 1038 |
| n | O(3n) |
| --- | -------------------------- |
| 1 | ~3 |
| 2 | ~9 |
| 3 | ~27 |
| 3 | ~81 |
| ... | ... |
| 128 | ~1.1790 * 1061 |
569.6.2. Exponential code example
Below are examples of two functions with exponential runtimes.
// O(2^n) function exponential2n(n) { if (n === 1) return; exponential_2n(n - 1); exponential_2n(n - 1); } // O(3^n) function exponential3n(n) { if (n === 0) return; exponential_3n(n - 1); exponential_3n(n - 1); exponential_3n(n - 1); }
The exponential2n function has O(2n) runtime because each call will
make two more recursive calls. The exponential3n function has O(3n)
runtime because each call will make three more recursive calls.
569.7. O(n!) - Factorial
Recall that n! = (n) * (n - 1) * (n - 2) * ... * 1. This complexity is
typically the largest/worst that we will end up implementing. An indicator of
this complexity class is recursive code that has a variable number of recursive
calls in each stack frame. Note that factorial is worse than exponential
because factorial algorithms have a variable amount of recursive calls in
each stack frame, whereas exponential algorithms have a constant amount of
recursive calls in each frame.
569.7.1. Factorial growth
Below is a table showing the growth for O(n!). Notice how this has a more
aggressive growth than exponential behavior.
| n | O(n!) |
|---|---|
| 1 | ~1 |
| 2 | ~2 |
| 3 | ~6 |
| 4 | ~24 |
| ... | ... |
| 128 | ~3.8562 * 10215 |
569.7.2. Factorial code example
Below is an example of a function with factorial runtime.
// O(n!) function factorial(n) { if (n === 1) return; for (let i = 1; i <= n; i++) { factorial(n - 1); } }
The factorial function has O(n!) runtime because the code is recursive but
the number of recursive calls made in a single stack frame depends on the input.
This contrasts with an exponential function because exponential functions have
a fixed number of calls in each stack frame.
You may it difficult to identify the complexity class of a given code snippet,
especially if the code falls into the loglinear, exponential, or factorial
classes. In the upcoming videos, we'll explain the analysis of these functions
in greater detail. For now, you should focus on the relative order of these
seven complexity classes!
570. What you've learned
In this reading, we listed the seven common complexity classes and saw some
example code for each. In order of ascending growth, the seven classes are:
- Constant
- Logarithmic
- Linear
- Loglinear
- Polynomial
- Exponential
- Factorial
Memoization
Memoization is a design pattern used to reduce the overall number of
calculations that can occur in algorithms that use recursive strategies to
solve.
Recall that recursion solves a large problem by dividing it into smaller
sub-problems that are more manageable. Memoization will store the results of
the sub-problems in some other data structure, meaning that you avoid duplicate
calculations and only "solve" each subproblem once. There are two features that
comprise memoization:
- the function is recursive
- the additional data structure used is typically an object (we refer to this as
the memo!)
This is a trade-off between the time it takes to run an algorithm (without
memoization) and the memory used to run the algorithm (with memoization).
Usually memoization is a good trade-off when dealing with large data or
calculations.
You cannot always apply this technique to recursive problems. The problem must
have an "overlapping subproblem structure" for memoization to be effective.
Here's an example of a problem that has such a structure:
Using pennies, nickels, dimes, and quarters, what is the smallest combination
of coins that total 27 cents?
You'll explore this exact problem in depth later on. For now, here is some food
for thought. Along the way to calculating the smallest coin combination of 27
cents, you should also calculate the smallest coin combination of say, 25 cents
as a component of that problem. This is the essence of an overlapping subproblem
structure.
571. Memoizing factorial
Here's an example of a function that computes the factorial of the number passed
into it.
function factorial(n) { if (n === 1) return 1; return n * factorial(n - 1); } factorial(6); // => 720, requires 6 calls factorial(6); // => 720, requires 6 calls factorial(5); // => 120, requires 5 calls factorial(7); // => 5040, requires 7 calls
From this plain factorial above, it is clear that every time you call
factorial(6) you should get the same result of 720 each time. The code is
somewhat inefficient because you must go down the full recursive stack for each
top level call to factorial(6). It would be great if you could store the result
of factorial(6) the first time you calculate it, then on subsequent calls to
factorial(6) you simply fetch the stored result in constant time. You can
accomplish exactly this by memoizing with an object!
let memo = {} function factorial(n) { // if this function has calculated factorial(n) previously, // fetch the stored result in memo if (n in memo) return memo[n]; if (n === 1) return 1; // otherwise, it havs not calculated factorial(n) previously, // so calculate it now, but store the result in case it is // needed again in the future memo[n] = n * factorial(n - 1); return memo[n] } factorial(6); // => 720, requires 6 calls factorial(6); // => 720, requires 1 call factorial(5); // => 120, requires 1 call factorial(7); // => 5040, requires 2 calls memo; // => { '2': 2, '3': 6, '4': 24, '5': 120, '6': 720, '7': 5040 }
The memo object above will map an argument of factorial to its return
value. That is, the keys will be arguments and their values will be the
corresponding results returned. By using the memo, you are able to avoid
duplicate recursive calls!
Here's some food for thought: By the time your first call to factorial(6)
returns, you will not have just the argument 6 stored in the memo. Rather, you will
have all arguments 2 to 6 stored in the memo.
Hopefully you sense the efficiency you can get by memoizing your functions, but
maybe you are not convinced by the last example for two reasons:
- You didn't improve the speed of the algorithm by an order of Big-O (it is
still O(n)). - The code uses some global variable, so it's kind of ugly.
Both of those points are true, so take a look at a more advanced example that
benefits from memoization.
572. Memoizing the Fibonacci generator
Here's a naive implementation of a function that calculates the Fibonacci
number for a given input.
function fib(n) { if (n === 1 || n === 2) return 1; return fib(n - 1) + fib(n - 2); } fib(6); // => 8
Before you optimize this, ask yourself what complexity class it falls into in
the first place.
The time complexity of this function is not super intuitive to describe because
the code branches twice recursively. Fret not! You'll find it useful to
visualize the calls needed to do this with a tree. When reasoning about the time
complexity for recursive functions, draw a tree that helps you see the calls.
Every node of the tree represents a call of the recursion:

In general, the height of this tree will be n. You derive this by following
the path going straight down the left side of the tree. You can also see that
each internal node leads to two more nodes. Overall, this means that the tree
will have roughly 2n nodes which is the same as saying that the fib
function has an exponential time complexity of 2n. That is very slow!
See for yourself, try running fib(50) - you'll be waiting for quite a while
(it took 3 minutes on the author's machine).
Okay. So the fib function is slow. Is there anyway to speed it up? Take a look
at the tree above. Can you find any repetitive regions of the tree?

As the n grows bigger, the number of duplicate sub-trees grows exponentially.
Luckily you can fix this using memoization by using a similar object strategy as
before. You can use some JavaScript default arguments to clean things up:
function fastFib(n, memo = {}) { if (n in memo) return memo[n]; if (n === 1 || n === 2) return 1; memo[n] = fastFib(n - 1, memo) + fastFib(n - 2, memo); return memo[n]; } fastFib(6); // => 8 fastFib(50); // => 12586269025
The code above can calculate the 50th Fibonacci number almost instantly! Thanks
to the memo object, you only need to explore a subtree fully once. Visually,
the fastFib recursion has this structure:

You can see the marked nodes (function calls) that access the memo in green.
It's easy to see that this version of the Fibonacci generator will do far less
computations as n grows larger! In fact, this memoization has brought the time
complexity down to linear O(n) time because the tree only branches on the left
side. This is an enormous gain if you recall the complexity class hierarchy.
573. The memoization formula
Now that you understand memoization, when should you apply it? Memoization is
useful when attacking recursive problems that have many overlapping
sub-problems. You'll find it most useful to draw out the visual tree first. If
you notice duplicate sub-trees, time to memoize. Here are the hard and fast
rules you can use to memoize a slow function:
- Write the unoptimized, brute force recursion and make sure it works.
- Add the memo object as an additional argument to the function. The keys will
represent unique arguments to the function, and their values will represent
the results for those arguments. - Add a base case condition to the function that returns the stored value if
the function's argument is in the memo. - Before you return the result of the recursive case, store it in the memo as a
value and make the function's argument it's key.
574. What you learned
You learned a secret to possibly changing an algorithm of one complexity class
to a lower complexity class by using memory to store intermediate results. This
is a powerful technique to use to make sure your programs that must do recursive
calculations can benefit from running much faster.
Tabulation
Now that you are familiar with memoization, you can explore a related method
of algorithmic optimization: Tabulation. There are two main features that
comprise the Tabulation strategy:
- the function is iterative and not recursive
- the additional data structure used is typically an array, commonly referred to
as the table
Many problems that can be solved with memoization can also be solved with
tabulation as long as you convert the recursion to iteration. The first example
is the canonical example of recursion, calculating the Fibonacci number for an
input. However, in the example, you'll see the iteration version of it for a
fresh start!
575. Tabulating the Fibonacci number
Tabulation is all about creating a table (array) and filling it out with
elements. In general, you will complete the table by filling entries from "left
to right". This means that the first entry of the table (first element of the
array) will correspond to the smallest subproblem. Naturally, the final entry of
the table (last element of the array) will correspond to the largest problem,
which is also the final answer.
Here's a way to use tabulation to store the intermediary calculations so that
later calculations can refer back to the table.
function tabulatedFib(n) { // create a blank array with n reserved spots let table = new Array(n); // seed the first two values table[0] = 0; table[1] = 1; // complete the table by moving from left to right, // following the fibonacci pattern for (let i = 2; i <= n; i += 1) { table[i] = table[i - 1] + table[i - 2]; } return table[n]; } console.log(tabulatedFib(7)); // => 13
When you initialized the table and seeded the first two values, it looked like
this:
| i | 0 | 1 | 2 | 3 | 4 | 5 | 6 | 7 |
|---|---|---|---|---|---|---|---|---|
table[i] |
0 |
1 |
||||||
After the loop finishes, the final table will be:
| i | 0 | 1 | 2 | 3 | 4 | 5 | 6 | 7 |
|---|---|---|---|---|---|---|---|---|
table[i] |
0 |
1 |
1 |
2 |
3 |
5 |
8 |
13 |
Similar to the previous memo, by the time the function completes, the table
will contain the final solution as well as all sub-solutions calculated along
the way.
To compute the complexity class of this tabulatedFib is very straightforward
since the code is iterative. The dominant operation in the function is the loop
used to fill out the entire table. The length of the table is roughly n
elements long, so the algorithm will have an O(n) runtime. The space taken by
our algorithm is also O(n) due to the size of the table. Overall, this should
be a satisfying solution for the efficiency of the algorithm.
576. Aside: Refactoring for O(1) Space
You may notice that you can cut down on the space used by the function. At any
point of the loop, the calculation really only need the previous two
subproblems' results. There is little utility to storing the full array. This
refactor is easy to do by using two variables:
function fib(n) { let mostRecentCalcs = [0, 1]; if (n === 0) return mostRecentCalcs[0]; for (let i = 2; i <= n; i++) { const [ secondLast, last ] = mostRecentCalcs; mostRecentCalcs = [ last, secondLast + last ]; } return mostRecentCalcs[1]; }
Bam! You now have O(n) runtime and O(1) space. This is the most optimal
algorithm for calculating a Fibonacci number. Note that this strategy is a pared
down form of tabulation, since it uses only the last two values.
576.1. The Tabulation Formula
Here are the general guidelines for implementing the tabulation strategy. This
is just a general recipe, so adjust for taste depending on your problem:
- Create the table array based off of the size of the input, which isn't always
straightforward if you have multiple input values - Initialize some values in the table that "answer" the trivially small
subproblem usually by initializing the first entry (or entries) of the table - Iterate through the array and fill in remaining entries, using previous
entries in the table to perform the current calculation - Your final answer is (usually) the last entry in the table
577. What you learned
You learned another way of possibly changing an algorithm of one complexity
class to a lower complexity class by using memory to store intermediate results.
This is a powerful technique to use to make sure your programs that must do
iterative calculations can benefit from running much faster.
Analysis of Linear Search
Consider the following search algorithm known as linear search.
function search(array, term) { for (let i = 0; i < array.length; i++) { if (array[i] == term) { return i; } } return -1; }
Most Big-O analysis is done on the "worst-case scenario" and provides an upper
bound. In the worst case analysis, you calculate the upper bound on running time
of an algorithm. You must know the case that causes the maximum number of
operations to be executed.
For linear search, the worst case happens when the element to be searched
(term in the above code) is not present in the array. When term is not
present, the search function compares it with all the elements of array one
by one. Therefore, the worst-case time complexity of linear search would be
O(n).
Analysis of Binary Search
Consider the following search algorithm known as the binary search. This
kind of search only works if the array is already sorted.
function binarySearch(arr, x, start, end) { if (start > end) return false; let mid = Math.floor((start + end) / 2); if (arr[mid] === x) return true; if (arr[mid] > x) { return binarySearch(arr, x, start, mid - 1); } else { return binarySearch(arr, x, mid + 1, end); } }
For the binary search, you cut the search space in half every time. This means
that it reduces the number of searches you must do by half, every time. That
means the number of steps it takes to get to the desired item (if it exists in
the array), in the worst case takes the same amount of steps for every number
within a range defined by the powers of 2.
- 7 -> 4 -> 2 -> 1
- 8 -> 4 -> 2 -> 1
- 9 -> 5 -> 3 -> 2 -> 1
- 15 -> 8 -> 4 -> 2 -> 1
- 16 -> 8 -> 4 -> 2 -> 1
- 17 -> 9 -> 5 -> 3 -> 2 -> 1
- 31 -> 16 -> 8 -> 4 -> 2 -> 1
- 32 -> 16 -> 8 -> 4 -> 2 -> 1
- 33 -> 17 -> 9 -> 5 -> 3 -> 2 -> 1
So, for any number of items in the sorted array between 2n-1 and
2n, it takes n number of steps. That means if you have k items in
the array, then it will take log2k.
Binary searches are O(log2n).
Analysis of the Merge Sort
Consider the following divide-and-conquer sort method known as the merge
sort.
function merge(leftArray, rightArray) { const sorted = []; while (leftArray.length > 0 && rightArray.length > 0) { const leftItem = leftArray[0]; const rightItem = rightArray[0]; if (leftItem > rightItem) { sorted.push(rightItem); rightArray.shift(); } else { sorted.push(leftItem); leftArray.shift(); } } while (leftArray.length !== 0) { const value = leftArray.shift(); sorted.push(value); } while (rightArray.length !== 0) { const value = rightArray.shift(); sorted.push(value); } return sorted } function mergeSort(array) { const length = array.length; if (length == 1) { return array; } const middleIndex = Math.ceil(length / 2); const leftArray = array.slice(0, middleIndex); const rightArray = array.slice(middleIndex, length); leftArray = mergeSort(leftArray); rightArray = mergeSort(rightArray); return merge(leftArray, rightArray); }
For the merge sort, you cut the sort space in half every time. In each of
those halves, you have to loop through the number of items in the array. That
means that, for the worst case, you get that same
log2n but it must be multiplied by the number of
elements in the array, n.
Merge sorts are O(n*log2n).
Analysis of Bubble Sort
Consider the following sort algorithm known as the bubble sort.
function bubbleSort(items) { var length = items.length; for (var i = 0; i < length; i++) { for (var j = 0; j < (length - i - 1); j++) { if (items[j] > items[j + 1]) { var tmp = items[j]; items[j] = items[j + 1]; items[j + 1] = tmp; } } } }
For the bubble sort, the worst case is the same as the best case because it
always makes nested loops. So, the outer loop loops the number of times of the
items in the array. For each one of those loops, the inner loop loops again a
number of times for the items in the array. So, if there are n values in the
array, then a loop inside a loop is n * n. So, this is O(n2).
That's polynomial, which ain't that good.
LeetCode.com
Some of the problems in the projects ask you to use the LeetCode platform to
check your work rather than relying on local mocha tests. If you don't already
have an account at LeetCode.com, please click
https://leetcode.com/accounts/signup/ to sign up for a free
account.
After you sign up for the account, please verify the account with the email
address that you used so that you can actually run your solution on
LeetCode.com.
In the projects, you will see files that are named "leet_code_«number».js".
When you open those, you will see a link in the file that you can use to go
directly to the corresponding problem on LeetCode.com.
Use the local JavaScript file in Visual Studio Code to collaborate on the
solution. Then, you can run the proposed solution in the LeetCode.com code
runner to validate its correctness.
Memoization Problems
This project contains two test-driven problems and one problem on LeetCode.com.
- Clone the project from
https://github.com/appacademy-starters/algorithms-memoization-project. cdinto the project foldernpm installto install dependencies in the project root directorynpx testto run the specs- You can view the test cases in
/test/test.js. Your job is to write code in
the/libfiles to pass all specs.- In
problems.js, you will write code to make thelucasNumberMemoand
minChangefunctions pass. - In
leet_code_518.js, you will use that file as a scratch pad to work on
the LeetCode.com problem at https://leetcode.com/problems/coin-change-2/.
- In
Tabulation Problems
This project contains two test-driven problems and one problem on LeetCode.com.
- Clone the project from
https://github.com/appacademy-starters/algorithms-tabulation-project. cdinto the project foldernpm installto install dependencies in the project root directorynpx testto run the specs- You can view the test cases in
/test/test.js. Your job is to write code in
the/libfiles to pass all specs.- In
problems.js, you will write code to make thestepper,
maxNonAdjacentSum, andminChangefunctions pass. - In
leet_code_64.js, you will use that file as a scratch pad to work on the
LeetCode.com problem at https://leetcode.com/problems/minimum-path-sum/. - In
leet_code_70.js, you will use that file as a scratch pad to work on the
LeetCode.com problem at https://leetcode.com/problems/climbing-stairs/.
- In
WEEK-07 DAY-3
Sorting Algorithms
Sorting Algorithms Learning Objectives
The objective of this lesson is for you to get experience implementing
common sorting algorithms that will come up during a lot of interviews. It is
also important for you to understand how different sorting algorithms behave
when given output.
At the end of this, you will be able to
- Explain the complexity of and write a function that performs
bubble sorton
an array of numbers. - Explain the complexity of and write a function that performs
selection sort
on an array of numbers. - Explain the complexity of and write a function that performs
insertion sort
on an array of numbers. - Explain the complexity of and write a function that performs
merge sorton
an array of numbers. - Explain the complexity of and write a function that performs
quick sorton
an array of numbers. - Explain the complexity of and write a function that performs a binary search
on a sorted array of numbers.nce implementing
common sorting algorithms that will come up during a lot of interviews. It is
also important for you to understand how different sorting algorithms behave
when given output.
At the end of this, you will be able to - Explain the complexity of and write a function that performs
bubble sorton
an array of numbers. - Explain the complexity of and write a function that performs
selection sort
on an array of numbers. - Explain the complexity of and write a function that performs
insertion sort
on an array of numbers. - Explain the complexity of and write a function that performs
merge sorton
an array of numbers. - Explain the complexity of and write a function that performs
quick sorton
an array of numbers. - Explain the complexity of and write a function that performs a binary search
on a sorted array of numbers.
Bubble Sort
Bubble Sort is generally the first major sorting algorithm to come up in most
introductory programming courses. Learning about this algorithm is useful
educationally, as it provides a good introduction to the challenges you face
when tasked with converting unsorted data into sorted data, such as conducting
logical comparisons, making swaps while iterating, and making optimizations.
It's also quite simple to implement, and can be done quickly.
Bubble Sort is almost never a good choice in production. simply because:
- It is not efficient
- It is not commonly used
- There is a stigma attached to using it
578. "But...then...why are we..."
It is quite useful as an educational base for you, and as a conversational
base for you while interviewing, because you can discuss how other more elegant
and efficient algorithms improve upon it. Taking naive code and improving upon
it by weighing the technical tradeoffs of your other options is 100% the name of
the game when trying to level yourself up from a junior engineer to a senior
engineer.
579. The algorithm bubbles up
As you progress through the algorithms and data structures of this course,
you'll eventually notice that there are some recurring funny terms. "Bubbling
up" is one of those terms.
When someone writes that an item in a collection "bubbles up," you should infer
that:
- The item is in motion
- The item is moving in some direction
- The item has some final resting destination
When invoking Bubble Sort to sort an array of integers in ascending order, the
largest integers will "bubble up" to the "top" (the end) of the array, one at a
time.
The largest values are captured, put into motion in the direction defined by the
desired sort (ascending right now), and traverse the array until they arrive at
their end destination. See if you can observe this behavior in the following
animation (courtesy http://visualgo.net):

As the algorithm iterates through the array, it compares each element to the
element's right neighbor. If the current element is larger than its neighbor,
the algorithm swaps them. This continues until all elements in the array are
sorted.
580. How does a pass of Bubble Sort work?
Bubble sort works by performing multiple passes to move elements closer to
their final positions. A single pass will iterate through the entire array once.
A pass works by scanning the array from left to right, two elements at a time,
and checking if they are ordered correctly. To be ordered correctly the first
element must be less than or equal to the second. If the two elements are not
ordered properly, then we swap them to correct their order. Afterwards, it scans
the next two numbers and continue repeat this process until we have gone through
the entire array.
See one pass of bubble sort on the array [2, 8, 5, 2, 6]. On each step the
elements currently being scanned are in bold.
- [2, 8, 5, 2, 6] - ordered, so leave them alone
- [2, 8, 5, 2, 6] - not ordered, so swap
- [2, 5, 8, 2, 6] - not ordered, so swap
- [2, 5, 2, 8, 6] - not ordered, so swap
- [2, 5, 2, 6, 8] - the first pass is complete
Because at least one swap occurred, the algorithm knows that it wasn't sorted.
It needs to make another pass. It starts over again at the first entry and goes
to the next-to-last entry doing the comparisons, again. It only needs to go to
the next-to-last entry because the previous "bubbling" put the largest entry in
the last position. - [2, 5, 2, 6, 8] - ordered, so leave them alone
- [2, 5, 2, 6, 8] - not ordered, so swap
- [2, 2, 5, 6, 8] - ordered, so leave them alone
- [2, 2, 5, 6, 8] - the second pass is complete
Because at least one swap occurred, the algorithm knows that it wasn't sorted.
Now, it can bubble from the first position to the last-2 position because the
last two values are sorted. - [2, 2, 5, 6, 8] - ordered, so leave them alone
- [2, 2, 5, 6, 8] - ordered, so leave them alone
- [2, 2, 5, 6, 8] - the third pass is complete
No swap occurred, so the Bubble Sort stops.
581. Ending the Bubble Sort
During Bubble Sort, you can tell if the array is in sorted order by checking if
a swap was made during the previous pass performed. If a swap was not performed
during the previous pass, then the array must be totally sorted and the
algorithm can stop.
You're probably wondering why that makes sense. Recall that a pass of Bubble
Sort checks if any adjacent elements are out of order and swaps them if they
are. If we don't make any swaps during a pass, then everything must be already
in order, so our job is done. Let that marinate for a bit.
582. Pseudocode for Bubble Sort
Bubble Sort: (array)
n := length(array)
repeat
swapped = false
for i := 1 to n - 1 inclusive do
/* if this pair is out of order */
if array[i - 1] > array[i] then
/* swap them and remember something changed */
swap(array, i - 1, i)
swapped := true
end if
end for
until not swapped
Selection Sort
Selection Sort is very similar to Bubble Sort. The major difference between the
two is that Bubble Sort bubbles the largest elements up to the end of the
array, while Selection Sort selects the smallest elements of the array and
directly places them at the beginning of the array in sorted position. Selection
sort will utilize swapping just as bubble sort did. Let's carefully break this
sorting algorithm down.
583. The algorithm: select the next smallest
Selection sort works by maintaining a sorted region on the left side of the
input array; this sorted region will grow by one element with every "pass" of
the algorithm. A single "pass" of selection sort will select the next smallest
element of unsorted region of the array and move it to the sorted region.
Because a single pass of selection sort will move an element of the unsorted
region into the sorted region, this means a single pass will shrink the unsorted
region by 1 element whilst increasing the sorted region by 1 element. Selection
sort is complete when the sorted region spans the entire array and the unsorted
region is empty!

The algorithm can be summarized as the following:
- Set MIN to location 0
- Search the minimum element in the list
- Swap with value at location MIN
- Increment MIN to point to next element
- Repeat until list is sorted
584. The pseudocode
In pseudocode, the Selection Sort can be written as this.
procedure selection sort
list : array of items
n : size of list
for i = 1 to n - 1
/* set current element as minimum*/
min = i
/* check the element to be minimum */
for j = i+1 to n
if list[j] < list[min] then
min = j;
end if
end for
/* swap the minimum element with the current element*/
if indexMin != i then
swap list[min] and list[i]
end if
end for
end procedure
Insertion Sort
With Bubble Sort and Selection Sort now in your tool box, you're starting to
get some experience points under your belt! Time to learn one more "naive"
sorting algorithm before you get to the efficient sorting algorithms.
585. The algorithm: insert into the sorted region
Insertion Sort is similar to Selection Sort in that it gradually builds up a
larger and larger sorted region at the left-most end of the array.
However, Insertion Sort differs from Selection Sort because this algorithm does
not focus on searching for the right element to place (the next smallest in our
Selection Sort) on each pass through the array. Instead, it focuses on sorting
each element in the order they appear from left to right, regardless of their
value, and inserting them in the most appropriate position in the sorted region.
See if you can observe the behavior described above in the following animation:

586. The Steps
Insertion Sort grows a sorted array on the left side of the input array by:
- If it is the first element, it is already sorted. return 1;
- Pick next element
- Compare with all elements in the sorted sub-list
- Shift all the elements in the sorted sub-list that is greater than the
value to be sorted - Insert the value
- Repeat until list is sorted
These steps are easy to confuse with selection sort, so you'll want to watch the
video lecture and drawing that accompanies this reading as always!
587. The pseudocode
procedure insertionSort( A : array of items )
int holePosition
int valueToInsert
for i = 1 to length(A) inclusive do:
/* select value to be inserted */
valueToInsert = A[i]
holePosition = i
/*locate hole position for the element to be inserted */
while holePosition > 0 and A[holePosition-1] > valueToInsert do:
A[holePosition] = A[holePosition-1]
holePosition = holePosition -1
end while
/* insert the number at hole position */
A[holePosition] = valueToInsert
end for
end procedure
Merge Sort
You've explored a few sorting algorithms already, all of them being quite slow
with a runtime of O(n2). It's time to level up and learn your first
time-efficient sorting algorithm! You'll explore merge sort in detail soon,
but first, you should jot down some key ideas for now. The following points are
not steps to an algorithm yet; rather, they are ideas that will motivate how you
can derive this algorithm.
- it is easy to merge elements of two sorted arrays into a single sorted array
- you can consider an array containing only a single element as already
trivially sorted - you can also consider an empty array as trivially sorted
588. The algorithm: divide and conquer
You're going to need a helper function that solves the first major point from
above. How might you merge two sorted arrays? In other words you want a merge
function that will behave like so:
let arr1 = [1, 5, 10, 15]; let arr2 = [0, 2, 3, 7, 10]; merge(arr1, arr2); // => [0, 1, 2, 3, 5, 7, 10, 10, 15]
Once you have that, you get to the "divide and conquer" bit.
The algorithm for merge sort is actually really simple.
- if there is only one element in the list, it is already sorted. return that
array. - otherwise, divide the list recursively into two halves until it can no more
be divided. - merge the smaller lists into new list in sorted order.
The process is visualized below. When elements are moved to the bottom of the
picture, they are going through themergestep:

The pseudocode for the algorithm is as follows.
procedure mergesort( a as array )
if ( n == 1 ) return a
/* Split the array into two */
var l1 as array = a[0] ... a[n/2]
var l2 as array = a[n/2+1] ... a[n]
l1 = mergesort( l1 )
l2 = mergesort( l2 )
return merge( l1, l2 )
end procedure
procedure merge( a as array, b as array )
var result as array
while ( a and b have elements )
if ( a[0] > b[0] )
add b[0] to the end of result
remove b[0] from b
else
add a[0] to the end of result
remove a[0] from a
end if
end while
while ( a has elements )
add a[0] to the end of result
remove a[0] from a
end while
while ( b has elements )
add b[0] to the end of result
remove b[0] from b
end while
return result
end procedure
Quick Sort
Quick Sort has a similar "divide and conquer" strategy to Merge Sort. Here are a
few key ideas that will motivate the design:
- it is easy to sort elements of an array relative to a particular target value
- an array of 0 or 1 elements is already trivially sorted
Regarding that first point, for example given[7, 3, 8, 9, 2]and a target of
5, we know[3, 2]are numbers less than5and[7, 8, 9]are numbers
greater than5.
589. How does it work?
In general, the strategy is to divide the input array into two subarrays: one
with the smaller elements, and one with the larger elements. Then, it
recursively operates on the two new subarrays. It continues this process until
of dividing into smaller arrays until it reaches subarrays of length 1 or
smaller. As you have seen with Merge Sort, arrays of such length are
automatically sorted.
The steps, when discussed on a high level, are simple:
- choose an element called "the pivot", how that's done is up to the
implementation - take two variables to point left and right of the list excluding pivot
- left points to the low index
- right points to the high
- while value at left is less than pivot move right
- while value at right is greater than pivot move left
- if both step 5 and step 6 does not match swap left and right
- if left ≥ right, the point where they met is new pivot
- repeat, recursively calling this for smaller and smaller arrays
Before we move forward, see if you can observe the behavior described above in
the following animation:

590. The algorithm: divide and conquer
Formally, we want to partition elements of an array relative to a pivot value.
That is, we want elements less than the pivot to be separated from elements that
are greater than or equal to the pivot. Our goal is to create a function with
this behavior:
let arr = [7, 3, 8, 9, 2]; partition(arr, 5); // => [[3, 2], [7,8,9]]
590.1. Partition
Seems simple enough! Let's implement it in JavaScript:
// nothing fancy function partition(array, pivot) { let left = []; let right = []; array.forEach(el => { if (el < pivot) { left.push(el); } else { right.push(el); } }); return [ left, right ]; } // if you fancy function partition(array, pivot) { let left = array.filter(el => el < pivot); let right = array.filter(el => el >= pivot); return [ left, right ]; }
You don't have to use an explicit partition helper function in your Quick Sort
implementation; however, we will borrow heavily from this pattern. As you design
algorithms, it helps to think about key patterns in isolation, although your
solution may not feature that exact helper. Some would say we like to divide and
conquer.
591. The pseudocode
It is so small, this algorithm. It's amazing that it performs so well with so
little code!
procedure quickSort(left, right)
if the length of the array is 0 or 1, return the array
set the pivot to the first element of the array
remove the first element of the array
put all values less than the pivot value into an array called left
put all values greater than the pivot value into an array called right
call quick sort on left and assign the return value to leftSorted
call quick sort on right and assign the return value to rightSorted
return the concatenation of leftSorted, the pivot value, and rightSorted
end procedure
Binary Search
We've explored many ways to sort arrays so far, but why did we go through all of
that trouble? By sorting elements of an array, we are organizing the data in a
way that gives us a quick way to look up elements later on. For simplicity, we
have been using arrays of numbers up until this point. However, these sorting
concepts can be generalized to other data types. For example, it would be easy
to modify our comparison-based sorting algorithms to sort strings: instead of
leveraging facts like 0 < 1, we can say 'A' < 'B'.
Think of a dictionary. A dictionary contains alphabetically sorted words and
their definitions. A dictionary is pretty much only useful if it is ordered in
this way. Let's say you wanted to look up the definition of "stupendous." What
steps might you take?
- you open up the dictionary at the roughly middle page
- you land in the "m" section
- you know "s" comes somewhere after "m" in the book, so you disregard all pages
before the "m" section. Instead, you flip to the roughly middle page between
"m" and "z"- you land in the "u" section
- you know "s" comes somewhere before "u", so you can disregard all pages after
the "u" section. Instead, you flip to the roughly middle page between the
previous "m" page and "u" - ...
You are essentially using thebinarySearchalgorithm in the real world.
592. The Algorithm: "check the middle and half the search space"
Formally, our binarySearch will seek to solve the following problem:
Given a sorted array of numbers and a target num, return a boolean indicating whether or not that target is contained in the array.
Programmatically, we want to satisfy the following behavior:
binarySearch([5, 10, 12, 15, 20, 30, 70], 12); // => true binarySearch([5, 10, 12, 15, 20, 30, 70], 24); // => false
Before we move on, really internalize the fact that binarySearch will only
work on sorted arrays! Obviously we can search any array, sorted or
unsorted, in O(n) time. But now our goal is be able to search the array with a
sub-linear time complexity (less than O(n)).
593. The pseudocode
procedure binary search (list, target)
parameter list: a list of sorted value
parameter target: the value to search for
if the list has zero length, then return false
determine the slice point:
if the list has an even number of elements,
the slice point is the number of elements
divided by two
if the list has an odd number of elements,
the slice point is the number of elements
minus one divided by two
create an list of the elements from 0 to the
slice point, not including the slice point,
which is known as the "left half"
create an list of the elements from the
slice point to the end of the list which is
known as the "right half"
if the target is less than the value in the
original array at the slice point, then
return the binary search of the "left half"
and the target
if the target is greater than the value in the
original array at the slice point, then
return the binary search of the "right half"
and the target
if neither of those is true, return true
end procedure binary search
Bubble Sort Analysis
Bubble Sort manipulates the array by swapping the position of two elements. To
implement Bubble Sort in JS, you'll need to perform this operation. It helps to
have a function to do that. A key detail in this function is that you need an
extra variable to store one of the elements since you will be overwriting them
in the array:
function swap(array, idx1, idx2) { let temp = array[idx1]; // save a copy of the first value array[idx1] = array[idx2]; // overwrite the first value with the second value array[idx2] = temp; // overwrite the second value with the first value }
Note that the swap function does not create or return a new array. It mutates
the original array:
let arr1 = [2, 8, 5, 2, 6]; swap(arr1, 1, 2); arr1; // => [ 2, 5, 8, 2, 6 ]
593.1. Bubble Sort JS Implementation
Take a look at the snippet below and try to understand how it corresponds to the
conceptual understanding of the algorithm. Scroll down to the commented version
when you get stuck.
function bubbleSort(array) { let swapped = true; while(swapped) { swapped = false; for (let i = 0; i < array.length - 1; i++) { if (array[i] > array[i+1]) { swap(array, i, i+1); swapped = true; } } } return array; }
// commented function bubbleSort(array) { // this variable will be used to track whether or not we // made a swap on the previous pass. If we did not make // any swap on the previous pass, then the array must // already be sorted let swapped = true; // this while will keep doing passes if a swap was made // on the previous pass while(swapped) { swapped = false; // reset swap to false // this for will perform a single pass for (let i = 0; i < array.length; i++) { // if the two value are not ordered... if (array[i] > array[i+1]) { // swap the two values swap(array, i, i+1); // since you made a swap, remember that you did so // b/c we should perform another pass after this one swapped = true; } } } return array; }
594. Time Complexity: O(n2)
Picture the worst case scenario where the input array is completely unsorted.
Say it's sorted in fully decreasing order, but the goal is to sort it in
increasing order:
- n is the length of the input array
- The inner
forloop along contributes O(n) in isolation - The outer while loop contributes O(n) in isolation because a single
iteration of the while loop will bring one element to its final resting
position. In other words, it keeps running the while loop until the array is
fully sorted. To fully sort the array we will need to bring allnelements
into their final resting positions. - Those two loops are nested so the total time complexity is O(n * n) =
O(n2).
It's worth mentioning that the best case scenario is when the input array is
already fully sorted. This will cause our for loop to conduct a single pass
without performing any swap, so thewhileloop will not trigger further
iterations. This means best case time complexity is O(n) for bubble sort. This
best case linear time is probably the only advantage of bubble sort. Programmers
are usually interested only in the worst-case analysis and ignore best-case
analysis.
595. Space Complexity: O(1)
Bubble Sort is a constant space, O(1), algorithm. The amount of memory consumed
by the algorithm does not increase relative to the size of the input array. It
uses the same amount of memory and create the same amount of variables
regardless of the size of the input, making this algorithm quite space
efficient. The space efficiency mostly comes from the fact that it mutates the
input array in-place. This is known as a destructive sort because it
"destroys" the positions of the values in the array.
596. When should you use Bubble Sort?
Nearly never, but it may be a good choice in the following list of special
cases:
- When sorting really small arrays where run time will be negligible no matter
what algorithm you choose. - When sorting arrays that you expect to already be nearly sorted.
- At parties
Selection Sort Analysis
Since a component of Selection Sort requires us to locate the smallest value in
the array, let's focus on that pattern in isolation:
function minumumValueIndex(arr) { let minIndex = 0; for (let j = 0; j < arr.length; j++) { if (arr[minIndex] > arr[j]) { minIndex = j; } } return minIndex; }
Pretty basic code right? We won't use this explicit helper function to solve
selection sort, however we will borrow from this pattern soon.
597. Selection Sort JS Implementation
We'll also utilize the classic swap pattern that we introduced in the bubble sort. To
refresh:
function swap(arr, index1, index2) { let temp = arr[index1]; arr[index1] = arr[index2]; arr[index2] = temp; }
Now for the punchline! Take a look at the snippet below and try to understand
how it corresponds to our conceptual understanding of the selection sort
algorithm. Scroll down to the commented version when you get stuck.
function selectionSort(arr) { for (let i = 0; i < arr.length; i++) { let minIndex = i; for (let j = i + 1; j < arr.length; j++) { if (arr[minIndex] > arr[j]) { minIndex = j; } } swap(arr, i, minIndex); } return arr; }
// commented function selectionSort(arr) { // the `i` loop will track the index that points to the first element of the unsorted region: // this means that the sorted region is everything left of index i // and the unsorted region is everything to the right of index i for (let i = 0; i < arr.length; i++) { let minIndex = i; // the `j` loop will iterate through the unsorted region and find the index of the smallest element for (let j = i + 1; j < arr.length; j++) { if (arr[minIndex] > arr[j]) { minIndex = j; } } // after we find the minIndex in the unsorted region, // swap that minIndex with the first index of the unsorted region swap(arr, i, minIndex); } return arr; }
598. Time Complexity Analysis
Selection Sort runtime is O(n2) because:
nis the length of the input array- The outer loop i contributes O(n) in isolation, this is plain to see
- The inner loop j is more complicated, it will make one less iteration for
every iteration of i.- for example, let's say we have an array of 10 elements,
n = 10. - the first full cycle of
jwill have 9 iterations - the second full cycle of
jwill have 8 iterations - the third full cycle of
jwill have 7 iterations - ...
- the last full cycle of
jwill have 1 iteration - This means that the inner loop j will contribute roughly O(n / 2) on
average
- for example, let's say we have an array of 10 elements,
- The two loops are nested so our total time complexity is O(n * n / 2) =
O(n2)
You'll notice that during this analysis we said something silly like O(n / 2).
In some analyses such as this one, we'll prefer to drop the constants only at
the end of the sketch so you understand the logical steps we took to derive a
complicated time complexity.
599. Space Complexity Analysis: O(1)
The amount of memory consumed by the algorithm does not increase relative to the
size of the input array. We use the same amount of memory and create the same
amount of variables regardless of the size of our input. A quick indicator of
this is the fact that we don't create any arrays.
600. When should we use Selection Sort?
There is really only one use case where Selection Sort becomes superior to
Bubble Sort. Both algorithms are quadratic in time and constant in space, but
the point at which they differ is in the number of swaps they make.
Bubble Sort, in the worst case, invokes a swap on every single comparison.
Selection Sort only swaps once our inner loop has completely finished traversing
the array. Therefore, Selection Sort is optimized to make the least possible
number of swaps.
Selection Sort becomes advantageous when making a swap is the most expensive
operation in your system. You will likely rarely encounter this scenario, but in
a situation where you've built (or have inherited) a system with suboptimal
write speed ability, for instance, maybe you're sorting data in a specialized
database tuned strictly for fast read speeds at the expense of slow write
speeds, using Selection Sort would save you a ton of expensive operations that
could potential crash your system under peak load.
Though in industry this situation is very rare, the insights above make for a
fantastic conversational piece when weighing technical tradeoffs while
strategizing solutions in an interview setting. This commentary may help deliver
the impression that you are well-versed in system design and technical analysis,
a key indicator that someone is prepared for a senior level position.
Insertion Sort Analysis
Take a look at the snippet below and try to understand how it corresponds to our
conceptual understanding of the Insertion Sort algorithm. Scroll down to the
commented version when you get stuck:
function insertionSort(arr) { for (let i = 1; i < arr.length; i++) { let currElement = arr[i]; for (var j = i - 1; j >= 0 && currElement < arr[j]; j--) { arr[j + 1] = arr[j]; } arr[j + 1] = currElement; } return arr; }
function insertionSort(arr) { // the `i` loop will iterate through every element of the array // we begin at i = 1, because we can consider the first element of the array as a // trivially sorted region of only one element // insertion sort allows us to insert new elements anywhere within the sorted region for (let i = 1; i < arr.length; i++) { // grab the first element of the unsorted region let currElement = arr[i]; // the `j` loop will iterate left through the sorted region, // looking for a legal spot to insert currElement for (var j = i - 1; j >= 0 && currElement < arr[j]; j--) { // keep moving left while currElement is less than the j-th element arr[j + 1] = arr[j]; // the line above will move the j-th element to the right, // leaving a gap to potentially insert currElement } // insert currElement into that gap arr[j + 1] = currElement; } return arr; }
There are a few key pieces to point out in the above solution before moving
forward:
- The outer
forloop starts at the 1st index, not the 0th index, and moves to
the right. - The inner
forloop starts immediately to the left of the current element,
and moves to the left. - The condition for the inner
forloop is complicated, and behaves similarly
to a while loop!- It continues iterating to the left toward
j = 0, only while the
currElementis less thanarr[j]. - It does this over and over until it finds the proper place to insert
currElement, and then we exit the inner loop!
- It continues iterating to the left toward
- When shifting elements in the sorted region to the right, it does not
replace the value at their old index! If the input array is[1, 2, 4, 3],
andcurrElementis3, after comparing4and3, but before inserting
3between2and4, the array will look like this:[1, 2, 4, 4].
If you are currently scratching your head, that is perfectly okay because when
this one clicks, it clicks for good.
If you're struggling, you should try taking out a pen and paper and step through
the solution provided above one step at a time. Keep track ofi,j,
currElement,arr[j], and the inputarritself at every step. After going
through this a few times, you'll have your "ah HA!" moment.
601. Time and Space Complexity Analysis
Insertion Sort runtime is O(n2) because:
In the worst case scenario where our input array is entirely unsorted, since
this algorithm contains a nested loop, its run time behaves similarly to
bubbleSort and selectionSort. In this case, we are forced to make a comparison
at each iteration of the inner loop. Not convinced? Let's derive the complexity.
We'll use much of the same argument as we did in selectionSort. Say we had the
worst case scenario where are input array is sorted in full decreasing order,
but we wanted to sort it in increasing order:
nis the length of the input array- The outer loop i contributes O(n) in isolation, this is plain to see
- The inner loop j is more complicated. We know j will iterate until it finds an
appropriate place to insert thecurrElementinto the sorted region. However,
since we are discussing the case where the data is already in decreasing
order, the element must travel the maximum distance to find it's insertion
point! We know this insertion point to be index 0, since everycurrElement
will be the next smallest of the array. So:- the 1st element travels 1 distance to be inserted
- the 2nd element travels 2 distance to be inserted
- the 3rd element travels 3 distance to be inserted
- ...
- the n-1th element travels n-1 distance to be inserted
- This means that our inner loop j will contribute roughly O(n / 2) on
average
- The two loops are nested so our total time complexity is O(n * n / 2) =
O(n2)
601.1. Space Complexity: O(1)
The amount of memory consumed by the algorithm does not increase relative to the
size of the input array. We use the same amount of memory and create the same
amount of variables regardless of the size of our input. A quick indicator of
this is the fact that we don't create any arrays.
602. When should you use Insertion Sort?
Insertion Sort has one advantage that makes it absolutely supreme in one special
case. Insertion Sort is what's known as an "online" algorithm. Online algorithms
are great when you're dealing with streaming data, because they can sort the
data live as it is received.
If you must sort a set of data that is ever-incoming, for example, maybe you are
sorting the most relevant posts in a social media feed so that those posts that
are most likely to impact the site's audience always appear at the top of the
feed, an online algorithm like Insertion Sort is a great option.
Insertion Sort works well in this situation because the left side of the array
is always sorted, and in the case of nearly sorted arrays, it can run in linear
time. The absolute best case scenario for Insertion Sort is when there is only
one unsorted element, and it is located all the way to the right of the array.
Well, if you have data constantly being pushed to the array, it will always be
added to the right side. If you keep your algorithm constantly running, the left
side will always be sorted. Now you have linear time sort.
Otherwise, Insertion Sort is, in general, useful in all the same situations as
Bubble Sort. It's a good option when:
- You are sorting really small arrays where run time will be negligible no
matter what algorithm we choose. - You are sorting an array that you expect to already be nearly sorted.
Merge Sort Analysis
You needed to come up with two pieces of code to make merge sort work.
603. Full code
function merge(array1, array2) { let merged = []; while (array1.length || array2.length) { let ele1 = array1.length ? array1[0] : Infinity; let ele2 = array2.length ? array2[0] : Infinity; let next; if (ele1 < ele2) { next = array1.shift(); } else { next = array2.shift(); } merged.push(next); } return merged; } function mergeSort(array) { if (array.length <= 1) { return array; } let midIdx = Math.floor(array.length / 2); let leftHalf = array.slice(0, midIdx); let rightHalf = array.slice(midIdx); let sortedLeft = mergeSort(leftHalf); let sortedRight = mergeSort(rightHalf); return merge(sortedLeft, sortedRight); }
604. Merging two sorted arrays
Merging two sorted arrays is simple. Since both arrays are sorted, we know the
smallest numbers to always be at the front of the arrays. We can construct the
new array by comparing the first elements of both input arrays. We remove the
smaller element from it's respective array and add it to our new array. Do this
until both input arrays are empty:
function merge(array1, array2) { let merged = []; while (array1.length || array2.length) { let ele1 = array1.length ? array1[0] : Infinity; let ele2 = array2.length ? array2[0] : Infinity; let next; if (ele1 < ele2) { next = array1.shift(); } else { next = array2.shift(); } merged.push(next); } return merged; }
Remember the following about JavaScript to understand the above code.
0is considered a falsey value, meaning it acts likefalsewhen used in
Boolean expressions. All other numbers are truthy.Infinityis a value that is guaranteed to be greater than any other quantityshiftis an array method that removes and returns the first element
Here's the annotated version.
// commented function merge(array1, array2) { let merged = []; // keep running while either array still contains elements while (array1.length || array2.length) { // if array1 is nonempty, take its the first element as ele1 // otherwise array1 is empty, so take Infinity as ele1 let ele1 = array1.length ? array1[0] : Infinity; // do the same for array2, ele2 let ele2 = array2.length ? array2[0] : Infinity; let next; // remove the smaller of the eles from it's array if (ele1 < ele2) { next = array1.shift(); } else { next = array2.shift(); } // and add that ele to the new array merged.push(next); } return merged; }
By using Infinity as the default element when an array is empty, we are able to
elegantly handle the scenario where one array empties before the other. We know
that any actual element will be less than Infinity so we will continually take
the other element into our merged array.
In other words, we can safely handle this edge case:
merge([10, 13, 15, 25], []); // => [10, 13, 15, 25]
Nice! We now have a way to merge two sorted arrays into a single sorted array.
It's worth mentioning that merge will have a O(n) runtime where n is
the
combined length of the two input arrays. This is what we meant when we said it
was "easy" to merge two sorted arrays; linear time is fast! We'll find fact this
useful later.
605. Divide and conquer, step-by-step
Now that we satisfied the merge idea, let's handle the second point. That is, we
say an array of 1 or 0 elements is already sorted. This will be the base case of
our recursion. Let's begin adding this code:
function mergeSort(array) { if (array.length <= 1) { return array; } // .... }
If our base case pertains to an array of a very small size, then the design of
our recursive case should make progress toward hitting this base scenario. In
other words, we should recursively call mergeSort on smaller and smaller
arrays. A logical way to do this is to take the input array and split it into
left and right halves.
function mergeSort(array) { if (array.length <= 1) { return array; } let midIdx = Math.floor(array.length / 2); let leftHalf = array.slice(0, midIdx); let rightHalf = array.slice(midIdx); let sortedLeft = mergeSort(leftHalf); let sortedRight = mergeSort(rightHalf); // ... }
Here is the part of the recursion where we do a lot of hand waving and we take
things on faith. We know that mergeSort will take in an array and return the
sorted version; we assume that it works. That means the two recursive calls will
return the sortedLeft and sortedRight halves.
Okay, so we have two sorted arrays. We want to return one sorted array. So
merge them! Using the merge function we designed earlier:
function mergeSort(array) { if (array.length <= 1) { return array; } let midIdx = Math.floor(array.length / 2); let leftHalf = array.slice(0, midIdx); let rightHalf = array.slice(midIdx); let sortedLeft = mergeSort(leftHalf); let sortedRight = mergeSort(rightHalf); return merge(sortedLeft, sortedRight); }
Wow. that's it. Notice how light the implementation of mergeSort is. Much of
the heavy lifting (the actually comparisons) is done by the merge helper.
mergeSort is a classic example of a "Divide and Conquer" algorithm. In other
words, we keep breaking the array into smaller and smaller sub arrays. This is
the same as saying we take the problem and break it down into smaller and
smaller subproblems. We do this until the subproblems are so small that we
trivially know the answer to them (an array length 0 or 1 is already sorted).
Once we have those subanswers we can combine to reconstruct the larger problems
that we previously divided (merge the left and right subarrays).
606. Time and Space Complexity Analysis
606.1. Time Complexity: O(n log(n))
nis the length of the input array- We must calculate how many recursive calls we make. The number of recursive
calls is the number of times we must split the array to reach the base case.
Since we split in half each time, the number of recursive calls is
O(log(n)).- for example, say we had an array of length
32 - then the length would change as
32 -> 16 -> 8 -> 4 -> 2 -> 1, we have to
split 5 times before reaching the base case,log(32) = 5 - in our algorithm, log(n) describes how many times we must halve n
until the quantity reaches 1.
- for example, say we had an array of length
- Besides the recursive calls, we must consider the while loop within the
mergefunction, which contributesO(n)in isolation - We call
mergein every recursivemergeSortcall, so the total complexity
is O(n * log(n))
606.2. Space Complexity: O(n)
Merge Sort is the first non-O(1) space sorting algorithm we've seen thus far.
The larger the size of our input array, the greater the number of subarrays we
must create in memory. These are not free! They each take up finite space, and
we will need a new subarray for each element in the original input. Therefore,
Merge Sort has a linear space complexity, O(n).
606.3. When should you use Merge Sort?
Unless we, the engineers, have access in advance to some unique, exploitable
insight about our dataset, it turns out that O(n log n) time is the best we
can do when sorting unknown datasets.
That means that Merge Sort is fast! It's way faster than Bubble Sort, Selection
Sort, and Insertion Sort. However, due to its linear space complexity, we must
always weigh the trade off between speed and memory consumption when making the
choice to use Merge Sort. Consider the following:
- If you have unlimited memory available, use it, it's fast!
- If you have a decent amount of memory available and a medium sized dataset,
run some tests first, but use it! - In other cases, maybe you should consider other options.
Quick Sort Analysis
Let's begin structuring the recursion. The base case of any recursive problem is
where the input is so trivial, we immediately know the answer without
calculation. If our problem is to sort an array, what is the trivial array? An
array of 1 or 0 elements! Let's establish the code:
function quickSort(array) { if (array.length <= 1) { return array; } // ... }
If our base case pertains to an array of a very small size, then the design of
our recursive case should make progress toward hitting this base scenario. In
other words, we should recursively call quickSort on smaller and smaller
arrays. This is very similar to our previous mergeSort, except we don't just
split the array down the middle. Instead we should arbitrarily choose an element
of the array as a pivot and partition the remaining elements relative to this
pivot:
function quickSort(array) { if (array.length <= 1) { return array; } let pivot = array.shift(); let left = array.filter(el => el < pivot); let right = array.filter(el => el >= pivot); // ...
Here is what to notice about the partition step above:
- the pivot is an element of the array; we arbitrarily chose the first element
- we removed the pivot from the master array before we filter into the left and
right partitions
Now that we have the two subarrays ofleftandrightwe have our
subproblems! To solve these subproblems we must sort the subarrays. I wish we
had a function that sorts an array...oh wait we do,quickSort! Recursively:
function quickSort(array) { if (array.length <= 1) { return array; } let pivot = array.shift(); let left = array.filter(el => el < pivot); let right = array.filter(el => el >= pivot); let leftSorted = quickSort(left); let rightSorted = quickSort(right); // ...
Okay, so we have the two sorted partitions. This means we have the two
subsolutions. But how do we put them together? Think about how we partitioned
them in the first place. Everything in leftSorted is guaranteed to be less
than everything in rightSorted. On top of that, pivot should be placed after
the last element in leftSorted, but before the first element in rightSorted.
So all we need to do is to combine the elements in the order "left, pivot,
right"!
function quickSort(array) { if (array.length <= 1) { return array; } let pivot = array.shift(); let left = array.filter(el => el < pivot); let right = array.filter(el => el >= pivot); let leftSorted = quickSort(left); let rightSorted = quickSort(right); return leftSorted.concat([pivot]).concat(rightSorted); }
That last concat line is a bit clunky. Bonus JS Lesson: we can use the spread
... operator to elegantly concatenate arrays. In general:
let one = ['a', 'b'] let two = ['d', 'e', 'f'] let newArr = [ ...one, 'c', ...two ]; newArr; // => [ 'a', 'b', 'c', 'd', 'e', 'f' ]
Utilizing that spread pattern gives us this final implementation:
function quickSort(array) { if (array.length <= 1) { return array; } let pivot = array.shift(); let left = array.filter(el => el < pivot); let right = array.filter(el => el >= pivot); let leftSorted = quickSort(left); let rightSorted = quickSort(right); return [ ...leftSorted, pivot, ...rightSorted ]; }
606.4. Quicksort Sort JS Implementation
That code was so clean we should show it again. Here's the complete code for
your reference, for when you ctrl+F "quicksort" the night before an interview:
function quickSort(array) { if (array.length <= 1) { return array; } let pivot = array.shift(); let left = array.filter(el => el < pivot); let right = array.filter(el => el >= pivot); let leftSorted = quickSort(left); let rightSorted = quickSort(right); return [ ...leftSorted, pivot, ...rightSorted ]; }
607. Time and Space Complexity Analysis
Here is a summary of the complexity.
607.1. Time Complexity
- Avg Case: O(n log(n))
- Worst Case: O(n2)
The runtime analysis ofquickSortis more complex thanmergeSort nis the length of the input array- The partition step alone is
O(n) - We must calculate how many recursive calls we make. The number of recursive
calls is the number of times we must split the array to reach the base case.
This is dependent on how we choose the pivot. Let's analyze the best and worst
case:- Best Case: We are lucky and always choose the median as the pivot.
This means the left and right partitions will have equal length. This will
halve the array length at every step of the recursion. We benefit from
this halving withO(log(n))recursive calls to reach the base case. - Worst Case: We are unlucky and always choose the min or max as the
pivot. This means one partition will contain everything, and the other
partition is empty. This will decrease the array length by 1 at every step
of the recursion. We suffer fromO(n)recursive calls to reach the base
case.
- Best Case: We are lucky and always choose the median as the pivot.
- The partition step occurs in every recursive call, so our total complexities
are:- Best Case: O(n * log(n))
- Worst Case: O(n2)
Although we typically take the worst case when describing Big-O for an
algorithm, much research onquickSorthas shown the worst case to be an
exceedingly rare occurrence even if we choose the pivot at random. Because of
this we still considerquickSortan efficient algorithm. This is a common
interview talking point, so you should be familiar with the relationship between
the choice of pivot and efficiency of the algorithm.
Just in case: A somewhat common question a student may ask when studying
quickSortis, "If the median is the best pivot, why don't we always just
choose the median when we partition?" Don't overthink this. To know the median
of an array, it must be sorted in the first place.
607.2. Space Complexity
Our implementation of quickSort uses O(n) space because of the partition
arrays we create. There is an in-place version of quickSort that uses
O(log(n)) space. O(log(n)) space is not huge benefit over O(n).
You'll
also find our version of quickSort as easier to remember, easier to implement.
Just know that a O(logn) space quickSort exists.
607.3. When should you use Quick Sort?
- When you are in a pinch and need to throw down an efficient sort (on average).
The recursive code is light and simple to implement; much smaller than
mergeSort. - When constant space is important to you, use the in-place version. This will
of course trade off some simplicity of implementation.
If you know some constraints about dataset you can make some modifications to
optimize pivot choice. Here's some food for thought. Our implementation of
quickSortwill always take the first element as the pivot. This means we will
suffer from the worst case time complexity in the event that we are given an
already sorted array (ironic isn't it?). If you know your input data to be
mostly already sorted, randomize the choice of pivot - this is a very easy
change. Bam. Solved like a true engineer.
Binary Search Analysis
We'll implement binary search recursively. As always, we start with a base case
that captures the scenario of the input array being so trivial, that we know the
answer without further calculation. If we are given an empty array and a target,
we can be certain that the target is not inside of the array:
function binarySearch(array, target) { if (array.length === 0) { return false; } // ... }
Now for our recursive case. If we want to get a time complexity less than
O(n), we must avoid touching all n elements. Adopting our dictionary
strategy, let's find the middle element and grab references to the left and
right halves of the sorted array:
function binarySearch(array, target) { if (array.length === 0) { return false; } let midIdx = Math.floor(array.length / 2); let leftHalf = array.slice(0, midIdx); let rightHalf = array.slice(midIdx + 1); // ... }
It's worth pointing out that the left and right halves do not contain the middle
element we chose.
Here is where we leverage the sorted property of the array. If the target is
less than the middle, then the target must be in the left half of the array. If
the target is greater than the middle, then the target must be in the right half
of the array. So we can narrow our search to one of these halves, and ignore the
other. Luckily we have a function that can search the half, its binarySearch:
function binarySearch(array, target) { if (array.length === 0) { return false; } let midIdx = Math.floor(array.length / 2); let leftHalf = array.slice(0, midIdx); let rightHalf = array.slice(midIdx + 1); if (target < array[midIdx]) { return binarySearch(leftHalf, target); } else if (target > array[midIdx]) { return binarySearch(rightHalf, target); } // ... }
We know binarySeach will return the correct Boolean, so we just pass that
result up by returning it ourselves. However, something is lacking in our code.
It is only possible to get a false from the literal return false line, but
there is no return true. Looking at our conditionals, we handle the cases
where the target is less than middle or the target is greater than the middle,
but what if the product is equal to the middle? If the target is equal to
the middle, then we found the target and should return true! This is easy to
add with an else:
function binarySearch(array, target) { if (array.length === 0) { return false; } let midIdx = Math.floor(array.length / 2); let leftHalf = array.slice(0, midIdx); let rightHalf = array.slice(midIdx + 1); if (target < array[midIdx]) { return binarySearch(leftHalf, target); } else if (target > array[midIdx]) { return binarySearch(rightHalf, target); } else { return true; } }
To wrap up, we have confidence of our base case will eventually be hit because
we are continually halving the array. We halve the array until it's length is 0
or we actually find the target.
607.4. Binary Search JS Implementation
Here is the code again for your quick reference:
function binarySearch(array, target) { if (array.length === 0) { return false; } let midIdx = Math.floor(array.length / 2); let leftHalf = array.slice(0, midIdx); let rightHalf = array.slice(midIdx + 1); if (target < array[midIdx]) { return binarySearch(leftHalf, target); } else if (target > array[midIdx]) { return binarySearch(rightHalf, target); } else { return true; } }
608. Time and Space Complexity Analysis
The complexity analysis of this algorithm is easier to explain through visuals,
so we highly encourage you to watch the lecture that accompanies this
reading. In any case, here is a summary of the complexity:
608.1. Time Complexity: O(log(n))
nis the length of the input array- We have no loops, so we must only consider the number of recursive calls it
takes to hit the base case - The number of recursive calls is the number of times we must halve the array
until it's length becomes 0. This number can be described bylog(n)- for example, say we had an array of 8 elements,
n = 8 - the length would halve as
8 -> 4 -> 2 -> 1 - it takes 3 calls,
log(8) = 3
- for example, say we had an array of 8 elements,
608.2. Space Complexity: O(n)
Our implementation uses n space due to half arrays we create using slice. Note
that JavaScript slice creates a new array, so it requires additional memory to
be allocated.
608.3. When should we use Binary Search?
Use this algorithm when the input data is sorted!!! This is a heavy requirement,
but if you have it, you'll have an insanely fast algorithm. Of course, you can
use one of your high-functioning sorting algorithms to sort the input and then
perform the binary search!
Practice: Bubble Sort
This project contains a skeleton for you to implement Bubble Sort. In the
file lib/bubble_sort.js, you should implement the Bubble Sort. This is a
description of how the Bubble Sort works (and is also in the code file).
Bubble Sort: (array)
n := length(array)
repeat
swapped = false
for i := 1 to n - 1 inclusive do
/* if this pair is out of order */
if array[i - 1] > array[i] then
/* swap them and remember something changed */
swap(array, i - 1, i)
swapped := true
end if
end for
until not swapped
609. Instructions
- Clone the project from
https://github.com/appacademy-starters/algorithms-bubble-sort-starter. cdinto the project foldernpm installto install dependencies in the project root directorynpm testto run the specs- You can view the test cases in
/test/test.js. Your job is to write code in
the/lib/bubble_sort.jsthat implements the Bubble Sort.
Practice: Selection Sort
This project contains a skeleton for you to implement Selection Sort. In the
file lib/selection_sort.js, you should implement the Selection Sort. You
can use the same swap function from Bubble Sort; however, try to implement it
on your own, first.
The algorithm can be summarized as the following:
- Set MIN to location 0
- Search the minimum element in the list
- Swap with value at location MIN
- Increment MIN to point to next element
- Repeat until list is sorted
This is a description of how the Selection Sort works (and is also in the code
file).
procedure selection sort(list)
list : array of items
n : size of list
for i = 1 to n - 1
/* set current element as minimum*/
min = i
/* check the element to be minimum */
for j = i+1 to n
if list[j] < list[min] then
min = j;
end if
end for
/* swap the minimum element with the current element*/
if indexMin != i then
swap list[min] and list[i]
end if
end for
end procedure
610. Instructions
- Clone the project from
https://github.com/appacademy-starters/algorithms-selection-sort-starter. cdinto the project foldernpm installto install dependencies in the project root directorynpm testto run the specs- You can view the test cases in
/test/test.js. Your job is to write code in
the/lib/selection_sort.jsthat implements the Selection Sort.
Practice: Insertion Sort
This project contains a skeleton for you to implement Insertion Sort. In the
file lib/insertion_sort.js, you should implement the Insertion Sort.
The algorithm can be summarized as the following:
- If it is the first element, it is already sorted. return 1;
- Pick next element
- Compare with all elements in the sorted sub-list
- Shift all the elements in the sorted sub-list that is greater than the
value to be sorted - Insert the value
- Repeat until list is sorted
This is a description of how the Insertion Sort works (and is also in the code
file).
procedure insertionSort( A : array of items )
int holePosition
int valueToInsert
for i = 1 to length(A) inclusive do:
/* select value to be inserted */
valueToInsert = A[i]
holePosition = i
/*locate hole position for the element to be inserted */
while holePosition > 0 and A[holePosition-1] > valueToInsert do:
A[holePosition] = A[holePosition-1]
holePosition = holePosition -1
end while
/* insert the number at hole position */
A[holePosition] = valueToInsert
end for
end procedure
611. Instructions
- Clone the project from
https://github.com/appacademy-starters/algorithms-insertion-sort-starter. cdinto the project foldernpm installto install dependencies in the project root directorynpm testto run the specs- You can view the test cases in
/test/test.js. Your job is to write code in
the/lib/insertion_sort.jsthat implements the Insertion Sort.
Practice: Merge Sort
This project contains a skeleton for you to implement Merge Sort. In the
file lib/merge_sort.js, you should implement the Merge Sort.
The algorithm can be summarized as the following:
- if there is only one element in the list, it is already sorted. return that
array. - otherwise, divide the list recursively into two halves until it can no more
be divided. - merge the smaller lists into new list in sorted order.
This is a description of how the Merge Sort works (and is also in the code
file).
procedure mergesort( a as array )
if ( n == 1 ) return a
/* Split the array into two */
var l1 as array = a[0] ... a[n/2]
var l2 as array = a[n/2+1] ... a[n]
l1 = mergesort( l1 )
l2 = mergesort( l2 )
return merge( l1, l2 )
end procedure
procedure merge( a as array, b as array )
var result as array
while ( a and b have elements )
if ( a[0] > b[0] )
add b[0] to the end of result
remove b[0] from b
else
add a[0] to the end of result
remove a[0] from a
end if
end while
while ( a has elements )
add a[0] to the end of result
remove a[0] from a
end while
while ( b has elements )
add b[0] to the end of result
remove b[0] from b
end while
return result
end procedure
612. Instructions
- Clone the project from
https://github.com/appacademy-starters/algorithms-merge-sort-starter. cdinto the project foldernpm installto install dependencies in the project root directorynpm testto run the specs- You can view the test cases in
/test/test.js. Your job is to write code in
the/lib/merge_sort.jsthat implements the Merge Sort.
Practice: Quick Sort
This project contains a skeleton for you to implement Quick Sort. In the
file lib/quick_sort.js, you should implement the Quick Sort. This is a
description of how the Quick Sort works (and is also in the code file).
procedure quick sort (array)
if the length of the array is 0 or 1, return the array
set the pivot to the first element of the array
remove the first element of the array
put all values less than the pivot value into an array called left
put all values greater than the pivot value into an array called right
call quick sort on left and assign the return value to leftSorted
call quick sort on right and assign the return value to rightSorted
return the concatenation of leftSorted, the pivot value, and rightSorted
end procedure quick sort
613. Instructions
- Clone the project from
https://github.com/appacademy-starters/algorithms-quick-sort-starter. cdinto the project foldernpm installto install dependencies in the project root directorynpm testto run the specs- You can view the test cases in
/test/test.js. Your job is to write code in
the/lib/quick_sort.jsthat implements the Quick Sort.
Practice: Binary Search
This project contains a skeleton for you to implement Binary Search. In the
file lib/binary_search.js, you should implement the Binary Search and its
cousin Binary Search Index.
The Binary Search algorithm can be summarized as the following:
- If the array is empty, then return false
- Check the value in the middle of the array against the target value
- If the value is equal to the target value, then return true
- If the value is less than the target value, then return the binary search on
the left half of the array for the target - If the value is greater than the target value, then return the binary search
on the right half of the array for the target
This is a description of how the Binary Search works (and is also in the code
file).
procedure binary search (list, target)
parameter list: a list of sorted value
parameter target: the value to search for
if the list has zero length, then return false
determine the slice point:
if the list has an even number of elements,
the slice point is the number of elements
divided by two
if the list has an odd number of elements,
the slice point is the number of elements
minus one divided by two
create an list of the elements from 0 to the
slice point, not including the slice point,
which is known as the "left half"
create an list of the elements from the
slice point to the end of the list which is
known as the "right half"
if the target is less than the value in the
original array at the slice point, then
return the binary search of the "left half"
and the target
if the target is greater than the value in the
original array at the slice point, then
return the binary search of the "right half"
and the target
if neither of those is true, return true
end procedure binary search
Then you need to adapt that to return the index of the found item rather than
a Boolean value. The pseudocode is also in the code file.
procedure binary search index(list, target, low, high)
parameter list: a list of sorted value
parameter target: the value to search for
parameter low: the lower index for the search
parameter high: the upper index for the search
if low is equal to high, then return -1 to indicate
that the value was not found
determine the slice point:
if the list between the high index and the low index
has an even number of elements,
the slice point is the number of elements
between high and low divided by two
if the list between the high index and the low index
has an odd number of elements,
the slice point is the number of elements
between high and low minus one, divided by two
if the target is less than the value in the
original array at the slice point, then
return the binary search of the array,
the target, low, and the slice point
if the target is greater than the value in the
original array at the slice point, then return
the binary search of the array, the target,
the slice point plus one, and high
if neither of those is true, return the slice point
end procedure binary search index
614. Instructions
- Clone the project from
https://github.com/appacademy-starters/algorithms-binary-search-starter. cdinto the project foldernpm installto install dependencies in the project root directorynpm testto run the specs- You can view the test cases in
/test/test.js. Your job is to write code in
the/lib/binary_search.jsthat implements the Binary Search and Binary
Search Index.
WEEK-07 DAY-4
Lists, Stacks, Queues
Lists, Stacks, and Queues Learning Objectives
The objective of this lesson is for you to become comfortable with
implementing common data structures. This is important because questions about
data structures are incredibly likely to be interview questions for software
engineers from junior to senior levels. Moreover, understanding how different
data structures work will influence the libraries and frameworks that you choose
when writing software.
When you are done, you will be able to:
- Explain and implement a List.
- Explain and implement a Stack.
- Explain and implement a Queue.me comfortable with
implementing common data structures. This is important because questions about
data structures are incredibly likely to be interview questions for software
engineers from junior to senior levels. Moreover, understanding how different
data structures work will influence the libraries and frameworks that you choose
when writing software.
When you are done, you will be able to: - Explain and implement a List.
- Explain and implement a Stack.
- Explain and implement a Queue.
Linked Lists
In the university setting, it’s common for Linked Lists to appear early on in an
undergraduate’s Computer Science coursework. While they don't always have the
most practical real-world applications in industry, Linked Lists make for an
important and effective educational tool in helping develop a student's mental
model on what data structures actually are to begin with.
Linked lists are simple. They have many compelling, reoccurring edge cases to
consider that emphasize to the student the need for care and intent while
implementing data structures. They can be applied as the underlying data
structure while implementing a variety of other prevalent abstract data types,
such as Lists, Stacks, and Queues, and they have a level of versatility high
enough to clearly illustrate the value of the Object Oriented Programming
paradigm.
They also come up in software engineering interviews quite often.
615. What is a Linked List?
A Linked List data structure represents a linear sequence of "vertices" (or
"nodes"), and tracks three important properties.
Linked List Properties:
| Property | Description | | :---------: | :-------------------------------------------------: | | `head` | The first node in the list. | | `tail` | The last node in the list. | | `length` | The number of nodes in the list; the list's length. | The data being tracked by a particular Linked List does not live inside the Linked List instance itself. Instead, each vertex is actually an instance of an even simpler, smaller data structure, often referred to as a "Node". Depending on the type of Linked List (there are many), Node instances track some very important properties as well.Linked List Node Properties:
| Property | Description | | :---------: | :----------------------------------------------------: | | `value` | The actual value this node represents. | | `next` | The next node in the list (relative to this node). | | `previous` | The previous node in the list (relative to this node). |
NOTE: The previous property is for Doubly Linked Lists only!
Admittedly, this does sound a lot like an Array so far, and that's because
Arrays and Linked Lists are both implementations of the List ADT. However, there
is an incredibly important distinction to be made between Arrays and Linked
Lists, and that is how they physically store their data. (As opposed to how
they represent the order of their data.)
Recall that Arrays contain contiguous data. Each element of an array is
actually stored next to it's neighboring element in the actual hardware of
your machine, in a single continuous block in memory.

An Array's contiguous data being stored in a continuous block of addresses in memory.
Unlike Arrays, Linked Lists contain _non-contiguous_ data. Though Linked Lists _represent_ data that is ordered linearly, that mental model is just that - an interpretation of the _representation_ of information, not reality. In reality, in the actual hardware of your machine, whether it be in disk or in memory, a Linked List's Nodes are not stored in a single continuous block of addresses. Rather, Linked List Nodes live at randomly distributed addresses throughout your machine! The only reason we know which node comes next in the list is because we've assigned its reference to the current node's `next` pointer. 
A Singly Linked List's non-contiguous data (Nodes) being stored at randomly distributed addresses in memory.
For this reason, Linked List Nodes have _no indices_, and no _random access_. Without random access, we do not have the ability to look up an individual Linked List Node in constant time. Instead, to find a particular Node, we have to start at the very first Node and iterate through the Linked List one node at a time, checking each Node's _next_ Node until we find the one we're interested in. So when implementing a Linked List, we actually must implement both the Linked List class _and_ the Node class. Since the actual data lives in the Nodes, it's simpler to implement the Node class first. ## 616. Types of Linked Lists
There are four flavors of Linked List you should be familiar with when walking
into your job interviews.
Linked List Types:
| List Type | Description | Directionality | | :-------------------: | :-------------------------------------------------------------------------------: | :--------------------------: | | Singly Linked | Nodes have a single pointer connecting them in a single direction. | Head→Tail | | Doubly Linked | Nodes have two pointers connecting them bi-directionally. | Head⇄Tail | | Multiply Linked | Nodes have two or more pointers, providing a variety of potential node orderings. | Head⇄Tail, A→Z, Jan→Dec, etc. | | Circularly Linked | Final node's `next` pointer points to the first node, creating a non-linear, circular version of a Linked List. | Head→Tail→Head→Tail|NOTE: These Linked List types are not always mutually exclusive.
For instance: - Any type of Linked List can be implemented Circularly (e.g. A Circular Doubly Linked List). - A Doubly Linked List is actually just a special case of a Multiply Linked List. You are most likely to encounter Singly and Doubly Linked Lists in your upcoming job search, so we are going to focus exclusively on those two moving forward. However, in more senior level interviews, it is very valuable to have some familiarity with the other types of Linked Lists. Though you may not actually code them out, _you will win extra points by illustrating your ability to weigh the tradeoffs of your technical decisions_ by discussing how your choice of Linked List type may affect the efficiency of the solutions you propose. ## 617. Linked List MethodsLinked Lists are great foundation builders when learning about data structures
because they share a number of similar methods (and edge cases) with many other
common data structures. You will find that many of the concepts discussed here
will repeat themselves as we dive into some of the more complex non-linear data
structures later on, like Trees and Graphs.
In the project that follows, we will implement the following Linked List
methods:
| Type | Name | Description | Returns |
|---|---|---|---|
| Insertion | addToTail |
Adds a new node to the tail of the Linked List. | Updated Linked List |
| Insertion | addToHead |
Adds a new node to the head of the Linked List. | Updated Linked List |
| Insertion | insertAt |
Inserts a new node at the "index", or position, specified. | Boolean |
| Deletion | removeTail |
Removes the node at the tail of the Linked List. | Removed node |
| Deletion | removeHead |
Removes the node at the head of the Linked List. | Removed node |
| Deletion | removeFrom |
Removes the node at the "index", or position, specified. | Removed node |
| Search | contains |
Searches the Linked List for a node with the value specified. | Boolean |
| Access | get |
Gets the node at the "index", or position, specified. | Node at index |
| Access | set |
Updates the value of a node at the "index", or position, specified. | Boolean |
| Meta | size |
Returns the current size of the Linked List. | Integer |
618. Time and Space Complexity Analysis
Before we begin our analysis, here is a quick summary of the Time and Space
constraints of each Linked List Operation. The complexities below apply to both
Singly and Doubly Linked Lists:
| Data Structure Operation | Time Complexity (Avg) | Time Complexity (Worst) | Space Complexity (Worst) |
|---|---|---|---|
| Access | Θ(n) |
O(n) |
O(n) |
| Search | Θ(n) |
O(n) |
O(n) |
| Insertion | Θ(1) |
O(1) |
O(n) |
| Deletion | Θ(1) |
O(1) |
O(n) |
Before moving forward, see if you can reason to yourself why each operation has
the time and space complexity listed above!
619. Time Complexity - Access and Search:
619.1. Scenarios:
- We have a Linked List, and we'd like to find the 8th item in the list.
- We have a Linked List of sorted alphabet letters, and we'd like to see if the
letter "Q" is inside that list.
619.2. Discussion:
Unlike Arrays, Linked Lists Nodes are not stored contiguously in memory, and
thereby do not have an indexed set of memory addresses at which we can quickly
lookup individual nodes in constant time. Instead, we must begin at the head of
the list (or possibly at the tail, if we have a Doubly Linked List), and iterate
through the list until we arrive at the node of interest.
In Scenario 1, we'll know we're there because we've iterated 8 times. In
Scenario 2, we'll know we're there because, while iterating, we've checked each
node's value and found one that matches our target value, "Q".
In the worst case scenario, we may have to traverse the entire Linked List until
we arrive at the final node. This makes both Access & Search Linear Time
operations.
620. Time Complexity - Insertion and Deletion:
620.1. Scenarios:
- We have an empty Linked List, and we'd like to insert our first node.
- We have a Linked List, and we'd like to insert or delete a node at the Head
or Tail. - We have a Linked List, and we'd like to insert or delete a node from
somewhere in the middle of the list.
620.2. Discussion:
Since we have our Linked List Nodes stored in a non-contiguous manner that
relies on pointers to keep track of where the next and previous nodes live,
Linked Lists liberate us from the linear time nature of Array insertions and
deletions. We no longer have to adjust the position at which each node/element
is stored after making an insertion at a particular position in the list.
Instead, if we want to insert a new node at position i, we can simply:
- Create a new node.
- Set the new node's
nextandpreviouspointers to the nodes that live at
positionsiandi - 1, respectively. - Adjust the
nextpointer of the node that lives at positioni - 1to point
to the new node. - Adjust the
previouspointer of the node that lives at positionito point
to the new node.
And we're done, in Constant Time. No iterating across the entire list necessary.
"But hold on one second," you may be thinking. "In order to insert a new node in
the middle of the list, don't we have to lookup its position? Doesn't that take
linear time?!"
Yes, it is tempting to call insertion or deletion in the middle of a Linked List
a linear time operation since there is lookup involved. However, it's usually
the case that you'll already have a reference to the node where your desired
insertion or deletion will occur.
For this reason, we separate the Access time complexity from the
Insertion/Deletion time complexity, and formally state that Insertion and
Deletion in a Linked List are Constant Time across the board.
620.3. NOTE:
Without a reference to the node at which an insertion or deletion will occur,
due to linear time lookup, an insertion or deletion in the middle of a Linked
List will still take Linear Time, sum total.
621. Space Complexity:
621.1. Scenarios:
- We're given a Linked List, and need to operate on it.
- We've decided to create a new Linked List as part of strategy to solve some
problem.
621.2. Discussion:
It's obvious that Linked Lists have one node for every one item in the list, and
for that reason we know that Linked Lists take up Linear Space in memory.
However, when asked in an interview setting what the Space Complexity of your
solution to a problem is, it's important to recognize the difference between
the two scenarios above.
In Scenario 1, we are not creating a new Linked List. We simply need to
operate on the one given. Since we are not storing a new node for every node
represented in the Linked List we are provided, our solution is not
necessarily linear in space.
In Scenario 2, we are creating a new Linked List. If the number of nodes we
create is linearly correlated to the size of our input data, we are now
operating in Linear Space.
621.3. NOTE:
Linked Lists can be traversed both iteratively and recursively. If you choose
to traverse a Linked List recursively, there will be a recursive function call
added to the call stack for every node in the Linked List. Even if you're
provided the Linked List, as in Scenario 1, you will still use Linear Space in
the call stack, and that counts.
Stacks and Queues
Stacks and Queues aren't really "data structures" by the strict definition of
the term. The more appropriate terminology would be to call them abstract data
types (ADTs), meaning that their definitions are more conceptual and related to
the rules governing their user-facing behaviors rather than their core
implementations.
For the sake of simplicity, we'll refer to them as data structures and ADTs
interchangeably throughout the course, but the distinction is an important one
to be familiar with as you level up as an engineer.
Now that that's out of the way, Stacks and Queues represent a linear collection
of nodes or values. In this way, they are quite similar to the Linked List data
structure we discussed in the previous section. In fact, you can even use a
modified version of a Linked List to implement each of them. (Hint, hint.)
These two ADTs are similar to each other as well, but each obey their own
special rule regarding the order with which Nodes can be added and removed from
the structure.
Since we've covered Linked Lists in great length, these two data structures will
be quick and easy. Let's break them down individually in the next couple of
sections.
622. What is a Stack?
Stacks are a Last In First Out (LIFO) data structure. The last Node added to a
stack is always the first Node to be removed, and as a result, the first Node
added is always the last Node removed.
The name Stack actually comes from this characteristic, as it is helpful to
visualize the data structure as a vertical stack of items. Personally, I like to
think of a Stack as a stack of plates, or a stack of sheets of paper. This seems
to make them more approachable, because the analogy relates to something in our
everyday lives.
If you can imagine adding items to, or removing items from, a Stack
of...literally anything...you'll realize that every (sane) person naturally
obeys the LIFO rule.
We add things to the top of a stack. We remove things from the top of a
stack. We never add things to, or remove things from, the bottom of the stack.
That's just crazy.
Note: We can use JavaScript Arrays to implement a basic stack. Array#push adds
to the top of the stack and Array#pop will remove from the top of the stack.
In the exercise that follows, we'll build our own Stack class from scratch
(without using any arrays). In an interview setting, your evaluator may be okay
with you using an array as a stack.
623. What is a Queue?
Queues are a First In First Out (FIFO) data structure. The first Node added to
the queue is always the first Node to be removed.
The name Queue comes from this characteristic, as it is helpful to visualize
this data structure as a horizontal line of items with a beginning and an end.
Personally, I like to think of a Queue as the line one waits on for an amusement
park, at a grocery store checkout, or to see the teller at a bank.
If you can imagine a queue of humans waiting...again, for literally
anything...you'll realize that most people (the civil ones) naturally obey the
FIFO rule.
People add themselves to the back of a queue, wait their turn in line, and
make their way toward the front. People exit from the front of a queue, but
only when they have made their way to being first in line.
We never add ourselves to the front of a queue (unless there is no one else in
line), otherwise we would be "cutting" the line, and other humans don't seem to
appreciate that.
Note: We can use JavaScript Arrays to implement a basic queue. Array#push adds
to the back (enqueue) and Array#shift will remove from the front (dequeue). In
the exercise that follows, we'll build our own Queue class from scratch (without
using any arrays). In an interview setting, your evaluator may be okay with you
using an array as a queue.
624. Stack and Queue Properties
Stacks and Queues are so similar in composition that we can discuss their
properties together. They track the following three properties:
Stack Properties | Queue Properties:
| Stack Property | Description | Queue Property | Description | | :------------: | :---------------------------------------------------: | :------------: | :---------------------------------------------------: | | `top` | The first node in the Stack | `front` | The first node in the Queue. | | ---- | Stacks do not have an equivalent | `back` | The last node in the Queue. | | `length` | The number of nodes in the Stack; the Stack's length. | `length` | The number of nodes in the Queue; the Queue's length. | Notice that rather than having a `head` and a `tail` like Linked Lists, Stacks have a `top`, and Queues have a `front` and a `back` instead. Stacks don't have the equivalent of a `tail` because you only ever push or pop things off the top of Stacks. These properties are essentially the same; pointers to the end points of the respective List ADT where important actions way take place. The differences in naming conventions are strictly for human comprehension.Similarly to Linked Lists, the values stored inside a Stack or a Queue are actually contained within Stack Node and Queue Node instances. Stack, Queue, and Singly Linked List Nodes are all identical, but just as a reminder and for the sake of completion, these List Nodes track the following two properties:
Stack & Queue Node Properties:
| Property | Description | | :---------: | :----------------------------------------------------: | | `value` | The actual value this node represents. | | `next` | The next node in the Stack (relative to this node). | ## 625. Stack MethodsIn the exercise that follows, we will implement a Stack data structure along
with the following Stack methods:
| Type | Name | Description | Returns |
|---|---|---|---|
| Insertion | push |
Adds a Node to the top of the Stack. | Integer - New size of stack |
| Deletion | pop |
Removes a Node from the top of the Stack. | Node removed from top of Stack |
| Meta | size |
Returns the current size of the Stack. | Integer |
626. Queue Methods
In the exercise that follows, we will implement a Queue data structure along
with the following Queue methods:
| Type | Name | Description | Returns |
|---|---|---|---|
| Insertion | enqueue |
Adds a Node to the front of the Queue. | Integer - New size of Queue |
| Deletion | dequeue |
Removes a Node from the front of the Queue. | Node removed from front of Queue |
| Meta | size |
Returns the current size of the Queue. | Integer |
627. Time and Space Complexity Analysis
Before we begin our analysis, here is a quick summary of the Time and Space
constraints of each Stack Operation.
| Data Structure Operation | Time Complexity (Avg) | Time Complexity (Worst) | Space Complexity (Worst) |
|---|---|---|---|
| Access | Θ(n) |
O(n) |
O(n) |
| Search | Θ(n) |
O(n) |
O(n) |
| Insertion | Θ(1) |
O(1) |
O(n) |
| Deletion | Θ(1) |
O(1) |
O(n) |
Before moving forward, see if you can reason to yourself why each operation has
the time and space complexity listed above!
627.1. Time Complexity - Access and Search:
When the Stack ADT was first conceived, its inventor definitely did not
prioritize searching and accessing individual Nodes or values in the list. The
same idea applies for the Queue ADT. There are certainly better data structures
for speedy search and lookup, and if these operations are a priority for your
use case, it would be best to choose something else!
Search and Access are both linear time operations for Stacks and Queues, and
that shouldn't be too unclear. Both ADTs are nearly identical to Linked Lists in
this way. The only way to find a Node somewhere in the middle of a Stack or a
Queue, is to start at the top (or the back) and traverse downward (or
forward) toward the bottom (or front) one node at a time via each Node's
next property.
This is a linear time operation, O(n).
627.2. Time Complexity - Insertion and Deletion:
For Stacks and Queues, insertion and deletion is what it's all about. If there
is one feature a Stack absolutely must have, it's constant time insertion and
removal to and from the top of the Stack (FIFO). The same applies for Queues,
but with insertion occurring at the back and removal occurring at the front
(LIFO).
Think about it. When you add a plate to the top of a stack of plates, do you
have to iterate through all of the other plates first to do so? Of course not.
You simply add your plate to the top of the stack, and that's that. The concept
is the same for removal.
Therefore, Stacks and Queues have constant time Insertion and Deletion via their
push and pop or enqueue and dequeue methods, O(1).
627.3. Space Complexity:
The space complexity of Stacks and Queues is very simple. Whether we are
instantiating a new instance of a Stack or Queue to store a set of data, or we
are using a Stack or Queue as part of a strategy to solve some problem, Stacks
and Queues always store one Node for each value they receive as input.
For this reason, we always consider Stacks and Queues to have a linear space
complexity, O(n).
628. When should we use Stacks and Queues?
At this point, we've done a lot of work understanding the ins and outs of Stacks
and Queues, but we still haven't really discussed what we can use them for. The
answer is actually...a lot!
For one, Stacks and Queues can be used as intermediate data structures while
implementing some of the more complicated data structures and methods we'll see
in some of our upcoming sections.
For example, the implementation of the breadth-first Tree traversal algorithm
takes advantage of a Queue instance, and the depth-first Graph traversal
algorithm exploits the benefits of a Stack instance.
Additionally, Stacks and Queues serve as the essential underlying data
structures to a wide variety of applications you use all the time. Just to name
a few:
628.1. Stacks:
- The Call Stack is a Stack data structure, and is used to manage the order of
function invocations in your code. - Browser History is often implemented using a Stack, with one great example
being the browser history object in the very popular React Router module. - Undo/Redo functionality in just about any application. For example:
- When you're coding in your text editor, each of the actions you take on your
keyboard are recorded bypushing that event to a Stack. - When you hit [cmd + z] to undo your most recent action, that event is
poped off the Stack, because the last event that occured should be the
first one to be undone (LIFO). - When you hit [cmd + y] to redo your most recent action, that event is
pushed back onto the Stack.
- When you're coding in your text editor, each of the actions you take on your
628.2. Queues:
- Printers use a Queue to manage incoming jobs to ensure that documents are
printed in the order they are received. - Chat rooms, online video games, and customer service phone lines use a Queue
to ensure that patrons are served in the order they arrive.- In the case of a Chat Room, to be admitted to a size-limited room.
- In the case of an Online Multi-Player Game, players wait in a lobby until
there is enough space and it is their turn to be admitted to a game. - In the case of a Customer Service Phone Line...you get the point.
- As a more advanced use case, Queues are often used as components or services
in the system design of a service-oriented architecture. A very popular and
easy to use example of this is Amazon's Simple Queue Service (SQS), which is a
part of their Amazon Web Services (AWS) offering.- You would add this service to your system between two other services, one
that is sending information for processing, and one that is receiving
information to be processed, when the volume of incoming requests is high
and the integrity of the order with which those requests are processed must
be maintained.
- You would add this service to your system between two other services, one
Linked List Project
This project contains a skeleton for you to implement a linked list. This is a
test-driven project. Run the tests and read the top-most error. If it's not
clear what is failing, open the test/test.js file to figure out what the
test is expecting. Make the top-most test pass.
Keep making the top-most test pass until all tests pass.
629. Instructions
- Clone the project from
https://github.com/appacademy-starters/data-structures-linked-list-starter. cdinto the project foldernpm installto install dependencies in the project root directorynpm testto run the specs- You can view the test cases in
/test/test.js. Your job is to write code in
the/lib/linked_list.jsthat implements theNodeandLinkedListclasses
to make the tests pass.
Stack Project
This project contains a skeleton for you to implement a stack. This is a
test-driven project. Run the tests and read the top-most error. If it's not
clear what is failing, open the test/test.js file to figure out what the
test is expecting. Make the top-most test pass.
Keep making the top-most test pass until all tests pass.
630. Instructions
- Clone the project from
https://github.com/appacademy-starters/data-structures-stack-starter. cdinto the project foldernpm installto install dependencies in the project root directorynpm testto run the specs- You can view the test cases in
/test/test.js. Your job is to write code in
the/lib/stack.jsthat implements theNodeandStackclasses
to make the tests pass.
Queue Project
This project contains a skeleton for you to implement a queue. This is a
test-driven project. Run the tests and read the top-most error. If it's not
clear what is failing, open the test/test.js file to figure out what the
test is expecting. Make the top-most test pass.
Keep making the top-most test pass until all tests pass.
631. Instructions
- Clone the project from
https://github.com/appacademy-starters/data-structures-queue-starter. cdinto the project foldernpm installto install dependencies in the project root directorynpm testto run the specs- You can view the test cases in
/test/test.js. Your job is to write code in
the/lib/queue.jsthat implements theNodeandQueueclasses
to make the tests pass.
WEEK-07 DAY-5
Heaps
Graphs and Heaps Learning Objectives
The objective of this lesson is for you to become comfortable with
implementing common data structures. This is important because questions about
data structures are incredibly likely to be interview questions for software
engineers from junior to senior levels. Moreover, understanding how different
data structures work will influence the libraries and frameworks that you choose
when writing software.
When you are done, you will be able to:
- Explain and implement a Heap.
- Explain and implement a Graph.table with
implementing common data structures. This is important because questions about
data structures are incredibly likely to be interview questions for software
engineers from junior to senior levels. Moreover, understanding how different
data structures work will influence the libraries and frameworks that you choose
when writing software.
When you are done, you will be able to: - Explain and implement a Heap.
- Explain and implement a Graph.
Introduction to Heaps
Let's explore the Heap data structure! In particular, we'll explore Binary
Heaps. A binary heap is a type of binary tree. However, a heap is not a binary
search tree. A heap is a partially ordered data structure, whereas a BST has
full order. In a heap, the root of the tree will be the maximum (max heap) or
the minimum (min heap). Below is an example of a max heap:

Notice that the heap above does not follow search tree property where all values
to the left of a node are less and all values to the right are greater or equal.
Instead, the max heap invariant is:
- given any node, its children must be less than or equal to the node
This constraint makes heaps much more relaxed in structure compared to a search
tree. There is no guaranteed order among "siblings" or "cousins" in a heap. The
relationship only flows down the tree from parent to child. In other words, in a
max heap, a node will be greater than all of it's children, it's grandchildren,
its great-grandchildren, and so on. A consequence of this is the root being the
absolute maximum of the entire tree. We'll be exploring max heaps together, but
these arguments are symmetric for a min heap.
631.1. Complete Trees
We'll eventually implement a max heap together, but first we'll need to take a
quick detour. Our design goal is to implement a data structure with efficient
operations. Since a heap is a type of binary tree, recall the circumstances
where we had a "best case" binary tree. We'll need to ensure our heap has
minimal height, that is, it must be a balanced tree!
Our heap implementation will not only be balanced, but it will also be
complete. To clarify, every complete tree is also a balanced tree, but
not every balanced tree is also complete. Our definition of a complete tree is:
- a tree where all levels have the maximal number of nodes, except the bottom
the level - AND the bottom level has all nodes filled as far left as possible
Here are few examples of the definition:

Notice that the tree is on the right fails the second point of our definition
because there is a gap in the last level. Informally, you can think about a
complete tree as packing its nodes as closely together as possible. This line of
thinking will come into play when we code heaps later.
631.2. When to Use Heaps?
Heaps are the most useful when attacking problems that require you to "partially
sort" data. This usually takes form in problems that have us calculate the
largest or smallest n numbers of a collection. For example: What if you were
asked to find the largest 5 numbers in an array in linear time, O(n)? The
fastest sorting algorithms are O(n logn), so none of those algorithms will be
good enough. However, we can use a heap to solve this problem in linear time.
We'll analyze this in depth when we implement a heap in the next section!
One of the most common uses of a binary heap is to implement a "[priority queue]".
We learned before that a queue is a FIFO (First In, First Out) data structure.
With a priority queue, items are removed from the queue based on a priority number.
The priority number is used to place the items into the heap and pull them out
in the correct priority order!
[priority queue]:https://en.wikipedia.org/wiki/Priority_queue
632. Binary Heap Implementation
Now that we are familiar with the structure of a heap, let's implement one! What
may be surprising is that the usual way to implement a heap is by simply using an
array. That is, we won't need to create a node class with pointers. Instead,
each index of the array will represent a node, with the root being at index 1.
We'll avoid using index 0 of the array so our math works out nicely. From this
point, we'll use the following rules to interpret the array as a heap:
- index
irepresents a node in the heap - the left child of node
ican be found at index2 * i - the right child of code
ican be found at index2 * i + 1
In other words, the array[null, 42, 32, 24, 30, 9, 20, 18, 2, 7]represents
the heap below. Take a moment to analyze how the array indices work out to
represent left and right children.

Pretty clever math right? We can also describe the relationship from child to
parent node. Say we are given a node at indexiin the heap, then it's parent
is found at indexMath.floor(i / 2).
It's useful to visualize heap algorithms using the classic image of nodes and
edges, but we'll translate that into array index operations.
632.1. Insert
What's a heap if we can't add data into it? We'll need a insert method
that will add a new value into the heap without voiding our heap property. In
our MaxHeap, the property states that a node must be greater than its
children.
632.1.1. Visualizing our heap as a tree of nodes:
- We begin an insertion by adding the new node to the bottom leaf level of the
heap, preferring to place the new node as far left in the level as possible.
This ensures the tree remains complete. - Placing the new node there may momentarily break our heap property, so we
need to restore it by moving the node up the tree into a legal position.
Restoring the heap property is a matter of continually swapping the new node
with it's parent while it's parent contains a smaller value. We refer to this
process assiftUp
632.1.2. Translating that into array operations:
pushthe new value to the end of the array- continually swap that value toward the front of the array (following our
child-parent index rules) until heap property is restored
632.2. DeleteMax
This is the "fetch" operation of a heap. Since we maintain heap property
throughout, the root of the heap will always be the maximum value. We want to
delete and return the root, whilst keeping the heap property.
632.2.1. Visualizing our heap as a tree of nodes:
- We begin the deletion by saving a reference to the root value (the max) to
return later. We then locate the right most node of the bottom level and copy
it's value into the root of the tree. We easily delete the duplicate node at
the leaf level. This ensures the tree remains complete. - Copying that value into the root may momentarily break our heap property, so
we need to restore it by moving the node down the tree into a legal position.
Restoring the heap property is a matter of continually swapping the node with
the greater of it's two children. We refer to this process assiftDown.
632.2.2. Translating that into array operations:
- The root is at index 1, so save it to return later. The right most node of
the bottom level would just be the very last element of the array. Copy the
last element into index 1, and pop off the last element (since it now appears
at the root). - Continually swap the new root toward the back of the array (following our
parent-child index rules) until heap property is restored. A node can have
two children, so we should always prefer to swap with the greater child.
632.3. Time Complexity Analysis
- insert:
O(log(n)) - deleteMax:
O(log(n))
Recall that our heap will be a complete/balanced tree. This means it's height is
log(n)wherenis the number of items. BothinsertanddeleteMaxhave a
time complexity oflog(n)because ofsiftUpandsiftDownrespectively. In
worst caseinsert, we will have tosiftUpa leaf all the way to the root of
the tree. In the worst casedeleteMax, we will have tosiftDownthe new root
all the way down to the leaf level. In either case, we'll have to traverse the
full height of the tree,log(n).
632.3.1. Array Heapify Analysis
Now that we have established O(log(n)) for a single insertion, let's analyze
the time complexity for turning an array into a heap (we call this heapify,
coming in the next project 😃). The algorithm itself is simple, just perform an
insert for every element. Since there are n elements and each insert
requires log(n) time, our total complexity for heapify is O(nlog(n))... Or
is it? There is actually a tighter bound on heapify. The proof requires some
math that you won't find valuable in your job search, but do understand that the
true time complexity of heapify is amortized O(n). Amortized refers to the
fact that our analysis is about performance over many insertions.
632.4. Space Complexity Analysis
O(n), since we use a single array to store heap data.heap, let's implement one! What
may be surprising is that the usual way to implement a heap is by simply using an
array. That is, we won't need to create a node class with pointers. Instead,
each index of the array will represent a node, with the root being at index 1.
We'll avoid using index 0 of the array so our math works out nicely. From this
point, we'll use the following rules to interpret the array as a heap:- index
irepresents a node in the heap - the left child of node
ican be found at index2 * i - the right child of code
ican be found at index2 * i + 1
In other words, the array[null, 42, 32, 24, 30, 9, 20, 18, 2, 7]represents
the heap below. Take a moment to analyze how the array indices work out to
represent left and right children.
Pretty clever math right? We can also describe the relationship from child to
parent node. Say we are given a node at indexiin the heap, then it's parent
is found at indexMath.floor(i / 2).
It's useful to visualize heap algorithms using the classic image of nodes and
edges, but we'll translate that into array index operations.
632.5. Insert
What's a heap if we can't add data into it? We'll need a insert method
that will add a new value into the heap without voiding our heap property. In
our MaxHeap, the property states that a node must be greater than its
children.
632.5.1. Visualizing our heap as a tree of nodes:
- We begin an insertion by adding the new node to the bottom leaf level of the
heap, preferring to place the new node as far left in the level as possible.
This ensures the tree remains complete. - Placing the new node there may momentarily break our heap property, so we
need to restore it by moving the node up the tree into a legal position.
Restoring the heap property is a matter of continually swapping the new node
with it's parent while it's parent contains a smaller value. We refer to this
process assiftUp
632.5.2. Translating that into array operations:
pushthe new value to the end of the array- continually swap that value toward the front of the array (following our
child-parent index rules) until heap property is restored
632.6. DeleteMax
This is the "fetch" operation of a heap. Since we maintain heap property
throughout, the root of the heap will always be the maximum value. We want to
delete and return the root, whilst keeping the heap property.
632.6.1. Visualizing our heap as a tree of nodes:
- We begin the deletion by saving a reference to the root value (the max) to
return later. We then locate the right most node of the bottom level and copy
it's value into the root of the tree. We easily delete the duplicate node at
the leaf level. This ensures the tree remains complete. - Copying that value into the root may momentarily break our heap property, so
we need to restore it by moving the node down the tree into a legal position.
Restoring the heap property is a matter of continually swapping the node with
the greater of it's two children. We refer to this process assiftDown.
632.6.2. Translating that into array operations:
- The root is at index 1, so save it to return later. The right most node of
the bottom level would just be the very last element of the array. Copy the
last element into index 1, and pop off the last element (since it now appears
at the root). - Continually swap the new root toward the back of the array (following our
parent-child index rules) until heap property is restored. A node can have
two children, so we should always prefer to swap with the greater child.
632.7. Time Complexity Analysis
- insert:
O(log(n)) - deleteMax:
O(log(n))
Recall that our heap will be a complete/balanced tree. This means it's height is
log(n)wherenis the number of items. BothinsertanddeleteMaxhave a
time complexity oflog(n)because ofsiftUpandsiftDownrespectively. In
worst caseinsert, we will have tosiftUpa leaf all the way to the root of
the tree. In the worst casedeleteMax, we will have tosiftDownthe new root
all the way down to the leaf level. In either case, we'll have to traverse the
full height of the tree,log(n).
632.7.1. Array Heapify Analysis
Now that we have established O(log(n)) for a single insertion, let's analyze
the time complexity for turning an array into a heap (we call this heapify,
coming in the next project 😃). The algorithm itself is simple, just perform an
insert for every element. Since there are n elements and each insert
requires log(n) time, our total complexity for heapify is O(nlog(n))... Or
is it? There is actually a tighter bound on heapify. The proof requires some
math that you won't find valuable in your job search, but do understand that the
true time complexity of heapify is amortized O(n). Amortized refers to the
fact that our analysis is about performance over many insertions.
632.8. Space Complexity Analysis
O(n), since we use a single array to store heap data.
633. Heap Sort
We've emphasized heavily that heaps are a partially ordered data structure. However, we can still
leverage heaps in a sorting algorithm to end up with fully sorted array. The strategy is simple using our previous
MaxHeap implementation:
- build the heap:
insertall elements of the array into aMaxHeap - construct the sorted list: continue to
deleteMaxuntil the heap is empty, every deletion will return the next element in decreasing order
The code is straightforward:
// assuming our `MaxHeap` from the previous section function heapSort(array) { // Step 1: build the heap let heap = new MaxHeap(); array.forEach(num => heap.insert(num)); // Step 2: constructed the sorted array let sorted = []; while (heap.array.length > 1) { sorted.push(heap.deleteMax()); } return sorted; }
633.1. Time Complexity Analysis: O(nlog(n))
nis the size of the input array- step-1 requires
O(n)time as previously discussed - step-2's while loop requires
nsteps in isolation and eachdeleteMaxwill requirelog(n)steps to restore max heap property (due to sifting-down). This means step 2 costsO(nlog(n)) - the total time complexity of the algorithm is
O(n + nlog(n)) = O(nlog(n))
633.2. Space Complexity Analysis:
So heapSort performs as fast as our other efficient sorting algorithms, but how does it fair in
space complexity? Our implementation above requires an extra O(n) amount of space because the heap is
maintained separately from the input array. If we can figure out a way to do all of these heap operations in-place
we can get constant O(1) space! Let's work on this now.
634. In-Place Heap Sort
The in-place algorithm will have the same 2 steps, but it will differ in the implementation details. Since we need to have all operations take place in a single array, we're going to have to denote two regions of the array. That is, we'll need a heap region and a sorted region. We begin by turning the entire region into a heap. Then we continually delete max to get the next element in increasing order. As the heap region shrinks, the sorted region will grow.
634.1. Heapify
Let's focus on designing step-1 as an in-place algorithm. In other words, we'll need to reorder
elements of the input array so they follow max heap property. This is usually refered to as heapify.
Our heapify will use much of the same logic as MaxHeap#siftDown.
// swap the elements at indices i and j of array function swap(array, i, j) { [ array[i], array[j] ] = [ array[j], array[i] ]; } // sift-down the node at index i until max heap property is restored // n represents the size of the heap function heapify(array, n, i) { let leftIdx = 2 * i + 1; let rightIdx = 2 * i + 2; let leftVal = array[leftIdx]; let rightVal = array[rightIdx]; if (leftIdx >= n) leftVal = -Infinity; if (rightIdx >= n) rightVal = -Infinity; if (array[i] > leftVal && array[i] > rightVal) return; let swapIdx; if (leftVal < rightVal) { swapIdx = rightIdx; } else { swapIdx = leftIdx; } swap(array, i, swapIdx); heapify(array, n, swapIdx); }
We weren't kidding when we said this would be similar to MaxHeap#siftDown. If you are not
convinced, flip to the previous section and take a look! The few differences we want to emphasize are:
- Given a node at index
i, it's left index is2 * i + 1and it's right index is2 * i + 2- Using these as our child index formulas will allow us to avoid using a placeholder element at index 0. The root of the heap will be at index 0.
- The parameter
nrepresents the number of nodes in the heap- You may feel that
array.lengthalso represents the number of nodes in the heap. That is true, but only in step-1. Later we will need to dynamically state the size of the heap. Remember, we are trying to do this without creating any extra arrays. We'll need to separate the heap and sorted regions of the array andnwill dictate the end of the heap.
- You may feel that
- We created a separate
swaphelper function.- Nothing fancy here. Swapping will be valuable in step-2 of the algorithm as well, so we'll want to
keep our code DRY (don't repeat yourself).
To correctly convert the input array into a heap, we'll need to callheapifyon children nodes before their parents. This is easy to do, just callheapifyon each element right-to-left in the array:
- Nothing fancy here. Swapping will be valuable in step-2 of the algorithm as well, so we'll want to
keep our code DRY (don't repeat yourself).
function heapSort(array) { // heapify the tree from the bottom up for (let i = array.length - 1; i >= 0; i--) { heapify(array, array.length, i); } // the entire array is now a heap // ... }
Nice! Now the elements of the array have been moved around to obey max heap property.
634.2. Construct the Sorted Array
To put everything together, we'll need to continually "delete max" from our heap. From our previous lecture, we learned the steps for deletion are to swap the last node of the heap into the root and then sift the new root down to restore max heap property. We'll follow the same logic here, except we'll need to account for the sorted region of the array. The array will contain the heap region in the front and the sorted region at the rear:
function heapSort(array) { // heapify the tree from the bottom up for (let i = array.length - 1; i >= 0; i--) { heapify(array, array.length, i); } // the entire array is now a heap // until the heap is empty, continue to "delete max" for (let endOfHeap = array.length - 1; endOfHeap >= 0; endOfHeap--) { // swap the root of the heap with the last element of the heap, // this effecively shrinks the heap by one and grows the sorted array by one swap(array, endOfHeap, 0); // sift down the new root, but not past the end of the heap heapify(array, endOfHeap, 0); } return array; }
You'll definitely want to watch the lecture that follows this reading to get a visual of how the array is divided into the heap and sorted regions.
634.3. In-Place Heap Sort JavaScript Implementation
Here is the full code for your reference:
function heapSort(array) { for (let i = array.length - 1; i >= 0; i--) { heapify(array, array.length, i); } for (let endOfHeap = array.length - 1; endOfHeap >= 0; endOfHeap--) { swap(array, endOfHeap, 0); heapify(array, endOfHeap, 0); } return array; } function heapify(array, n, i) { let leftIdx = 2 * i + 1; let rightIdx = 2 * i + 2; let leftVal = array[leftIdx]; let rightVal = array[rightIdx]; if (leftIdx >= n) leftVal = -Infinity; if (rightIdx >= n) rightVal = -Infinity; if (array[i] > leftVal && array[i] > rightVal) return; let swapIdx; if (leftVal < rightVal) { swapIdx = rightIdx; } else { swapIdx = leftIdx; } swap(array, i, swapIdx); heapify(array, n, swapIdx); } function swap(array, i, j) { [ array[i], array[j] ] = [ array[j], array[i] ]; }
Heaps Project
This project contains a skeleton for you to implement a max heap. This is a
test-driven project. Run the tests and read the top-most error. If it's not
clear what is failing, open the test/test.js file to figure out what the
test is expecting. Make the top-most test pass.
Keep making the top-most test pass until all tests pass.
635. Instructions
- Clone the project from
https://github.com/appacademy-starters/data-structures-max-heap-starter. cdinto the project foldernpm installto install dependencies in the project root directorynpm testto run the specs- You can view the test cases in
test/test.js. Your job is to write code in- lib/max_heap.js to implement the
MaxHeapclass - lib/is_heap.js to implement the
isMaxHeapfunction - lib/leet_code_215.js to implement the
findKthLargestfunction located
at https://leetcode.com/problems/kth-largest-element-in-an-array/
- lib/max_heap.js to implement the
WEEK 7
Data Structures and Algorithms
GitHub Profile and Projects Learning Objectives
- Improving Your Profile Using GitHub
- Your GitHub Identity
Big O Learning Objectives
Memoization And Tabulation Learning Objectives - Recursion Videos
- Curating Complexity: A Guide to Big-O Notation
- Common Complexity Classes
- Memoization
- Tabulation
- Analysis of Linear Search
- Analysis of Binary Search
- Analysis of the Merge Sort
- Analysis of Bubble Sort
- LeetCode.com
- Memoization Problems
- Tabulation Problems
Sorting Algorithms Learning Objectives - Bubble Sort
- Selection Sort
- Insertion Sort
- Merge Sort
- Quick Sort
- Binary Search
- Bubble Sort Analysis
- Selection Sort Analysis
- Insertion Sort Analysis
- Merge Sort Analysis
- Quick Sort Analysis
- Binary Search Analysis
- Practice: Bubble Sort
- Practice: Selection Sort
- Practice: Insertion Sort
- Practice: Merge Sort
- Practice: Quick Sort
- Practice: Binary Search
Lists, Stacks, and Queues Learning Objectives - Linked Lists
- Stacks and Queues
- Linked List Project
- Stack Project
- Queue Project
Graphs and Heaps Learning Objectives - Introduction to Heaps
- Heaps Project
WEEK-07 DAY-1
Your GitHub Identity
GitHub Profile and Projects Learning Objectives
GitHub is a powerful platform that hiring managers and other developers can use
to see how you create software.
- You will be able to participate in the social aspects of GitHub by starring
repositories, following other developers, and reviewing your followers - You will be able to use Markdown to write code snippets in your README files
- You will craft your GitHub profile and contribute throughout the course by
keeping your "gardens green" - You will be able to identify the basics of a good Wiki entries for proposals
and minimum viable products - You will be able to identify the basics of a good project README that includes
technologies at the top, images, descriptions and code snippetsing managers and other developers can use
to see how you create software. - You will be able to participate in the social aspects of GitHub by starring
repositories, following other developers, and reviewing your followers - You will be able to use Markdown to write code snippets in your README files
- You will craft your GitHub profile and contribute throughout the course by
keeping your "gardens green" - You will be able to identify the basics of a good Wiki entries for proposals
and minimum viable products - You will be able to identify the basics of a good project README that includes
technologies at the top, images, descriptions and code snippets
Improving Your Profile Using GitHub
By now you are likely familiar with certain aspects of GitHub. You know how to
create repos and add and commit code, but there is much, much more that GitHub
can do.
GitHub is an online community of software engineers - a place where we not only
house our code, but share ideas, express feedback, gain inspiration, and present
ourselves as competent, qualified software engineers. Yes, this is a place to
manage version control and collaborate on projects, but in this module we are
going to discuss how to harness the power of GitHub to your advantage.
Aside from your actual code repositories, there are several other sections that
represent who you are as a developer.
- Followers and Following: Think of this as your “friends’ list on GitHub.
If you see a social media profile of a person with two friends, what are you
going to think? Though you’re not expected to have hundreds of followers on
GitHub, you should follow your peers and encourage them to follow you to show
industry engineers that there are people who would vouch for your skillset. - Stars: These are the “likes” on your GitHub profile. Similar to
encouraging others to follow you and following them, you should also “star”
their popular repositories. By the end of the curriculum, you should have
several stars on each of your portfolio projects. - Green Gardens: This is birds-eye view of your “newsfeed” if your newsfeed
reflected the number of commits that you were making. If you are very active
on GitHub, your activity squares, AKA “green gardens” will be verdant and
green. This tells anyone who views your profile that you are actively coding
and engaged with your identity as a software engineer. However, if your “green
gardens” are not green, this suggests that you are not actively coding and
therefore perhaps not the best candidates for a development job. - Photo and brief intro: This is fairly straight-forward and should mirror
the photo from you LinkedIn. Choose a professional photo and brief description
that highlights the fact that you are a software engineer.
Your followers, stars, green gardens, and photo represent who you are as a
developer and should be constantly monitored and updated. It can be easy to fall
into the trap of not pushing commits to GitHub or keeping your commits on your
local machine - be careful to avoid these tendencies because they are
counter-productive to your candidacy as a software engineer.
Not only is GitHub as representation of you as a developer, but it is also a
place to present proposals, recaps, and provide additional project context. Two
features that you will soon become familiar with are Wikis and READMEs.
636. Wikis (pre-project)
Wikis are features of PUBLIC repositories on GitHub and are where your design
documents, explanation of technologies used and insight into what your repo
contains will live.
Wikis are created at the beginning of any significant project and should be
updated as your project evolves.
To create or update your repository’s Wiki, click on the “Wiki” tab in your repo
header and click “Edit” to update your home page and “New Page” to add a new
section.
Best practices for Wiki creation:
- List of technologies in a visually accessible place
- Separate design documents into their own sections
- Write clearly and concisely - grammar and spelling matters!
Design documents will become very important when you begin your projects, but
for now just know that you will spend time creating a solid Wiki in order to
facilitate a smooth development process. One of the most important aspects of
your Wiki will be the outline of your project’s features and the minimum
viable product (MVP).
As you begin any project, you will consider what constitutes a “final product”
and break down features into bite-sized “minimum viable products.” For example,
if you intend to create an a/A version of Twitter, your list of MVPs may
include: - Users are able to log into application
- Users are able to create, edit, and delete tweets
- Users are able to follow other users and see their tweets
- Users are able to like other users tweets
- Users are able to comment on other users tweets
In order for your project to stay on track, it is very important to break down
your features and tackle one MVP at a time. All of the MVPs combined result in a
final application.
Your MVP breakdown will live in your project’s Wiki and is subject to evolution.
As your project comes to life, your MVPs may merge, divide, or become
irrelevant. Update your Wiki as things change and continue to referring to it as
your go through the development process.
637. README files (post-project)
READMEs are text files that introduce and explain a project. Typically, READMEs
are created and completed when you are ready to roll your application into
production. READMEs should contain information about two impressive features
that you implemented in your project, the technologies used, how to install the
program, and anything else that makes you stand out as a software developer.
Think of READMEs as the “first impression” that prospective employers,
colleagues, and peers will have of you as a developer. You want their first
impression to be “wow, this person is thorough and this project sounds
interesting,” not “oh no, typos, missing instructions, and snores-galore.”
When it is time to create your README, you should allocate about three hours to
guarantee you have enough time to make your project shine.
README.md files are written using markdown syntax (.md) which makes them appear
nicely on-screen. Markdown is a lightweight markup language with plain text
formatting syntax. It’s a very simple language used to create beautiful and
presentable README and Wiki files for GitHub. There are many good resources out
there for creating markdown documents, but here are two of our favorite:
- GitHub's guide to [Mastering Markdown]
- [Repository with a collection of examples]
- [Browser side-by-side markdown and on-screen program] (this is a favorite, code
here and copy markdown into GitHub).
README Best Practices - Divide your README into distinct sections
- List the technologies used at the top of your README for increased visibility
- Include nice pictures or Gifs to show and/or demonstrate how things work
- Include code snippets
- Provide instructions for how to install project (if applicable)
- Include link to the live site
638. Wrap up
The bottom line is that the way you represent yourself on GitHub matters! Take
the time you need to write clearly, accurately reflect your process and
applications, and immerse yourself in the diverse and interesting pool of
software professionals who work and play on GitHub.
[Mastering Markdown]: https://guides.github.com/features/mastering-markdown/
[Repository with a collection of examples]: https://github.com/matiassingers/awesome-readme
[Browser side-by-side markdown and on-screen program]: https://stackedit.io/app#
Your GitHub Identity
It is hard to write about yourself. But, today, you need to do that. This is a
day of starting to establish how other software developers and hiring managers
will perceive you.
Go to your GitHub profile page. Edit your profile to contain your description,
"App Academy (@appacademy)" as your current company, your location (if you
desire), and your Web site.
Now, make a personal Web site for your GitHub profile. You can do that using
GitHub Pages. Follow the instructions at [Getting Started with GitHub Pages] to
create your site, add a theme, create a custom 404, and use HTTPS (if you want).
Spend time writing about yourself. Like you read earlier, this is hard. But,
tell the story of you in a way that will engage people.
Now, go follow all of your class mates and star their personal Web site
repository, if they created one.
If you want to get really fancy and set up a blog, you can use a "static site
generator" known as Jekyll to do that. It's a Ruby-based program; however,
you don't need to know Ruby to use it. All you have to be able to do is use
command line programs, something you're really getting to be a pro at! To do
this, follow the well-documented instructions at [Setting up a GitHub Pages site
with Jekyll].
[Getting Started with GitHub Pages]: https://help.github.com/en/github/working-with-github-pages/getting-started-with-github-pages
[Setting up a GitHub Pages site with Jekyll]: https://help.github.com/en/github/working-with-github-pages/setting-up-a-github-pages-site-with-jekyll
WEEK-07 DAY-2
Big-O and Optimizations
Big O Learning Objectives
The objective of this lesson is get you comfortable with identifying the
time and space complexity of code you see. Being able to diagnose time
complexity for algorithms is an essential for interviewing software engineers.
At the end of this, you will be able to
- Order the common complexity classes according to their growth rate
- Identify the complexity classes of common sort methods
- Identify complexity classes of codeable with identifying the
time and space complexity of code you see. Being able to diagnose time
complexity for algorithms is an essential for interviewing software engineers.
At the end of this, you will be able to - Order the common complexity classes according to their growth rate
- Identify the complexity classes of common sort methods
- Identify complexity classes of code
Memoization And Tabulation Learning Objectives
The objective of this lesson is to give you a couple of ways to optimize a
computation (algorithm) from a higher complexity class to a lower complexity
class. Being able to optimize algorithms is an essential for interviewing
software engineers.
At the end of this, you will be able to
- Apply memoization to recursive problems to make them less than polynomial
time. - Apply tabulation to iterative problems to make them less than polynomial
time.** is to give you a couple of ways to optimize a
computation (algorithm) from a higher complexity class to a lower complexity
class. Being able to optimize algorithms is an essential for interviewing
software engineers.
At the end of this, you will be able to - Apply memoization to recursive problems to make them less than polynomial
time. - Apply tabulation to iterative problems to make them less than polynomial
time.
Recursion Videos
A lot of algorithms that we use in the upcoming days will use recursion. The
next two videos are just helpful reminders about recursion so that you can get
that thought process back into your brain.
Big-O By Colt Steele
Colt Steele provides a very nice, non-mathy introduction to Big-O notation.
Please watch this so you can get the easy introduction. Big-O is, by its very
nature, math based. It's good to get an understanding before jumping in to
math expressions.
[Complete Beginner's Guide to Big O Notation] by Colt Steele.
[Complete Beginner's Guide to Big O Notation]: https://www.youtube.com/embed/kS_gr2_-ws8
Curating Complexity: A Guide to Big-O Notation
As software engineers, our goal is not just to solve problems. Rather, our goal
is to solve problems efficiently and elegantly. Not all solutions are made
equal! In this section we'll explore how to analyze the efficiency of algorithms
in terms of their speed (time complexity) and memory consumption (space
complexity).
In this article, we'll use the word efficiency to describe the amount of
resources a program needs to execute. The two resources we are concerned with
are time and space. Our goal is to minimize the amount of time and space
that our programs use.
When you finish this article you will be able to:
- explain why computer scientists use Big-O notation
- simplify a mathematical function into Big-O notation
639. Why Big-O?
Let's begin by understanding what method we should not use when describing the
efficiency of our algorithms. Most importantly, we'll want to avoid using
absolute units of time when describing speed. When the software engineer
exclaims, "My function runs in 0.2 seconds, it's so fast!!!", the computer
scientist is not impressed. Skeptical, the computer scientist asks the following
questions:
- What computer did you run it on? Maybe the credit belongs to the hardware
and not the software. Some hardware architectures will be better for certain
operations than others. - Were there other background processes running on the computer that could have
effected the runtime? It's hard to control the environment during
performance experiments. - Will your code still be performant if we increase the size of the input? For
example, sorting 3 numbers is trivial; but how about a million numbers?
The job of the software engineer is to focus on the software detail and not
necessarily the hardware it will run on. Because we can't answer points 1 and 2
with total certainty, we'll want to avoid using concrete units like
"milliseconds" or "seconds" when describing the efficiency of our algorithms.
Instead, we'll opt for a more abstract approach that focuses on point 3. This
means that we should focus on how the performance of our algorithm is affected
by increasing the size of the input. In other words, how does our performance
scale?
The argument above focuses on time, but a similar argument could also be
made for space. For example, we should not analyze our code in terms of the
amount of absolute kilobytes of memory it uses, because this is dependent on
the programming language.
640. Big-O Notation
In Computer Science, we use Big-O notation as a tool for describing the
efficiency of algorithms with respect to the size of the input argument(s). We
use mathematical functions in Big-O notation, so there are a few big picture
ideas that we'll want to keep in mind:
- The function should be defined in terms of the size of the input(s).
- A smaller Big-O function is more desirable than a larger one. Intuitively,
we want our algorithms to use a minimal amount of time and space. - Big-O describes the worst-case scenario for our code, also known as the
upper bound. We prepare our algorithm for the worst case, because the
best case is a luxury that is not guaranteed. - A Big-O function should be simplified to show only its most dominant
mathematical term.
The first 3 points are conceptual, so they are easy to swallow. However, point 4
is typically the biggest source of confusion when learning the notation. Before
we apply Big-O to our code, we'll need to first understand the underlying math
and simplification process.
640.1. Simplifying Math Terms
We want our Big-O notation to describe the performance of our algorithm with
respect to the input size and nothing else. Because of this, we should to
simplify our Big-O functions using the following rules:
- Simplify Products: if the function is a product of many terms, we drop the
terms that don't depend on the size of the input. - Simplify Sums: if the function is a sum of many terms, we keep the term
with the largest growth rate and drop the other terms.
We'll look at these rules in action, but first we'll define a few things: - n is the size of the input
- T(f) refers to an unsimplified mathematical function
- O(f) refers to the Big-O simplified mathematical function
640.2. Simplifying a Product
If a function consists of a product of many factors, we drop the factors that
don't depend on the size of the input, n. The factors that we drop are called
constant factors because their size remains consistent as we increase the size
of the input. The reasoning behind this simplification is that we make the input
large enough, the non-constant factors will overshadow the constant ones. Below
are some examples:
| Unsimplified | Big-O Simplified |
|---|---|
| T( 5 * n2 ) | O( n2 ) |
| T( 100000 * n ) | O( n ) |
| T( n / 12 ) | O( n ) |
| T( 42 * n * log(n) ) | O( n * log(n) ) |
| T( 12 ) | O( 1 ) |
Note that in the third example, we can simplify T( n / 12 ) to O( n )
because we can rewrite a division into an equivalent multiplication. In other
words, T( n / 12 ) = T( 1/12 * n ) = O( n ).
640.3. Simplifying a Sum
If the function consists of a sum of many terms, we only need to show the term
that grows the fastest, relative to the size of the input. The reasoning behind
this simplification is that if we make the input large enough, the fastest
growing term will overshadow the other, smaller terms. To understand which term
to keep, you'll need to recall the relative size of our common math terms from
the previous section. Below are some examples:
| Unsimplified | Big-O Simplified |
|---|---|
| T( n3 + n2 + n ) | O( n3 ) |
| T( log(n) + 2n ) | O( 2n ) |
| T( n + log(n) ) | O( n ) |
| T( n! + 10n ) | O( n! ) |
640.4. Putting it all together
The product and sum rules are all we'll need to Big-O simplify any math
functions. We just apply the product rule to drop all constants, then apply the
sum rule to select the single most dominant term.
| Unsimplified | Big-O Simplified |
|---|---|
| T( 5n2 + 99n ) | O( n2 ) |
| T( 2n + nlog(n) ) | O( nlog(n) ) |
| T( 2n + 5n1000) | O( 2n ) |
Aside: We'll often omit the multiplication symbol in expressions as a form of
shorthand. For example, we'll write O( 5n2 ) in place of O( 5 *
n2 ).
641. What you've learned
In this reading we:
- explained why Big-O is the preferred notation used to describe the efficiency
of algorithms - used the product and sum rules to simplify mathematical functions into Big-O
notation
Common Complexity Classes
Analyzing the efficiency of our code seems like a daunting task because there
are many different possibilities in how we may choose to implement something.
Luckily, most code we write can be categorized into one of a handful of common
complexity classes. In this reading, we'll identify the common classes and
explore some of the code characteristics that will lead to these classes.
When you finish this reading, you should be able to:
- name and order the seven common complexity classes
- identify the time complexity class of a given code snippet
642. The seven major classes
There are seven complexity classes that we will encounter most often. Below is a
list of each complexity class as well as its Big-O notation. This list is
ordered from smallest to largest. Bear in mind that a "more efficient"
algorithm is one with a smaller complexity class, because it requires fewer
resources.
| Big-O | Complexity Class Name |
|---|---|
| O(1) | constant |
| O(log(n)) | logarithmic |
| O(n) | linear |
| O(n * log(n)) | loglinear, linearithmic, quasilinear |
| O(nc) - O(n2), O(n3), etc. | polynomial |
| O(cn) - O(2n), O(3n), etc. | exponential |
| O(n!) | factorial |
There are more complexity classes that exist, but these are most common. Let's
take a closer look at each of these classes to gain some intuition on what
behavior their functions define. We'll explore famous algorithms that correspond
to these classes further in the course.
For simplicity, we'll provide small, generic code examples that illustrate the
complexity, although they may not solve a practical problem.
642.1. O(1) - Constant
Constant complexity means that the algorithm takes roughly the same number of
steps for any size input. In a constant time algorithm, there is no relationship
between the size of the input and the number of steps required. For example,
this means performing the algorithm on a input of size 1 takes the same number
of steps as performing it on an input of size 128.
642.1.1. Constant growth
The table below shows the growing behavior of a constant function. Notice that
the behavior stays constant for all values of n.
| n | O(1) |
|---|---|
| 1 | ~1 |
| 2 | ~1 |
| 3 | ~1 |
| ... | ... |
| 128 | ~1 |
642.1.2. Example Constant code
Below is are two examples of functions that have constant runtimes.
// O(1) function constant1(n) { return n * 2 + 1; } // O(1) function constant2(n) { for (let i = 1; i <= 100; i++) { console.log(i); } }
The runtime of the constant1 function does not depend on the size of the
input, because only two arithmetic operations (multiplication and addition) are
always performed. The runtime of the constant2 function also does not depend
on the size of the input because one-hundred iterations are always performed,
irrespective of the input.
642.2. O(log(n)) - Logarithmic
Typically, the hidden base of O(log(n)) is 2, meaning O(log2(n)).
Logarithmic complexity algorithms will usual display a sense of continually
"halving" the size of the input. Another tell of a logarithmic algorithm is that
we don't have to access every element of the input. O(log2(n)) means
that every time we double the size of the input, we only require one additional
step. Overall, this means that a large increase of input size will increase the
number of steps required by a small amount.
642.2.1. Logarithmic growth
The table below shows the growing behavior of a logarithmic runtime function.
Notice that doubling the input size will only require only one additional
"step".
| n | O(log2(n)) |
|---|---|
| 2 | ~1 |
| 4 | ~2 |
| 8 | ~3 |
| 16 | ~4 |
| ... | ... |
| 128 | ~7 |
642.2.2. Example logarithmic code
Below is an example of two functions with logarithmic runtimes.
// O(log(n)) function logarithmic1(n) { if (n <= 1) return; logarithmic1(n / 2); } // O(log(n)) function logarithmic2(n) { let i = n; while (i > 1) { i /= 2; } }
The logarithmic1 function has O(log(n)) runtime because the recursion will
half the argument, n, each time. In other words, if we pass 8 as the original
argument, then the recursive chain would be 8 -> 4 -> 2 -> 1. In a similar way,
the logarithmic2 function has O(log(n)) runtime because of the number of
iterations in the while loop. The while loop depends on the variable i, which
will be divided in half each iteration.
642.3. O(n) - Linear
Linear complexity algorithms will access each item of the input "once" (in the
Big-O sense). Algorithms that iterate through the input without nested loops or
recurse by reducing the size of the input by "one" each time are typically
linear.
642.3.1. Linear growth
The table below shows the growing behavior of a linear runtime function. Notice
that a change in input size leads to similar change in the number of steps.
| n | O(n) |
|---|---|
| 1 | ~1 |
| 2 | ~2 |
| 3 | ~3 |
| 4 | ~4 |
| ... | ... |
| 128 | ~128 |
642.3.2. Example linear code
Below are examples of three functions that each have linear runtime.
// O(n) function linear1(n) { for (let i = 1; i <= n; i++) { console.log(i); } } // O(n), where n is the length of the array function linear2(array) { for (let i = 0; i < array.length; i++) { console.log(i); } } // O(n) function linear3(n) { if (n === 1) return; linear3(n - 1); }
The linear1 function has O(n) runtime because the for loop will iterate n
times. The linear2 function has O(n) runtime because the for loop iterates
through the array argument. The linear3 function has O(n) runtime because each
subsequent call in the recursion will decrease the argument by one. In other
words, if we pass 8 as the original argument to linear3, the recursive chain
would be 8 -> 7 -> 6 -> 5 -> ... -> 1.
642.4. O(n * log(n)) - Loglinear
This class is a combination of both linear and logarithmic behavior, so features
from both classes are evident. Algorithms the exhibit this behavior use both
recursion and iteration. Typically, this means that the recursive calls will
halve the input each time (logarithmic), but iterations are also performed on
the input (linear).
642.4.1. Loglinear growth
The table below shows the growing behavior of a loglinear runtime function.
| n | O(n * log2(n)) |
|---|---|
| 2 | ~2 |
| 4 | ~8 |
| 8 | ~24 |
| ... | ... |
| 128 | ~896 |
642.4.2. Example loglinear code
Below is an example of a function with a loglinear runtime.
// O(n * log(n)) function loglinear(n) { if (n <= 1) return; for (let i = 1; i <= n; i++) { console.log(i); } loglinear(n / 2); loglinear(n / 2); }
The loglinear function has O(n * log(n)) runtime because the for loop
iterates linearly (n) through the input and the recursive chain behaves
logarithmically (log(n)).
642.5. O(nc) - Polynomial
Polynomial complexity refers to complexity of the form O(nc) where
n is the size of the input and c is some fixed constant. For example,
O(n3) is a larger/worse function than O(n2), but they
belong to the same complexity class. Nested loops are usually the indicator of
this complexity class.
642.5.1. Polynomial growth
Below are tables showing the growth for O(n2) and O(n3).
| n | O(n2) |
|---|---|
| 1 | ~1 |
| 2 | ~4 |
| 3 | ~9 |
| ... | ... |
| 128 | ~16,384 |
| n | O(n3) |
| --- | ---------------- |
| 1 | ~1 |
| 2 | ~8 |
| 3 | ~27 |
| ... | ... |
| 128 | ~2,097,152 |
642.5.2. Example polynomial code
Below are examples of two functions with polynomial runtimes.
// O(n^2) function quadratic(n) { for (let i = 1; i <= n; i++) { for (let j = 1; j <= n; j++) {} } } // O(n^3) function cubic(n) { for (let i = 1; i <= n; i++) { for (let j = 1; j <= n; j++) { for (let k = 1; k <= n; k++) {} } } }
The quadratic function has O(n2) runtime because there are nested
loops. The outer loop iterates n times and the inner loop iterates n times. This
leads to n * n total number of iterations. In a similar way, the cubic
function has O(n3) runtime because it has triply nested loops that
lead to a total of n * n * n iterations.
642.6. O(cn) - Exponential
Exponential complexity refers to Big-O functions of the form O(cn)
where n is the size of the input and c is some fixed constant. For example,
O(3n) is a larger/worse function than O(2n), but they both
belong to the exponential complexity class. A common indicator of this
complexity class is recursive code where there is a constant number of recursive
calls in each stack frame. The c will be the number of recursive calls made in
each stack frame. Algorithms with this complexity are considered quite slow.
642.6.1. Exponential growth
Below are tables showing the growth for O(2n) and O(3n).
Notice how these grow large, quickly.
| n | O(2n) |
|---|---|
| 1 | ~2 |
| 2 | ~4 |
| 3 | ~8 |
| 4 | ~16 |
| ... | ... |
| 128 | ~3.4028 * 1038 |
| n | O(3n) |
| --- | -------------------------- |
| 1 | ~3 |
| 2 | ~9 |
| 3 | ~27 |
| 3 | ~81 |
| ... | ... |
| 128 | ~1.1790 * 1061 |
642.6.2. Exponential code example
Below are examples of two functions with exponential runtimes.
// O(2^n) function exponential2n(n) { if (n === 1) return; exponential_2n(n - 1); exponential_2n(n - 1); } // O(3^n) function exponential3n(n) { if (n === 0) return; exponential_3n(n - 1); exponential_3n(n - 1); exponential_3n(n - 1); }
The exponential2n function has O(2n) runtime because each call will
make two more recursive calls. The exponential3n function has O(3n)
runtime because each call will make three more recursive calls.
642.7. O(n!) - Factorial
Recall that n! = (n) * (n - 1) * (n - 2) * ... * 1. This complexity is
typically the largest/worst that we will end up implementing. An indicator of
this complexity class is recursive code that has a variable number of recursive
calls in each stack frame. Note that factorial is worse than exponential
because factorial algorithms have a variable amount of recursive calls in
each stack frame, whereas exponential algorithms have a constant amount of
recursive calls in each frame.
642.7.1. Factorial growth
Below is a table showing the growth for O(n!). Notice how this has a more
aggressive growth than exponential behavior.
| n | O(n!) |
|---|---|
| 1 | ~1 |
| 2 | ~2 |
| 3 | ~6 |
| 4 | ~24 |
| ... | ... |
| 128 | ~3.8562 * 10215 |
642.7.2. Factorial code example
Below is an example of a function with factorial runtime.
// O(n!) function factorial(n) { if (n === 1) return; for (let i = 1; i <= n; i++) { factorial(n - 1); } }
The factorial function has O(n!) runtime because the code is recursive but
the number of recursive calls made in a single stack frame depends on the input.
This contrasts with an exponential function because exponential functions have
a fixed number of calls in each stack frame.
You may it difficult to identify the complexity class of a given code snippet,
especially if the code falls into the loglinear, exponential, or factorial
classes. In the upcoming videos, we'll explain the analysis of these functions
in greater detail. For now, you should focus on the relative order of these
seven complexity classes!
643. What you've learned
In this reading, we listed the seven common complexity classes and saw some
example code for each. In order of ascending growth, the seven classes are:
- Constant
- Logarithmic
- Linear
- Loglinear
- Polynomial
- Exponential
- Factorial
Memoization
Memoization is a design pattern used to reduce the overall number of
calculations that can occur in algorithms that use recursive strategies to
solve.
Recall that recursion solves a large problem by dividing it into smaller
sub-problems that are more manageable. Memoization will store the results of
the sub-problems in some other data structure, meaning that you avoid duplicate
calculations and only "solve" each subproblem once. There are two features that
comprise memoization:
- the function is recursive
- the additional data structure used is typically an object (we refer to this as
the memo!)
This is a trade-off between the time it takes to run an algorithm (without
memoization) and the memory used to run the algorithm (with memoization).
Usually memoization is a good trade-off when dealing with large data or
calculations.
You cannot always apply this technique to recursive problems. The problem must
have an "overlapping subproblem structure" for memoization to be effective.
Here's an example of a problem that has such a structure:
Using pennies, nickels, dimes, and quarters, what is the smallest combination
of coins that total 27 cents?
You'll explore this exact problem in depth later on. For now, here is some food
for thought. Along the way to calculating the smallest coin combination of 27
cents, you should also calculate the smallest coin combination of say, 25 cents
as a component of that problem. This is the essence of an overlapping subproblem
structure.
644. Memoizing factorial
Here's an example of a function that computes the factorial of the number passed
into it.
function factorial(n) { if (n === 1) return 1; return n * factorial(n - 1); } factorial(6); // => 720, requires 6 calls factorial(6); // => 720, requires 6 calls factorial(5); // => 120, requires 5 calls factorial(7); // => 5040, requires 7 calls
From this plain factorial above, it is clear that every time you call
factorial(6) you should get the same result of 720 each time. The code is
somewhat inefficient because you must go down the full recursive stack for each
top level call to factorial(6). It would be great if you could store the result
of factorial(6) the first time you calculate it, then on subsequent calls to
factorial(6) you simply fetch the stored result in constant time. You can
accomplish exactly this by memoizing with an object!
let memo = {} function factorial(n) { // if this function has calculated factorial(n) previously, // fetch the stored result in memo if (n in memo) return memo[n]; if (n === 1) return 1; // otherwise, it havs not calculated factorial(n) previously, // so calculate it now, but store the result in case it is // needed again in the future memo[n] = n * factorial(n - 1); return memo[n] } factorial(6); // => 720, requires 6 calls factorial(6); // => 720, requires 1 call factorial(5); // => 120, requires 1 call factorial(7); // => 5040, requires 2 calls memo; // => { '2': 2, '3': 6, '4': 24, '5': 120, '6': 720, '7': 5040 }
The memo object above will map an argument of factorial to its return
value. That is, the keys will be arguments and their values will be the
corresponding results returned. By using the memo, you are able to avoid
duplicate recursive calls!
Here's some food for thought: By the time your first call to factorial(6)
returns, you will not have just the argument 6 stored in the memo. Rather, you will
have all arguments 2 to 6 stored in the memo.
Hopefully you sense the efficiency you can get by memoizing your functions, but
maybe you are not convinced by the last example for two reasons:
- You didn't improve the speed of the algorithm by an order of Big-O (it is
still O(n)). - The code uses some global variable, so it's kind of ugly.
Both of those points are true, so take a look at a more advanced example that
benefits from memoization.
645. Memoizing the Fibonacci generator
Here's a naive implementation of a function that calculates the Fibonacci
number for a given input.
function fib(n) { if (n === 1 || n === 2) return 1; return fib(n - 1) + fib(n - 2); } fib(6); // => 8
Before you optimize this, ask yourself what complexity class it falls into in
the first place.
The time complexity of this function is not super intuitive to describe because
the code branches twice recursively. Fret not! You'll find it useful to
visualize the calls needed to do this with a tree. When reasoning about the time
complexity for recursive functions, draw a tree that helps you see the calls.
Every node of the tree represents a call of the recursion:
In general, the height of this tree will be n. You derive this by following
the path going straight down the left side of the tree. You can also see that
each internal node leads to two more nodes. Overall, this means that the tree
will have roughly 2n nodes which is the same as saying that the fib
function has an exponential time complexity of 2n. That is very slow!
See for yourself, try running fib(50) - you'll be waiting for quite a while
(it took 3 minutes on the author's machine).
Okay. So the fib function is slow. Is there anyway to speed it up? Take a look
at the tree above. Can you find any repetitive regions of the tree?
As the n grows bigger, the number of duplicate sub-trees grows exponentially.
Luckily you can fix this using memoization by using a similar object strategy as
before. You can use some JavaScript default arguments to clean things up:
function fastFib(n, memo = {}) { if (n in memo) return memo[n]; if (n === 1 || n === 2) return 1; memo[n] = fastFib(n - 1, memo) + fastFib(n - 2, memo); return memo[n]; } fastFib(6); // => 8 fastFib(50); // => 12586269025
The code above can calculate the 50th Fibonacci number almost instantly! Thanks
to the memo object, you only need to explore a subtree fully once. Visually,
the fastFib recursion has this structure:
You can see the marked nodes (function calls) that access the memo in green.
It's easy to see that this version of the Fibonacci generator will do far less
computations as n grows larger! In fact, this memoization has brought the time
complexity down to linear O(n) time because the tree only branches on the left
side. This is an enormous gain if you recall the complexity class hierarchy.
646. The memoization formula
Now that you understand memoization, when should you apply it? Memoization is
useful when attacking recursive problems that have many overlapping
sub-problems. You'll find it most useful to draw out the visual tree first. If
you notice duplicate sub-trees, time to memoize. Here are the hard and fast
rules you can use to memoize a slow function:
- Write the unoptimized, brute force recursion and make sure it works.
- Add the memo object as an additional argument to the function. The keys will
represent unique arguments to the function, and their values will represent
the results for those arguments. - Add a base case condition to the function that returns the stored value if
the function's argument is in the memo. - Before you return the result of the recursive case, store it in the memo as a
value and make the function's argument it's key.
647. What you learned
You learned a secret to possibly changing an algorithm of one complexity class
to a lower complexity class by using memory to store intermediate results. This
is a powerful technique to use to make sure your programs that must do recursive
calculations can benefit from running much faster.
Tabulation
Now that you are familiar with memoization, you can explore a related method
of algorithmic optimization: Tabulation. There are two main features that
comprise the Tabulation strategy:
- the function is iterative and not recursive
- the additional data structure used is typically an array, commonly referred to
as the table
Many problems that can be solved with memoization can also be solved with
tabulation as long as you convert the recursion to iteration. The first example
is the canonical example of recursion, calculating the Fibonacci number for an
input. However, in the example, you'll see the iteration version of it for a
fresh start!
648. Tabulating the Fibonacci number
Tabulation is all about creating a table (array) and filling it out with
elements. In general, you will complete the table by filling entries from "left
to right". This means that the first entry of the table (first element of the
array) will correspond to the smallest subproblem. Naturally, the final entry of
the table (last element of the array) will correspond to the largest problem,
which is also the final answer.
Here's a way to use tabulation to store the intermediary calculations so that
later calculations can refer back to the table.
function tabulatedFib(n) { // create a blank array with n reserved spots let table = new Array(n); // seed the first two values table[0] = 0; table[1] = 1; // complete the table by moving from left to right, // following the fibonacci pattern for (let i = 2; i <= n; i += 1) { table[i] = table[i - 1] + table[i - 2]; } return table[n]; } console.log(tabulatedFib(7)); // => 13
When you initialized the table and seeded the first two values, it looked like
this:
| i | 0 | 1 | 2 | 3 | 4 | 5 | 6 | 7 |
|---|---|---|---|---|---|---|---|---|
table[i] |
0 |
1 |
||||||
After the loop finishes, the final table will be:
| i | 0 | 1 | 2 | 3 | 4 | 5 | 6 | 7 |
|---|---|---|---|---|---|---|---|---|
table[i] |
0 |
1 |
1 |
2 |
3 |
5 |
8 |
13 |
Similar to the previous memo, by the time the function completes, the table
will contain the final solution as well as all sub-solutions calculated along
the way.
To compute the complexity class of this tabulatedFib is very straightforward
since the code is iterative. The dominant operation in the function is the loop
used to fill out the entire table. The length of the table is roughly n
elements long, so the algorithm will have an O(n) runtime. The space taken by
our algorithm is also O(n) due to the size of the table. Overall, this should
be a satisfying solution for the efficiency of the algorithm.
649. Aside: Refactoring for O(1) Space
You may notice that you can cut down on the space used by the function. At any
point of the loop, the calculation really only need the previous two
subproblems' results. There is little utility to storing the full array. This
refactor is easy to do by using two variables:
function fib(n) { let mostRecentCalcs = [0, 1]; if (n === 0) return mostRecentCalcs[0]; for (let i = 2; i <= n; i++) { const [ secondLast, last ] = mostRecentCalcs; mostRecentCalcs = [ last, secondLast + last ]; } return mostRecentCalcs[1]; }
Bam! You now have O(n) runtime and O(1) space. This is the most optimal
algorithm for calculating a Fibonacci number. Note that this strategy is a pared
down form of tabulation, since it uses only the last two values.
649.1. The Tabulation Formula
Here are the general guidelines for implementing the tabulation strategy. This
is just a general recipe, so adjust for taste depending on your problem:
- Create the table array based off of the size of the input, which isn't always
straightforward if you have multiple input values - Initialize some values in the table that "answer" the trivially small
subproblem usually by initializing the first entry (or entries) of the table - Iterate through the array and fill in remaining entries, using previous
entries in the table to perform the current calculation - Your final answer is (usually) the last entry in the table
650. What you learned
You learned another way of possibly changing an algorithm of one complexity
class to a lower complexity class by using memory to store intermediate results.
This is a powerful technique to use to make sure your programs that must do
iterative calculations can benefit from running much faster.
Analysis of Linear Search
Consider the following search algorithm known as linear search.
function search(array, term) { for (let i = 0; i < array.length; i++) { if (array[i] == term) { return i; } } return -1; }
Most Big-O analysis is done on the "worst-case scenario" and provides an upper
bound. In the worst case analysis, you calculate the upper bound on running time
of an algorithm. You must know the case that causes the maximum number of
operations to be executed.
For linear search, the worst case happens when the element to be searched
(term in the above code) is not present in the array. When term is not
present, the search function compares it with all the elements of array one
by one. Therefore, the worst-case time complexity of linear search would be
O(n).
Analysis of Binary Search
Consider the following search algorithm known as the binary search. This
kind of search only works if the array is already sorted.
function binarySearch(arr, x, start, end) { if (start > end) return false; let mid = Math.floor((start + end) / 2); if (arr[mid] === x) return true; if (arr[mid] > x) { return binarySearch(arr, x, start, mid - 1); } else { return binarySearch(arr, x, mid + 1, end); } }
For the binary search, you cut the search space in half every time. This means
that it reduces the number of searches you must do by half, every time. That
means the number of steps it takes to get to the desired item (if it exists in
the array), in the worst case takes the same amount of steps for every number
within a range defined by the powers of 2.
- 7 -> 4 -> 2 -> 1
- 8 -> 4 -> 2 -> 1
- 9 -> 5 -> 3 -> 2 -> 1
- 15 -> 8 -> 4 -> 2 -> 1
- 16 -> 8 -> 4 -> 2 -> 1
- 17 -> 9 -> 5 -> 3 -> 2 -> 1
- 31 -> 16 -> 8 -> 4 -> 2 -> 1
- 32 -> 16 -> 8 -> 4 -> 2 -> 1
- 33 -> 17 -> 9 -> 5 -> 3 -> 2 -> 1
So, for any number of items in the sorted array between 2n-1 and
2n, it takes n number of steps. That means if you have k items in
the array, then it will take log2k.
Binary searches are O(log2n).
Analysis of the Merge Sort
Consider the following divide-and-conquer sort method known as the merge
sort.
function merge(leftArray, rightArray) { const sorted = []; while (leftArray.length > 0 && rightArray.length > 0) { const leftItem = leftArray[0]; const rightItem = rightArray[0]; if (leftItem > rightItem) { sorted.push(rightItem); rightArray.shift(); } else { sorted.push(leftItem); leftArray.shift(); } } while (leftArray.length !== 0) { const value = leftArray.shift(); sorted.push(value); } while (rightArray.length !== 0) { const value = rightArray.shift(); sorted.push(value); } return sorted } function mergeSort(array) { const length = array.length; if (length == 1) { return array; } const middleIndex = Math.ceil(length / 2); const leftArray = array.slice(0, middleIndex); const rightArray = array.slice(middleIndex, length); leftArray = mergeSort(leftArray); rightArray = mergeSort(rightArray); return merge(leftArray, rightArray); }
For the merge sort, you cut the sort space in half every time. In each of
those halves, you have to loop through the number of items in the array. That
means that, for the worst case, you get that same
log2n but it must be multiplied by the number of
elements in the array, n.
Merge sorts are O(n*log2n).
Analysis of Bubble Sort
Consider the following sort algorithm known as the bubble sort.
function bubbleSort(items) { var length = items.length; for (var i = 0; i < length; i++) { for (var j = 0; j < (length - i - 1); j++) { if (items[j] > items[j + 1]) { var tmp = items[j]; items[j] = items[j + 1]; items[j + 1] = tmp; } } } }
For the bubble sort, the worst case is the same as the best case because it
always makes nested loops. So, the outer loop loops the number of times of the
items in the array. For each one of those loops, the inner loop loops again a
number of times for the items in the array. So, if there are n values in the
array, then a loop inside a loop is n * n. So, this is O(n2).
That's polynomial, which ain't that good.
LeetCode.com
Some of the problems in the projects ask you to use the LeetCode platform to
check your work rather than relying on local mocha tests. If you don't already
have an account at LeetCode.com, please click
https://leetcode.com/accounts/signup/ to sign up for a free
account.
After you sign up for the account, please verify the account with the email
address that you used so that you can actually run your solution on
LeetCode.com.
In the projects, you will see files that are named "leet_code_«number».js".
When you open those, you will see a link in the file that you can use to go
directly to the corresponding problem on LeetCode.com.
Use the local JavaScript file in Visual Studio Code to collaborate on the
solution. Then, you can run the proposed solution in the LeetCode.com code
runner to validate its correctness.
Memoization Problems
This project contains two test-driven problems and one problem on LeetCode.com.
- Clone the project from
https://github.com/appacademy-starters/algorithms-memoization-project. cdinto the project foldernpm installto install dependencies in the project root directorynpx testto run the specs- You can view the test cases in
/test/test.js. Your job is to write code in
the/libfiles to pass all specs.- In
problems.js, you will write code to make thelucasNumberMemoand
minChangefunctions pass. - In
leet_code_518.js, you will use that file as a scratch pad to work on
the LeetCode.com problem at https://leetcode.com/problems/coin-change-2/.
- In
Tabulation Problems
This project contains two test-driven problems and one problem on LeetCode.com.
- Clone the project from
https://github.com/appacademy-starters/algorithms-tabulation-project. cdinto the project foldernpm installto install dependencies in the project root directorynpx testto run the specs- You can view the test cases in
/test/test.js. Your job is to write code in
the/libfiles to pass all specs.- In
problems.js, you will write code to make thestepper,
maxNonAdjacentSum, andminChangefunctions pass. - In
leet_code_64.js, you will use that file as a scratch pad to work on the
LeetCode.com problem at https://leetcode.com/problems/minimum-path-sum/. - In
leet_code_70.js, you will use that file as a scratch pad to work on the
LeetCode.com problem at https://leetcode.com/problems/climbing-stairs/.
- In
WEEK-07 DAY-3
Sorting Algorithms
Sorting Algorithms Learning Objectives
The objective of this lesson is for you to get experience implementing
common sorting algorithms that will come up during a lot of interviews. It is
also important for you to understand how different sorting algorithms behave
when given output.
At the end of this, you will be able to
- Explain the complexity of and write a function that performs
bubble sorton
an array of numbers. - Explain the complexity of and write a function that performs
selection sort
on an array of numbers. - Explain the complexity of and write a function that performs
insertion sort
on an array of numbers. - Explain the complexity of and write a function that performs
merge sorton
an array of numbers. - Explain the complexity of and write a function that performs
quick sorton
an array of numbers. - Explain the complexity of and write a function that performs a binary search
on a sorted array of numbers.nce implementing
common sorting algorithms that will come up during a lot of interviews. It is
also important for you to understand how different sorting algorithms behave
when given output.
At the end of this, you will be able to - Explain the complexity of and write a function that performs
bubble sorton
an array of numbers. - Explain the complexity of and write a function that performs
selection sort
on an array of numbers. - Explain the complexity of and write a function that performs
insertion sort
on an array of numbers. - Explain the complexity of and write a function that performs
merge sorton
an array of numbers. - Explain the complexity of and write a function that performs
quick sorton
an array of numbers. - Explain the complexity of and write a function that performs a binary search
on a sorted array of numbers.
Bubble Sort
Bubble Sort is generally the first major sorting algorithm to come up in most
introductory programming courses. Learning about this algorithm is useful
educationally, as it provides a good introduction to the challenges you face
when tasked with converting unsorted data into sorted data, such as conducting
logical comparisons, making swaps while iterating, and making optimizations.
It's also quite simple to implement, and can be done quickly.
Bubble Sort is almost never a good choice in production. simply because:
- It is not efficient
- It is not commonly used
- There is a stigma attached to using it
651. "But...then...why are we..."
It is quite useful as an educational base for you, and as a conversational
base for you while interviewing, because you can discuss how other more elegant
and efficient algorithms improve upon it. Taking naive code and improving upon
it by weighing the technical tradeoffs of your other options is 100% the name of
the game when trying to level yourself up from a junior engineer to a senior
engineer.
652. The algorithm bubbles up
As you progress through the algorithms and data structures of this course,
you'll eventually notice that there are some recurring funny terms. "Bubbling
up" is one of those terms.
When someone writes that an item in a collection "bubbles up," you should infer
that:
- The item is in motion
- The item is moving in some direction
- The item has some final resting destination
When invoking Bubble Sort to sort an array of integers in ascending order, the
largest integers will "bubble up" to the "top" (the end) of the array, one at a
time.
The largest values are captured, put into motion in the direction defined by the
desired sort (ascending right now), and traverse the array until they arrive at
their end destination. See if you can observe this behavior in the following
animation (courtesy http://visualgo.net):
As the algorithm iterates through the array, it compares each element to the
element's right neighbor. If the current element is larger than its neighbor,
the algorithm swaps them. This continues until all elements in the array are
sorted.
653. How does a pass of Bubble Sort work?
Bubble sort works by performing multiple passes to move elements closer to
their final positions. A single pass will iterate through the entire array once.
A pass works by scanning the array from left to right, two elements at a time,
and checking if they are ordered correctly. To be ordered correctly the first
element must be less than or equal to the second. If the two elements are not
ordered properly, then we swap them to correct their order. Afterwards, it scans
the next two numbers and continue repeat this process until we have gone through
the entire array.
See one pass of bubble sort on the array [2, 8, 5, 2, 6]. On each step the
elements currently being scanned are in bold.
- [2, 8, 5, 2, 6] - ordered, so leave them alone
- [2, 8, 5, 2, 6] - not ordered, so swap
- [2, 5, 8, 2, 6] - not ordered, so swap
- [2, 5, 2, 8, 6] - not ordered, so swap
- [2, 5, 2, 6, 8] - the first pass is complete
Because at least one swap occurred, the algorithm knows that it wasn't sorted.
It needs to make another pass. It starts over again at the first entry and goes
to the next-to-last entry doing the comparisons, again. It only needs to go to
the next-to-last entry because the previous "bubbling" put the largest entry in
the last position. - [2, 5, 2, 6, 8] - ordered, so leave them alone
- [2, 5, 2, 6, 8] - not ordered, so swap
- [2, 2, 5, 6, 8] - ordered, so leave them alone
- [2, 2, 5, 6, 8] - the second pass is complete
Because at least one swap occurred, the algorithm knows that it wasn't sorted.
Now, it can bubble from the first position to the last-2 position because the
last two values are sorted. - [2, 2, 5, 6, 8] - ordered, so leave them alone
- [2, 2, 5, 6, 8] - ordered, so leave them alone
- [2, 2, 5, 6, 8] - the third pass is complete
No swap occurred, so the Bubble Sort stops.
654. Ending the Bubble Sort
During Bubble Sort, you can tell if the array is in sorted order by checking if
a swap was made during the previous pass performed. If a swap was not performed
during the previous pass, then the array must be totally sorted and the
algorithm can stop.
You're probably wondering why that makes sense. Recall that a pass of Bubble
Sort checks if any adjacent elements are out of order and swaps them if they
are. If we don't make any swaps during a pass, then everything must be already
in order, so our job is done. Let that marinate for a bit.
655. Pseudocode for Bubble Sort
Bubble Sort: (array)
n := length(array)
repeat
swapped = false
for i := 1 to n - 1 inclusive do
/* if this pair is out of order */
if array[i - 1] > array[i] then
/* swap them and remember something changed */
swap(array, i - 1, i)
swapped := true
end if
end for
until not swapped
Selection Sort
Selection Sort is very similar to Bubble Sort. The major difference between the
two is that Bubble Sort bubbles the largest elements up to the end of the
array, while Selection Sort selects the smallest elements of the array and
directly places them at the beginning of the array in sorted position. Selection
sort will utilize swapping just as bubble sort did. Let's carefully break this
sorting algorithm down.
656. The algorithm: select the next smallest
Selection sort works by maintaining a sorted region on the left side of the
input array; this sorted region will grow by one element with every "pass" of
the algorithm. A single "pass" of selection sort will select the next smallest
element of unsorted region of the array and move it to the sorted region.
Because a single pass of selection sort will move an element of the unsorted
region into the sorted region, this means a single pass will shrink the unsorted
region by 1 element whilst increasing the sorted region by 1 element. Selection
sort is complete when the sorted region spans the entire array and the unsorted
region is empty!
The algorithm can be summarized as the following:
- Set MIN to location 0
- Search the minimum element in the list
- Swap with value at location MIN
- Increment MIN to point to next element
- Repeat until list is sorted
657. The pseudocode
In pseudocode, the Selection Sort can be written as this.
procedure selection sort
list : array of items
n : size of list
for i = 1 to n - 1
/* set current element as minimum*/
min = i
/* check the element to be minimum */
for j = i+1 to n
if list[j] < list[min] then
min = j;
end if
end for
/* swap the minimum element with the current element*/
if indexMin != i then
swap list[min] and list[i]
end if
end for
end procedure
Insertion Sort
With Bubble Sort and Selection Sort now in your tool box, you're starting to
get some experience points under your belt! Time to learn one more "naive"
sorting algorithm before you get to the efficient sorting algorithms.
658. The algorithm: insert into the sorted region
Insertion Sort is similar to Selection Sort in that it gradually builds up a
larger and larger sorted region at the left-most end of the array.
However, Insertion Sort differs from Selection Sort because this algorithm does
not focus on searching for the right element to place (the next smallest in our
Selection Sort) on each pass through the array. Instead, it focuses on sorting
each element in the order they appear from left to right, regardless of their
value, and inserting them in the most appropriate position in the sorted region.
See if you can observe the behavior described above in the following animation:
659. The Steps
Insertion Sort grows a sorted array on the left side of the input array by:
- If it is the first element, it is already sorted. return 1;
- Pick next element
- Compare with all elements in the sorted sub-list
- Shift all the elements in the sorted sub-list that is greater than the
value to be sorted - Insert the value
- Repeat until list is sorted
These steps are easy to confuse with selection sort, so you'll want to watch the
video lecture and drawing that accompanies this reading as always!
660. The pseudocode
procedure insertionSort( A : array of items )
int holePosition
int valueToInsert
for i = 1 to length(A) inclusive do:
/* select value to be inserted */
valueToInsert = A[i]
holePosition = i
/*locate hole position for the element to be inserted */
while holePosition > 0 and A[holePosition-1] > valueToInsert do:
A[holePosition] = A[holePosition-1]
holePosition = holePosition -1
end while
/* insert the number at hole position */
A[holePosition] = valueToInsert
end for
end procedure
Merge Sort
You've explored a few sorting algorithms already, all of them being quite slow
with a runtime of O(n2). It's time to level up and learn your first
time-efficient sorting algorithm! You'll explore merge sort in detail soon,
but first, you should jot down some key ideas for now. The following points are
not steps to an algorithm yet; rather, they are ideas that will motivate how you
can derive this algorithm.
- it is easy to merge elements of two sorted arrays into a single sorted array
- you can consider an array containing only a single element as already
trivially sorted - you can also consider an empty array as trivially sorted
661. The algorithm: divide and conquer
You're going to need a helper function that solves the first major point from
above. How might you merge two sorted arrays? In other words you want a merge
function that will behave like so:
let arr1 = [1, 5, 10, 15]; let arr2 = [0, 2, 3, 7, 10]; merge(arr1, arr2); // => [0, 1, 2, 3, 5, 7, 10, 10, 15]
Once you have that, you get to the "divide and conquer" bit.
The algorithm for merge sort is actually really simple.
- if there is only one element in the list, it is already sorted. return that
array. - otherwise, divide the list recursively into two halves until it can no more
be divided. - merge the smaller lists into new list in sorted order.
The process is visualized below. When elements are moved to the bottom of the
picture, they are going through themergestep:
The pseudocode for the algorithm is as follows.
procedure mergesort( a as array )
if ( n == 1 ) return a
/* Split the array into two */
var l1 as array = a[0] ... a[n/2]
var l2 as array = a[n/2+1] ... a[n]
l1 = mergesort( l1 )
l2 = mergesort( l2 )
return merge( l1, l2 )
end procedure
procedure merge( a as array, b as array )
var result as array
while ( a and b have elements )
if ( a[0] > b[0] )
add b[0] to the end of result
remove b[0] from b
else
add a[0] to the end of result
remove a[0] from a
end if
end while
while ( a has elements )
add a[0] to the end of result
remove a[0] from a
end while
while ( b has elements )
add b[0] to the end of result
remove b[0] from b
end while
return result
end procedure
Quick Sort
Quick Sort has a similar "divide and conquer" strategy to Merge Sort. Here are a
few key ideas that will motivate the design:
- it is easy to sort elements of an array relative to a particular target value
- an array of 0 or 1 elements is already trivially sorted
Regarding that first point, for example given[7, 3, 8, 9, 2]and a target of
5, we know[3, 2]are numbers less than5and[7, 8, 9]are numbers
greater than5.
662. How does it work?
In general, the strategy is to divide the input array into two subarrays: one
with the smaller elements, and one with the larger elements. Then, it
recursively operates on the two new subarrays. It continues this process until
of dividing into smaller arrays until it reaches subarrays of length 1 or
smaller. As you have seen with Merge Sort, arrays of such length are
automatically sorted.
The steps, when discussed on a high level, are simple:
- choose an element called "the pivot", how that's done is up to the
implementation - take two variables to point left and right of the list excluding pivot
- left points to the low index
- right points to the high
- while value at left is less than pivot move right
- while value at right is greater than pivot move left
- if both step 5 and step 6 does not match swap left and right
- if left ≥ right, the point where they met is new pivot
- repeat, recursively calling this for smaller and smaller arrays
Before we move forward, see if you can observe the behavior described above in
the following animation:
663. The algorithm: divide and conquer
Formally, we want to partition elements of an array relative to a pivot value.
That is, we want elements less than the pivot to be separated from elements that
are greater than or equal to the pivot. Our goal is to create a function with
this behavior:
let arr = [7, 3, 8, 9, 2]; partition(arr, 5); // => [[3, 2], [7,8,9]]
663.1. Partition
Seems simple enough! Let's implement it in JavaScript:
// nothing fancy function partition(array, pivot) { let left = []; let right = []; array.forEach(el => { if (el < pivot) { left.push(el); } else { right.push(el); } }); return [ left, right ]; } // if you fancy function partition(array, pivot) { let left = array.filter(el => el < pivot); let right = array.filter(el => el >= pivot); return [ left, right ]; }
You don't have to use an explicit partition helper function in your Quick Sort
implementation; however, we will borrow heavily from this pattern. As you design
algorithms, it helps to think about key patterns in isolation, although your
solution may not feature that exact helper. Some would say we like to divide and
conquer.
664. The pseudocode
It is so small, this algorithm. It's amazing that it performs so well with so
little code!
procedure quickSort(left, right)
if the length of the array is 0 or 1, return the array
set the pivot to the first element of the array
remove the first element of the array
put all values less than the pivot value into an array called left
put all values greater than the pivot value into an array called right
call quick sort on left and assign the return value to leftSorted
call quick sort on right and assign the return value to rightSorted
return the concatenation of leftSorted, the pivot value, and rightSorted
end procedure
Binary Search
We've explored many ways to sort arrays so far, but why did we go through all of
that trouble? By sorting elements of an array, we are organizing the data in a
way that gives us a quick way to look up elements later on. For simplicity, we
have been using arrays of numbers up until this point. However, these sorting
concepts can be generalized to other data types. For example, it would be easy
to modify our comparison-based sorting algorithms to sort strings: instead of
leveraging facts like 0 < 1, we can say 'A' < 'B'.
Think of a dictionary. A dictionary contains alphabetically sorted words and
their definitions. A dictionary is pretty much only useful if it is ordered in
this way. Let's say you wanted to look up the definition of "stupendous." What
steps might you take?
- you open up the dictionary at the roughly middle page
- you land in the "m" section
- you know "s" comes somewhere after "m" in the book, so you disregard all pages
before the "m" section. Instead, you flip to the roughly middle page between
"m" and "z"- you land in the "u" section
- you know "s" comes somewhere before "u", so you can disregard all pages after
the "u" section. Instead, you flip to the roughly middle page between the
previous "m" page and "u" - ...
You are essentially using thebinarySearchalgorithm in the real world.
665. The Algorithm: "check the middle and half the search space"
Formally, our binarySearch will seek to solve the following problem:
Given a sorted array of numbers and a target num, return a boolean indicating whether or not that target is contained in the array.
Programmatically, we want to satisfy the following behavior:
binarySearch([5, 10, 12, 15, 20, 30, 70], 12); // => true binarySearch([5, 10, 12, 15, 20, 30, 70], 24); // => false
Before we move on, really internalize the fact that binarySearch will only
work on sorted arrays! Obviously we can search any array, sorted or
unsorted, in O(n) time. But now our goal is be able to search the array with a
sub-linear time complexity (less than O(n)).
666. The pseudocode
procedure binary search (list, target)
parameter list: a list of sorted value
parameter target: the value to search for
if the list has zero length, then return false
determine the slice point:
if the list has an even number of elements,
the slice point is the number of elements
divided by two
if the list has an odd number of elements,
the slice point is the number of elements
minus one divided by two
create an list of the elements from 0 to the
slice point, not including the slice point,
which is known as the "left half"
create an list of the elements from the
slice point to the end of the list which is
known as the "right half"
if the target is less than the value in the
original array at the slice point, then
return the binary search of the "left half"
and the target
if the target is greater than the value in the
original array at the slice point, then
return the binary search of the "right half"
and the target
if neither of those is true, return true
end procedure binary search
Bubble Sort Analysis
Bubble Sort manipulates the array by swapping the position of two elements. To
implement Bubble Sort in JS, you'll need to perform this operation. It helps to
have a function to do that. A key detail in this function is that you need an
extra variable to store one of the elements since you will be overwriting them
in the array:
function swap(array, idx1, idx2) { let temp = array[idx1]; // save a copy of the first value array[idx1] = array[idx2]; // overwrite the first value with the second value array[idx2] = temp; // overwrite the second value with the first value }
Note that the swap function does not create or return a new array. It mutates
the original array:
let arr1 = [2, 8, 5, 2, 6]; swap(arr1, 1, 2); arr1; // => [ 2, 5, 8, 2, 6 ]
666.1. Bubble Sort JS Implementation
Take a look at the snippet below and try to understand how it corresponds to the
conceptual understanding of the algorithm. Scroll down to the commented version
when you get stuck.
function bubbleSort(array) { let swapped = true; while(swapped) { swapped = false; for (let i = 0; i < array.length - 1; i++) { if (array[i] > array[i+1]) { swap(array, i, i+1); swapped = true; } } } return array; }
// commented function bubbleSort(array) { // this variable will be used to track whether or not we // made a swap on the previous pass. If we did not make // any swap on the previous pass, then the array must // already be sorted let swapped = true; // this while will keep doing passes if a swap was made // on the previous pass while(swapped) { swapped = false; // reset swap to false // this for will perform a single pass for (let i = 0; i < array.length; i++) { // if the two value are not ordered... if (array[i] > array[i+1]) { // swap the two values swap(array, i, i+1); // since you made a swap, remember that you did so // b/c we should perform another pass after this one swapped = true; } } } return array; }
667. Time Complexity: O(n2)
Picture the worst case scenario where the input array is completely unsorted.
Say it's sorted in fully decreasing order, but the goal is to sort it in
increasing order:
- n is the length of the input array
- The inner
forloop along contributes O(n) in isolation - The outer while loop contributes O(n) in isolation because a single
iteration of the while loop will bring one element to its final resting
position. In other words, it keeps running the while loop until the array is
fully sorted. To fully sort the array we will need to bring allnelements
into their final resting positions. - Those two loops are nested so the total time complexity is O(n * n) =
O(n2).
It's worth mentioning that the best case scenario is when the input array is
already fully sorted. This will cause our for loop to conduct a single pass
without performing any swap, so thewhileloop will not trigger further
iterations. This means best case time complexity is O(n) for bubble sort. This
best case linear time is probably the only advantage of bubble sort. Programmers
are usually interested only in the worst-case analysis and ignore best-case
analysis.
668. Space Complexity: O(1)
Bubble Sort is a constant space, O(1), algorithm. The amount of memory consumed
by the algorithm does not increase relative to the size of the input array. It
uses the same amount of memory and create the same amount of variables
regardless of the size of the input, making this algorithm quite space
efficient. The space efficiency mostly comes from the fact that it mutates the
input array in-place. This is known as a destructive sort because it
"destroys" the positions of the values in the array.
669. When should you use Bubble Sort?
Nearly never, but it may be a good choice in the following list of special
cases:
- When sorting really small arrays where run time will be negligible no matter
what algorithm you choose. - When sorting arrays that you expect to already be nearly sorted.
- At parties
Selection Sort Analysis
Since a component of Selection Sort requires us to locate the smallest value in
the array, let's focus on that pattern in isolation:
function minumumValueIndex(arr) { let minIndex = 0; for (let j = 0; j < arr.length; j++) { if (arr[minIndex] > arr[j]) { minIndex = j; } } return minIndex; }
Pretty basic code right? We won't use this explicit helper function to solve
selection sort, however we will borrow from this pattern soon.
670. Selection Sort JS Implementation
We'll also utilize the classic swap pattern that we introduced in the bubble sort. To
refresh:
function swap(arr, index1, index2) { let temp = arr[index1]; arr[index1] = arr[index2]; arr[index2] = temp; }
Now for the punchline! Take a look at the snippet below and try to understand
how it corresponds to our conceptual understanding of the selection sort
algorithm. Scroll down to the commented version when you get stuck.
function selectionSort(arr) { for (let i = 0; i < arr.length; i++) { let minIndex = i; for (let j = i + 1; j < arr.length; j++) { if (arr[minIndex] > arr[j]) { minIndex = j; } } swap(arr, i, minIndex); } return arr; }
// commented function selectionSort(arr) { // the `i` loop will track the index that points to the first element of the unsorted region: // this means that the sorted region is everything left of index i // and the unsorted region is everything to the right of index i for (let i = 0; i < arr.length; i++) { let minIndex = i; // the `j` loop will iterate through the unsorted region and find the index of the smallest element for (let j = i + 1; j < arr.length; j++) { if (arr[minIndex] > arr[j]) { minIndex = j; } } // after we find the minIndex in the unsorted region, // swap that minIndex with the first index of the unsorted region swap(arr, i, minIndex); } return arr; }
671. Time Complexity Analysis
Selection Sort runtime is O(n2) because:
nis the length of the input array- The outer loop i contributes O(n) in isolation, this is plain to see
- The inner loop j is more complicated, it will make one less iteration for
every iteration of i.- for example, let's say we have an array of 10 elements,
n = 10. - the first full cycle of
jwill have 9 iterations - the second full cycle of
jwill have 8 iterations - the third full cycle of
jwill have 7 iterations - ...
- the last full cycle of
jwill have 1 iteration - This means that the inner loop j will contribute roughly O(n / 2) on
average
- for example, let's say we have an array of 10 elements,
- The two loops are nested so our total time complexity is O(n * n / 2) =
O(n2)
You'll notice that during this analysis we said something silly like O(n / 2).
In some analyses such as this one, we'll prefer to drop the constants only at
the end of the sketch so you understand the logical steps we took to derive a
complicated time complexity.
672. Space Complexity Analysis: O(1)
The amount of memory consumed by the algorithm does not increase relative to the
size of the input array. We use the same amount of memory and create the same
amount of variables regardless of the size of our input. A quick indicator of
this is the fact that we don't create any arrays.
673. When should we use Selection Sort?
There is really only one use case where Selection Sort becomes superior to
Bubble Sort. Both algorithms are quadratic in time and constant in space, but
the point at which they differ is in the number of swaps they make.
Bubble Sort, in the worst case, invokes a swap on every single comparison.
Selection Sort only swaps once our inner loop has completely finished traversing
the array. Therefore, Selection Sort is optimized to make the least possible
number of swaps.
Selection Sort becomes advantageous when making a swap is the most expensive
operation in your system. You will likely rarely encounter this scenario, but in
a situation where you've built (or have inherited) a system with suboptimal
write speed ability, for instance, maybe you're sorting data in a specialized
database tuned strictly for fast read speeds at the expense of slow write
speeds, using Selection Sort would save you a ton of expensive operations that
could potential crash your system under peak load.
Though in industry this situation is very rare, the insights above make for a
fantastic conversational piece when weighing technical tradeoffs while
strategizing solutions in an interview setting. This commentary may help deliver
the impression that you are well-versed in system design and technical analysis,
a key indicator that someone is prepared for a senior level position.
Insertion Sort Analysis
Take a look at the snippet below and try to understand how it corresponds to our
conceptual understanding of the Insertion Sort algorithm. Scroll down to the
commented version when you get stuck:
function insertionSort(arr) { for (let i = 1; i < arr.length; i++) { let currElement = arr[i]; for (var j = i - 1; j >= 0 && currElement < arr[j]; j--) { arr[j + 1] = arr[j]; } arr[j + 1] = currElement; } return arr; }
function insertionSort(arr) { // the `i` loop will iterate through every element of the array // we begin at i = 1, because we can consider the first element of the array as a // trivially sorted region of only one element // insertion sort allows us to insert new elements anywhere within the sorted region for (let i = 1; i < arr.length; i++) { // grab the first element of the unsorted region let currElement = arr[i]; // the `j` loop will iterate left through the sorted region, // looking for a legal spot to insert currElement for (var j = i - 1; j >= 0 && currElement < arr[j]; j--) { // keep moving left while currElement is less than the j-th element arr[j + 1] = arr[j]; // the line above will move the j-th element to the right, // leaving a gap to potentially insert currElement } // insert currElement into that gap arr[j + 1] = currElement; } return arr; }
There are a few key pieces to point out in the above solution before moving
forward:
- The outer
forloop starts at the 1st index, not the 0th index, and moves to
the right. - The inner
forloop starts immediately to the left of the current element,
and moves to the left. - The condition for the inner
forloop is complicated, and behaves similarly
to a while loop!- It continues iterating to the left toward
j = 0, only while the
currElementis less thanarr[j]. - It does this over and over until it finds the proper place to insert
currElement, and then we exit the inner loop!
- It continues iterating to the left toward
- When shifting elements in the sorted region to the right, it does not
replace the value at their old index! If the input array is[1, 2, 4, 3],
andcurrElementis3, after comparing4and3, but before inserting
3between2and4, the array will look like this:[1, 2, 4, 4].
If you are currently scratching your head, that is perfectly okay because when
this one clicks, it clicks for good.
If you're struggling, you should try taking out a pen and paper and step through
the solution provided above one step at a time. Keep track ofi,j,
currElement,arr[j], and the inputarritself at every step. After going
through this a few times, you'll have your "ah HA!" moment.
674. Time and Space Complexity Analysis
Insertion Sort runtime is O(n2) because:
In the worst case scenario where our input array is entirely unsorted, since
this algorithm contains a nested loop, its run time behaves similarly to
bubbleSort and selectionSort. In this case, we are forced to make a comparison
at each iteration of the inner loop. Not convinced? Let's derive the complexity.
We'll use much of the same argument as we did in selectionSort. Say we had the
worst case scenario where are input array is sorted in full decreasing order,
but we wanted to sort it in increasing order:
nis the length of the input array- The outer loop i contributes O(n) in isolation, this is plain to see
- The inner loop j is more complicated. We know j will iterate until it finds an
appropriate place to insert thecurrElementinto the sorted region. However,
since we are discussing the case where the data is already in decreasing
order, the element must travel the maximum distance to find it's insertion
point! We know this insertion point to be index 0, since everycurrElement
will be the next smallest of the array. So:- the 1st element travels 1 distance to be inserted
- the 2nd element travels 2 distance to be inserted
- the 3rd element travels 3 distance to be inserted
- ...
- the n-1th element travels n-1 distance to be inserted
- This means that our inner loop j will contribute roughly O(n / 2) on
average
- The two loops are nested so our total time complexity is O(n * n / 2) =
O(n2)
674.1. Space Complexity: O(1)
The amount of memory consumed by the algorithm does not increase relative to the
size of the input array. We use the same amount of memory and create the same
amount of variables regardless of the size of our input. A quick indicator of
this is the fact that we don't create any arrays.
675. When should you use Insertion Sort?
Insertion Sort has one advantage that makes it absolutely supreme in one special
case. Insertion Sort is what's known as an "online" algorithm. Online algorithms
are great when you're dealing with streaming data, because they can sort the
data live as it is received.
If you must sort a set of data that is ever-incoming, for example, maybe you are
sorting the most relevant posts in a social media feed so that those posts that
are most likely to impact the site's audience always appear at the top of the
feed, an online algorithm like Insertion Sort is a great option.
Insertion Sort works well in this situation because the left side of the array
is always sorted, and in the case of nearly sorted arrays, it can run in linear
time. The absolute best case scenario for Insertion Sort is when there is only
one unsorted element, and it is located all the way to the right of the array.
Well, if you have data constantly being pushed to the array, it will always be
added to the right side. If you keep your algorithm constantly running, the left
side will always be sorted. Now you have linear time sort.
Otherwise, Insertion Sort is, in general, useful in all the same situations as
Bubble Sort. It's a good option when:
- You are sorting really small arrays where run time will be negligible no
matter what algorithm we choose. - You are sorting an array that you expect to already be nearly sorted.
Merge Sort Analysis
You needed to come up with two pieces of code to make merge sort work.
676. Full code
function merge(array1, array2) { let merged = []; while (array1.length || array2.length) { let ele1 = array1.length ? array1[0] : Infinity; let ele2 = array2.length ? array2[0] : Infinity; let next; if (ele1 < ele2) { next = array1.shift(); } else { next = array2.shift(); } merged.push(next); } return merged; } function mergeSort(array) { if (array.length <= 1) { return array; } let midIdx = Math.floor(array.length / 2); let leftHalf = array.slice(0, midIdx); let rightHalf = array.slice(midIdx); let sortedLeft = mergeSort(leftHalf); let sortedRight = mergeSort(rightHalf); return merge(sortedLeft, sortedRight); }
677. Merging two sorted arrays
Merging two sorted arrays is simple. Since both arrays are sorted, we know the
smallest numbers to always be at the front of the arrays. We can construct the
new array by comparing the first elements of both input arrays. We remove the
smaller element from it's respective array and add it to our new array. Do this
until both input arrays are empty:
function merge(array1, array2) { let merged = []; while (array1.length || array2.length) { let ele1 = array1.length ? array1[0] : Infinity; let ele2 = array2.length ? array2[0] : Infinity; let next; if (ele1 < ele2) { next = array1.shift(); } else { next = array2.shift(); } merged.push(next); } return merged; }
Remember the following about JavaScript to understand the above code.
0is considered a falsey value, meaning it acts likefalsewhen used in
Boolean expressions. All other numbers are truthy.Infinityis a value that is guaranteed to be greater than any other quantityshiftis an array method that removes and returns the first element
Here's the annotated version.
// commented function merge(array1, array2) { let merged = []; // keep running while either array still contains elements while (array1.length || array2.length) { // if array1 is nonempty, take its the first element as ele1 // otherwise array1 is empty, so take Infinity as ele1 let ele1 = array1.length ? array1[0] : Infinity; // do the same for array2, ele2 let ele2 = array2.length ? array2[0] : Infinity; let next; // remove the smaller of the eles from it's array if (ele1 < ele2) { next = array1.shift(); } else { next = array2.shift(); } // and add that ele to the new array merged.push(next); } return merged; }
By using Infinity as the default element when an array is empty, we are able to
elegantly handle the scenario where one array empties before the other. We know
that any actual element will be less than Infinity so we will continually take
the other element into our merged array.
In other words, we can safely handle this edge case:
merge([10, 13, 15, 25], []); // => [10, 13, 15, 25]
Nice! We now have a way to merge two sorted arrays into a single sorted array.
It's worth mentioning that merge will have a O(n) runtime where n is
the
combined length of the two input arrays. This is what we meant when we said it
was "easy" to merge two sorted arrays; linear time is fast! We'll find fact this
useful later.
678. Divide and conquer, step-by-step
Now that we satisfied the merge idea, let's handle the second point. That is, we
say an array of 1 or 0 elements is already sorted. This will be the base case of
our recursion. Let's begin adding this code:
function mergeSort(array) { if (array.length <= 1) { return array; } // .... }
If our base case pertains to an array of a very small size, then the design of
our recursive case should make progress toward hitting this base scenario. In
other words, we should recursively call mergeSort on smaller and smaller
arrays. A logical way to do this is to take the input array and split it into
left and right halves.
function mergeSort(array) { if (array.length <= 1) { return array; } let midIdx = Math.floor(array.length / 2); let leftHalf = array.slice(0, midIdx); let rightHalf = array.slice(midIdx); let sortedLeft = mergeSort(leftHalf); let sortedRight = mergeSort(rightHalf); // ... }
Here is the part of the recursion where we do a lot of hand waving and we take
things on faith. We know that mergeSort will take in an array and return the
sorted version; we assume that it works. That means the two recursive calls will
return the sortedLeft and sortedRight halves.
Okay, so we have two sorted arrays. We want to return one sorted array. So
merge them! Using the merge function we designed earlier:
function mergeSort(array) { if (array.length <= 1) { return array; } let midIdx = Math.floor(array.length / 2); let leftHalf = array.slice(0, midIdx); let rightHalf = array.slice(midIdx); let sortedLeft = mergeSort(leftHalf); let sortedRight = mergeSort(rightHalf); return merge(sortedLeft, sortedRight); }
Wow. that's it. Notice how light the implementation of mergeSort is. Much of
the heavy lifting (the actually comparisons) is done by the merge helper.
mergeSort is a classic example of a "Divide and Conquer" algorithm. In other
words, we keep breaking the array into smaller and smaller sub arrays. This is
the same as saying we take the problem and break it down into smaller and
smaller subproblems. We do this until the subproblems are so small that we
trivially know the answer to them (an array length 0 or 1 is already sorted).
Once we have those subanswers we can combine to reconstruct the larger problems
that we previously divided (merge the left and right subarrays).
679. Time and Space Complexity Analysis
679.1. Time Complexity: O(n log(n))
nis the length of the input array- We must calculate how many recursive calls we make. The number of recursive
calls is the number of times we must split the array to reach the base case.
Since we split in half each time, the number of recursive calls is
O(log(n)).- for example, say we had an array of length
32 - then the length would change as
32 -> 16 -> 8 -> 4 -> 2 -> 1, we have to
split 5 times before reaching the base case,log(32) = 5 - in our algorithm, log(n) describes how many times we must halve n
until the quantity reaches 1.
- for example, say we had an array of length
- Besides the recursive calls, we must consider the while loop within the
mergefunction, which contributesO(n)in isolation - We call
mergein every recursivemergeSortcall, so the total complexity
is O(n * log(n))
679.2. Space Complexity: O(n)
Merge Sort is the first non-O(1) space sorting algorithm we've seen thus far.
The larger the size of our input array, the greater the number of subarrays we
must create in memory. These are not free! They each take up finite space, and
we will need a new subarray for each element in the original input. Therefore,
Merge Sort has a linear space complexity, O(n).
679.3. When should you use Merge Sort?
Unless we, the engineers, have access in advance to some unique, exploitable
insight about our dataset, it turns out that O(n log n) time is the best we
can do when sorting unknown datasets.
That means that Merge Sort is fast! It's way faster than Bubble Sort, Selection
Sort, and Insertion Sort. However, due to its linear space complexity, we must
always weigh the trade off between speed and memory consumption when making the
choice to use Merge Sort. Consider the following:
- If you have unlimited memory available, use it, it's fast!
- If you have a decent amount of memory available and a medium sized dataset,
run some tests first, but use it! - In other cases, maybe you should consider other options.
Quick Sort Analysis
Let's begin structuring the recursion. The base case of any recursive problem is
where the input is so trivial, we immediately know the answer without
calculation. If our problem is to sort an array, what is the trivial array? An
array of 1 or 0 elements! Let's establish the code:
function quickSort(array) { if (array.length <= 1) { return array; } // ... }
If our base case pertains to an array of a very small size, then the design of
our recursive case should make progress toward hitting this base scenario. In
other words, we should recursively call quickSort on smaller and smaller
arrays. This is very similar to our previous mergeSort, except we don't just
split the array down the middle. Instead we should arbitrarily choose an element
of the array as a pivot and partition the remaining elements relative to this
pivot:
function quickSort(array) { if (array.length <= 1) { return array; } let pivot = array.shift(); let left = array.filter(el => el < pivot); let right = array.filter(el => el >= pivot); // ...
Here is what to notice about the partition step above:
- the pivot is an element of the array; we arbitrarily chose the first element
- we removed the pivot from the master array before we filter into the left and
right partitions
Now that we have the two subarrays ofleftandrightwe have our
subproblems! To solve these subproblems we must sort the subarrays. I wish we
had a function that sorts an array...oh wait we do,quickSort! Recursively:
function quickSort(array) { if (array.length <= 1) { return array; } let pivot = array.shift(); let left = array.filter(el => el < pivot); let right = array.filter(el => el >= pivot); let leftSorted = quickSort(left); let rightSorted = quickSort(right); // ...
Okay, so we have the two sorted partitions. This means we have the two
subsolutions. But how do we put them together? Think about how we partitioned
them in the first place. Everything in leftSorted is guaranteed to be less
than everything in rightSorted. On top of that, pivot should be placed after
the last element in leftSorted, but before the first element in rightSorted.
So all we need to do is to combine the elements in the order "left, pivot,
right"!
function quickSort(array) { if (array.length <= 1) { return array; } let pivot = array.shift(); let left = array.filter(el => el < pivot); let right = array.filter(el => el >= pivot); let leftSorted = quickSort(left); let rightSorted = quickSort(right); return leftSorted.concat([pivot]).concat(rightSorted); }
That last concat line is a bit clunky. Bonus JS Lesson: we can use the spread
... operator to elegantly concatenate arrays. In general:
let one = ['a', 'b'] let two = ['d', 'e', 'f'] let newArr = [ ...one, 'c', ...two ]; newArr; // => [ 'a', 'b', 'c', 'd', 'e', 'f' ]
Utilizing that spread pattern gives us this final implementation:
function quickSort(array) { if (array.length <= 1) { return array; } let pivot = array.shift(); let left = array.filter(el => el < pivot); let right = array.filter(el => el >= pivot); let leftSorted = quickSort(left); let rightSorted = quickSort(right); return [ ...leftSorted, pivot, ...rightSorted ]; }
679.4. Quicksort Sort JS Implementation
That code was so clean we should show it again. Here's the complete code for
your reference, for when you ctrl+F "quicksort" the night before an interview:
function quickSort(array) { if (array.length <= 1) { return array; } let pivot = array.shift(); let left = array.filter(el => el < pivot); let right = array.filter(el => el >= pivot); let leftSorted = quickSort(left); let rightSorted = quickSort(right); return [ ...leftSorted, pivot, ...rightSorted ]; }
680. Time and Space Complexity Analysis
Here is a summary of the complexity.
680.1. Time Complexity
- Avg Case: O(n log(n))
- Worst Case: O(n2)
The runtime analysis ofquickSortis more complex thanmergeSort nis the length of the input array- The partition step alone is
O(n) - We must calculate how many recursive calls we make. The number of recursive
calls is the number of times we must split the array to reach the base case.
This is dependent on how we choose the pivot. Let's analyze the best and worst
case:- Best Case: We are lucky and always choose the median as the pivot.
This means the left and right partitions will have equal length. This will
halve the array length at every step of the recursion. We benefit from
this halving withO(log(n))recursive calls to reach the base case. - Worst Case: We are unlucky and always choose the min or max as the
pivot. This means one partition will contain everything, and the other
partition is empty. This will decrease the array length by 1 at every step
of the recursion. We suffer fromO(n)recursive calls to reach the base
case.
- Best Case: We are lucky and always choose the median as the pivot.
- The partition step occurs in every recursive call, so our total complexities
are:- Best Case: O(n * log(n))
- Worst Case: O(n2)
Although we typically take the worst case when describing Big-O for an
algorithm, much research onquickSorthas shown the worst case to be an
exceedingly rare occurrence even if we choose the pivot at random. Because of
this we still considerquickSortan efficient algorithm. This is a common
interview talking point, so you should be familiar with the relationship between
the choice of pivot and efficiency of the algorithm.
Just in case: A somewhat common question a student may ask when studying
quickSortis, "If the median is the best pivot, why don't we always just
choose the median when we partition?" Don't overthink this. To know the median
of an array, it must be sorted in the first place.
680.2. Space Complexity
Our implementation of quickSort uses O(n) space because of the partition
arrays we create. There is an in-place version of quickSort that uses
O(log(n)) space. O(log(n)) space is not huge benefit over O(n).
You'll
also find our version of quickSort as easier to remember, easier to implement.
Just know that a O(logn) space quickSort exists.
680.3. When should you use Quick Sort?
- When you are in a pinch and need to throw down an efficient sort (on average).
The recursive code is light and simple to implement; much smaller than
mergeSort. - When constant space is important to you, use the in-place version. This will
of course trade off some simplicity of implementation.
If you know some constraints about dataset you can make some modifications to
optimize pivot choice. Here's some food for thought. Our implementation of
quickSortwill always take the first element as the pivot. This means we will
suffer from the worst case time complexity in the event that we are given an
already sorted array (ironic isn't it?). If you know your input data to be
mostly already sorted, randomize the choice of pivot - this is a very easy
change. Bam. Solved like a true engineer.
Binary Search Analysis
We'll implement binary search recursively. As always, we start with a base case
that captures the scenario of the input array being so trivial, that we know the
answer without further calculation. If we are given an empty array and a target,
we can be certain that the target is not inside of the array:
function binarySearch(array, target) { if (array.length === 0) { return false; } // ... }
Now for our recursive case. If we want to get a time complexity less than
O(n), we must avoid touching all n elements. Adopting our dictionary
strategy, let's find the middle element and grab references to the left and
right halves of the sorted array:
function binarySearch(array, target) { if (array.length === 0) { return false; } let midIdx = Math.floor(array.length / 2); let leftHalf = array.slice(0, midIdx); let rightHalf = array.slice(midIdx + 1); // ... }
It's worth pointing out that the left and right halves do not contain the middle
element we chose.
Here is where we leverage the sorted property of the array. If the target is
less than the middle, then the target must be in the left half of the array. If
the target is greater than the middle, then the target must be in the right half
of the array. So we can narrow our search to one of these halves, and ignore the
other. Luckily we have a function that can search the half, its binarySearch:
function binarySearch(array, target) { if (array.length === 0) { return false; } let midIdx = Math.floor(array.length / 2); let leftHalf = array.slice(0, midIdx); let rightHalf = array.slice(midIdx + 1); if (target < array[midIdx]) { return binarySearch(leftHalf, target); } else if (target > array[midIdx]) { return binarySearch(rightHalf, target); } // ... }
We know binarySeach will return the correct Boolean, so we just pass that
result up by returning it ourselves. However, something is lacking in our code.
It is only possible to get a false from the literal return false line, but
there is no return true. Looking at our conditionals, we handle the cases
where the target is less than middle or the target is greater than the middle,
but what if the product is equal to the middle? If the target is equal to
the middle, then we found the target and should return true! This is easy to
add with an else:
function binarySearch(array, target) { if (array.length === 0) { return false; } let midIdx = Math.floor(array.length / 2); let leftHalf = array.slice(0, midIdx); let rightHalf = array.slice(midIdx + 1); if (target < array[midIdx]) { return binarySearch(leftHalf, target); } else if (target > array[midIdx]) { return binarySearch(rightHalf, target); } else { return true; } }
To wrap up, we have confidence of our base case will eventually be hit because
we are continually halving the array. We halve the array until it's length is 0
or we actually find the target.
680.4. Binary Search JS Implementation
Here is the code again for your quick reference:
function binarySearch(array, target) { if (array.length === 0) { return false; } let midIdx = Math.floor(array.length / 2); let leftHalf = array.slice(0, midIdx); let rightHalf = array.slice(midIdx + 1); if (target < array[midIdx]) { return binarySearch(leftHalf, target); } else if (target > array[midIdx]) { return binarySearch(rightHalf, target); } else { return true; } }
681. Time and Space Complexity Analysis
The complexity analysis of this algorithm is easier to explain through visuals,
so we highly encourage you to watch the lecture that accompanies this
reading. In any case, here is a summary of the complexity:
681.1. Time Complexity: O(log(n))
nis the length of the input array- We have no loops, so we must only consider the number of recursive calls it
takes to hit the base case - The number of recursive calls is the number of times we must halve the array
until it's length becomes 0. This number can be described bylog(n)- for example, say we had an array of 8 elements,
n = 8 - the length would halve as
8 -> 4 -> 2 -> 1 - it takes 3 calls,
log(8) = 3
- for example, say we had an array of 8 elements,
681.2. Space Complexity: O(n)
Our implementation uses n space due to half arrays we create using slice. Note
that JavaScript slice creates a new array, so it requires additional memory to
be allocated.
681.3. When should we use Binary Search?
Use this algorithm when the input data is sorted!!! This is a heavy requirement,
but if you have it, you'll have an insanely fast algorithm. Of course, you can
use one of your high-functioning sorting algorithms to sort the input and then
perform the binary search!
Practice: Bubble Sort
This project contains a skeleton for you to implement Bubble Sort. In the
file lib/bubble_sort.js, you should implement the Bubble Sort. This is a
description of how the Bubble Sort works (and is also in the code file).
Bubble Sort: (array)
n := length(array)
repeat
swapped = false
for i := 1 to n - 1 inclusive do
/* if this pair is out of order */
if array[i - 1] > array[i] then
/* swap them and remember something changed */
swap(array, i - 1, i)
swapped := true
end if
end for
until not swapped
682. Instructions
- Clone the project from
https://github.com/appacademy-starters/algorithms-bubble-sort-starter. cdinto the project foldernpm installto install dependencies in the project root directorynpm testto run the specs- You can view the test cases in
/test/test.js. Your job is to write code in
the/lib/bubble_sort.jsthat implements the Bubble Sort.
Practice: Selection Sort
This project contains a skeleton for you to implement Selection Sort. In the
file lib/selection_sort.js, you should implement the Selection Sort. You
can use the same swap function from Bubble Sort; however, try to implement it
on your own, first.
The algorithm can be summarized as the following:
- Set MIN to location 0
- Search the minimum element in the list
- Swap with value at location MIN
- Increment MIN to point to next element
- Repeat until list is sorted
This is a description of how the Selection Sort works (and is also in the code
file).
procedure selection sort(list)
list : array of items
n : size of list
for i = 1 to n - 1
/* set current element as minimum*/
min = i
/* check the element to be minimum */
for j = i+1 to n
if list[j] < list[min] then
min = j;
end if
end for
/* swap the minimum element with the current element*/
if indexMin != i then
swap list[min] and list[i]
end if
end for
end procedure
683. Instructions
- Clone the project from
https://github.com/appacademy-starters/algorithms-selection-sort-starter. cdinto the project foldernpm installto install dependencies in the project root directorynpm testto run the specs- You can view the test cases in
/test/test.js. Your job is to write code in
the/lib/selection_sort.jsthat implements the Selection Sort.
Practice: Insertion Sort
This project contains a skeleton for you to implement Insertion Sort. In the
file lib/insertion_sort.js, you should implement the Insertion Sort.
The algorithm can be summarized as the following:
- If it is the first element, it is already sorted. return 1;
- Pick next element
- Compare with all elements in the sorted sub-list
- Shift all the elements in the sorted sub-list that is greater than the
value to be sorted - Insert the value
- Repeat until list is sorted
This is a description of how the Insertion Sort works (and is also in the code
file).
procedure insertionSort( A : array of items )
int holePosition
int valueToInsert
for i = 1 to length(A) inclusive do:
/* select value to be inserted */
valueToInsert = A[i]
holePosition = i
/*locate hole position for the element to be inserted */
while holePosition > 0 and A[holePosition-1] > valueToInsert do:
A[holePosition] = A[holePosition-1]
holePosition = holePosition -1
end while
/* insert the number at hole position */
A[holePosition] = valueToInsert
end for
end procedure
684. Instructions
- Clone the project from
https://github.com/appacademy-starters/algorithms-insertion-sort-starter. cdinto the project foldernpm installto install dependencies in the project root directorynpm testto run the specs- You can view the test cases in
/test/test.js. Your job is to write code in
the/lib/insertion_sort.jsthat implements the Insertion Sort.
Practice: Merge Sort
This project contains a skeleton for you to implement Merge Sort. In the
file lib/merge_sort.js, you should implement the Merge Sort.
The algorithm can be summarized as the following:
- if there is only one element in the list, it is already sorted. return that
array. - otherwise, divide the list recursively into two halves until it can no more
be divided. - merge the smaller lists into new list in sorted order.
This is a description of how the Merge Sort works (and is also in the code
file).
procedure mergesort( a as array )
if ( n == 1 ) return a
/* Split the array into two */
var l1 as array = a[0] ... a[n/2]
var l2 as array = a[n/2+1] ... a[n]
l1 = mergesort( l1 )
l2 = mergesort( l2 )
return merge( l1, l2 )
end procedure
procedure merge( a as array, b as array )
var result as array
while ( a and b have elements )
if ( a[0] > b[0] )
add b[0] to the end of result
remove b[0] from b
else
add a[0] to the end of result
remove a[0] from a
end if
end while
while ( a has elements )
add a[0] to the end of result
remove a[0] from a
end while
while ( b has elements )
add b[0] to the end of result
remove b[0] from b
end while
return result
end procedure
685. Instructions
- Clone the project from
https://github.com/appacademy-starters/algorithms-merge-sort-starter. cdinto the project foldernpm installto install dependencies in the project root directorynpm testto run the specs- You can view the test cases in
/test/test.js. Your job is to write code in
the/lib/merge_sort.jsthat implements the Merge Sort.
Practice: Quick Sort
This project contains a skeleton for you to implement Quick Sort. In the
file lib/quick_sort.js, you should implement the Quick Sort. This is a
description of how the Quick Sort works (and is also in the code file).
procedure quick sort (array)
if the length of the array is 0 or 1, return the array
set the pivot to the first element of the array
remove the first element of the array
put all values less than the pivot value into an array called left
put all values greater than the pivot value into an array called right
call quick sort on left and assign the return value to leftSorted
call quick sort on right and assign the return value to rightSorted
return the concatenation of leftSorted, the pivot value, and rightSorted
end procedure quick sort
686. Instructions
- Clone the project from
https://github.com/appacademy-starters/algorithms-quick-sort-starter. cdinto the project foldernpm installto install dependencies in the project root directorynpm testto run the specs- You can view the test cases in
/test/test.js. Your job is to write code in
the/lib/quick_sort.jsthat implements the Quick Sort.
Practice: Binary Search
This project contains a skeleton for you to implement Binary Search. In the
file lib/binary_search.js, you should implement the Binary Search and its
cousin Binary Search Index.
The Binary Search algorithm can be summarized as the following:
- If the array is empty, then return false
- Check the value in the middle of the array against the target value
- If the value is equal to the target value, then return true
- If the value is less than the target value, then return the binary search on
the left half of the array for the target - If the value is greater than the target value, then return the binary search
on the right half of the array for the target
This is a description of how the Binary Search works (and is also in the code
file).
procedure binary search (list, target)
parameter list: a list of sorted value
parameter target: the value to search for
if the list has zero length, then return false
determine the slice point:
if the list has an even number of elements,
the slice point is the number of elements
divided by two
if the list has an odd number of elements,
the slice point is the number of elements
minus one divided by two
create an list of the elements from 0 to the
slice point, not including the slice point,
which is known as the "left half"
create an list of the elements from the
slice point to the end of the list which is
known as the "right half"
if the target is less than the value in the
original array at the slice point, then
return the binary search of the "left half"
and the target
if the target is greater than the value in the
original array at the slice point, then
return the binary search of the "right half"
and the target
if neither of those is true, return true
end procedure binary search
Then you need to adapt that to return the index of the found item rather than
a Boolean value. The pseudocode is also in the code file.
procedure binary search index(list, target, low, high)
parameter list: a list of sorted value
parameter target: the value to search for
parameter low: the lower index for the search
parameter high: the upper index for the search
if low is equal to high, then return -1 to indicate
that the value was not found
determine the slice point:
if the list between the high index and the low index
has an even number of elements,
the slice point is the number of elements
between high and low divided by two
if the list between the high index and the low index
has an odd number of elements,
the slice point is the number of elements
between high and low minus one, divided by two
if the target is less than the value in the
original array at the slice point, then
return the binary search of the array,
the target, low, and the slice point
if the target is greater than the value in the
original array at the slice point, then return
the binary search of the array, the target,
the slice point plus one, and high
if neither of those is true, return the slice point
end procedure binary search index
687. Instructions
- Clone the project from
https://github.com/appacademy-starters/algorithms-binary-search-starter. cdinto the project foldernpm installto install dependencies in the project root directorynpm testto run the specs- You can view the test cases in
/test/test.js. Your job is to write code in
the/lib/binary_search.jsthat implements the Binary Search and Binary
Search Index.
WEEK-07 DAY-4
Lists, Stacks, Queues
Lists, Stacks, and Queues Learning Objectives
The objective of this lesson is for you to become comfortable with
implementing common data structures. This is important because questions about
data structures are incredibly likely to be interview questions for software
engineers from junior to senior levels. Moreover, understanding how different
data structures work will influence the libraries and frameworks that you choose
when writing software.
When you are done, you will be able to:
- Explain and implement a List.
- Explain and implement a Stack.
- Explain and implement a Queue.me comfortable with
implementing common data structures. This is important because questions about
data structures are incredibly likely to be interview questions for software
engineers from junior to senior levels. Moreover, understanding how different
data structures work will influence the libraries and frameworks that you choose
when writing software.
When you are done, you will be able to: - Explain and implement a List.
- Explain and implement a Stack.
- Explain and implement a Queue.
Linked Lists
In the university setting, it’s common for Linked Lists to appear early on in an
undergraduate’s Computer Science coursework. While they don't always have the
most practical real-world applications in industry, Linked Lists make for an
important and effective educational tool in helping develop a student's mental
model on what data structures actually are to begin with.
Linked lists are simple. They have many compelling, reoccurring edge cases to
consider that emphasize to the student the need for care and intent while
implementing data structures. They can be applied as the underlying data
structure while implementing a variety of other prevalent abstract data types,
such as Lists, Stacks, and Queues, and they have a level of versatility high
enough to clearly illustrate the value of the Object Oriented Programming
paradigm.
They also come up in software engineering interviews quite often.
688. What is a Linked List?
A Linked List data structure represents a linear sequence of "vertices" (or
"nodes"), and tracks three important properties.
Linked List Properties:
| Property | Description | | :---------: | :-------------------------------------------------: | | `head` | The first node in the list. | | `tail` | The last node in the list. | | `length` | The number of nodes in the list; the list's length. | The data being tracked by a particular Linked List does not live inside the Linked List instance itself. Instead, each vertex is actually an instance of an even simpler, smaller data structure, often referred to as a "Node". Depending on the type of Linked List (there are many), Node instances track some very important properties as well.Linked List Node Properties:
| Property | Description | | :---------: | :----------------------------------------------------: | | `value` | The actual value this node represents. | | `next` | The next node in the list (relative to this node). | | `previous` | The previous node in the list (relative to this node). |
NOTE: The previous property is for Doubly Linked Lists only!
Admittedly, this does sound a lot like an Array so far, and that's because
Arrays and Linked Lists are both implementations of the List ADT. However, there
is an incredibly important distinction to be made between Arrays and Linked
Lists, and that is how they physically store their data. (As opposed to how
they represent the order of their data.)
Recall that Arrays contain contiguous data. Each element of an array is
actually stored next to it's neighboring element in the actual hardware of
your machine, in a single continuous block in memory.
An Array's contiguous data being stored in a continuous block of addresses in memory.
Unlike Arrays, Linked Lists contain _non-contiguous_ data. Though Linked Lists _represent_ data that is ordered linearly, that mental model is just that - an interpretation of the _representation_ of information, not reality. In reality, in the actual hardware of your machine, whether it be in disk or in memory, a Linked List's Nodes are not stored in a single continuous block of addresses. Rather, Linked List Nodes live at randomly distributed addresses throughout your machine! The only reason we know which node comes next in the list is because we've assigned its reference to the current node's `next` pointer. 
A Singly Linked List's non-contiguous data (Nodes) being stored at randomly distributed addresses in memory.
For this reason, Linked List Nodes have _no indices_, and no _random access_. Without random access, we do not have the ability to look up an individual Linked List Node in constant time. Instead, to find a particular Node, we have to start at the very first Node and iterate through the Linked List one node at a time, checking each Node's _next_ Node until we find the one we're interested in. So when implementing a Linked List, we actually must implement both the Linked List class _and_ the Node class. Since the actual data lives in the Nodes, it's simpler to implement the Node class first. ## 689. Types of Linked Lists
There are four flavors of Linked List you should be familiar with when walking
into your job interviews.
Linked List Types:
| List Type | Description | Directionality | | :-------------------: | :-------------------------------------------------------------------------------: | :--------------------------: | | Singly Linked | Nodes have a single pointer connecting them in a single direction. | Head→Tail | | Doubly Linked | Nodes have two pointers connecting them bi-directionally. | Head⇄Tail | | Multiply Linked | Nodes have two or more pointers, providing a variety of potential node orderings. | Head⇄Tail, A→Z, Jan→Dec, etc. | | Circularly Linked | Final node's `next` pointer points to the first node, creating a non-linear, circular version of a Linked List. | Head→Tail→Head→Tail|NOTE: These Linked List types are not always mutually exclusive.
For instance: - Any type of Linked List can be implemented Circularly (e.g. A Circular Doubly Linked List). - A Doubly Linked List is actually just a special case of a Multiply Linked List. You are most likely to encounter Singly and Doubly Linked Lists in your upcoming job search, so we are going to focus exclusively on those two moving forward. However, in more senior level interviews, it is very valuable to have some familiarity with the other types of Linked Lists. Though you may not actually code them out, _you will win extra points by illustrating your ability to weigh the tradeoffs of your technical decisions_ by discussing how your choice of Linked List type may affect the efficiency of the solutions you propose. ## 690. Linked List MethodsLinked Lists are great foundation builders when learning about data structures
because they share a number of similar methods (and edge cases) with many other
common data structures. You will find that many of the concepts discussed here
will repeat themselves as we dive into some of the more complex non-linear data
structures later on, like Trees and Graphs.
In the project that follows, we will implement the following Linked List
methods:
| Type | Name | Description | Returns |
|---|---|---|---|
| Insertion | addToTail |
Adds a new node to the tail of the Linked List. | Updated Linked List |
| Insertion | addToHead |
Adds a new node to the head of the Linked List. | Updated Linked List |
| Insertion | insertAt |
Inserts a new node at the "index", or position, specified. | Boolean |
| Deletion | removeTail |
Removes the node at the tail of the Linked List. | Removed node |
| Deletion | removeHead |
Removes the node at the head of the Linked List. | Removed node |
| Deletion | removeFrom |
Removes the node at the "index", or position, specified. | Removed node |
| Search | contains |
Searches the Linked List for a node with the value specified. | Boolean |
| Access | get |
Gets the node at the "index", or position, specified. | Node at index |
| Access | set |
Updates the value of a node at the "index", or position, specified. | Boolean |
| Meta | size |
Returns the current size of the Linked List. | Integer |
691. Time and Space Complexity Analysis
Before we begin our analysis, here is a quick summary of the Time and Space
constraints of each Linked List Operation. The complexities below apply to both
Singly and Doubly Linked Lists:
| Data Structure Operation | Time Complexity (Avg) | Time Complexity (Worst) | Space Complexity (Worst) |
|---|---|---|---|
| Access | Θ(n) |
O(n) |
O(n) |
| Search | Θ(n) |
O(n) |
O(n) |
| Insertion | Θ(1) |
O(1) |
O(n) |
| Deletion | Θ(1) |
O(1) |
O(n) |
Before moving forward, see if you can reason to yourself why each operation has
the time and space complexity listed above!
692. Time Complexity - Access and Search:
692.1. Scenarios:
- We have a Linked List, and we'd like to find the 8th item in the list.
- We have a Linked List of sorted alphabet letters, and we'd like to see if the
letter "Q" is inside that list.
692.2. Discussion:
Unlike Arrays, Linked Lists Nodes are not stored contiguously in memory, and
thereby do not have an indexed set of memory addresses at which we can quickly
lookup individual nodes in constant time. Instead, we must begin at the head of
the list (or possibly at the tail, if we have a Doubly Linked List), and iterate
through the list until we arrive at the node of interest.
In Scenario 1, we'll know we're there because we've iterated 8 times. In
Scenario 2, we'll know we're there because, while iterating, we've checked each
node's value and found one that matches our target value, "Q".
In the worst case scenario, we may have to traverse the entire Linked List until
we arrive at the final node. This makes both Access & Search Linear Time
operations.
693. Time Complexity - Insertion and Deletion:
693.1. Scenarios:
- We have an empty Linked List, and we'd like to insert our first node.
- We have a Linked List, and we'd like to insert or delete a node at the Head
or Tail. - We have a Linked List, and we'd like to insert or delete a node from
somewhere in the middle of the list.
693.2. Discussion:
Since we have our Linked List Nodes stored in a non-contiguous manner that
relies on pointers to keep track of where the next and previous nodes live,
Linked Lists liberate us from the linear time nature of Array insertions and
deletions. We no longer have to adjust the position at which each node/element
is stored after making an insertion at a particular position in the list.
Instead, if we want to insert a new node at position i, we can simply:
- Create a new node.
- Set the new node's
nextandpreviouspointers to the nodes that live at
positionsiandi - 1, respectively. - Adjust the
nextpointer of the node that lives at positioni - 1to point
to the new node. - Adjust the
previouspointer of the node that lives at positionito point
to the new node.
And we're done, in Constant Time. No iterating across the entire list necessary.
"But hold on one second," you may be thinking. "In order to insert a new node in
the middle of the list, don't we have to lookup its position? Doesn't that take
linear time?!"
Yes, it is tempting to call insertion or deletion in the middle of a Linked List
a linear time operation since there is lookup involved. However, it's usually
the case that you'll already have a reference to the node where your desired
insertion or deletion will occur.
For this reason, we separate the Access time complexity from the
Insertion/Deletion time complexity, and formally state that Insertion and
Deletion in a Linked List are Constant Time across the board.
693.3. NOTE:
Without a reference to the node at which an insertion or deletion will occur,
due to linear time lookup, an insertion or deletion in the middle of a Linked
List will still take Linear Time, sum total.
694. Space Complexity:
694.1. Scenarios:
- We're given a Linked List, and need to operate on it.
- We've decided to create a new Linked List as part of strategy to solve some
problem.
694.2. Discussion:
It's obvious that Linked Lists have one node for every one item in the list, and
for that reason we know that Linked Lists take up Linear Space in memory.
However, when asked in an interview setting what the Space Complexity of your
solution to a problem is, it's important to recognize the difference between
the two scenarios above.
In Scenario 1, we are not creating a new Linked List. We simply need to
operate on the one given. Since we are not storing a new node for every node
represented in the Linked List we are provided, our solution is not
necessarily linear in space.
In Scenario 2, we are creating a new Linked List. If the number of nodes we
create is linearly correlated to the size of our input data, we are now
operating in Linear Space.
694.3. NOTE:
Linked Lists can be traversed both iteratively and recursively. If you choose
to traverse a Linked List recursively, there will be a recursive function call
added to the call stack for every node in the Linked List. Even if you're
provided the Linked List, as in Scenario 1, you will still use Linear Space in
the call stack, and that counts.
Stacks and Queues
Stacks and Queues aren't really "data structures" by the strict definition of
the term. The more appropriate terminology would be to call them abstract data
types (ADTs), meaning that their definitions are more conceptual and related to
the rules governing their user-facing behaviors rather than their core
implementations.
For the sake of simplicity, we'll refer to them as data structures and ADTs
interchangeably throughout the course, but the distinction is an important one
to be familiar with as you level up as an engineer.
Now that that's out of the way, Stacks and Queues represent a linear collection
of nodes or values. In this way, they are quite similar to the Linked List data
structure we discussed in the previous section. In fact, you can even use a
modified version of a Linked List to implement each of them. (Hint, hint.)
These two ADTs are similar to each other as well, but each obey their own
special rule regarding the order with which Nodes can be added and removed from
the structure.
Since we've covered Linked Lists in great length, these two data structures will
be quick and easy. Let's break them down individually in the next couple of
sections.
695. What is a Stack?
Stacks are a Last In First Out (LIFO) data structure. The last Node added to a
stack is always the first Node to be removed, and as a result, the first Node
added is always the last Node removed.
The name Stack actually comes from this characteristic, as it is helpful to
visualize the data structure as a vertical stack of items. Personally, I like to
think of a Stack as a stack of plates, or a stack of sheets of paper. This seems
to make them more approachable, because the analogy relates to something in our
everyday lives.
If you can imagine adding items to, or removing items from, a Stack
of...literally anything...you'll realize that every (sane) person naturally
obeys the LIFO rule.
We add things to the top of a stack. We remove things from the top of a
stack. We never add things to, or remove things from, the bottom of the stack.
That's just crazy.
Note: We can use JavaScript Arrays to implement a basic stack. Array#push adds
to the top of the stack and Array#pop will remove from the top of the stack.
In the exercise that follows, we'll build our own Stack class from scratch
(without using any arrays). In an interview setting, your evaluator may be okay
with you using an array as a stack.
696. What is a Queue?
Queues are a First In First Out (FIFO) data structure. The first Node added to
the queue is always the first Node to be removed.
The name Queue comes from this characteristic, as it is helpful to visualize
this data structure as a horizontal line of items with a beginning and an end.
Personally, I like to think of a Queue as the line one waits on for an amusement
park, at a grocery store checkout, or to see the teller at a bank.
If you can imagine a queue of humans waiting...again, for literally
anything...you'll realize that most people (the civil ones) naturally obey the
FIFO rule.
People add themselves to the back of a queue, wait their turn in line, and
make their way toward the front. People exit from the front of a queue, but
only when they have made their way to being first in line.
We never add ourselves to the front of a queue (unless there is no one else in
line), otherwise we would be "cutting" the line, and other humans don't seem to
appreciate that.
Note: We can use JavaScript Arrays to implement a basic queue. Array#push adds
to the back (enqueue) and Array#shift will remove from the front (dequeue). In
the exercise that follows, we'll build our own Queue class from scratch (without
using any arrays). In an interview setting, your evaluator may be okay with you
using an array as a queue.
697. Stack and Queue Properties
Stacks and Queues are so similar in composition that we can discuss their
properties together. They track the following three properties:
Stack Properties | Queue Properties:
| Stack Property | Description | Queue Property | Description | | :------------: | :---------------------------------------------------: | :------------: | :---------------------------------------------------: | | `top` | The first node in the Stack | `front` | The first node in the Queue. | | ---- | Stacks do not have an equivalent | `back` | The last node in the Queue. | | `length` | The number of nodes in the Stack; the Stack's length. | `length` | The number of nodes in the Queue; the Queue's length. | Notice that rather than having a `head` and a `tail` like Linked Lists, Stacks have a `top`, and Queues have a `front` and a `back` instead. Stacks don't have the equivalent of a `tail` because you only ever push or pop things off the top of Stacks. These properties are essentially the same; pointers to the end points of the respective List ADT where important actions way take place. The differences in naming conventions are strictly for human comprehension.Similarly to Linked Lists, the values stored inside a Stack or a Queue are actually contained within Stack Node and Queue Node instances. Stack, Queue, and Singly Linked List Nodes are all identical, but just as a reminder and for the sake of completion, these List Nodes track the following two properties:
Stack & Queue Node Properties:
| Property | Description | | :---------: | :----------------------------------------------------: | | `value` | The actual value this node represents. | | `next` | The next node in the Stack (relative to this node). | ## 698. Stack MethodsIn the exercise that follows, we will implement a Stack data structure along
with the following Stack methods:
| Type | Name | Description | Returns |
|---|---|---|---|
| Insertion | push |
Adds a Node to the top of the Stack. | Integer - New size of stack |
| Deletion | pop |
Removes a Node from the top of the Stack. | Node removed from top of Stack |
| Meta | size |
Returns the current size of the Stack. | Integer |
699. Queue Methods
In the exercise that follows, we will implement a Queue data structure along
with the following Queue methods:
| Type | Name | Description | Returns |
|---|---|---|---|
| Insertion | enqueue |
Adds a Node to the front of the Queue. | Integer - New size of Queue |
| Deletion | dequeue |
Removes a Node from the front of the Queue. | Node removed from front of Queue |
| Meta | size |
Returns the current size of the Queue. | Integer |
700. Time and Space Complexity Analysis
Before we begin our analysis, here is a quick summary of the Time and Space
constraints of each Stack Operation.
| Data Structure Operation | Time Complexity (Avg) | Time Complexity (Worst) | Space Complexity (Worst) |
|---|---|---|---|
| Access | Θ(n) |
O(n) |
O(n) |
| Search | Θ(n) |
O(n) |
O(n) |
| Insertion | Θ(1) |
O(1) |
O(n) |
| Deletion | Θ(1) |
O(1) |
O(n) |
Before moving forward, see if you can reason to yourself why each operation has
the time and space complexity listed above!
700.1. Time Complexity - Access and Search:
When the Stack ADT was first conceived, its inventor definitely did not
prioritize searching and accessing individual Nodes or values in the list. The
same idea applies for the Queue ADT. There are certainly better data structures
for speedy search and lookup, and if these operations are a priority for your
use case, it would be best to choose something else!
Search and Access are both linear time operations for Stacks and Queues, and
that shouldn't be too unclear. Both ADTs are nearly identical to Linked Lists in
this way. The only way to find a Node somewhere in the middle of a Stack or a
Queue, is to start at the top (or the back) and traverse downward (or
forward) toward the bottom (or front) one node at a time via each Node's
next property.
This is a linear time operation, O(n).
700.2. Time Complexity - Insertion and Deletion:
For Stacks and Queues, insertion and deletion is what it's all about. If there
is one feature a Stack absolutely must have, it's constant time insertion and
removal to and from the top of the Stack (FIFO). The same applies for Queues,
but with insertion occurring at the back and removal occurring at the front
(LIFO).
Think about it. When you add a plate to the top of a stack of plates, do you
have to iterate through all of the other plates first to do so? Of course not.
You simply add your plate to the top of the stack, and that's that. The concept
is the same for removal.
Therefore, Stacks and Queues have constant time Insertion and Deletion via their
push and pop or enqueue and dequeue methods, O(1).
700.3. Space Complexity:
The space complexity of Stacks and Queues is very simple. Whether we are
instantiating a new instance of a Stack or Queue to store a set of data, or we
are using a Stack or Queue as part of a strategy to solve some problem, Stacks
and Queues always store one Node for each value they receive as input.
For this reason, we always consider Stacks and Queues to have a linear space
complexity, O(n).
701. When should we use Stacks and Queues?
At this point, we've done a lot of work understanding the ins and outs of Stacks
and Queues, but we still haven't really discussed what we can use them for. The
answer is actually...a lot!
For one, Stacks and Queues can be used as intermediate data structures while
implementing some of the more complicated data structures and methods we'll see
in some of our upcoming sections.
For example, the implementation of the breadth-first Tree traversal algorithm
takes advantage of a Queue instance, and the depth-first Graph traversal
algorithm exploits the benefits of a Stack instance.
Additionally, Stacks and Queues serve as the essential underlying data
structures to a wide variety of applications you use all the time. Just to name
a few:
701.1. Stacks:
- The Call Stack is a Stack data structure, and is used to manage the order of
function invocations in your code. - Browser History is often implemented using a Stack, with one great example
being the browser history object in the very popular React Router module. - Undo/Redo functionality in just about any application. For example:
- When you're coding in your text editor, each of the actions you take on your
keyboard are recorded bypushing that event to a Stack. - When you hit [cmd + z] to undo your most recent action, that event is
poped off the Stack, because the last event that occured should be the
first one to be undone (LIFO). - When you hit [cmd + y] to redo your most recent action, that event is
pushed back onto the Stack.
- When you're coding in your text editor, each of the actions you take on your
701.2. Queues:
- Printers use a Queue to manage incoming jobs to ensure that documents are
printed in the order they are received. - Chat rooms, online video games, and customer service phone lines use a Queue
to ensure that patrons are served in the order they arrive.- In the case of a Chat Room, to be admitted to a size-limited room.
- In the case of an Online Multi-Player Game, players wait in a lobby until
there is enough space and it is their turn to be admitted to a game. - In the case of a Customer Service Phone Line...you get the point.
- As a more advanced use case, Queues are often used as components or services
in the system design of a service-oriented architecture. A very popular and
easy to use example of this is Amazon's Simple Queue Service (SQS), which is a
part of their Amazon Web Services (AWS) offering.- You would add this service to your system between two other services, one
that is sending information for processing, and one that is receiving
information to be processed, when the volume of incoming requests is high
and the integrity of the order with which those requests are processed must
be maintained.
- You would add this service to your system between two other services, one
Linked List Project
This project contains a skeleton for you to implement a linked list. This is a
test-driven project. Run the tests and read the top-most error. If it's not
clear what is failing, open the test/test.js file to figure out what the
test is expecting. Make the top-most test pass.
Keep making the top-most test pass until all tests pass.
702. Instructions
- Clone the project from
https://github.com/appacademy-starters/data-structures-linked-list-starter. cdinto the project foldernpm installto install dependencies in the project root directorynpm testto run the specs- You can view the test cases in
/test/test.js. Your job is to write code in
the/lib/linked_list.jsthat implements theNodeandLinkedListclasses
to make the tests pass.
Stack Project
This project contains a skeleton for you to implement a stack. This is a
test-driven project. Run the tests and read the top-most error. If it's not
clear what is failing, open the test/test.js file to figure out what the
test is expecting. Make the top-most test pass.
Keep making the top-most test pass until all tests pass.
703. Instructions
- Clone the project from
https://github.com/appacademy-starters/data-structures-stack-starter. cdinto the project foldernpm installto install dependencies in the project root directorynpm testto run the specs- You can view the test cases in
/test/test.js. Your job is to write code in
the/lib/stack.jsthat implements theNodeandStackclasses
to make the tests pass.
Queue Project
This project contains a skeleton for you to implement a queue. This is a
test-driven project. Run the tests and read the top-most error. If it's not
clear what is failing, open the test/test.js file to figure out what the
test is expecting. Make the top-most test pass.
Keep making the top-most test pass until all tests pass.
704. Instructions
- Clone the project from
https://github.com/appacademy-starters/data-structures-queue-starter. cdinto the project foldernpm installto install dependencies in the project root directorynpm testto run the specs- You can view the test cases in
/test/test.js. Your job is to write code in
the/lib/queue.jsthat implements theNodeandQueueclasses
to make the tests pass.
WEEK-07 DAY-5
Heaps
Graphs and Heaps Learning Objectives
The objective of this lesson is for you to become comfortable with
implementing common data structures. This is important because questions about
data structures are incredibly likely to be interview questions for software
engineers from junior to senior levels. Moreover, understanding how different
data structures work will influence the libraries and frameworks that you choose
when writing software.
When you are done, you will be able to:
- Explain and implement a Heap.
- Explain and implement a Graph.table with
implementing common data structures. This is important because questions about
data structures are incredibly likely to be interview questions for software
engineers from junior to senior levels. Moreover, understanding how different
data structures work will influence the libraries and frameworks that you choose
when writing software.
When you are done, you will be able to: - Explain and implement a Heap.
- Explain and implement a Graph.
Introduction to Heaps
Let's explore the Heap data structure! In particular, we'll explore Binary
Heaps. A binary heap is a type of binary tree. However, a heap is not a binary
search tree. A heap is a partially ordered data structure, whereas a BST has
full order. In a heap, the root of the tree will be the maximum (max heap) or
the minimum (min heap). Below is an example of a max heap:
Notice that the heap above does not follow search tree property where all values
to the left of a node are less and all values to the right are greater or equal.
Instead, the max heap invariant is:
- given any node, its children must be less than or equal to the node
This constraint makes heaps much more relaxed in structure compared to a search
tree. There is no guaranteed order among "siblings" or "cousins" in a heap. The
relationship only flows down the tree from parent to child. In other words, in a
max heap, a node will be greater than all of it's children, it's grandchildren,
its great-grandchildren, and so on. A consequence of this is the root being the
absolute maximum of the entire tree. We'll be exploring max heaps together, but
these arguments are symmetric for a min heap.
704.1. Complete Trees
We'll eventually implement a max heap together, but first we'll need to take a
quick detour. Our design goal is to implement a data structure with efficient
operations. Since a heap is a type of binary tree, recall the circumstances
where we had a "best case" binary tree. We'll need to ensure our heap has
minimal height, that is, it must be a balanced tree!
Our heap implementation will not only be balanced, but it will also be
complete. To clarify, every complete tree is also a balanced tree, but
not every balanced tree is also complete. Our definition of a complete tree is:
- a tree where all levels have the maximal number of nodes, except the bottom
the level - AND the bottom level has all nodes filled as far left as possible
Here are few examples of the definition:
Notice that the tree is on the right fails the second point of our definition
because there is a gap in the last level. Informally, you can think about a
complete tree as packing its nodes as closely together as possible. This line of
thinking will come into play when we code heaps later.
704.2. When to Use Heaps?
Heaps are the most useful when attacking problems that require you to "partially
sort" data. This usually takes form in problems that have us calculate the
largest or smallest n numbers of a collection. For example: What if you were
asked to find the largest 5 numbers in an array in linear time, O(n)? The
fastest sorting algorithms are O(n logn), so none of those algorithms will be
good enough. However, we can use a heap to solve this problem in linear time.
We'll analyze this in depth when we implement a heap in the next section!
One of the most common uses of a binary heap is to implement a "[priority queue]".
We learned before that a queue is a FIFO (First In, First Out) data structure.
With a priority queue, items are removed from the queue based on a priority number.
The priority number is used to place the items into the heap and pull them out
in the correct priority order!
[priority queue]:https://en.wikipedia.org/wiki/Priority_queue
705. Binary Heap Implementation
Now that we are familiar with the structure of a heap, let's implement one! What
may be surprising is that the usual way to implement a heap is by simply using an
array. That is, we won't need to create a node class with pointers. Instead,
each index of the array will represent a node, with the root being at index 1.
We'll avoid using index 0 of the array so our math works out nicely. From this
point, we'll use the following rules to interpret the array as a heap:
- index
irepresents a node in the heap - the left child of node
ican be found at index2 * i - the right child of code
ican be found at index2 * i + 1
In other words, the array[null, 42, 32, 24, 30, 9, 20, 18, 2, 7]represents
the heap below. Take a moment to analyze how the array indices work out to
represent left and right children.
Pretty clever math right? We can also describe the relationship from child to
parent node. Say we are given a node at indexiin the heap, then it's parent
is found at indexMath.floor(i / 2).
It's useful to visualize heap algorithms using the classic image of nodes and
edges, but we'll translate that into array index operations.
705.1. Insert
What's a heap if we can't add data into it? We'll need a insert method
that will add a new value into the heap without voiding our heap property. In
our MaxHeap, the property states that a node must be greater than its
children.
705.1.1. Visualizing our heap as a tree of nodes:
- We begin an insertion by adding the new node to the bottom leaf level of the
heap, preferring to place the new node as far left in the level as possible.
This ensures the tree remains complete. - Placing the new node there may momentarily break our heap property, so we
need to restore it by moving the node up the tree into a legal position.
Restoring the heap property is a matter of continually swapping the new node
with it's parent while it's parent contains a smaller value. We refer to this
process assiftUp
705.1.2. Translating that into array operations:
pushthe new value to the end of the array- continually swap that value toward the front of the array (following our
child-parent index rules) until heap property is restored
705.2. DeleteMax
This is the "fetch" operation of a heap. Since we maintain heap property
throughout, the root of the heap will always be the maximum value. We want to
delete and return the root, whilst keeping the heap property.
705.2.1. Visualizing our heap as a tree of nodes:
- We begin the deletion by saving a reference to the root value (the max) to
return later. We then locate the right most node of the bottom level and copy
it's value into the root of the tree. We easily delete the duplicate node at
the leaf level. This ensures the tree remains complete. - Copying that value into the root may momentarily break our heap property, so
we need to restore it by moving the node down the tree into a legal position.
Restoring the heap property is a matter of continually swapping the node with
the greater of it's two children. We refer to this process assiftDown.
705.2.2. Translating that into array operations:
- The root is at index 1, so save it to return later. The right most node of
the bottom level would just be the very last element of the array. Copy the
last element into index 1, and pop off the last element (since it now appears
at the root). - Continually swap the new root toward the back of the array (following our
parent-child index rules) until heap property is restored. A node can have
two children, so we should always prefer to swap with the greater child.
705.3. Time Complexity Analysis
- insert:
O(log(n)) - deleteMax:
O(log(n))
Recall that our heap will be a complete/balanced tree. This means it's height is
log(n)wherenis the number of items. BothinsertanddeleteMaxhave a
time complexity oflog(n)because ofsiftUpandsiftDownrespectively. In
worst caseinsert, we will have tosiftUpa leaf all the way to the root of
the tree. In the worst casedeleteMax, we will have tosiftDownthe new root
all the way down to the leaf level. In either case, we'll have to traverse the
full height of the tree,log(n).
705.3.1. Array Heapify Analysis
Now that we have established O(log(n)) for a single insertion, let's analyze
the time complexity for turning an array into a heap (we call this heapify,
coming in the next project 😃). The algorithm itself is simple, just perform an
insert for every element. Since there are n elements and each insert
requires log(n) time, our total complexity for heapify is O(nlog(n))... Or
is it? There is actually a tighter bound on heapify. The proof requires some
math that you won't find valuable in your job search, but do understand that the
true time complexity of heapify is amortized O(n). Amortized refers to the
fact that our analysis is about performance over many insertions.
705.4. Space Complexity Analysis
O(n), since we use a single array to store heap data.heap, let's implement one! What
may be surprising is that the usual way to implement a heap is by simply using an
array. That is, we won't need to create a node class with pointers. Instead,
each index of the array will represent a node, with the root being at index 1.
We'll avoid using index 0 of the array so our math works out nicely. From this
point, we'll use the following rules to interpret the array as a heap:- index
irepresents a node in the heap - the left child of node
ican be found at index2 * i - the right child of code
ican be found at index2 * i + 1
In other words, the array[null, 42, 32, 24, 30, 9, 20, 18, 2, 7]represents
the heap below. Take a moment to analyze how the array indices work out to
represent left and right children.
Pretty clever math right? We can also describe the relationship from child to
parent node. Say we are given a node at indexiin the heap, then it's parent
is found at indexMath.floor(i / 2).
It's useful to visualize heap algorithms using the classic image of nodes and
edges, but we'll translate that into array index operations.
705.5. Insert
What's a heap if we can't add data into it? We'll need a insert method
that will add a new value into the heap without voiding our heap property. In
our MaxHeap, the property states that a node must be greater than its
children.
705.5.1. Visualizing our heap as a tree of nodes:
- We begin an insertion by adding the new node to the bottom leaf level of the
heap, preferring to place the new node as far left in the level as possible.
This ensures the tree remains complete. - Placing the new node there may momentarily break our heap property, so we
need to restore it by moving the node up the tree into a legal position.
Restoring the heap property is a matter of continually swapping the new node
with it's parent while it's parent contains a smaller value. We refer to this
process assiftUp
705.5.2. Translating that into array operations:
pushthe new value to the end of the array- continually swap that value toward the front of the array (following our
child-parent index rules) until heap property is restored
705.6. DeleteMax
This is the "fetch" operation of a heap. Since we maintain heap property
throughout, the root of the heap will always be the maximum value. We want to
delete and return the root, whilst keeping the heap property.
705.6.1. Visualizing our heap as a tree of nodes:
- We begin the deletion by saving a reference to the root value (the max) to
return later. We then locate the right most node of the bottom level and copy
it's value into the root of the tree. We easily delete the duplicate node at
the leaf level. This ensures the tree remains complete. - Copying that value into the root may momentarily break our heap property, so
we need to restore it by moving the node down the tree into a legal position.
Restoring the heap property is a matter of continually swapping the node with
the greater of it's two children. We refer to this process assiftDown.
705.6.2. Translating that into array operations:
- The root is at index 1, so save it to return later. The right most node of
the bottom level would just be the very last element of the array. Copy the
last element into index 1, and pop off the last element (since it now appears
at the root). - Continually swap the new root toward the back of the array (following our
parent-child index rules) until heap property is restored. A node can have
two children, so we should always prefer to swap with the greater child.
705.7. Time Complexity Analysis
- insert:
O(log(n)) - deleteMax:
O(log(n))
Recall that our heap will be a complete/balanced tree. This means it's height is
log(n)wherenis the number of items. BothinsertanddeleteMaxhave a
time complexity oflog(n)because ofsiftUpandsiftDownrespectively. In
worst caseinsert, we will have tosiftUpa leaf all the way to the root of
the tree. In the worst casedeleteMax, we will have tosiftDownthe new root
all the way down to the leaf level. In either case, we'll have to traverse the
full height of the tree,log(n).
705.7.1. Array Heapify Analysis
Now that we have established O(log(n)) for a single insertion, let's analyze
the time complexity for turning an array into a heap (we call this heapify,
coming in the next project 😃). The algorithm itself is simple, just perform an
insert for every element. Since there are n elements and each insert
requires log(n) time, our total complexity for heapify is O(nlog(n))... Or
is it? There is actually a tighter bound on heapify. The proof requires some
math that you won't find valuable in your job search, but do understand that the
true time complexity of heapify is amortized O(n). Amortized refers to the
fact that our analysis is about performance over many insertions.
705.8. Space Complexity Analysis
O(n), since we use a single array to store heap data.
706. Heap Sort
We've emphasized heavily that heaps are a partially ordered data structure. However, we can still
leverage heaps in a sorting algorithm to end up with fully sorted array. The strategy is simple using our previous
MaxHeap implementation:
- build the heap:
insertall elements of the array into aMaxHeap - construct the sorted list: continue to
deleteMaxuntil the heap is empty, every deletion will return the next element in decreasing order
The code is straightforward:
// assuming our `MaxHeap` from the previous section function heapSort(array) { // Step 1: build the heap let heap = new MaxHeap(); array.forEach(num => heap.insert(num)); // Step 2: constructed the sorted array let sorted = []; while (heap.array.length > 1) { sorted.push(heap.deleteMax()); } return sorted; }
706.1. Time Complexity Analysis: O(nlog(n))
nis the size of the input array- step-1 requires
O(n)time as previously discussed - step-2's while loop requires
nsteps in isolation and eachdeleteMaxwill requirelog(n)steps to restore max heap property (due to sifting-down). This means step 2 costsO(nlog(n)) - the total time complexity of the algorithm is
O(n + nlog(n)) = O(nlog(n))
706.2. Space Complexity Analysis:
So heapSort performs as fast as our other efficient sorting algorithms, but how does it fair in
space complexity? Our implementation above requires an extra O(n) amount of space because the heap is
maintained separately from the input array. If we can figure out a way to do all of these heap operations in-place
we can get constant O(1) space! Let's work on this now.
707. In-Place Heap Sort
The in-place algorithm will have the same 2 steps, but it will differ in the implementation details. Since we need to have all operations take place in a single array, we're going to have to denote two regions of the array. That is, we'll need a heap region and a sorted region. We begin by turning the entire region into a heap. Then we continually delete max to get the next element in increasing order. As the heap region shrinks, the sorted region will grow.
707.1. Heapify
Let's focus on designing step-1 as an in-place algorithm. In other words, we'll need to reorder
elements of the input array so they follow max heap property. This is usually refered to as heapify.
Our heapify will use much of the same logic as MaxHeap#siftDown.
// swap the elements at indices i and j of array function swap(array, i, j) { [ array[i], array[j] ] = [ array[j], array[i] ]; } // sift-down the node at index i until max heap property is restored // n represents the size of the heap function heapify(array, n, i) { let leftIdx = 2 * i + 1; let rightIdx = 2 * i + 2; let leftVal = array[leftIdx]; let rightVal = array[rightIdx]; if (leftIdx >= n) leftVal = -Infinity; if (rightIdx >= n) rightVal = -Infinity; if (array[i] > leftVal && array[i] > rightVal) return; let swapIdx; if (leftVal < rightVal) { swapIdx = rightIdx; } else { swapIdx = leftIdx; } swap(array, i, swapIdx); heapify(array, n, swapIdx); }
We weren't kidding when we said this would be similar to MaxHeap#siftDown. If you are not
convinced, flip to the previous section and take a look! The few differences we want to emphasize are:
- Given a node at index
i, it's left index is2 * i + 1and it's right index is2 * i + 2- Using these as our child index formulas will allow us to avoid using a placeholder element at index 0. The root of the heap will be at index 0.
- The parameter
nrepresents the number of nodes in the heap- You may feel that
array.lengthalso represents the number of nodes in the heap. That is true, but only in step-1. Later we will need to dynamically state the size of the heap. Remember, we are trying to do this without creating any extra arrays. We'll need to separate the heap and sorted regions of the array andnwill dictate the end of the heap.
- You may feel that
- We created a separate
swaphelper function.- Nothing fancy here. Swapping will be valuable in step-2 of the algorithm as well, so we'll want to
keep our code DRY (don't repeat yourself).
To correctly convert the input array into a heap, we'll need to callheapifyon children nodes before their parents. This is easy to do, just callheapifyon each element right-to-left in the array:
- Nothing fancy here. Swapping will be valuable in step-2 of the algorithm as well, so we'll want to
keep our code DRY (don't repeat yourself).
function heapSort(array) { // heapify the tree from the bottom up for (let i = array.length - 1; i >= 0; i--) { heapify(array, array.length, i); } // the entire array is now a heap // ... }
Nice! Now the elements of the array have been moved around to obey max heap property.
707.2. Construct the Sorted Array
To put everything together, we'll need to continually "delete max" from our heap. From our previous lecture, we learned the steps for deletion are to swap the last node of the heap into the root and then sift the new root down to restore max heap property. We'll follow the same logic here, except we'll need to account for the sorted region of the array. The array will contain the heap region in the front and the sorted region at the rear:
function heapSort(array) { // heapify the tree from the bottom up for (let i = array.length - 1; i >= 0; i--) { heapify(array, array.length, i); } // the entire array is now a heap // until the heap is empty, continue to "delete max" for (let endOfHeap = array.length - 1; endOfHeap >= 0; endOfHeap--) { // swap the root of the heap with the last element of the heap, // this effecively shrinks the heap by one and grows the sorted array by one swap(array, endOfHeap, 0); // sift down the new root, but not past the end of the heap heapify(array, endOfHeap, 0); } return array; }
You'll definitely want to watch the lecture that follows this reading to get a visual of how the array is divided into the heap and sorted regions.
707.3. In-Place Heap Sort JavaScript Implementation
Here is the full code for your reference:
function heapSort(array) { for (let i = array.length - 1; i >= 0; i--) { heapify(array, array.length, i); } for (let endOfHeap = array.length - 1; endOfHeap >= 0; endOfHeap--) { swap(array, endOfHeap, 0); heapify(array, endOfHeap, 0); } return array; } function heapify(array, n, i) { let leftIdx = 2 * i + 1; let rightIdx = 2 * i + 2; let leftVal = array[leftIdx]; let rightVal = array[rightIdx]; if (leftIdx >= n) leftVal = -Infinity; if (rightIdx >= n) rightVal = -Infinity; if (array[i] > leftVal && array[i] > rightVal) return; let swapIdx; if (leftVal < rightVal) { swapIdx = rightIdx; } else { swapIdx = leftIdx; } swap(array, i, swapIdx); heapify(array, n, swapIdx); } function swap(array, i, j) { [ array[i], array[j] ] = [ array[j], array[i] ]; }
Heaps Project
This project contains a skeleton for you to implement a max heap. This is a
test-driven project. Run the tests and read the top-most error. If it's not
clear what is failing, open the test/test.js file to figure out what the
test is expecting. Make the top-most test pass.
Keep making the top-most test pass until all tests pass.
708. Instructions
- Clone the project from
https://github.com/appacademy-starters/data-structures-max-heap-starter. cdinto the project foldernpm installto install dependencies in the project root directorynpm testto run the specs- You can view the test cases in
test/test.js. Your job is to write code in- lib/max_heap.js to implement the
MaxHeapclass - lib/is_heap.js to implement the
isMaxHeapfunction - lib/leet_code_215.js to implement the
findKthLargestfunction located
at https://leetcode.com/problems/kth-largest-element-in-an-array/
- lib/max_heap.js to implement the
709. CSS
WEEK 7
Data Structures and Algorithms
GitHub Profile and Projects Learning Objectives
- Improving Your Profile Using GitHub
- Your GitHub Identity
Big O Learning Objectives
Memoization And Tabulation Learning Objectives - Recursion Videos
- Curating Complexity: A Guide to Big-O Notation
- Common Complexity Classes
- Memoization
- Tabulation
- Analysis of Linear Search
- Analysis of Binary Search
- Analysis of the Merge Sort
- Analysis of Bubble Sort
- LeetCode.com
- Memoization Problems
- Tabulation Problems
Sorting Algorithms Learning Objectives - Bubble Sort
- Selection Sort
- Insertion Sort
- Merge Sort
- Quick Sort
- Binary Search
- Bubble Sort Analysis
- Selection Sort Analysis
- Insertion Sort Analysis
- Merge Sort Analysis
- Quick Sort Analysis
- Binary Search Analysis
- Practice: Bubble Sort
- Practice: Selection Sort
- Practice: Insertion Sort
- Practice: Merge Sort
- Practice: Quick Sort
- Practice: Binary Search
Lists, Stacks, and Queues Learning Objectives - Linked Lists
- Stacks and Queues
- Linked List Project
- Stack Project
- Queue Project
Graphs and Heaps Learning Objectives - Introduction to Heaps
- Heaps Project
WEEK-07 DAY-1
Your GitHub Identity
GitHub Profile and Projects Learning Objectives
GitHub is a powerful platform that hiring managers and other developers can use
to see how you create software.
- You will be able to participate in the social aspects of GitHub by starring
repositories, following other developers, and reviewing your followers - You will be able to use Markdown to write code snippets in your README files
- You will craft your GitHub profile and contribute throughout the course by
keeping your "gardens green" - You will be able to identify the basics of a good Wiki entries for proposals
and minimum viable products - You will be able to identify the basics of a good project README that includes
technologies at the top, images, descriptions and code snippetsing managers and other developers can use
to see how you create software. - You will be able to participate in the social aspects of GitHub by starring
repositories, following other developers, and reviewing your followers - You will be able to use Markdown to write code snippets in your README files
- You will craft your GitHub profile and contribute throughout the course by
keeping your "gardens green" - You will be able to identify the basics of a good Wiki entries for proposals
and minimum viable products - You will be able to identify the basics of a good project README that includes
technologies at the top, images, descriptions and code snippets
Improving Your Profile Using GitHub
By now you are likely familiar with certain aspects of GitHub. You know how to
create repos and add and commit code, but there is much, much more that GitHub
can do.
GitHub is an online community of software engineers - a place where we not only
house our code, but share ideas, express feedback, gain inspiration, and present
ourselves as competent, qualified software engineers. Yes, this is a place to
manage version control and collaborate on projects, but in this module we are
going to discuss how to harness the power of GitHub to your advantage.
Aside from your actual code repositories, there are several other sections that
represent who you are as a developer.
- Followers and Following: Think of this as your “friends’ list on GitHub.
If you see a social media profile of a person with two friends, what are you
going to think? Though you’re not expected to have hundreds of followers on
GitHub, you should follow your peers and encourage them to follow you to show
industry engineers that there are people who would vouch for your skillset. - Stars: These are the “likes” on your GitHub profile. Similar to
encouraging others to follow you and following them, you should also “star”
their popular repositories. By the end of the curriculum, you should have
several stars on each of your portfolio projects. - Green Gardens: This is birds-eye view of your “newsfeed” if your newsfeed
reflected the number of commits that you were making. If you are very active
on GitHub, your activity squares, AKA “green gardens” will be verdant and
green. This tells anyone who views your profile that you are actively coding
and engaged with your identity as a software engineer. However, if your “green
gardens” are not green, this suggests that you are not actively coding and
therefore perhaps not the best candidates for a development job. - Photo and brief intro: This is fairly straight-forward and should mirror
the photo from you LinkedIn. Choose a professional photo and brief description
that highlights the fact that you are a software engineer.
Your followers, stars, green gardens, and photo represent who you are as a
developer and should be constantly monitored and updated. It can be easy to fall
into the trap of not pushing commits to GitHub or keeping your commits on your
local machine - be careful to avoid these tendencies because they are
counter-productive to your candidacy as a software engineer.
Not only is GitHub as representation of you as a developer, but it is also a
place to present proposals, recaps, and provide additional project context. Two
features that you will soon become familiar with are Wikis and READMEs.
710. Wikis (pre-project)
Wikis are features of PUBLIC repositories on GitHub and are where your design
documents, explanation of technologies used and insight into what your repo
contains will live.
Wikis are created at the beginning of any significant project and should be
updated as your project evolves.
To create or update your repository’s Wiki, click on the “Wiki” tab in your repo
header and click “Edit” to update your home page and “New Page” to add a new
section.
Best practices for Wiki creation:
- List of technologies in a visually accessible place
- Separate design documents into their own sections
- Write clearly and concisely - grammar and spelling matters!
Design documents will become very important when you begin your projects, but
for now just know that you will spend time creating a solid Wiki in order to
facilitate a smooth development process. One of the most important aspects of
your Wiki will be the outline of your project’s features and the minimum
viable product (MVP).
As you begin any project, you will consider what constitutes a “final product”
and break down features into bite-sized “minimum viable products.” For example,
if you intend to create an a/A version of Twitter, your list of MVPs may
include: - Users are able to log into application
- Users are able to create, edit, and delete tweets
- Users are able to follow other users and see their tweets
- Users are able to like other users tweets
- Users are able to comment on other users tweets
In order for your project to stay on track, it is very important to break down
your features and tackle one MVP at a time. All of the MVPs combined result in a
final application.
Your MVP breakdown will live in your project’s Wiki and is subject to evolution.
As your project comes to life, your MVPs may merge, divide, or become
irrelevant. Update your Wiki as things change and continue to referring to it as
your go through the development process.
711. README files (post-project)
READMEs are text files that introduce and explain a project. Typically, READMEs
are created and completed when you are ready to roll your application into
production. READMEs should contain information about two impressive features
that you implemented in your project, the technologies used, how to install the
program, and anything else that makes you stand out as a software developer.
Think of READMEs as the “first impression” that prospective employers,
colleagues, and peers will have of you as a developer. You want their first
impression to be “wow, this person is thorough and this project sounds
interesting,” not “oh no, typos, missing instructions, and snores-galore.”
When it is time to create your README, you should allocate about three hours to
guarantee you have enough time to make your project shine.
README.md files are written using markdown syntax (.md) which makes them appear
nicely on-screen. Markdown is a lightweight markup language with plain text
formatting syntax. It’s a very simple language used to create beautiful and
presentable README and Wiki files for GitHub. There are many good resources out
there for creating markdown documents, but here are two of our favorite:
- GitHub's guide to [Mastering Markdown]
- [Repository with a collection of examples]
- [Browser side-by-side markdown and on-screen program] (this is a favorite, code
here and copy markdown into GitHub).
README Best Practices - Divide your README into distinct sections
- List the technologies used at the top of your README for increased visibility
- Include nice pictures or Gifs to show and/or demonstrate how things work
- Include code snippets
- Provide instructions for how to install project (if applicable)
- Include link to the live site
712. Wrap up
The bottom line is that the way you represent yourself on GitHub matters! Take
the time you need to write clearly, accurately reflect your process and
applications, and immerse yourself in the diverse and interesting pool of
software professionals who work and play on GitHub.
[Mastering Markdown]: https://guides.github.com/features/mastering-markdown/
[Repository with a collection of examples]: https://github.com/matiassingers/awesome-readme
[Browser side-by-side markdown and on-screen program]: https://stackedit.io/app#
Your GitHub Identity
It is hard to write about yourself. But, today, you need to do that. This is a
day of starting to establish how other software developers and hiring managers
will perceive you.
Go to your GitHub profile page. Edit your profile to contain your description,
"App Academy (@appacademy)" as your current company, your location (if you
desire), and your Web site.
Now, make a personal Web site for your GitHub profile. You can do that using
GitHub Pages. Follow the instructions at [Getting Started with GitHub Pages] to
create your site, add a theme, create a custom 404, and use HTTPS (if you want).
Spend time writing about yourself. Like you read earlier, this is hard. But,
tell the story of you in a way that will engage people.
Now, go follow all of your class mates and star their personal Web site
repository, if they created one.
If you want to get really fancy and set up a blog, you can use a "static site
generator" known as Jekyll to do that. It's a Ruby-based program; however,
you don't need to know Ruby to use it. All you have to be able to do is use
command line programs, something you're really getting to be a pro at! To do
this, follow the well-documented instructions at [Setting up a GitHub Pages site
with Jekyll].
[Getting Started with GitHub Pages]: https://help.github.com/en/github/working-with-github-pages/getting-started-with-github-pages
[Setting up a GitHub Pages site with Jekyll]: https://help.github.com/en/github/working-with-github-pages/setting-up-a-github-pages-site-with-jekyll
WEEK-07 DAY-2
Big-O and Optimizations
Big O Learning Objectives
The objective of this lesson is get you comfortable with identifying the
time and space complexity of code you see. Being able to diagnose time
complexity for algorithms is an essential for interviewing software engineers.
At the end of this, you will be able to
- Order the common complexity classes according to their growth rate
- Identify the complexity classes of common sort methods
- Identify complexity classes of codeable with identifying the
time and space complexity of code you see. Being able to diagnose time
complexity for algorithms is an essential for interviewing software engineers.
At the end of this, you will be able to - Order the common complexity classes according to their growth rate
- Identify the complexity classes of common sort methods
- Identify complexity classes of code
Memoization And Tabulation Learning Objectives
The objective of this lesson is to give you a couple of ways to optimize a
computation (algorithm) from a higher complexity class to a lower complexity
class. Being able to optimize algorithms is an essential for interviewing
software engineers.
At the end of this, you will be able to
- Apply memoization to recursive problems to make them less than polynomial
time. - Apply tabulation to iterative problems to make them less than polynomial
time.** is to give you a couple of ways to optimize a
computation (algorithm) from a higher complexity class to a lower complexity
class. Being able to optimize algorithms is an essential for interviewing
software engineers.
At the end of this, you will be able to - Apply memoization to recursive problems to make them less than polynomial
time. - Apply tabulation to iterative problems to make them less than polynomial
time.
Recursion Videos
A lot of algorithms that we use in the upcoming days will use recursion. The
next two videos are just helpful reminders about recursion so that you can get
that thought process back into your brain.
Big-O By Colt Steele
Colt Steele provides a very nice, non-mathy introduction to Big-O notation.
Please watch this so you can get the easy introduction. Big-O is, by its very
nature, math based. It's good to get an understanding before jumping in to
math expressions.
[Complete Beginner's Guide to Big O Notation] by Colt Steele.
[Complete Beginner's Guide to Big O Notation]: https://www.youtube.com/embed/kS_gr2_-ws8
Curating Complexity: A Guide to Big-O Notation
As software engineers, our goal is not just to solve problems. Rather, our goal
is to solve problems efficiently and elegantly. Not all solutions are made
equal! In this section we'll explore how to analyze the efficiency of algorithms
in terms of their speed (time complexity) and memory consumption (space
complexity).
In this article, we'll use the word efficiency to describe the amount of
resources a program needs to execute. The two resources we are concerned with
are time and space. Our goal is to minimize the amount of time and space
that our programs use.
When you finish this article you will be able to:
- explain why computer scientists use Big-O notation
- simplify a mathematical function into Big-O notation
713. Why Big-O?
Let's begin by understanding what method we should not use when describing the
efficiency of our algorithms. Most importantly, we'll want to avoid using
absolute units of time when describing speed. When the software engineer
exclaims, "My function runs in 0.2 seconds, it's so fast!!!", the computer
scientist is not impressed. Skeptical, the computer scientist asks the following
questions:
- What computer did you run it on? Maybe the credit belongs to the hardware
and not the software. Some hardware architectures will be better for certain
operations than others. - Were there other background processes running on the computer that could have
effected the runtime? It's hard to control the environment during
performance experiments. - Will your code still be performant if we increase the size of the input? For
example, sorting 3 numbers is trivial; but how about a million numbers?
The job of the software engineer is to focus on the software detail and not
necessarily the hardware it will run on. Because we can't answer points 1 and 2
with total certainty, we'll want to avoid using concrete units like
"milliseconds" or "seconds" when describing the efficiency of our algorithms.
Instead, we'll opt for a more abstract approach that focuses on point 3. This
means that we should focus on how the performance of our algorithm is affected
by increasing the size of the input. In other words, how does our performance
scale?
The argument above focuses on time, but a similar argument could also be
made for space. For example, we should not analyze our code in terms of the
amount of absolute kilobytes of memory it uses, because this is dependent on
the programming language.
714. Big-O Notation
In Computer Science, we use Big-O notation as a tool for describing the
efficiency of algorithms with respect to the size of the input argument(s). We
use mathematical functions in Big-O notation, so there are a few big picture
ideas that we'll want to keep in mind:
- The function should be defined in terms of the size of the input(s).
- A smaller Big-O function is more desirable than a larger one. Intuitively,
we want our algorithms to use a minimal amount of time and space. - Big-O describes the worst-case scenario for our code, also known as the
upper bound. We prepare our algorithm for the worst case, because the
best case is a luxury that is not guaranteed. - A Big-O function should be simplified to show only its most dominant
mathematical term.
The first 3 points are conceptual, so they are easy to swallow. However, point 4
is typically the biggest source of confusion when learning the notation. Before
we apply Big-O to our code, we'll need to first understand the underlying math
and simplification process.
714.1. Simplifying Math Terms
We want our Big-O notation to describe the performance of our algorithm with
respect to the input size and nothing else. Because of this, we should to
simplify our Big-O functions using the following rules:
- Simplify Products: if the function is a product of many terms, we drop the
terms that don't depend on the size of the input. - Simplify Sums: if the function is a sum of many terms, we keep the term
with the largest growth rate and drop the other terms.
We'll look at these rules in action, but first we'll define a few things: - n is the size of the input
- T(f) refers to an unsimplified mathematical function
- O(f) refers to the Big-O simplified mathematical function
714.2. Simplifying a Product
If a function consists of a product of many factors, we drop the factors that
don't depend on the size of the input, n. The factors that we drop are called
constant factors because their size remains consistent as we increase the size
of the input. The reasoning behind this simplification is that we make the input
large enough, the non-constant factors will overshadow the constant ones. Below
are some examples:
| Unsimplified | Big-O Simplified |
|---|---|
| T( 5 * n2 ) | O( n2 ) |
| T( 100000 * n ) | O( n ) |
| T( n / 12 ) | O( n ) |
| T( 42 * n * log(n) ) | O( n * log(n) ) |
| T( 12 ) | O( 1 ) |
Note that in the third example, we can simplify T( n / 12 ) to O( n )
because we can rewrite a division into an equivalent multiplication. In other
words, T( n / 12 ) = T( 1/12 * n ) = O( n ).
714.3. Simplifying a Sum
If the function consists of a sum of many terms, we only need to show the term
that grows the fastest, relative to the size of the input. The reasoning behind
this simplification is that if we make the input large enough, the fastest
growing term will overshadow the other, smaller terms. To understand which term
to keep, you'll need to recall the relative size of our common math terms from
the previous section. Below are some examples:
| Unsimplified | Big-O Simplified |
|---|---|
| T( n3 + n2 + n ) | O( n3 ) |
| T( log(n) + 2n ) | O( 2n ) |
| T( n + log(n) ) | O( n ) |
| T( n! + 10n ) | O( n! ) |
714.4. Putting it all together
The product and sum rules are all we'll need to Big-O simplify any math
functions. We just apply the product rule to drop all constants, then apply the
sum rule to select the single most dominant term.
| Unsimplified | Big-O Simplified |
|---|---|
| T( 5n2 + 99n ) | O( n2 ) |
| T( 2n + nlog(n) ) | O( nlog(n) ) |
| T( 2n + 5n1000) | O( 2n ) |
Aside: We'll often omit the multiplication symbol in expressions as a form of
shorthand. For example, we'll write O( 5n2 ) in place of O( 5 *
n2 ).
715. What you've learned
In this reading we:
- explained why Big-O is the preferred notation used to describe the efficiency
of algorithms - used the product and sum rules to simplify mathematical functions into Big-O
notation
Common Complexity Classes
Analyzing the efficiency of our code seems like a daunting task because there
are many different possibilities in how we may choose to implement something.
Luckily, most code we write can be categorized into one of a handful of common
complexity classes. In this reading, we'll identify the common classes and
explore some of the code characteristics that will lead to these classes.
When you finish this reading, you should be able to:
- name and order the seven common complexity classes
- identify the time complexity class of a given code snippet
716. The seven major classes
There are seven complexity classes that we will encounter most often. Below is a
list of each complexity class as well as its Big-O notation. This list is
ordered from smallest to largest. Bear in mind that a "more efficient"
algorithm is one with a smaller complexity class, because it requires fewer
resources.
| Big-O | Complexity Class Name |
|---|---|
| O(1) | constant |
| O(log(n)) | logarithmic |
| O(n) | linear |
| O(n * log(n)) | loglinear, linearithmic, quasilinear |
| O(nc) - O(n2), O(n3), etc. | polynomial |
| O(cn) - O(2n), O(3n), etc. | exponential |
| O(n!) | factorial |
There are more complexity classes that exist, but these are most common. Let's
take a closer look at each of these classes to gain some intuition on what
behavior their functions define. We'll explore famous algorithms that correspond
to these classes further in the course.
For simplicity, we'll provide small, generic code examples that illustrate the
complexity, although they may not solve a practical problem.
716.1. O(1) - Constant
Constant complexity means that the algorithm takes roughly the same number of
steps for any size input. In a constant time algorithm, there is no relationship
between the size of the input and the number of steps required. For example,
this means performing the algorithm on a input of size 1 takes the same number
of steps as performing it on an input of size 128.
716.1.1. Constant growth
The table below shows the growing behavior of a constant function. Notice that
the behavior stays constant for all values of n.
| n | O(1) |
|---|---|
| 1 | ~1 |
| 2 | ~1 |
| 3 | ~1 |
| ... | ... |
| 128 | ~1 |
716.1.2. Example Constant code
Below is are two examples of functions that have constant runtimes.
// O(1) function constant1(n) { return n * 2 + 1; } // O(1) function constant2(n) { for (let i = 1; i <= 100; i++) { console.log(i); } }
The runtime of the constant1 function does not depend on the size of the
input, because only two arithmetic operations (multiplication and addition) are
always performed. The runtime of the constant2 function also does not depend
on the size of the input because one-hundred iterations are always performed,
irrespective of the input.
716.2. O(log(n)) - Logarithmic
Typically, the hidden base of O(log(n)) is 2, meaning O(log2(n)).
Logarithmic complexity algorithms will usual display a sense of continually
"halving" the size of the input. Another tell of a logarithmic algorithm is that
we don't have to access every element of the input. O(log2(n)) means
that every time we double the size of the input, we only require one additional
step. Overall, this means that a large increase of input size will increase the
number of steps required by a small amount.
716.2.1. Logarithmic growth
The table below shows the growing behavior of a logarithmic runtime function.
Notice that doubling the input size will only require only one additional
"step".
| n | O(log2(n)) |
|---|---|
| 2 | ~1 |
| 4 | ~2 |
| 8 | ~3 |
| 16 | ~4 |
| ... | ... |
| 128 | ~7 |
716.2.2. Example logarithmic code
Below is an example of two functions with logarithmic runtimes.
// O(log(n)) function logarithmic1(n) { if (n <= 1) return; logarithmic1(n / 2); } // O(log(n)) function logarithmic2(n) { let i = n; while (i > 1) { i /= 2; } }
The logarithmic1 function has O(log(n)) runtime because the recursion will
half the argument, n, each time. In other words, if we pass 8 as the original
argument, then the recursive chain would be 8 -> 4 -> 2 -> 1. In a similar way,
the logarithmic2 function has O(log(n)) runtime because of the number of
iterations in the while loop. The while loop depends on the variable i, which
will be divided in half each iteration.
716.3. O(n) - Linear
Linear complexity algorithms will access each item of the input "once" (in the
Big-O sense). Algorithms that iterate through the input without nested loops or
recurse by reducing the size of the input by "one" each time are typically
linear.
716.3.1. Linear growth
The table below shows the growing behavior of a linear runtime function. Notice
that a change in input size leads to similar change in the number of steps.
| n | O(n) |
|---|---|
| 1 | ~1 |
| 2 | ~2 |
| 3 | ~3 |
| 4 | ~4 |
| ... | ... |
| 128 | ~128 |
716.3.2. Example linear code
Below are examples of three functions that each have linear runtime.
// O(n) function linear1(n) { for (let i = 1; i <= n; i++) { console.log(i); } } // O(n), where n is the length of the array function linear2(array) { for (let i = 0; i < array.length; i++) { console.log(i); } } // O(n) function linear3(n) { if (n === 1) return; linear3(n - 1); }
The linear1 function has O(n) runtime because the for loop will iterate n
times. The linear2 function has O(n) runtime because the for loop iterates
through the array argument. The linear3 function has O(n) runtime because each
subsequent call in the recursion will decrease the argument by one. In other
words, if we pass 8 as the original argument to linear3, the recursive chain
would be 8 -> 7 -> 6 -> 5 -> ... -> 1.
716.4. O(n * log(n)) - Loglinear
This class is a combination of both linear and logarithmic behavior, so features
from both classes are evident. Algorithms the exhibit this behavior use both
recursion and iteration. Typically, this means that the recursive calls will
halve the input each time (logarithmic), but iterations are also performed on
the input (linear).
716.4.1. Loglinear growth
The table below shows the growing behavior of a loglinear runtime function.
| n | O(n * log2(n)) |
|---|---|
| 2 | ~2 |
| 4 | ~8 |
| 8 | ~24 |
| ... | ... |
| 128 | ~896 |
716.4.2. Example loglinear code
Below is an example of a function with a loglinear runtime.
// O(n * log(n)) function loglinear(n) { if (n <= 1) return; for (let i = 1; i <= n; i++) { console.log(i); } loglinear(n / 2); loglinear(n / 2); }
The loglinear function has O(n * log(n)) runtime because the for loop
iterates linearly (n) through the input and the recursive chain behaves
logarithmically (log(n)).
716.5. O(nc) - Polynomial
Polynomial complexity refers to complexity of the form O(nc) where
n is the size of the input and c is some fixed constant. For example,
O(n3) is a larger/worse function than O(n2), but they
belong to the same complexity class. Nested loops are usually the indicator of
this complexity class.
716.5.1. Polynomial growth
Below are tables showing the growth for O(n2) and O(n3).
| n | O(n2) |
|---|---|
| 1 | ~1 |
| 2 | ~4 |
| 3 | ~9 |
| ... | ... |
| 128 | ~16,384 |
| n | O(n3) |
| --- | ---------------- |
| 1 | ~1 |
| 2 | ~8 |
| 3 | ~27 |
| ... | ... |
| 128 | ~2,097,152 |
716.5.2. Example polynomial code
Below are examples of two functions with polynomial runtimes.
// O(n^2) function quadratic(n) { for (let i = 1; i <= n; i++) { for (let j = 1; j <= n; j++) {} } } // O(n^3) function cubic(n) { for (let i = 1; i <= n; i++) { for (let j = 1; j <= n; j++) { for (let k = 1; k <= n; k++) {} } } }
The quadratic function has O(n2) runtime because there are nested
loops. The outer loop iterates n times and the inner loop iterates n times. This
leads to n * n total number of iterations. In a similar way, the cubic
function has O(n3) runtime because it has triply nested loops that
lead to a total of n * n * n iterations.
716.6. O(cn) - Exponential
Exponential complexity refers to Big-O functions of the form O(cn)
where n is the size of the input and c is some fixed constant. For example,
O(3n) is a larger/worse function than O(2n), but they both
belong to the exponential complexity class. A common indicator of this
complexity class is recursive code where there is a constant number of recursive
calls in each stack frame. The c will be the number of recursive calls made in
each stack frame. Algorithms with this complexity are considered quite slow.
716.6.1. Exponential growth
Below are tables showing the growth for O(2n) and O(3n).
Notice how these grow large, quickly.
| n | O(2n) |
|---|---|
| 1 | ~2 |
| 2 | ~4 |
| 3 | ~8 |
| 4 | ~16 |
| ... | ... |
| 128 | ~3.4028 * 1038 |
| n | O(3n) |
| --- | -------------------------- |
| 1 | ~3 |
| 2 | ~9 |
| 3 | ~27 |
| 3 | ~81 |
| ... | ... |
| 128 | ~1.1790 * 1061 |
716.6.2. Exponential code example
Below are examples of two functions with exponential runtimes.
// O(2^n) function exponential2n(n) { if (n === 1) return; exponential_2n(n - 1); exponential_2n(n - 1); } // O(3^n) function exponential3n(n) { if (n === 0) return; exponential_3n(n - 1); exponential_3n(n - 1); exponential_3n(n - 1); }
The exponential2n function has O(2n) runtime because each call will
make two more recursive calls. The exponential3n function has O(3n)
runtime because each call will make three more recursive calls.
716.7. O(n!) - Factorial
Recall that n! = (n) * (n - 1) * (n - 2) * ... * 1. This complexity is
typically the largest/worst that we will end up implementing. An indicator of
this complexity class is recursive code that has a variable number of recursive
calls in each stack frame. Note that factorial is worse than exponential
because factorial algorithms have a variable amount of recursive calls in
each stack frame, whereas exponential algorithms have a constant amount of
recursive calls in each frame.
716.7.1. Factorial growth
Below is a table showing the growth for O(n!). Notice how this has a more
aggressive growth than exponential behavior.
| n | O(n!) |
|---|---|
| 1 | ~1 |
| 2 | ~2 |
| 3 | ~6 |
| 4 | ~24 |
| ... | ... |
| 128 | ~3.8562 * 10215 |
716.7.2. Factorial code example
Below is an example of a function with factorial runtime.
// O(n!) function factorial(n) { if (n === 1) return; for (let i = 1; i <= n; i++) { factorial(n - 1); } }
The factorial function has O(n!) runtime because the code is recursive but
the number of recursive calls made in a single stack frame depends on the input.
This contrasts with an exponential function because exponential functions have
a fixed number of calls in each stack frame.
You may it difficult to identify the complexity class of a given code snippet,
especially if the code falls into the loglinear, exponential, or factorial
classes. In the upcoming videos, we'll explain the analysis of these functions
in greater detail. For now, you should focus on the relative order of these
seven complexity classes!
717. What you've learned
In this reading, we listed the seven common complexity classes and saw some
example code for each. In order of ascending growth, the seven classes are:
- Constant
- Logarithmic
- Linear
- Loglinear
- Polynomial
- Exponential
- Factorial
Memoization
Memoization is a design pattern used to reduce the overall number of
calculations that can occur in algorithms that use recursive strategies to
solve.
Recall that recursion solves a large problem by dividing it into smaller
sub-problems that are more manageable. Memoization will store the results of
the sub-problems in some other data structure, meaning that you avoid duplicate
calculations and only "solve" each subproblem once. There are two features that
comprise memoization:
- the function is recursive
- the additional data structure used is typically an object (we refer to this as
the memo!)
This is a trade-off between the time it takes to run an algorithm (without
memoization) and the memory used to run the algorithm (with memoization).
Usually memoization is a good trade-off when dealing with large data or
calculations.
You cannot always apply this technique to recursive problems. The problem must
have an "overlapping subproblem structure" for memoization to be effective.
Here's an example of a problem that has such a structure:
Using pennies, nickels, dimes, and quarters, what is the smallest combination
of coins that total 27 cents?
You'll explore this exact problem in depth later on. For now, here is some food
for thought. Along the way to calculating the smallest coin combination of 27
cents, you should also calculate the smallest coin combination of say, 25 cents
as a component of that problem. This is the essence of an overlapping subproblem
structure.
718. Memoizing factorial
Here's an example of a function that computes the factorial of the number passed
into it.
function factorial(n) { if (n === 1) return 1; return n * factorial(n - 1); } factorial(6); // => 720, requires 6 calls factorial(6); // => 720, requires 6 calls factorial(5); // => 120, requires 5 calls factorial(7); // => 5040, requires 7 calls
From this plain factorial above, it is clear that every time you call
factorial(6) you should get the same result of 720 each time. The code is
somewhat inefficient because you must go down the full recursive stack for each
top level call to factorial(6). It would be great if you could store the result
of factorial(6) the first time you calculate it, then on subsequent calls to
factorial(6) you simply fetch the stored result in constant time. You can
accomplish exactly this by memoizing with an object!
let memo = {} function factorial(n) { // if this function has calculated factorial(n) previously, // fetch the stored result in memo if (n in memo) return memo[n]; if (n === 1) return 1; // otherwise, it havs not calculated factorial(n) previously, // so calculate it now, but store the result in case it is // needed again in the future memo[n] = n * factorial(n - 1); return memo[n] } factorial(6); // => 720, requires 6 calls factorial(6); // => 720, requires 1 call factorial(5); // => 120, requires 1 call factorial(7); // => 5040, requires 2 calls memo; // => { '2': 2, '3': 6, '4': 24, '5': 120, '6': 720, '7': 5040 }
The memo object above will map an argument of factorial to its return
value. That is, the keys will be arguments and their values will be the
corresponding results returned. By using the memo, you are able to avoid
duplicate recursive calls!
Here's some food for thought: By the time your first call to factorial(6)
returns, you will not have just the argument 6 stored in the memo. Rather, you will
have all arguments 2 to 6 stored in the memo.
Hopefully you sense the efficiency you can get by memoizing your functions, but
maybe you are not convinced by the last example for two reasons:
- You didn't improve the speed of the algorithm by an order of Big-O (it is
still O(n)). - The code uses some global variable, so it's kind of ugly.
Both of those points are true, so take a look at a more advanced example that
benefits from memoization.
719. Memoizing the Fibonacci generator
Here's a naive implementation of a function that calculates the Fibonacci
number for a given input.
function fib(n) { if (n === 1 || n === 2) return 1; return fib(n - 1) + fib(n - 2); } fib(6); // => 8
Before you optimize this, ask yourself what complexity class it falls into in
the first place.
The time complexity of this function is not super intuitive to describe because
the code branches twice recursively. Fret not! You'll find it useful to
visualize the calls needed to do this with a tree. When reasoning about the time
complexity for recursive functions, draw a tree that helps you see the calls.
Every node of the tree represents a call of the recursion:
In general, the height of this tree will be n. You derive this by following
the path going straight down the left side of the tree. You can also see that
each internal node leads to two more nodes. Overall, this means that the tree
will have roughly 2n nodes which is the same as saying that the fib
function has an exponential time complexity of 2n. That is very slow!
See for yourself, try running fib(50) - you'll be waiting for quite a while
(it took 3 minutes on the author's machine).
Okay. So the fib function is slow. Is there anyway to speed it up? Take a look
at the tree above. Can you find any repetitive regions of the tree?
As the n grows bigger, the number of duplicate sub-trees grows exponentially.
Luckily you can fix this using memoization by using a similar object strategy as
before. You can use some JavaScript default arguments to clean things up:
function fastFib(n, memo = {}) { if (n in memo) return memo[n]; if (n === 1 || n === 2) return 1; memo[n] = fastFib(n - 1, memo) + fastFib(n - 2, memo); return memo[n]; } fastFib(6); // => 8 fastFib(50); // => 12586269025
The code above can calculate the 50th Fibonacci number almost instantly! Thanks
to the memo object, you only need to explore a subtree fully once. Visually,
the fastFib recursion has this structure:
You can see the marked nodes (function calls) that access the memo in green.
It's easy to see that this version of the Fibonacci generator will do far less
computations as n grows larger! In fact, this memoization has brought the time
complexity down to linear O(n) time because the tree only branches on the left
side. This is an enormous gain if you recall the complexity class hierarchy.
720. The memoization formula
Now that you understand memoization, when should you apply it? Memoization is
useful when attacking recursive problems that have many overlapping
sub-problems. You'll find it most useful to draw out the visual tree first. If
you notice duplicate sub-trees, time to memoize. Here are the hard and fast
rules you can use to memoize a slow function:
- Write the unoptimized, brute force recursion and make sure it works.
- Add the memo object as an additional argument to the function. The keys will
represent unique arguments to the function, and their values will represent
the results for those arguments. - Add a base case condition to the function that returns the stored value if
the function's argument is in the memo. - Before you return the result of the recursive case, store it in the memo as a
value and make the function's argument it's key.
721. What you learned
You learned a secret to possibly changing an algorithm of one complexity class
to a lower complexity class by using memory to store intermediate results. This
is a powerful technique to use to make sure your programs that must do recursive
calculations can benefit from running much faster.
Tabulation
Now that you are familiar with memoization, you can explore a related method
of algorithmic optimization: Tabulation. There are two main features that
comprise the Tabulation strategy:
- the function is iterative and not recursive
- the additional data structure used is typically an array, commonly referred to
as the table
Many problems that can be solved with memoization can also be solved with
tabulation as long as you convert the recursion to iteration. The first example
is the canonical example of recursion, calculating the Fibonacci number for an
input. However, in the example, you'll see the iteration version of it for a
fresh start!
722. Tabulating the Fibonacci number
Tabulation is all about creating a table (array) and filling it out with
elements. In general, you will complete the table by filling entries from "left
to right". This means that the first entry of the table (first element of the
array) will correspond to the smallest subproblem. Naturally, the final entry of
the table (last element of the array) will correspond to the largest problem,
which is also the final answer.
Here's a way to use tabulation to store the intermediary calculations so that
later calculations can refer back to the table.
function tabulatedFib(n) { // create a blank array with n reserved spots let table = new Array(n); // seed the first two values table[0] = 0; table[1] = 1; // complete the table by moving from left to right, // following the fibonacci pattern for (let i = 2; i <= n; i += 1) { table[i] = table[i - 1] + table[i - 2]; } return table[n]; } console.log(tabulatedFib(7)); // => 13
When you initialized the table and seeded the first two values, it looked like
this:
| i | 0 | 1 | 2 | 3 | 4 | 5 | 6 | 7 |
|---|---|---|---|---|---|---|---|---|
table[i] |
0 |
1 |
||||||
After the loop finishes, the final table will be:
| i | 0 | 1 | 2 | 3 | 4 | 5 | 6 | 7 |
|---|---|---|---|---|---|---|---|---|
table[i] |
0 |
1 |
1 |
2 |
3 |
5 |
8 |
13 |
Similar to the previous memo, by the time the function completes, the table
will contain the final solution as well as all sub-solutions calculated along
the way.
To compute the complexity class of this tabulatedFib is very straightforward
since the code is iterative. The dominant operation in the function is the loop
used to fill out the entire table. The length of the table is roughly n
elements long, so the algorithm will have an O(n) runtime. The space taken by
our algorithm is also O(n) due to the size of the table. Overall, this should
be a satisfying solution for the efficiency of the algorithm.
723. Aside: Refactoring for O(1) Space
You may notice that you can cut down on the space used by the function. At any
point of the loop, the calculation really only need the previous two
subproblems' results. There is little utility to storing the full array. This
refactor is easy to do by using two variables:
function fib(n) { let mostRecentCalcs = [0, 1]; if (n === 0) return mostRecentCalcs[0]; for (let i = 2; i <= n; i++) { const [ secondLast, last ] = mostRecentCalcs; mostRecentCalcs = [ last, secondLast + last ]; } return mostRecentCalcs[1]; }
Bam! You now have O(n) runtime and O(1) space. This is the most optimal
algorithm for calculating a Fibonacci number. Note that this strategy is a pared
down form of tabulation, since it uses only the last two values.
723.1. The Tabulation Formula
Here are the general guidelines for implementing the tabulation strategy. This
is just a general recipe, so adjust for taste depending on your problem:
- Create the table array based off of the size of the input, which isn't always
straightforward if you have multiple input values - Initialize some values in the table that "answer" the trivially small
subproblem usually by initializing the first entry (or entries) of the table - Iterate through the array and fill in remaining entries, using previous
entries in the table to perform the current calculation - Your final answer is (usually) the last entry in the table
724. What you learned
You learned another way of possibly changing an algorithm of one complexity
class to a lower complexity class by using memory to store intermediate results.
This is a powerful technique to use to make sure your programs that must do
iterative calculations can benefit from running much faster.
Analysis of Linear Search
Consider the following search algorithm known as linear search.
function search(array, term) { for (let i = 0; i < array.length; i++) { if (array[i] == term) { return i; } } return -1; }
Most Big-O analysis is done on the "worst-case scenario" and provides an upper
bound. In the worst case analysis, you calculate the upper bound on running time
of an algorithm. You must know the case that causes the maximum number of
operations to be executed.
For linear search, the worst case happens when the element to be searched
(term in the above code) is not present in the array. When term is not
present, the search function compares it with all the elements of array one
by one. Therefore, the worst-case time complexity of linear search would be
O(n).
Analysis of Binary Search
Consider the following search algorithm known as the binary search. This
kind of search only works if the array is already sorted.
function binarySearch(arr, x, start, end) { if (start > end) return false; let mid = Math.floor((start + end) / 2); if (arr[mid] === x) return true; if (arr[mid] > x) { return binarySearch(arr, x, start, mid - 1); } else { return binarySearch(arr, x, mid + 1, end); } }
For the binary search, you cut the search space in half every time. This means
that it reduces the number of searches you must do by half, every time. That
means the number of steps it takes to get to the desired item (if it exists in
the array), in the worst case takes the same amount of steps for every number
within a range defined by the powers of 2.
- 7 -> 4 -> 2 -> 1
- 8 -> 4 -> 2 -> 1
- 9 -> 5 -> 3 -> 2 -> 1
- 15 -> 8 -> 4 -> 2 -> 1
- 16 -> 8 -> 4 -> 2 -> 1
- 17 -> 9 -> 5 -> 3 -> 2 -> 1
- 31 -> 16 -> 8 -> 4 -> 2 -> 1
- 32 -> 16 -> 8 -> 4 -> 2 -> 1
- 33 -> 17 -> 9 -> 5 -> 3 -> 2 -> 1
So, for any number of items in the sorted array between 2n-1 and
2n, it takes n number of steps. That means if you have k items in
the array, then it will take log2k.
Binary searches are O(log2n).
Analysis of the Merge Sort
Consider the following divide-and-conquer sort method known as the merge
sort.
function merge(leftArray, rightArray) { const sorted = []; while (leftArray.length > 0 && rightArray.length > 0) { const leftItem = leftArray[0]; const rightItem = rightArray[0]; if (leftItem > rightItem) { sorted.push(rightItem); rightArray.shift(); } else { sorted.push(leftItem); leftArray.shift(); } } while (leftArray.length !== 0) { const value = leftArray.shift(); sorted.push(value); } while (rightArray.length !== 0) { const value = rightArray.shift(); sorted.push(value); } return sorted } function mergeSort(array) { const length = array.length; if (length == 1) { return array; } const middleIndex = Math.ceil(length / 2); const leftArray = array.slice(0, middleIndex); const rightArray = array.slice(middleIndex, length); leftArray = mergeSort(leftArray); rightArray = mergeSort(rightArray); return merge(leftArray, rightArray); }
For the merge sort, you cut the sort space in half every time. In each of
those halves, you have to loop through the number of items in the array. That
means that, for the worst case, you get that same
log2n but it must be multiplied by the number of
elements in the array, n.
Merge sorts are O(n*log2n).
Analysis of Bubble Sort
Consider the following sort algorithm known as the bubble sort.
function bubbleSort(items) { var length = items.length; for (var i = 0; i < length; i++) { for (var j = 0; j < (length - i - 1); j++) { if (items[j] > items[j + 1]) { var tmp = items[j]; items[j] = items[j + 1]; items[j + 1] = tmp; } } } }
For the bubble sort, the worst case is the same as the best case because it
always makes nested loops. So, the outer loop loops the number of times of the
items in the array. For each one of those loops, the inner loop loops again a
number of times for the items in the array. So, if there are n values in the
array, then a loop inside a loop is n * n. So, this is O(n2).
That's polynomial, which ain't that good.
LeetCode.com
Some of the problems in the projects ask you to use the LeetCode platform to
check your work rather than relying on local mocha tests. If you don't already
have an account at LeetCode.com, please click
https://leetcode.com/accounts/signup/ to sign up for a free
account.
After you sign up for the account, please verify the account with the email
address that you used so that you can actually run your solution on
LeetCode.com.
In the projects, you will see files that are named "leet_code_«number».js".
When you open those, you will see a link in the file that you can use to go
directly to the corresponding problem on LeetCode.com.
Use the local JavaScript file in Visual Studio Code to collaborate on the
solution. Then, you can run the proposed solution in the LeetCode.com code
runner to validate its correctness.
Memoization Problems
This project contains two test-driven problems and one problem on LeetCode.com.
- Clone the project from
https://github.com/appacademy-starters/algorithms-memoization-project. cdinto the project foldernpm installto install dependencies in the project root directorynpx testto run the specs- You can view the test cases in
/test/test.js. Your job is to write code in
the/libfiles to pass all specs.- In
problems.js, you will write code to make thelucasNumberMemoand
minChangefunctions pass. - In
leet_code_518.js, you will use that file as a scratch pad to work on
the LeetCode.com problem at https://leetcode.com/problems/coin-change-2/.
- In
Tabulation Problems
This project contains two test-driven problems and one problem on LeetCode.com.
- Clone the project from
https://github.com/appacademy-starters/algorithms-tabulation-project. cdinto the project foldernpm installto install dependencies in the project root directorynpx testto run the specs- You can view the test cases in
/test/test.js. Your job is to write code in
the/libfiles to pass all specs.- In
problems.js, you will write code to make thestepper,
maxNonAdjacentSum, andminChangefunctions pass. - In
leet_code_64.js, you will use that file as a scratch pad to work on the
LeetCode.com problem at https://leetcode.com/problems/minimum-path-sum/. - In
leet_code_70.js, you will use that file as a scratch pad to work on the
LeetCode.com problem at https://leetcode.com/problems/climbing-stairs/.
- In
WEEK-07 DAY-3
Sorting Algorithms
Sorting Algorithms Learning Objectives
The objective of this lesson is for you to get experience implementing
common sorting algorithms that will come up during a lot of interviews. It is
also important for you to understand how different sorting algorithms behave
when given output.
At the end of this, you will be able to
- Explain the complexity of and write a function that performs
bubble sorton
an array of numbers. - Explain the complexity of and write a function that performs
selection sort
on an array of numbers. - Explain the complexity of and write a function that performs
insertion sort
on an array of numbers. - Explain the complexity of and write a function that performs
merge sorton
an array of numbers. - Explain the complexity of and write a function that performs
quick sorton
an array of numbers. - Explain the complexity of and write a function that performs a binary search
on a sorted array of numbers.nce implementing
common sorting algorithms that will come up during a lot of interviews. It is
also important for you to understand how different sorting algorithms behave
when given output.
At the end of this, you will be able to - Explain the complexity of and write a function that performs
bubble sorton
an array of numbers. - Explain the complexity of and write a function that performs
selection sort
on an array of numbers. - Explain the complexity of and write a function that performs
insertion sort
on an array of numbers. - Explain the complexity of and write a function that performs
merge sorton
an array of numbers. - Explain the complexity of and write a function that performs
quick sorton
an array of numbers. - Explain the complexity of and write a function that performs a binary search
on a sorted array of numbers.
Bubble Sort
Bubble Sort is generally the first major sorting algorithm to come up in most
introductory programming courses. Learning about this algorithm is useful
educationally, as it provides a good introduction to the challenges you face
when tasked with converting unsorted data into sorted data, such as conducting
logical comparisons, making swaps while iterating, and making optimizations.
It's also quite simple to implement, and can be done quickly.
Bubble Sort is almost never a good choice in production. simply because:
- It is not efficient
- It is not commonly used
- There is a stigma attached to using it
725. "But...then...why are we..."
It is quite useful as an educational base for you, and as a conversational
base for you while interviewing, because you can discuss how other more elegant
and efficient algorithms improve upon it. Taking naive code and improving upon
it by weighing the technical tradeoffs of your other options is 100% the name of
the game when trying to level yourself up from a junior engineer to a senior
engineer.
726. The algorithm bubbles up
As you progress through the algorithms and data structures of this course,
you'll eventually notice that there are some recurring funny terms. "Bubbling
up" is one of those terms.
When someone writes that an item in a collection "bubbles up," you should infer
that:
- The item is in motion
- The item is moving in some direction
- The item has some final resting destination
When invoking Bubble Sort to sort an array of integers in ascending order, the
largest integers will "bubble up" to the "top" (the end) of the array, one at a
time.
The largest values are captured, put into motion in the direction defined by the
desired sort (ascending right now), and traverse the array until they arrive at
their end destination. See if you can observe this behavior in the following
animation (courtesy http://visualgo.net):
As the algorithm iterates through the array, it compares each element to the
element's right neighbor. If the current element is larger than its neighbor,
the algorithm swaps them. This continues until all elements in the array are
sorted.
727. How does a pass of Bubble Sort work?
Bubble sort works by performing multiple passes to move elements closer to
their final positions. A single pass will iterate through the entire array once.
A pass works by scanning the array from left to right, two elements at a time,
and checking if they are ordered correctly. To be ordered correctly the first
element must be less than or equal to the second. If the two elements are not
ordered properly, then we swap them to correct their order. Afterwards, it scans
the next two numbers and continue repeat this process until we have gone through
the entire array.
See one pass of bubble sort on the array [2, 8, 5, 2, 6]. On each step the
elements currently being scanned are in bold.
- [2, 8, 5, 2, 6] - ordered, so leave them alone
- [2, 8, 5, 2, 6] - not ordered, so swap
- [2, 5, 8, 2, 6] - not ordered, so swap
- [2, 5, 2, 8, 6] - not ordered, so swap
- [2, 5, 2, 6, 8] - the first pass is complete
Because at least one swap occurred, the algorithm knows that it wasn't sorted.
It needs to make another pass. It starts over again at the first entry and goes
to the next-to-last entry doing the comparisons, again. It only needs to go to
the next-to-last entry because the previous "bubbling" put the largest entry in
the last position. - [2, 5, 2, 6, 8] - ordered, so leave them alone
- [2, 5, 2, 6, 8] - not ordered, so swap
- [2, 2, 5, 6, 8] - ordered, so leave them alone
- [2, 2, 5, 6, 8] - the second pass is complete
Because at least one swap occurred, the algorithm knows that it wasn't sorted.
Now, it can bubble from the first position to the last-2 position because the
last two values are sorted. - [2, 2, 5, 6, 8] - ordered, so leave them alone
- [2, 2, 5, 6, 8] - ordered, so leave them alone
- [2, 2, 5, 6, 8] - the third pass is complete
No swap occurred, so the Bubble Sort stops.
728. Ending the Bubble Sort
During Bubble Sort, you can tell if the array is in sorted order by checking if
a swap was made during the previous pass performed. If a swap was not performed
during the previous pass, then the array must be totally sorted and the
algorithm can stop.
You're probably wondering why that makes sense. Recall that a pass of Bubble
Sort checks if any adjacent elements are out of order and swaps them if they
are. If we don't make any swaps during a pass, then everything must be already
in order, so our job is done. Let that marinate for a bit.
729. Pseudocode for Bubble Sort
Bubble Sort: (array)
n := length(array)
repeat
swapped = false
for i := 1 to n - 1 inclusive do
/* if this pair is out of order */
if array[i - 1] > array[i] then
/* swap them and remember something changed */
swap(array, i - 1, i)
swapped := true
end if
end for
until not swapped
Selection Sort
Selection Sort is very similar to Bubble Sort. The major difference between the
two is that Bubble Sort bubbles the largest elements up to the end of the
array, while Selection Sort selects the smallest elements of the array and
directly places them at the beginning of the array in sorted position. Selection
sort will utilize swapping just as bubble sort did. Let's carefully break this
sorting algorithm down.
730. The algorithm: select the next smallest
Selection sort works by maintaining a sorted region on the left side of the
input array; this sorted region will grow by one element with every "pass" of
the algorithm. A single "pass" of selection sort will select the next smallest
element of unsorted region of the array and move it to the sorted region.
Because a single pass of selection sort will move an element of the unsorted
region into the sorted region, this means a single pass will shrink the unsorted
region by 1 element whilst increasing the sorted region by 1 element. Selection
sort is complete when the sorted region spans the entire array and the unsorted
region is empty!
The algorithm can be summarized as the following:
- Set MIN to location 0
- Search the minimum element in the list
- Swap with value at location MIN
- Increment MIN to point to next element
- Repeat until list is sorted
731. The pseudocode
In pseudocode, the Selection Sort can be written as this.
procedure selection sort
list : array of items
n : size of list
for i = 1 to n - 1
/* set current element as minimum*/
min = i
/* check the element to be minimum */
for j = i+1 to n
if list[j] < list[min] then
min = j;
end if
end for
/* swap the minimum element with the current element*/
if indexMin != i then
swap list[min] and list[i]
end if
end for
end procedure
Insertion Sort
With Bubble Sort and Selection Sort now in your tool box, you're starting to
get some experience points under your belt! Time to learn one more "naive"
sorting algorithm before you get to the efficient sorting algorithms.
732. The algorithm: insert into the sorted region
Insertion Sort is similar to Selection Sort in that it gradually builds up a
larger and larger sorted region at the left-most end of the array.
However, Insertion Sort differs from Selection Sort because this algorithm does
not focus on searching for the right element to place (the next smallest in our
Selection Sort) on each pass through the array. Instead, it focuses on sorting
each element in the order they appear from left to right, regardless of their
value, and inserting them in the most appropriate position in the sorted region.
See if you can observe the behavior described above in the following animation:
733. The Steps
Insertion Sort grows a sorted array on the left side of the input array by:
- If it is the first element, it is already sorted. return 1;
- Pick next element
- Compare with all elements in the sorted sub-list
- Shift all the elements in the sorted sub-list that is greater than the
value to be sorted - Insert the value
- Repeat until list is sorted
These steps are easy to confuse with selection sort, so you'll want to watch the
video lecture and drawing that accompanies this reading as always!
734. The pseudocode
procedure insertionSort( A : array of items )
int holePosition
int valueToInsert
for i = 1 to length(A) inclusive do:
/* select value to be inserted */
valueToInsert = A[i]
holePosition = i
/*locate hole position for the element to be inserted */
while holePosition > 0 and A[holePosition-1] > valueToInsert do:
A[holePosition] = A[holePosition-1]
holePosition = holePosition -1
end while
/* insert the number at hole position */
A[holePosition] = valueToInsert
end for
end procedure
Merge Sort
You've explored a few sorting algorithms already, all of them being quite slow
with a runtime of O(n2). It's time to level up and learn your first
time-efficient sorting algorithm! You'll explore merge sort in detail soon,
but first, you should jot down some key ideas for now. The following points are
not steps to an algorithm yet; rather, they are ideas that will motivate how you
can derive this algorithm.
- it is easy to merge elements of two sorted arrays into a single sorted array
- you can consider an array containing only a single element as already
trivially sorted - you can also consider an empty array as trivially sorted
735. The algorithm: divide and conquer
You're going to need a helper function that solves the first major point from
above. How might you merge two sorted arrays? In other words you want a merge
function that will behave like so:
let arr1 = [1, 5, 10, 15]; let arr2 = [0, 2, 3, 7, 10]; merge(arr1, arr2); // => [0, 1, 2, 3, 5, 7, 10, 10, 15]
Once you have that, you get to the "divide and conquer" bit.
The algorithm for merge sort is actually really simple.
- if there is only one element in the list, it is already sorted. return that
array. - otherwise, divide the list recursively into two halves until it can no more
be divided. - merge the smaller lists into new list in sorted order.
The process is visualized below. When elements are moved to the bottom of the
picture, they are going through themergestep:
The pseudocode for the algorithm is as follows.
procedure mergesort( a as array )
if ( n == 1 ) return a
/* Split the array into two */
var l1 as array = a[0] ... a[n/2]
var l2 as array = a[n/2+1] ... a[n]
l1 = mergesort( l1 )
l2 = mergesort( l2 )
return merge( l1, l2 )
end procedure
procedure merge( a as array, b as array )
var result as array
while ( a and b have elements )
if ( a[0] > b[0] )
add b[0] to the end of result
remove b[0] from b
else
add a[0] to the end of result
remove a[0] from a
end if
end while
while ( a has elements )
add a[0] to the end of result
remove a[0] from a
end while
while ( b has elements )
add b[0] to the end of result
remove b[0] from b
end while
return result
end procedure
Quick Sort
Quick Sort has a similar "divide and conquer" strategy to Merge Sort. Here are a
few key ideas that will motivate the design:
- it is easy to sort elements of an array relative to a particular target value
- an array of 0 or 1 elements is already trivially sorted
Regarding that first point, for example given[7, 3, 8, 9, 2]and a target of
5, we know[3, 2]are numbers less than5and[7, 8, 9]are numbers
greater than5.
736. How does it work?
In general, the strategy is to divide the input array into two subarrays: one
with the smaller elements, and one with the larger elements. Then, it
recursively operates on the two new subarrays. It continues this process until
of dividing into smaller arrays until it reaches subarrays of length 1 or
smaller. As you have seen with Merge Sort, arrays of such length are
automatically sorted.
The steps, when discussed on a high level, are simple:
- choose an element called "the pivot", how that's done is up to the
implementation - take two variables to point left and right of the list excluding pivot
- left points to the low index
- right points to the high
- while value at left is less than pivot move right
- while value at right is greater than pivot move left
- if both step 5 and step 6 does not match swap left and right
- if left ≥ right, the point where they met is new pivot
- repeat, recursively calling this for smaller and smaller arrays
Before we move forward, see if you can observe the behavior described above in
the following animation:
737. The algorithm: divide and conquer
Formally, we want to partition elements of an array relative to a pivot value.
That is, we want elements less than the pivot to be separated from elements that
are greater than or equal to the pivot. Our goal is to create a function with
this behavior:
let arr = [7, 3, 8, 9, 2]; partition(arr, 5); // => [[3, 2], [7,8,9]]
737.1. Partition
Seems simple enough! Let's implement it in JavaScript:
// nothing fancy function partition(array, pivot) { let left = []; let right = []; array.forEach(el => { if (el < pivot) { left.push(el); } else { right.push(el); } }); return [ left, right ]; } // if you fancy function partition(array, pivot) { let left = array.filter(el => el < pivot); let right = array.filter(el => el >= pivot); return [ left, right ]; }
You don't have to use an explicit partition helper function in your Quick Sort
implementation; however, we will borrow heavily from this pattern. As you design
algorithms, it helps to think about key patterns in isolation, although your
solution may not feature that exact helper. Some would say we like to divide and
conquer.
738. The pseudocode
It is so small, this algorithm. It's amazing that it performs so well with so
little code!
procedure quickSort(left, right)
if the length of the array is 0 or 1, return the array
set the pivot to the first element of the array
remove the first element of the array
put all values less than the pivot value into an array called left
put all values greater than the pivot value into an array called right
call quick sort on left and assign the return value to leftSorted
call quick sort on right and assign the return value to rightSorted
return the concatenation of leftSorted, the pivot value, and rightSorted
end procedure
Binary Search
We've explored many ways to sort arrays so far, but why did we go through all of
that trouble? By sorting elements of an array, we are organizing the data in a
way that gives us a quick way to look up elements later on. For simplicity, we
have been using arrays of numbers up until this point. However, these sorting
concepts can be generalized to other data types. For example, it would be easy
to modify our comparison-based sorting algorithms to sort strings: instead of
leveraging facts like 0 < 1, we can say 'A' < 'B'.
Think of a dictionary. A dictionary contains alphabetically sorted words and
their definitions. A dictionary is pretty much only useful if it is ordered in
this way. Let's say you wanted to look up the definition of "stupendous." What
steps might you take?
- you open up the dictionary at the roughly middle page
- you land in the "m" section
- you know "s" comes somewhere after "m" in the book, so you disregard all pages
before the "m" section. Instead, you flip to the roughly middle page between
"m" and "z"- you land in the "u" section
- you know "s" comes somewhere before "u", so you can disregard all pages after
the "u" section. Instead, you flip to the roughly middle page between the
previous "m" page and "u" - ...
You are essentially using thebinarySearchalgorithm in the real world.
739. The Algorithm: "check the middle and half the search space"
Formally, our binarySearch will seek to solve the following problem:
Given a sorted array of numbers and a target num, return a boolean indicating whether or not that target is contained in the array.
Programmatically, we want to satisfy the following behavior:
binarySearch([5, 10, 12, 15, 20, 30, 70], 12); // => true binarySearch([5, 10, 12, 15, 20, 30, 70], 24); // => false
Before we move on, really internalize the fact that binarySearch will only
work on sorted arrays! Obviously we can search any array, sorted or
unsorted, in O(n) time. But now our goal is be able to search the array with a
sub-linear time complexity (less than O(n)).
740. The pseudocode
procedure binary search (list, target)
parameter list: a list of sorted value
parameter target: the value to search for
if the list has zero length, then return false
determine the slice point:
if the list has an even number of elements,
the slice point is the number of elements
divided by two
if the list has an odd number of elements,
the slice point is the number of elements
minus one divided by two
create an list of the elements from 0 to the
slice point, not including the slice point,
which is known as the "left half"
create an list of the elements from the
slice point to the end of the list which is
known as the "right half"
if the target is less than the value in the
original array at the slice point, then
return the binary search of the "left half"
and the target
if the target is greater than the value in the
original array at the slice point, then
return the binary search of the "right half"
and the target
if neither of those is true, return true
end procedure binary search
Bubble Sort Analysis
Bubble Sort manipulates the array by swapping the position of two elements. To
implement Bubble Sort in JS, you'll need to perform this operation. It helps to
have a function to do that. A key detail in this function is that you need an
extra variable to store one of the elements since you will be overwriting them
in the array:
function swap(array, idx1, idx2) { let temp = array[idx1]; // save a copy of the first value array[idx1] = array[idx2]; // overwrite the first value with the second value array[idx2] = temp; // overwrite the second value with the first value }
Note that the swap function does not create or return a new array. It mutates
the original array:
let arr1 = [2, 8, 5, 2, 6]; swap(arr1, 1, 2); arr1; // => [ 2, 5, 8, 2, 6 ]
740.1. Bubble Sort JS Implementation
Take a look at the snippet below and try to understand how it corresponds to the
conceptual understanding of the algorithm. Scroll down to the commented version
when you get stuck.
function bubbleSort(array) { let swapped = true; while(swapped) { swapped = false; for (let i = 0; i < array.length - 1; i++) { if (array[i] > array[i+1]) { swap(array, i, i+1); swapped = true; } } } return array; }
// commented function bubbleSort(array) { // this variable will be used to track whether or not we // made a swap on the previous pass. If we did not make // any swap on the previous pass, then the array must // already be sorted let swapped = true; // this while will keep doing passes if a swap was made // on the previous pass while(swapped) { swapped = false; // reset swap to false // this for will perform a single pass for (let i = 0; i < array.length; i++) { // if the two value are not ordered... if (array[i] > array[i+1]) { // swap the two values swap(array, i, i+1); // since you made a swap, remember that you did so // b/c we should perform another pass after this one swapped = true; } } } return array; }
741. Time Complexity: O(n2)
Picture the worst case scenario where the input array is completely unsorted.
Say it's sorted in fully decreasing order, but the goal is to sort it in
increasing order:
- n is the length of the input array
- The inner
forloop along contributes O(n) in isolation - The outer while loop contributes O(n) in isolation because a single
iteration of the while loop will bring one element to its final resting
position. In other words, it keeps running the while loop until the array is
fully sorted. To fully sort the array we will need to bring allnelements
into their final resting positions. - Those two loops are nested so the total time complexity is O(n * n) =
O(n2).
It's worth mentioning that the best case scenario is when the input array is
already fully sorted. This will cause our for loop to conduct a single pass
without performing any swap, so thewhileloop will not trigger further
iterations. This means best case time complexity is O(n) for bubble sort. This
best case linear time is probably the only advantage of bubble sort. Programmers
are usually interested only in the worst-case analysis and ignore best-case
analysis.
742. Space Complexity: O(1)
Bubble Sort is a constant space, O(1), algorithm. The amount of memory consumed
by the algorithm does not increase relative to the size of the input array. It
uses the same amount of memory and create the same amount of variables
regardless of the size of the input, making this algorithm quite space
efficient. The space efficiency mostly comes from the fact that it mutates the
input array in-place. This is known as a destructive sort because it
"destroys" the positions of the values in the array.
743. When should you use Bubble Sort?
Nearly never, but it may be a good choice in the following list of special
cases:
- When sorting really small arrays where run time will be negligible no matter
what algorithm you choose. - When sorting arrays that you expect to already be nearly sorted.
- At parties
Selection Sort Analysis
Since a component of Selection Sort requires us to locate the smallest value in
the array, let's focus on that pattern in isolation:
function minumumValueIndex(arr) { let minIndex = 0; for (let j = 0; j < arr.length; j++) { if (arr[minIndex] > arr[j]) { minIndex = j; } } return minIndex; }
Pretty basic code right? We won't use this explicit helper function to solve
selection sort, however we will borrow from this pattern soon.
744. Selection Sort JS Implementation
We'll also utilize the classic swap pattern that we introduced in the bubble sort. To
refresh:
function swap(arr, index1, index2) { let temp = arr[index1]; arr[index1] = arr[index2]; arr[index2] = temp; }
Now for the punchline! Take a look at the snippet below and try to understand
how it corresponds to our conceptual understanding of the selection sort
algorithm. Scroll down to the commented version when you get stuck.
function selectionSort(arr) { for (let i = 0; i < arr.length; i++) { let minIndex = i; for (let j = i + 1; j < arr.length; j++) { if (arr[minIndex] > arr[j]) { minIndex = j; } } swap(arr, i, minIndex); } return arr; }
// commented function selectionSort(arr) { // the `i` loop will track the index that points to the first element of the unsorted region: // this means that the sorted region is everything left of index i // and the unsorted region is everything to the right of index i for (let i = 0; i < arr.length; i++) { let minIndex = i; // the `j` loop will iterate through the unsorted region and find the index of the smallest element for (let j = i + 1; j < arr.length; j++) { if (arr[minIndex] > arr[j]) { minIndex = j; } } // after we find the minIndex in the unsorted region, // swap that minIndex with the first index of the unsorted region swap(arr, i, minIndex); } return arr; }
745. Time Complexity Analysis
Selection Sort runtime is O(n2) because:
nis the length of the input array- The outer loop i contributes O(n) in isolation, this is plain to see
- The inner loop j is more complicated, it will make one less iteration for
every iteration of i.- for example, let's say we have an array of 10 elements,
n = 10. - the first full cycle of
jwill have 9 iterations - the second full cycle of
jwill have 8 iterations - the third full cycle of
jwill have 7 iterations - ...
- the last full cycle of
jwill have 1 iteration - This means that the inner loop j will contribute roughly O(n / 2) on
average
- for example, let's say we have an array of 10 elements,
- The two loops are nested so our total time complexity is O(n * n / 2) =
O(n2)
You'll notice that during this analysis we said something silly like O(n / 2).
In some analyses such as this one, we'll prefer to drop the constants only at
the end of the sketch so you understand the logical steps we took to derive a
complicated time complexity.
746. Space Complexity Analysis: O(1)
The amount of memory consumed by the algorithm does not increase relative to the
size of the input array. We use the same amount of memory and create the same
amount of variables regardless of the size of our input. A quick indicator of
this is the fact that we don't create any arrays.
747. When should we use Selection Sort?
There is really only one use case where Selection Sort becomes superior to
Bubble Sort. Both algorithms are quadratic in time and constant in space, but
the point at which they differ is in the number of swaps they make.
Bubble Sort, in the worst case, invokes a swap on every single comparison.
Selection Sort only swaps once our inner loop has completely finished traversing
the array. Therefore, Selection Sort is optimized to make the least possible
number of swaps.
Selection Sort becomes advantageous when making a swap is the most expensive
operation in your system. You will likely rarely encounter this scenario, but in
a situation where you've built (or have inherited) a system with suboptimal
write speed ability, for instance, maybe you're sorting data in a specialized
database tuned strictly for fast read speeds at the expense of slow write
speeds, using Selection Sort would save you a ton of expensive operations that
could potential crash your system under peak load.
Though in industry this situation is very rare, the insights above make for a
fantastic conversational piece when weighing technical tradeoffs while
strategizing solutions in an interview setting. This commentary may help deliver
the impression that you are well-versed in system design and technical analysis,
a key indicator that someone is prepared for a senior level position.
Insertion Sort Analysis
Take a look at the snippet below and try to understand how it corresponds to our
conceptual understanding of the Insertion Sort algorithm. Scroll down to the
commented version when you get stuck:
function insertionSort(arr) { for (let i = 1; i < arr.length; i++) { let currElement = arr[i]; for (var j = i - 1; j >= 0 && currElement < arr[j]; j--) { arr[j + 1] = arr[j]; } arr[j + 1] = currElement; } return arr; }
function insertionSort(arr) { // the `i` loop will iterate through every element of the array // we begin at i = 1, because we can consider the first element of the array as a // trivially sorted region of only one element // insertion sort allows us to insert new elements anywhere within the sorted region for (let i = 1; i < arr.length; i++) { // grab the first element of the unsorted region let currElement = arr[i]; // the `j` loop will iterate left through the sorted region, // looking for a legal spot to insert currElement for (var j = i - 1; j >= 0 && currElement < arr[j]; j--) { // keep moving left while currElement is less than the j-th element arr[j + 1] = arr[j]; // the line above will move the j-th element to the right, // leaving a gap to potentially insert currElement } // insert currElement into that gap arr[j + 1] = currElement; } return arr; }
There are a few key pieces to point out in the above solution before moving
forward:
- The outer
forloop starts at the 1st index, not the 0th index, and moves to
the right. - The inner
forloop starts immediately to the left of the current element,
and moves to the left. - The condition for the inner
forloop is complicated, and behaves similarly
to a while loop!- It continues iterating to the left toward
j = 0, only while the
currElementis less thanarr[j]. - It does this over and over until it finds the proper place to insert
currElement, and then we exit the inner loop!
- It continues iterating to the left toward
- When shifting elements in the sorted region to the right, it does not
replace the value at their old index! If the input array is[1, 2, 4, 3],
andcurrElementis3, after comparing4and3, but before inserting
3between2and4, the array will look like this:[1, 2, 4, 4].
If you are currently scratching your head, that is perfectly okay because when
this one clicks, it clicks for good.
If you're struggling, you should try taking out a pen and paper and step through
the solution provided above one step at a time. Keep track ofi,j,
currElement,arr[j], and the inputarritself at every step. After going
through this a few times, you'll have your "ah HA!" moment.
748. Time and Space Complexity Analysis
Insertion Sort runtime is O(n2) because:
In the worst case scenario where our input array is entirely unsorted, since
this algorithm contains a nested loop, its run time behaves similarly to
bubbleSort and selectionSort. In this case, we are forced to make a comparison
at each iteration of the inner loop. Not convinced? Let's derive the complexity.
We'll use much of the same argument as we did in selectionSort. Say we had the
worst case scenario where are input array is sorted in full decreasing order,
but we wanted to sort it in increasing order:
nis the length of the input array- The outer loop i contributes O(n) in isolation, this is plain to see
- The inner loop j is more complicated. We know j will iterate until it finds an
appropriate place to insert thecurrElementinto the sorted region. However,
since we are discussing the case where the data is already in decreasing
order, the element must travel the maximum distance to find it's insertion
point! We know this insertion point to be index 0, since everycurrElement
will be the next smallest of the array. So:- the 1st element travels 1 distance to be inserted
- the 2nd element travels 2 distance to be inserted
- the 3rd element travels 3 distance to be inserted
- ...
- the n-1th element travels n-1 distance to be inserted
- This means that our inner loop j will contribute roughly O(n / 2) on
average
- The two loops are nested so our total time complexity is O(n * n / 2) =
O(n2)
748.1. Space Complexity: O(1)
The amount of memory consumed by the algorithm does not increase relative to the
size of the input array. We use the same amount of memory and create the same
amount of variables regardless of the size of our input. A quick indicator of
this is the fact that we don't create any arrays.
749. When should you use Insertion Sort?
Insertion Sort has one advantage that makes it absolutely supreme in one special
case. Insertion Sort is what's known as an "online" algorithm. Online algorithms
are great when you're dealing with streaming data, because they can sort the
data live as it is received.
If you must sort a set of data that is ever-incoming, for example, maybe you are
sorting the most relevant posts in a social media feed so that those posts that
are most likely to impact the site's audience always appear at the top of the
feed, an online algorithm like Insertion Sort is a great option.
Insertion Sort works well in this situation because the left side of the array
is always sorted, and in the case of nearly sorted arrays, it can run in linear
time. The absolute best case scenario for Insertion Sort is when there is only
one unsorted element, and it is located all the way to the right of the array.
Well, if you have data constantly being pushed to the array, it will always be
added to the right side. If you keep your algorithm constantly running, the left
side will always be sorted. Now you have linear time sort.
Otherwise, Insertion Sort is, in general, useful in all the same situations as
Bubble Sort. It's a good option when:
- You are sorting really small arrays where run time will be negligible no
matter what algorithm we choose. - You are sorting an array that you expect to already be nearly sorted.
Merge Sort Analysis
You needed to come up with two pieces of code to make merge sort work.
750. Full code
function merge(array1, array2) { let merged = []; while (array1.length || array2.length) { let ele1 = array1.length ? array1[0] : Infinity; let ele2 = array2.length ? array2[0] : Infinity; let next; if (ele1 < ele2) { next = array1.shift(); } else { next = array2.shift(); } merged.push(next); } return merged; } function mergeSort(array) { if (array.length <= 1) { return array; } let midIdx = Math.floor(array.length / 2); let leftHalf = array.slice(0, midIdx); let rightHalf = array.slice(midIdx); let sortedLeft = mergeSort(leftHalf); let sortedRight = mergeSort(rightHalf); return merge(sortedLeft, sortedRight); }
751. Merging two sorted arrays
Merging two sorted arrays is simple. Since both arrays are sorted, we know the
smallest numbers to always be at the front of the arrays. We can construct the
new array by comparing the first elements of both input arrays. We remove the
smaller element from it's respective array and add it to our new array. Do this
until both input arrays are empty:
function merge(array1, array2) { let merged = []; while (array1.length || array2.length) { let ele1 = array1.length ? array1[0] : Infinity; let ele2 = array2.length ? array2[0] : Infinity; let next; if (ele1 < ele2) { next = array1.shift(); } else { next = array2.shift(); } merged.push(next); } return merged; }
Remember the following about JavaScript to understand the above code.
0is considered a falsey value, meaning it acts likefalsewhen used in
Boolean expressions. All other numbers are truthy.Infinityis a value that is guaranteed to be greater than any other quantityshiftis an array method that removes and returns the first element
Here's the annotated version.
// commented function merge(array1, array2) { let merged = []; // keep running while either array still contains elements while (array1.length || array2.length) { // if array1 is nonempty, take its the first element as ele1 // otherwise array1 is empty, so take Infinity as ele1 let ele1 = array1.length ? array1[0] : Infinity; // do the same for array2, ele2 let ele2 = array2.length ? array2[0] : Infinity; let next; // remove the smaller of the eles from it's array if (ele1 < ele2) { next = array1.shift(); } else { next = array2.shift(); } // and add that ele to the new array merged.push(next); } return merged; }
By using Infinity as the default element when an array is empty, we are able to
elegantly handle the scenario where one array empties before the other. We know
that any actual element will be less than Infinity so we will continually take
the other element into our merged array.
In other words, we can safely handle this edge case:
merge([10, 13, 15, 25], []); // => [10, 13, 15, 25]
Nice! We now have a way to merge two sorted arrays into a single sorted array.
It's worth mentioning that merge will have a O(n) runtime where n is
the
combined length of the two input arrays. This is what we meant when we said it
was "easy" to merge two sorted arrays; linear time is fast! We'll find fact this
useful later.
752. Divide and conquer, step-by-step
Now that we satisfied the merge idea, let's handle the second point. That is, we
say an array of 1 or 0 elements is already sorted. This will be the base case of
our recursion. Let's begin adding this code:
function mergeSort(array) { if (array.length <= 1) { return array; } // .... }
If our base case pertains to an array of a very small size, then the design of
our recursive case should make progress toward hitting this base scenario. In
other words, we should recursively call mergeSort on smaller and smaller
arrays. A logical way to do this is to take the input array and split it into
left and right halves.
function mergeSort(array) { if (array.length <= 1) { return array; } let midIdx = Math.floor(array.length / 2); let leftHalf = array.slice(0, midIdx); let rightHalf = array.slice(midIdx); let sortedLeft = mergeSort(leftHalf); let sortedRight = mergeSort(rightHalf); // ... }
Here is the part of the recursion where we do a lot of hand waving and we take
things on faith. We know that mergeSort will take in an array and return the
sorted version; we assume that it works. That means the two recursive calls will
return the sortedLeft and sortedRight halves.
Okay, so we have two sorted arrays. We want to return one sorted array. So
merge them! Using the merge function we designed earlier:
function mergeSort(array) { if (array.length <= 1) { return array; } let midIdx = Math.floor(array.length / 2); let leftHalf = array.slice(0, midIdx); let rightHalf = array.slice(midIdx); let sortedLeft = mergeSort(leftHalf); let sortedRight = mergeSort(rightHalf); return merge(sortedLeft, sortedRight); }
Wow. that's it. Notice how light the implementation of mergeSort is. Much of
the heavy lifting (the actually comparisons) is done by the merge helper.
mergeSort is a classic example of a "Divide and Conquer" algorithm. In other
words, we keep breaking the array into smaller and smaller sub arrays. This is
the same as saying we take the problem and break it down into smaller and
smaller subproblems. We do this until the subproblems are so small that we
trivially know the answer to them (an array length 0 or 1 is already sorted).
Once we have those subanswers we can combine to reconstruct the larger problems
that we previously divided (merge the left and right subarrays).
753. Time and Space Complexity Analysis
753.1. Time Complexity: O(n log(n))
nis the length of the input array- We must calculate how many recursive calls we make. The number of recursive
calls is the number of times we must split the array to reach the base case.
Since we split in half each time, the number of recursive calls is
O(log(n)).- for example, say we had an array of length
32 - then the length would change as
32 -> 16 -> 8 -> 4 -> 2 -> 1, we have to
split 5 times before reaching the base case,log(32) = 5 - in our algorithm, log(n) describes how many times we must halve n
until the quantity reaches 1.
- for example, say we had an array of length
- Besides the recursive calls, we must consider the while loop within the
mergefunction, which contributesO(n)in isolation - We call
mergein every recursivemergeSortcall, so the total complexity
is O(n * log(n))
753.2. Space Complexity: O(n)
Merge Sort is the first non-O(1) space sorting algorithm we've seen thus far.
The larger the size of our input array, the greater the number of subarrays we
must create in memory. These are not free! They each take up finite space, and
we will need a new subarray for each element in the original input. Therefore,
Merge Sort has a linear space complexity, O(n).
753.3. When should you use Merge Sort?
Unless we, the engineers, have access in advance to some unique, exploitable
insight about our dataset, it turns out that O(n log n) time is the best we
can do when sorting unknown datasets.
That means that Merge Sort is fast! It's way faster than Bubble Sort, Selection
Sort, and Insertion Sort. However, due to its linear space complexity, we must
always weigh the trade off between speed and memory consumption when making the
choice to use Merge Sort. Consider the following:
- If you have unlimited memory available, use it, it's fast!
- If you have a decent amount of memory available and a medium sized dataset,
run some tests first, but use it! - In other cases, maybe you should consider other options.
Quick Sort Analysis
Let's begin structuring the recursion. The base case of any recursive problem is
where the input is so trivial, we immediately know the answer without
calculation. If our problem is to sort an array, what is the trivial array? An
array of 1 or 0 elements! Let's establish the code:
function quickSort(array) { if (array.length <= 1) { return array; } // ... }
If our base case pertains to an array of a very small size, then the design of
our recursive case should make progress toward hitting this base scenario. In
other words, we should recursively call quickSort on smaller and smaller
arrays. This is very similar to our previous mergeSort, except we don't just
split the array down the middle. Instead we should arbitrarily choose an element
of the array as a pivot and partition the remaining elements relative to this
pivot:
function quickSort(array) { if (array.length <= 1) { return array; } let pivot = array.shift(); let left = array.filter(el => el < pivot); let right = array.filter(el => el >= pivot); // ...
Here is what to notice about the partition step above:
- the pivot is an element of the array; we arbitrarily chose the first element
- we removed the pivot from the master array before we filter into the left and
right partitions
Now that we have the two subarrays ofleftandrightwe have our
subproblems! To solve these subproblems we must sort the subarrays. I wish we
had a function that sorts an array...oh wait we do,quickSort! Recursively:
function quickSort(array) { if (array.length <= 1) { return array; } let pivot = array.shift(); let left = array.filter(el => el < pivot); let right = array.filter(el => el >= pivot); let leftSorted = quickSort(left); let rightSorted = quickSort(right); // ...
Okay, so we have the two sorted partitions. This means we have the two
subsolutions. But how do we put them together? Think about how we partitioned
them in the first place. Everything in leftSorted is guaranteed to be less
than everything in rightSorted. On top of that, pivot should be placed after
the last element in leftSorted, but before the first element in rightSorted.
So all we need to do is to combine the elements in the order "left, pivot,
right"!
function quickSort(array) { if (array.length <= 1) { return array; } let pivot = array.shift(); let left = array.filter(el => el < pivot); let right = array.filter(el => el >= pivot); let leftSorted = quickSort(left); let rightSorted = quickSort(right); return leftSorted.concat([pivot]).concat(rightSorted); }
That last concat line is a bit clunky. Bonus JS Lesson: we can use the spread
... operator to elegantly concatenate arrays. In general:
let one = ['a', 'b'] let two = ['d', 'e', 'f'] let newArr = [ ...one, 'c', ...two ]; newArr; // => [ 'a', 'b', 'c', 'd', 'e', 'f' ]
Utilizing that spread pattern gives us this final implementation:
function quickSort(array) { if (array.length <= 1) { return array; } let pivot = array.shift(); let left = array.filter(el => el < pivot); let right = array.filter(el => el >= pivot); let leftSorted = quickSort(left); let rightSorted = quickSort(right); return [ ...leftSorted, pivot, ...rightSorted ]; }
753.4. Quicksort Sort JS Implementation
That code was so clean we should show it again. Here's the complete code for
your reference, for when you ctrl+F "quicksort" the night before an interview:
function quickSort(array) { if (array.length <= 1) { return array; } let pivot = array.shift(); let left = array.filter(el => el < pivot); let right = array.filter(el => el >= pivot); let leftSorted = quickSort(left); let rightSorted = quickSort(right); return [ ...leftSorted, pivot, ...rightSorted ]; }
754. Time and Space Complexity Analysis
Here is a summary of the complexity.
754.1. Time Complexity
- Avg Case: O(n log(n))
- Worst Case: O(n2)
The runtime analysis ofquickSortis more complex thanmergeSort nis the length of the input array- The partition step alone is
O(n) - We must calculate how many recursive calls we make. The number of recursive
calls is the number of times we must split the array to reach the base case.
This is dependent on how we choose the pivot. Let's analyze the best and worst
case:- Best Case: We are lucky and always choose the median as the pivot.
This means the left and right partitions will have equal length. This will
halve the array length at every step of the recursion. We benefit from
this halving withO(log(n))recursive calls to reach the base case. - Worst Case: We are unlucky and always choose the min or max as the
pivot. This means one partition will contain everything, and the other
partition is empty. This will decrease the array length by 1 at every step
of the recursion. We suffer fromO(n)recursive calls to reach the base
case.
- Best Case: We are lucky and always choose the median as the pivot.
- The partition step occurs in every recursive call, so our total complexities
are:- Best Case: O(n * log(n))
- Worst Case: O(n2)
Although we typically take the worst case when describing Big-O for an
algorithm, much research onquickSorthas shown the worst case to be an
exceedingly rare occurrence even if we choose the pivot at random. Because of
this we still considerquickSortan efficient algorithm. This is a common
interview talking point, so you should be familiar with the relationship between
the choice of pivot and efficiency of the algorithm.
Just in case: A somewhat common question a student may ask when studying
quickSortis, "If the median is the best pivot, why don't we always just
choose the median when we partition?" Don't overthink this. To know the median
of an array, it must be sorted in the first place.
754.2. Space Complexity
Our implementation of quickSort uses O(n) space because of the partition
arrays we create. There is an in-place version of quickSort that uses
O(log(n)) space. O(log(n)) space is not huge benefit over O(n).
You'll
also find our version of quickSort as easier to remember, easier to implement.
Just know that a O(logn) space quickSort exists.
754.3. When should you use Quick Sort?
- When you are in a pinch and need to throw down an efficient sort (on average).
The recursive code is light and simple to implement; much smaller than
mergeSort. - When constant space is important to you, use the in-place version. This will
of course trade off some simplicity of implementation.
If you know some constraints about dataset you can make some modifications to
optimize pivot choice. Here's some food for thought. Our implementation of
quickSortwill always take the first element as the pivot. This means we will
suffer from the worst case time complexity in the event that we are given an
already sorted array (ironic isn't it?). If you know your input data to be
mostly already sorted, randomize the choice of pivot - this is a very easy
change. Bam. Solved like a true engineer.
Binary Search Analysis
We'll implement binary search recursively. As always, we start with a base case
that captures the scenario of the input array being so trivial, that we know the
answer without further calculation. If we are given an empty array and a target,
we can be certain that the target is not inside of the array:
function binarySearch(array, target) { if (array.length === 0) { return false; } // ... }
Now for our recursive case. If we want to get a time complexity less than
O(n), we must avoid touching all n elements. Adopting our dictionary
strategy, let's find the middle element and grab references to the left and
right halves of the sorted array:
function binarySearch(array, target) { if (array.length === 0) { return false; } let midIdx = Math.floor(array.length / 2); let leftHalf = array.slice(0, midIdx); let rightHalf = array.slice(midIdx + 1); // ... }
It's worth pointing out that the left and right halves do not contain the middle
element we chose.
Here is where we leverage the sorted property of the array. If the target is
less than the middle, then the target must be in the left half of the array. If
the target is greater than the middle, then the target must be in the right half
of the array. So we can narrow our search to one of these halves, and ignore the
other. Luckily we have a function that can search the half, its binarySearch:
function binarySearch(array, target) { if (array.length === 0) { return false; } let midIdx = Math.floor(array.length / 2); let leftHalf = array.slice(0, midIdx); let rightHalf = array.slice(midIdx + 1); if (target < array[midIdx]) { return binarySearch(leftHalf, target); } else if (target > array[midIdx]) { return binarySearch(rightHalf, target); } // ... }
We know binarySeach will return the correct Boolean, so we just pass that
result up by returning it ourselves. However, something is lacking in our code.
It is only possible to get a false from the literal return false line, but
there is no return true. Looking at our conditionals, we handle the cases
where the target is less than middle or the target is greater than the middle,
but what if the product is equal to the middle? If the target is equal to
the middle, then we found the target and should return true! This is easy to
add with an else:
function binarySearch(array, target) { if (array.length === 0) { return false; } let midIdx = Math.floor(array.length / 2); let leftHalf = array.slice(0, midIdx); let rightHalf = array.slice(midIdx + 1); if (target < array[midIdx]) { return binarySearch(leftHalf, target); } else if (target > array[midIdx]) { return binarySearch(rightHalf, target); } else { return true; } }
To wrap up, we have confidence of our base case will eventually be hit because
we are continually halving the array. We halve the array until it's length is 0
or we actually find the target.
754.4. Binary Search JS Implementation
Here is the code again for your quick reference:
function binarySearch(array, target) { if (array.length === 0) { return false; } let midIdx = Math.floor(array.length / 2); let leftHalf = array.slice(0, midIdx); let rightHalf = array.slice(midIdx + 1); if (target < array[midIdx]) { return binarySearch(leftHalf, target); } else if (target > array[midIdx]) { return binarySearch(rightHalf, target); } else { return true; } }
755. Time and Space Complexity Analysis
The complexity analysis of this algorithm is easier to explain through visuals,
so we highly encourage you to watch the lecture that accompanies this
reading. In any case, here is a summary of the complexity:
755.1. Time Complexity: O(log(n))
nis the length of the input array- We have no loops, so we must only consider the number of recursive calls it
takes to hit the base case - The number of recursive calls is the number of times we must halve the array
until it's length becomes 0. This number can be described bylog(n)- for example, say we had an array of 8 elements,
n = 8 - the length would halve as
8 -> 4 -> 2 -> 1 - it takes 3 calls,
log(8) = 3
- for example, say we had an array of 8 elements,
755.2. Space Complexity: O(n)
Our implementation uses n space due to half arrays we create using slice. Note
that JavaScript slice creates a new array, so it requires additional memory to
be allocated.
755.3. When should we use Binary Search?
Use this algorithm when the input data is sorted!!! This is a heavy requirement,
but if you have it, you'll have an insanely fast algorithm. Of course, you can
use one of your high-functioning sorting algorithms to sort the input and then
perform the binary search!
Practice: Bubble Sort
This project contains a skeleton for you to implement Bubble Sort. In the
file lib/bubble_sort.js, you should implement the Bubble Sort. This is a
description of how the Bubble Sort works (and is also in the code file).
Bubble Sort: (array)
n := length(array)
repeat
swapped = false
for i := 1 to n - 1 inclusive do
/* if this pair is out of order */
if array[i - 1] > array[i] then
/* swap them and remember something changed */
swap(array, i - 1, i)
swapped := true
end if
end for
until not swapped
756. Instructions
- Clone the project from
https://github.com/appacademy-starters/algorithms-bubble-sort-starter. cdinto the project foldernpm installto install dependencies in the project root directorynpm testto run the specs- You can view the test cases in
/test/test.js. Your job is to write code in
the/lib/bubble_sort.jsthat implements the Bubble Sort.
Practice: Selection Sort
This project contains a skeleton for you to implement Selection Sort. In the
file lib/selection_sort.js, you should implement the Selection Sort. You
can use the same swap function from Bubble Sort; however, try to implement it
on your own, first.
The algorithm can be summarized as the following:
- Set MIN to location 0
- Search the minimum element in the list
- Swap with value at location MIN
- Increment MIN to point to next element
- Repeat until list is sorted
This is a description of how the Selection Sort works (and is also in the code
file).
procedure selection sort(list)
list : array of items
n : size of list
for i = 1 to n - 1
/* set current element as minimum*/
min = i
/* check the element to be minimum */
for j = i+1 to n
if list[j] < list[min] then
min = j;
end if
end for
/* swap the minimum element with the current element*/
if indexMin != i then
swap list[min] and list[i]
end if
end for
end procedure
757. Instructions
- Clone the project from
https://github.com/appacademy-starters/algorithms-selection-sort-starter. cdinto the project foldernpm installto install dependencies in the project root directorynpm testto run the specs- You can view the test cases in
/test/test.js. Your job is to write code in
the/lib/selection_sort.jsthat implements the Selection Sort.
Practice: Insertion Sort
This project contains a skeleton for you to implement Insertion Sort. In the
file lib/insertion_sort.js, you should implement the Insertion Sort.
The algorithm can be summarized as the following:
- If it is the first element, it is already sorted. return 1;
- Pick next element
- Compare with all elements in the sorted sub-list
- Shift all the elements in the sorted sub-list that is greater than the
value to be sorted - Insert the value
- Repeat until list is sorted
This is a description of how the Insertion Sort works (and is also in the code
file).
procedure insertionSort( A : array of items )
int holePosition
int valueToInsert
for i = 1 to length(A) inclusive do:
/* select value to be inserted */
valueToInsert = A[i]
holePosition = i
/*locate hole position for the element to be inserted */
while holePosition > 0 and A[holePosition-1] > valueToInsert do:
A[holePosition] = A[holePosition-1]
holePosition = holePosition -1
end while
/* insert the number at hole position */
A[holePosition] = valueToInsert
end for
end procedure
758. Instructions
- Clone the project from
https://github.com/appacademy-starters/algorithms-insertion-sort-starter. cdinto the project foldernpm installto install dependencies in the project root directorynpm testto run the specs- You can view the test cases in
/test/test.js. Your job is to write code in
the/lib/insertion_sort.jsthat implements the Insertion Sort.
Practice: Merge Sort
This project contains a skeleton for you to implement Merge Sort. In the
file lib/merge_sort.js, you should implement the Merge Sort.
The algorithm can be summarized as the following:
- if there is only one element in the list, it is already sorted. return that
array. - otherwise, divide the list recursively into two halves until it can no more
be divided. - merge the smaller lists into new list in sorted order.
This is a description of how the Merge Sort works (and is also in the code
file).
procedure mergesort( a as array )
if ( n == 1 ) return a
/* Split the array into two */
var l1 as array = a[0] ... a[n/2]
var l2 as array = a[n/2+1] ... a[n]
l1 = mergesort( l1 )
l2 = mergesort( l2 )
return merge( l1, l2 )
end procedure
procedure merge( a as array, b as array )
var result as array
while ( a and b have elements )
if ( a[0] > b[0] )
add b[0] to the end of result
remove b[0] from b
else
add a[0] to the end of result
remove a[0] from a
end if
end while
while ( a has elements )
add a[0] to the end of result
remove a[0] from a
end while
while ( b has elements )
add b[0] to the end of result
remove b[0] from b
end while
return result
end procedure
759. Instructions
- Clone the project from
https://github.com/appacademy-starters/algorithms-merge-sort-starter. cdinto the project foldernpm installto install dependencies in the project root directorynpm testto run the specs- You can view the test cases in
/test/test.js. Your job is to write code in
the/lib/merge_sort.jsthat implements the Merge Sort.
Practice: Quick Sort
This project contains a skeleton for you to implement Quick Sort. In the
file lib/quick_sort.js, you should implement the Quick Sort. This is a
description of how the Quick Sort works (and is also in the code file).
procedure quick sort (array)
if the length of the array is 0 or 1, return the array
set the pivot to the first element of the array
remove the first element of the array
put all values less than the pivot value into an array called left
put all values greater than the pivot value into an array called right
call quick sort on left and assign the return value to leftSorted
call quick sort on right and assign the return value to rightSorted
return the concatenation of leftSorted, the pivot value, and rightSorted
end procedure quick sort
760. Instructions
- Clone the project from
https://github.com/appacademy-starters/algorithms-quick-sort-starter. cdinto the project foldernpm installto install dependencies in the project root directorynpm testto run the specs- You can view the test cases in
/test/test.js. Your job is to write code in
the/lib/quick_sort.jsthat implements the Quick Sort.
Practice: Binary Search
This project contains a skeleton for you to implement Binary Search. In the
file lib/binary_search.js, you should implement the Binary Search and its
cousin Binary Search Index.
The Binary Search algorithm can be summarized as the following:
- If the array is empty, then return false
- Check the value in the middle of the array against the target value
- If the value is equal to the target value, then return true
- If the value is less than the target value, then return the binary search on
the left half of the array for the target - If the value is greater than the target value, then return the binary search
on the right half of the array for the target
This is a description of how the Binary Search works (and is also in the code
file).
procedure binary search (list, target)
parameter list: a list of sorted value
parameter target: the value to search for
if the list has zero length, then return false
determine the slice point:
if the list has an even number of elements,
the slice point is the number of elements
divided by two
if the list has an odd number of elements,
the slice point is the number of elements
minus one divided by two
create an list of the elements from 0 to the
slice point, not including the slice point,
which is known as the "left half"
create an list of the elements from the
slice point to the end of the list which is
known as the "right half"
if the target is less than the value in the
original array at the slice point, then
return the binary search of the "left half"
and the target
if the target is greater than the value in the
original array at the slice point, then
return the binary search of the "right half"
and the target
if neither of those is true, return true
end procedure binary search
Then you need to adapt that to return the index of the found item rather than
a Boolean value. The pseudocode is also in the code file.
procedure binary search index(list, target, low, high)
parameter list: a list of sorted value
parameter target: the value to search for
parameter low: the lower index for the search
parameter high: the upper index for the search
if low is equal to high, then return -1 to indicate
that the value was not found
determine the slice point:
if the list between the high index and the low index
has an even number of elements,
the slice point is the number of elements
between high and low divided by two
if the list between the high index and the low index
has an odd number of elements,
the slice point is the number of elements
between high and low minus one, divided by two
if the target is less than the value in the
original array at the slice point, then
return the binary search of the array,
the target, low, and the slice point
if the target is greater than the value in the
original array at the slice point, then return
the binary search of the array, the target,
the slice point plus one, and high
if neither of those is true, return the slice point
end procedure binary search index
761. Instructions
- Clone the project from
https://github.com/appacademy-starters/algorithms-binary-search-starter. cdinto the project foldernpm installto install dependencies in the project root directorynpm testto run the specs- You can view the test cases in
/test/test.js. Your job is to write code in
the/lib/binary_search.jsthat implements the Binary Search and Binary
Search Index.
WEEK-07 DAY-4
Lists, Stacks, Queues
Lists, Stacks, and Queues Learning Objectives
The objective of this lesson is for you to become comfortable with
implementing common data structures. This is important because questions about
data structures are incredibly likely to be interview questions for software
engineers from junior to senior levels. Moreover, understanding how different
data structures work will influence the libraries and frameworks that you choose
when writing software.
When you are done, you will be able to:
- Explain and implement a List.
- Explain and implement a Stack.
- Explain and implement a Queue.me comfortable with
implementing common data structures. This is important because questions about
data structures are incredibly likely to be interview questions for software
engineers from junior to senior levels. Moreover, understanding how different
data structures work will influence the libraries and frameworks that you choose
when writing software.
When you are done, you will be able to: - Explain and implement a List.
- Explain and implement a Stack.
- Explain and implement a Queue.
Linked Lists
In the university setting, it’s common for Linked Lists to appear early on in an
undergraduate’s Computer Science coursework. While they don't always have the
most practical real-world applications in industry, Linked Lists make for an
important and effective educational tool in helping develop a student's mental
model on what data structures actually are to begin with.
Linked lists are simple. They have many compelling, reoccurring edge cases to
consider that emphasize to the student the need for care and intent while
implementing data structures. They can be applied as the underlying data
structure while implementing a variety of other prevalent abstract data types,
such as Lists, Stacks, and Queues, and they have a level of versatility high
enough to clearly illustrate the value of the Object Oriented Programming
paradigm.
They also come up in software engineering interviews quite often.
762. What is a Linked List?
A Linked List data structure represents a linear sequence of "vertices" (or
"nodes"), and tracks three important properties.
Linked List Properties:
| Property | Description | | :---------: | :-------------------------------------------------: | | `head` | The first node in the list. | | `tail` | The last node in the list. | | `length` | The number of nodes in the list; the list's length. | The data being tracked by a particular Linked List does not live inside the Linked List instance itself. Instead, each vertex is actually an instance of an even simpler, smaller data structure, often referred to as a "Node". Depending on the type of Linked List (there are many), Node instances track some very important properties as well.Linked List Node Properties:
| Property | Description | | :---------: | :----------------------------------------------------: | | `value` | The actual value this node represents. | | `next` | The next node in the list (relative to this node). | | `previous` | The previous node in the list (relative to this node). |
NOTE: The previous property is for Doubly Linked Lists only!
Admittedly, this does sound a lot like an Array so far, and that's because
Arrays and Linked Lists are both implementations of the List ADT. However, there
is an incredibly important distinction to be made between Arrays and Linked
Lists, and that is how they physically store their data. (As opposed to how
they represent the order of their data.)
Recall that Arrays contain contiguous data. Each element of an array is
actually stored next to it's neighboring element in the actual hardware of
your machine, in a single continuous block in memory.
An Array's contiguous data being stored in a continuous block of addresses in memory.
Unlike Arrays, Linked Lists contain _non-contiguous_ data. Though Linked Lists _represent_ data that is ordered linearly, that mental model is just that - an interpretation of the _representation_ of information, not reality. In reality, in the actual hardware of your machine, whether it be in disk or in memory, a Linked List's Nodes are not stored in a single continuous block of addresses. Rather, Linked List Nodes live at randomly distributed addresses throughout your machine! The only reason we know which node comes next in the list is because we've assigned its reference to the current node's `next` pointer. 
A Singly Linked List's non-contiguous data (Nodes) being stored at randomly distributed addresses in memory.
For this reason, Linked List Nodes have _no indices_, and no _random access_. Without random access, we do not have the ability to look up an individual Linked List Node in constant time. Instead, to find a particular Node, we have to start at the very first Node and iterate through the Linked List one node at a time, checking each Node's _next_ Node until we find the one we're interested in. So when implementing a Linked List, we actually must implement both the Linked List class _and_ the Node class. Since the actual data lives in the Nodes, it's simpler to implement the Node class first. ## 763. Types of Linked Lists
There are four flavors of Linked List you should be familiar with when walking
into your job interviews.
Linked List Types:
| List Type | Description | Directionality | | :-------------------: | :-------------------------------------------------------------------------------: | :--------------------------: | | Singly Linked | Nodes have a single pointer connecting them in a single direction. | Head→Tail | | Doubly Linked | Nodes have two pointers connecting them bi-directionally. | Head⇄Tail | | Multiply Linked | Nodes have two or more pointers, providing a variety of potential node orderings. | Head⇄Tail, A→Z, Jan→Dec, etc. | | Circularly Linked | Final node's `next` pointer points to the first node, creating a non-linear, circular version of a Linked List. | Head→Tail→Head→Tail|NOTE: These Linked List types are not always mutually exclusive.
For instance: - Any type of Linked List can be implemented Circularly (e.g. A Circular Doubly Linked List). - A Doubly Linked List is actually just a special case of a Multiply Linked List. You are most likely to encounter Singly and Doubly Linked Lists in your upcoming job search, so we are going to focus exclusively on those two moving forward. However, in more senior level interviews, it is very valuable to have some familiarity with the other types of Linked Lists. Though you may not actually code them out, _you will win extra points by illustrating your ability to weigh the tradeoffs of your technical decisions_ by discussing how your choice of Linked List type may affect the efficiency of the solutions you propose. ## 764. Linked List MethodsLinked Lists are great foundation builders when learning about data structures
because they share a number of similar methods (and edge cases) with many other
common data structures. You will find that many of the concepts discussed here
will repeat themselves as we dive into some of the more complex non-linear data
structures later on, like Trees and Graphs.
In the project that follows, we will implement the following Linked List
methods:
| Type | Name | Description | Returns |
|---|---|---|---|
| Insertion | addToTail |
Adds a new node to the tail of the Linked List. | Updated Linked List |
| Insertion | addToHead |
Adds a new node to the head of the Linked List. | Updated Linked List |
| Insertion | insertAt |
Inserts a new node at the "index", or position, specified. | Boolean |
| Deletion | removeTail |
Removes the node at the tail of the Linked List. | Removed node |
| Deletion | removeHead |
Removes the node at the head of the Linked List. | Removed node |
| Deletion | removeFrom |
Removes the node at the "index", or position, specified. | Removed node |
| Search | contains |
Searches the Linked List for a node with the value specified. | Boolean |
| Access | get |
Gets the node at the "index", or position, specified. | Node at index |
| Access | set |
Updates the value of a node at the "index", or position, specified. | Boolean |
| Meta | size |
Returns the current size of the Linked List. | Integer |
765. Time and Space Complexity Analysis
Before we begin our analysis, here is a quick summary of the Time and Space
constraints of each Linked List Operation. The complexities below apply to both
Singly and Doubly Linked Lists:
| Data Structure Operation | Time Complexity (Avg) | Time Complexity (Worst) | Space Complexity (Worst) |
|---|---|---|---|
| Access | Θ(n) |
O(n) |
O(n) |
| Search | Θ(n) |
O(n) |
O(n) |
| Insertion | Θ(1) |
O(1) |
O(n) |
| Deletion | Θ(1) |
O(1) |
O(n) |
Before moving forward, see if you can reason to yourself why each operation has
the time and space complexity listed above!
766. Time Complexity - Access and Search:
766.1. Scenarios:
- We have a Linked List, and we'd like to find the 8th item in the list.
- We have a Linked List of sorted alphabet letters, and we'd like to see if the
letter "Q" is inside that list.
766.2. Discussion:
Unlike Arrays, Linked Lists Nodes are not stored contiguously in memory, and
thereby do not have an indexed set of memory addresses at which we can quickly
lookup individual nodes in constant time. Instead, we must begin at the head of
the list (or possibly at the tail, if we have a Doubly Linked List), and iterate
through the list until we arrive at the node of interest.
In Scenario 1, we'll know we're there because we've iterated 8 times. In
Scenario 2, we'll know we're there because, while iterating, we've checked each
node's value and found one that matches our target value, "Q".
In the worst case scenario, we may have to traverse the entire Linked List until
we arrive at the final node. This makes both Access & Search Linear Time
operations.
767. Time Complexity - Insertion and Deletion:
767.1. Scenarios:
- We have an empty Linked List, and we'd like to insert our first node.
- We have a Linked List, and we'd like to insert or delete a node at the Head
or Tail. - We have a Linked List, and we'd like to insert or delete a node from
somewhere in the middle of the list.
767.2. Discussion:
Since we have our Linked List Nodes stored in a non-contiguous manner that
relies on pointers to keep track of where the next and previous nodes live,
Linked Lists liberate us from the linear time nature of Array insertions and
deletions. We no longer have to adjust the position at which each node/element
is stored after making an insertion at a particular position in the list.
Instead, if we want to insert a new node at position i, we can simply:
- Create a new node.
- Set the new node's
nextandpreviouspointers to the nodes that live at
positionsiandi - 1, respectively. - Adjust the
nextpointer of the node that lives at positioni - 1to point
to the new node. - Adjust the
previouspointer of the node that lives at positionito point
to the new node.
And we're done, in Constant Time. No iterating across the entire list necessary.
"But hold on one second," you may be thinking. "In order to insert a new node in
the middle of the list, don't we have to lookup its position? Doesn't that take
linear time?!"
Yes, it is tempting to call insertion or deletion in the middle of a Linked List
a linear time operation since there is lookup involved. However, it's usually
the case that you'll already have a reference to the node where your desired
insertion or deletion will occur.
For this reason, we separate the Access time complexity from the
Insertion/Deletion time complexity, and formally state that Insertion and
Deletion in a Linked List are Constant Time across the board.
767.3. NOTE:
Without a reference to the node at which an insertion or deletion will occur,
due to linear time lookup, an insertion or deletion in the middle of a Linked
List will still take Linear Time, sum total.
768. Space Complexity:
768.1. Scenarios:
- We're given a Linked List, and need to operate on it.
- We've decided to create a new Linked List as part of strategy to solve some
problem.
768.2. Discussion:
It's obvious that Linked Lists have one node for every one item in the list, and
for that reason we know that Linked Lists take up Linear Space in memory.
However, when asked in an interview setting what the Space Complexity of your
solution to a problem is, it's important to recognize the difference between
the two scenarios above.
In Scenario 1, we are not creating a new Linked List. We simply need to
operate on the one given. Since we are not storing a new node for every node
represented in the Linked List we are provided, our solution is not
necessarily linear in space.
In Scenario 2, we are creating a new Linked List. If the number of nodes we
create is linearly correlated to the size of our input data, we are now
operating in Linear Space.
768.3. NOTE:
Linked Lists can be traversed both iteratively and recursively. If you choose
to traverse a Linked List recursively, there will be a recursive function call
added to the call stack for every node in the Linked List. Even if you're
provided the Linked List, as in Scenario 1, you will still use Linear Space in
the call stack, and that counts.
Stacks and Queues
Stacks and Queues aren't really "data structures" by the strict definition of
the term. The more appropriate terminology would be to call them abstract data
types (ADTs), meaning that their definitions are more conceptual and related to
the rules governing their user-facing behaviors rather than their core
implementations.
For the sake of simplicity, we'll refer to them as data structures and ADTs
interchangeably throughout the course, but the distinction is an important one
to be familiar with as you level up as an engineer.
Now that that's out of the way, Stacks and Queues represent a linear collection
of nodes or values. In this way, they are quite similar to the Linked List data
structure we discussed in the previous section. In fact, you can even use a
modified version of a Linked List to implement each of them. (Hint, hint.)
These two ADTs are similar to each other as well, but each obey their own
special rule regarding the order with which Nodes can be added and removed from
the structure.
Since we've covered Linked Lists in great length, these two data structures will
be quick and easy. Let's break them down individually in the next couple of
sections.
769. What is a Stack?
Stacks are a Last In First Out (LIFO) data structure. The last Node added to a
stack is always the first Node to be removed, and as a result, the first Node
added is always the last Node removed.
The name Stack actually comes from this characteristic, as it is helpful to
visualize the data structure as a vertical stack of items. Personally, I like to
think of a Stack as a stack of plates, or a stack of sheets of paper. This seems
to make them more approachable, because the analogy relates to something in our
everyday lives.
If you can imagine adding items to, or removing items from, a Stack
of...literally anything...you'll realize that every (sane) person naturally
obeys the LIFO rule.
We add things to the top of a stack. We remove things from the top of a
stack. We never add things to, or remove things from, the bottom of the stack.
That's just crazy.
Note: We can use JavaScript Arrays to implement a basic stack. Array#push adds
to the top of the stack and Array#pop will remove from the top of the stack.
In the exercise that follows, we'll build our own Stack class from scratch
(without using any arrays). In an interview setting, your evaluator may be okay
with you using an array as a stack.
770. What is a Queue?
Queues are a First In First Out (FIFO) data structure. The first Node added to
the queue is always the first Node to be removed.
The name Queue comes from this characteristic, as it is helpful to visualize
this data structure as a horizontal line of items with a beginning and an end.
Personally, I like to think of a Queue as the line one waits on for an amusement
park, at a grocery store checkout, or to see the teller at a bank.
If you can imagine a queue of humans waiting...again, for literally
anything...you'll realize that most people (the civil ones) naturally obey the
FIFO rule.
People add themselves to the back of a queue, wait their turn in line, and
make their way toward the front. People exit from the front of a queue, but
only when they have made their way to being first in line.
We never add ourselves to the front of a queue (unless there is no one else in
line), otherwise we would be "cutting" the line, and other humans don't seem to
appreciate that.
Note: We can use JavaScript Arrays to implement a basic queue. Array#push adds
to the back (enqueue) and Array#shift will remove from the front (dequeue). In
the exercise that follows, we'll build our own Queue class from scratch (without
using any arrays). In an interview setting, your evaluator may be okay with you
using an array as a queue.
771. Stack and Queue Properties
Stacks and Queues are so similar in composition that we can discuss their
properties together. They track the following three properties:
Stack Properties | Queue Properties:
| Stack Property | Description | Queue Property | Description | | :------------: | :---------------------------------------------------: | :------------: | :---------------------------------------------------: | | `top` | The first node in the Stack | `front` | The first node in the Queue. | | ---- | Stacks do not have an equivalent | `back` | The last node in the Queue. | | `length` | The number of nodes in the Stack; the Stack's length. | `length` | The number of nodes in the Queue; the Queue's length. | Notice that rather than having a `head` and a `tail` like Linked Lists, Stacks have a `top`, and Queues have a `front` and a `back` instead. Stacks don't have the equivalent of a `tail` because you only ever push or pop things off the top of Stacks. These properties are essentially the same; pointers to the end points of the respective List ADT where important actions way take place. The differences in naming conventions are strictly for human comprehension.Similarly to Linked Lists, the values stored inside a Stack or a Queue are actually contained within Stack Node and Queue Node instances. Stack, Queue, and Singly Linked List Nodes are all identical, but just as a reminder and for the sake of completion, these List Nodes track the following two properties:
Stack & Queue Node Properties:
| Property | Description | | :---------: | :----------------------------------------------------: | | `value` | The actual value this node represents. | | `next` | The next node in the Stack (relative to this node). | ## 772. Stack MethodsIn the exercise that follows, we will implement a Stack data structure along
with the following Stack methods:
| Type | Name | Description | Returns |
|---|---|---|---|
| Insertion | push |
Adds a Node to the top of the Stack. | Integer - New size of stack |
| Deletion | pop |
Removes a Node from the top of the Stack. | Node removed from top of Stack |
| Meta | size |
Returns the current size of the Stack. | Integer |
773. Queue Methods
In the exercise that follows, we will implement a Queue data structure along
with the following Queue methods:
| Type | Name | Description | Returns |
|---|---|---|---|
| Insertion | enqueue |
Adds a Node to the front of the Queue. | Integer - New size of Queue |
| Deletion | dequeue |
Removes a Node from the front of the Queue. | Node removed from front of Queue |
| Meta | size |
Returns the current size of the Queue. | Integer |
774. Time and Space Complexity Analysis
Before we begin our analysis, here is a quick summary of the Time and Space
constraints of each Stack Operation.
| Data Structure Operation | Time Complexity (Avg) | Time Complexity (Worst) | Space Complexity (Worst) |
|---|---|---|---|
| Access | Θ(n) |
O(n) |
O(n) |
| Search | Θ(n) |
O(n) |
O(n) |
| Insertion | Θ(1) |
O(1) |
O(n) |
| Deletion | Θ(1) |
O(1) |
O(n) |
Before moving forward, see if you can reason to yourself why each operation has
the time and space complexity listed above!
774.1. Time Complexity - Access and Search:
When the Stack ADT was first conceived, its inventor definitely did not
prioritize searching and accessing individual Nodes or values in the list. The
same idea applies for the Queue ADT. There are certainly better data structures
for speedy search and lookup, and if these operations are a priority for your
use case, it would be best to choose something else!
Search and Access are both linear time operations for Stacks and Queues, and
that shouldn't be too unclear. Both ADTs are nearly identical to Linked Lists in
this way. The only way to find a Node somewhere in the middle of a Stack or a
Queue, is to start at the top (or the back) and traverse downward (or
forward) toward the bottom (or front) one node at a time via each Node's
next property.
This is a linear time operation, O(n).
774.2. Time Complexity - Insertion and Deletion:
For Stacks and Queues, insertion and deletion is what it's all about. If there
is one feature a Stack absolutely must have, it's constant time insertion and
removal to and from the top of the Stack (FIFO). The same applies for Queues,
but with insertion occurring at the back and removal occurring at the front
(LIFO).
Think about it. When you add a plate to the top of a stack of plates, do you
have to iterate through all of the other plates first to do so? Of course not.
You simply add your plate to the top of the stack, and that's that. The concept
is the same for removal.
Therefore, Stacks and Queues have constant time Insertion and Deletion via their
push and pop or enqueue and dequeue methods, O(1).
774.3. Space Complexity:
The space complexity of Stacks and Queues is very simple. Whether we are
instantiating a new instance of a Stack or Queue to store a set of data, or we
are using a Stack or Queue as part of a strategy to solve some problem, Stacks
and Queues always store one Node for each value they receive as input.
For this reason, we always consider Stacks and Queues to have a linear space
complexity, O(n).
775. When should we use Stacks and Queues?
At this point, we've done a lot of work understanding the ins and outs of Stacks
and Queues, but we still haven't really discussed what we can use them for. The
answer is actually...a lot!
For one, Stacks and Queues can be used as intermediate data structures while
implementing some of the more complicated data structures and methods we'll see
in some of our upcoming sections.
For example, the implementation of the breadth-first Tree traversal algorithm
takes advantage of a Queue instance, and the depth-first Graph traversal
algorithm exploits the benefits of a Stack instance.
Additionally, Stacks and Queues serve as the essential underlying data
structures to a wide variety of applications you use all the time. Just to name
a few:
775.1. Stacks:
- The Call Stack is a Stack data structure, and is used to manage the order of
function invocations in your code. - Browser History is often implemented using a Stack, with one great example
being the browser history object in the very popular React Router module. - Undo/Redo functionality in just about any application. For example:
- When you're coding in your text editor, each of the actions you take on your
keyboard are recorded bypushing that event to a Stack. - When you hit [cmd + z] to undo your most recent action, that event is
poped off the Stack, because the last event that occured should be the
first one to be undone (LIFO). - When you hit [cmd + y] to redo your most recent action, that event is
pushed back onto the Stack.
- When you're coding in your text editor, each of the actions you take on your
775.2. Queues:
- Printers use a Queue to manage incoming jobs to ensure that documents are
printed in the order they are received. - Chat rooms, online video games, and customer service phone lines use a Queue
to ensure that patrons are served in the order they arrive.- In the case of a Chat Room, to be admitted to a size-limited room.
- In the case of an Online Multi-Player Game, players wait in a lobby until
there is enough space and it is their turn to be admitted to a game. - In the case of a Customer Service Phone Line...you get the point.
- As a more advanced use case, Queues are often used as components or services
in the system design of a service-oriented architecture. A very popular and
easy to use example of this is Amazon's Simple Queue Service (SQS), which is a
part of their Amazon Web Services (AWS) offering.- You would add this service to your system between two other services, one
that is sending information for processing, and one that is receiving
information to be processed, when the volume of incoming requests is high
and the integrity of the order with which those requests are processed must
be maintained.
- You would add this service to your system between two other services, one
Linked List Project
This project contains a skeleton for you to implement a linked list. This is a
test-driven project. Run the tests and read the top-most error. If it's not
clear what is failing, open the test/test.js file to figure out what the
test is expecting. Make the top-most test pass.
Keep making the top-most test pass until all tests pass.
776. Instructions
- Clone the project from
https://github.com/appacademy-starters/data-structures-linked-list-starter. cdinto the project foldernpm installto install dependencies in the project root directorynpm testto run the specs- You can view the test cases in
/test/test.js. Your job is to write code in
the/lib/linked_list.jsthat implements theNodeandLinkedListclasses
to make the tests pass.
Stack Project
This project contains a skeleton for you to implement a stack. This is a
test-driven project. Run the tests and read the top-most error. If it's not
clear what is failing, open the test/test.js file to figure out what the
test is expecting. Make the top-most test pass.
Keep making the top-most test pass until all tests pass.
777. Instructions
- Clone the project from
https://github.com/appacademy-starters/data-structures-stack-starter. cdinto the project foldernpm installto install dependencies in the project root directorynpm testto run the specs- You can view the test cases in
/test/test.js. Your job is to write code in
the/lib/stack.jsthat implements theNodeandStackclasses
to make the tests pass.
Queue Project
This project contains a skeleton for you to implement a queue. This is a
test-driven project. Run the tests and read the top-most error. If it's not
clear what is failing, open the test/test.js file to figure out what the
test is expecting. Make the top-most test pass.
Keep making the top-most test pass until all tests pass.
778. Instructions
- Clone the project from
https://github.com/appacademy-starters/data-structures-queue-starter. cdinto the project foldernpm installto install dependencies in the project root directorynpm testto run the specs- You can view the test cases in
/test/test.js. Your job is to write code in
the/lib/queue.jsthat implements theNodeandQueueclasses
to make the tests pass.
WEEK-07 DAY-5
Heaps
Graphs and Heaps Learning Objectives
The objective of this lesson is for you to become comfortable with
implementing common data structures. This is important because questions about
data structures are incredibly likely to be interview questions for software
engineers from junior to senior levels. Moreover, understanding how different
data structures work will influence the libraries and frameworks that you choose
when writing software.
When you are done, you will be able to:
- Explain and implement a Heap.
- Explain and implement a Graph.table with
implementing common data structures. This is important because questions about
data structures are incredibly likely to be interview questions for software
engineers from junior to senior levels. Moreover, understanding how different
data structures work will influence the libraries and frameworks that you choose
when writing software.
When you are done, you will be able to: - Explain and implement a Heap.
- Explain and implement a Graph.
Introduction to Heaps
Let's explore the Heap data structure! In particular, we'll explore Binary
Heaps. A binary heap is a type of binary tree. However, a heap is not a binary
search tree. A heap is a partially ordered data structure, whereas a BST has
full order. In a heap, the root of the tree will be the maximum (max heap) or
the minimum (min heap). Below is an example of a max heap:
Notice that the heap above does not follow search tree property where all values
to the left of a node are less and all values to the right are greater or equal.
Instead, the max heap invariant is:
- given any node, its children must be less than or equal to the node
This constraint makes heaps much more relaxed in structure compared to a search
tree. There is no guaranteed order among "siblings" or "cousins" in a heap. The
relationship only flows down the tree from parent to child. In other words, in a
max heap, a node will be greater than all of it's children, it's grandchildren,
its great-grandchildren, and so on. A consequence of this is the root being the
absolute maximum of the entire tree. We'll be exploring max heaps together, but
these arguments are symmetric for a min heap.
778.1. Complete Trees
We'll eventually implement a max heap together, but first we'll need to take a
quick detour. Our design goal is to implement a data structure with efficient
operations. Since a heap is a type of binary tree, recall the circumstances
where we had a "best case" binary tree. We'll need to ensure our heap has
minimal height, that is, it must be a balanced tree!
Our heap implementation will not only be balanced, but it will also be
complete. To clarify, every complete tree is also a balanced tree, but
not every balanced tree is also complete. Our definition of a complete tree is:
- a tree where all levels have the maximal number of nodes, except the bottom
the level - AND the bottom level has all nodes filled as far left as possible
Here are few examples of the definition:
Notice that the tree is on the right fails the second point of our definition
because there is a gap in the last level. Informally, you can think about a
complete tree as packing its nodes as closely together as possible. This line of
thinking will come into play when we code heaps later.
778.2. When to Use Heaps?
Heaps are the most useful when attacking problems that require you to "partially
sort" data. This usually takes form in problems that have us calculate the
largest or smallest n numbers of a collection. For example: What if you were
asked to find the largest 5 numbers in an array in linear time, O(n)? The
fastest sorting algorithms are O(n logn), so none of those algorithms will be
good enough. However, we can use a heap to solve this problem in linear time.
We'll analyze this in depth when we implement a heap in the next section!
One of the most common uses of a binary heap is to implement a "[priority queue]".
We learned before that a queue is a FIFO (First In, First Out) data structure.
With a priority queue, items are removed from the queue based on a priority number.
The priority number is used to place the items into the heap and pull them out
in the correct priority order!
[priority queue]:https://en.wikipedia.org/wiki/Priority_queue
779. Binary Heap Implementation
Now that we are familiar with the structure of a heap, let's implement one! What
may be surprising is that the usual way to implement a heap is by simply using an
array. That is, we won't need to create a node class with pointers. Instead,
each index of the array will represent a node, with the root being at index 1.
We'll avoid using index 0 of the array so our math works out nicely. From this
point, we'll use the following rules to interpret the array as a heap:
- index
irepresents a node in the heap - the left child of node
ican be found at index2 * i - the right child of code
ican be found at index2 * i + 1
In other words, the array[null, 42, 32, 24, 30, 9, 20, 18, 2, 7]represents
the heap below. Take a moment to analyze how the array indices work out to
represent left and right children.
Pretty clever math right? We can also describe the relationship from child to
parent node. Say we are given a node at indexiin the heap, then it's parent
is found at indexMath.floor(i / 2).
It's useful to visualize heap algorithms using the classic image of nodes and
edges, but we'll translate that into array index operations.
779.1. Insert
What's a heap if we can't add data into it? We'll need a insert method
that will add a new value into the heap without voiding our heap property. In
our MaxHeap, the property states that a node must be greater than its
children.
779.1.1. Visualizing our heap as a tree of nodes:
- We begin an insertion by adding the new node to the bottom leaf level of the
heap, preferring to place the new node as far left in the level as possible.
This ensures the tree remains complete. - Placing the new node there may momentarily break our heap property, so we
need to restore it by moving the node up the tree into a legal position.
Restoring the heap property is a matter of continually swapping the new node
with it's parent while it's parent contains a smaller value. We refer to this
process assiftUp
779.1.2. Translating that into array operations:
pushthe new value to the end of the array- continually swap that value toward the front of the array (following our
child-parent index rules) until heap property is restored
779.2. DeleteMax
This is the "fetch" operation of a heap. Since we maintain heap property
throughout, the root of the heap will always be the maximum value. We want to
delete and return the root, whilst keeping the heap property.
779.2.1. Visualizing our heap as a tree of nodes:
- We begin the deletion by saving a reference to the root value (the max) to
return later. We then locate the right most node of the bottom level and copy
it's value into the root of the tree. We easily delete the duplicate node at
the leaf level. This ensures the tree remains complete. - Copying that value into the root may momentarily break our heap property, so
we need to restore it by moving the node down the tree into a legal position.
Restoring the heap property is a matter of continually swapping the node with
the greater of it's two children. We refer to this process assiftDown.
779.2.2. Translating that into array operations:
- The root is at index 1, so save it to return later. The right most node of
the bottom level would just be the very last element of the array. Copy the
last element into index 1, and pop off the last element (since it now appears
at the root). - Continually swap the new root toward the back of the array (following our
parent-child index rules) until heap property is restored. A node can have
two children, so we should always prefer to swap with the greater child.
779.3. Time Complexity Analysis
- insert:
O(log(n)) - deleteMax:
O(log(n))
Recall that our heap will be a complete/balanced tree. This means it's height is
log(n)wherenis the number of items. BothinsertanddeleteMaxhave a
time complexity oflog(n)because ofsiftUpandsiftDownrespectively. In
worst caseinsert, we will have tosiftUpa leaf all the way to the root of
the tree. In the worst casedeleteMax, we will have tosiftDownthe new root
all the way down to the leaf level. In either case, we'll have to traverse the
full height of the tree,log(n).
779.3.1. Array Heapify Analysis
Now that we have established O(log(n)) for a single insertion, let's analyze
the time complexity for turning an array into a heap (we call this heapify,
coming in the next project 😃). The algorithm itself is simple, just perform an
insert for every element. Since there are n elements and each insert
requires log(n) time, our total complexity for heapify is O(nlog(n))... Or
is it? There is actually a tighter bound on heapify. The proof requires some
math that you won't find valuable in your job search, but do understand that the
true time complexity of heapify is amortized O(n). Amortized refers to the
fact that our analysis is about performance over many insertions.
779.4. Space Complexity Analysis
O(n), since we use a single array to store heap data.heap, let's implement one! What
may be surprising is that the usual way to implement a heap is by simply using an
array. That is, we won't need to create a node class with pointers. Instead,
each index of the array will represent a node, with the root being at index 1.
We'll avoid using index 0 of the array so our math works out nicely. From this
point, we'll use the following rules to interpret the array as a heap:- index
irepresents a node in the heap - the left child of node
ican be found at index2 * i - the right child of code
ican be found at index2 * i + 1
In other words, the array[null, 42, 32, 24, 30, 9, 20, 18, 2, 7]represents
the heap below. Take a moment to analyze how the array indices work out to
represent left and right children.
Pretty clever math right? We can also describe the relationship from child to
parent node. Say we are given a node at indexiin the heap, then it's parent
is found at indexMath.floor(i / 2).
It's useful to visualize heap algorithms using the classic image of nodes and
edges, but we'll translate that into array index operations.
779.5. Insert
What's a heap if we can't add data into it? We'll need a insert method
that will add a new value into the heap without voiding our heap property. In
our MaxHeap, the property states that a node must be greater than its
children.
779.5.1. Visualizing our heap as a tree of nodes:
- We begin an insertion by adding the new node to the bottom leaf level of the
heap, preferring to place the new node as far left in the level as possible.
This ensures the tree remains complete. - Placing the new node there may momentarily break our heap property, so we
need to restore it by moving the node up the tree into a legal position.
Restoring the heap property is a matter of continually swapping the new node
with it's parent while it's parent contains a smaller value. We refer to this
process assiftUp
779.5.2. Translating that into array operations:
pushthe new value to the end of the array- continually swap that value toward the front of the array (following our
child-parent index rules) until heap property is restored
779.6. DeleteMax
This is the "fetch" operation of a heap. Since we maintain heap property
throughout, the root of the heap will always be the maximum value. We want to
delete and return the root, whilst keeping the heap property.
779.6.1. Visualizing our heap as a tree of nodes:
- We begin the deletion by saving a reference to the root value (the max) to
return later. We then locate the right most node of the bottom level and copy
it's value into the root of the tree. We easily delete the duplicate node at
the leaf level. This ensures the tree remains complete. - Copying that value into the root may momentarily break our heap property, so
we need to restore it by moving the node down the tree into a legal position.
Restoring the heap property is a matter of continually swapping the node with
the greater of it's two children. We refer to this process assiftDown.
779.6.2. Translating that into array operations:
- The root is at index 1, so save it to return later. The right most node of
the bottom level would just be the very last element of the array. Copy the
last element into index 1, and pop off the last element (since it now appears
at the root). - Continually swap the new root toward the back of the array (following our
parent-child index rules) until heap property is restored. A node can have
two children, so we should always prefer to swap with the greater child.
779.7. Time Complexity Analysis
- insert:
O(log(n)) - deleteMax:
O(log(n))
Recall that our heap will be a complete/balanced tree. This means it's height is
log(n)wherenis the number of items. BothinsertanddeleteMaxhave a
time complexity oflog(n)because ofsiftUpandsiftDownrespectively. In
worst caseinsert, we will have tosiftUpa leaf all the way to the root of
the tree. In the worst casedeleteMax, we will have tosiftDownthe new root
all the way down to the leaf level. In either case, we'll have to traverse the
full height of the tree,log(n).
779.7.1. Array Heapify Analysis
Now that we have established O(log(n)) for a single insertion, let's analyze
the time complexity for turning an array into a heap (we call this heapify,
coming in the next project 😃). The algorithm itself is simple, just perform an
insert for every element. Since there are n elements and each insert
requires log(n) time, our total complexity for heapify is O(nlog(n))... Or
is it? There is actually a tighter bound on heapify. The proof requires some
math that you won't find valuable in your job search, but do understand that the
true time complexity of heapify is amortized O(n). Amortized refers to the
fact that our analysis is about performance over many insertions.
779.8. Space Complexity Analysis
O(n), since we use a single array to store heap data.
780. Heap Sort
We've emphasized heavily that heaps are a partially ordered data structure. However, we can still
leverage heaps in a sorting algorithm to end up with fully sorted array. The strategy is simple using our previous
MaxHeap implementation:
- build the heap:
insertall elements of the array into aMaxHeap - construct the sorted list: continue to
deleteMaxuntil the heap is empty, every deletion will return the next element in decreasing order
The code is straightforward:
// assuming our `MaxHeap` from the previous section function heapSort(array) { // Step 1: build the heap let heap = new MaxHeap(); array.forEach(num => heap.insert(num)); // Step 2: constructed the sorted array let sorted = []; while (heap.array.length > 1) { sorted.push(heap.deleteMax()); } return sorted; }
780.1. Time Complexity Analysis: O(nlog(n))
nis the size of the input array- step-1 requires
O(n)time as previously discussed - step-2's while loop requires
nsteps in isolation and eachdeleteMaxwill requirelog(n)steps to restore max heap property (due to sifting-down). This means step 2 costsO(nlog(n)) - the total time complexity of the algorithm is
O(n + nlog(n)) = O(nlog(n))
780.2. Space Complexity Analysis:
So heapSort performs as fast as our other efficient sorting algorithms, but how does it fair in
space complexity? Our implementation above requires an extra O(n) amount of space because the heap is
maintained separately from the input array. If we can figure out a way to do all of these heap operations in-place
we can get constant O(1) space! Let's work on this now.
781. In-Place Heap Sort
The in-place algorithm will have the same 2 steps, but it will differ in the implementation details. Since we need to have all operations take place in a single array, we're going to have to denote two regions of the array. That is, we'll need a heap region and a sorted region. We begin by turning the entire region into a heap. Then we continually delete max to get the next element in increasing order. As the heap region shrinks, the sorted region will grow.
781.1. Heapify
Let's focus on designing step-1 as an in-place algorithm. In other words, we'll need to reorder
elements of the input array so they follow max heap property. This is usually refered to as heapify.
Our heapify will use much of the same logic as MaxHeap#siftDown.
// swap the elements at indices i and j of array function swap(array, i, j) { [ array[i], array[j] ] = [ array[j], array[i] ]; } // sift-down the node at index i until max heap property is restored // n represents the size of the heap function heapify(array, n, i) { let leftIdx = 2 * i + 1; let rightIdx = 2 * i + 2; let leftVal = array[leftIdx]; let rightVal = array[rightIdx]; if (leftIdx >= n) leftVal = -Infinity; if (rightIdx >= n) rightVal = -Infinity; if (array[i] > leftVal && array[i] > rightVal) return; let swapIdx; if (leftVal < rightVal) { swapIdx = rightIdx; } else { swapIdx = leftIdx; } swap(array, i, swapIdx); heapify(array, n, swapIdx); }
We weren't kidding when we said this would be similar to MaxHeap#siftDown. If you are not
convinced, flip to the previous section and take a look! The few differences we want to emphasize are:
- Given a node at index
i, it's left index is2 * i + 1and it's right index is2 * i + 2- Using these as our child index formulas will allow us to avoid using a placeholder element at index 0. The root of the heap will be at index 0.
- The parameter
nrepresents the number of nodes in the heap- You may feel that
array.lengthalso represents the number of nodes in the heap. That is true, but only in step-1. Later we will need to dynamically state the size of the heap. Remember, we are trying to do this without creating any extra arrays. We'll need to separate the heap and sorted regions of the array andnwill dictate the end of the heap.
- You may feel that
- We created a separate
swaphelper function.- Nothing fancy here. Swapping will be valuable in step-2 of the algorithm as well, so we'll want to
keep our code DRY (don't repeat yourself).
To correctly convert the input array into a heap, we'll need to callheapifyon children nodes before their parents. This is easy to do, just callheapifyon each element right-to-left in the array:
- Nothing fancy here. Swapping will be valuable in step-2 of the algorithm as well, so we'll want to
keep our code DRY (don't repeat yourself).
function heapSort(array) { // heapify the tree from the bottom up for (let i = array.length - 1; i >= 0; i--) { heapify(array, array.length, i); } // the entire array is now a heap // ... }
Nice! Now the elements of the array have been moved around to obey max heap property.
781.2. Construct the Sorted Array
To put everything together, we'll need to continually "delete max" from our heap. From our previous lecture, we learned the steps for deletion are to swap the last node of the heap into the root and then sift the new root down to restore max heap property. We'll follow the same logic here, except we'll need to account for the sorted region of the array. The array will contain the heap region in the front and the sorted region at the rear:
function heapSort(array) { // heapify the tree from the bottom up for (let i = array.length - 1; i >= 0; i--) { heapify(array, array.length, i); } // the entire array is now a heap // until the heap is empty, continue to "delete max" for (let endOfHeap = array.length - 1; endOfHeap >= 0; endOfHeap--) { // swap the root of the heap with the last element of the heap, // this effecively shrinks the heap by one and grows the sorted array by one swap(array, endOfHeap, 0); // sift down the new root, but not past the end of the heap heapify(array, endOfHeap, 0); } return array; }
You'll definitely want to watch the lecture that follows this reading to get a visual of how the array is divided into the heap and sorted regions.
781.3. In-Place Heap Sort JavaScript Implementation
Here is the full code for your reference:
function heapSort(array) { for (let i = array.length - 1; i >= 0; i--) { heapify(array, array.length, i); } for (let endOfHeap = array.length - 1; endOfHeap >= 0; endOfHeap--) { swap(array, endOfHeap, 0); heapify(array, endOfHeap, 0); } return array; } function heapify(array, n, i) { let leftIdx = 2 * i + 1; let rightIdx = 2 * i + 2; let leftVal = array[leftIdx]; let rightVal = array[rightIdx]; if (leftIdx >= n) leftVal = -Infinity; if (rightIdx >= n) rightVal = -Infinity; if (array[i] > leftVal && array[i] > rightVal) return; let swapIdx; if (leftVal < rightVal) { swapIdx = rightIdx; } else { swapIdx = leftIdx; } swap(array, i, swapIdx); heapify(array, n, swapIdx); } function swap(array, i, j) { [ array[i], array[j] ] = [ array[j], array[i] ]; }
Heaps Project
This project contains a skeleton for you to implement a max heap. This is a
test-driven project. Run the tests and read the top-most error. If it's not
clear what is failing, open the test/test.js file to figure out what the
test is expecting. Make the top-most test pass.
Keep making the top-most test pass until all tests pass.
782. Instructions
- Clone the project from
https://github.com/appacademy-starters/data-structures-max-heap-starter. cdinto the project foldernpm installto install dependencies in the project root directorynpm testto run the specs- You can view the test cases in
test/test.js. Your job is to write code in- lib/max_heap.js to implement the
MaxHeapclass - lib/is_heap.js to implement the
isMaxHeapfunction - lib/leet_code_215.js to implement the
findKthLargestfunction located
at https://leetcode.com/problems/kth-largest-element-in-an-array/
- lib/max_heap.js to implement the
783. Databases
WEEK 7
Data Structures and Algorithms
GitHub Profile and Projects Learning Objectives
- Improving Your Profile Using GitHub
- Your GitHub Identity
Big O Learning Objectives
Memoization And Tabulation Learning Objectives - Recursion Videos
- Curating Complexity: A Guide to Big-O Notation
- Common Complexity Classes
- Memoization
- Tabulation
- Analysis of Linear Search
- Analysis of Binary Search
- Analysis of the Merge Sort
- Analysis of Bubble Sort
- LeetCode.com
- Memoization Problems
- Tabulation Problems
Sorting Algorithms Learning Objectives - Bubble Sort
- Selection Sort
- Insertion Sort
- Merge Sort
- Quick Sort
- Binary Search
- Bubble Sort Analysis
- Selection Sort Analysis
- Insertion Sort Analysis
- Merge Sort Analysis
- Quick Sort Analysis
- Binary Search Analysis
- Practice: Bubble Sort
- Practice: Selection Sort
- Practice: Insertion Sort
- Practice: Merge Sort
- Practice: Quick Sort
- Practice: Binary Search
Lists, Stacks, and Queues Learning Objectives - Linked Lists
- Stacks and Queues
- Linked List Project
- Stack Project
- Queue Project
Graphs and Heaps Learning Objectives - Introduction to Heaps
- Heaps Project
WEEK-07 DAY-1
Your GitHub Identity
GitHub Profile and Projects Learning Objectives
GitHub is a powerful platform that hiring managers and other developers can use
to see how you create software.
- You will be able to participate in the social aspects of GitHub by starring
repositories, following other developers, and reviewing your followers - You will be able to use Markdown to write code snippets in your README files
- You will craft your GitHub profile and contribute throughout the course by
keeping your "gardens green" - You will be able to identify the basics of a good Wiki entries for proposals
and minimum viable products - You will be able to identify the basics of a good project README that includes
technologies at the top, images, descriptions and code snippetsing managers and other developers can use
to see how you create software. - You will be able to participate in the social aspects of GitHub by starring
repositories, following other developers, and reviewing your followers - You will be able to use Markdown to write code snippets in your README files
- You will craft your GitHub profile and contribute throughout the course by
keeping your "gardens green" - You will be able to identify the basics of a good Wiki entries for proposals
and minimum viable products - You will be able to identify the basics of a good project README that includes
technologies at the top, images, descriptions and code snippets
Improving Your Profile Using GitHub
By now you are likely familiar with certain aspects of GitHub. You know how to
create repos and add and commit code, but there is much, much more that GitHub
can do.
GitHub is an online community of software engineers - a place where we not only
house our code, but share ideas, express feedback, gain inspiration, and present
ourselves as competent, qualified software engineers. Yes, this is a place to
manage version control and collaborate on projects, but in this module we are
going to discuss how to harness the power of GitHub to your advantage.
Aside from your actual code repositories, there are several other sections that
represent who you are as a developer.
- Followers and Following: Think of this as your “friends’ list on GitHub.
If you see a social media profile of a person with two friends, what are you
going to think? Though you’re not expected to have hundreds of followers on
GitHub, you should follow your peers and encourage them to follow you to show
industry engineers that there are people who would vouch for your skillset. - Stars: These are the “likes” on your GitHub profile. Similar to
encouraging others to follow you and following them, you should also “star”
their popular repositories. By the end of the curriculum, you should have
several stars on each of your portfolio projects. - Green Gardens: This is birds-eye view of your “newsfeed” if your newsfeed
reflected the number of commits that you were making. If you are very active
on GitHub, your activity squares, AKA “green gardens” will be verdant and
green. This tells anyone who views your profile that you are actively coding
and engaged with your identity as a software engineer. However, if your “green
gardens” are not green, this suggests that you are not actively coding and
therefore perhaps not the best candidates for a development job. - Photo and brief intro: This is fairly straight-forward and should mirror
the photo from you LinkedIn. Choose a professional photo and brief description
that highlights the fact that you are a software engineer.
Your followers, stars, green gardens, and photo represent who you are as a
developer and should be constantly monitored and updated. It can be easy to fall
into the trap of not pushing commits to GitHub or keeping your commits on your
local machine - be careful to avoid these tendencies because they are
counter-productive to your candidacy as a software engineer.
Not only is GitHub as representation of you as a developer, but it is also a
place to present proposals, recaps, and provide additional project context. Two
features that you will soon become familiar with are Wikis and READMEs.
784. Wikis (pre-project)
Wikis are features of PUBLIC repositories on GitHub and are where your design
documents, explanation of technologies used and insight into what your repo
contains will live.
Wikis are created at the beginning of any significant project and should be
updated as your project evolves.
To create or update your repository’s Wiki, click on the “Wiki” tab in your repo
header and click “Edit” to update your home page and “New Page” to add a new
section.
Best practices for Wiki creation:
- List of technologies in a visually accessible place
- Separate design documents into their own sections
- Write clearly and concisely - grammar and spelling matters!
Design documents will become very important when you begin your projects, but
for now just know that you will spend time creating a solid Wiki in order to
facilitate a smooth development process. One of the most important aspects of
your Wiki will be the outline of your project’s features and the minimum
viable product (MVP).
As you begin any project, you will consider what constitutes a “final product”
and break down features into bite-sized “minimum viable products.” For example,
if you intend to create an a/A version of Twitter, your list of MVPs may
include: - Users are able to log into application
- Users are able to create, edit, and delete tweets
- Users are able to follow other users and see their tweets
- Users are able to like other users tweets
- Users are able to comment on other users tweets
In order for your project to stay on track, it is very important to break down
your features and tackle one MVP at a time. All of the MVPs combined result in a
final application.
Your MVP breakdown will live in your project’s Wiki and is subject to evolution.
As your project comes to life, your MVPs may merge, divide, or become
irrelevant. Update your Wiki as things change and continue to referring to it as
your go through the development process.
785. README files (post-project)
READMEs are text files that introduce and explain a project. Typically, READMEs
are created and completed when you are ready to roll your application into
production. READMEs should contain information about two impressive features
that you implemented in your project, the technologies used, how to install the
program, and anything else that makes you stand out as a software developer.
Think of READMEs as the “first impression” that prospective employers,
colleagues, and peers will have of you as a developer. You want their first
impression to be “wow, this person is thorough and this project sounds
interesting,” not “oh no, typos, missing instructions, and snores-galore.”
When it is time to create your README, you should allocate about three hours to
guarantee you have enough time to make your project shine.
README.md files are written using markdown syntax (.md) which makes them appear
nicely on-screen. Markdown is a lightweight markup language with plain text
formatting syntax. It’s a very simple language used to create beautiful and
presentable README and Wiki files for GitHub. There are many good resources out
there for creating markdown documents, but here are two of our favorite:
- GitHub's guide to [Mastering Markdown]
- [Repository with a collection of examples]
- [Browser side-by-side markdown and on-screen program] (this is a favorite, code
here and copy markdown into GitHub).
README Best Practices - Divide your README into distinct sections
- List the technologies used at the top of your README for increased visibility
- Include nice pictures or Gifs to show and/or demonstrate how things work
- Include code snippets
- Provide instructions for how to install project (if applicable)
- Include link to the live site
786. Wrap up
The bottom line is that the way you represent yourself on GitHub matters! Take
the time you need to write clearly, accurately reflect your process and
applications, and immerse yourself in the diverse and interesting pool of
software professionals who work and play on GitHub.
[Mastering Markdown]: https://guides.github.com/features/mastering-markdown/
[Repository with a collection of examples]: https://github.com/matiassingers/awesome-readme
[Browser side-by-side markdown and on-screen program]: https://stackedit.io/app#
Your GitHub Identity
It is hard to write about yourself. But, today, you need to do that. This is a
day of starting to establish how other software developers and hiring managers
will perceive you.
Go to your GitHub profile page. Edit your profile to contain your description,
"App Academy (@appacademy)" as your current company, your location (if you
desire), and your Web site.
Now, make a personal Web site for your GitHub profile. You can do that using
GitHub Pages. Follow the instructions at [Getting Started with GitHub Pages] to
create your site, add a theme, create a custom 404, and use HTTPS (if you want).
Spend time writing about yourself. Like you read earlier, this is hard. But,
tell the story of you in a way that will engage people.
Now, go follow all of your class mates and star their personal Web site
repository, if they created one.
If you want to get really fancy and set up a blog, you can use a "static site
generator" known as Jekyll to do that. It's a Ruby-based program; however,
you don't need to know Ruby to use it. All you have to be able to do is use
command line programs, something you're really getting to be a pro at! To do
this, follow the well-documented instructions at [Setting up a GitHub Pages site
with Jekyll].
[Getting Started with GitHub Pages]: https://help.github.com/en/github/working-with-github-pages/getting-started-with-github-pages
[Setting up a GitHub Pages site with Jekyll]: https://help.github.com/en/github/working-with-github-pages/setting-up-a-github-pages-site-with-jekyll
WEEK-07 DAY-2
Big-O and Optimizations
Big O Learning Objectives
The objective of this lesson is get you comfortable with identifying the
time and space complexity of code you see. Being able to diagnose time
complexity for algorithms is an essential for interviewing software engineers.
At the end of this, you will be able to
- Order the common complexity classes according to their growth rate
- Identify the complexity classes of common sort methods
- Identify complexity classes of codeable with identifying the
time and space complexity of code you see. Being able to diagnose time
complexity for algorithms is an essential for interviewing software engineers.
At the end of this, you will be able to - Order the common complexity classes according to their growth rate
- Identify the complexity classes of common sort methods
- Identify complexity classes of code
Memoization And Tabulation Learning Objectives
The objective of this lesson is to give you a couple of ways to optimize a
computation (algorithm) from a higher complexity class to a lower complexity
class. Being able to optimize algorithms is an essential for interviewing
software engineers.
At the end of this, you will be able to
- Apply memoization to recursive problems to make them less than polynomial
time. - Apply tabulation to iterative problems to make them less than polynomial
time.** is to give you a couple of ways to optimize a
computation (algorithm) from a higher complexity class to a lower complexity
class. Being able to optimize algorithms is an essential for interviewing
software engineers.
At the end of this, you will be able to - Apply memoization to recursive problems to make them less than polynomial
time. - Apply tabulation to iterative problems to make them less than polynomial
time.
Recursion Videos
A lot of algorithms that we use in the upcoming days will use recursion. The
next two videos are just helpful reminders about recursion so that you can get
that thought process back into your brain.
Big-O By Colt Steele
Colt Steele provides a very nice, non-mathy introduction to Big-O notation.
Please watch this so you can get the easy introduction. Big-O is, by its very
nature, math based. It's good to get an understanding before jumping in to
math expressions.
[Complete Beginner's Guide to Big O Notation] by Colt Steele.
[Complete Beginner's Guide to Big O Notation]: https://www.youtube.com/embed/kS_gr2_-ws8
Curating Complexity: A Guide to Big-O Notation
As software engineers, our goal is not just to solve problems. Rather, our goal
is to solve problems efficiently and elegantly. Not all solutions are made
equal! In this section we'll explore how to analyze the efficiency of algorithms
in terms of their speed (time complexity) and memory consumption (space
complexity).
In this article, we'll use the word efficiency to describe the amount of
resources a program needs to execute. The two resources we are concerned with
are time and space. Our goal is to minimize the amount of time and space
that our programs use.
When you finish this article you will be able to:
- explain why computer scientists use Big-O notation
- simplify a mathematical function into Big-O notation
787. Why Big-O?
Let's begin by understanding what method we should not use when describing the
efficiency of our algorithms. Most importantly, we'll want to avoid using
absolute units of time when describing speed. When the software engineer
exclaims, "My function runs in 0.2 seconds, it's so fast!!!", the computer
scientist is not impressed. Skeptical, the computer scientist asks the following
questions:
- What computer did you run it on? Maybe the credit belongs to the hardware
and not the software. Some hardware architectures will be better for certain
operations than others. - Were there other background processes running on the computer that could have
effected the runtime? It's hard to control the environment during
performance experiments. - Will your code still be performant if we increase the size of the input? For
example, sorting 3 numbers is trivial; but how about a million numbers?
The job of the software engineer is to focus on the software detail and not
necessarily the hardware it will run on. Because we can't answer points 1 and 2
with total certainty, we'll want to avoid using concrete units like
"milliseconds" or "seconds" when describing the efficiency of our algorithms.
Instead, we'll opt for a more abstract approach that focuses on point 3. This
means that we should focus on how the performance of our algorithm is affected
by increasing the size of the input. In other words, how does our performance
scale?
The argument above focuses on time, but a similar argument could also be
made for space. For example, we should not analyze our code in terms of the
amount of absolute kilobytes of memory it uses, because this is dependent on
the programming language.
788. Big-O Notation
In Computer Science, we use Big-O notation as a tool for describing the
efficiency of algorithms with respect to the size of the input argument(s). We
use mathematical functions in Big-O notation, so there are a few big picture
ideas that we'll want to keep in mind:
- The function should be defined in terms of the size of the input(s).
- A smaller Big-O function is more desirable than a larger one. Intuitively,
we want our algorithms to use a minimal amount of time and space. - Big-O describes the worst-case scenario for our code, also known as the
upper bound. We prepare our algorithm for the worst case, because the
best case is a luxury that is not guaranteed. - A Big-O function should be simplified to show only its most dominant
mathematical term.
The first 3 points are conceptual, so they are easy to swallow. However, point 4
is typically the biggest source of confusion when learning the notation. Before
we apply Big-O to our code, we'll need to first understand the underlying math
and simplification process.
788.1. Simplifying Math Terms
We want our Big-O notation to describe the performance of our algorithm with
respect to the input size and nothing else. Because of this, we should to
simplify our Big-O functions using the following rules:
- Simplify Products: if the function is a product of many terms, we drop the
terms that don't depend on the size of the input. - Simplify Sums: if the function is a sum of many terms, we keep the term
with the largest growth rate and drop the other terms.
We'll look at these rules in action, but first we'll define a few things: - n is the size of the input
- T(f) refers to an unsimplified mathematical function
- O(f) refers to the Big-O simplified mathematical function
788.2. Simplifying a Product
If a function consists of a product of many factors, we drop the factors that
don't depend on the size of the input, n. The factors that we drop are called
constant factors because their size remains consistent as we increase the size
of the input. The reasoning behind this simplification is that we make the input
large enough, the non-constant factors will overshadow the constant ones. Below
are some examples:
| Unsimplified | Big-O Simplified |
|---|---|
| T( 5 * n2 ) | O( n2 ) |
| T( 100000 * n ) | O( n ) |
| T( n / 12 ) | O( n ) |
| T( 42 * n * log(n) ) | O( n * log(n) ) |
| T( 12 ) | O( 1 ) |
Note that in the third example, we can simplify T( n / 12 ) to O( n )
because we can rewrite a division into an equivalent multiplication. In other
words, T( n / 12 ) = T( 1/12 * n ) = O( n ).
788.3. Simplifying a Sum
If the function consists of a sum of many terms, we only need to show the term
that grows the fastest, relative to the size of the input. The reasoning behind
this simplification is that if we make the input large enough, the fastest
growing term will overshadow the other, smaller terms. To understand which term
to keep, you'll need to recall the relative size of our common math terms from
the previous section. Below are some examples:
| Unsimplified | Big-O Simplified |
|---|---|
| T( n3 + n2 + n ) | O( n3 ) |
| T( log(n) + 2n ) | O( 2n ) |
| T( n + log(n) ) | O( n ) |
| T( n! + 10n ) | O( n! ) |
788.4. Putting it all together
The product and sum rules are all we'll need to Big-O simplify any math
functions. We just apply the product rule to drop all constants, then apply the
sum rule to select the single most dominant term.
| Unsimplified | Big-O Simplified |
|---|---|
| T( 5n2 + 99n ) | O( n2 ) |
| T( 2n + nlog(n) ) | O( nlog(n) ) |
| T( 2n + 5n1000) | O( 2n ) |
Aside: We'll often omit the multiplication symbol in expressions as a form of
shorthand. For example, we'll write O( 5n2 ) in place of O( 5 *
n2 ).
789. What you've learned
In this reading we:
- explained why Big-O is the preferred notation used to describe the efficiency
of algorithms - used the product and sum rules to simplify mathematical functions into Big-O
notation
Common Complexity Classes
Analyzing the efficiency of our code seems like a daunting task because there
are many different possibilities in how we may choose to implement something.
Luckily, most code we write can be categorized into one of a handful of common
complexity classes. In this reading, we'll identify the common classes and
explore some of the code characteristics that will lead to these classes.
When you finish this reading, you should be able to:
- name and order the seven common complexity classes
- identify the time complexity class of a given code snippet
790. The seven major classes
There are seven complexity classes that we will encounter most often. Below is a
list of each complexity class as well as its Big-O notation. This list is
ordered from smallest to largest. Bear in mind that a "more efficient"
algorithm is one with a smaller complexity class, because it requires fewer
resources.
| Big-O | Complexity Class Name |
|---|---|
| O(1) | constant |
| O(log(n)) | logarithmic |
| O(n) | linear |
| O(n * log(n)) | loglinear, linearithmic, quasilinear |
| O(nc) - O(n2), O(n3), etc. | polynomial |
| O(cn) - O(2n), O(3n), etc. | exponential |
| O(n!) | factorial |
There are more complexity classes that exist, but these are most common. Let's
take a closer look at each of these classes to gain some intuition on what
behavior their functions define. We'll explore famous algorithms that correspond
to these classes further in the course.
For simplicity, we'll provide small, generic code examples that illustrate the
complexity, although they may not solve a practical problem.
790.1. O(1) - Constant
Constant complexity means that the algorithm takes roughly the same number of
steps for any size input. In a constant time algorithm, there is no relationship
between the size of the input and the number of steps required. For example,
this means performing the algorithm on a input of size 1 takes the same number
of steps as performing it on an input of size 128.
790.1.1. Constant growth
The table below shows the growing behavior of a constant function. Notice that
the behavior stays constant for all values of n.
| n | O(1) |
|---|---|
| 1 | ~1 |
| 2 | ~1 |
| 3 | ~1 |
| ... | ... |
| 128 | ~1 |
790.1.2. Example Constant code
Below is are two examples of functions that have constant runtimes.
// O(1) function constant1(n) { return n * 2 + 1; } // O(1) function constant2(n) { for (let i = 1; i <= 100; i++) { console.log(i); } }
The runtime of the constant1 function does not depend on the size of the
input, because only two arithmetic operations (multiplication and addition) are
always performed. The runtime of the constant2 function also does not depend
on the size of the input because one-hundred iterations are always performed,
irrespective of the input.
790.2. O(log(n)) - Logarithmic
Typically, the hidden base of O(log(n)) is 2, meaning O(log2(n)).
Logarithmic complexity algorithms will usual display a sense of continually
"halving" the size of the input. Another tell of a logarithmic algorithm is that
we don't have to access every element of the input. O(log2(n)) means
that every time we double the size of the input, we only require one additional
step. Overall, this means that a large increase of input size will increase the
number of steps required by a small amount.
790.2.1. Logarithmic growth
The table below shows the growing behavior of a logarithmic runtime function.
Notice that doubling the input size will only require only one additional
"step".
| n | O(log2(n)) |
|---|---|
| 2 | ~1 |
| 4 | ~2 |
| 8 | ~3 |
| 16 | ~4 |
| ... | ... |
| 128 | ~7 |
790.2.2. Example logarithmic code
Below is an example of two functions with logarithmic runtimes.
// O(log(n)) function logarithmic1(n) { if (n <= 1) return; logarithmic1(n / 2); } // O(log(n)) function logarithmic2(n) { let i = n; while (i > 1) { i /= 2; } }
The logarithmic1 function has O(log(n)) runtime because the recursion will
half the argument, n, each time. In other words, if we pass 8 as the original
argument, then the recursive chain would be 8 -> 4 -> 2 -> 1. In a similar way,
the logarithmic2 function has O(log(n)) runtime because of the number of
iterations in the while loop. The while loop depends on the variable i, which
will be divided in half each iteration.
790.3. O(n) - Linear
Linear complexity algorithms will access each item of the input "once" (in the
Big-O sense). Algorithms that iterate through the input without nested loops or
recurse by reducing the size of the input by "one" each time are typically
linear.
790.3.1. Linear growth
The table below shows the growing behavior of a linear runtime function. Notice
that a change in input size leads to similar change in the number of steps.
| n | O(n) |
|---|---|
| 1 | ~1 |
| 2 | ~2 |
| 3 | ~3 |
| 4 | ~4 |
| ... | ... |
| 128 | ~128 |
790.3.2. Example linear code
Below are examples of three functions that each have linear runtime.
// O(n) function linear1(n) { for (let i = 1; i <= n; i++) { console.log(i); } } // O(n), where n is the length of the array function linear2(array) { for (let i = 0; i < array.length; i++) { console.log(i); } } // O(n) function linear3(n) { if (n === 1) return; linear3(n - 1); }
The linear1 function has O(n) runtime because the for loop will iterate n
times. The linear2 function has O(n) runtime because the for loop iterates
through the array argument. The linear3 function has O(n) runtime because each
subsequent call in the recursion will decrease the argument by one. In other
words, if we pass 8 as the original argument to linear3, the recursive chain
would be 8 -> 7 -> 6 -> 5 -> ... -> 1.
790.4. O(n * log(n)) - Loglinear
This class is a combination of both linear and logarithmic behavior, so features
from both classes are evident. Algorithms the exhibit this behavior use both
recursion and iteration. Typically, this means that the recursive calls will
halve the input each time (logarithmic), but iterations are also performed on
the input (linear).
790.4.1. Loglinear growth
The table below shows the growing behavior of a loglinear runtime function.
| n | O(n * log2(n)) |
|---|---|
| 2 | ~2 |
| 4 | ~8 |
| 8 | ~24 |
| ... | ... |
| 128 | ~896 |
790.4.2. Example loglinear code
Below is an example of a function with a loglinear runtime.
// O(n * log(n)) function loglinear(n) { if (n <= 1) return; for (let i = 1; i <= n; i++) { console.log(i); } loglinear(n / 2); loglinear(n / 2); }
The loglinear function has O(n * log(n)) runtime because the for loop
iterates linearly (n) through the input and the recursive chain behaves
logarithmically (log(n)).
790.5. O(nc) - Polynomial
Polynomial complexity refers to complexity of the form O(nc) where
n is the size of the input and c is some fixed constant. For example,
O(n3) is a larger/worse function than O(n2), but they
belong to the same complexity class. Nested loops are usually the indicator of
this complexity class.
790.5.1. Polynomial growth
Below are tables showing the growth for O(n2) and O(n3).
| n | O(n2) |
|---|---|
| 1 | ~1 |
| 2 | ~4 |
| 3 | ~9 |
| ... | ... |
| 128 | ~16,384 |
| n | O(n3) |
| --- | ---------------- |
| 1 | ~1 |
| 2 | ~8 |
| 3 | ~27 |
| ... | ... |
| 128 | ~2,097,152 |
790.5.2. Example polynomial code
Below are examples of two functions with polynomial runtimes.
// O(n^2) function quadratic(n) { for (let i = 1; i <= n; i++) { for (let j = 1; j <= n; j++) {} } } // O(n^3) function cubic(n) { for (let i = 1; i <= n; i++) { for (let j = 1; j <= n; j++) { for (let k = 1; k <= n; k++) {} } } }
The quadratic function has O(n2) runtime because there are nested
loops. The outer loop iterates n times and the inner loop iterates n times. This
leads to n * n total number of iterations. In a similar way, the cubic
function has O(n3) runtime because it has triply nested loops that
lead to a total of n * n * n iterations.
790.6. O(cn) - Exponential
Exponential complexity refers to Big-O functions of the form O(cn)
where n is the size of the input and c is some fixed constant. For example,
O(3n) is a larger/worse function than O(2n), but they both
belong to the exponential complexity class. A common indicator of this
complexity class is recursive code where there is a constant number of recursive
calls in each stack frame. The c will be the number of recursive calls made in
each stack frame. Algorithms with this complexity are considered quite slow.
790.6.1. Exponential growth
Below are tables showing the growth for O(2n) and O(3n).
Notice how these grow large, quickly.
| n | O(2n) |
|---|---|
| 1 | ~2 |
| 2 | ~4 |
| 3 | ~8 |
| 4 | ~16 |
| ... | ... |
| 128 | ~3.4028 * 1038 |
| n | O(3n) |
| --- | -------------------------- |
| 1 | ~3 |
| 2 | ~9 |
| 3 | ~27 |
| 3 | ~81 |
| ... | ... |
| 128 | ~1.1790 * 1061 |
790.6.2. Exponential code example
Below are examples of two functions with exponential runtimes.
// O(2^n) function exponential2n(n) { if (n === 1) return; exponential_2n(n - 1); exponential_2n(n - 1); } // O(3^n) function exponential3n(n) { if (n === 0) return; exponential_3n(n - 1); exponential_3n(n - 1); exponential_3n(n - 1); }
The exponential2n function has O(2n) runtime because each call will
make two more recursive calls. The exponential3n function has O(3n)
runtime because each call will make three more recursive calls.
790.7. O(n!) - Factorial
Recall that n! = (n) * (n - 1) * (n - 2) * ... * 1. This complexity is
typically the largest/worst that we will end up implementing. An indicator of
this complexity class is recursive code that has a variable number of recursive
calls in each stack frame. Note that factorial is worse than exponential
because factorial algorithms have a variable amount of recursive calls in
each stack frame, whereas exponential algorithms have a constant amount of
recursive calls in each frame.
790.7.1. Factorial growth
Below is a table showing the growth for O(n!). Notice how this has a more
aggressive growth than exponential behavior.
| n | O(n!) |
|---|---|
| 1 | ~1 |
| 2 | ~2 |
| 3 | ~6 |
| 4 | ~24 |
| ... | ... |
| 128 | ~3.8562 * 10215 |
790.7.2. Factorial code example
Below is an example of a function with factorial runtime.
// O(n!) function factorial(n) { if (n === 1) return; for (let i = 1; i <= n; i++) { factorial(n - 1); } }
The factorial function has O(n!) runtime because the code is recursive but
the number of recursive calls made in a single stack frame depends on the input.
This contrasts with an exponential function because exponential functions have
a fixed number of calls in each stack frame.
You may it difficult to identify the complexity class of a given code snippet,
especially if the code falls into the loglinear, exponential, or factorial
classes. In the upcoming videos, we'll explain the analysis of these functions
in greater detail. For now, you should focus on the relative order of these
seven complexity classes!
791. What you've learned
In this reading, we listed the seven common complexity classes and saw some
example code for each. In order of ascending growth, the seven classes are:
- Constant
- Logarithmic
- Linear
- Loglinear
- Polynomial
- Exponential
- Factorial
Memoization
Memoization is a design pattern used to reduce the overall number of
calculations that can occur in algorithms that use recursive strategies to
solve.
Recall that recursion solves a large problem by dividing it into smaller
sub-problems that are more manageable. Memoization will store the results of
the sub-problems in some other data structure, meaning that you avoid duplicate
calculations and only "solve" each subproblem once. There are two features that
comprise memoization:
- the function is recursive
- the additional data structure used is typically an object (we refer to this as
the memo!)
This is a trade-off between the time it takes to run an algorithm (without
memoization) and the memory used to run the algorithm (with memoization).
Usually memoization is a good trade-off when dealing with large data or
calculations.
You cannot always apply this technique to recursive problems. The problem must
have an "overlapping subproblem structure" for memoization to be effective.
Here's an example of a problem that has such a structure:
Using pennies, nickels, dimes, and quarters, what is the smallest combination
of coins that total 27 cents?
You'll explore this exact problem in depth later on. For now, here is some food
for thought. Along the way to calculating the smallest coin combination of 27
cents, you should also calculate the smallest coin combination of say, 25 cents
as a component of that problem. This is the essence of an overlapping subproblem
structure.
792. Memoizing factorial
Here's an example of a function that computes the factorial of the number passed
into it.
function factorial(n) { if (n === 1) return 1; return n * factorial(n - 1); } factorial(6); // => 720, requires 6 calls factorial(6); // => 720, requires 6 calls factorial(5); // => 120, requires 5 calls factorial(7); // => 5040, requires 7 calls
From this plain factorial above, it is clear that every time you call
factorial(6) you should get the same result of 720 each time. The code is
somewhat inefficient because you must go down the full recursive stack for each
top level call to factorial(6). It would be great if you could store the result
of factorial(6) the first time you calculate it, then on subsequent calls to
factorial(6) you simply fetch the stored result in constant time. You can
accomplish exactly this by memoizing with an object!
let memo = {} function factorial(n) { // if this function has calculated factorial(n) previously, // fetch the stored result in memo if (n in memo) return memo[n]; if (n === 1) return 1; // otherwise, it havs not calculated factorial(n) previously, // so calculate it now, but store the result in case it is // needed again in the future memo[n] = n * factorial(n - 1); return memo[n] } factorial(6); // => 720, requires 6 calls factorial(6); // => 720, requires 1 call factorial(5); // => 120, requires 1 call factorial(7); // => 5040, requires 2 calls memo; // => { '2': 2, '3': 6, '4': 24, '5': 120, '6': 720, '7': 5040 }
The memo object above will map an argument of factorial to its return
value. That is, the keys will be arguments and their values will be the
corresponding results returned. By using the memo, you are able to avoid
duplicate recursive calls!
Here's some food for thought: By the time your first call to factorial(6)
returns, you will not have just the argument 6 stored in the memo. Rather, you will
have all arguments 2 to 6 stored in the memo.
Hopefully you sense the efficiency you can get by memoizing your functions, but
maybe you are not convinced by the last example for two reasons:
- You didn't improve the speed of the algorithm by an order of Big-O (it is
still O(n)). - The code uses some global variable, so it's kind of ugly.
Both of those points are true, so take a look at a more advanced example that
benefits from memoization.
793. Memoizing the Fibonacci generator
Here's a naive implementation of a function that calculates the Fibonacci
number for a given input.
function fib(n) { if (n === 1 || n === 2) return 1; return fib(n - 1) + fib(n - 2); } fib(6); // => 8
Before you optimize this, ask yourself what complexity class it falls into in
the first place.
The time complexity of this function is not super intuitive to describe because
the code branches twice recursively. Fret not! You'll find it useful to
visualize the calls needed to do this with a tree. When reasoning about the time
complexity for recursive functions, draw a tree that helps you see the calls.
Every node of the tree represents a call of the recursion:
In general, the height of this tree will be n. You derive this by following
the path going straight down the left side of the tree. You can also see that
each internal node leads to two more nodes. Overall, this means that the tree
will have roughly 2n nodes which is the same as saying that the fib
function has an exponential time complexity of 2n. That is very slow!
See for yourself, try running fib(50) - you'll be waiting for quite a while
(it took 3 minutes on the author's machine).
Okay. So the fib function is slow. Is there anyway to speed it up? Take a look
at the tree above. Can you find any repetitive regions of the tree?
As the n grows bigger, the number of duplicate sub-trees grows exponentially.
Luckily you can fix this using memoization by using a similar object strategy as
before. You can use some JavaScript default arguments to clean things up:
function fastFib(n, memo = {}) { if (n in memo) return memo[n]; if (n === 1 || n === 2) return 1; memo[n] = fastFib(n - 1, memo) + fastFib(n - 2, memo); return memo[n]; } fastFib(6); // => 8 fastFib(50); // => 12586269025
The code above can calculate the 50th Fibonacci number almost instantly! Thanks
to the memo object, you only need to explore a subtree fully once. Visually,
the fastFib recursion has this structure:
You can see the marked nodes (function calls) that access the memo in green.
It's easy to see that this version of the Fibonacci generator will do far less
computations as n grows larger! In fact, this memoization has brought the time
complexity down to linear O(n) time because the tree only branches on the left
side. This is an enormous gain if you recall the complexity class hierarchy.
794. The memoization formula
Now that you understand memoization, when should you apply it? Memoization is
useful when attacking recursive problems that have many overlapping
sub-problems. You'll find it most useful to draw out the visual tree first. If
you notice duplicate sub-trees, time to memoize. Here are the hard and fast
rules you can use to memoize a slow function:
- Write the unoptimized, brute force recursion and make sure it works.
- Add the memo object as an additional argument to the function. The keys will
represent unique arguments to the function, and their values will represent
the results for those arguments. - Add a base case condition to the function that returns the stored value if
the function's argument is in the memo. - Before you return the result of the recursive case, store it in the memo as a
value and make the function's argument it's key.
795. What you learned
You learned a secret to possibly changing an algorithm of one complexity class
to a lower complexity class by using memory to store intermediate results. This
is a powerful technique to use to make sure your programs that must do recursive
calculations can benefit from running much faster.
Tabulation
Now that you are familiar with memoization, you can explore a related method
of algorithmic optimization: Tabulation. There are two main features that
comprise the Tabulation strategy:
- the function is iterative and not recursive
- the additional data structure used is typically an array, commonly referred to
as the table
Many problems that can be solved with memoization can also be solved with
tabulation as long as you convert the recursion to iteration. The first example
is the canonical example of recursion, calculating the Fibonacci number for an
input. However, in the example, you'll see the iteration version of it for a
fresh start!
796. Tabulating the Fibonacci number
Tabulation is all about creating a table (array) and filling it out with
elements. In general, you will complete the table by filling entries from "left
to right". This means that the first entry of the table (first element of the
array) will correspond to the smallest subproblem. Naturally, the final entry of
the table (last element of the array) will correspond to the largest problem,
which is also the final answer.
Here's a way to use tabulation to store the intermediary calculations so that
later calculations can refer back to the table.
function tabulatedFib(n) { // create a blank array with n reserved spots let table = new Array(n); // seed the first two values table[0] = 0; table[1] = 1; // complete the table by moving from left to right, // following the fibonacci pattern for (let i = 2; i <= n; i += 1) { table[i] = table[i - 1] + table[i - 2]; } return table[n]; } console.log(tabulatedFib(7)); // => 13
When you initialized the table and seeded the first two values, it looked like
this:
| i | 0 | 1 | 2 | 3 | 4 | 5 | 6 | 7 |
|---|---|---|---|---|---|---|---|---|
table[i] |
0 |
1 |
||||||
After the loop finishes, the final table will be:
| i | 0 | 1 | 2 | 3 | 4 | 5 | 6 | 7 |
|---|---|---|---|---|---|---|---|---|
table[i] |
0 |
1 |
1 |
2 |
3 |
5 |
8 |
13 |
Similar to the previous memo, by the time the function completes, the table
will contain the final solution as well as all sub-solutions calculated along
the way.
To compute the complexity class of this tabulatedFib is very straightforward
since the code is iterative. The dominant operation in the function is the loop
used to fill out the entire table. The length of the table is roughly n
elements long, so the algorithm will have an O(n) runtime. The space taken by
our algorithm is also O(n) due to the size of the table. Overall, this should
be a satisfying solution for the efficiency of the algorithm.
797. Aside: Refactoring for O(1) Space
You may notice that you can cut down on the space used by the function. At any
point of the loop, the calculation really only need the previous two
subproblems' results. There is little utility to storing the full array. This
refactor is easy to do by using two variables:
function fib(n) { let mostRecentCalcs = [0, 1]; if (n === 0) return mostRecentCalcs[0]; for (let i = 2; i <= n; i++) { const [ secondLast, last ] = mostRecentCalcs; mostRecentCalcs = [ last, secondLast + last ]; } return mostRecentCalcs[1]; }
Bam! You now have O(n) runtime and O(1) space. This is the most optimal
algorithm for calculating a Fibonacci number. Note that this strategy is a pared
down form of tabulation, since it uses only the last two values.
797.1. The Tabulation Formula
Here are the general guidelines for implementing the tabulation strategy. This
is just a general recipe, so adjust for taste depending on your problem:
- Create the table array based off of the size of the input, which isn't always
straightforward if you have multiple input values - Initialize some values in the table that "answer" the trivially small
subproblem usually by initializing the first entry (or entries) of the table - Iterate through the array and fill in remaining entries, using previous
entries in the table to perform the current calculation - Your final answer is (usually) the last entry in the table
798. What you learned
You learned another way of possibly changing an algorithm of one complexity
class to a lower complexity class by using memory to store intermediate results.
This is a powerful technique to use to make sure your programs that must do
iterative calculations can benefit from running much faster.
Analysis of Linear Search
Consider the following search algorithm known as linear search.
function search(array, term) { for (let i = 0; i < array.length; i++) { if (array[i] == term) { return i; } } return -1; }
Most Big-O analysis is done on the "worst-case scenario" and provides an upper
bound. In the worst case analysis, you calculate the upper bound on running time
of an algorithm. You must know the case that causes the maximum number of
operations to be executed.
For linear search, the worst case happens when the element to be searched
(term in the above code) is not present in the array. When term is not
present, the search function compares it with all the elements of array one
by one. Therefore, the worst-case time complexity of linear search would be
O(n).
Analysis of Binary Search
Consider the following search algorithm known as the binary search. This
kind of search only works if the array is already sorted.
function binarySearch(arr, x, start, end) { if (start > end) return false; let mid = Math.floor((start + end) / 2); if (arr[mid] === x) return true; if (arr[mid] > x) { return binarySearch(arr, x, start, mid - 1); } else { return binarySearch(arr, x, mid + 1, end); } }
For the binary search, you cut the search space in half every time. This means
that it reduces the number of searches you must do by half, every time. That
means the number of steps it takes to get to the desired item (if it exists in
the array), in the worst case takes the same amount of steps for every number
within a range defined by the powers of 2.
- 7 -> 4 -> 2 -> 1
- 8 -> 4 -> 2 -> 1
- 9 -> 5 -> 3 -> 2 -> 1
- 15 -> 8 -> 4 -> 2 -> 1
- 16 -> 8 -> 4 -> 2 -> 1
- 17 -> 9 -> 5 -> 3 -> 2 -> 1
- 31 -> 16 -> 8 -> 4 -> 2 -> 1
- 32 -> 16 -> 8 -> 4 -> 2 -> 1
- 33 -> 17 -> 9 -> 5 -> 3 -> 2 -> 1
So, for any number of items in the sorted array between 2n-1 and
2n, it takes n number of steps. That means if you have k items in
the array, then it will take log2k.
Binary searches are O(log2n).
Analysis of the Merge Sort
Consider the following divide-and-conquer sort method known as the merge
sort.
function merge(leftArray, rightArray) { const sorted = []; while (leftArray.length > 0 && rightArray.length > 0) { const leftItem = leftArray[0]; const rightItem = rightArray[0]; if (leftItem > rightItem) { sorted.push(rightItem); rightArray.shift(); } else { sorted.push(leftItem); leftArray.shift(); } } while (leftArray.length !== 0) { const value = leftArray.shift(); sorted.push(value); } while (rightArray.length !== 0) { const value = rightArray.shift(); sorted.push(value); } return sorted } function mergeSort(array) { const length = array.length; if (length == 1) { return array; } const middleIndex = Math.ceil(length / 2); const leftArray = array.slice(0, middleIndex); const rightArray = array.slice(middleIndex, length); leftArray = mergeSort(leftArray); rightArray = mergeSort(rightArray); return merge(leftArray, rightArray); }
For the merge sort, you cut the sort space in half every time. In each of
those halves, you have to loop through the number of items in the array. That
means that, for the worst case, you get that same
log2n but it must be multiplied by the number of
elements in the array, n.
Merge sorts are O(n*log2n).
Analysis of Bubble Sort
Consider the following sort algorithm known as the bubble sort.
function bubbleSort(items) { var length = items.length; for (var i = 0; i < length; i++) { for (var j = 0; j < (length - i - 1); j++) { if (items[j] > items[j + 1]) { var tmp = items[j]; items[j] = items[j + 1]; items[j + 1] = tmp; } } } }
For the bubble sort, the worst case is the same as the best case because it
always makes nested loops. So, the outer loop loops the number of times of the
items in the array. For each one of those loops, the inner loop loops again a
number of times for the items in the array. So, if there are n values in the
array, then a loop inside a loop is n * n. So, this is O(n2).
That's polynomial, which ain't that good.
LeetCode.com
Some of the problems in the projects ask you to use the LeetCode platform to
check your work rather than relying on local mocha tests. If you don't already
have an account at LeetCode.com, please click
https://leetcode.com/accounts/signup/ to sign up for a free
account.
After you sign up for the account, please verify the account with the email
address that you used so that you can actually run your solution on
LeetCode.com.
In the projects, you will see files that are named "leet_code_«number».js".
When you open those, you will see a link in the file that you can use to go
directly to the corresponding problem on LeetCode.com.
Use the local JavaScript file in Visual Studio Code to collaborate on the
solution. Then, you can run the proposed solution in the LeetCode.com code
runner to validate its correctness.
Memoization Problems
This project contains two test-driven problems and one problem on LeetCode.com.
- Clone the project from
https://github.com/appacademy-starters/algorithms-memoization-project. cdinto the project foldernpm installto install dependencies in the project root directorynpx testto run the specs- You can view the test cases in
/test/test.js. Your job is to write code in
the/libfiles to pass all specs.- In
problems.js, you will write code to make thelucasNumberMemoand
minChangefunctions pass. - In
leet_code_518.js, you will use that file as a scratch pad to work on
the LeetCode.com problem at https://leetcode.com/problems/coin-change-2/.
- In
Tabulation Problems
This project contains two test-driven problems and one problem on LeetCode.com.
- Clone the project from
https://github.com/appacademy-starters/algorithms-tabulation-project. cdinto the project foldernpm installto install dependencies in the project root directorynpx testto run the specs- You can view the test cases in
/test/test.js. Your job is to write code in
the/libfiles to pass all specs.- In
problems.js, you will write code to make thestepper,
maxNonAdjacentSum, andminChangefunctions pass. - In
leet_code_64.js, you will use that file as a scratch pad to work on the
LeetCode.com problem at https://leetcode.com/problems/minimum-path-sum/. - In
leet_code_70.js, you will use that file as a scratch pad to work on the
LeetCode.com problem at https://leetcode.com/problems/climbing-stairs/.
- In
WEEK-07 DAY-3
Sorting Algorithms
Sorting Algorithms Learning Objectives
The objective of this lesson is for you to get experience implementing
common sorting algorithms that will come up during a lot of interviews. It is
also important for you to understand how different sorting algorithms behave
when given output.
At the end of this, you will be able to
- Explain the complexity of and write a function that performs
bubble sorton
an array of numbers. - Explain the complexity of and write a function that performs
selection sort
on an array of numbers. - Explain the complexity of and write a function that performs
insertion sort
on an array of numbers. - Explain the complexity of and write a function that performs
merge sorton
an array of numbers. - Explain the complexity of and write a function that performs
quick sorton
an array of numbers. - Explain the complexity of and write a function that performs a binary search
on a sorted array of numbers.nce implementing
common sorting algorithms that will come up during a lot of interviews. It is
also important for you to understand how different sorting algorithms behave
when given output.
At the end of this, you will be able to - Explain the complexity of and write a function that performs
bubble sorton
an array of numbers. - Explain the complexity of and write a function that performs
selection sort
on an array of numbers. - Explain the complexity of and write a function that performs
insertion sort
on an array of numbers. - Explain the complexity of and write a function that performs
merge sorton
an array of numbers. - Explain the complexity of and write a function that performs
quick sorton
an array of numbers. - Explain the complexity of and write a function that performs a binary search
on a sorted array of numbers.
Bubble Sort
Bubble Sort is generally the first major sorting algorithm to come up in most
introductory programming courses. Learning about this algorithm is useful
educationally, as it provides a good introduction to the challenges you face
when tasked with converting unsorted data into sorted data, such as conducting
logical comparisons, making swaps while iterating, and making optimizations.
It's also quite simple to implement, and can be done quickly.
Bubble Sort is almost never a good choice in production. simply because:
- It is not efficient
- It is not commonly used
- There is a stigma attached to using it
799. "But...then...why are we..."
It is quite useful as an educational base for you, and as a conversational
base for you while interviewing, because you can discuss how other more elegant
and efficient algorithms improve upon it. Taking naive code and improving upon
it by weighing the technical tradeoffs of your other options is 100% the name of
the game when trying to level yourself up from a junior engineer to a senior
engineer.
800. The algorithm bubbles up
As you progress through the algorithms and data structures of this course,
you'll eventually notice that there are some recurring funny terms. "Bubbling
up" is one of those terms.
When someone writes that an item in a collection "bubbles up," you should infer
that:
- The item is in motion
- The item is moving in some direction
- The item has some final resting destination
When invoking Bubble Sort to sort an array of integers in ascending order, the
largest integers will "bubble up" to the "top" (the end) of the array, one at a
time.
The largest values are captured, put into motion in the direction defined by the
desired sort (ascending right now), and traverse the array until they arrive at
their end destination. See if you can observe this behavior in the following
animation (courtesy http://visualgo.net):
As the algorithm iterates through the array, it compares each element to the
element's right neighbor. If the current element is larger than its neighbor,
the algorithm swaps them. This continues until all elements in the array are
sorted.
801. How does a pass of Bubble Sort work?
Bubble sort works by performing multiple passes to move elements closer to
their final positions. A single pass will iterate through the entire array once.
A pass works by scanning the array from left to right, two elements at a time,
and checking if they are ordered correctly. To be ordered correctly the first
element must be less than or equal to the second. If the two elements are not
ordered properly, then we swap them to correct their order. Afterwards, it scans
the next two numbers and continue repeat this process until we have gone through
the entire array.
See one pass of bubble sort on the array [2, 8, 5, 2, 6]. On each step the
elements currently being scanned are in bold.
- [2, 8, 5, 2, 6] - ordered, so leave them alone
- [2, 8, 5, 2, 6] - not ordered, so swap
- [2, 5, 8, 2, 6] - not ordered, so swap
- [2, 5, 2, 8, 6] - not ordered, so swap
- [2, 5, 2, 6, 8] - the first pass is complete
Because at least one swap occurred, the algorithm knows that it wasn't sorted.
It needs to make another pass. It starts over again at the first entry and goes
to the next-to-last entry doing the comparisons, again. It only needs to go to
the next-to-last entry because the previous "bubbling" put the largest entry in
the last position. - [2, 5, 2, 6, 8] - ordered, so leave them alone
- [2, 5, 2, 6, 8] - not ordered, so swap
- [2, 2, 5, 6, 8] - ordered, so leave them alone
- [2, 2, 5, 6, 8] - the second pass is complete
Because at least one swap occurred, the algorithm knows that it wasn't sorted.
Now, it can bubble from the first position to the last-2 position because the
last two values are sorted. - [2, 2, 5, 6, 8] - ordered, so leave them alone
- [2, 2, 5, 6, 8] - ordered, so leave them alone
- [2, 2, 5, 6, 8] - the third pass is complete
No swap occurred, so the Bubble Sort stops.
802. Ending the Bubble Sort
During Bubble Sort, you can tell if the array is in sorted order by checking if
a swap was made during the previous pass performed. If a swap was not performed
during the previous pass, then the array must be totally sorted and the
algorithm can stop.
You're probably wondering why that makes sense. Recall that a pass of Bubble
Sort checks if any adjacent elements are out of order and swaps them if they
are. If we don't make any swaps during a pass, then everything must be already
in order, so our job is done. Let that marinate for a bit.
803. Pseudocode for Bubble Sort
Bubble Sort: (array)
n := length(array)
repeat
swapped = false
for i := 1 to n - 1 inclusive do
/* if this pair is out of order */
if array[i - 1] > array[i] then
/* swap them and remember something changed */
swap(array, i - 1, i)
swapped := true
end if
end for
until not swapped
Selection Sort
Selection Sort is very similar to Bubble Sort. The major difference between the
two is that Bubble Sort bubbles the largest elements up to the end of the
array, while Selection Sort selects the smallest elements of the array and
directly places them at the beginning of the array in sorted position. Selection
sort will utilize swapping just as bubble sort did. Let's carefully break this
sorting algorithm down.
804. The algorithm: select the next smallest
Selection sort works by maintaining a sorted region on the left side of the
input array; this sorted region will grow by one element with every "pass" of
the algorithm. A single "pass" of selection sort will select the next smallest
element of unsorted region of the array and move it to the sorted region.
Because a single pass of selection sort will move an element of the unsorted
region into the sorted region, this means a single pass will shrink the unsorted
region by 1 element whilst increasing the sorted region by 1 element. Selection
sort is complete when the sorted region spans the entire array and the unsorted
region is empty!
The algorithm can be summarized as the following:
- Set MIN to location 0
- Search the minimum element in the list
- Swap with value at location MIN
- Increment MIN to point to next element
- Repeat until list is sorted
805. The pseudocode
In pseudocode, the Selection Sort can be written as this.
procedure selection sort
list : array of items
n : size of list
for i = 1 to n - 1
/* set current element as minimum*/
min = i
/* check the element to be minimum */
for j = i+1 to n
if list[j] < list[min] then
min = j;
end if
end for
/* swap the minimum element with the current element*/
if indexMin != i then
swap list[min] and list[i]
end if
end for
end procedure
Insertion Sort
With Bubble Sort and Selection Sort now in your tool box, you're starting to
get some experience points under your belt! Time to learn one more "naive"
sorting algorithm before you get to the efficient sorting algorithms.
806. The algorithm: insert into the sorted region
Insertion Sort is similar to Selection Sort in that it gradually builds up a
larger and larger sorted region at the left-most end of the array.
However, Insertion Sort differs from Selection Sort because this algorithm does
not focus on searching for the right element to place (the next smallest in our
Selection Sort) on each pass through the array. Instead, it focuses on sorting
each element in the order they appear from left to right, regardless of their
value, and inserting them in the most appropriate position in the sorted region.
See if you can observe the behavior described above in the following animation:
807. The Steps
Insertion Sort grows a sorted array on the left side of the input array by:
- If it is the first element, it is already sorted. return 1;
- Pick next element
- Compare with all elements in the sorted sub-list
- Shift all the elements in the sorted sub-list that is greater than the
value to be sorted - Insert the value
- Repeat until list is sorted
These steps are easy to confuse with selection sort, so you'll want to watch the
video lecture and drawing that accompanies this reading as always!
808. The pseudocode
procedure insertionSort( A : array of items )
int holePosition
int valueToInsert
for i = 1 to length(A) inclusive do:
/* select value to be inserted */
valueToInsert = A[i]
holePosition = i
/*locate hole position for the element to be inserted */
while holePosition > 0 and A[holePosition-1] > valueToInsert do:
A[holePosition] = A[holePosition-1]
holePosition = holePosition -1
end while
/* insert the number at hole position */
A[holePosition] = valueToInsert
end for
end procedure
Merge Sort
You've explored a few sorting algorithms already, all of them being quite slow
with a runtime of O(n2). It's time to level up and learn your first
time-efficient sorting algorithm! You'll explore merge sort in detail soon,
but first, you should jot down some key ideas for now. The following points are
not steps to an algorithm yet; rather, they are ideas that will motivate how you
can derive this algorithm.
- it is easy to merge elements of two sorted arrays into a single sorted array
- you can consider an array containing only a single element as already
trivially sorted - you can also consider an empty array as trivially sorted
809. The algorithm: divide and conquer
You're going to need a helper function that solves the first major point from
above. How might you merge two sorted arrays? In other words you want a merge
function that will behave like so:
let arr1 = [1, 5, 10, 15]; let arr2 = [0, 2, 3, 7, 10]; merge(arr1, arr2); // => [0, 1, 2, 3, 5, 7, 10, 10, 15]
Once you have that, you get to the "divide and conquer" bit.
The algorithm for merge sort is actually really simple.
- if there is only one element in the list, it is already sorted. return that
array. - otherwise, divide the list recursively into two halves until it can no more
be divided. - merge the smaller lists into new list in sorted order.
The process is visualized below. When elements are moved to the bottom of the
picture, they are going through themergestep:
The pseudocode for the algorithm is as follows.
procedure mergesort( a as array )
if ( n == 1 ) return a
/* Split the array into two */
var l1 as array = a[0] ... a[n/2]
var l2 as array = a[n/2+1] ... a[n]
l1 = mergesort( l1 )
l2 = mergesort( l2 )
return merge( l1, l2 )
end procedure
procedure merge( a as array, b as array )
var result as array
while ( a and b have elements )
if ( a[0] > b[0] )
add b[0] to the end of result
remove b[0] from b
else
add a[0] to the end of result
remove a[0] from a
end if
end while
while ( a has elements )
add a[0] to the end of result
remove a[0] from a
end while
while ( b has elements )
add b[0] to the end of result
remove b[0] from b
end while
return result
end procedure
Quick Sort
Quick Sort has a similar "divide and conquer" strategy to Merge Sort. Here are a
few key ideas that will motivate the design:
- it is easy to sort elements of an array relative to a particular target value
- an array of 0 or 1 elements is already trivially sorted
Regarding that first point, for example given[7, 3, 8, 9, 2]and a target of
5, we know[3, 2]are numbers less than5and[7, 8, 9]are numbers
greater than5.
810. How does it work?
In general, the strategy is to divide the input array into two subarrays: one
with the smaller elements, and one with the larger elements. Then, it
recursively operates on the two new subarrays. It continues this process until
of dividing into smaller arrays until it reaches subarrays of length 1 or
smaller. As you have seen with Merge Sort, arrays of such length are
automatically sorted.
The steps, when discussed on a high level, are simple:
- choose an element called "the pivot", how that's done is up to the
implementation - take two variables to point left and right of the list excluding pivot
- left points to the low index
- right points to the high
- while value at left is less than pivot move right
- while value at right is greater than pivot move left
- if both step 5 and step 6 does not match swap left and right
- if left ≥ right, the point where they met is new pivot
- repeat, recursively calling this for smaller and smaller arrays
Before we move forward, see if you can observe the behavior described above in
the following animation:
811. The algorithm: divide and conquer
Formally, we want to partition elements of an array relative to a pivot value.
That is, we want elements less than the pivot to be separated from elements that
are greater than or equal to the pivot. Our goal is to create a function with
this behavior:
let arr = [7, 3, 8, 9, 2]; partition(arr, 5); // => [[3, 2], [7,8,9]]
811.1. Partition
Seems simple enough! Let's implement it in JavaScript:
// nothing fancy function partition(array, pivot) { let left = []; let right = []; array.forEach(el => { if (el < pivot) { left.push(el); } else { right.push(el); } }); return [ left, right ]; } // if you fancy function partition(array, pivot) { let left = array.filter(el => el < pivot); let right = array.filter(el => el >= pivot); return [ left, right ]; }
You don't have to use an explicit partition helper function in your Quick Sort
implementation; however, we will borrow heavily from this pattern. As you design
algorithms, it helps to think about key patterns in isolation, although your
solution may not feature that exact helper. Some would say we like to divide and
conquer.
812. The pseudocode
It is so small, this algorithm. It's amazing that it performs so well with so
little code!
procedure quickSort(left, right)
if the length of the array is 0 or 1, return the array
set the pivot to the first element of the array
remove the first element of the array
put all values less than the pivot value into an array called left
put all values greater than the pivot value into an array called right
call quick sort on left and assign the return value to leftSorted
call quick sort on right and assign the return value to rightSorted
return the concatenation of leftSorted, the pivot value, and rightSorted
end procedure
Binary Search
We've explored many ways to sort arrays so far, but why did we go through all of
that trouble? By sorting elements of an array, we are organizing the data in a
way that gives us a quick way to look up elements later on. For simplicity, we
have been using arrays of numbers up until this point. However, these sorting
concepts can be generalized to other data types. For example, it would be easy
to modify our comparison-based sorting algorithms to sort strings: instead of
leveraging facts like 0 < 1, we can say 'A' < 'B'.
Think of a dictionary. A dictionary contains alphabetically sorted words and
their definitions. A dictionary is pretty much only useful if it is ordered in
this way. Let's say you wanted to look up the definition of "stupendous." What
steps might you take?
- you open up the dictionary at the roughly middle page
- you land in the "m" section
- you know "s" comes somewhere after "m" in the book, so you disregard all pages
before the "m" section. Instead, you flip to the roughly middle page between
"m" and "z"- you land in the "u" section
- you know "s" comes somewhere before "u", so you can disregard all pages after
the "u" section. Instead, you flip to the roughly middle page between the
previous "m" page and "u" - ...
You are essentially using thebinarySearchalgorithm in the real world.
813. The Algorithm: "check the middle and half the search space"
Formally, our binarySearch will seek to solve the following problem:
Given a sorted array of numbers and a target num, return a boolean indicating whether or not that target is contained in the array.
Programmatically, we want to satisfy the following behavior:
binarySearch([5, 10, 12, 15, 20, 30, 70], 12); // => true binarySearch([5, 10, 12, 15, 20, 30, 70], 24); // => false
Before we move on, really internalize the fact that binarySearch will only
work on sorted arrays! Obviously we can search any array, sorted or
unsorted, in O(n) time. But now our goal is be able to search the array with a
sub-linear time complexity (less than O(n)).
814. The pseudocode
procedure binary search (list, target)
parameter list: a list of sorted value
parameter target: the value to search for
if the list has zero length, then return false
determine the slice point:
if the list has an even number of elements,
the slice point is the number of elements
divided by two
if the list has an odd number of elements,
the slice point is the number of elements
minus one divided by two
create an list of the elements from 0 to the
slice point, not including the slice point,
which is known as the "left half"
create an list of the elements from the
slice point to the end of the list which is
known as the "right half"
if the target is less than the value in the
original array at the slice point, then
return the binary search of the "left half"
and the target
if the target is greater than the value in the
original array at the slice point, then
return the binary search of the "right half"
and the target
if neither of those is true, return true
end procedure binary search
Bubble Sort Analysis
Bubble Sort manipulates the array by swapping the position of two elements. To
implement Bubble Sort in JS, you'll need to perform this operation. It helps to
have a function to do that. A key detail in this function is that you need an
extra variable to store one of the elements since you will be overwriting them
in the array:
function swap(array, idx1, idx2) { let temp = array[idx1]; // save a copy of the first value array[idx1] = array[idx2]; // overwrite the first value with the second value array[idx2] = temp; // overwrite the second value with the first value }
Note that the swap function does not create or return a new array. It mutates
the original array:
let arr1 = [2, 8, 5, 2, 6]; swap(arr1, 1, 2); arr1; // => [ 2, 5, 8, 2, 6 ]
814.1. Bubble Sort JS Implementation
Take a look at the snippet below and try to understand how it corresponds to the
conceptual understanding of the algorithm. Scroll down to the commented version
when you get stuck.
function bubbleSort(array) { let swapped = true; while(swapped) { swapped = false; for (let i = 0; i < array.length - 1; i++) { if (array[i] > array[i+1]) { swap(array, i, i+1); swapped = true; } } } return array; }
// commented function bubbleSort(array) { // this variable will be used to track whether or not we // made a swap on the previous pass. If we did not make // any swap on the previous pass, then the array must // already be sorted let swapped = true; // this while will keep doing passes if a swap was made // on the previous pass while(swapped) { swapped = false; // reset swap to false // this for will perform a single pass for (let i = 0; i < array.length; i++) { // if the two value are not ordered... if (array[i] > array[i+1]) { // swap the two values swap(array, i, i+1); // since you made a swap, remember that you did so // b/c we should perform another pass after this one swapped = true; } } } return array; }
815. Time Complexity: O(n2)
Picture the worst case scenario where the input array is completely unsorted.
Say it's sorted in fully decreasing order, but the goal is to sort it in
increasing order:
- n is the length of the input array
- The inner
forloop along contributes O(n) in isolation - The outer while loop contributes O(n) in isolation because a single
iteration of the while loop will bring one element to its final resting
position. In other words, it keeps running the while loop until the array is
fully sorted. To fully sort the array we will need to bring allnelements
into their final resting positions. - Those two loops are nested so the total time complexity is O(n * n) =
O(n2).
It's worth mentioning that the best case scenario is when the input array is
already fully sorted. This will cause our for loop to conduct a single pass
without performing any swap, so thewhileloop will not trigger further
iterations. This means best case time complexity is O(n) for bubble sort. This
best case linear time is probably the only advantage of bubble sort. Programmers
are usually interested only in the worst-case analysis and ignore best-case
analysis.
816. Space Complexity: O(1)
Bubble Sort is a constant space, O(1), algorithm. The amount of memory consumed
by the algorithm does not increase relative to the size of the input array. It
uses the same amount of memory and create the same amount of variables
regardless of the size of the input, making this algorithm quite space
efficient. The space efficiency mostly comes from the fact that it mutates the
input array in-place. This is known as a destructive sort because it
"destroys" the positions of the values in the array.
817. When should you use Bubble Sort?
Nearly never, but it may be a good choice in the following list of special
cases:
- When sorting really small arrays where run time will be negligible no matter
what algorithm you choose. - When sorting arrays that you expect to already be nearly sorted.
- At parties
Selection Sort Analysis
Since a component of Selection Sort requires us to locate the smallest value in
the array, let's focus on that pattern in isolation:
function minumumValueIndex(arr) { let minIndex = 0; for (let j = 0; j < arr.length; j++) { if (arr[minIndex] > arr[j]) { minIndex = j; } } return minIndex; }
Pretty basic code right? We won't use this explicit helper function to solve
selection sort, however we will borrow from this pattern soon.
818. Selection Sort JS Implementation
We'll also utilize the classic swap pattern that we introduced in the bubble sort. To
refresh:
function swap(arr, index1, index2) { let temp = arr[index1]; arr[index1] = arr[index2]; arr[index2] = temp; }
Now for the punchline! Take a look at the snippet below and try to understand
how it corresponds to our conceptual understanding of the selection sort
algorithm. Scroll down to the commented version when you get stuck.
function selectionSort(arr) { for (let i = 0; i < arr.length; i++) { let minIndex = i; for (let j = i + 1; j < arr.length; j++) { if (arr[minIndex] > arr[j]) { minIndex = j; } } swap(arr, i, minIndex); } return arr; }
// commented function selectionSort(arr) { // the `i` loop will track the index that points to the first element of the unsorted region: // this means that the sorted region is everything left of index i // and the unsorted region is everything to the right of index i for (let i = 0; i < arr.length; i++) { let minIndex = i; // the `j` loop will iterate through the unsorted region and find the index of the smallest element for (let j = i + 1; j < arr.length; j++) { if (arr[minIndex] > arr[j]) { minIndex = j; } } // after we find the minIndex in the unsorted region, // swap that minIndex with the first index of the unsorted region swap(arr, i, minIndex); } return arr; }
819. Time Complexity Analysis
Selection Sort runtime is O(n2) because:
nis the length of the input array- The outer loop i contributes O(n) in isolation, this is plain to see
- The inner loop j is more complicated, it will make one less iteration for
every iteration of i.- for example, let's say we have an array of 10 elements,
n = 10. - the first full cycle of
jwill have 9 iterations - the second full cycle of
jwill have 8 iterations - the third full cycle of
jwill have 7 iterations - ...
- the last full cycle of
jwill have 1 iteration - This means that the inner loop j will contribute roughly O(n / 2) on
average
- for example, let's say we have an array of 10 elements,
- The two loops are nested so our total time complexity is O(n * n / 2) =
O(n2)
You'll notice that during this analysis we said something silly like O(n / 2).
In some analyses such as this one, we'll prefer to drop the constants only at
the end of the sketch so you understand the logical steps we took to derive a
complicated time complexity.
820. Space Complexity Analysis: O(1)
The amount of memory consumed by the algorithm does not increase relative to the
size of the input array. We use the same amount of memory and create the same
amount of variables regardless of the size of our input. A quick indicator of
this is the fact that we don't create any arrays.
821. When should we use Selection Sort?
There is really only one use case where Selection Sort becomes superior to
Bubble Sort. Both algorithms are quadratic in time and constant in space, but
the point at which they differ is in the number of swaps they make.
Bubble Sort, in the worst case, invokes a swap on every single comparison.
Selection Sort only swaps once our inner loop has completely finished traversing
the array. Therefore, Selection Sort is optimized to make the least possible
number of swaps.
Selection Sort becomes advantageous when making a swap is the most expensive
operation in your system. You will likely rarely encounter this scenario, but in
a situation where you've built (or have inherited) a system with suboptimal
write speed ability, for instance, maybe you're sorting data in a specialized
database tuned strictly for fast read speeds at the expense of slow write
speeds, using Selection Sort would save you a ton of expensive operations that
could potential crash your system under peak load.
Though in industry this situation is very rare, the insights above make for a
fantastic conversational piece when weighing technical tradeoffs while
strategizing solutions in an interview setting. This commentary may help deliver
the impression that you are well-versed in system design and technical analysis,
a key indicator that someone is prepared for a senior level position.
Insertion Sort Analysis
Take a look at the snippet below and try to understand how it corresponds to our
conceptual understanding of the Insertion Sort algorithm. Scroll down to the
commented version when you get stuck:
function insertionSort(arr) { for (let i = 1; i < arr.length; i++) { let currElement = arr[i]; for (var j = i - 1; j >= 0 && currElement < arr[j]; j--) { arr[j + 1] = arr[j]; } arr[j + 1] = currElement; } return arr; }
function insertionSort(arr) { // the `i` loop will iterate through every element of the array // we begin at i = 1, because we can consider the first element of the array as a // trivially sorted region of only one element // insertion sort allows us to insert new elements anywhere within the sorted region for (let i = 1; i < arr.length; i++) { // grab the first element of the unsorted region let currElement = arr[i]; // the `j` loop will iterate left through the sorted region, // looking for a legal spot to insert currElement for (var j = i - 1; j >= 0 && currElement < arr[j]; j--) { // keep moving left while currElement is less than the j-th element arr[j + 1] = arr[j]; // the line above will move the j-th element to the right, // leaving a gap to potentially insert currElement } // insert currElement into that gap arr[j + 1] = currElement; } return arr; }
There are a few key pieces to point out in the above solution before moving
forward:
- The outer
forloop starts at the 1st index, not the 0th index, and moves to
the right. - The inner
forloop starts immediately to the left of the current element,
and moves to the left. - The condition for the inner
forloop is complicated, and behaves similarly
to a while loop!- It continues iterating to the left toward
j = 0, only while the
currElementis less thanarr[j]. - It does this over and over until it finds the proper place to insert
currElement, and then we exit the inner loop!
- It continues iterating to the left toward
- When shifting elements in the sorted region to the right, it does not
replace the value at their old index! If the input array is[1, 2, 4, 3],
andcurrElementis3, after comparing4and3, but before inserting
3between2and4, the array will look like this:[1, 2, 4, 4].
If you are currently scratching your head, that is perfectly okay because when
this one clicks, it clicks for good.
If you're struggling, you should try taking out a pen and paper and step through
the solution provided above one step at a time. Keep track ofi,j,
currElement,arr[j], and the inputarritself at every step. After going
through this a few times, you'll have your "ah HA!" moment.
822. Time and Space Complexity Analysis
Insertion Sort runtime is O(n2) because:
In the worst case scenario where our input array is entirely unsorted, since
this algorithm contains a nested loop, its run time behaves similarly to
bubbleSort and selectionSort. In this case, we are forced to make a comparison
at each iteration of the inner loop. Not convinced? Let's derive the complexity.
We'll use much of the same argument as we did in selectionSort. Say we had the
worst case scenario where are input array is sorted in full decreasing order,
but we wanted to sort it in increasing order:
nis the length of the input array- The outer loop i contributes O(n) in isolation, this is plain to see
- The inner loop j is more complicated. We know j will iterate until it finds an
appropriate place to insert thecurrElementinto the sorted region. However,
since we are discussing the case where the data is already in decreasing
order, the element must travel the maximum distance to find it's insertion
point! We know this insertion point to be index 0, since everycurrElement
will be the next smallest of the array. So:- the 1st element travels 1 distance to be inserted
- the 2nd element travels 2 distance to be inserted
- the 3rd element travels 3 distance to be inserted
- ...
- the n-1th element travels n-1 distance to be inserted
- This means that our inner loop j will contribute roughly O(n / 2) on
average
- The two loops are nested so our total time complexity is O(n * n / 2) =
O(n2)
822.1. Space Complexity: O(1)
The amount of memory consumed by the algorithm does not increase relative to the
size of the input array. We use the same amount of memory and create the same
amount of variables regardless of the size of our input. A quick indicator of
this is the fact that we don't create any arrays.
823. When should you use Insertion Sort?
Insertion Sort has one advantage that makes it absolutely supreme in one special
case. Insertion Sort is what's known as an "online" algorithm. Online algorithms
are great when you're dealing with streaming data, because they can sort the
data live as it is received.
If you must sort a set of data that is ever-incoming, for example, maybe you are
sorting the most relevant posts in a social media feed so that those posts that
are most likely to impact the site's audience always appear at the top of the
feed, an online algorithm like Insertion Sort is a great option.
Insertion Sort works well in this situation because the left side of the array
is always sorted, and in the case of nearly sorted arrays, it can run in linear
time. The absolute best case scenario for Insertion Sort is when there is only
one unsorted element, and it is located all the way to the right of the array.
Well, if you have data constantly being pushed to the array, it will always be
added to the right side. If you keep your algorithm constantly running, the left
side will always be sorted. Now you have linear time sort.
Otherwise, Insertion Sort is, in general, useful in all the same situations as
Bubble Sort. It's a good option when:
- You are sorting really small arrays where run time will be negligible no
matter what algorithm we choose. - You are sorting an array that you expect to already be nearly sorted.
Merge Sort Analysis
You needed to come up with two pieces of code to make merge sort work.
824. Full code
function merge(array1, array2) { let merged = []; while (array1.length || array2.length) { let ele1 = array1.length ? array1[0] : Infinity; let ele2 = array2.length ? array2[0] : Infinity; let next; if (ele1 < ele2) { next = array1.shift(); } else { next = array2.shift(); } merged.push(next); } return merged; } function mergeSort(array) { if (array.length <= 1) { return array; } let midIdx = Math.floor(array.length / 2); let leftHalf = array.slice(0, midIdx); let rightHalf = array.slice(midIdx); let sortedLeft = mergeSort(leftHalf); let sortedRight = mergeSort(rightHalf); return merge(sortedLeft, sortedRight); }
825. Merging two sorted arrays
Merging two sorted arrays is simple. Since both arrays are sorted, we know the
smallest numbers to always be at the front of the arrays. We can construct the
new array by comparing the first elements of both input arrays. We remove the
smaller element from it's respective array and add it to our new array. Do this
until both input arrays are empty:
function merge(array1, array2) { let merged = []; while (array1.length || array2.length) { let ele1 = array1.length ? array1[0] : Infinity; let ele2 = array2.length ? array2[0] : Infinity; let next; if (ele1 < ele2) { next = array1.shift(); } else { next = array2.shift(); } merged.push(next); } return merged; }
Remember the following about JavaScript to understand the above code.
0is considered a falsey value, meaning it acts likefalsewhen used in
Boolean expressions. All other numbers are truthy.Infinityis a value that is guaranteed to be greater than any other quantityshiftis an array method that removes and returns the first element
Here's the annotated version.
// commented function merge(array1, array2) { let merged = []; // keep running while either array still contains elements while (array1.length || array2.length) { // if array1 is nonempty, take its the first element as ele1 // otherwise array1 is empty, so take Infinity as ele1 let ele1 = array1.length ? array1[0] : Infinity; // do the same for array2, ele2 let ele2 = array2.length ? array2[0] : Infinity; let next; // remove the smaller of the eles from it's array if (ele1 < ele2) { next = array1.shift(); } else { next = array2.shift(); } // and add that ele to the new array merged.push(next); } return merged; }
By using Infinity as the default element when an array is empty, we are able to
elegantly handle the scenario where one array empties before the other. We know
that any actual element will be less than Infinity so we will continually take
the other element into our merged array.
In other words, we can safely handle this edge case:
merge([10, 13, 15, 25], []); // => [10, 13, 15, 25]
Nice! We now have a way to merge two sorted arrays into a single sorted array.
It's worth mentioning that merge will have a O(n) runtime where n is
the
combined length of the two input arrays. This is what we meant when we said it
was "easy" to merge two sorted arrays; linear time is fast! We'll find fact this
useful later.
826. Divide and conquer, step-by-step
Now that we satisfied the merge idea, let's handle the second point. That is, we
say an array of 1 or 0 elements is already sorted. This will be the base case of
our recursion. Let's begin adding this code:
function mergeSort(array) { if (array.length <= 1) { return array; } // .... }
If our base case pertains to an array of a very small size, then the design of
our recursive case should make progress toward hitting this base scenario. In
other words, we should recursively call mergeSort on smaller and smaller
arrays. A logical way to do this is to take the input array and split it into
left and right halves.
function mergeSort(array) { if (array.length <= 1) { return array; } let midIdx = Math.floor(array.length / 2); let leftHalf = array.slice(0, midIdx); let rightHalf = array.slice(midIdx); let sortedLeft = mergeSort(leftHalf); let sortedRight = mergeSort(rightHalf); // ... }
Here is the part of the recursion where we do a lot of hand waving and we take
things on faith. We know that mergeSort will take in an array and return the
sorted version; we assume that it works. That means the two recursive calls will
return the sortedLeft and sortedRight halves.
Okay, so we have two sorted arrays. We want to return one sorted array. So
merge them! Using the merge function we designed earlier:
function mergeSort(array) { if (array.length <= 1) { return array; } let midIdx = Math.floor(array.length / 2); let leftHalf = array.slice(0, midIdx); let rightHalf = array.slice(midIdx); let sortedLeft = mergeSort(leftHalf); let sortedRight = mergeSort(rightHalf); return merge(sortedLeft, sortedRight); }
Wow. that's it. Notice how light the implementation of mergeSort is. Much of
the heavy lifting (the actually comparisons) is done by the merge helper.
mergeSort is a classic example of a "Divide and Conquer" algorithm. In other
words, we keep breaking the array into smaller and smaller sub arrays. This is
the same as saying we take the problem and break it down into smaller and
smaller subproblems. We do this until the subproblems are so small that we
trivially know the answer to them (an array length 0 or 1 is already sorted).
Once we have those subanswers we can combine to reconstruct the larger problems
that we previously divided (merge the left and right subarrays).
827. Time and Space Complexity Analysis
827.1. Time Complexity: O(n log(n))
nis the length of the input array- We must calculate how many recursive calls we make. The number of recursive
calls is the number of times we must split the array to reach the base case.
Since we split in half each time, the number of recursive calls is
O(log(n)).- for example, say we had an array of length
32 - then the length would change as
32 -> 16 -> 8 -> 4 -> 2 -> 1, we have to
split 5 times before reaching the base case,log(32) = 5 - in our algorithm, log(n) describes how many times we must halve n
until the quantity reaches 1.
- for example, say we had an array of length
- Besides the recursive calls, we must consider the while loop within the
mergefunction, which contributesO(n)in isolation - We call
mergein every recursivemergeSortcall, so the total complexity
is O(n * log(n))
827.2. Space Complexity: O(n)
Merge Sort is the first non-O(1) space sorting algorithm we've seen thus far.
The larger the size of our input array, the greater the number of subarrays we
must create in memory. These are not free! They each take up finite space, and
we will need a new subarray for each element in the original input. Therefore,
Merge Sort has a linear space complexity, O(n).
827.3. When should you use Merge Sort?
Unless we, the engineers, have access in advance to some unique, exploitable
insight about our dataset, it turns out that O(n log n) time is the best we
can do when sorting unknown datasets.
That means that Merge Sort is fast! It's way faster than Bubble Sort, Selection
Sort, and Insertion Sort. However, due to its linear space complexity, we must
always weigh the trade off between speed and memory consumption when making the
choice to use Merge Sort. Consider the following:
- If you have unlimited memory available, use it, it's fast!
- If you have a decent amount of memory available and a medium sized dataset,
run some tests first, but use it! - In other cases, maybe you should consider other options.
Quick Sort Analysis
Let's begin structuring the recursion. The base case of any recursive problem is
where the input is so trivial, we immediately know the answer without
calculation. If our problem is to sort an array, what is the trivial array? An
array of 1 or 0 elements! Let's establish the code:
function quickSort(array) { if (array.length <= 1) { return array; } // ... }
If our base case pertains to an array of a very small size, then the design of
our recursive case should make progress toward hitting this base scenario. In
other words, we should recursively call quickSort on smaller and smaller
arrays. This is very similar to our previous mergeSort, except we don't just
split the array down the middle. Instead we should arbitrarily choose an element
of the array as a pivot and partition the remaining elements relative to this
pivot:
function quickSort(array) { if (array.length <= 1) { return array; } let pivot = array.shift(); let left = array.filter(el => el < pivot); let right = array.filter(el => el >= pivot); // ...
Here is what to notice about the partition step above:
- the pivot is an element of the array; we arbitrarily chose the first element
- we removed the pivot from the master array before we filter into the left and
right partitions
Now that we have the two subarrays ofleftandrightwe have our
subproblems! To solve these subproblems we must sort the subarrays. I wish we
had a function that sorts an array...oh wait we do,quickSort! Recursively:
function quickSort(array) { if (array.length <= 1) { return array; } let pivot = array.shift(); let left = array.filter(el => el < pivot); let right = array.filter(el => el >= pivot); let leftSorted = quickSort(left); let rightSorted = quickSort(right); // ...
Okay, so we have the two sorted partitions. This means we have the two
subsolutions. But how do we put them together? Think about how we partitioned
them in the first place. Everything in leftSorted is guaranteed to be less
than everything in rightSorted. On top of that, pivot should be placed after
the last element in leftSorted, but before the first element in rightSorted.
So all we need to do is to combine the elements in the order "left, pivot,
right"!
function quickSort(array) { if (array.length <= 1) { return array; } let pivot = array.shift(); let left = array.filter(el => el < pivot); let right = array.filter(el => el >= pivot); let leftSorted = quickSort(left); let rightSorted = quickSort(right); return leftSorted.concat([pivot]).concat(rightSorted); }
That last concat line is a bit clunky. Bonus JS Lesson: we can use the spread
... operator to elegantly concatenate arrays. In general:
let one = ['a', 'b'] let two = ['d', 'e', 'f'] let newArr = [ ...one, 'c', ...two ]; newArr; // => [ 'a', 'b', 'c', 'd', 'e', 'f' ]
Utilizing that spread pattern gives us this final implementation:
function quickSort(array) { if (array.length <= 1) { return array; } let pivot = array.shift(); let left = array.filter(el => el < pivot); let right = array.filter(el => el >= pivot); let leftSorted = quickSort(left); let rightSorted = quickSort(right); return [ ...leftSorted, pivot, ...rightSorted ]; }
827.4. Quicksort Sort JS Implementation
That code was so clean we should show it again. Here's the complete code for
your reference, for when you ctrl+F "quicksort" the night before an interview:
function quickSort(array) { if (array.length <= 1) { return array; } let pivot = array.shift(); let left = array.filter(el => el < pivot); let right = array.filter(el => el >= pivot); let leftSorted = quickSort(left); let rightSorted = quickSort(right); return [ ...leftSorted, pivot, ...rightSorted ]; }
828. Time and Space Complexity Analysis
Here is a summary of the complexity.
828.1. Time Complexity
- Avg Case: O(n log(n))
- Worst Case: O(n2)
The runtime analysis ofquickSortis more complex thanmergeSort nis the length of the input array- The partition step alone is
O(n) - We must calculate how many recursive calls we make. The number of recursive
calls is the number of times we must split the array to reach the base case.
This is dependent on how we choose the pivot. Let's analyze the best and worst
case:- Best Case: We are lucky and always choose the median as the pivot.
This means the left and right partitions will have equal length. This will
halve the array length at every step of the recursion. We benefit from
this halving withO(log(n))recursive calls to reach the base case. - Worst Case: We are unlucky and always choose the min or max as the
pivot. This means one partition will contain everything, and the other
partition is empty. This will decrease the array length by 1 at every step
of the recursion. We suffer fromO(n)recursive calls to reach the base
case.
- Best Case: We are lucky and always choose the median as the pivot.
- The partition step occurs in every recursive call, so our total complexities
are:- Best Case: O(n * log(n))
- Worst Case: O(n2)
Although we typically take the worst case when describing Big-O for an
algorithm, much research onquickSorthas shown the worst case to be an
exceedingly rare occurrence even if we choose the pivot at random. Because of
this we still considerquickSortan efficient algorithm. This is a common
interview talking point, so you should be familiar with the relationship between
the choice of pivot and efficiency of the algorithm.
Just in case: A somewhat common question a student may ask when studying
quickSortis, "If the median is the best pivot, why don't we always just
choose the median when we partition?" Don't overthink this. To know the median
of an array, it must be sorted in the first place.
828.2. Space Complexity
Our implementation of quickSort uses O(n) space because of the partition
arrays we create. There is an in-place version of quickSort that uses
O(log(n)) space. O(log(n)) space is not huge benefit over O(n).
You'll
also find our version of quickSort as easier to remember, easier to implement.
Just know that a O(logn) space quickSort exists.
828.3. When should you use Quick Sort?
- When you are in a pinch and need to throw down an efficient sort (on average).
The recursive code is light and simple to implement; much smaller than
mergeSort. - When constant space is important to you, use the in-place version. This will
of course trade off some simplicity of implementation.
If you know some constraints about dataset you can make some modifications to
optimize pivot choice. Here's some food for thought. Our implementation of
quickSortwill always take the first element as the pivot. This means we will
suffer from the worst case time complexity in the event that we are given an
already sorted array (ironic isn't it?). If you know your input data to be
mostly already sorted, randomize the choice of pivot - this is a very easy
change. Bam. Solved like a true engineer.
Binary Search Analysis
We'll implement binary search recursively. As always, we start with a base case
that captures the scenario of the input array being so trivial, that we know the
answer without further calculation. If we are given an empty array and a target,
we can be certain that the target is not inside of the array:
function binarySearch(array, target) { if (array.length === 0) { return false; } // ... }
Now for our recursive case. If we want to get a time complexity less than
O(n), we must avoid touching all n elements. Adopting our dictionary
strategy, let's find the middle element and grab references to the left and
right halves of the sorted array:
function binarySearch(array, target) { if (array.length === 0) { return false; } let midIdx = Math.floor(array.length / 2); let leftHalf = array.slice(0, midIdx); let rightHalf = array.slice(midIdx + 1); // ... }
It's worth pointing out that the left and right halves do not contain the middle
element we chose.
Here is where we leverage the sorted property of the array. If the target is
less than the middle, then the target must be in the left half of the array. If
the target is greater than the middle, then the target must be in the right half
of the array. So we can narrow our search to one of these halves, and ignore the
other. Luckily we have a function that can search the half, its binarySearch:
function binarySearch(array, target) { if (array.length === 0) { return false; } let midIdx = Math.floor(array.length / 2); let leftHalf = array.slice(0, midIdx); let rightHalf = array.slice(midIdx + 1); if (target < array[midIdx]) { return binarySearch(leftHalf, target); } else if (target > array[midIdx]) { return binarySearch(rightHalf, target); } // ... }
We know binarySeach will return the correct Boolean, so we just pass that
result up by returning it ourselves. However, something is lacking in our code.
It is only possible to get a false from the literal return false line, but
there is no return true. Looking at our conditionals, we handle the cases
where the target is less than middle or the target is greater than the middle,
but what if the product is equal to the middle? If the target is equal to
the middle, then we found the target and should return true! This is easy to
add with an else:
function binarySearch(array, target) { if (array.length === 0) { return false; } let midIdx = Math.floor(array.length / 2); let leftHalf = array.slice(0, midIdx); let rightHalf = array.slice(midIdx + 1); if (target < array[midIdx]) { return binarySearch(leftHalf, target); } else if (target > array[midIdx]) { return binarySearch(rightHalf, target); } else { return true; } }
To wrap up, we have confidence of our base case will eventually be hit because
we are continually halving the array. We halve the array until it's length is 0
or we actually find the target.
828.4. Binary Search JS Implementation
Here is the code again for your quick reference:
function binarySearch(array, target) { if (array.length === 0) { return false; } let midIdx = Math.floor(array.length / 2); let leftHalf = array.slice(0, midIdx); let rightHalf = array.slice(midIdx + 1); if (target < array[midIdx]) { return binarySearch(leftHalf, target); } else if (target > array[midIdx]) { return binarySearch(rightHalf, target); } else { return true; } }
829. Time and Space Complexity Analysis
The complexity analysis of this algorithm is easier to explain through visuals,
so we highly encourage you to watch the lecture that accompanies this
reading. In any case, here is a summary of the complexity:
829.1. Time Complexity: O(log(n))
nis the length of the input array- We have no loops, so we must only consider the number of recursive calls it
takes to hit the base case - The number of recursive calls is the number of times we must halve the array
until it's length becomes 0. This number can be described bylog(n)- for example, say we had an array of 8 elements,
n = 8 - the length would halve as
8 -> 4 -> 2 -> 1 - it takes 3 calls,
log(8) = 3
- for example, say we had an array of 8 elements,
829.2. Space Complexity: O(n)
Our implementation uses n space due to half arrays we create using slice. Note
that JavaScript slice creates a new array, so it requires additional memory to
be allocated.
829.3. When should we use Binary Search?
Use this algorithm when the input data is sorted!!! This is a heavy requirement,
but if you have it, you'll have an insanely fast algorithm. Of course, you can
use one of your high-functioning sorting algorithms to sort the input and then
perform the binary search!
Practice: Bubble Sort
This project contains a skeleton for you to implement Bubble Sort. In the
file lib/bubble_sort.js, you should implement the Bubble Sort. This is a
description of how the Bubble Sort works (and is also in the code file).
Bubble Sort: (array)
n := length(array)
repeat
swapped = false
for i := 1 to n - 1 inclusive do
/* if this pair is out of order */
if array[i - 1] > array[i] then
/* swap them and remember something changed */
swap(array, i - 1, i)
swapped := true
end if
end for
until not swapped
830. Instructions
- Clone the project from
https://github.com/appacademy-starters/algorithms-bubble-sort-starter. cdinto the project foldernpm installto install dependencies in the project root directorynpm testto run the specs- You can view the test cases in
/test/test.js. Your job is to write code in
the/lib/bubble_sort.jsthat implements the Bubble Sort.
Practice: Selection Sort
This project contains a skeleton for you to implement Selection Sort. In the
file lib/selection_sort.js, you should implement the Selection Sort. You
can use the same swap function from Bubble Sort; however, try to implement it
on your own, first.
The algorithm can be summarized as the following:
- Set MIN to location 0
- Search the minimum element in the list
- Swap with value at location MIN
- Increment MIN to point to next element
- Repeat until list is sorted
This is a description of how the Selection Sort works (and is also in the code
file).
procedure selection sort(list)
list : array of items
n : size of list
for i = 1 to n - 1
/* set current element as minimum*/
min = i
/* check the element to be minimum */
for j = i+1 to n
if list[j] < list[min] then
min = j;
end if
end for
/* swap the minimum element with the current element*/
if indexMin != i then
swap list[min] and list[i]
end if
end for
end procedure
831. Instructions
- Clone the project from
https://github.com/appacademy-starters/algorithms-selection-sort-starter. cdinto the project foldernpm installto install dependencies in the project root directorynpm testto run the specs- You can view the test cases in
/test/test.js. Your job is to write code in
the/lib/selection_sort.jsthat implements the Selection Sort.
Practice: Insertion Sort
This project contains a skeleton for you to implement Insertion Sort. In the
file lib/insertion_sort.js, you should implement the Insertion Sort.
The algorithm can be summarized as the following:
- If it is the first element, it is already sorted. return 1;
- Pick next element
- Compare with all elements in the sorted sub-list
- Shift all the elements in the sorted sub-list that is greater than the
value to be sorted - Insert the value
- Repeat until list is sorted
This is a description of how the Insertion Sort works (and is also in the code
file).
procedure insertionSort( A : array of items )
int holePosition
int valueToInsert
for i = 1 to length(A) inclusive do:
/* select value to be inserted */
valueToInsert = A[i]
holePosition = i
/*locate hole position for the element to be inserted */
while holePosition > 0 and A[holePosition-1] > valueToInsert do:
A[holePosition] = A[holePosition-1]
holePosition = holePosition -1
end while
/* insert the number at hole position */
A[holePosition] = valueToInsert
end for
end procedure
832. Instructions
- Clone the project from
https://github.com/appacademy-starters/algorithms-insertion-sort-starter. cdinto the project foldernpm installto install dependencies in the project root directorynpm testto run the specs- You can view the test cases in
/test/test.js. Your job is to write code in
the/lib/insertion_sort.jsthat implements the Insertion Sort.
Practice: Merge Sort
This project contains a skeleton for you to implement Merge Sort. In the
file lib/merge_sort.js, you should implement the Merge Sort.
The algorithm can be summarized as the following:
- if there is only one element in the list, it is already sorted. return that
array. - otherwise, divide the list recursively into two halves until it can no more
be divided. - merge the smaller lists into new list in sorted order.
This is a description of how the Merge Sort works (and is also in the code
file).
procedure mergesort( a as array )
if ( n == 1 ) return a
/* Split the array into two */
var l1 as array = a[0] ... a[n/2]
var l2 as array = a[n/2+1] ... a[n]
l1 = mergesort( l1 )
l2 = mergesort( l2 )
return merge( l1, l2 )
end procedure
procedure merge( a as array, b as array )
var result as array
while ( a and b have elements )
if ( a[0] > b[0] )
add b[0] to the end of result
remove b[0] from b
else
add a[0] to the end of result
remove a[0] from a
end if
end while
while ( a has elements )
add a[0] to the end of result
remove a[0] from a
end while
while ( b has elements )
add b[0] to the end of result
remove b[0] from b
end while
return result
end procedure
833. Instructions
- Clone the project from
https://github.com/appacademy-starters/algorithms-merge-sort-starter. cdinto the project foldernpm installto install dependencies in the project root directorynpm testto run the specs- You can view the test cases in
/test/test.js. Your job is to write code in
the/lib/merge_sort.jsthat implements the Merge Sort.
Practice: Quick Sort
This project contains a skeleton for you to implement Quick Sort. In the
file lib/quick_sort.js, you should implement the Quick Sort. This is a
description of how the Quick Sort works (and is also in the code file).
procedure quick sort (array)
if the length of the array is 0 or 1, return the array
set the pivot to the first element of the array
remove the first element of the array
put all values less than the pivot value into an array called left
put all values greater than the pivot value into an array called right
call quick sort on left and assign the return value to leftSorted
call quick sort on right and assign the return value to rightSorted
return the concatenation of leftSorted, the pivot value, and rightSorted
end procedure quick sort
834. Instructions
- Clone the project from
https://github.com/appacademy-starters/algorithms-quick-sort-starter. cdinto the project foldernpm installto install dependencies in the project root directorynpm testto run the specs- You can view the test cases in
/test/test.js. Your job is to write code in
the/lib/quick_sort.jsthat implements the Quick Sort.
Practice: Binary Search
This project contains a skeleton for you to implement Binary Search. In the
file lib/binary_search.js, you should implement the Binary Search and its
cousin Binary Search Index.
The Binary Search algorithm can be summarized as the following:
- If the array is empty, then return false
- Check the value in the middle of the array against the target value
- If the value is equal to the target value, then return true
- If the value is less than the target value, then return the binary search on
the left half of the array for the target - If the value is greater than the target value, then return the binary search
on the right half of the array for the target
This is a description of how the Binary Search works (and is also in the code
file).
procedure binary search (list, target)
parameter list: a list of sorted value
parameter target: the value to search for
if the list has zero length, then return false
determine the slice point:
if the list has an even number of elements,
the slice point is the number of elements
divided by two
if the list has an odd number of elements,
the slice point is the number of elements
minus one divided by two
create an list of the elements from 0 to the
slice point, not including the slice point,
which is known as the "left half"
create an list of the elements from the
slice point to the end of the list which is
known as the "right half"
if the target is less than the value in the
original array at the slice point, then
return the binary search of the "left half"
and the target
if the target is greater than the value in the
original array at the slice point, then
return the binary search of the "right half"
and the target
if neither of those is true, return true
end procedure binary search
Then you need to adapt that to return the index of the found item rather than
a Boolean value. The pseudocode is also in the code file.
procedure binary search index(list, target, low, high)
parameter list: a list of sorted value
parameter target: the value to search for
parameter low: the lower index for the search
parameter high: the upper index for the search
if low is equal to high, then return -1 to indicate
that the value was not found
determine the slice point:
if the list between the high index and the low index
has an even number of elements,
the slice point is the number of elements
between high and low divided by two
if the list between the high index and the low index
has an odd number of elements,
the slice point is the number of elements
between high and low minus one, divided by two
if the target is less than the value in the
original array at the slice point, then
return the binary search of the array,
the target, low, and the slice point
if the target is greater than the value in the
original array at the slice point, then return
the binary search of the array, the target,
the slice point plus one, and high
if neither of those is true, return the slice point
end procedure binary search index
835. Instructions
- Clone the project from
https://github.com/appacademy-starters/algorithms-binary-search-starter. cdinto the project foldernpm installto install dependencies in the project root directorynpm testto run the specs- You can view the test cases in
/test/test.js. Your job is to write code in
the/lib/binary_search.jsthat implements the Binary Search and Binary
Search Index.
WEEK-07 DAY-4
Lists, Stacks, Queues
Lists, Stacks, and Queues Learning Objectives
The objective of this lesson is for you to become comfortable with
implementing common data structures. This is important because questions about
data structures are incredibly likely to be interview questions for software
engineers from junior to senior levels. Moreover, understanding how different
data structures work will influence the libraries and frameworks that you choose
when writing software.
When you are done, you will be able to:
- Explain and implement a List.
- Explain and implement a Stack.
- Explain and implement a Queue.me comfortable with
implementing common data structures. This is important because questions about
data structures are incredibly likely to be interview questions for software
engineers from junior to senior levels. Moreover, understanding how different
data structures work will influence the libraries and frameworks that you choose
when writing software.
When you are done, you will be able to: - Explain and implement a List.
- Explain and implement a Stack.
- Explain and implement a Queue.
Linked Lists
In the university setting, it’s common for Linked Lists to appear early on in an
undergraduate’s Computer Science coursework. While they don't always have the
most practical real-world applications in industry, Linked Lists make for an
important and effective educational tool in helping develop a student's mental
model on what data structures actually are to begin with.
Linked lists are simple. They have many compelling, reoccurring edge cases to
consider that emphasize to the student the need for care and intent while
implementing data structures. They can be applied as the underlying data
structure while implementing a variety of other prevalent abstract data types,
such as Lists, Stacks, and Queues, and they have a level of versatility high
enough to clearly illustrate the value of the Object Oriented Programming
paradigm.
They also come up in software engineering interviews quite often.
836. What is a Linked List?
A Linked List data structure represents a linear sequence of "vertices" (or
"nodes"), and tracks three important properties.
Linked List Properties:
| Property | Description | | :---------: | :-------------------------------------------------: | | `head` | The first node in the list. | | `tail` | The last node in the list. | | `length` | The number of nodes in the list; the list's length. | The data being tracked by a particular Linked List does not live inside the Linked List instance itself. Instead, each vertex is actually an instance of an even simpler, smaller data structure, often referred to as a "Node". Depending on the type of Linked List (there are many), Node instances track some very important properties as well.Linked List Node Properties:
| Property | Description | | :---------: | :----------------------------------------------------: | | `value` | The actual value this node represents. | | `next` | The next node in the list (relative to this node). | | `previous` | The previous node in the list (relative to this node). |
NOTE: The previous property is for Doubly Linked Lists only!
Admittedly, this does sound a lot like an Array so far, and that's because
Arrays and Linked Lists are both implementations of the List ADT. However, there
is an incredibly important distinction to be made between Arrays and Linked
Lists, and that is how they physically store their data. (As opposed to how
they represent the order of their data.)
Recall that Arrays contain contiguous data. Each element of an array is
actually stored next to it's neighboring element in the actual hardware of
your machine, in a single continuous block in memory.
An Array's contiguous data being stored in a continuous block of addresses in memory.
Unlike Arrays, Linked Lists contain _non-contiguous_ data. Though Linked Lists _represent_ data that is ordered linearly, that mental model is just that - an interpretation of the _representation_ of information, not reality. In reality, in the actual hardware of your machine, whether it be in disk or in memory, a Linked List's Nodes are not stored in a single continuous block of addresses. Rather, Linked List Nodes live at randomly distributed addresses throughout your machine! The only reason we know which node comes next in the list is because we've assigned its reference to the current node's `next` pointer. 
A Singly Linked List's non-contiguous data (Nodes) being stored at randomly distributed addresses in memory.
For this reason, Linked List Nodes have _no indices_, and no _random access_. Without random access, we do not have the ability to look up an individual Linked List Node in constant time. Instead, to find a particular Node, we have to start at the very first Node and iterate through the Linked List one node at a time, checking each Node's _next_ Node until we find the one we're interested in. So when implementing a Linked List, we actually must implement both the Linked List class _and_ the Node class. Since the actual data lives in the Nodes, it's simpler to implement the Node class first. ## 837. Types of Linked Lists
There are four flavors of Linked List you should be familiar with when walking
into your job interviews.
Linked List Types:
| List Type | Description | Directionality | | :-------------------: | :-------------------------------------------------------------------------------: | :--------------------------: | | Singly Linked | Nodes have a single pointer connecting them in a single direction. | Head→Tail | | Doubly Linked | Nodes have two pointers connecting them bi-directionally. | Head⇄Tail | | Multiply Linked | Nodes have two or more pointers, providing a variety of potential node orderings. | Head⇄Tail, A→Z, Jan→Dec, etc. | | Circularly Linked | Final node's `next` pointer points to the first node, creating a non-linear, circular version of a Linked List. | Head→Tail→Head→Tail|NOTE: These Linked List types are not always mutually exclusive.
For instance: - Any type of Linked List can be implemented Circularly (e.g. A Circular Doubly Linked List). - A Doubly Linked List is actually just a special case of a Multiply Linked List. You are most likely to encounter Singly and Doubly Linked Lists in your upcoming job search, so we are going to focus exclusively on those two moving forward. However, in more senior level interviews, it is very valuable to have some familiarity with the other types of Linked Lists. Though you may not actually code them out, _you will win extra points by illustrating your ability to weigh the tradeoffs of your technical decisions_ by discussing how your choice of Linked List type may affect the efficiency of the solutions you propose. ## 838. Linked List MethodsLinked Lists are great foundation builders when learning about data structures
because they share a number of similar methods (and edge cases) with many other
common data structures. You will find that many of the concepts discussed here
will repeat themselves as we dive into some of the more complex non-linear data
structures later on, like Trees and Graphs.
In the project that follows, we will implement the following Linked List
methods:
| Type | Name | Description | Returns |
|---|---|---|---|
| Insertion | addToTail |
Adds a new node to the tail of the Linked List. | Updated Linked List |
| Insertion | addToHead |
Adds a new node to the head of the Linked List. | Updated Linked List |
| Insertion | insertAt |
Inserts a new node at the "index", or position, specified. | Boolean |
| Deletion | removeTail |
Removes the node at the tail of the Linked List. | Removed node |
| Deletion | removeHead |
Removes the node at the head of the Linked List. | Removed node |
| Deletion | removeFrom |
Removes the node at the "index", or position, specified. | Removed node |
| Search | contains |
Searches the Linked List for a node with the value specified. | Boolean |
| Access | get |
Gets the node at the "index", or position, specified. | Node at index |
| Access | set |
Updates the value of a node at the "index", or position, specified. | Boolean |
| Meta | size |
Returns the current size of the Linked List. | Integer |
839. Time and Space Complexity Analysis
Before we begin our analysis, here is a quick summary of the Time and Space
constraints of each Linked List Operation. The complexities below apply to both
Singly and Doubly Linked Lists:
| Data Structure Operation | Time Complexity (Avg) | Time Complexity (Worst) | Space Complexity (Worst) |
|---|---|---|---|
| Access | Θ(n) |
O(n) |
O(n) |
| Search | Θ(n) |
O(n) |
O(n) |
| Insertion | Θ(1) |
O(1) |
O(n) |
| Deletion | Θ(1) |
O(1) |
O(n) |
Before moving forward, see if you can reason to yourself why each operation has
the time and space complexity listed above!
840. Time Complexity - Access and Search:
840.1. Scenarios:
- We have a Linked List, and we'd like to find the 8th item in the list.
- We have a Linked List of sorted alphabet letters, and we'd like to see if the
letter "Q" is inside that list.
840.2. Discussion:
Unlike Arrays, Linked Lists Nodes are not stored contiguously in memory, and
thereby do not have an indexed set of memory addresses at which we can quickly
lookup individual nodes in constant time. Instead, we must begin at the head of
the list (or possibly at the tail, if we have a Doubly Linked List), and iterate
through the list until we arrive at the node of interest.
In Scenario 1, we'll know we're there because we've iterated 8 times. In
Scenario 2, we'll know we're there because, while iterating, we've checked each
node's value and found one that matches our target value, "Q".
In the worst case scenario, we may have to traverse the entire Linked List until
we arrive at the final node. This makes both Access & Search Linear Time
operations.
841. Time Complexity - Insertion and Deletion:
841.1. Scenarios:
- We have an empty Linked List, and we'd like to insert our first node.
- We have a Linked List, and we'd like to insert or delete a node at the Head
or Tail. - We have a Linked List, and we'd like to insert or delete a node from
somewhere in the middle of the list.
841.2. Discussion:
Since we have our Linked List Nodes stored in a non-contiguous manner that
relies on pointers to keep track of where the next and previous nodes live,
Linked Lists liberate us from the linear time nature of Array insertions and
deletions. We no longer have to adjust the position at which each node/element
is stored after making an insertion at a particular position in the list.
Instead, if we want to insert a new node at position i, we can simply:
- Create a new node.
- Set the new node's
nextandpreviouspointers to the nodes that live at
positionsiandi - 1, respectively. - Adjust the
nextpointer of the node that lives at positioni - 1to point
to the new node. - Adjust the
previouspointer of the node that lives at positionito point
to the new node.
And we're done, in Constant Time. No iterating across the entire list necessary.
"But hold on one second," you may be thinking. "In order to insert a new node in
the middle of the list, don't we have to lookup its position? Doesn't that take
linear time?!"
Yes, it is tempting to call insertion or deletion in the middle of a Linked List
a linear time operation since there is lookup involved. However, it's usually
the case that you'll already have a reference to the node where your desired
insertion or deletion will occur.
For this reason, we separate the Access time complexity from the
Insertion/Deletion time complexity, and formally state that Insertion and
Deletion in a Linked List are Constant Time across the board.
841.3. NOTE:
Without a reference to the node at which an insertion or deletion will occur,
due to linear time lookup, an insertion or deletion in the middle of a Linked
List will still take Linear Time, sum total.
842. Space Complexity:
842.1. Scenarios:
- We're given a Linked List, and need to operate on it.
- We've decided to create a new Linked List as part of strategy to solve some
problem.
842.2. Discussion:
It's obvious that Linked Lists have one node for every one item in the list, and
for that reason we know that Linked Lists take up Linear Space in memory.
However, when asked in an interview setting what the Space Complexity of your
solution to a problem is, it's important to recognize the difference between
the two scenarios above.
In Scenario 1, we are not creating a new Linked List. We simply need to
operate on the one given. Since we are not storing a new node for every node
represented in the Linked List we are provided, our solution is not
necessarily linear in space.
In Scenario 2, we are creating a new Linked List. If the number of nodes we
create is linearly correlated to the size of our input data, we are now
operating in Linear Space.
842.3. NOTE:
Linked Lists can be traversed both iteratively and recursively. If you choose
to traverse a Linked List recursively, there will be a recursive function call
added to the call stack for every node in the Linked List. Even if you're
provided the Linked List, as in Scenario 1, you will still use Linear Space in
the call stack, and that counts.
Stacks and Queues
Stacks and Queues aren't really "data structures" by the strict definition of
the term. The more appropriate terminology would be to call them abstract data
types (ADTs), meaning that their definitions are more conceptual and related to
the rules governing their user-facing behaviors rather than their core
implementations.
For the sake of simplicity, we'll refer to them as data structures and ADTs
interchangeably throughout the course, but the distinction is an important one
to be familiar with as you level up as an engineer.
Now that that's out of the way, Stacks and Queues represent a linear collection
of nodes or values. In this way, they are quite similar to the Linked List data
structure we discussed in the previous section. In fact, you can even use a
modified version of a Linked List to implement each of them. (Hint, hint.)
These two ADTs are similar to each other as well, but each obey their own
special rule regarding the order with which Nodes can be added and removed from
the structure.
Since we've covered Linked Lists in great length, these two data structures will
be quick and easy. Let's break them down individually in the next couple of
sections.
843. What is a Stack?
Stacks are a Last In First Out (LIFO) data structure. The last Node added to a
stack is always the first Node to be removed, and as a result, the first Node
added is always the last Node removed.
The name Stack actually comes from this characteristic, as it is helpful to
visualize the data structure as a vertical stack of items. Personally, I like to
think of a Stack as a stack of plates, or a stack of sheets of paper. This seems
to make them more approachable, because the analogy relates to something in our
everyday lives.
If you can imagine adding items to, or removing items from, a Stack
of...literally anything...you'll realize that every (sane) person naturally
obeys the LIFO rule.
We add things to the top of a stack. We remove things from the top of a
stack. We never add things to, or remove things from, the bottom of the stack.
That's just crazy.
Note: We can use JavaScript Arrays to implement a basic stack. Array#push adds
to the top of the stack and Array#pop will remove from the top of the stack.
In the exercise that follows, we'll build our own Stack class from scratch
(without using any arrays). In an interview setting, your evaluator may be okay
with you using an array as a stack.
844. What is a Queue?
Queues are a First In First Out (FIFO) data structure. The first Node added to
the queue is always the first Node to be removed.
The name Queue comes from this characteristic, as it is helpful to visualize
this data structure as a horizontal line of items with a beginning and an end.
Personally, I like to think of a Queue as the line one waits on for an amusement
park, at a grocery store checkout, or to see the teller at a bank.
If you can imagine a queue of humans waiting...again, for literally
anything...you'll realize that most people (the civil ones) naturally obey the
FIFO rule.
People add themselves to the back of a queue, wait their turn in line, and
make their way toward the front. People exit from the front of a queue, but
only when they have made their way to being first in line.
We never add ourselves to the front of a queue (unless there is no one else in
line), otherwise we would be "cutting" the line, and other humans don't seem to
appreciate that.
Note: We can use JavaScript Arrays to implement a basic queue. Array#push adds
to the back (enqueue) and Array#shift will remove from the front (dequeue). In
the exercise that follows, we'll build our own Queue class from scratch (without
using any arrays). In an interview setting, your evaluator may be okay with you
using an array as a queue.
845. Stack and Queue Properties
Stacks and Queues are so similar in composition that we can discuss their
properties together. They track the following three properties:
Stack Properties | Queue Properties:
| Stack Property | Description | Queue Property | Description | | :------------: | :---------------------------------------------------: | :------------: | :---------------------------------------------------: | | `top` | The first node in the Stack | `front` | The first node in the Queue. | | ---- | Stacks do not have an equivalent | `back` | The last node in the Queue. | | `length` | The number of nodes in the Stack; the Stack's length. | `length` | The number of nodes in the Queue; the Queue's length. | Notice that rather than having a `head` and a `tail` like Linked Lists, Stacks have a `top`, and Queues have a `front` and a `back` instead. Stacks don't have the equivalent of a `tail` because you only ever push or pop things off the top of Stacks. These properties are essentially the same; pointers to the end points of the respective List ADT where important actions way take place. The differences in naming conventions are strictly for human comprehension.Similarly to Linked Lists, the values stored inside a Stack or a Queue are actually contained within Stack Node and Queue Node instances. Stack, Queue, and Singly Linked List Nodes are all identical, but just as a reminder and for the sake of completion, these List Nodes track the following two properties:
Stack & Queue Node Properties:
| Property | Description | | :---------: | :----------------------------------------------------: | | `value` | The actual value this node represents. | | `next` | The next node in the Stack (relative to this node). | ## 846. Stack MethodsIn the exercise that follows, we will implement a Stack data structure along
with the following Stack methods:
| Type | Name | Description | Returns |
|---|---|---|---|
| Insertion | push |
Adds a Node to the top of the Stack. | Integer - New size of stack |
| Deletion | pop |
Removes a Node from the top of the Stack. | Node removed from top of Stack |
| Meta | size |
Returns the current size of the Stack. | Integer |
847. Queue Methods
In the exercise that follows, we will implement a Queue data structure along
with the following Queue methods:
| Type | Name | Description | Returns |
|---|---|---|---|
| Insertion | enqueue |
Adds a Node to the front of the Queue. | Integer - New size of Queue |
| Deletion | dequeue |
Removes a Node from the front of the Queue. | Node removed from front of Queue |
| Meta | size |
Returns the current size of the Queue. | Integer |
848. Time and Space Complexity Analysis
Before we begin our analysis, here is a quick summary of the Time and Space
constraints of each Stack Operation.
| Data Structure Operation | Time Complexity (Avg) | Time Complexity (Worst) | Space Complexity (Worst) |
|---|---|---|---|
| Access | Θ(n) |
O(n) |
O(n) |
| Search | Θ(n) |
O(n) |
O(n) |
| Insertion | Θ(1) |
O(1) |
O(n) |
| Deletion | Θ(1) |
O(1) |
O(n) |
Before moving forward, see if you can reason to yourself why each operation has
the time and space complexity listed above!
848.1. Time Complexity - Access and Search:
When the Stack ADT was first conceived, its inventor definitely did not
prioritize searching and accessing individual Nodes or values in the list. The
same idea applies for the Queue ADT. There are certainly better data structures
for speedy search and lookup, and if these operations are a priority for your
use case, it would be best to choose something else!
Search and Access are both linear time operations for Stacks and Queues, and
that shouldn't be too unclear. Both ADTs are nearly identical to Linked Lists in
this way. The only way to find a Node somewhere in the middle of a Stack or a
Queue, is to start at the top (or the back) and traverse downward (or
forward) toward the bottom (or front) one node at a time via each Node's
next property.
This is a linear time operation, O(n).
848.2. Time Complexity - Insertion and Deletion:
For Stacks and Queues, insertion and deletion is what it's all about. If there
is one feature a Stack absolutely must have, it's constant time insertion and
removal to and from the top of the Stack (FIFO). The same applies for Queues,
but with insertion occurring at the back and removal occurring at the front
(LIFO).
Think about it. When you add a plate to the top of a stack of plates, do you
have to iterate through all of the other plates first to do so? Of course not.
You simply add your plate to the top of the stack, and that's that. The concept
is the same for removal.
Therefore, Stacks and Queues have constant time Insertion and Deletion via their
push and pop or enqueue and dequeue methods, O(1).
848.3. Space Complexity:
The space complexity of Stacks and Queues is very simple. Whether we are
instantiating a new instance of a Stack or Queue to store a set of data, or we
are using a Stack or Queue as part of a strategy to solve some problem, Stacks
and Queues always store one Node for each value they receive as input.
For this reason, we always consider Stacks and Queues to have a linear space
complexity, O(n).
849. When should we use Stacks and Queues?
At this point, we've done a lot of work understanding the ins and outs of Stacks
and Queues, but we still haven't really discussed what we can use them for. The
answer is actually...a lot!
For one, Stacks and Queues can be used as intermediate data structures while
implementing some of the more complicated data structures and methods we'll see
in some of our upcoming sections.
For example, the implementation of the breadth-first Tree traversal algorithm
takes advantage of a Queue instance, and the depth-first Graph traversal
algorithm exploits the benefits of a Stack instance.
Additionally, Stacks and Queues serve as the essential underlying data
structures to a wide variety of applications you use all the time. Just to name
a few:
849.1. Stacks:
- The Call Stack is a Stack data structure, and is used to manage the order of
function invocations in your code. - Browser History is often implemented using a Stack, with one great example
being the browser history object in the very popular React Router module. - Undo/Redo functionality in just about any application. For example:
- When you're coding in your text editor, each of the actions you take on your
keyboard are recorded bypushing that event to a Stack. - When you hit [cmd + z] to undo your most recent action, that event is
poped off the Stack, because the last event that occured should be the
first one to be undone (LIFO). - When you hit [cmd + y] to redo your most recent action, that event is
pushed back onto the Stack.
- When you're coding in your text editor, each of the actions you take on your
849.2. Queues:
- Printers use a Queue to manage incoming jobs to ensure that documents are
printed in the order they are received. - Chat rooms, online video games, and customer service phone lines use a Queue
to ensure that patrons are served in the order they arrive.- In the case of a Chat Room, to be admitted to a size-limited room.
- In the case of an Online Multi-Player Game, players wait in a lobby until
there is enough space and it is their turn to be admitted to a game. - In the case of a Customer Service Phone Line...you get the point.
- As a more advanced use case, Queues are often used as components or services
in the system design of a service-oriented architecture. A very popular and
easy to use example of this is Amazon's Simple Queue Service (SQS), which is a
part of their Amazon Web Services (AWS) offering.- You would add this service to your system between two other services, one
that is sending information for processing, and one that is receiving
information to be processed, when the volume of incoming requests is high
and the integrity of the order with which those requests are processed must
be maintained.
- You would add this service to your system between two other services, one
Linked List Project
This project contains a skeleton for you to implement a linked list. This is a
test-driven project. Run the tests and read the top-most error. If it's not
clear what is failing, open the test/test.js file to figure out what the
test is expecting. Make the top-most test pass.
Keep making the top-most test pass until all tests pass.
850. Instructions
- Clone the project from
https://github.com/appacademy-starters/data-structures-linked-list-starter. cdinto the project foldernpm installto install dependencies in the project root directorynpm testto run the specs- You can view the test cases in
/test/test.js. Your job is to write code in
the/lib/linked_list.jsthat implements theNodeandLinkedListclasses
to make the tests pass.
Stack Project
This project contains a skeleton for you to implement a stack. This is a
test-driven project. Run the tests and read the top-most error. If it's not
clear what is failing, open the test/test.js file to figure out what the
test is expecting. Make the top-most test pass.
Keep making the top-most test pass until all tests pass.
851. Instructions
- Clone the project from
https://github.com/appacademy-starters/data-structures-stack-starter. cdinto the project foldernpm installto install dependencies in the project root directorynpm testto run the specs- You can view the test cases in
/test/test.js. Your job is to write code in
the/lib/stack.jsthat implements theNodeandStackclasses
to make the tests pass.
Queue Project
This project contains a skeleton for you to implement a queue. This is a
test-driven project. Run the tests and read the top-most error. If it's not
clear what is failing, open the test/test.js file to figure out what the
test is expecting. Make the top-most test pass.
Keep making the top-most test pass until all tests pass.
852. Instructions
- Clone the project from
https://github.com/appacademy-starters/data-structures-queue-starter. cdinto the project foldernpm installto install dependencies in the project root directorynpm testto run the specs- You can view the test cases in
/test/test.js. Your job is to write code in
the/lib/queue.jsthat implements theNodeandQueueclasses
to make the tests pass.
WEEK-07 DAY-5
Heaps
Graphs and Heaps Learning Objectives
The objective of this lesson is for you to become comfortable with
implementing common data structures. This is important because questions about
data structures are incredibly likely to be interview questions for software
engineers from junior to senior levels. Moreover, understanding how different
data structures work will influence the libraries and frameworks that you choose
when writing software.
When you are done, you will be able to:
- Explain and implement a Heap.
- Explain and implement a Graph.table with
implementing common data structures. This is important because questions about
data structures are incredibly likely to be interview questions for software
engineers from junior to senior levels. Moreover, understanding how different
data structures work will influence the libraries and frameworks that you choose
when writing software.
When you are done, you will be able to: - Explain and implement a Heap.
- Explain and implement a Graph.
Introduction to Heaps
Let's explore the Heap data structure! In particular, we'll explore Binary
Heaps. A binary heap is a type of binary tree. However, a heap is not a binary
search tree. A heap is a partially ordered data structure, whereas a BST has
full order. In a heap, the root of the tree will be the maximum (max heap) or
the minimum (min heap). Below is an example of a max heap:
Notice that the heap above does not follow search tree property where all values
to the left of a node are less and all values to the right are greater or equal.
Instead, the max heap invariant is:
- given any node, its children must be less than or equal to the node
This constraint makes heaps much more relaxed in structure compared to a search
tree. There is no guaranteed order among "siblings" or "cousins" in a heap. The
relationship only flows down the tree from parent to child. In other words, in a
max heap, a node will be greater than all of it's children, it's grandchildren,
its great-grandchildren, and so on. A consequence of this is the root being the
absolute maximum of the entire tree. We'll be exploring max heaps together, but
these arguments are symmetric for a min heap.
852.1. Complete Trees
We'll eventually implement a max heap together, but first we'll need to take a
quick detour. Our design goal is to implement a data structure with efficient
operations. Since a heap is a type of binary tree, recall the circumstances
where we had a "best case" binary tree. We'll need to ensure our heap has
minimal height, that is, it must be a balanced tree!
Our heap implementation will not only be balanced, but it will also be
complete. To clarify, every complete tree is also a balanced tree, but
not every balanced tree is also complete. Our definition of a complete tree is:
- a tree where all levels have the maximal number of nodes, except the bottom
the level - AND the bottom level has all nodes filled as far left as possible
Here are few examples of the definition:
Notice that the tree is on the right fails the second point of our definition
because there is a gap in the last level. Informally, you can think about a
complete tree as packing its nodes as closely together as possible. This line of
thinking will come into play when we code heaps later.
852.2. When to Use Heaps?
Heaps are the most useful when attacking problems that require you to "partially
sort" data. This usually takes form in problems that have us calculate the
largest or smallest n numbers of a collection. For example: What if you were
asked to find the largest 5 numbers in an array in linear time, O(n)? The
fastest sorting algorithms are O(n logn), so none of those algorithms will be
good enough. However, we can use a heap to solve this problem in linear time.
We'll analyze this in depth when we implement a heap in the next section!
One of the most common uses of a binary heap is to implement a "[priority queue]".
We learned before that a queue is a FIFO (First In, First Out) data structure.
With a priority queue, items are removed from the queue based on a priority number.
The priority number is used to place the items into the heap and pull them out
in the correct priority order!
[priority queue]:https://en.wikipedia.org/wiki/Priority_queue
853. Binary Heap Implementation
Now that we are familiar with the structure of a heap, let's implement one! What
may be surprising is that the usual way to implement a heap is by simply using an
array. That is, we won't need to create a node class with pointers. Instead,
each index of the array will represent a node, with the root being at index 1.
We'll avoid using index 0 of the array so our math works out nicely. From this
point, we'll use the following rules to interpret the array as a heap:
- index
irepresents a node in the heap - the left child of node
ican be found at index2 * i - the right child of code
ican be found at index2 * i + 1
In other words, the array[null, 42, 32, 24, 30, 9, 20, 18, 2, 7]represents
the heap below. Take a moment to analyze how the array indices work out to
represent left and right children.
Pretty clever math right? We can also describe the relationship from child to
parent node. Say we are given a node at indexiin the heap, then it's parent
is found at indexMath.floor(i / 2).
It's useful to visualize heap algorithms using the classic image of nodes and
edges, but we'll translate that into array index operations.
853.1. Insert
What's a heap if we can't add data into it? We'll need a insert method
that will add a new value into the heap without voiding our heap property. In
our MaxHeap, the property states that a node must be greater than its
children.
853.1.1. Visualizing our heap as a tree of nodes:
- We begin an insertion by adding the new node to the bottom leaf level of the
heap, preferring to place the new node as far left in the level as possible.
This ensures the tree remains complete. - Placing the new node there may momentarily break our heap property, so we
need to restore it by moving the node up the tree into a legal position.
Restoring the heap property is a matter of continually swapping the new node
with it's parent while it's parent contains a smaller value. We refer to this
process assiftUp
853.1.2. Translating that into array operations:
pushthe new value to the end of the array- continually swap that value toward the front of the array (following our
child-parent index rules) until heap property is restored
853.2. DeleteMax
This is the "fetch" operation of a heap. Since we maintain heap property
throughout, the root of the heap will always be the maximum value. We want to
delete and return the root, whilst keeping the heap property.
853.2.1. Visualizing our heap as a tree of nodes:
- We begin the deletion by saving a reference to the root value (the max) to
return later. We then locate the right most node of the bottom level and copy
it's value into the root of the tree. We easily delete the duplicate node at
the leaf level. This ensures the tree remains complete. - Copying that value into the root may momentarily break our heap property, so
we need to restore it by moving the node down the tree into a legal position.
Restoring the heap property is a matter of continually swapping the node with
the greater of it's two children. We refer to this process assiftDown.
853.2.2. Translating that into array operations:
- The root is at index 1, so save it to return later. The right most node of
the bottom level would just be the very last element of the array. Copy the
last element into index 1, and pop off the last element (since it now appears
at the root). - Continually swap the new root toward the back of the array (following our
parent-child index rules) until heap property is restored. A node can have
two children, so we should always prefer to swap with the greater child.
853.3. Time Complexity Analysis
- insert:
O(log(n)) - deleteMax:
O(log(n))
Recall that our heap will be a complete/balanced tree. This means it's height is
log(n)wherenis the number of items. BothinsertanddeleteMaxhave a
time complexity oflog(n)because ofsiftUpandsiftDownrespectively. In
worst caseinsert, we will have tosiftUpa leaf all the way to the root of
the tree. In the worst casedeleteMax, we will have tosiftDownthe new root
all the way down to the leaf level. In either case, we'll have to traverse the
full height of the tree,log(n).
853.3.1. Array Heapify Analysis
Now that we have established O(log(n)) for a single insertion, let's analyze
the time complexity for turning an array into a heap (we call this heapify,
coming in the next project 😃). The algorithm itself is simple, just perform an
insert for every element. Since there are n elements and each insert
requires log(n) time, our total complexity for heapify is O(nlog(n))... Or
is it? There is actually a tighter bound on heapify. The proof requires some
math that you won't find valuable in your job search, but do understand that the
true time complexity of heapify is amortized O(n). Amortized refers to the
fact that our analysis is about performance over many insertions.
853.4. Space Complexity Analysis
O(n), since we use a single array to store heap data.heap, let's implement one! What
may be surprising is that the usual way to implement a heap is by simply using an
array. That is, we won't need to create a node class with pointers. Instead,
each index of the array will represent a node, with the root being at index 1.
We'll avoid using index 0 of the array so our math works out nicely. From this
point, we'll use the following rules to interpret the array as a heap:- index
irepresents a node in the heap - the left child of node
ican be found at index2 * i - the right child of code
ican be found at index2 * i + 1
In other words, the array[null, 42, 32, 24, 30, 9, 20, 18, 2, 7]represents
the heap below. Take a moment to analyze how the array indices work out to
represent left and right children.
Pretty clever math right? We can also describe the relationship from child to
parent node. Say we are given a node at indexiin the heap, then it's parent
is found at indexMath.floor(i / 2).
It's useful to visualize heap algorithms using the classic image of nodes and
edges, but we'll translate that into array index operations.
853.5. Insert
What's a heap if we can't add data into it? We'll need a insert method
that will add a new value into the heap without voiding our heap property. In
our MaxHeap, the property states that a node must be greater than its
children.
853.5.1. Visualizing our heap as a tree of nodes:
- We begin an insertion by adding the new node to the bottom leaf level of the
heap, preferring to place the new node as far left in the level as possible.
This ensures the tree remains complete. - Placing the new node there may momentarily break our heap property, so we
need to restore it by moving the node up the tree into a legal position.
Restoring the heap property is a matter of continually swapping the new node
with it's parent while it's parent contains a smaller value. We refer to this
process assiftUp
853.5.2. Translating that into array operations:
pushthe new value to the end of the array- continually swap that value toward the front of the array (following our
child-parent index rules) until heap property is restored
853.6. DeleteMax
This is the "fetch" operation of a heap. Since we maintain heap property
throughout, the root of the heap will always be the maximum value. We want to
delete and return the root, whilst keeping the heap property.
853.6.1. Visualizing our heap as a tree of nodes:
- We begin the deletion by saving a reference to the root value (the max) to
return later. We then locate the right most node of the bottom level and copy
it's value into the root of the tree. We easily delete the duplicate node at
the leaf level. This ensures the tree remains complete. - Copying that value into the root may momentarily break our heap property, so
we need to restore it by moving the node down the tree into a legal position.
Restoring the heap property is a matter of continually swapping the node with
the greater of it's two children. We refer to this process assiftDown.
853.6.2. Translating that into array operations:
- The root is at index 1, so save it to return later. The right most node of
the bottom level would just be the very last element of the array. Copy the
last element into index 1, and pop off the last element (since it now appears
at the root). - Continually swap the new root toward the back of the array (following our
parent-child index rules) until heap property is restored. A node can have
two children, so we should always prefer to swap with the greater child.
853.7. Time Complexity Analysis
- insert:
O(log(n)) - deleteMax:
O(log(n))
Recall that our heap will be a complete/balanced tree. This means it's height is
log(n)wherenis the number of items. BothinsertanddeleteMaxhave a
time complexity oflog(n)because ofsiftUpandsiftDownrespectively. In
worst caseinsert, we will have tosiftUpa leaf all the way to the root of
the tree. In the worst casedeleteMax, we will have tosiftDownthe new root
all the way down to the leaf level. In either case, we'll have to traverse the
full height of the tree,log(n).
853.7.1. Array Heapify Analysis
Now that we have established O(log(n)) for a single insertion, let's analyze
the time complexity for turning an array into a heap (we call this heapify,
coming in the next project 😃). The algorithm itself is simple, just perform an
insert for every element. Since there are n elements and each insert
requires log(n) time, our total complexity for heapify is O(nlog(n))... Or
is it? There is actually a tighter bound on heapify. The proof requires some
math that you won't find valuable in your job search, but do understand that the
true time complexity of heapify is amortized O(n). Amortized refers to the
fact that our analysis is about performance over many insertions.
853.8. Space Complexity Analysis
O(n), since we use a single array to store heap data.
854. Heap Sort
We've emphasized heavily that heaps are a partially ordered data structure. However, we can still
leverage heaps in a sorting algorithm to end up with fully sorted array. The strategy is simple using our previous
MaxHeap implementation:
- build the heap:
insertall elements of the array into aMaxHeap - construct the sorted list: continue to
deleteMaxuntil the heap is empty, every deletion will return the next element in decreasing order
The code is straightforward:
// assuming our `MaxHeap` from the previous section function heapSort(array) { // Step 1: build the heap let heap = new MaxHeap(); array.forEach(num => heap.insert(num)); // Step 2: constructed the sorted array let sorted = []; while (heap.array.length > 1) { sorted.push(heap.deleteMax()); } return sorted; }
854.1. Time Complexity Analysis: O(nlog(n))
nis the size of the input array- step-1 requires
O(n)time as previously discussed - step-2's while loop requires
nsteps in isolation and eachdeleteMaxwill requirelog(n)steps to restore max heap property (due to sifting-down). This means step 2 costsO(nlog(n)) - the total time complexity of the algorithm is
O(n + nlog(n)) = O(nlog(n))
854.2. Space Complexity Analysis:
So heapSort performs as fast as our other efficient sorting algorithms, but how does it fair in
space complexity? Our implementation above requires an extra O(n) amount of space because the heap is
maintained separately from the input array. If we can figure out a way to do all of these heap operations in-place
we can get constant O(1) space! Let's work on this now.
855. In-Place Heap Sort
The in-place algorithm will have the same 2 steps, but it will differ in the implementation details. Since we need to have all operations take place in a single array, we're going to have to denote two regions of the array. That is, we'll need a heap region and a sorted region. We begin by turning the entire region into a heap. Then we continually delete max to get the next element in increasing order. As the heap region shrinks, the sorted region will grow.
855.1. Heapify
Let's focus on designing step-1 as an in-place algorithm. In other words, we'll need to reorder
elements of the input array so they follow max heap property. This is usually refered to as heapify.
Our heapify will use much of the same logic as MaxHeap#siftDown.
// swap the elements at indices i and j of array function swap(array, i, j) { [ array[i], array[j] ] = [ array[j], array[i] ]; } // sift-down the node at index i until max heap property is restored // n represents the size of the heap function heapify(array, n, i) { let leftIdx = 2 * i + 1; let rightIdx = 2 * i + 2; let leftVal = array[leftIdx]; let rightVal = array[rightIdx]; if (leftIdx >= n) leftVal = -Infinity; if (rightIdx >= n) rightVal = -Infinity; if (array[i] > leftVal && array[i] > rightVal) return; let swapIdx; if (leftVal < rightVal) { swapIdx = rightIdx; } else { swapIdx = leftIdx; } swap(array, i, swapIdx); heapify(array, n, swapIdx); }
We weren't kidding when we said this would be similar to MaxHeap#siftDown. If you are not
convinced, flip to the previous section and take a look! The few differences we want to emphasize are:
- Given a node at index
i, it's left index is2 * i + 1and it's right index is2 * i + 2- Using these as our child index formulas will allow us to avoid using a placeholder element at index 0. The root of the heap will be at index 0.
- The parameter
nrepresents the number of nodes in the heap- You may feel that
array.lengthalso represents the number of nodes in the heap. That is true, but only in step-1. Later we will need to dynamically state the size of the heap. Remember, we are trying to do this without creating any extra arrays. We'll need to separate the heap and sorted regions of the array andnwill dictate the end of the heap.
- You may feel that
- We created a separate
swaphelper function.- Nothing fancy here. Swapping will be valuable in step-2 of the algorithm as well, so we'll want to
keep our code DRY (don't repeat yourself).
To correctly convert the input array into a heap, we'll need to callheapifyon children nodes before their parents. This is easy to do, just callheapifyon each element right-to-left in the array:
- Nothing fancy here. Swapping will be valuable in step-2 of the algorithm as well, so we'll want to
keep our code DRY (don't repeat yourself).
function heapSort(array) { // heapify the tree from the bottom up for (let i = array.length - 1; i >= 0; i--) { heapify(array, array.length, i); } // the entire array is now a heap // ... }
Nice! Now the elements of the array have been moved around to obey max heap property.
855.2. Construct the Sorted Array
To put everything together, we'll need to continually "delete max" from our heap. From our previous lecture, we learned the steps for deletion are to swap the last node of the heap into the root and then sift the new root down to restore max heap property. We'll follow the same logic here, except we'll need to account for the sorted region of the array. The array will contain the heap region in the front and the sorted region at the rear:
function heapSort(array) { // heapify the tree from the bottom up for (let i = array.length - 1; i >= 0; i--) { heapify(array, array.length, i); } // the entire array is now a heap // until the heap is empty, continue to "delete max" for (let endOfHeap = array.length - 1; endOfHeap >= 0; endOfHeap--) { // swap the root of the heap with the last element of the heap, // this effecively shrinks the heap by one and grows the sorted array by one swap(array, endOfHeap, 0); // sift down the new root, but not past the end of the heap heapify(array, endOfHeap, 0); } return array; }
You'll definitely want to watch the lecture that follows this reading to get a visual of how the array is divided into the heap and sorted regions.
855.3. In-Place Heap Sort JavaScript Implementation
Here is the full code for your reference:
function heapSort(array) { for (let i = array.length - 1; i >= 0; i--) { heapify(array, array.length, i); } for (let endOfHeap = array.length - 1; endOfHeap >= 0; endOfHeap--) { swap(array, endOfHeap, 0); heapify(array, endOfHeap, 0); } return array; } function heapify(array, n, i) { let leftIdx = 2 * i + 1; let rightIdx = 2 * i + 2; let leftVal = array[leftIdx]; let rightVal = array[rightIdx]; if (leftIdx >= n) leftVal = -Infinity; if (rightIdx >= n) rightVal = -Infinity; if (array[i] > leftVal && array[i] > rightVal) return; let swapIdx; if (leftVal < rightVal) { swapIdx = rightIdx; } else { swapIdx = leftIdx; } swap(array, i, swapIdx); heapify(array, n, swapIdx); } function swap(array, i, j) { [ array[i], array[j] ] = [ array[j], array[i] ]; }
Heaps Project
This project contains a skeleton for you to implement a max heap. This is a
test-driven project. Run the tests and read the top-most error. If it's not
clear what is failing, open the test/test.js file to figure out what the
test is expecting. Make the top-most test pass.
Keep making the top-most test pass until all tests pass.
856. Instructions
- Clone the project from
https://github.com/appacademy-starters/data-structures-max-heap-starter. cdinto the project foldernpm installto install dependencies in the project root directorynpm testto run the specs- You can view the test cases in
test/test.js. Your job is to write code in- lib/max_heap.js to implement the
MaxHeapclass - lib/is_heap.js to implement the
isMaxHeapfunction - lib/leet_code_215.js to implement the
findKthLargestfunction located
at https://leetcode.com/problems/kth-largest-element-in-an-array/
- lib/max_heap.js to implement the