You will now start adding data rendering to the page with the components created and modified in this step.
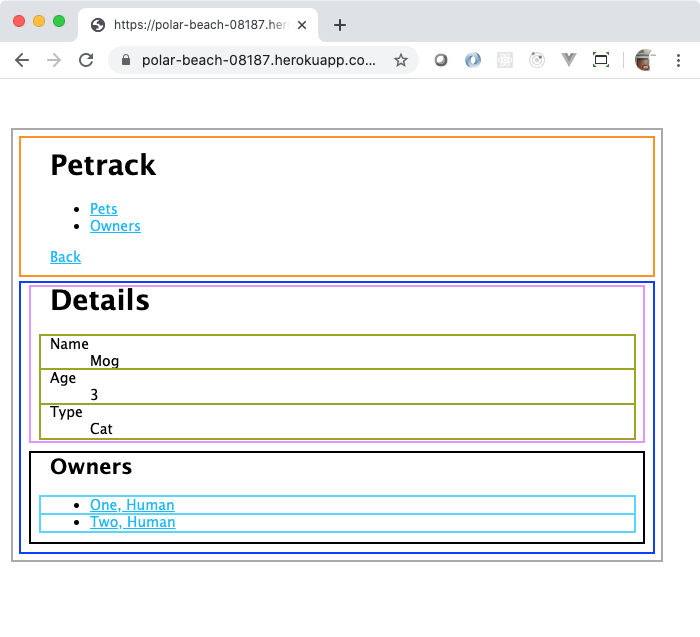
PetDetailPage: Modified in this stepNavigation: DonePetDetails: Created in this stepPetDetailList: Created in this stepPetInformationItem: Created in this stepOwnersListOwnerLinkOpen the src/index.js file. In it, after the call to ReactDOM.render, create a fetch call for the RESTful endpoint https://polar-beach-08187.herokuapp.com/api/pets/2. (You can click on the link to see the data. That’s “Mog”, the cat. She is forgetful.) Do all of the normal stuff that you would do with async functions and what not.
(async () => {
  const url = 'https://polar-beach-08187.herokuapp.com/api/pets/2';
  const response = await fetch(url);
  if (response.ok) {
    const pet = await response.json();
    console.log(pet);
  }
})();
Now, to pass that data into your React components, you will pass it as a property. You have to pass it on the element getting rendered. React is all about rendering things. You can just call another render from inside your async function. But, this time, you will pass the pet data in as an attribute of the App component with curly braces to indicate to JSX that it is a data value and not a string.
(async () => {
const url = 'https://polar-beach-08187.herokuapp.com/api/pets/2';
const response = await fetch(url);
if (response.ok) {
const pet = await response.json();
console.log(pet);
ReactDOM.render(
<React.StrictMode>
<App pet={pet} /> {/* Now, with data */}
</React.StrictMode>,
document.getElementById('root')
);
}
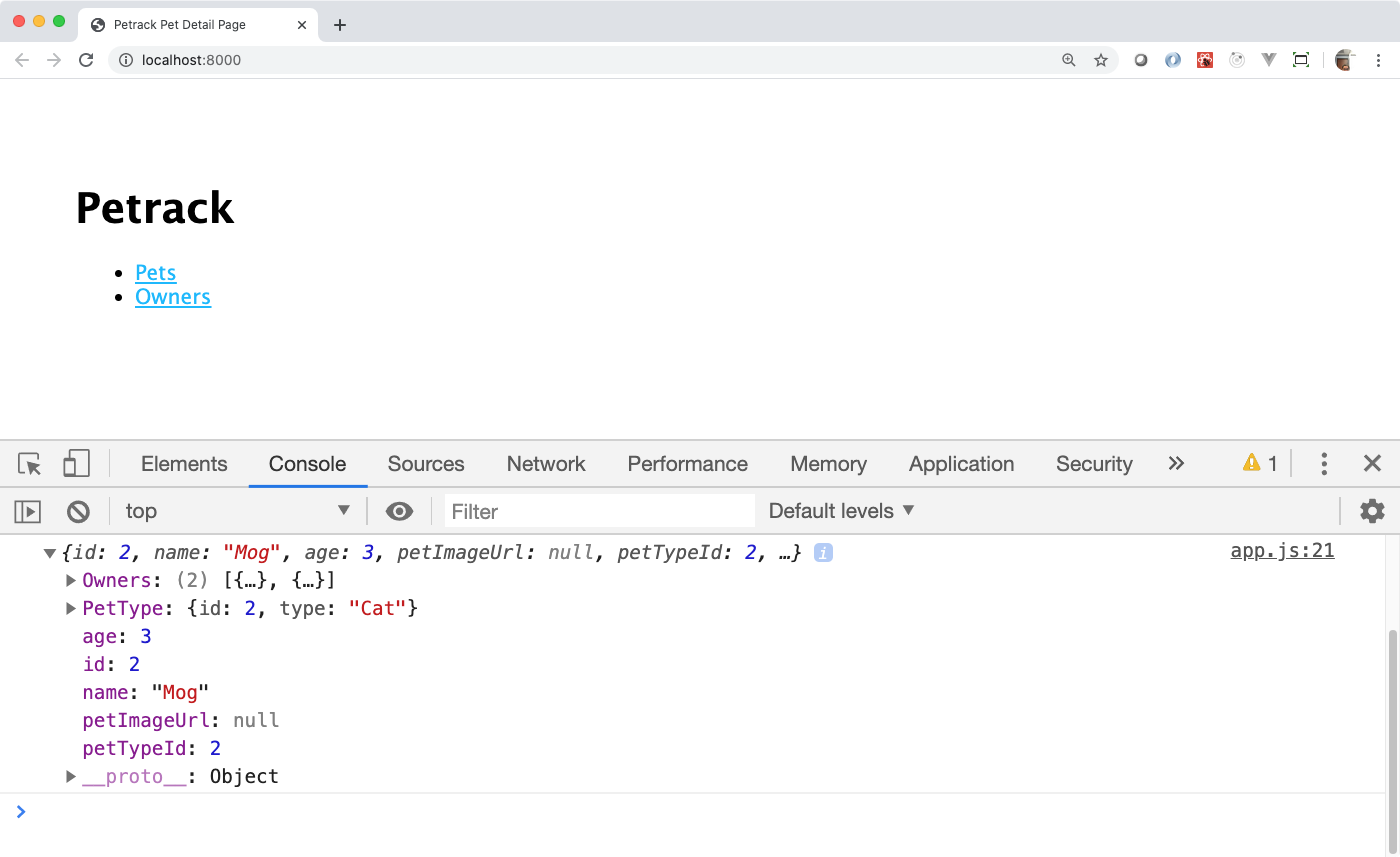
})();This has changed everything! You don’t see it, yet, but once the AJAX call completes, go look at the Components tab of your DevTools. Click on the App component and look at the values in the right pane. React now knows about the data that you passed in!
Now, you need to pass that to the PetDetailPage component. In the src/App.js file, change the function’s parameter list to have a single parameter named “props”. Then, pass the value of props.pet into the pet attribute of the PetDetailPage component, similar to what you did in src/index.js for the App component. You should be able to see the props in the Components tab for both the App and PetDetailPage components.

You will use that data to pass down into the detail components that you will now create.
Note: This section introduces an error that you will fix. It is a common error, so knowing how to fix it when you see it is good information to have.
The PetDetails component is in charge of rendering the PetDetailList and the OwnersList components. For now, get a new component working.
Create a new file named src/PetDetails.js. Import the React object. Create a function-based PetDetails component that has a props parameter, and have it render an empty div. Export the component as the default export for the module.
In the PetDetailPage.js file, import the new PetDetails component. Change the PetDetailPage component to accept a props parameter rather then an empty parameter list. Then, use the PetDetails component in the body of the PetDetailPage as a sibling to the Navigation component. You need to pass the pet data into it. Your code should look like this. (You may have empty tags rather than the self-closing slash tags. That’s fine.)
import React from 'react';

import Navigation from './Navigation';
import PetDetails from './PetDetails';

const PetDetailPage = props =>
  <Navigation />
  <PetDetails pet={props.pet} />
;

export default PetDetailPage;
Save all of your files. Look at your browser. There is an error.

This happens because components must have a single top-level element. You can see that PetDetailPage now has two because both Navigation and PetDetails are at the top level.
To solve this, you need the two elements in a single element. You could do that with a div, for example.
const PetDetailPage = props =>
  <div>
    <Navigation />
    <PetDetails pet={props.pet} />
  </div>
;
This is fine, except for when you don’t want to introduce extra tags for no reason in your HTML. That is why, in React 16, the developers introduced the idea of a Fragment. The Fragment is a special placeholder that groups together JSX elements in the virtual DOM, but does not creating any tags in the real DOM. You can wrap those two elements (or any number of elements) in a React.Fragment JSX element like this.
const PetDetailPage = props =>
  <React.Fragment>
    <Navigation />
    <PetDetails pet={props.pet} />
  </React.Fragment>
;
If you do that and save the file, the compile error goes away and you see the content as it should be.
Wrapping things in Fragment elements like that is such a common thing, that there is a shortcut syntax for it. Since the Fragment does not represent any real tag, you write it like an HTML tag that has no name.
const PetDetailPage = props =>
  <>
    <Navigation />
    <PetDetails pet={props.pet} />
  </>
;
It’s pretty weird. But, it’s a very React way of doing things.
Here’s some code for you that you can use for your PetDetailList component. Create a file named src/PetDetailList.js and put it in there. Feel free to copy and paste it so that you can get on to the neat-o data stuff.
import React from 'react';

const PetDetailList = props =>
  <>
    <h2>Details</h2>
    <dl>

    </dl>
  </>
;

export default PetDetailList;
Back in PetDetails.js, import this new PetDetailList component, and replace the empty div with it.
// Add the import line
import PetDetailList from './PetDetailList.js';

const PetDetails = props =>
  <PetDetailList pet={props.pet} />
;

export default PetDetails;
Refresh your page. You should now see the PetDetailList in the Components tab. It’s props should have all of data for the pet on it. You should also see the “Details” headline in the rendered HTML, too.
The next step is to create the PetInformationItem component to fill out that dl just yearning for content in the PetDetailList component.
Note: The following steps will introduce an error that you will fix. This is so you can get a feel for what kind of errors you will see when working with React.
Mira’s Note: The following will not actually introduce an error for the reason provided, because there is no missing pass-down of props in the chain of nested components if you follow the instructions. The error described after it, however, will show.
Create a new file, src/PetInformationItem.js. It will contain a function-based component that needs data to render, so stub out the function with the “props” parameter. Don’t forget to import the React. Then, it needs to render two elements, the dt element and the dd element. Do that by wrapping a fragment around them.
So, the code will look something like this.
import React from 'react';

const PetInformationItem = props =>
  <>
    <dt>{props.name}</dt>
    {/* Replace this with the dd element and value */}
  </>
;

export default PetInformationItem;
Replace the comment with a dd JSX element that has props.value as its content, similar to how the dt has props.name as its content.
That implies an expectation that this component needs a property named “name” that will be used to render the dt element, and it needs a property named “value” to render the dd element.
Once you have that done, it’s time to use it in the PetDetailList components. Go back to src/PetDetailList.js. Import the PetInformationItem component. You will use it three times, to show the name, age, and pet type of the pet. Here’s the first one. Just put it in there and save it because you have to investigate an error.
const PetDetailList = props =>
  <>
    <h2>Details</h2>
    <dl>
      <PetInformationItem name="Name" value={props.pet.name}/>
    </dl>
  </>
;
This shows that PetDetailList now has an expectation that props will have a “name” property, an “age” property, and a “PetType” property that will have a “type” property on it! That’s a lot of expectations…
If you refresh your page, an error might occur.
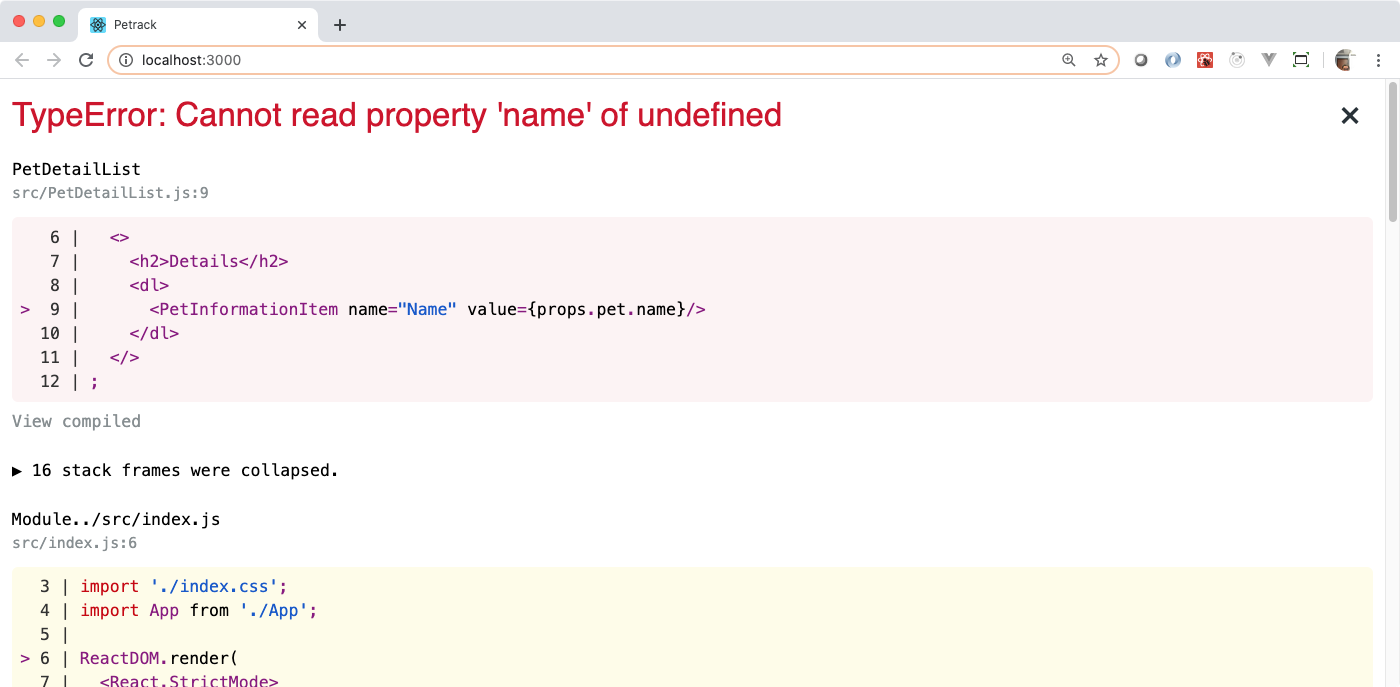
The Create React App reports the error for you in the browser’s main window. This is nice so that you don’t have to go mucking about the console to try to determine what went wrong.
In the above screen shot, it complains that it cannot get the “property ‘name’ of undefined”. If you get this error, make sure you are passing down the pet prop from the App component all the way down to the PetDetailList component. You can see all the props for each component in the Chrome dev tools Component tab.
The following conditions trigger that same error but for a different reason.
In the src/index.js file, you render App twice. Once before the fetch call, and once after the fetch response comes back. NOTE: This is NOT the normal way to render the App after a fetch call. You will be learning a better way to use fetch calls with React tomorrow.
Your src/index.js should now look like this:
// ... imports
ReactDOM.render(
  <React.StrictMode>
    <App />
  </React.StrictMode>,
  document.getElementById('root')
);

(async () => {
  const url = 'https://polar-beach-08187.herokuapp.com/api/pets/2';
  const response = await fetch(url);
  if (response.ok) {
    const pet = await response.json();
    ReactDOM.render(
      <React.StrictMode>
        <App pet={pet} />   {/* Now, with data */}
      </React.StrictMode>,
      document.getElementById('root')
    );
  }
})();
If you refresh your page, you should see the following error.
Can you see where that’s happening in the PetDetailList.js file? Take a moment to figure out where the error is being thrown.
If you identified the expression props.pet.name, then you got it! Remember that when the React first renders the virtual DOM, it has no data. That doesn’t come until later, after the AJAX call completes. There are so many ways to fix this but only one is idiomatic React. That is the use of defaultProps.
Recall that the PetDetailList component has an expectation that the props value should have a “pet” property that is an object. You can specify a default value for the “pet” property for the PetDetails component by putting the following code after the function declaration.
This tells React that, when the PetDetailList renders, if the “pet” property of props is undefined, then it should use the default value specified in the assignment. This is a built-in React feature and fixes the problem.
Refresh the page. You should now see the page render and, when the AJAX call completes, the name “Mog” to appear.
Now, add the other two PetInformationItem calls. One should have the name “Age” and the value of props.pet.age. The second should have the name “Type” and the value of props.pet.PetType.type. That will cause another error, so take care of it in the defaultProps.

If it’s hard to see the before load, comment out the async function in the src/index.js to see what the page looks like before the fetch call is made.
// ... src/index.js

// (async () => {
//   const url = 'https://polar-beach-08187.herokuapp.com/api/pets/2';
//   const response = await fetch(url);
//   if (response.ok) {
//     const pet = await response.json();
//     ReactDOM.render(
//       <React.StrictMode>
//         <App pet={pet} />   {/* Now, with data */}
//       </React.StrictMode>,
//       document.getElementById('root')
//     );
//   }
// })();
If you want that yucky bumpy load to not happen, consider creating a default value for the “value” property in PetInformationItem. In the following screenshot, you can see what happens when you set a default value of “loading…” for the “value” property in PetInformationItem.

In this part of building a React application, you have
props parameter in your function-based componentsJust one more step and you’re done!