Just like Luke Skywalker returning to Dagobah to complete his Jedi training with Yoda, it’s time for you to return to learning Redux one more time. In this final section on Redux, you’ll learn how to use the React-Redux library to connect components to a Redux store and how to use middleware and thunks to interact with an API.
After completing this final section on Redux, you should be able to:
<Provider /> component to make your Redux store available to any nested components that have been wrapped in the connect functionconnect function to give a component access to a Redux storeapplyMiddleware function to configure one or more middleware when creating a storeIn React, higher-order components (HOCs) are a pattern for reusing component logic. Ultimately, higher order components allow you to dynamically generate wrapper components.
Before React existed, developers leveraged JavaScript’s support for functions as first-class objects, meaning that functions can be treated just like any other data type (i.e. stored in a variable, object, or array, passed as an argument to a function, or returned from a function). Understanding what higher-order functions are and how they work will help you to understand and use higher-order components in React.
When you finish this article, you should be able to:
Functions that operate on other functions, either by receiving them as arguments or returning them, are called higher-order functions. Said differently, higher-order functions are functions that:
A closure, also known as lexical scoping, is a function that uses free variables, variables defined outside of its scope. Closures come in handy when writing higher-order functions. Consider the following code:
const calculator = function (operationCb) { // high-order function
  return function (op1, op2) { // closure
    console.log(`calling with ${op1} ${op2}`);
    const result = operationCb(op1, op2);
    console.log(`equals ${result}`);
  };
}

const addition = function (n1, n2) { // callback
  console.log(`${n1} + ${n2}`);
  return n1 + n2;
}

const adder = calculator(addition);
adder(1, 2);
// calling with 1 2
// 1 + 2
// equals 3
The calculator function receives a callback as an argument (operationCb) which is called in the anonymous function calculator returns. This return value would not work if the inner function could not close over operationCb, a variable defined outside of its scope.
Arrow functions make it easy to write higher-order functions. The two examples below illustrate the same function:
// Without arrow functions (ES5):
function foo(arg1) {
  return function(arg2) {
    return function(arg3) {
      console.log(`${arg1} came before ${arg2} and ${arg3} came last`);
    };
  };
}

// With arrow functions (ES6):
const foo = arg1 => arg2 => arg3 => {
  console.log(`${arg1} came before ${arg2} and ${arg3} came last`);
};
Here’s the earlier calculator function rewritten using arrow functions:
const calculator = (operationCb) => (op1, op2) => {
  console.log(`calling with ${op1} ${op2}`);
  const result = operationCb(op1, op2);
  console.log(`equals ${result}`);
};
Note: Remember, ES6 arrow functions, unlike normal JavaScript functions, are automatically bound to the context (
this) that existed when they were defined. In other words,thismeans the same thing inside an arrow function that it does outside of it.
In the same way that higher-order functions can receive a function as an argument and return a new function, higher-order components or HOCs receive a React component as an argument and return a new component.
ProtectedRoute and AuthRouteIn the React Twitter Lite project, you created two HOCs to control what pages users could see based upon their authentication status. The ProtectedRoute HOC ensured that only logged users could view the Profile and Home pages while the AuthRoute HOC prevented logged in users from viewing the Login or Registration pages:
export const ProtectedRoute = ({ component: Component, path, currentUserId, exact }) => {
  return (
    <Route
      path={path}
      exact={exact}
      render={(props) =>
        currentUserId ? <Component {...props} /> : <Redirect to="/login" />
      }
    />
  );
};
export const AuthRoute = ({ component: Component, path, currentUserId, exact }) => {
return (
<Route
path={path}
exact={exact}
render={(props) =>
currentUserId ? <Redirect to="/" /> : <Component {...props} />
}
/>
);
};Notice how both components accept a component via the component parameter and return a Route component (that renders the passed component via a render prop).
HOCs give React developers a powerful way to reuse component logic so that they can keep their code DRY.
When learning about Redux container components, you might have noticed that the FruitManagerContainer and FarmerManagerContainer components in the Fruit Stand application contain the same componentDidMount and componentWillUnmount lifecycle method implementations:
// ./src/components/FruitManagerContainer.js

import React from 'react';
import store from '../store';
import {
  addFruit,
  addFruits,
  sellFruit,
  sellOut,
} from '../actions/fruitActions';
import FruitManager from './FruitManager';

class FruitManagerContainer extends React.Component {
  componentDidMount() {
    this.unsubscribe = store.subscribe(() => {
      this.forceUpdate();
    });
  }

  componentWillUnmount() {
    if (this.unsubscribe) {
      this.unsubscribe();
    }
  }

  add = (fruit) => {
    store.dispatch(addFruit(fruit));
  }

  addBulk = (fruit) => {
    store.dispatch(addFruits(fruit));
  }

  sell = (fruit) => {
    store.dispatch(sellFruit(fruit));
  }

  sellAll = () => {
    store.dispatch(sellOut());
  }

  render() {
    const { fruit } = store.getState();
    const distinctFruit = Array.from(new Set(fruit)).sort();

    return (
      <FruitManager
        fruit={fruit}
        distinctFruit={distinctFruit}
        add={this.add}
        addBulk={this.addBulk}
        sell={this.sell}
        sellAll={this.sellAll} />
    );
  }
}

export default FruitManagerContainer;
// ./src/components/FarmerManagerContainer.js
import React from 'react';
import store from '../store';
import { hireFarmer, payFarmer } from '../actions/farmersActions';
import FarmerManager from './FarmerManager';
class FarmerManagerContainer extends React.Component {
componentDidMount() {
this.unsubscribe = store.subscribe(() => {
this.forceUpdate();
});
}
componentWillUnmount() {
if (this.unsubscribe) {
this.unsubscribe();
}
}
pay = (id) => {
store.dispatch(payFarmer(id));
}
hire = (name) => {
store.dispatch(hireFarmer(name));
}
render() {
const { farmers: farmersState } = store.getState();
const farmers = Object.values(farmersState);
return (
<FarmerManager
farmers={farmers}
pay={this.pay}
hire={this.hire} />
);
}
}
export default FarmerManagerContainer;While the amount of duplicated code is currently relatively small, keep in mind that the approach of using the forceUpdate method to render the component whenever state is updated in the store isn’t optimal. Calling forceUpdate causes render to be called without first calling shouldComponentUpdate.
Ideally, each container component should contain logic to determine if the state that it retrieves from the store has actually changed before continuing with rendering. Adding the code for this logic would increase the amount of code duplicated in each container component.
connectReact-Redux, a library from the creators of Redux, includes a higher-order component named connect that you can use to create container components. Using connect frees you from having to manually create the FruitManagerContainer and FarmerManagerContainer container components. Using connect also eliminates boilerplate code so you can focus on what makes each container unique: selecting specific slices of state from the store and writing functions to dispatch specific actions. Even better, connect includes the logic that’s needed to optimize the rendering performance, only rendering when the state retrieved from the store has actually changed.
Over the next couple of articles, you’ll learn how to use
connectand the React-Redux library.
Higher-order components like React-Redux connect, while extremely useful, can be confusing to understand. To help give you some insight into the underlying implementation of the connect function, you can build a your own custom version of connect (albeit without the logic that’s needed to optimize rendering performance).
Don’t worry if you struggle to fully understand the following custom version of
connect. It takes time and practice to get comfortable with the techniques that are used to create higher-order components. And remember, you don’t have to build yourconnectfunction! Going forward, you’ll use the well-maintained, highly optimizedconnectfunction provided by the React-Redux library.
Consider the following custom connect function:
// ./src/connect.js

import React from 'react';
import store from './store';

const connect = (mapStateToProps, mapDispatchToProps) => (WrappedComponent) => (
  class extends React.Component {
    render() {
      let stateProps = {};
      if (mapStateToProps) {
        stateProps = mapStateToProps(store.getState(), this.props);
      }

      let dispatchProps = {};
      if (mapDispatchToProps) {
        dispatchProps = mapDispatchToProps(store.dispatch, this.props);
      }

      const propsToSpread = Object.assign({}, this.props, stateProps, dispatchProps);

      return (
        <WrappedComponent {...propsToSpread} />
      );
    }

    componentDidMount() {
      this.unsubscribe = store.subscribe(() => {
        this.forceUpdate();
      });
    }

    componentWillUnmount() {
      if (this.unsubscribe) {
        this.unsubscribe();
      }
    }
  }
);

export default connect;
The connect function is a higher-order component that returns a function. That function returns an anonymous class component that wraps the component passed in via the WrappedComponent parameter.
The anonymous class component is a “generic” container component that connects WrappedComponent to the Redux store by:
componentDidMount and componentWillUnmount lifecycle method implementations necessary for managing the subscription to the store to render WrappedComponent when state is updated; andWrappedComponent using props.As you saw earlier in this article, higher-order functions can be written using arrow functions or regular functions. The connect higher-order function can be written using arrow functions and implicit return statements:
const connect = (mapStateToProps, mapDispatchToProps) => (WrappedComponent) => (
  class extends React.Component {
    // Code removed for brevity.
  }
);
Or can be rewritten using regular functions and explicit return statements:
function connect(mapStateToProps, mapDispatchToProps) {
  return function(WrappedComponent) {
    return class extends React.Component {
      // Code removed for brevity.
    };
  };
};
The arrow function syntax, while concise, can be confusing to read.
The connect function’s mapStateToProps and mapDispatchToProps parameters are both functions that are called within the anonymous class’ render method:
const connect = (mapStateToProps, mapDispatchToProps) => (WrappedComponent) => (
  class extends React.Component {
    render() {
      let stateProps = {};
      if (mapStateToProps) {
        stateProps = mapStateToProps(store.getState(), this.props);
      }

      let dispatchProps = {};
      if (mapDispatchToProps) {
        dispatchProps = mapDispatchToProps(store.dispatch, this.props);
      }

      // Code removed for brevity.
    }

    // Code removed for brevity.
  }
);
The Redux store’s current state, retrieved using store.getState, is passed to the mapStateToProps function and the store’s dispatch method is passed to the mapDispatchToProps function. The mapStateToProps and mapDispatchToProps functions also receive the anonymous class component’s props (via this.props).
But what are the mapStateToProps and mapDispatchToProps functions exactly? To answer that question, take a look at an example of using the connect function to define the FruitManagerContainer component:
// ./src/components/FruitManagerContainer.js

import connect from '../connect';
import {
  addFruit,
  addFruits,
  sellFruit,
  sellOut,
} from '../actions/fruitActions';
import FruitManager from './FruitManager';

const mapStateToProps = (state) => ({
  fruit: state.fruit,
  distinctFruit: Array.from(new Set(state.fruit)).sort(),
});

const mapDispatchToProps = (dispatch) => ({
  add: (fruit) => dispatch(addFruit(fruit)),
  addBulk: (fruit) => dispatch(addFruits(fruit)),
  sell: (fruit) => dispatch(sellFruit(fruit)),
  sellAll: () => dispatch(sellOut()),
});

export default connect(
  mapStateToProps,
  mapDispatchToProps
)(FruitManager);
mapStateToProps is a function that accepts store’s current state and returns an object that maps state data to one or more properties. mapDispatchToProps is also a function, but it accepts the store’s dispatch method and returns an object whose properties are set to functions that can be called dispatch actions to the store.
In the connect function, Object.assign is then used to combine the stateProps and dispatchProps objects with this.props (the anonymous class component’s props):
Then the properties defined on the propsToSpread object become props on WrappedComponent using JSX spread attribute syntax (...):
Within the FruitManager component (the component that the connect function’s WrappedComponent is wrapping), parameter destructuring is used to reference the props provided by the mapStateToProps and mapDispatchToProps functions. These props are then passed as props to the appropriate child presentational component:
// ./src/components/FruitManager.js

import React from 'react';
import FruitList from './FruitList';
import FruitSeller from './FruitSeller';
import FruitQuickAdd from './FruitQuickAdd';
import FruitBulkAdd from './FruitBulkAdd';

const FruitManager = ({ fruit, distinctFruit, add, addBulk, sell, sellAll }) => {
  return (
    <div>
      <h2>Available Fruit</h2>
      <FruitList fruit={fruit} />
      <h2>Fruit Inventory Manager</h2>
      <FruitSeller distinctFruit={distinctFruit} sell={sell} sellAll={sellAll} />
      <FruitQuickAdd add={add} />
      <FruitBulkAdd addBulk={addBulk} />
    </div>
  );
};

export default FruitManager;
Visualizing the flow of data all the from the mapStateToProps and mapDispatchToProps function definitions within the FruitManagerContainer.js file through the connect higher-order component down to the FruitManager wrapped component is difficult to do. Understanding how to use React’s ability to dynamically set component attributes using JSX spread attribute syntax is one of the more challenging aspects of writing higher-order components.
Just remember that you don’t need to fully understand the above example to use the connect function provided by the React-Redux library.
To review and run a completed Fruit Stand example application that utilizes the above custom connect higher-order component to create container components, clone the redux-fruit-stand-examples repo.
After cloning the repo, open a terminal and browse to the fruit-stand-redux-with-react-generic-container folder. Run the command npm install to install the project’s dependencies. Then use the command npm start to run the Fruit Stand application.
This Fruit Stand example application is a React application created by the Create React App tooling. When running the application using npm start, the application should automatically open in your default browser. If it doesn’t, you can manually browse to http://localhost:3000/ to view the application.
In this article, you learned about higher-order components (HOCs) including how to write a higher-order component that accepts a component as an argument and returns a new component.
<Provider/>As you learned in earlier articles, the integration techniques that you were initially shown were just a starting point with using Redux with React. Now that you’ve learned the basics of how React components interact with a Redux store, it’s time to learn how you can use React-Redux, a library from the creators of Redux, to improve upon those techniques.
To prepare to use the connect function from the React-Redux library, you need to first add a <Provider /> component to your React application. When you finish this article, you should be able to use the <Provider /> component to make your Redux store available to any nested components that have been wrapped in the connect function.
<Provider /> componentOftentimes, a deeply nested component will need access to the store, while its parents do not. Using vanilla React, these parents would have to receive the store prop in order to pass it down to its child.
Consider the example below:
// App.js

import React from 'react';

const UserInfo = ({ store }) => (
  <div>
    {store.getState().username}
  </div>
);

const Header = ({ store }) => (
  <div>
    <UserInfo store={store} />
  </div>
);

const App = ({ store }) => (
  <div>
    <Header store={store} />
  </div>
);

export default App;
// index.js
import React from 'react';
import ReactDOM from 'react-dom';
import { createStore } from 'redux';
import reducer from './reducer';
import App from './App';
const store = createStore(reducer);
ReactDOM.render(
<React.StrictMode>
<App store={store} />
</React.StrictMode>,
document.getElementById('root')
);The store is created in the index.js file, but the UserInfo component that needs to access it is deeply nested. Thus, the store must be passed as a prop down the entire component tree, even though components such as the Header do not need to access the store.
This pattern, called prop threading, is tedious and error-prone. You can avoid it by using the <Provider />/connect API provided by React-Redux.
Using <Provider /> also helps to prepare your React/Redux application to utilize server-side rendering. Server-side rendering allows you to render components to static markup, which can help to reduce the initial loading time of your application.
React server-side rendering is an advanced topic that won’t be covered in this course. For more information, see the official React and Redux docs.
<Provider />Before adding <Provider /> to your React application, use npm to install the react-redux package:
Then, in the entry point for your application (typically the index.js file), import the Provider component and your Redux store:
Then use the Provider component to wrap your App component and set its store prop to your Redux store:
Here’s what your completed index.js file will look like:
// ./src/index.js
import React from 'react';
import ReactDOM from 'react-dom';
import { Provider } from 'react-redux';
import './index.css';
import App from './App';
import store from './store';
ReactDOM.render(
<React.StrictMode>
<Provider store={store}>
  <App />
</Provider>
</React.StrictMode>,
document.getElementById('root')
);<Provider /> is simply a React component in which you wrap the rest of the application. The Provider component receives the store as a prop and sets a store context. Because you wrapped the entire App in the Provider component, all your components can access the store context.
Components that need to access the store context have to be wrapped in a container component created by the connect function, which converts the store context into a store prop. You’ll learn how to use the connect function in the next article.
<Provider /> relates to the React Context APIThe store context set by <Provider /> is the same React Context that you used in an earlier lesson to manage global state within a React application. You can see this in action by reviewing the react-redux source code on GitHub:
// https://github.com/reduxjs/react-redux/blob/master/src/components/Context.js

import React from 'react'

export const ReactReduxContext = /*#__PURE__*/ React.createContext(null)

if (process.env.NODE_ENV !== 'production') {
  ReactReduxContext.displayName = 'ReactRedux'
}

export default ReactReduxContext
And while it’s rarely used, it’s possible to import the context from React-Redux and use the <Consumer /> to access the store:
import { ReactReduxContext } from 'react-redux';

// in your connected component
render() {
  return (
    <ReactReduxContext.Consumer>
      {({ store }) => {
        // do something with the store here
      }}
    </ReactReduxContext.Consumer>
  );
}
You can also connect the Redux <Provider /> component to the <Context.Provider /> component that passes the value of a context object to all child components. Redux’s <Provider /> component simply passes the Redux store, instead of a context value.
In this article, you learned how to use the <Provider /> component to make your Redux store available to any nested components that have been wrapped in the connect function.
connect()The React-Redux library allows you to access the store context set by the <Provider /> in a powerful and convenient way via the connect function. Using connect, you can pass specific slices of the store’s state and specific action-dispatches to a React component as props. A component’s props then serve as its API to the store, making the component more modular and less burdened by Redux boilerplate.
When you finish this article, you should be able to use the connect function to give a component access to a Redux store.
connectThe React-Redux connect function is a higher-order function. It takes two arguments (plus a couple optional arguments you can read more about in the docs) and returns a function:
The returned function (createConnectedComponent) then takes the React component that needs access to the Redux store and returns a new React component:
const ConnectedComponent = createConnectedComponent(MyComponent);

export default ConnectedComponent;
ConnectedComponent will render MyComponent, passing along props as determined by the mapStateToProps and mapDispatchToProps arguments.
You can combine these function calls into a single statement by immediately calling the function returned by the connect method (similarly to how you immediately call a function expression when defining an IIFE):
const ConnectedComponent = connect(mapStateToProps, mapDispatchToProps)(MyComponent);

export default ConnectedComponent;
Typically, to keep things as concise as possible, the ConnectedComponent variable is omitted:
mapStateToProps(state, [ownProps])This first argument to connect is a function, mapStateToProps. It tells connect how to map the state into your component’s props.
It must take as an argument the store’s state (supplied by the Provider’s store context) and return an object containing the relevant props for your component.
const MyComponent = ({ name }) => (
  <div>{name}</div>
);

const mapStateToProps = (state) => ({
  name: state.name;
});

const ConnectedComponent = connect(mapStateToProps)(MyComponent);
In the example above, ConnectedComponent will render MyComponent, passing name as a prop.
ownProps (optional)A component with explicit props passed down from its parent (e.g. <ConnectedComponent lastName={'Wozniak'}/>) can merge those props with slices of state via ownProps, a optional second argument to mapStateToProps:
const mapStateToProps = (state, ownProps) => ({
  firstName: state.name,
  initials: `${state.name[0]}. ${ownProps.lastName[0]}.`
});

const ConnectedComponent = connect(mapStateToProps)(MyComponent);
You can also access React Router props, such match and history through ownProps. Imagine you have a users slice of state, and you want to pass a specific user’s name based on a :userId parameter. You can access the parameter from within the mapStateToProps function with ownProps.match.params.userId:
const mapStateToProps = (state, ownProps) => ({
  name: state.users[ownProps.match.params.userId].name,
});

const ConnectedComponent = connect(mapStateToProps)(MyComponent);mapDispatchToPropsmapDispatchToProps is the second argument to connect. It’s a function that accepts the store’s dispatch method and returns an object containing functions that can be called to dispatch actions to the store. These action dispatchers are then passed as props to the component.
const deleteTodo = (id) => ({ type: 'DELETE_TODO', id }); // action creators
const addTodo = (msg) => ({ type: 'ADD_TODO', msg });

const mapDispatchToProps = (dispatch) => ({
  handleDelete: (id) => dispatch(deleteTodo(id)),
  handleAdd: (msg) => dispatch(addTodo(msg))
});

const ConnectedComponent = connect(null, mapDispatchToProps)(MyComponent);
Notice that in the example above, the connect function is invoked with null as a placeholder for the mapStateToProps function. The connect function expects mapStateToProps as its first argument and mapDispatchToProps as its second argument.
const MyComponent = ({ firstName, initials, handleAdd, handleDelete }) => {
  return <div>...</div>;
};

const mapStateToProps = (state, ownProps) => ({
  firstName: state.name,
  initials: `${state.name[0]}. ${ownProps.lastName[0]}.`
});

const mapDispatchToProps = (dispatch) => ({
  handleDelete: (id) => dispatch(deleteTodo(id)),
  handleAdd: (msg) => dispatch(addTodo(msg))
});

export default connect(
  mapStateToProps,
  mapDispatchToProps
)(MyComponent);
MyComponent will receive firstName, initials, handleDelete, and handleAdd as props.
And remember, unlike the earlier attempt at writing a custom connect higher-order component, the React-Redux library’s connect function contains logic to optimize the rendering of your connected components.
To review and run a completed Fruit Stand example application that utilizes the React-Redux library, clone the redux-fruit-stand-examples repo.
After cloning the repo, open a terminal and browse to the fruit-stand-redux-with-react-official-bindings folder. Run the command npm install to install the project’s dependencies. Then use the command npm start to run the Fruit Stand application.
This Fruit Stand example application is a React application created by the Create React App tooling. When running the application using npm start, the application should automatically open in your default browser. If it doesn’t, you can manually browse to http://localhost:3000/ to view the application.
In this article, you learned how to use the React-Redux library’s connect function to give a component access to a Redux store.
Selectors are functions used to extract and format information from the application state in different forms. When you finish this article, you should be able to write a selector to extract and format information from state stored in a Redux store.
Here’s a sample state tree from the Fruit Stand React/Redux application:
{
  fruit: [
    'APPLE',
    'APPLE',
    'ORANGE',
    'GRAPEFRUIT',
    'WATERMELON',
  ],
  farmers: {
    1: {
      id: 1,
      name: 'John Smith',
      paid: false,
    },
    2: {
      id: 2,
      name: 'Sally Jones',
      paid: false,
    },
  }
}
The state’s farmers are stored as an object. Keys correspond to farmer.ids and values correspond to farmer objects. This yields O(1) for the lookup of a single farmer. However, storing all the farmers as values of an object makes it slightly inconvenient to obtain and render them all at once. To solve this inconvenience, we use selectors.
Selectors are typically defined in a file that sits next to the reducer for its slice of state. For example, if the farmers state slice is managed by the reducer defined in ./src/reducers/farmersReducer.js, then the farmers selectors would be stored in a file at ./src/reducers/farmersSelectors.js.
Selectors are passed the application’s state and return information from the state in a specified form (e.g. an array). You can use selectors to format different slice(s) of the state by calling them in a container’s mapStateToProps.
For example, getAllFarmers returns all the farmers stored in the state as an array of farmer objects, making it easier to iterate over and render each one.
// ./src/reducers/farmersSelectors.js

export const getAllFarmers = ({ farmers }) => (
  Object.values(farmers)
);
A selector can be used in multiple components’ mapStateToProps. For example:
// ./src/components/FarmerManagerContainer.js

import { getAllFarmers } from '../reducers/farmersSelectors';

const mapStateToProps = (state) => ({
  farmers: getAllFarmers(state),
});
Selectors are passed the entire application state so they can utilize multiple slices of the application state to assemble data. For example, if the Fruit Stand application’s state tree included a filter state slice:
{
  fruit: [
    'APPLE',
    'APPLE',
    'ORANGE',
    'GRAPEFRUIT',
    'WATERMELON',
  ],
  farmers: {
    1: {
      id: 1,
      name: 'John Smith',
      paid: false,
    },
    2: {
      id: 2,
      name: 'Sally Jones',
      paid: false,
    },
  },
  filter: ''
}
Then you could write a selector to extract a filtered list of farmer objects:
// ./src/reducers/farmersSelectors.js

export const getAllFarmers = ({ farmers }) => (
  Object.values(farmers)
);

export const getFilteredFarmers = ({ farmers, filter }) => {
  const lowerCaseFilter = filter.toLowerCase();
  return Object.values(farmers).filter(
    (farmer) => farmer.name.toLowerCase().includes(lowerCaseFilter)
  );
};
// ./src/components/FarmerManagerContainer.js
import { getAllFarmers, getFilteredFarmers } from '../reducers/farmersSelectors';
const mapStateToProps = (state) => ({
farmers: getAllFarmers(state),
filteredFarmers: getFilteredFarmers(state),
});// ./src/reducers/farmersSelectors.js
// Returns the state's farmers as an array of farmer objects.
export const getAllFarmers = ({ farmers }) => (
Object.values(farmers)
);
// Returns the state's farmers as an array of farmer objects,
// filtered by their name.
export const getFilteredFarmers = ({ farmers, filter }) => {
const lowerCaseFilter = filter.toLowerCase();
return Object.values(farmers).filter(
(farmer) => farmer.name.toLowerCase().includes(lowerCaseFilter)
);
};
// Returns the selected farmer object or an empty farmer object
// if no farmer exists with given id.
export const selectFarmer = ({ farmers }, id) => {
const nullFarmer = {
id: null,
name: '',
paid: false
};
return farmers[id] || nullFarmer;
};In this article, you learned how to write a selector to extract and format information from state stored in a Redux store.
In Redux, middleware specifically refers to an enhancer passed to the store via createStore. When a dispatch is made, the middleware intercepts the action before it reaches the reducer. The middleware can then:
You’ll use Redux middleware for logging information about the store and making asynchronous API requests, but you can also use it for crash reporting, routing, and many other applications.
When you finish this article, you should be able to use the React-Redux library’s applyMiddleware function to configure one or more middleware when creating a store.
Recall the redux library’s createStore function used to instantiate a store. createStore accepts three arguments (reducer, preloadedState, enhancer); middleware is given to the store via the optional enhancer argument.
Consider the following example, where you import a third-party logger middleware:
// ./src/store.js

import { createStore, applyMiddleware } from 'redux';
import logger from 'redux-logger';

import rootReducer from './reducers/rootReducer';

const configureStore = (preloadedState = {}) => {
  return createStore(
    rootReducer,
    preloadedState,
    applyMiddleware(logger),
  );
};

export default configureStore;
Any actions dispatched to the store pass through the logger middleware, which prints the store’s state before and after the action is processed.
Note:
applyMiddleware()accepts multiple arguments, so you can also apply more middleware if necessary.
In addition to importing third-party middlewares such as the above logger, you’ll sometimes need to roll your own. All middleware functions need to conform to the same signature in order to be compatible with the store and other middlewares.
A function signature is the set of inputs and output of a function. A Redux middleware must always have the following signature:
Every middleware receives the store as an argument and returns a function that takes the next link in the middleware chain as an argument. That function returns another function that receives the action and then triggers any side effects before returning the result of next(action). Side effects can include triggering AJAX requests, logging to the console, and more. Side effects can also happen after next(action) is called, like so:
const middleware = store => next => action => {
 const result = next(action);
 // side effect using `result`
 return result;
};logger middlewareYou can hand-roll the logger middleware you imported above. It should print out the state before and after each dispatch, allowing you to check if your reducers are working as expected. This middleware should:
next middleware,action.The body of the innermost function is where you want to do your logging. That function should:
console.log the actionconsole.log the result of store.getState() (pre-dispatch)next(action) to pass the action on to the rest of the middlewares, and eventually, the reducerresult of the next(action) variable, to be returned laterconsole.log the new store.getState()resultconst logger = store => next => action => {
console.log('Action received:', action);
console.log('State pre-dispatch:', store.getState());
let result = next(action);
console.log('State post-dispatch:', store.getState());
return result;
};Now, whenever you dispatch an action, you’ll see its effect on the store.
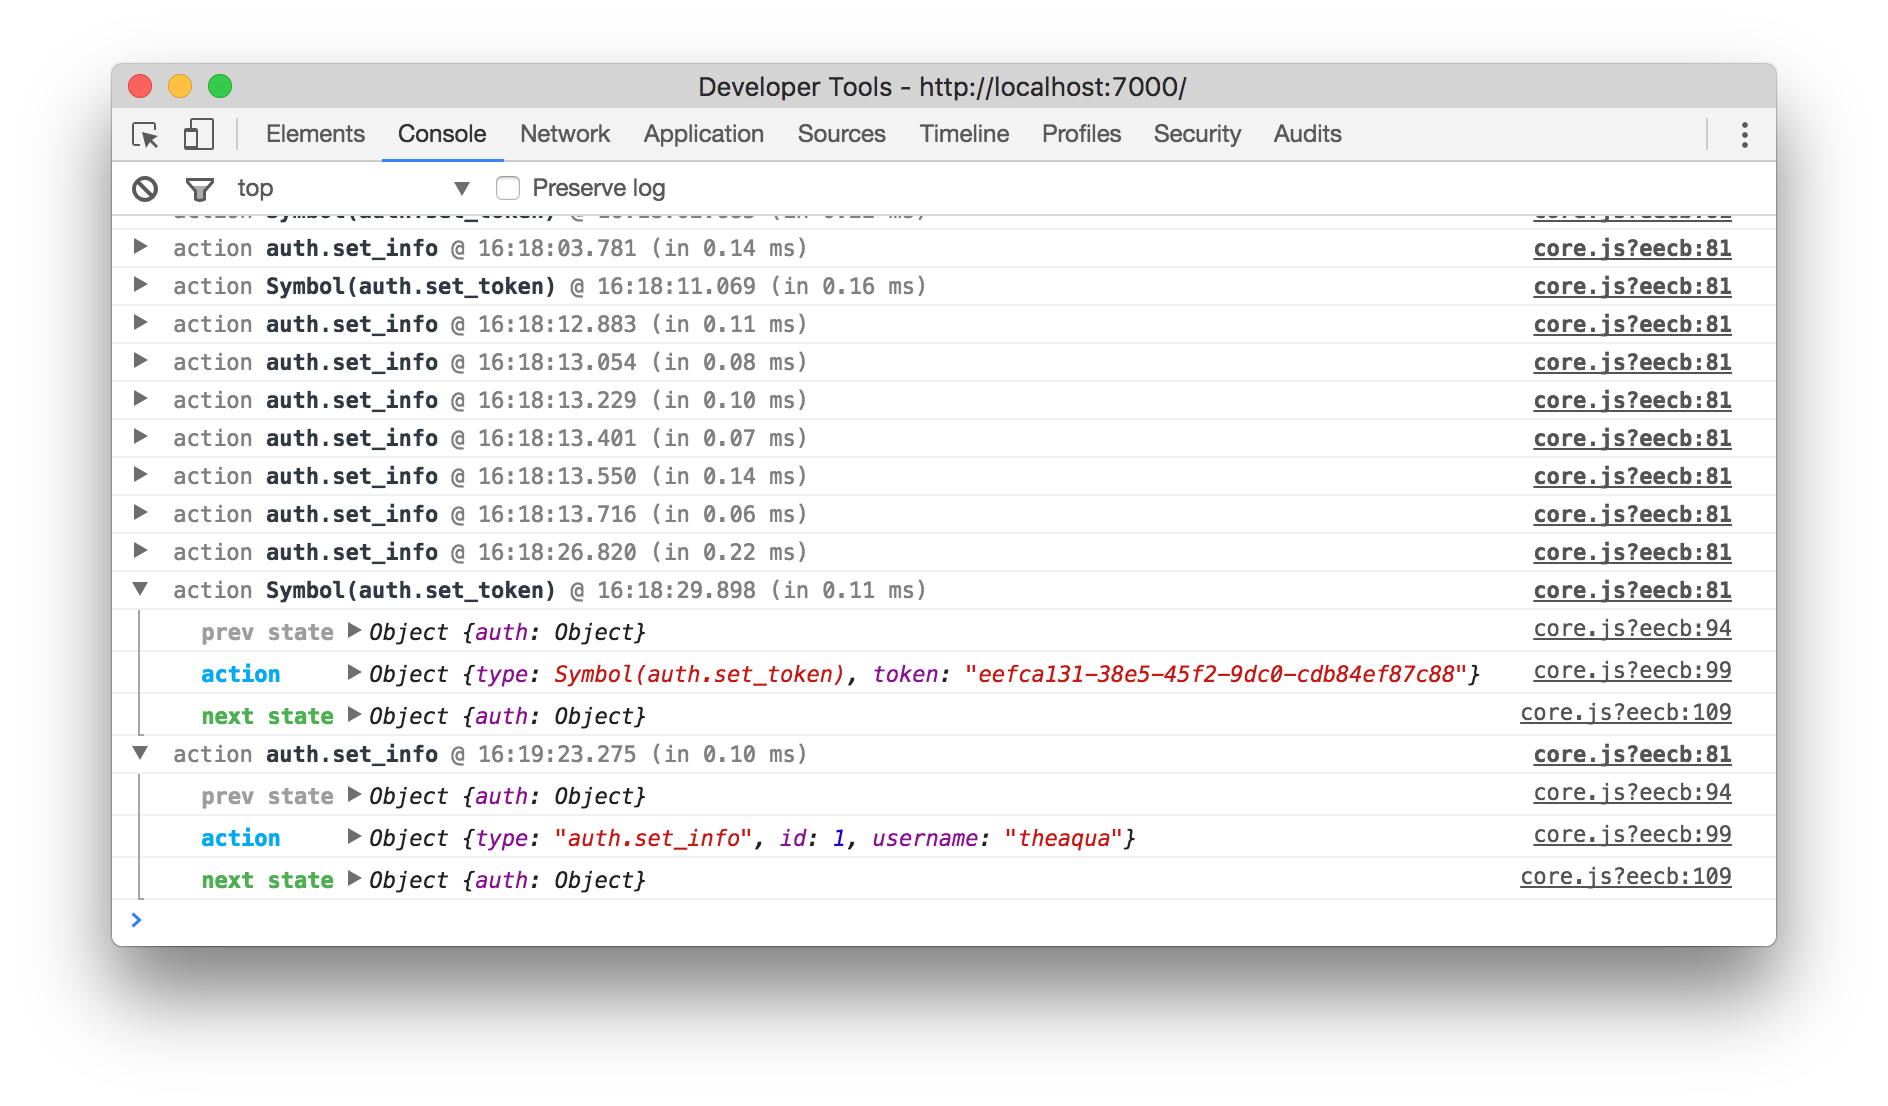
redux-logger middlewareAs you move forward with Redux, you’ll want to have access to your store’s state for debugging purposes. Including the redux-logger npm package and adding it as a middleware gives you access (through the console) to the previous state, action, and next state with each dispatch. This is incredibly convenient for debugging purposes and avoids such unpleasantness as attaching the store to the window.
Follow the example below to include it in your projects:
redux-logger package:redux-logger to applyMiddleware when creating your store:Note: logger must be the last middleware passed into applyMiddleware, otherwise it will log the thunk and any involved promises. You’ll learn about thunks and react-thunk in the next article.
// ./src/store.js

import { createStore, applyMiddleware } from 'redux';
import thunk from 'redux-thunk';
import logger from 'redux-logger';

import rootReducer from './reducers/rootReducer';

const configureStore = (preloadedState = {}) => {
  return createStore(
    rootReducer,
    preloadedState,
    applyMiddleware(thunk, logger),
  );
};

export default configureStore;In this article, you learned how to use the React-Redux library’s applyMiddleware function to configure one or more middleware when creating a store.
One of the most common problems you need middleware to solve is asynchronicity. When building web applications that interact with a server, you’ll need to request resources and then dispatch the response to your store when it eventually gets back.
While it’s possible to make these API calls from your components and dispatch synchronously on success, for consistency and reusability it’s preferable to have the source of every change to our application state be an action creator. Thunks are a new kind of action creator that will allow you to do that.
When you finish this article, you should be able to write a thunk action creator to make an asynchronous request to an API and dispatch an action when the response is received.
Rather than returning a plain object, a thunk action creator returns a function. This function, when called with an argument of dispatch, can then dispatch one or more actions, immediately, or later. Here’s an example:
const thunkActionCreator = () => dispatch => {
  dispatch({
    type: 'RECEIVE_MESSAGE',
    message: 'This will be dispatched immediately.'
  });

  setTimeout(() => dispatch({
    type: 'RECEIVE_MESSAGE',
    message: 'This will be dispatched 1 second later.'
  }, 1000));
}
This is great, but without custom middleware it will break as soon as the function action hits your reducer. You need middleware to intercept all actions of type function and then trigger the dispatch:
// ./src/middleware/thunkMiddleware.js

const thunk = ({ dispatch, getState }) => next => action => {
  if (typeof action === 'function') {
    return action(dispatch, getState);
  }
  return next(action);
};

export default thunk;
Notice how the getState function is passed into the action in case your asynchronous action creators need access to your application state.
Then you’d apply your custom middleware to your store:
// ./src/store.js

import { createStore, applyMiddleware } from 'redux';
import logger from 'redux-logger';

import rootReducer from './reducers/rootReducer';
import thunk from './middleware/thunkMiddleware';

const configureStore = (preloadedState = {}) => {
  return createStore(
    rootReducer,
    preloadedState,
    applyMiddleware(thunk, logger),
  );
};

export default configureStore;
That’s it! Now that you have all the pieces, you’re ready to review a more concrete example.
Much like the logger from the previous article, thunk middleware is available as the redux-thunk library.
The middleware you just wrote is almost the entire original library! (Check out the source code). For more on thunks and handling asynchronicity in Redux, you can take a look at this interesting SO post from the creator.
Start by using npm to install the redux-thunk package:
Then apply the middleware to your store:
// ./src/store.js

import { createStore, applyMiddleware } from 'redux';
import thunk from 'redux-thunk';
import logger from 'redux-logger';

import rootReducer from './reducers/rootReducer';

const configureStore = (preloadedState = {}) => {
  return createStore(
    rootReducer,
    preloadedState,
    applyMiddleware(thunk, logger),
  );
};

export default configureStore;
Imagine that you’re updating the Fruit Stand application to use a Node/Express API for data persistence. You would use a fetchFruits thunk action creator to retrieve the list of fruits from the API:
// ./src/actions/fruitActions.js

import { FRUIT_STAND_API_BASE_URL } from '../config';

export const RECEIVE_FRUITS = 'RECEIVE_FRUITS';

export const fetchFruits = () => (dispatch) => (
  fetch(`${FRUIT_STAND_API_BASE_URL}/fruits`)
    .then((res) => res.json())
    .then((data) => {
      dispatch(receiveFruits(data.fruits));
    })
);

const receiveFruits = (fruits) => {
  return {
    type: RECEIVE_FRUITS,
    fruits,
  };
};
Notice that the Fetch API is used to make an HTTP request to the /fruits API endpoint. When the promise returned from the fetch method call resolves, the res.json method is called to parse the JSON into JavaScript objects, which in turn is dispatched to the store using the receiveFruits action creator. The receiveFruits action creator returns an action of type RECEIVE_FRUITS that includes the fruit payload.
In the fruitReducer, the RECEIVE_FRUITS case clause simply returns the action.fruits payload as the new state:
// ./src/reducers/fruitReducer.js

import { RECEIVE_FRUITS } from '../actions/fruitActions';

const fruitReducer = (state = [], action) => {
  Object.freeze(state);
  switch (action.type) {
    case RECEIVE_FRUITS:
      return action.fruits;
    default:
      return state;
  }
};

export default fruitReducer;
To load the fruits from the API when the React application starts up, you can update the index.js file to dispatch the fetchFruits thunk action creator after creating the store:
// ./src/index.js

import React from 'react';
import ReactDOM from 'react-dom';
import { Provider } from 'react-redux';

import './index.css';
import App from './App';
import configureStore from './store';
import { fetchFruits } from './actions/fruitActions';

const store = configureStore();
store.dispatch(fetchFruits());

ReactDOM.render(
  <React.StrictMode>
    <Provider store={store}>
      <App />
    </Provider>
  </React.StrictMode>,
  document.getElementById('root')
);The FRUIT_STAND_API_BASE_URL variable (imported at the top of the fruitActions.js file) is defined in the config.js file:
And the REACT_APP_FRUIT_STAND_API_BASE_URL environment variable is defined in an .env file (located in the root of the React project):
REACT_APP_FRUIT_STAND_API_BASE_URL=http://localhost:8080Adding configuration for the API base URL keeps you from having to hard-code a value that’ll change between environments.
To review and run a completed Fruit Stand example application that utilizes middleware and thunks to support asynchronous interaction with a backend API, clone the redux-fruit-stand-examples repo.
After cloning the repo, open a terminal and browse to the fruit-stand-redux-with-react-middleware-thunks folder.
To run the Node/Express API application, complete the following steps:
Within the backend folder, add an .env file based upon the .env.example file.
Use the following SQL statements to create a PostgreSQL database and user:
create database fruit_stand;
create user fruit_stand_app with encrypted password '«a strong password for the fruit_stand_app user»';
grant all privileges on database fruit_stand to fruit_stand_app;backend folder and run the following commands to apply the Sequelize migrations and seed data:npm start.From the frontend folder, run the command npm install to install the project’s dependencies. Then use the command npm start to run the Fruit Stand application.
This Fruit Stand example application is a React application created by the Create React App tooling. When running the application using npm start, the application should automatically open in your default browser. If it doesn’t, you can manually browse to http://localhost:3000/ to view the application.
In this article, you learned how to write a thunk action creator to make an asynchronous request to an API and dispatch an action when the response is received.
While you learned in an earlier article that you should aim to have very few containers, there are exceptions. When you finish this article, you should be able to describe a situation where defining multiple containers for a single component is advantageous.
Separating your concerns with presentational and container components allows you to reuse presentational components where it makes sense, rather than duplicating code. If a presentational component needs different data in each situation, though, you may need more containers. By creating more container components, you can render the same presentational component with each of those containers to suit different needs.
Consider a form component that may either create or edit a post. The form itself looks and works the same in both cases; it has a few inputs and a submit button. The use cases differ, though, in that the edit form needs to map state from the store to its props, while the create form does not. Furthermore, the edit form will need to dispatch a different action when the form submits than the create form will, as well as request the object from our backend.
As you go through the code snippets below, read the comments carefully.
Here’s the presentational component, PostForm:
// PostForm.js

import React from 'react';

class PostForm extends React.Component {
  constructor(props) {
    super(props);
    // set up initial state
    this.state = this.props.post; // a Post object has a title and a body
  }

  static getDerivedStateFromProps(props, state) {
    // if we get a different post in props, we'll need to set state
    if (props.post.id !== state.id) {
      return props.post;
    }
  }

  update = (field) => {
    return (e) => {
      this.setState({ [field]: e.target.value });
    };
  }

  handleSubmit = (e) => {
    e.preventDefault();
    // `submit` will be a thunk action that presumably creates or edits a post
    this.props.submit(this.state);
  }

  render() {
    return (
      <form onSubmit={this.handleSubmit}>
        <label>
          Title
          <input
            type="text"
            onChange={this.update("title")}
            value={this.state.title}
          />
        </label>

        <label>
          Body
          <input
            type="text"
            onChange={this.update("body")}
            value={this.state.body}
          />
        </label>

        <button>Submit Post</button>
      </form>
    );
  }
}

export default PostForm;
You can see that PostForm is expecting two things in props: a post object and a submit function. The container will have to define these, since right now, this form can’t actually do anything. Give it the ability to create a post:
// CreatePostFormContainer.js

import { connect } from 'react-redux';
import PostForm from './PostForm';
import { createPost } from '../actions/postActions';

const mapStateToProps = state => {
  return {
    post: { title: '', body: '' } // a default blank object
  };
};

const mapDispatchToProps = dispatch => {
  return {
    submit: post => dispatch(createPost(post))
  };
};

export default connect(
  mapStateToProps,
  mapDispatchToProps
)(PostForm);
So far, this is nothing new. Now, wherever you need a form to create a post, you can render CreatePostFormContainer by importing from the above file.
But what about editing? This is a little trickier, because you need more information from the store - so you’ll need a higher-order component to help you out. Higher-order components are a useful React pattern that essentially uses a component to render another component, usually to handle some sort of work and pass in data. This pattern allows us to keep your components small and modular. Here, you’ll use a higher-order component to fetch the post you want to edit and pass it into the PostForm:
// EditPostFormContainer.js

import React from 'react';
import { connect } from 'react-redux';
import PostForm from './PostForm';
import { fetchPost, updatePost } from '../actions/postActions';
import { selectPost } from '../reducers/postSelectors';

const mapStateToProps = (state, ownProps) => {
  const defaultPost = { title: '', body: '' };
  const post = selectPost(ownProps.match.params.postId) || defaultPost;
  // get the post this route is asking for
  // (assuming here that this component is being rendered by a route)
  // if you don't have the post in state yet, return a blank post so PostForm doesn't break
  return { post };
};

const mapDispatchToProps = dispatch => {
  // an edit form will need to fetch the relevant post, but the PostForm shouldn't handle that
  // you'll handle this problem with a higher-order component, EditPostFormContainer
  return {
    fetchPost: id => dispatch(fetchPost(id)),
    submit: post => dispatch(updatePost(post))
  };
};

class EditPostForm extends React.Component {
  // this is the higher-order component made to handle the fetch

  componentDidMount() {
    // do the fetching here so that PostForm doesn't have to
    this.props.fetchPost(this.props.match.params.postId);
  }

  render() {
    // destructure the props so you can easily pass them down to PostForm
    const { post, submit } = this.props;
    return <PostForm post={post} submit={submit} />;
  }
}

// now `connect` it to the Redux store

export default connect(
  mapStateToProps,
  mapDispatchToProps
)(EditPostForm);
The result here is that we can render a CreatePostFormContainer wherever you want a form to create a post, and an EditPostFormContainer wherever you want to edit a post. Both components will render a PostForm, but each will have different functions. The PostForm also gets to be very simple and make almost no decisions. This helps keep your code DRY and modular.
You can use this pattern with any presentational component that needs to be connected to the store, but may need entirely different data to perform different functions.
In this article, you learned about a situation where defining multiple containers for a single component is advantageous.
Redux has its own special set of developer tools. They allow you to do things like inspect your application state in real time as you use your app, or cancel an action to see a live recalculation of the state as if that action had never been dispatched. They require only a few minutes of setup, and can be well worth the effort.
Install the chrome extension.
Install the npm package into your project:
./src/store.js file.If you’re not using middleware:
  // ./src/store.js

  import { createStore } from 'redux';
+ import { devToolsEnhancer } from 'redux-devtools-extension';

  import rootReducer from './reducers/rootReducer';

  const configureStore = () => {
    return createStore(
      rootReducer,
+     devToolsEnhancer()
    );
  };

  export default configureStore;
Or if you’re using middleware:
  // ./src/store.js

  import { createStore, applyMiddleware } from 'redux';
  import thunk from 'redux-thunk';
  import logger from 'redux-logger';
+ import { composeWithDevTools } from 'redux-devtools-extension';

  import rootReducer from './reducers/rootReducer';

  const configureStore = () => {
    return createStore(
      rootReducer,
+     composeWithDevTools(applyMiddleware(thunk, logger))
-     applyMiddleware(thunk, logger)
    );
  };

export default configureStore;Now that you’ve set up the Redux dev tools, you can try them out. You’ll use one of the Fruit Stand application examples. If you haven’t already, clone the redux-fruit-stand-examples repo.
After cloning the repo, open a terminal and browse to the fruit-stand-redux-with-react-official-bindings folder. Run the command npm install to install the project’s dependencies. Then use the command npm start to run the Fruit Stand application.
This Fruit Stand example application is a React application created by the Create React App tooling. When running the application using npm start, the application should automatically open in your default browser. If it doesn’t, you can manually browse to http://localhost:3000/ to view the application.
Open the project into your code editor and complete the above set up steps.
You should see an atom (a nucleus with electrons) icon on your Chrome toolbar, and if you’ve set up the Redux dev tools correctly it should now be green. Click on it. When the Redux dev tools open, click one of the buttons on the very bottom left to open them in a new window.
Now try adding some fruit. This will cause actions to be dispatched. You should see those actions popping up in the Redux dev tools. You can click on them to cancel them and you should see the state recalculated in real time.
The Redux dev tools have some other handy features, so click around and explore!
Instead of building a new application, you will spend time refactoring an existing application, one that is not yours. Navigating around someone else’s code is an interesting way to learn what to do and what not to do. The starter application is in a little bit of a mess and needs your help to get unmessed.
By the end of this walk-through, you will be able to:
You’ll need the backend of the application.
If you have not cloned it, please clone the repository from https://github.com/appacademy-starters/pokedex-backend.
If you have cloned it, please get the latest (things sometimes change) by going to the repository in your Terminal and typing git pull origin master. This will get the latest code for you.
You’ll need the starter application. Please clone the repository from https://github.com/appacademy-starters/redux-pokedex-starter.
This application is a Heroku-deployable React application. Here are the files that are in it. Hopefully, you find nothing surprising about the file layout or the intent of each file. Take a moment to look in each file to get the lay of the land. (Really, take a look in each file. You may feel like jumping right into it, but looking at other people’s code is helpful. This is one of the benefits to the pair-programming learning style at App Academy.)
.
├── package-lock.json        - The NPM lock file
├── package.json             - The NPM file
├── public
│   └── index.html           - The page that gets served to the browser
├── server.js                - A very light-weight server for Heroku
└── src
    ├── App.js               - The main application component
    ├── Fab.js               - A floating action button component
    ├── LoginPanel.js        - The form that shows the login
    ├── LogoutButton.js      - A component for logging out
    ├── PokemonBrowser.js    - The component that shows the list and detail
    ├── PokemonDetail.js     - The component that shows the detail of a Pokemon
    ├── PokemonForm.js       - The form to create a new Pokemon
    ├── config.js            - Configuration variables
    ├── index.css            - Styling for the application
    └── index.js             - The main entry point for Webpack
Start the backend with npm run dev. Start the React application with npm run dev. Make sure it runs. It looks for a local backend at http://localhost:8000, so make sure that’s where the backend is running.
If you haven’t already, install Redux DevTools. During development, you can watch the Redux store handle actions and change state in the timeline.
To use Redux in this application, you need to install it and the connector between Redux and React. You will also want to use asynchronous actions with the Redux store, so you’ll want a middleware, one like Redux Thunk.
npm install react-redux redux redux-thunkThere are more than one asynchronous action-handling middleware out there in the world. Redux Thunk happens to be one of the oldest and widely used.
Whenever you consider installing a library or framework, you should make sure that your existing application meets the expectations. For example, as of the time of this writing, to install “react-redux”, your application needs to support React 16.8.3 or later. Take a look in the package.json file to make sure that an acceptable version of React is listed in there. If not, you will need to upgrade the version of React used by this project by running something like npm upgrade.
The store is the object (and supporting objects and functions) that will contain the state of the application. This centralizes the state so that, presumably, you can better reason about it.
There are a couple of ways to organize your state management code, each with their own benefits. Redux has a list of different articles about this very topic. You should choose to organize your code in a way that makes sense to your team (or follow any conventions that already exist). This walk-through will follow the Ducks approach of layout.
In the src directory, create a new directory named store. In that new directory, create a new file named configureStore.js. In that file, put this code. This is boilerplate code and will appear in nearly every application that you have that uses Redux. A description of the contents follows the code block.
import { createStore, applyMiddleware, combineReducers, compose } from 'redux';
import thunk from 'redux-thunk';

const composeEnhancers = window.__REDUX_DEVTOOLS_EXTENSION_COMPOSE__ || compose;

const reducer = combineReducers({
});

const configureStore = initialState => {
  return createStore(
    reducer,
    initialState,
    composeEnhancers(applyMiddleware(thunk)),
  );
};

export default configureStore;
(If you’re looking in your console after putting this code in there, you’ll see an error about not having any valid reducers. That’s true, there are no valid reducers. You’ll fix that in just a moment.)
On those first two lines, the code imports the stuff it will need to create and configure a store.
createStore is the function from Redux that creates the state-management objectapplyMiddleware allows you to plug in extra functionality into the state-management workflow (in this case, Redux Thunk)combineReducers takes many reducers and combines them into a single onecompose is a function that composes functions from right-to-left, that is, it puts them together, the return value of the right-most getting passed to the second right-most, return values getting passed from that to the third right-most, and so on, until the first function in the list returns its final value to the store (documentation for compose)thunk is the middleware that will allow you to make asynchronous calls because you can’t do that in Redux actionsThe fourth line creates a new composeEnhancers variable that will be either the Redux DevTools special compose function, or the one from Redux, if DevTools is not installed. This allows browsers that have the DevTools installed to take advantage of watching the changes in the store.
The sixth and seventh lines is just the thing that combines the reducers for the store into a single reducer. More about that later.
The ninth line declares a function that gets exported at the end of the file that creates and configures the store with the reducer, the initialState passed into the function, and composes the React Thunk middleware and the Redux DevTools, if they exist.
To use this functionality, open src/index.js and add two imports to the top of the file.
Those two lines import a Context Provider from React Redux and the function you just created above. Now, under those lines and before the ReactDOM.render statement, create a store.
Finally, wrap the App component in a Provider component that has a “store” property assigned the value of store that you created in the previous code snippet, just as you saw in the Passing the Store section of the Usage with React article you read in the homework preparing you for these topics.
If everything works, you should be able to view the Redux DevTools in your browser’s DevTools environment as a new tab. You should see the “@@INIT” action that was run and an empty state.

Now, you will refactor the LoginPanel component to put the token it receives from the AJAX call into the Redux store. The rest of the application will remain the same, for now.
Open LoginPanel and review it. There are two “interesting” portions of this code, the render function which will redirect to the path “/” when a token exists (and show the login form if it does not), and the handleSubmit method that makes the actual AJAX call to get the token. These are the things that you will modify to make this work. It’s going to seem like a lot of code replacing just a few lines, but this will make your application easier to understand because all of the state changes will be encapsulated in their own area under the store directory. You won’t have to search through a bunch of components to figure out why the application as a whole is not working.
The first step is to make LoginPanel a connected component, that is, connect it to the Redux store’s pipeline. To do this, follow these steps:
connect from react-redux in the import section of the LoginPanel.Remove the export line at the bottom and replace it with this.
const mapStateToProps = state => {
  return {
  };
};

const mapDispatchToProps = dispatch => {
  return {
  };
};

// Yes, this looks funny, but you will often
// see this kind of indentation in others'
// code when using React and Redux.
export default connect(
  mapStateToProps,
  mapDispatchToProps
)(
  LoginPanel
);
The last line of the code connects the LoginPanel to the Redux store. The two functions that you created above it, mapStateToProps and mapDispatchToProps are functions that you will write to help in translating state and actions for use in your component. The mapStateToProps function maps the state of the Redux store to the values that you want to show up in the props of the connected component. The mapDispatchToProps function maps complicated action calls to simple ones that your component can use.
The first thing you’ll need is one of those actions. This is going to be something to let your authentication run to get that token. In the src/store directory, create a new file named authentication.js which will contain all of the Redux-related stuff to handle authentication:
The steps that you want the application to go through are:
Most of these steps will need something more, so if you see something not defined in one of these steps, you will get to it in a later step.
In case you lost track, this goes in src/store/authentication.js.
First up, thunks are functions that return another function that takes a single function as its argument. The argument is the dispatch method used to dispatch actions to Redux. So, for example, the login thunk could have this form.
That’s pretty weird, if you’ve never seen that syntax before, those double => signs in there. It’s a shortcut to write a function that returns a function. You could also write it like this:
export const login = (email, password) => {
  return async dispatch => {
    // Dispatch an action, here
  }
}
Once you get used to the double (or triple) => signs, it becomes second nature to write functions that return functions, that way.
Inside the login method, make a fetch call to the API using the same fetch call found in LoginPanel’s handleSubmit method. You’ll need to import baseUrl from the src/config.js module. You don’t have access to the state of the object, just the email and password that they’re passing in through your method call, so change the “body” parameter of the fetch from JSON.stringify(this.state), to JSON.stringify({ email, password }),.
For now, if the response from the fetch is ok, just get the token out of the response object and log it to the console.
Now, to hook up this thunk to your component, open src/LoginPanel.js and import the login thunk that you just created. At the bottom in the mapDispatchToProps function, add a “login” key that is a function that takes an email and password, and then dispatches the login thunk with those values.
Now, there’s a “login” property on the props handed to the LoginPanel component. The value of the “login” property is a function that takes an email and a password. Those then get handed to the login thunk which returns a function to the dispatch function of Redux. It’s functions all the way down.
Now, delete everything from the handleSubmit method except the line that prevents the default action. Replace it with a call to the function in the “login” property of the props like this.
After the application refreshes, you should be able to click the Login button on the screen and see token appear after the AJAX call completes.
Now that you have the token, you need to dispatch another action, one that isn’t created yet, to set the token in the state so it can be used elsewhere. Remove the console.log statement in your login thunk and replace it with an invocation of the dispatch method that your thunk gets, dispatching an action creator named setToken with the token as its argument.
Now, it’s time to create that action.
Actions are just plain objects that have, at a minimum, a “type” property. Action creators are just plain functions that return actions.
Below your import section and above the login thunk of your code in src/store/authentication.js, create a constant named SET_TOKEN and set it equal to the string 'pokedex/authentication/SET_TOKEN'. You could make this string anything, it just needs to be unique within your application. This is merely the Ducks convention.
Now, create a function setToken that takes a token as its one parameter, and returns an object that has a “type” property set to the SET_TOKEN constant and a “token” property set to the value passed into the parameter. Export the setToken function.
If you’ve done everything correctly to this point, when you click the Login button, you should now see an action appear in the Redux DevTools with the string that you set the SET_TOKEN constant to.

Now, you need to tell Redux how to handle that action with a reducer.
Somewhere in the src/store/authentication.js file, export a reducer function as the default value of the module. The state parameter gets a default value of an empty object because Redux does not like undefined values returned from reducers. Redux will call your reducer when it creates the store with undefined just to mess with you.
In that reducer, you want to check if the “type” property of action is equal to the SET_TOKEN constant. Every reducer is called with every action, so you have to do this check. If it is, then you should return an object with the token in it. If it doesn’t, then just return the state unaltered. Idiomatic Redux usually uses a switch statement to do this with each case statement handling a different action type.
export default function reducer(state = {}, action) {
  switch (action.type) {
    case SET_TOKEN: {
      return {
        ...state,
        token: action.token,
      };
    }

    default: return state;
  }
}Now that you have the reducer handling the action, you must add it to the reducer in src/store/configureStore.js. Open up that file and import the default value as authentication from the src/store/authentication.js module.
Then, in the combineReducers invocation, add authentication as a key and value.
After the page reloads, when you click the Login button, you should now see the authentication and token appear in the right pane of the Redux DevTools. (You may need to select the action in the left pane.)
Now, you’ve come full circle. You’re going to use the token in the store to inform the LoginPanel that it needs to close. In the render function, the code uses this.state.token to determine whether or not to redirect. You want that to use this.props.token, now, so change it to that.
To get the token value from the state of the Redux store into the props, you use mapStateToProps function that you created below. Change it to read like this, now, which takes the value of the token stored in the state and puts it into the “token” property of what will be passed to LoginPanel in its props.
Now, when you click the Login button, it redirects the application back to “/”. However, because App relies on its own state to get updated from a call to its updateToken method, it goes into an recursive loop of redirecting back and forth between the App component and the LoginPanel. You’ll fix that in the next section.
The application is cleaner, but now has that bug of infinite redirecting. You will first fix that.
In the App component, it would change state in response to the LoginPanel calling the updateToken method. The LoginPanel no longer does that because it dispatches its information to a thunk that makes the AJAX call and, in turns, dispatches an action that updates the Redux store. Then, LoginPanel uses the value from the store to no that something good has happened. You need to have App do the same.
Since updateToken is no longer used, remove the method and all of its uses from the App component.
When you have that done, you may notice that the route that shows the LoginPanel looks like this.
That is rendering LoginPanel and passing its props to it. That’s just like using the “component” property of the Route component, so change it to use that instead of the more expensive “render” property.
You’re still in a render loop, so that hasn’t fixed it. Time to connect App to the Redux store.
LoginPanel, import the connect function from the “react-redux” module.LoginPanel, declare mapStateToProps and mapDispatchToProps functions after the component.mapStateToProps function, map the token to a property named “token” identically to the way it is done in LoginPanel.mapDispatchToProps just returning an empty object.App to the Redux store using those functions.That puts the value of the token into the props. In the actual App component, now find everywhere that uses this.state.token and replace it with this.props.token.
Try logging in, again. Still doesn’t work. That’s because App relies on another setting in its state named “needLogin” which is just a Boolean value that is basically the opposite of whether the token has a value. If there is a token, there is no need to login. If there is no token, there is a need to login. You can figure that out in the mapStateToProps function! Create another property, one named “needLogin”, in the object returned from the function. If there is a value in state.authentication.token, then set it to false. If there is no value (or an empty string) in state.authentication.token, then set “needLogin” to true. Once you have that, find every use of this.state.needLogin and replace it with this.props.needLogin.
You have now fixed the problem with the infinite redirects! And, once you log into the application, you can check that the App component is rendering the PokemonBrowser component. However, it is not showing anything. That’s because the App component calls its loadPokemon method in the componentDidMount method. There’s no token at that time in its state because the token now comes from Redux.
What would be great is if, after logging in, the login action loaded the Pokemon for you, put them in the store, and PokemonBrowser could just use them directly.
Oh, that’s what you’ll do next.
Now, you need some actions, thunks, and reducers for Pokemon, not authentication. Create a new file src/store/pokemon.js. In there, create the following items.
LOAD with a value of ‘pokedex/pokemon/LOAD’load that takes in a list of Pokemon and creates an action with the type of LOAD and the list of Pokemon in itstate parameterNow, you need to make a thunk that will make the AJAX call. Call your think “getPokemon”. The thunk needs the token from the state to make its API call. The function that gets the “dispatch” parameter can also get a second parameter, a function conventionally called “getState”. Your thunk could look like this.
export const getPokemon = () => async (dispatch, getState) => {
  const { authentication: { token } } = getState();
  // AJAX call
  // Handle response
};
Then, in configureStore.js, import the default reducer and add it to the combineReducers argument as the “pokemon” property next to “authentication”.
Now, you just need to kick off that AJAX call. It seems only reasonable that the component that actually needs it kicks it off, the PokemonBrowser component. In PokemonBrowser, do the following:
connect function from “react-redux”getPokemon thunk you just createdmapStateToProps function that maps the list of Pokemon from state.pokemon.list (or whatever you called your property in the reducer) to a property named “pokemon”mapDispatchToProps function that returns an object with a property named “getPokemon” that dispatches the getPokemon thunk you importedconnect, mapStateToProps, and mapDispatchToPropscomponentDidMount method to the PokemonBrowser component and call this.props.getPokemon() from itNow, when you log into the application, you should see two actions in your Redux store!
More importantly, you should see the list of Pokemon in the PokemonBrowser actually appear in the browser.
Previously, all of the fetching logic for the list of Pokemon was handled by the App component. You can now get rid of the loadPokemon method and clean up any calls to it. Also, anywhere that refers to this.state.pokemon or using setState to update the “pokemon” property, you should get rid of all of that. This makes the handleCreated method empty, so get rid of that and all references to it, too, in the App component.
Because the App component doesn’t make any AJAX calls, anymore, it doesn’t need the token from the state. Remove the “token” property in mapStateToProps and everywhere token is used in the App component. Include the call to local storage, too, in the deleting of things. You can remove the import of baseUrl, too, because there are no AJAX calls in the file.
Now, because cProps in the render method is empty, delete it and its uses in the PrivateRoute components below it. Now that the code is not using cProps, you can delete the parameter and its use from the PrivateRoute component on line 8 (or so) of the src/App.js file.
Actions that use outside resources like AJAX calls and local storage must be created in thunks. Back in the src/store/authentication.js module, do two things:
TOKEN_KEY and set it equal to some non-empty stringlogin thunk, between getting the token from the response and dispatching the setToken action, write the token to local storage using the constant TOKEN_KEYYou need a new thunk to do this. Create a thunk named loadToken that takes no parameters, and returns a function that accepts a “dispatch” parameter. Then, implement it to read the value from local storage using the TOKEN_KEY constant. If a value comes back, have it dispatch the setToken action.
In the App component, import the loadToken thunk. Use it in the mapDispatchToProps by mapping the dispatch of the loadToken thunk to a property of the same name.
Invoke that loadToken method in the componentDidMount method of the App component.
The moment you do that, the page should refresh and you should see the Pokemon browser rather than the login form.
You’re halfway home!
Now, it’s time to log out of the application. Do that with the following steps.
The steps that the application will take are these:
LogoutButton component dispatches a thunkLogoutButton will redirect the application back to “/login”In src/store/authentication.js:
REMOVE_TOKENREMOVE_TOKENlogout that
DELETE /api/session (using the token in the state)TOKEN_KEYremoveToken actionHandles the REMOVE_TOKEN action type in the reducer by creating a new object that does not have the “token” key in it and returning that.
Remember that handlers in reducers must return new objects if they want to modify the state.
In src/LogoutButton.js:
(If you make a mistake with this and get into an inconsistent state, just delete all of the contents of your local storage and refresh your browser.)
connect from “react-redux”logout thunk you just createdmapStateToProps and set a property named loggedOut to true if the token in the state is empty, and false if there is a value for the token in the statemapDispatchToProps and set the “logout” property equal to a function that dispatches the result of the logout thunk you importedLogoutButton’s method named “logout”, instead of making an AJAX call, have it call this.props.logout(), insteadthis.state.loggedOut to this.props.loggedOutIf you check the console, now, you’ll see that Babel is reporting a “useless” constructor. Sure enough, it is. LogoutButton no longer has any state, so there’s no reason to leave it as a class-based component. Convert it to a function-based component. If you’ve followed these instructions, your LogoutButton should end up looking something like this.
const LogoutButton = props =>
  props.loggedOut ?
    <Redirect to="/login" /> :
    <div id="logout-button-holder">
      <button onClick={props.logout}>Logout</button>
    </div>
;You have now been given instructions on how to refactor components from managing global application state to putting it in Redux. There are two more pieces left, the “select the current Pokemon” functionality and the “create a new Pokemon” functionality. Refactor the application so those are Redux-supported, as well.
The place to start, here, is to determine how the click of the navigation item on the left gets handled. It’s a NavLink, so the BrowserRouter in the App component handles that by routing to the PokemonBrowser with the route parameters. The PokemonBrowser then routes to the PokemonDetail with a Route component. In the PokemonDetail component, if the value of the this.props.match.params.id changes, then the loadPokemon method is called which, in turn, makes an AJAX call. And, there it is! The AJAX call.
This is like everything else, create a thunk, an action type, yada yada yada.
PokemonDetail to the Redux store by
dispatch call (don’t forget the id parameter)This is very similar to the login stuff you did with LoginPanel. In the PokemonForm, have
componentDidMount method call a thunk to load the Pokemon typeshandleSubmit method call a thunk to post the form information to the APIIn moving the Pokemon type fetching from the state to the props, you may end up getting an error that there is no method “map” of undefined. If that’s the case, in the reducer in your src/store/pokemon.js file, have the default state include an array for the “types” property.
That’s the power of default parameters and initial state!
The action types, action creators, and thunk created to do this should go into the src/store/pokemon.js module. When the AJAX call succeeds to create the new Pokemon, have it then dispatch the getPokemon thunk to get a new list of Pokemon. Redux and React will add a new Pokemon to the end of the list. That’s why you have to provide the “key” property in lists of things, so that React will efficiently determine if something in the list needs to get changed, added, or deleted.
The only “new” part, here, is the coordination between PokemonForm and PokemonBrowser to determine if it should show a form. This is up to you to decide, if showing the create form is part of the global application state (and should exist in the Redux store), or if it is part of the “local” state between the two components and be managed by PokemonForm invoking a function passed to it by PokemonBrowser. The solution choose the former solution.
Think about adding
Rather than relying on Redirect routes in your application, you can use actions to manage the URL of your application. Install Connected React Router and remove all Redirect components from the application, replacing them with dispatched push actions. Check out the How to navigation with Redux action article in the Connected React Router documentation.
Today’s project will help you become more comfortable with the full Redux cycle! You will build out a single Redux cycle for a Giphy search tool.
When a user enters a search query, a fetch action will use the search endpoint from the Giphy API to return the fetch response. The action will then be dispatched to update the application’s global state provided by the Redux store. Your application will then use a slice of state to render an index of GIF results.
Your completed project will look something like this:

You’ll begin by cloning this repository containing basic skeleton files and the conventional frontend folders (actions, components, reducers, and util).
Take a moment to familiarize yourself with the file structure. Look inside all the frontend files and note the TODO notes in each file skeleton. Throughout the next phases of the project, you’ll finish all the tasks listed in the TODO notes to create your very own Giphy search app!
After you have reviewed the TODO notes, run npm install to install your application’s packages. Note that you have redux, react-redux, redux-thunk, and redux-logger already listed as dependencies in your project’s package.json file. You’ll use Redux thunk as middleware to connect (or dispatch) your fetch results into the Redux store. You’ll use Redux logger as middleware to automatically console log your dispatched actions.
Now that you’re acquainted with the file structure, let’s map out an overview of the component hierarchy:
Root
  AppContainer
    App
      SearchBar
GifsRoot component is responsible for providing the component tree with the Redux store. It renders the AppContainer.AppContainer passes the gifs slice of state and the dispatched fetchGifs action creator as props to the App component. It wraps the App component to connect the component to the Redux store.App component renders the GifsList and the SearchBar. It uses its gifs prop (passed into App through mapStateToProps) to create and pass a gifUrls array as a prop to the GifsList. It also uses its fetchGifs prop (passed into App through mapDispatchToProps) as a prop to the SearchBar component.SearchBar component handles all of the search logic (keeping track of the query and triggering the fetch request on submit).GifsList component iterates over its gifUrls prop, to render an image for each one.Before you start, let’s create a Giphy API Key to use in your fetch requests to the Giphy API. Get started by creating a Giphy account. Then navigate to the Giphy API Quick Start Guide and click Create an App.
Fill out the form for creating a new app, and only check the option for I only want to use the GIPHY API.

Once you’ve submitted the form, you’ll be taken to a dashboard, and under the Your Apps section, you should see your newly created app with an API Key that you will use for this project. As a reminder, API keys normally shouldn’t be stored in client-side JavaScript. You would normally want to store the keys in your server-side code. To keep this project a simple, front-end only project, you’ll store the API key in a front-end environment variable for convenience. Take a moment to create an .env file in the root of your project and set an environment variable with your API key, like so:
Notice that your config.js file is already exporting your REACT_APP_GIPHY_API_KEY environment variable as apiKey:
This means that you can import the API key from any of your frontend components with the following import statement:
Before you begin to build the project, it’s important to think about the state shape. You know that you want to display GIF results returned by a fetch request. This means you’ll probably want a gifs slice of the state that holds a collection of gif objects.
As a reminder, you pass the gifs slice of state as a prop to the App component in the AppContainer through the mapStateToProps function.
The first part of creating your Redux cycle for fetching GIFs is creating a fetch request that will be connected to a thunk action creator. Define and export a fetchGifs function in the apiUtil.js file. This function will make a fetch call to the Giphy API’s search endpoint.
// apiUtil.js
import { apiKey } from '../config';

export const fetchGifs = searchTerm => (
  // TODO: Write a fetch call to the Giphy API's search endpoint
)
It will take a single argument, the searchQuery entered by a user. You can check out the Giphy API docs for more details, but in short, you want to make a fetch request to the following endpoint:
The searchQuery will be replaced with your user’s actual query. You should tag &limit=3 onto the end of your query string to tell Giphy you only want three GIF responses. The Giphy API is relatively slow, so keeping the response size down helps optimize your application’s performance.
Remember, it’s best to test small pieces as we go. Let’s test out that fetch request from your developer tools console to make sure it’s doing what you’re intending.
You may need to restart your server to have your application process the environment variables set in your .env file.
Import your fetchGifs function to the entry index.js file, then go ahead and put it on the window so we have access to it in the console:
// index.js
import React from 'react';
import ReactDOM from 'react-dom';
import Root from './components/Root';
import { fetchGifs } from './util/apiUtil';

window.fetchGifs = fetchGifs;

ReactDOM.render(
  <React.StrictMode>
    <Root />
  </React.StrictMode>,
  document.getElementById("root")
);
Try running this test code:
This will make the fetch request, which will return a promise. You’ll chain on a .then to parse the response and log the parsed response data. You should see an array of three objects. Those are your gif objects fetched from the Giphy API! Make sure you get this working before moving on, and don’t forget to remove fetchGifs from the window once you’re done testing.
Next, you’ll set up an action to properly receive GIF payload information (your fetch responses). As always, you want to export constants for your action types set to strings of your action types. As a reminder, this is to prevent bugs from mistyping your action types.
Now it’s time to write a function that returns your action, an object literal. Write receiveGifs as a function that takes in gifs data as a parameter and returns an action object. The object should have two keys: one for the type and another for the gifs data. Your function should look like the following:
Before testing this action creator, you’ll need a reducer.
Let’s write a switch case and default switch return in your gifsReducer.js file. Note that the gifsReducer function receives the previous state and an action. Recall that a reducer describes how a slice of state should change based on a dispatched action. It should always return the new state without mutating the previous state. If the action dispatched to the reducer should not change the state, the reducer should return the previous state by default. You will need to import the RECEIVE_GIFS constant from your gifActions.js file.
Your reducer should look similar to the this one:
// TODO: Import the `RECEIVE_GIFS` constant

const gifsReducer = (state = [], action) => {
  switch (action.type) {
    // TODO: Return the GIFs from the action object if the action type is `RECEIVE_GIFS`
    // TODO: Return the previous state by default
  }
};

export default gifsReducer;Recall the state shape you saw earlier in the project instructions. The gifsReducer above should control the gifs slice of the application state. You’ll create and export a rootReducer with Redux’s combineReducers function to assign control of different slices of state to their prospective reducer functions to create the application state structure.
This project only needs one reducer, but using combineReducers would allow you to easily add more state slices in the future.
The combineReducers function has already been imported for you. Take a moment to import your gifsReducer and set the gifs slice of state to its reducer, like so:
Now that you have your reducers set up to structure your application’s global state, you’ll need to set up the Redux store to hold that global state.
The store holds the global state of an application, so you’ll need to create it before you can test your reducer. Remember that Redux provides a createStore function that receives a reducer, optional preloadedState, and an optional enhancer. Begin by writing a configureStore function that passes your rootReducer to createStore.
// store.js
import { createStore } from 'redux';
// TODO: Import middleware
import rootReducer from './reducers/rootReducer';

const configureStore = () => {
  return createStore(rootReducer);
};

export default configureStore;
Import configureStore into your entry index.js file, then use the function to generate the Redux store.
Now you’ll work on providing the store you have generated to your application’s components! Begin by passing the store you’ve generated as a prop to the Root component. Your index.js file should look something like this:
// index.js
import React from 'react';
import ReactDOM from 'react-dom';
import Root from './components/Root';
import configureStore from './store';
import { fetchGifs } from './util/apiUtil';

window.fetchGifs = fetchGifs;
const store = configureStore();

ReactDOM.render(
  <React.StrictMode>
    <Root store={store} />
  </React.StrictMode>,
  document.getElementById('root')
);
Now go into your Root.js file and import Provider from react-redux. Use the Provider component to set the Redux store through the Provider component’s expected store prop. Remember how you have just configured and passed a store as a prop to the Root component in your entry file (index.js). Use the Root component’s store prop to set the store prop of the Provider:
// Root.js
import React from 'react';
import { Provider } from 'react-redux';
import App from './App';

const Root = ({ store }) => (
  <Provider store={store}>
    <App />
  </Provider>
);

export default Root;
Now that you have configured your Redux store and tested your fetchGifs function, let’s connect the function to the store to implement a full Redux cycle. In the next phase, you’ll define a thunk action creator function and use the thunk middleware so that each fetch response is dispatched as a change to the global application state.
Let’s refactor how you fetch GIFs by using a thunk action creator. Recall that we use a thunk action creator to return a function. When that function is called with an argument of dispatch, the function can dispatch additional actions.
Begin by refactoring your configureStore function in the store.js file to incorporate your thunk middleware. Remember that Redux provides thunk middleware from the redux-thunk module. Import the thunk middleware and applyMiddleware function from Redux. You’ll use the applyMiddleware function, with your thunk middleware as an argument, to set the optional enhancer argument in the createStore function:
Your store.js file should now include the following:
import { createStore, applyMiddleware } from 'redux';
import thunk from 'redux-thunk';
import rootReducer from './reducers/rootReducer';

const configureStore = () => {
  return createStore(rootReducer, applyMiddleware(thunk));
};

export default configureStore;
Now your Redux cycle is almost good to go! To summarize your progress to this point, you have configured your Redux store, provided the store to your application, written a fetch function in a util file, defined an action type, and defined an action creator.
The last step is to define a thunk action creator that will dispatch the receiveGifs action after the Giphy API call is successful!
Begin by importing your API util function into your gifActions.js file. Since you want to easily associate your thunk action creators with a specific action, and you’ll often have more than one function exported from your util file, use a namespace to import your fetch function:
You would then invoke your fetchGifs function in your apiUtil.js file like so:
Now it’s time to write your thunk action creator! Define and export a function named fetchGifs that receives a search term and returns a function that can be called with dispatch. Your function will use a promise to parse the fetch response to JSON and dispatch the receiveGifs action with the fetch response data after the APIUtil.fetchGifs call is successful.
Your thunk action creator should look like the following:
export const fetchGifs = searchTerm => {
  return dispatch => {
    return APIUtil.fetchGifs(searchTerm)
      .then(res => res.json())
      .then(res => dispatch(receiveGifs(res.data)));
  }
};
Or you can clean up the function by using implicit returns with ES6 arrow functions:
export const fetchGifs = searchTerm => dispatch => (
  APIUtil.fetchGifs(searchTerm)
    .then(res => res.json())
    .then(res => dispatch(receiveGifs(res.data)))
);Let’s take a moment to test your the fetchGifs thunk action creator you just defined.
Import fetchGifs from your gifActions.js file to your entry index.js file. You’ll hit the error Parsing error: Identifier 'fetchGifs' has already been declared since have already imported the fetchGifs function from your apiUtil.js file. Note that this is why using a namespace to import * as APIUtil from your apiUtil.js file is important.
Update the import statement from your ./util/apiUtil.js file with a namespace:
Now you’ll want to put your fetch function, thunk action creator, and Redux store on the window. This way you can view your application’s global state and compare the result of your fetch function and the dispatched thunk action creator:
// index.js
import React from 'react';
import ReactDOM from 'react-dom';
import Root from './components/Root';
import configureStore from './store';
import * as APIUtil from './util/apiUtil';
import { fetchGifs } from './actions/gifActions';

const store = configureStore();
window.apiFetchGifs = APIUtil.fetchGifs;
window.fetchGifs = fetchGifs;
window.store = store;

ReactDOM.render(
  <React.StrictMode>
    <Root store={store} />
  </React.StrictMode>,
  document.getElementById('root')
);
Now you’ll use the getState() and dispatch(action) store methods to view and update your application’s global state. Try the following code in the browser’s console before continuing to the next phase:
 // Return the initial application state
store.getState();

// Use the thunk action creator to dispatch the fetch response and populate state
store.dispatch(fetchGifs('puppy'));

// Return the application state populated with GIFs
store.getState();
Congratulations! You just wrote a Redux cycle to populate your application’s global state with a response from the Giphy API.
Notice how your application’s global state changed after invoking the dispatch(fetchGifs('puppy)) method. Now you can pass the fetchGifs thunk action creator through a Redux container so that a fetch call can be dispatched from your component to update the global state in the same way!
Now instead of manually logging the status of your global state and the response of your dispatch call, you can use the Redux logger middleware to automatically do so. Import logger from redux-logger into your store.js file:
Just like how you applied your thunk middleware to your configured store, you’ll invoke the applyMiddleware() function with your logger middleware. Your updated store.js file should look something like this:
// store.js
import { createStore, applyMiddleware } from 'redux';
import thunk from 'redux-thunk';
import logger from 'redux-logger';
import rootReducer from './reducers/rootReducer';

const configureStore = () => {
  return createStore(rootReducer, applyMiddleware(thunk, logger));
};

export default configureStore;
Now go back to your browser’s console and dispatch a fetch request:
Upon a successful fetch, you should have received a helpful log with your application’s prev state, the dispatched action object, and your application’s next state from the logger middleware you just utilized!
Now that you’ve set up the global state of your application, it’s time to connect your React components to the global state! Remember how you used the Provider component in your Root.js file to pass the configured store as a prop to the Provider component.
Just like how a Context.Provider component expects value as a prop to set the context object, the Redux Provider component expects store as a prop to share the store’s global state with nested components. Instead of rendering your App component as the child of the Provider, you’ll render an AppContainer.
In your AppContainer.js file, you will define a mapStateToProps function and a mapDispatchToProps function and invoke the connect() function from Redux. Invoking the connect() function will connect the App component with the Redux store. Within the container, you will pass slices of state and dispatched thunk action creators as props to the App component.
Note that the skeleton has already imported the connect function from react-redux, your fetchGifs thunk action creator from the gifAction.js file, and the App component.
Take a look at the code skeletons of the mapStateToProps and mapDispatchToProps functions. Think of these functions as functions that take in state or dispatch as arguments to return object literals that represent the props that your App component will receive.
Have your mapStateToProps function return an object with a gifs property set to the state.gifs slice of state. Doing this will pass a gifs prop into your App component.
Next, have your mapDispatchToProps function return an object with a fetchGifs property set to an arrow function that accepts a searchQuery value and dispatches a call to the fetchGifs(searchQuery) function. Remember how you tested the store.dispatch(fetchGifs(searchQuery)) function in the browser console. Think of how you would use an arrow function to almost wait for a searchQuery input from the user before firing the dispatch call.
Lastly, take a moment to examine how your AppContainer.js file is simply exporting the connect() invocation:
Now you can render your AppContainer instead of your App component so that the connect() method is invoked to pass a gifs prop and a fetchGifs props to App!
Take a moment to refactor your Root.js file to do so:
// Root.js
import React from 'react';
import { Provider } from 'react-redux';
import AppContainer from './AppContainer';

const Root = ({ store }) => (
  <Provider store={store}>
    <AppContainer />
  </Provider>
);

export default Root;Now that you’ve created a container to pass (or map) slices of the global state and dispatched actions as props, it’s time to render and update the gifs from the global state!
Have your App component take in and destructure your gifs and fetchGifs props. Notice how your component is rendering a SearchBar component and a GifsList component. You’ll want to pass in the fetchGifs function as a prop to the SearchBar component.
Instead of directly passing all of the gifs as a prop to the GifsList component, you’ll refactor your mapStateToProps function and use a selector to map the array of gifs into an array of GIF urls.
Currently, your mapStateToProps function should look something like this:
Define a getGifUrls selector that takes in the state and uses parameter destructuring to map over each gif in the gifs slice of state to pluck the image URL from the JSON data, like so:
const getGifUrls = ({ gifs }) => (
  gifs.map(gif => gif.images.fixed_height.url)
);

const mapStateToProps = state => {
  return {
    gifUrls: getGifUrls(state),
  };
};
Now you can pass in the gifUrls for your GifsList component to render GIF images without passing unnecessary data as props!
In your SearchBar component, you already have a search form, an inputValue state, and an onChange handler for the form’s input field set up. Right now, your component has several TODO notes to guide your creation of an onSubmit handler for your search form. The onSubmit handler will dispatch the fetchGifs action creator function (don’t forget to prevent the default action of a submit event).
After finishing your SearchBar component, test out your submit event handler and check your logger response to see if your fetchGifs action creator is actually being dispatched to update the application’s global state! Once you see that your fetched gifs have been dispatched to the gifs slice of state, it’s time to render your list of GIFs!
Right now, your component has several TODO notes:
gifUrls prop.<div> as the parent element of your GifsList component.gifUrls array to render an <img> for each url.If you’re having issues rendering a GIF in your project, that means it’s a great time to practice using debugger statements to debug your Redux cycle code! For example, you could set a debugger in the:
handleSubmit method to check out the submitted search inputValuereceiveGifs action creator function to check out the value of the gifs payloadRECEIVE_GIFS case statement in the gifsReducer to check out the value of the dispatch action objectIf you didn’t hit any issues, congratulations - you have implemented Redux with the Giphy API to create a search API that renders a list of GIFs! Before moving forward to the next project, you should still use debugger statements to step through this project’s Redux cycle.